Shortwave listening and everything radio including reviews, broadcasting, ham radio, field operation, DXing, maker kits, travel, emergency gear, events, and more
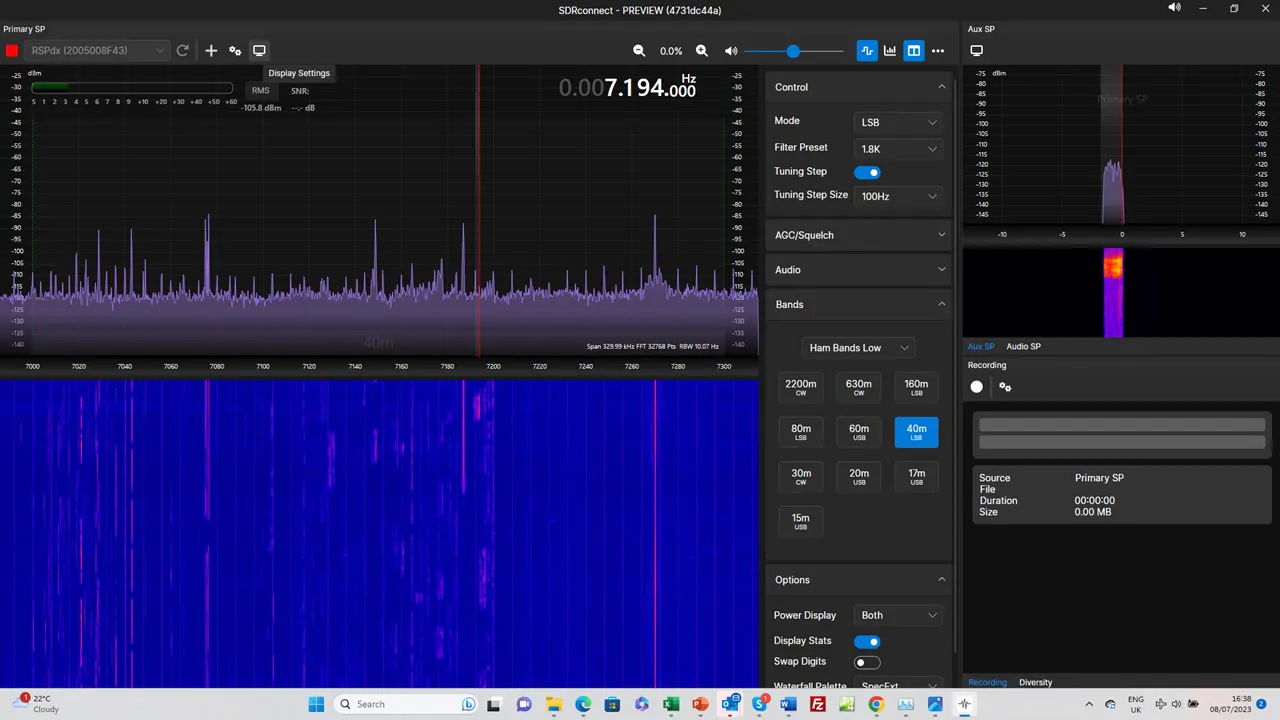
Many thanks to a number of SWLing Post contributors who’ve noted that SDRplay’s new multi-platform SDR application, SDRconnect, is now available to download as a preview!
Many thanks to SWLing Post contributor, TomL, who shares the following guest post. Click here to check out all of the posts in this Audio Plugin series:
Audio Plugins For Radios, Part 2 – SDR Recording
by TomL
I started investigating using the old Kenwood transceiver to send audio to my laptop and process the receive audio using VST Host for a number of functions: Noise reduction, Equalization, reduce Sibilances and fading distortion, increase presence of vocals without sounding boxy, etc. It was a qualified success depending on what VST apps I used, in what order they were used, and what settings each of them were set to. In this episode of ongoing discovery, I will attempt to show how easy it is to OVER-process the shortwave broadcast audio plus comparisons to my regular Audacity post-recording treatment.
Audio Examples
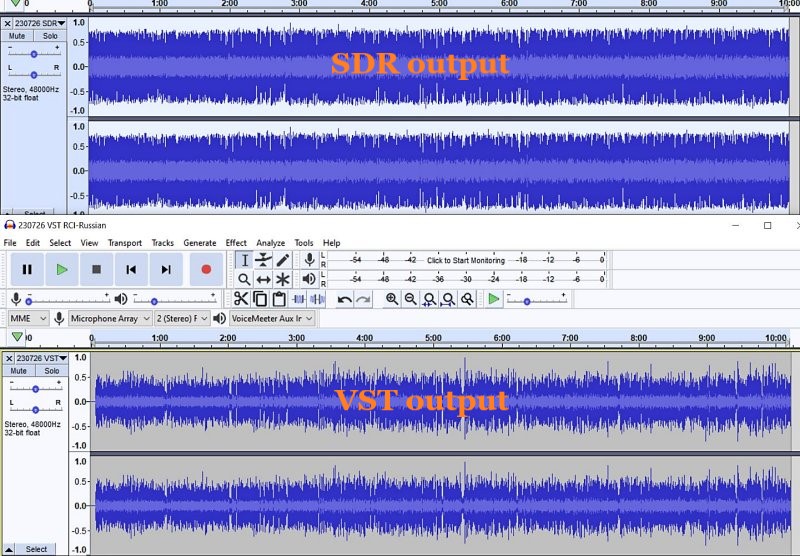
I noticed for the first time that the SDR creates a somewhat compressed file which can be seen when comparing the Waveforms of SDR vs. VST Host output files. This means that the unprocessed SDR file will always appear to sound louder because of this compression. This loss of Dynamic Range makes it harder to do the comparison. Therefore, the Audacity-only examples below are reduced 3dB or 5dB to maintain apparent loudness.
Example 1: KBS Weekend Playlist – S6-S9 signal, somewhat severe fading and moderate polar flutter.
SDR Console 3.2 using my usual NR4 set to 2dB Reduction, 30% Smoothing, and 3dB Rescale plus a Blackman-Harris-7, 5.3 kHz filter.
AUDACITY file is using my usual Audacity noise reduction:
VST version 2: Used my first set of VST apps. Sounds harsh with hash-noise and overdriven:
VST version 3: Used way too much bass, too much grunge, attenuated highs, still overdriven:
VST version 4: Using a different order to the Denoiser apps, added in Modern Exciter app, cut back on some bass but still too much, and overly forward sounding midrange:
VST version 5: My current Baseline setup. Adjusted the Denoiser apps, less extreme bass & treble, adjusted the De-Esser app, set the midrange to be less forward with just a single setting:
To my ears, Audacity processing is nice but as discovered before, sounds compressed and does not reduce some of the other problems inherent in shortwave signal fading and loss of musicality. It sounds utilitarian. Also, the noise is a bit more gnarly.
Versions 2-5 go through iterations of listening to the exact same segment over and over (and over) and trying different VST apps and settings. I think my comments are mostly accurate next to each version. However, you may think differently and perhaps prefer the sound of one of the other versions?
Example 2: Encore Classical Music, WRMI (fading S9 signal) – Audacity vs. Version 5 VST settings. VST is quieter and sounds less harsh than the Audacity version. A generally more smooth sound.
Example 3: RCI in Russian, S7-S9 with moderate polar flutter – 7kHz filter in SDR Console but VST Host is using BritPre, an analog preamp using a 6 kHz low pass filter to try to reduce DSP filter “ringing”. It shows some interesting possibilities.
Example 4: RCI in Russian – Music from the same broadcast and VST Host setup in Example 3. The screeching flute is under more control and strings more defined in the VST version.
Conclusions
I like the results of the audio processing that eventually ended up with “version 5” (plus the possibilities at 7kHz, too). It is not Earth-shattering but is an incremental improvement in my opinion (there is always room for improvement). I can use it in a simple Workflow anytime I want to record something off of the SDR. Also, I had already been using Voicemeeter Pro, a software audio mixer. It is setup with different profiles to do SDR, Ham, FM Broadcast, and now, VST Host audio routing. This process took a long time but seems satisfactory to use as a Baseline setup, which then can be tweaked slightly depending on various types of audio coming from the SDR. These changes in VST Host can be stored as their own unique profiles for audio processing.
However, a word of warning! Messing with Windows audio Sound settings and mixer software is potentially a confusing process and one can easily end up with a spaghetti-pile of conflicting connections, no audio output, doubled echo output, distortion, way too loud, way too soft, etc. If you start this experimentation, make sure to write down your current Windows Sound settings, both the Playback and the Recording settings for each item listed.
Having an SDR radio + Voicemeeter + VST Host is a very flexible setup. I can now safely say that the only thing I need Audacity for is to Normalize the peak audio to the -1 dB broadcast standard volume, which is a HUGE time saver. The SDR Console IQ files can be scheduled and processed from there at a later time. Also, the use of Voicemeeter Pro allows me to switch when to use VST Host anytime I feel like it, and Voicemeeter Pro comes with its own (manually engaged) Recorder.
Part 3 of this series will discuss Technical details for my setup. Your setup may need different settings or you may find a better way than I did. This will take some dedicated time.
The FCC seeks comments on a proposal to use HF spectrum for financial data
The FCC is taking public comment on a proposal to revise the rules governing the frequencies above 2 MHz and below 25 MHz.
The Shortwave Modernization Coalition thinks the 2-25 MHz band is underused and wants to use it for the long-distance transmission of time-sensitive data from fixed stations. The users would be companies working with certain kinds of financial transactions; the proposal would prohibit voice transmission and mobile operations.
The firms in the coalition are “market makers and liquidity providers” for exchange-traded financial instruments.
This high-frequency trading industry has in fact been using shortwave links for several years to send trading data between U.S. and foreign exchanges, but it has done so under experimental authorizations. [Continue reading…]
Many thanks to Bill Pietschman who notes that the book “QTC: I Have a Message for You” has now been published on Archive.org for all to read and download free of charge. Bill writes:
I knew Ray Redwood, and besides being a Professional radio operator, he was indeed a Ham’s Ham. You will find here not just the story of radio, but a detailed analysis of the Titanic, from a radioman’s point of view. Part documentary, part autobiography, and part technical, it’s a great read. I’m so glad that his work has been preserved here. Future radio historians will, I am certain, find it to be a valuable record of the Ship Radio Officers Era, and Ray’s insights at the dawning of the Global Maritime Distress and Safety System as we have today which utilizes satellite technology.
There was a time, some 50 years ago when cell phones didn’t exist and computers were only owned by large corporations, that people learned of the world around them by listening to shortwave radio. This is a journey back to that time to hear the sounds and see the correspondence from shortwave stations from all over the world. Sit back, listen and enjoy!
Last week, I published a post asking SWLing Post readers what type of radio their “daily driver” is at present. Click here to read that post.
I created a survey form and left it open for about five days. In that time, we received 639 responses! If you’d like to read the results, continue scrolling or click on continue reading below. Continue reading →
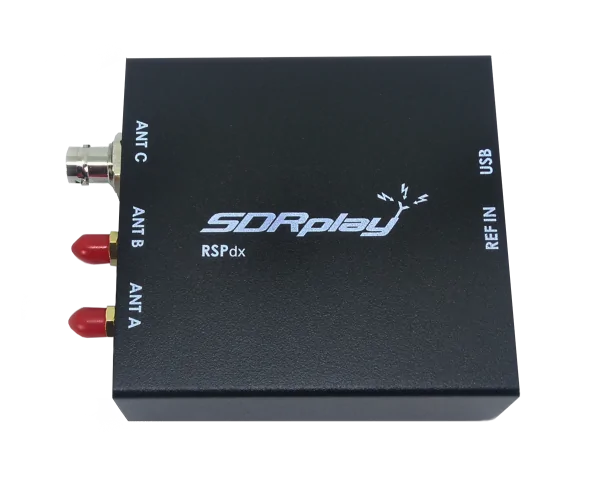
It is hard to imagine a less spectacular looking piece of radio gear than the SDRplay RSPdx. It is literally a black box. Aside from the printing on top of the box, the most exciting thing about the RSPdx are the two red plastic covers on the antenna connectors on the side. There are no switches, no knobs . . . you can’t do anything to it except connect an antenna (or antennas) on one side and a USB cable on the opposite.
But once you connect the USB cable to your laptop and fire up the SDRuno software (that you have previously downloaded and installed), you are now in command of a listening post that covers from 1 kHz to 2 GHz.
We’ll get to the important stuff in just a minute, but first a little background.
For an oldster retrocrank like me, a proper radio has knobs and switches . . . preferably a knob or switch for every job. Lately, however, I have noticed that a lot of DXers and ordinary listeners are reporting good success with SDRs – software-defined radios. So I started to wonder about them.
There are three elements to a software-defined radio like the SDRplay RSPdx: the SDR box itself, which is the part of the system that actually receives the radio signals; a Windows computer (laptop or desktop), which provides the command and control for the SDR; and whatever antennas are required to receive the signals that the listener would like to hear. And, just to be absolutely clear, you need all three elements for the SDR system to work at all.
With my curiosity about SDRs rising, I inquired of Thomas, SWLing’s Maximum Leader, whether SDRplay – one of SWLing Post’s sponsors – might like me to take a look at one of their SDRs. Their answer was an emphatic Yes, and I had an RSPdx in my hands just a couple of days later at no cost to me or the SWLing Post.
I have to admit I had some trepidation about the process of bringing the RSPdx online because any time you have three different elements from three different sources that must work together for a system to function properly, there is always the possibility that some of the elements might not “play well together.”
Installation is easy and fast. Connect the RSPdx to the computer using a USB A-male to B-male cable (which the user must supply; often called a printer cable), then connect the antennas using the appropriate cable. In my case, I connected an MFJ 1886 Receive Loop to the Antenna C connector and an off-center fed dipole to the Antenna A connector.
To SDRplay’s great credit, they have produced an excellent video for first-timers and folks not familiar with SDRs — https://youtu.be/Oj_-dOLVzH8 . I recommend watching it, perhaps a couple of times, before you get started.
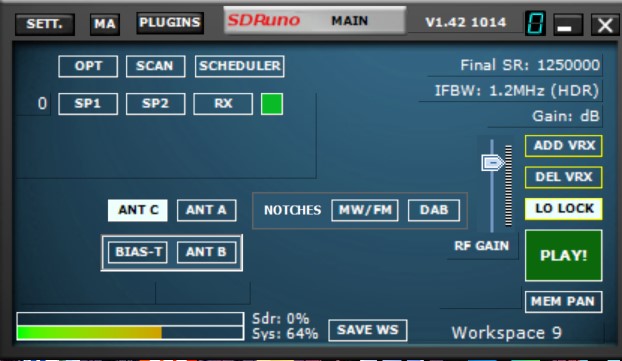
When you first fire up the SDRuno software, you will see the main panel:
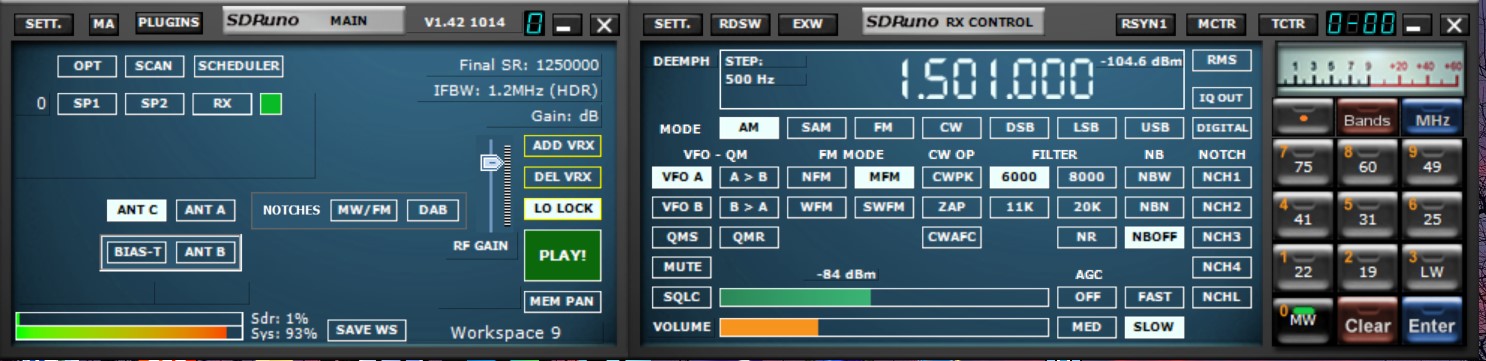
Click on the “RX” button, and the Receive panel will be displayed. After you slide it over, it will look something like this:
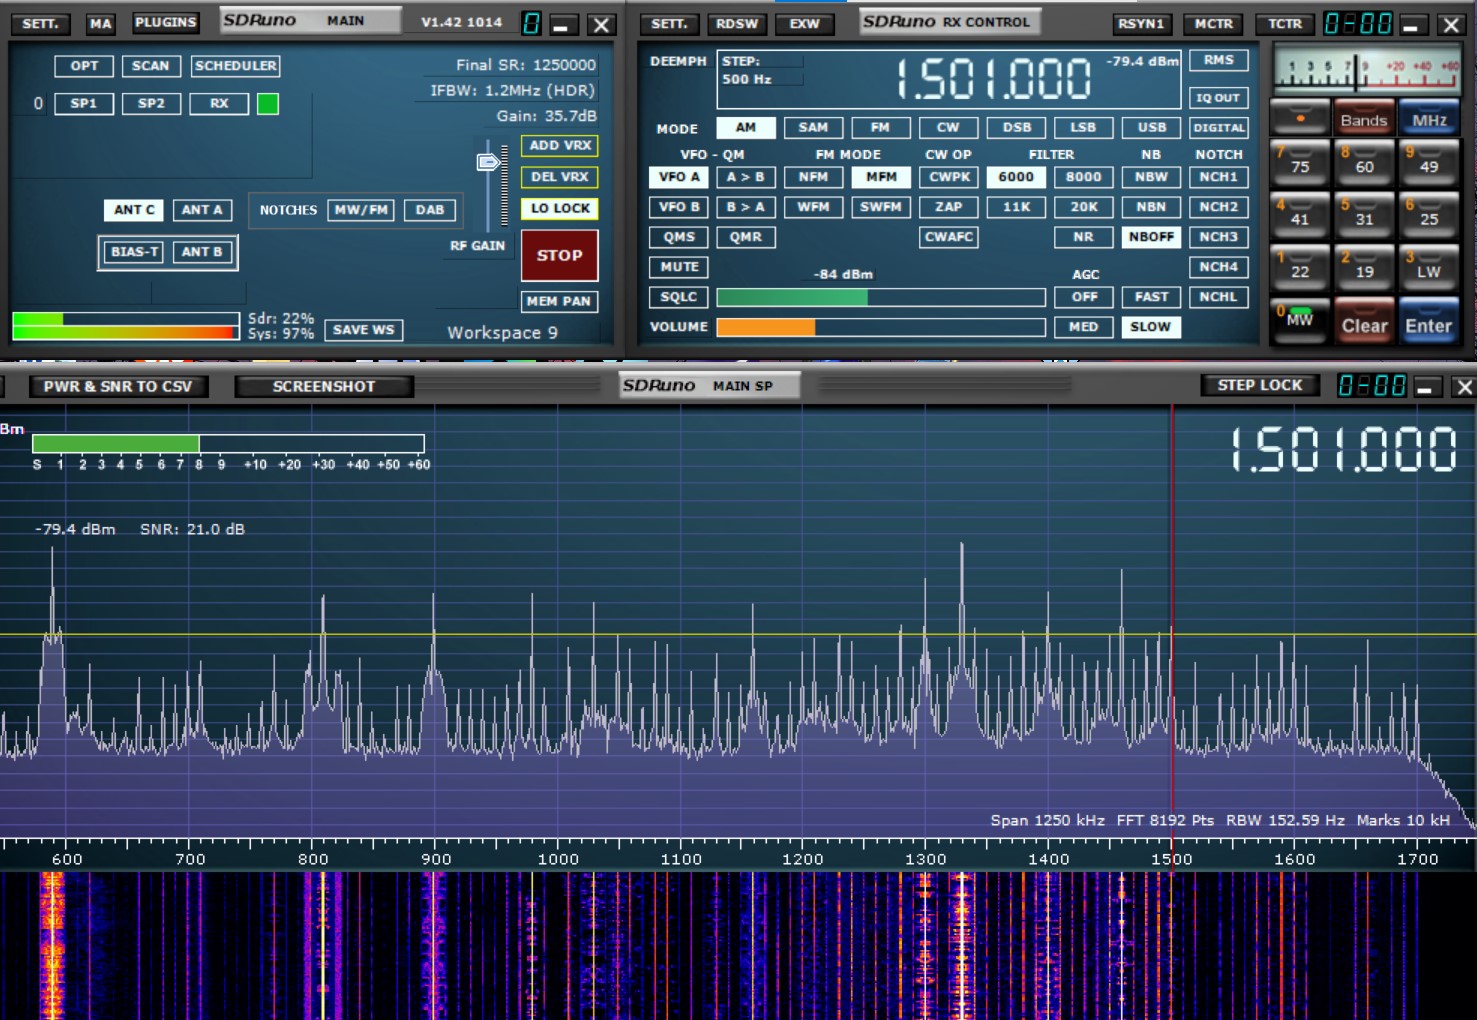
Click on SP1 or SP2 in the main panel, and one of the peak displays will appear:
Finally, click on the PLAY button in the main panel, and whatever frequency you have selected will begin to play. Continue reading →
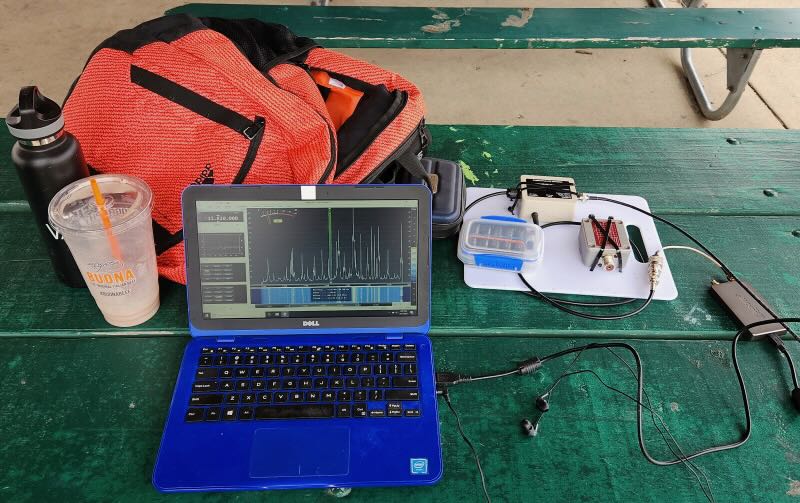
It dawned on me recently, perhaps due to sloppy thinking or unintended distractions, that I never wrote about my modified Loop on Ground (LoG) receive antenna that I use at parks and such. For over a year now, I have been using 3-conductor rotor wire bought cheap at the local hardware store and have wired the conductors in series. Grayhat (Andrew) was the inspiration when he decided to create a folded dipole along the side of his house.
The usual construction of a LoG antenna for shortwave is a single wire of about 60 feet in circumference in order to not go above one wavelength for 20 meter band usage. If you recall, going above one wavelength will start creating weird lobes in the reception pattern. See – Loop-On-Ground Antenna Part 2.
However, I did not like this 19 foot diameter wire on the ground in public parks just waiting to be tripped over. Like, the time when a horse got loose from its owners and almost tripped over my 60 foot wire. I don’t think I would have liked the resulting lawsuit!
So out of fearful necessity I took some leftover RCA 3-conductor rotor wire, about 29 feet of it, and wired a loop with the conductors in series. This gives about 81 feet of total conductive length. But since it is folded onto itself, there is an undetermined loss of resonant length. Callum (M0MCX) of DXCommander fame has experimented and found folded dipoles need three times more length in the folded section to reach resonance, so my loop is probably around 69 feet (electrically). See – Fold the end of a Dipole Back – What’s Happening?.
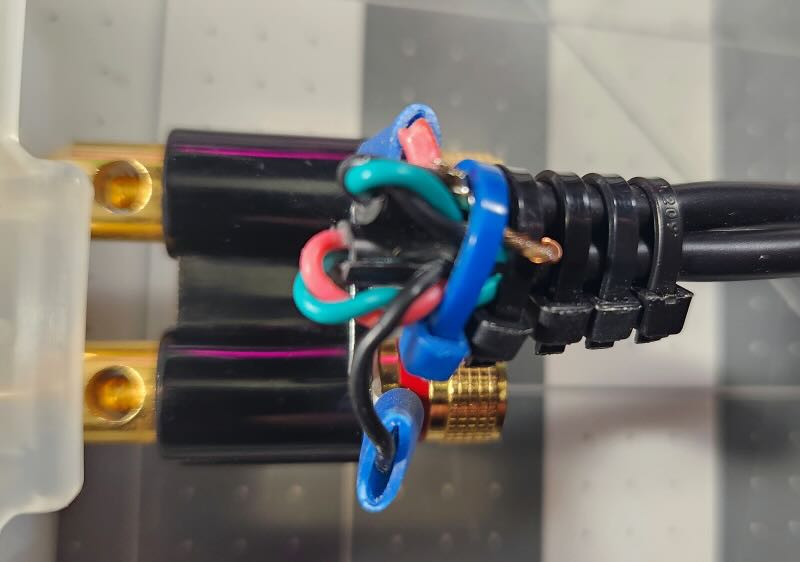
In the picture below, the black wire with Ring Terminal at the bottom goes all the way around to the other side, soldered to the green wire, which goes around and is soldered to the red wire, which goes around to the Ring Terminal at the top, plus tie-wraps to hold the wires together.
The next picture is how the Wellbrook Medium Aperture preamplifier is connected to the loop with BNC cable that goes to the 12V power injector. I have had this Wellbrook unit for maybe 6+years with no signs of problems. WARNING – do NOT use the Wellbrook preamplifier in the presence of high powered RF energy like your Amateur Radio antenna pumped with 1000 watts from a linear amplifier; the Wellbrook premap might just overload and get damaged! I did use this loop and preamplifier at last year’s 2022 ARRL Field Day and was able to get away with it because we were only using 100 watts per station. Listening to the 9pm 3916-net trivia group was fun but I still needed to keep it away from the transmitting antennas. Continue reading →
Spread the radio love
Please support this website by adding us to your whitelist in your ad blocker. Ads are what helps us bring you premium content! Thank you!