Shortwave listening and everything radio including reviews, broadcasting, ham radio, field operation, DXing, maker kits, travel, emergency gear, events, and more
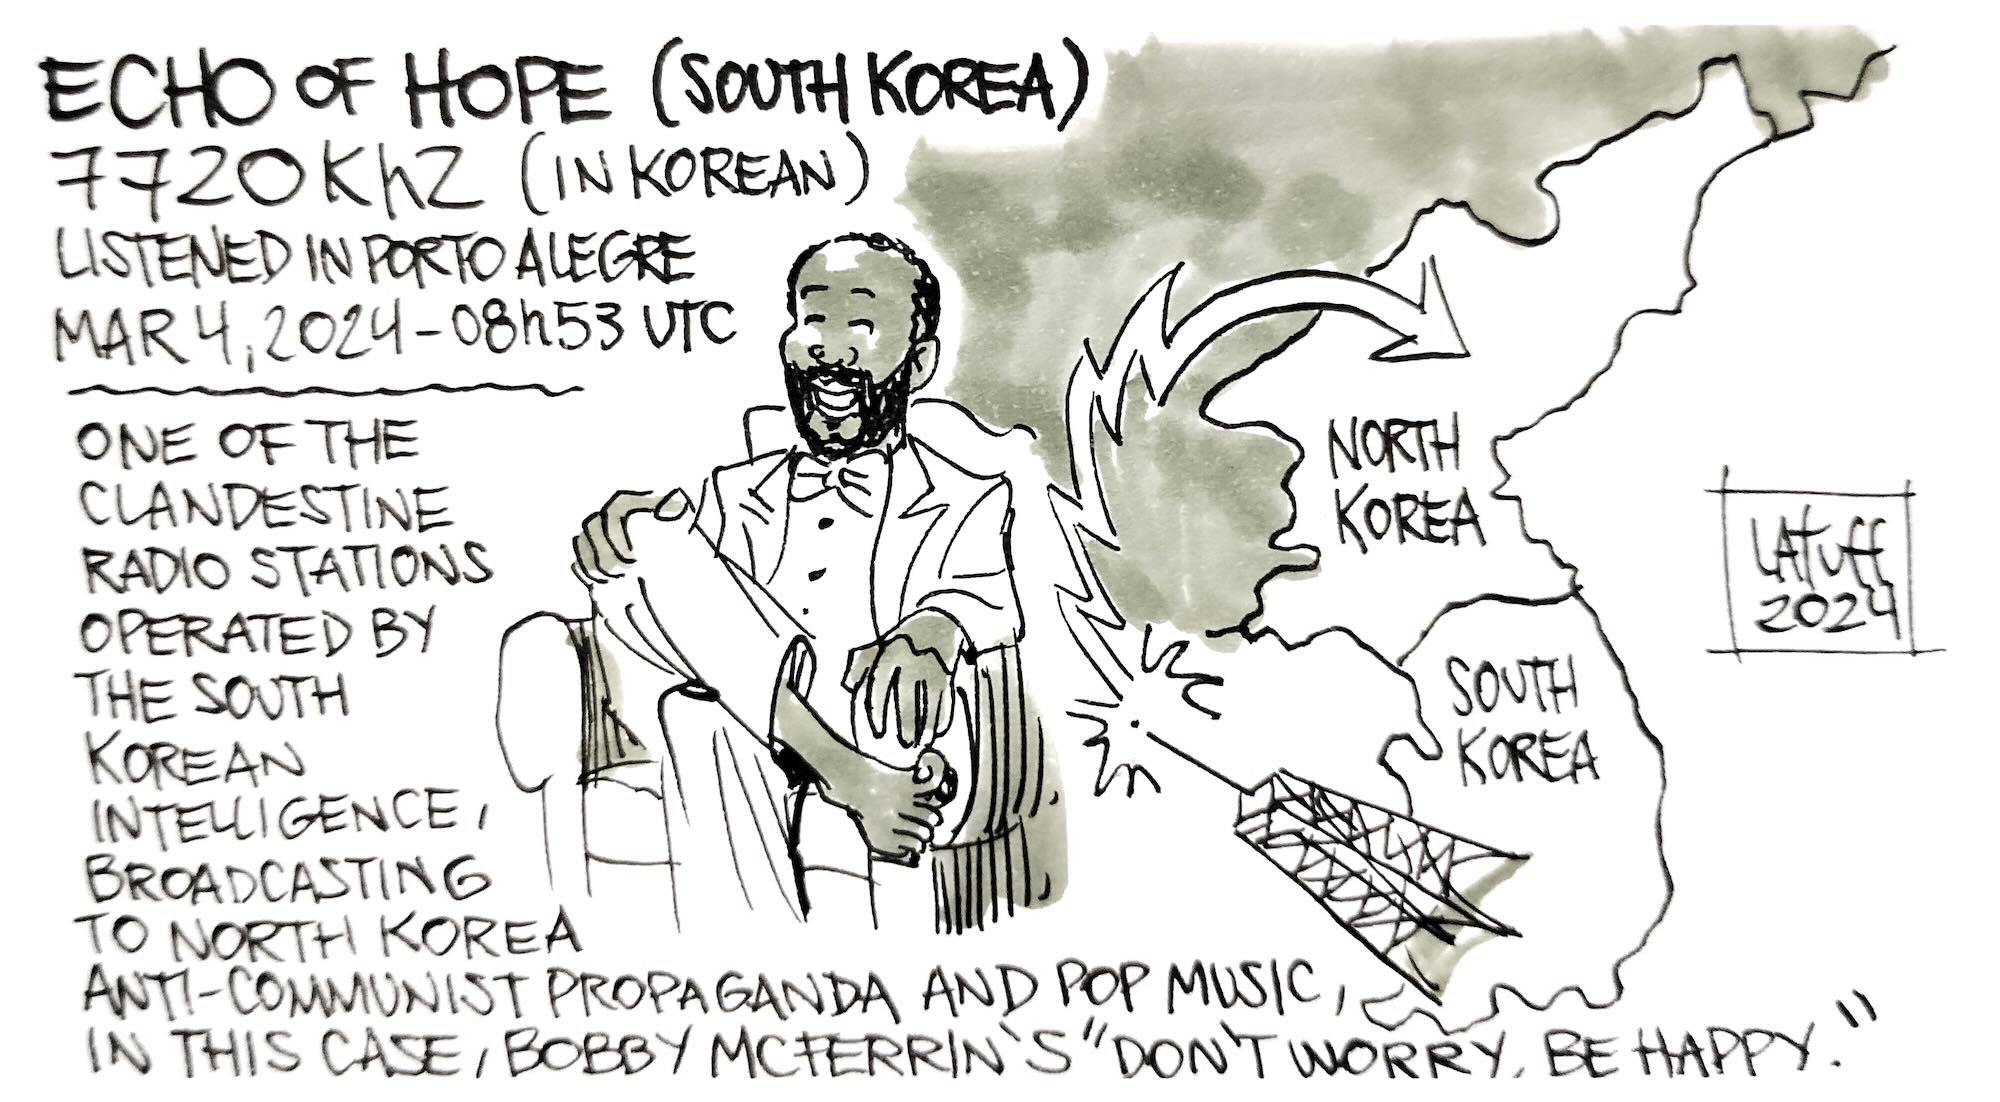
Many thanks to SWLing Post contributor and noted political cartoonist, Carlos Latuff, who shares this special dive into the world of radio both in and targeting the Korean peninsula. His report includes off-air recordings along with his own original artwork.
Koreas’ Radio War
by Carlos Latuff, a special for the SWLing Post
The war that divided Korea in two began in 1950. A truce was signed by both sides in 1953, but a peace agreement never came to fruition. Therefore, North Korea and South Korea remain at war. And this war is not just happening on the ground, but also over the airwaves.
Every day, a battle for hearts and minds takes place on AM, FM and shortwave. Whether the DPRK broadcasts are directed to South Korea, or South Korean broadcasters (including clandestine ones) broadcast to the DPRK.
I bring here a small collection of radio listenings made between February 29th and March 17th, all of them happened in Porto Alegre, Brazil, using a XHDATA D-808 receiver, with long wire antenna (outdoor), except for Radio Free Asia, listened with a Toshiba TR 486 receiver, using a telescopic antenna (indoor). Translations from Korean to English were made using transcription and translation apps.
KBS World
KBS World Radio was created in 1953, the year the truce was signed between the two warring Koreas, under the name “The Voice of Free Korea”, and today, as a public radio station, it broadcasts to several countries in different languages. Its programming includes news, music, variety, and of course, opposition to the DPRK government.
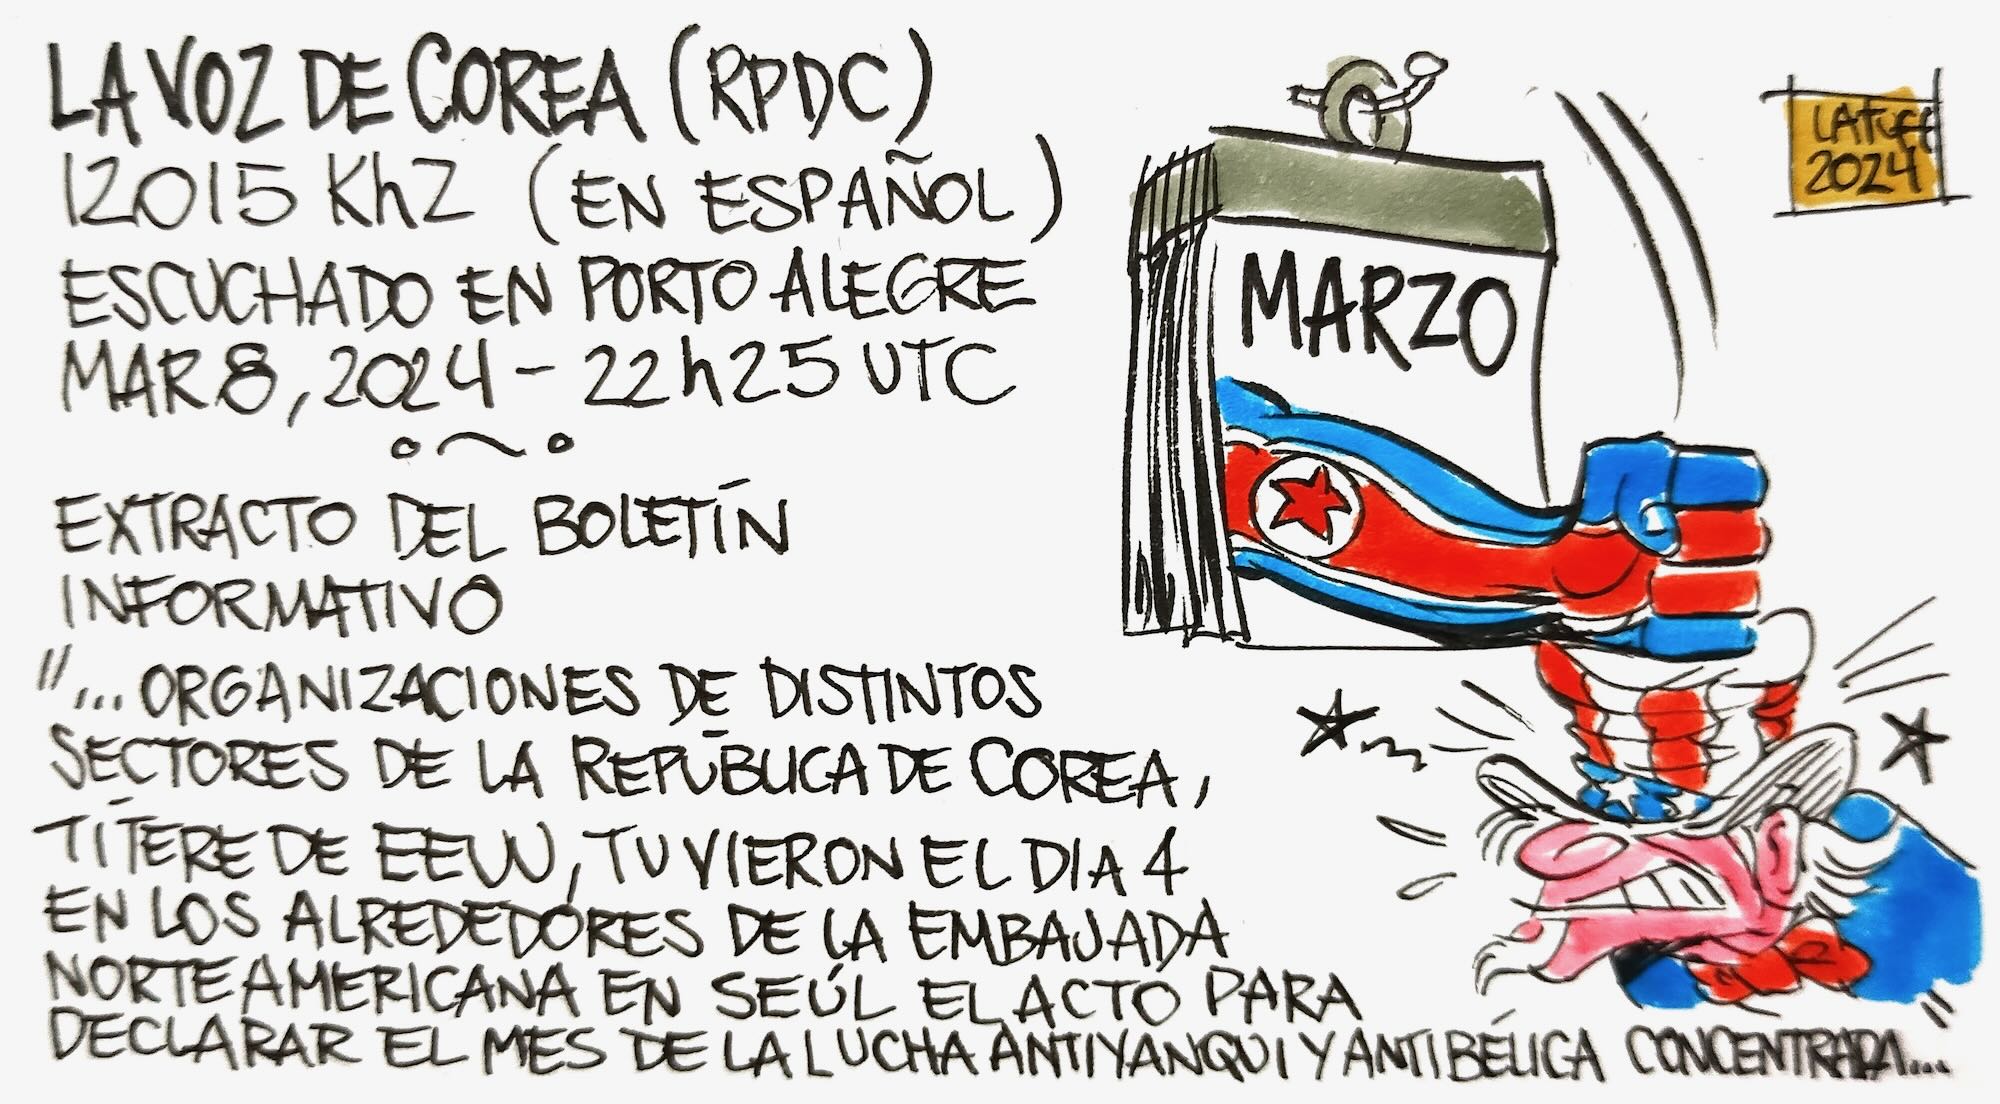
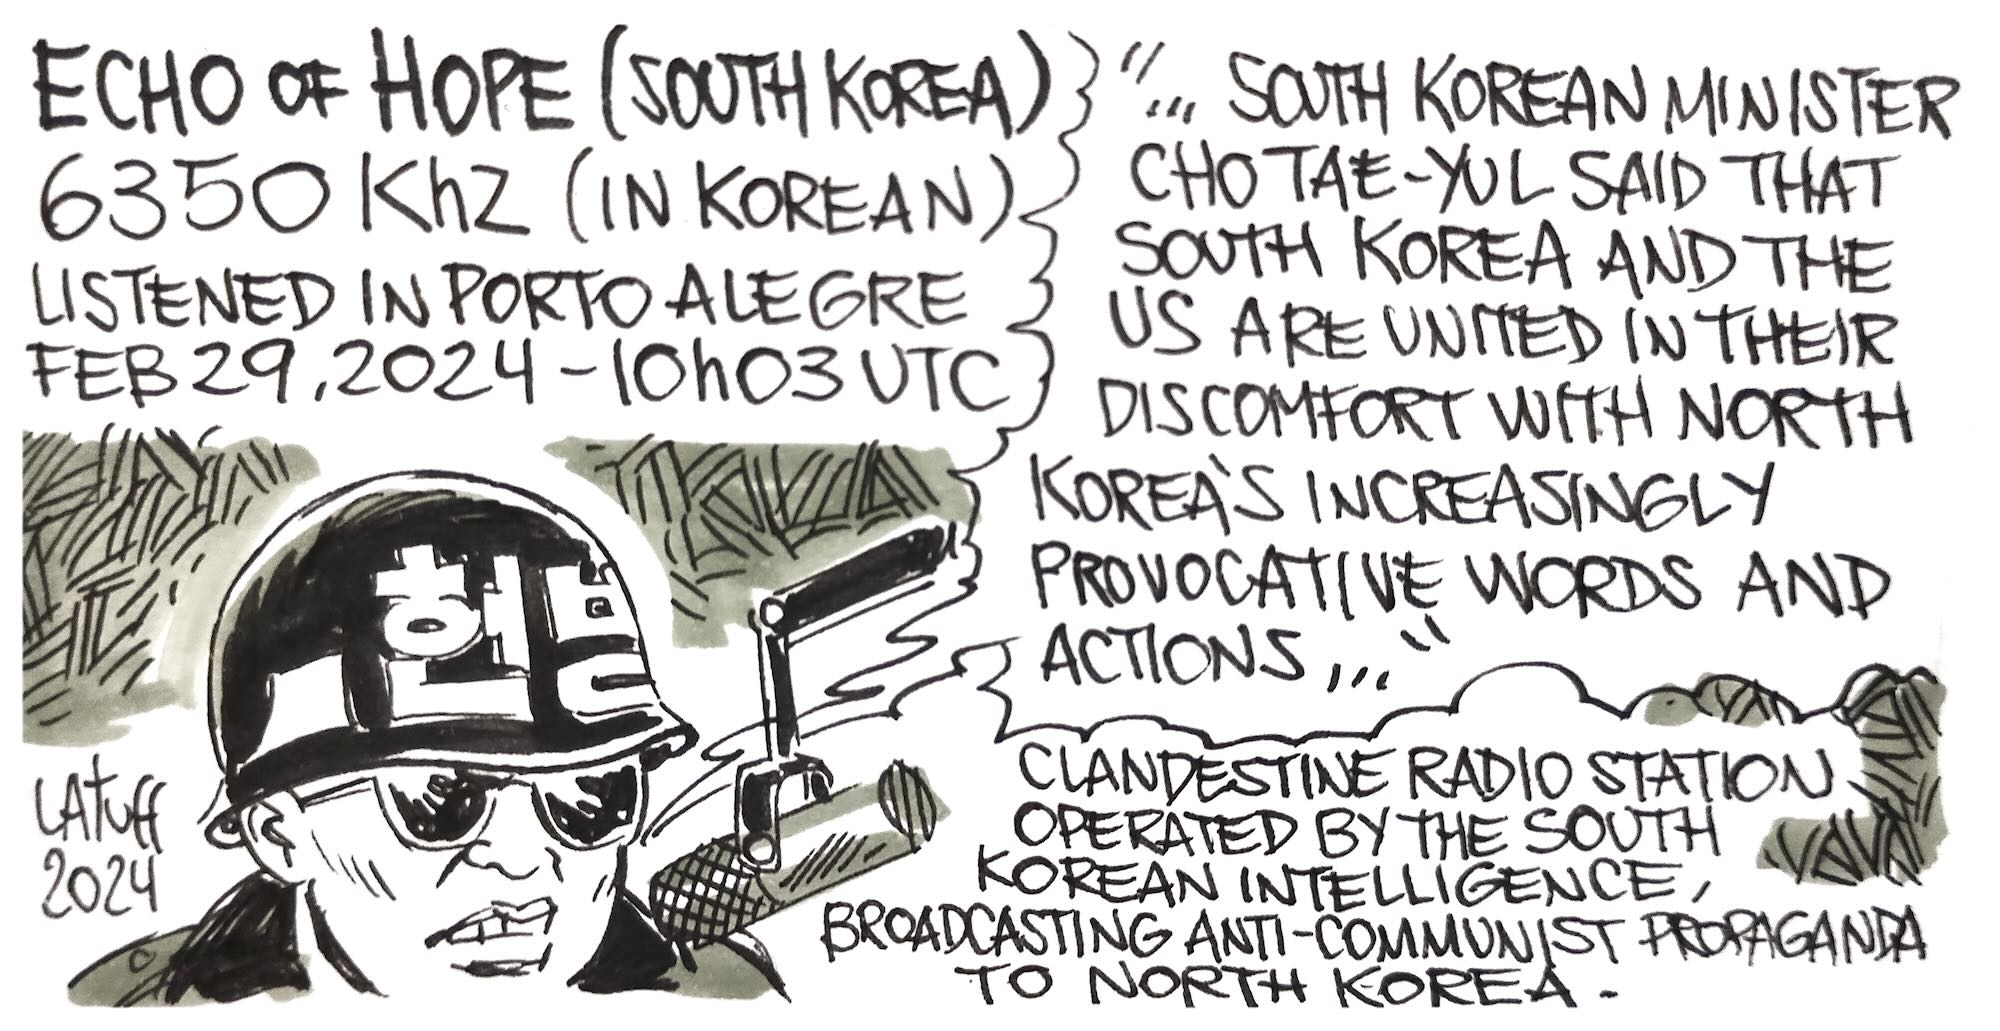
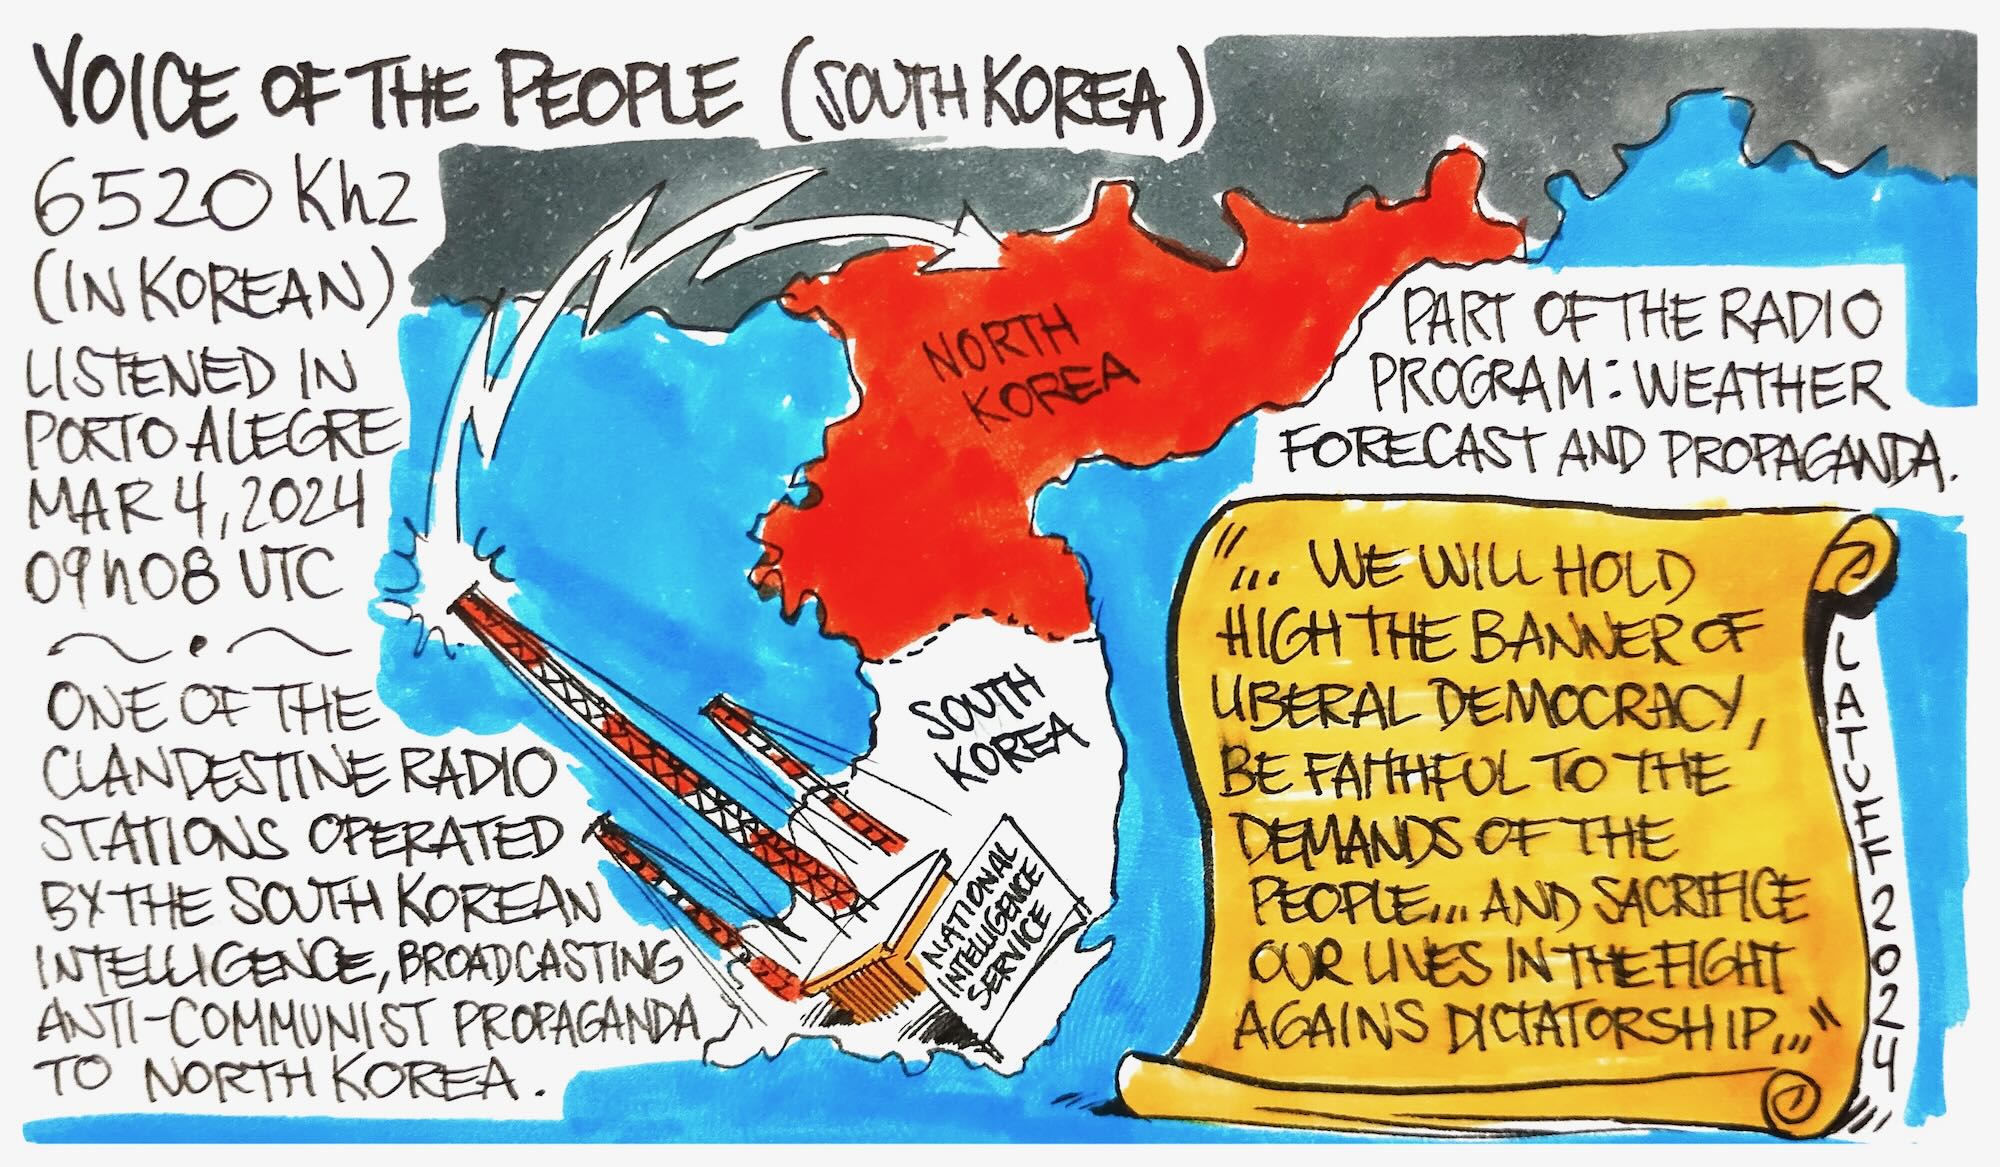
As part of the effort to promote “regime change” in the DPRK, the Seoul government, through its intelligence service, maintains clandestine radio stations (“Echo of Hope” and “Voice of the People”) whose role is basically broadcast 24 hours a day anti-Communist propaganda to North Korea, along South Korean and American pop music.
Echo of Hope
Voice of the People
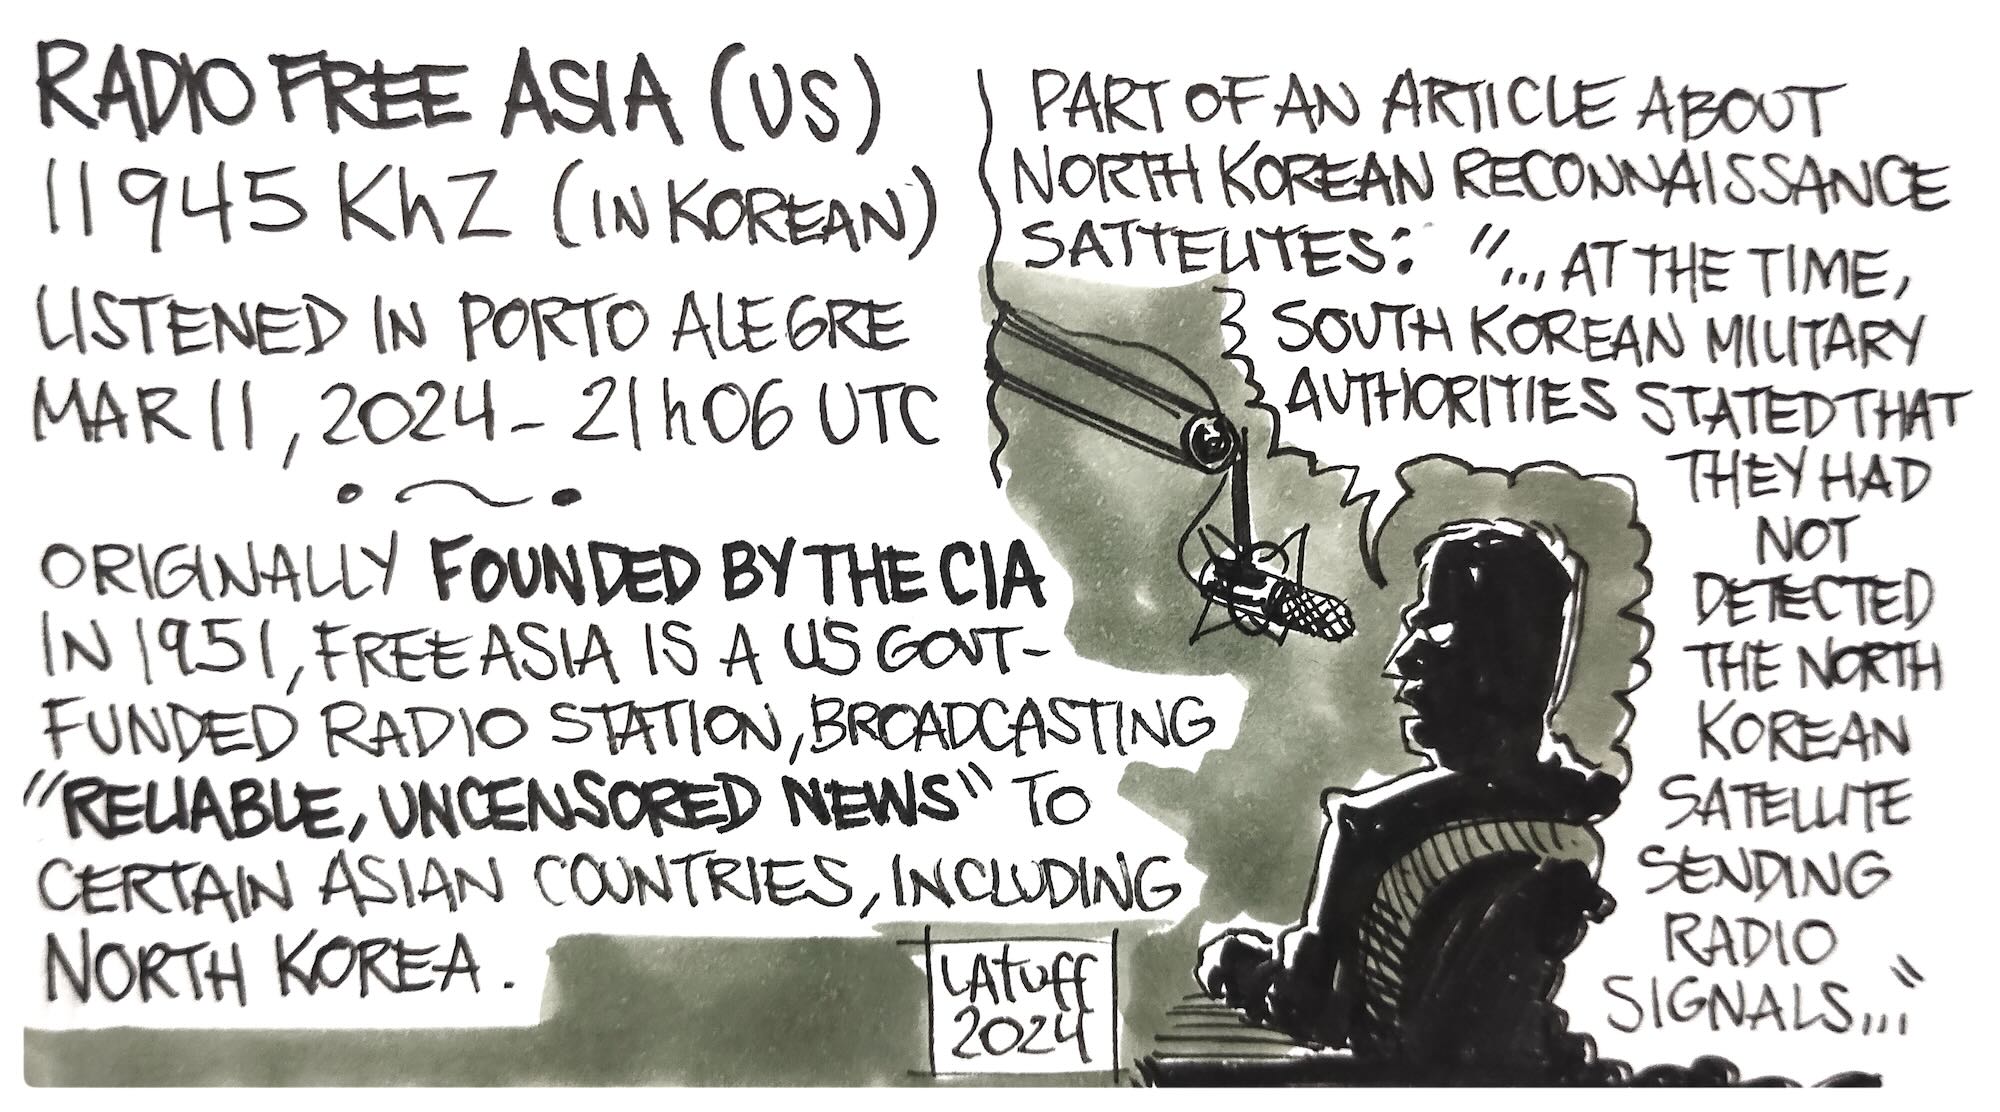
Radio Free Asia
Created by the CIA in 1951, at the height of the Cold War and the conflict in Korea, Radio Free Asia has undergone changes throughout its history, but continues to be operated by the United States government and aims, in its own words, to “provide independent, uncensored and accurate local news” for countries like China, Vietnam and, of course, North Korea. Content directed at the DPRK follows the same principle as South Korean clandestine broadcasters: basically anti-Communist orientation, in order to achieve a “regime change”. The articles broadcasted on the radio are the same as those published on the Radio Free Asia’s website.
KCBS Pyongyang
Korean Central Broadcasting Station (KCBS) Pyongyang is the DPRK’s domestic radio station, whose programming reaches North and South Korea, even being heard in Japan. News about the achievements of North Korean leader Kim Jong-un, music and attacks on Seoul government, seen by Pyongyang as a puppet regime.
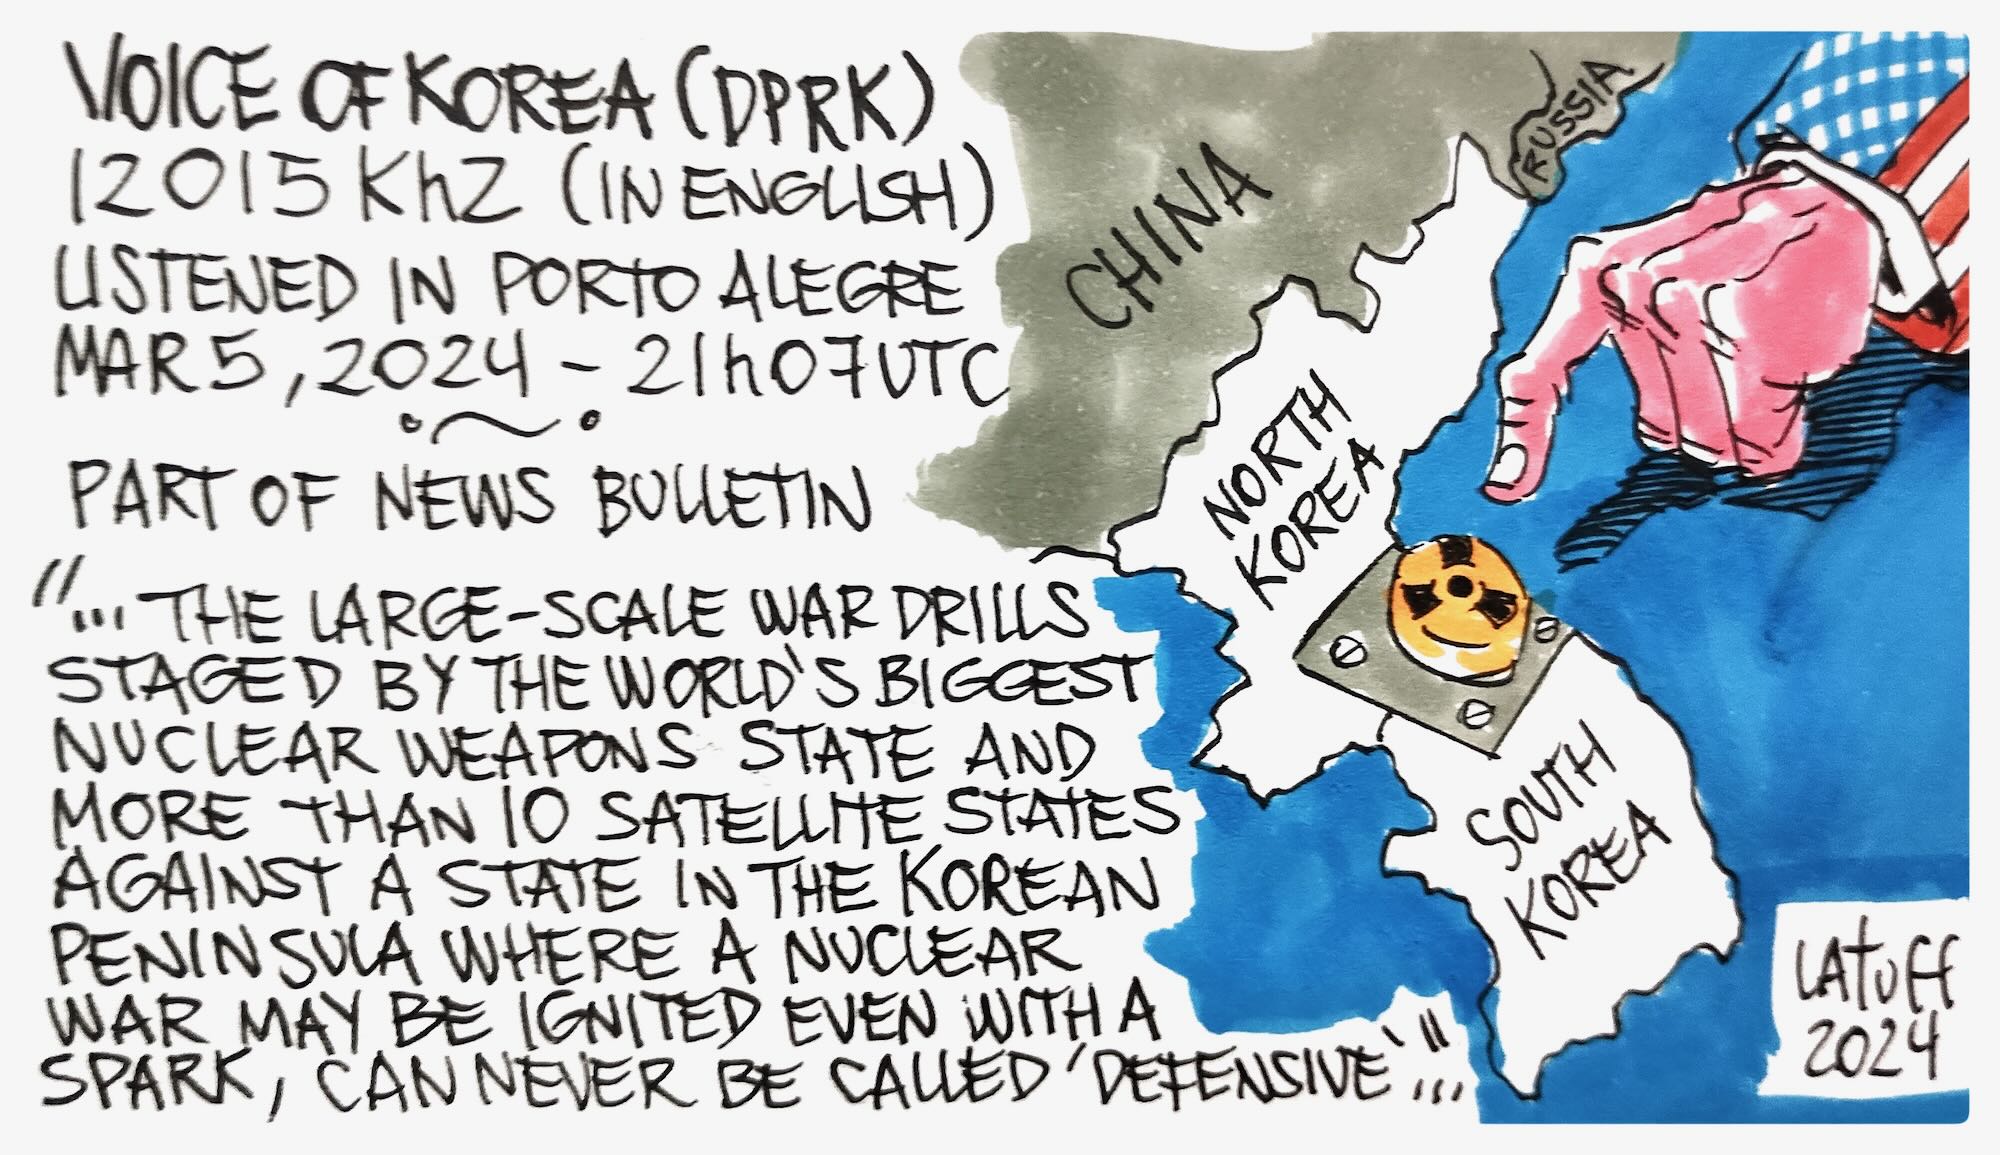
Voice of Korea
On October 14, 1945, the year Japan was defeated in World War II, KCBS Pyongyang and Voice of Korea were founded (domestic and international radio stations respectively). Voice of Korea broadcasts programming in several languages ??to the world via shortwave. The content is not much different from KCBS Pyongyang: achievements of North Korean leader Kim Jong-un, attacks on Seoul government and the United States, and traditional/patriotic music.
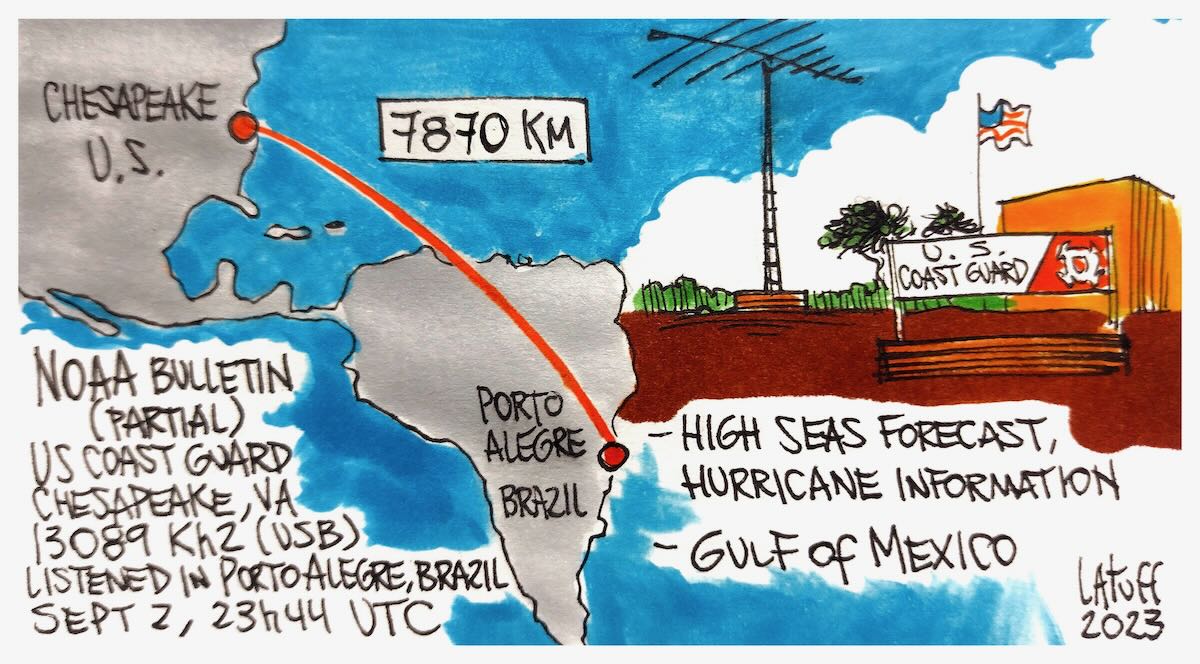
Many thanks to SWLing Post contributor and noted political cartoonist, Carlos Latuff, who shares his radio log art of a recent NOAA Weather Bulletin from the US Coast Guard:
Carlos writes:
NOAA bulletin (partial), US Coast Guard, Chesapeake, VA, 13089 kHz USB, high seas forecast and hurricane information. Listened in Porto Alegre, Brazil.
Many thanks to SWLing Post contributor, TomL, who shares the following guest post:
Recording Music on Shortwave Part 2 – Weak signal recovery
by TomL
The QRM noise cloud surrounding my condominium motivated my first foray into noise reduction software to find a little relief (Please refer to Part 1 posted here) using SDR recordings. I was able to use the freeware software Audacity to reduce some of that type of noise to tolerable levels on strong broadcasts. But what about non-condo noise, like out in the field??
NHK Japan
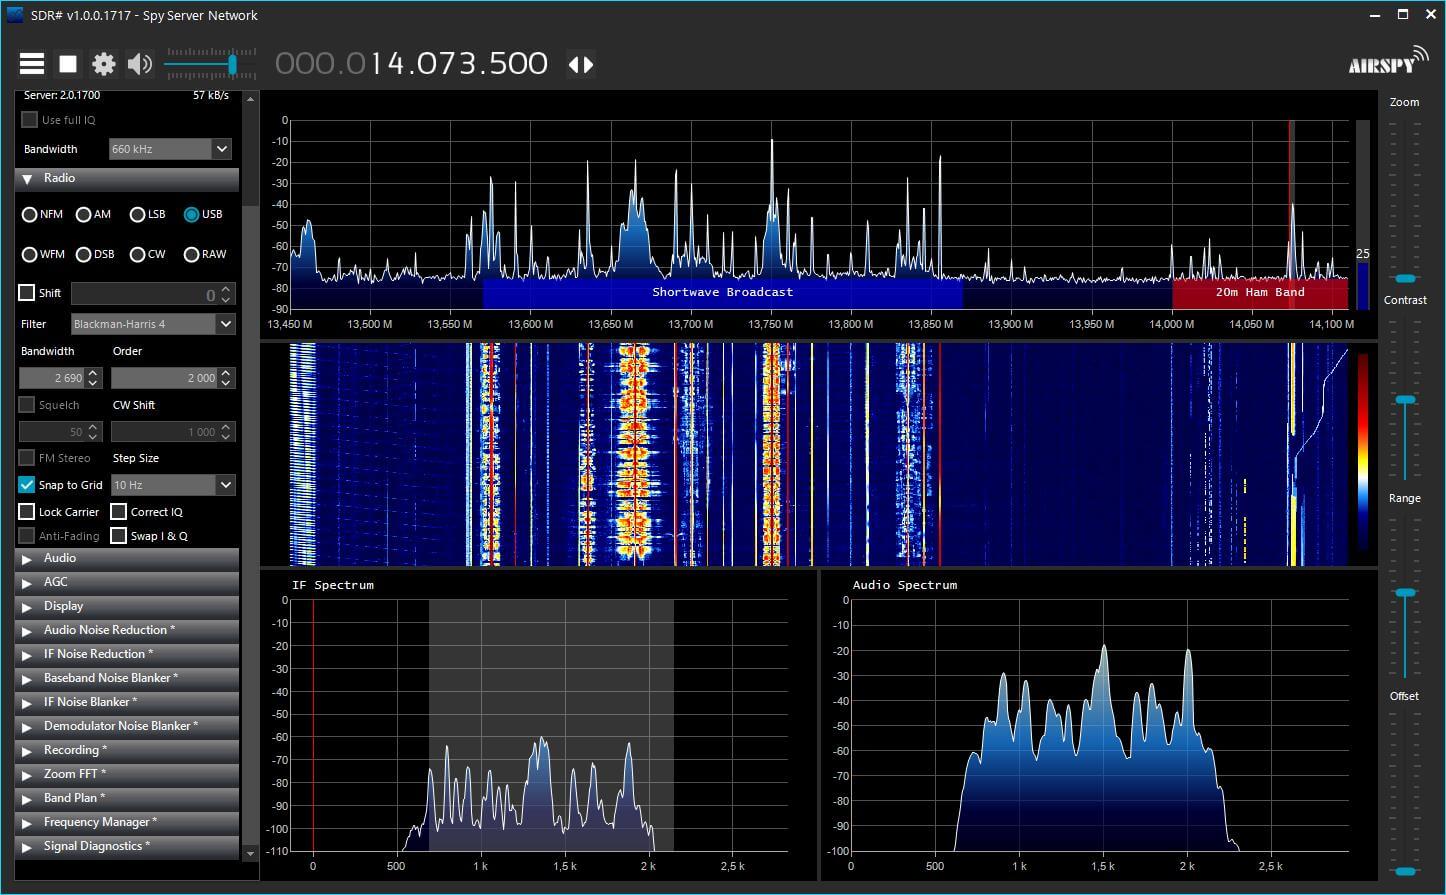
I took my trusty Loop On Ground antenna to the usual county park Forest Preserve which is relatively low in RF noise. I did some usual recording on 25 meters and poked around for something being captured by SDR Console. On 11910 kHz is NHK broadcasting daily from Koga, Japan. It is hearable at this location but is always an S7 or weaker signal despite its 300 KW of power no doubt due to being beamed away from the Midwest USA.
I recorded it using the SDR Console 10kHz bandwidth filter and created a separate noise recording from a nearby empty frequency. Here is the 2 minute portion of a Japanese music teacher. No noise reduction was applied:
I opened the noise and broadcast recordings in Audacity to see what I could do. Part 1 of my previously mentioned post details how I apply the Noise file. A big downside of using any kind of noise reduction software is that it is ridiculously easy to destroy the desirable characteristics of the original recording. Applying too much noise reduction, especially in the presence of constant, spiky lightning noises, will create both digital artifacts as well as very dull sounding results. So I used the Effect – Noise Reduction (NR) feature very carefully.
In this example, I used the Effect – Amplify feature on the one minute noise file. I applied just +1dB of Amplify to the whole file. Then I highlighted a 10 second section I thought was representative of the general background noise and chose Edit – Copy. Then, I opened the broadcast file, Pasted the 10 seconds of noise to the END of the file and highlighted just the 10 seconds of noise. Then I chose Effect – Noise Reduction – Get Noise Profile button. Amplifying the noise file by +1db does not sound like much but it seems to help according to my tests. Anymore than this and the Noise Profile would not recognize the noise without destroying the music.
I used the NR feature three times in succession using the following (NoiseReduction/Sensitivity/FrequencySmoothing) settings: Pass1 (3dB/0.79/1), Pass2 (2dB/1.28/1), Pass3 (1dB/2.05/0). Part of what I listened for was choosing the Residue circle and Preview button for any music or dialog that was being filtered out. If I heard something that came from the desired part of the recording in Residue, I knew that I hit the limit concerning the combination of Noise reduction and Sensitivity settings to engage. I used those Residue & Preview buttons over and over again with different settings to make sure I wasn’t getting rid of anything wanted. I also used the higher Noise reduction with lower Sensitivity to try to get rid of any momentary spiky type noise that is often associated with SWLing.
I messed around with a lot of test outputs of differing dB and Sensitivities and a lot seemed to depend on the strength of the broadcast signal compared to the noise. If the broadcast was weak, I could push the dB and Sensitivities a little harder. I also noted that with strong signal broadcasts, I could NOT use more than 1 dB of Noise reduction beyond a Sensitivity of about 0.85 without causing damage to the musical fidelity. This was a pretty low level of nuanced manipulation. Because of these minor level Audacity software settings, it dawned on me that it is very helpful to already be using a low-noise antenna design.
If the Sensitivity numbers look familiar, that is because I tried basing the series of Sensitivity on Fibonacci numbers 0.618 and 0.786. Don’t ask me why these type of numbers, they just ended up sounding better to me. I also needed a structured approach compared to just using random numbers! Probably any other similarly spaced Sensitivity numbers would work just fine, too.
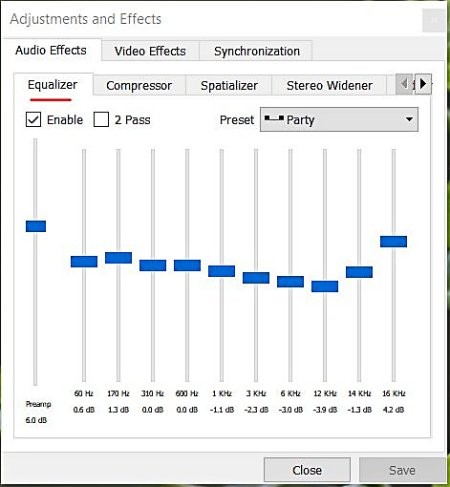
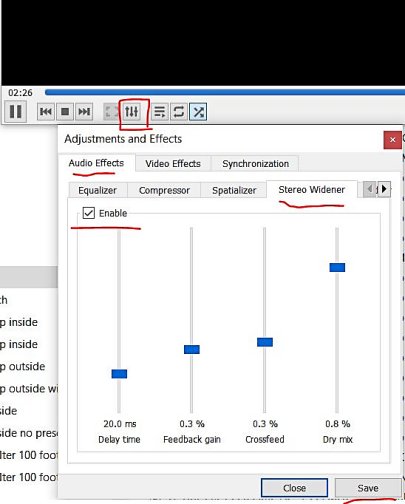
Now if you really want to go crazy with this, add Pseudo Stereo to your favorite version of this file (also detailed in Part 1) and playback the file using VLC Media Player. That software has a couple of interesting features such as an Equalizer and a Stereo Widener. You may or may not like using these features but sometimes it helps with intelligibility of the voice and/or music [VLC will also let you right-click a folder of music and choose to play all it finds there without having to import each MP3 file into a special “Library” of music tracks where they bombard you with advertisements].
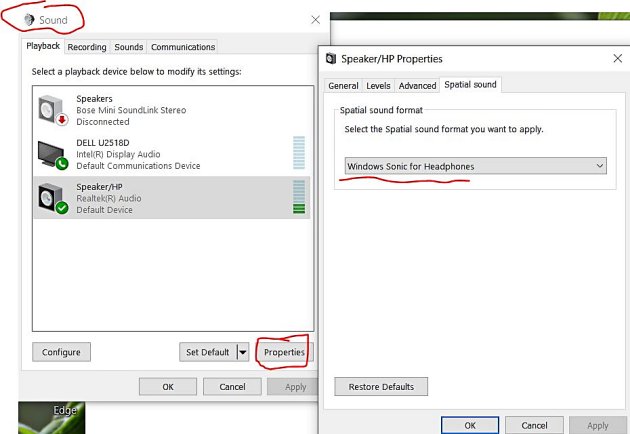
You can also turn on Windows Sonic for Headphones if you are using the Windows operating system. However, this can sometimes be too much audio manipulation for my tastes!
Here is the resulting NHK noise-reduced file with 9ms of delay with High & Low Filters:
Radio Thailand
Five days later I was out in the field again. This time I found Radio Thailand on 11920 kHz finishing up a Thai broadcast. It was a weaker S5 signal than the NHK example, so it would be a good test.
When I got home, I recorded the broadcast file at a Bandwidth filter of 8 kHz and using Slow AGC and the extra Noise file at 12kHz using Fast AGC. In a previous test I had noticed a very slight improvement in sound quality in the way noise seems to get out of the way quicker compared to Slow AGC (which is usually how I listen to shortwave broadcasters). I now try to remember to record the Noise file with Fast AGC.
Here is the original without any noise reduction:
This time the Noise file using Amplify +1dB did not help and I used it as-is for the 10 second Noise Profile. I then tried multiple passes of NR at higher and higher Sensitivities and ended up with these settings the best: Pass1 (1dB/0.79/0), Pass2 (1dB/1.27/0), Pass3 (1dB/2.05/0), Pass4 (1dB/3.33/0).
As a comparison, I tried recording only with SDR Console’s noise reduction NR1 set to 3dB and got this. I hear more noise and less of the music coming through:
Now for more crazy Pseudo Stereo to finish up the Audacity 4Pass version (nice Interval Signal of Buddhist bells ringing and station ID at the very end):
Summary
I do not understand why applying 3 or 4 separate 1dB Sensitivities of noise reduction is superior to just one Pass at 3dB Sensitivity (in Audacity) or the one 3dB noise reduction (in SDR Console). My guess is that doing 1 dB at different Sensitivities shaves off some spiky noise a little at a time, somehow allowing for more of the musical notes to poke through the noise cloud. Who knows but I can hear a difference in subtle musical notes and sharpness of voice and instruments. Probably the Fast AGC helps too.
Music is a Universal Language that we can share even when we don’t understand a word they are saying. And there is more music on the air than I thought. Some of these recordings sound surprisingly pleasing after noise reduction. The fake stereo is pumped through a CCrane FM Transmitter to a few radios in the home, or I can use the Beyerdynamic DT990 Pro headphones.
Many thanks to SWLing Post contributor, TomL, who shares the following guest post:
Recording Music on Shortwave
by TomL
I recently became curious about the seasonal music updates posted by Alan Roe. It is a nicely detailed list of musical offerings to be heard. Kudos to Alan who has spent the time and effort to make it much easier to see at a glance what might be on the airwaves in an easy to read tabular format. I do not know of any other listing specifically for shortwave music in any publication or web site. I especially like the way it lists everything in UTC time since I might want to look for certain time slots to record. For some listings, I would need to go outdoors away from noise to listen to certain broadcasts. Current web page is here: https://swling.com/blog/resources/alan-roes-guide-to-music-on-shortwave/ .
As a side note, I have also found a lot of music embedded in the middle of broadcasts that are unannounced, unattributed, and not part of a regular feature program. That can be a treasure trove of local music you might not be able to find anywhere on the internet. It can be worth recording a spectrum of frequencies using the capabilities of the SDR and then quickly combing through the broadcasts at two-minute intervals (most songs are three minutes or longer). In maybe ten minutes, I will have at least identified all of the listenable music that may or may not be worth saving to a separate file.
Whether at home or outdoors, I have wanted to try to record shortwave broadcasts of music using my AirSpy HF+ but never getting around to it until now. There is a certain learning curve to dealing with music compared to just a news summary or editorial. I found myself wishing I could improve the fidelity of what I was hearing. From static crashes, bad power line noise, fading signals, and adjacent channel interference, it can be quite difficult to get the full appreciation from the musical impact.
I am starting to monitor the stronger shortwave stations like WRMI, Radio Romania International, Radio Nacional do Amazonia, etc. These type of stations can be received in a strong enough manner to get good quality recordings (at least according to shortwave listening experience). I am also finding that I appreciate much more than before the effort that these broadcasters put into creating content/commentary to go along with the music and little pieces of background info about the music or the artist. I have also noticed how exact some broadcasters are in timing the music into the limited time slots. For instance, Radio Romania International tries to offer one Contemporary piece of music exactly at 14 minutes, Traditional music exactly at 30 minutes, and a Folk tune exactly at 52 minutes into the program (whether in English, French, or Spanish), with nice fade-outs if the music goes too long.
One thing I ran into was to bother checking my hearing range. If someone has impaired hearing, it does not make much sense to create files that have a lot of sound out of one’s hearing range. I found this YouTube video (among a bunch of others) and listened to the frequency sweep using my Beyerdynamic DT-990 Pro headphones (audiophile/studio type headphones). My hearing is approximately from 29 Hz through 14400 Hz. Of course, the extremes fall off drastically, and as with most people, my hearing is most sensitive in the 2000 through 6000 Hz range.
Recording Workflow
Let’s assume that you already know how to record IQ files using your SDR software and can play them back (In the example below, I recorded the whole 49 meter band outputting a series of 1GB WAV files). Then, when playing back to record to individual files, I have to choose the filters and noise reduction I want. This gets subjective. If I do not want to keep huge numbers of Terabytes of WAV files over time, I will want to record to individual WAV files and then delete the much larger spectrum recording. You might tell me to just record to MP3 or WMA files because there is that option in the SDR software. We will get into that as we go along. For the time being, I do not want to keep buying Terabytes of hard drives to hold onto the original spectrum recordings.
After lots of trial and error, I came up with this workflow:
Record the meter band spectrum of interest using the SDR software.
Record individual snippets of each broadcast in that spectrum to new individual WAV files. This includes not lopping-off any announcer notes about the music I want to retain. I also have to choose the bandwidth filter and any noise reduction options in the software. Because I am not keeping Terabytes of info, this is a permanent decision.
Take an individual recording and apply more processing to it.
Convert the processed recording to any number of final output formats for further consumption and/or sharing.
Repeat steps 3 & 4 to take care of all the individual WAV files.
Step 4 allows me to create whatever file format I might need it to be: WAV, MP3, WMA, or even use it as background sound to a video if I so choose. There are also different ways to create some of these files with different quality settings depending on what is needed. I have chosen to listen to the individual WAV files for personal consumption but there may come a time to create high quality MP3 files and transfer those to a portable player I can take anywhere (or share with anyone).
The example below is a snippet from the latest Radio Northern Europe International broadcast on WRMI. WRMI has some decent equipment and I like how clean and wide is the bandwidth of many of the music programs. This is captured on the AirSpy HF+ using SDR Console V.3 with a user-defined 12kHz filter (11kHz also seemed somewhat similar sounding).
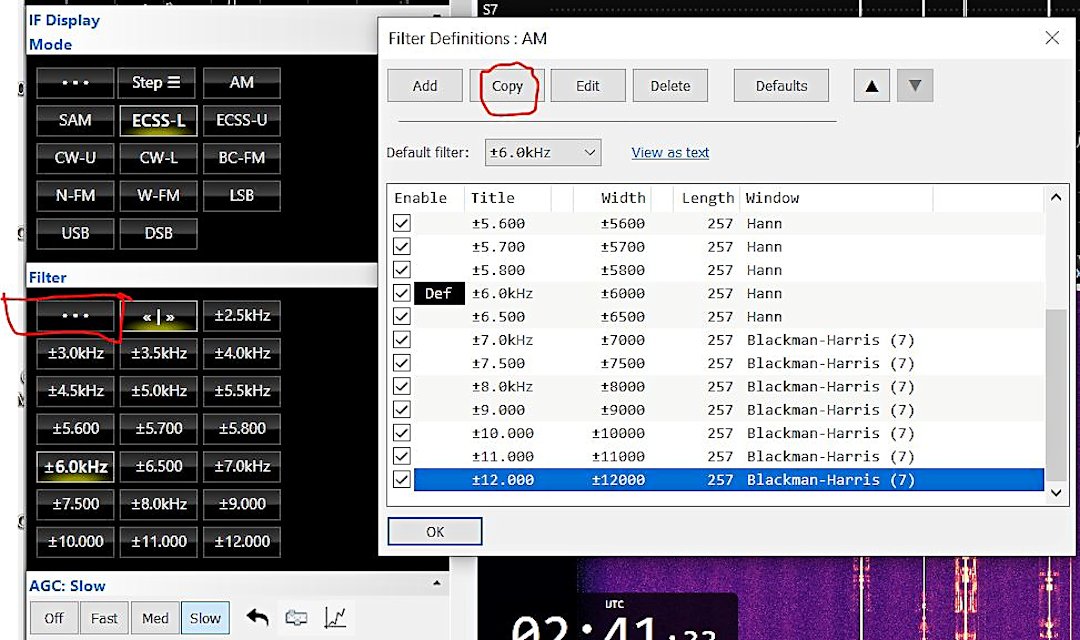
If you click on the ellipses, you can Copy an existing filter, type in a new title and change the bandwidth. I also played around with the different Windowing types and found that I like the Blackman-Harris (7) type best for music and the Hann type for smooth speech rendering (the Kaiser-Bessel types can also have more “punch” for voice recordings). Click OK TWICE to save the changes.
I also use Slow AGC and the SAM (Sync with both sidebands) to reduce the chance of distortion as the signal fades. I found that trying to use only one sideband while in Sync mode would make the reception open to loss of Sync with the musical notes warbling and varying all over the place!
Noise Reduction
The SDR Console software has a number of noise reduction choices. I tried NR1 through 4 and found the smoothest response to music to be NR1 with no more than 3 dB reduction. More than this seemed to muffle the musical notes, especially acoustic instruments and higher pitched voices. Part of the problem has to do with trying to preserve the crispness of the articulation of the sound and combating shortwave noise at the same time. At this time, I have chosen NOT to use any NR mode. More about noise reduction below.
Generic MP3 sounds really bland to my ears, so creating higher quality files will be important to me. I have been using Audacity which can apply processing and special effects to WAV files and export to any number of file formats. WAV files are a wonderful thing. It is a “lossless” file format which means that every single “bit” of computer input is captured and preserved in the file depending on the resolution of the recording device. This allows one to create any number of those “lossy” output formats or even another WAV file with special effects added. You can get it here:
One special effect is listed as “Noise Reduction”. I literally stumbled upon it while reading something else about Audacity (manual link). Here is how I use it for a shortwave broadcast. Open the original spectrum recording (in this example the 49m band). Tune about 25kHz away from the broadcast that was just recorded. Remember, my hearing extends at least to 14.4k plus there is still the pesky issue of sideband splatter of bandwidth filters. The old time ceramic and mechanical filters use to spec something called “skirt selectivity” -60db or more down from the center frequency. This is still an issue with DSP filters even though they SAY they are measured down to -140dB; I can still hear a raspy sideband splatter from strong stations!
Find the same time frame that you recorded the broadcast and make sure it is the same bandwidth filter, AGC, and any noise reduction used. Now record one minute of empty noise to a WAV file. Fortunately on 5850 kHz, WRMI has no adjacent interference.
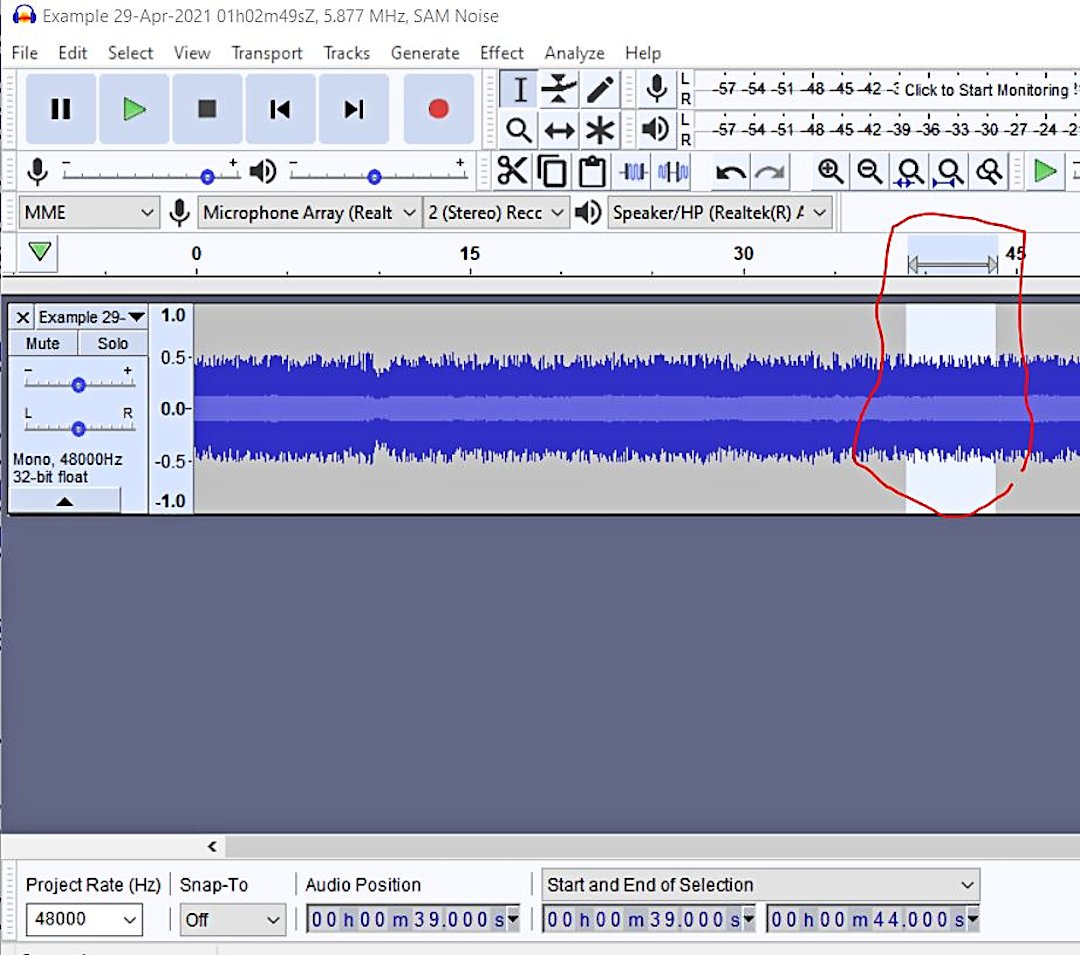
Now in Audacity, open the noise sample and listen for a 5 to 10 second space to copy that is relatively uniform in noise. We don’t want much beyond that and we don’t really want noise spikes. The object is to reduce background noise. In this case, I chose Start 39 seconds and End 44 seconds. Choose Edit – Copy (or CTRL-C).
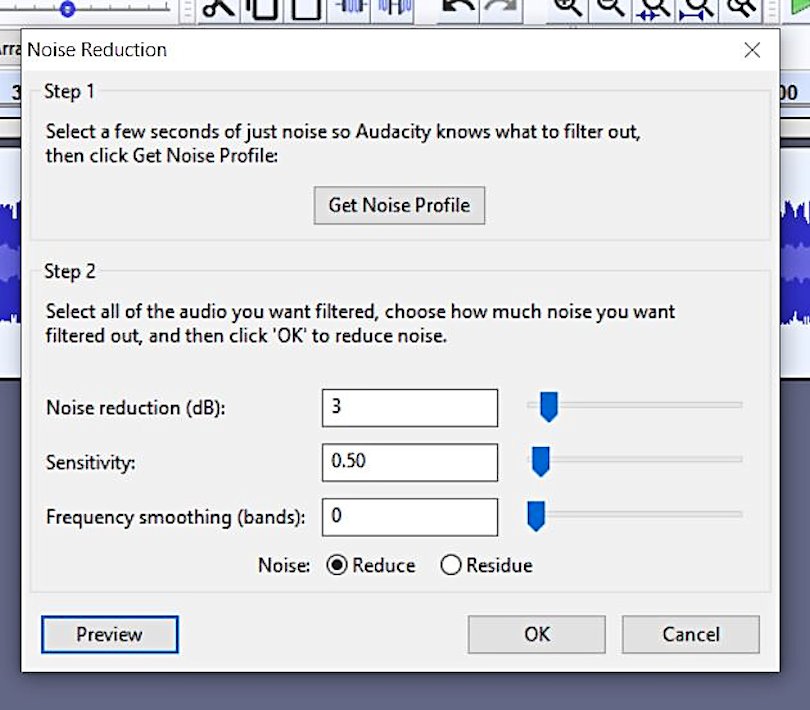
Choose File Open and find the broadcast WAV file in question. Now click on the end-of-file arrow or manually type in the Audio Position (in this example 1 minute 15 seconds). Now Paste (or CTRL-V) the 5 seconds of noise to the end of the broadcast file. Now, while the pasted noise is still highlighted, go immediately to Effect – Noise Reduction and choose the button Get Noise Profile. It will blink quickly to read the highlighted 5 seconds of noise and disappear.
Now select all with CTRL-A and the whole file is selected. Go immediately to Effect – Noise Reduction and choose the parameters in “Step 2”. Through some trial and error, I found 3db reduction has a noticeable effect without compromising the music. I have used up to 5 db for some music recorded with narrower bandwidths. Higher levels of noise reduction seemed to create an artificial flatness that was disturbing to me. I also use a Sensitivity of 0.50 and Frequency smoothing of 0. You can choose the Preview button while the Residue circle is checked to actually hear the noise being eliminated. Press OK in order to process the noise reduction. You should now see the waveform change slightly as the noise is filtered. In a nutshell, I find this to be a better noise reduction than using 3db of NR1 in the SDR Console software. Don’t forget to snip off those 5 seconds of noise before saving the file.
Pseudo Stereo
The SDR Console software has an Option for Pseudo Stereo (for playback only) and it can be useful for Amateur Radio receiving, especially in noisy band conditions when one is straining to hear the other person’s call sign and location. There is a way in Audacity to add a fake kind of stereo effect to mono audio files. I found a useful YouTube video that explained it very clearly.
I do everything listed there except for the Reverb effect. I find that too fake for my tastes.
I found the added 10ms of Delay on the right channel to be a little too much, so I use 9ms.
My High Pass filter settings are 80 Hz and 24dB/octave. This is based partly on my hearing preferences as well as established industry standards. There was a lot of science and audio engineering that went into creating the THX home theater crossover standard. There is also science that says that anything below 200 Hz is omnidirectional. The suggested 48dB/octave is too steep in my opinion.
My Low Pass filter settings are more squishy. The YouTube video suggests 8000 Hz and 6dB/octave. I feel that is too gentle a rolloff into the upper midrange. I use 9000 Hz at 12dB/octave for very strong, high quality shortwave broadcasters like WRMI. For more constrained quality broadcasts, like due to limited bandwidth (Cuban broadcasters) or adjacent channel interference, I will decrease down to 8000 or 7000 Hz but still use a 12dB/octave rolloff. This is subjective but it also means I am making a conscious decision to add that processing to the recording for future listening.
MP3 Quality
Typical MP3 files are a Constant Bit Rate of 128k. Some interviews and voice-only podcasts are only 64k. This is adequate but for recording detail in the music I prefer higher quality settings. Frankly, with these days of 4G cell phone service and Unlimited Data minutes on cell phone plans, there is NO good reason to limit MP3 files to just adequate quality levels. The typical MP3 file sounds limited in frequency range (muffled sounding) to me and very lacking in dynamic range (narrow amplitude). This would include limits on stereo files which are about twice the file size of mono files.
I have tried creating WMA files and I actually like the quality a little better than high quality MP3 files. The WMA files seem slightly more “airy” and defined to my ears. But it is a proprietary format from Microsoft and not all web sites or devices will easily play them. They are also a fixed standard and one cannot easily change the quality settings if forced to use a lower quality rendering.
There are many web sites talking about MP3 files, but I found this blog post helpful in summarizing in one paragraph the higher quality settings for a nice MP3 recording using VBR-ABR mode.
So finally for my examples. Since most web sites still prefer MP3 files, I have created these using that blog post’s suggestions. Typically this is Min bitrate=32, Max bitrate=224, VBR quality=9, and Quality=High (Q=2). Let’s see if you can hear the differences. It would be much easier to hear if we were listening to WAV files, but those are way too big to post on this web site! The software I used is Xmedia Recode and I find it easy to use.
Many thanks to SWLing Post contributor, TomL, who shares the following guest post:
YouLoop Picnic Table Report
by TomL
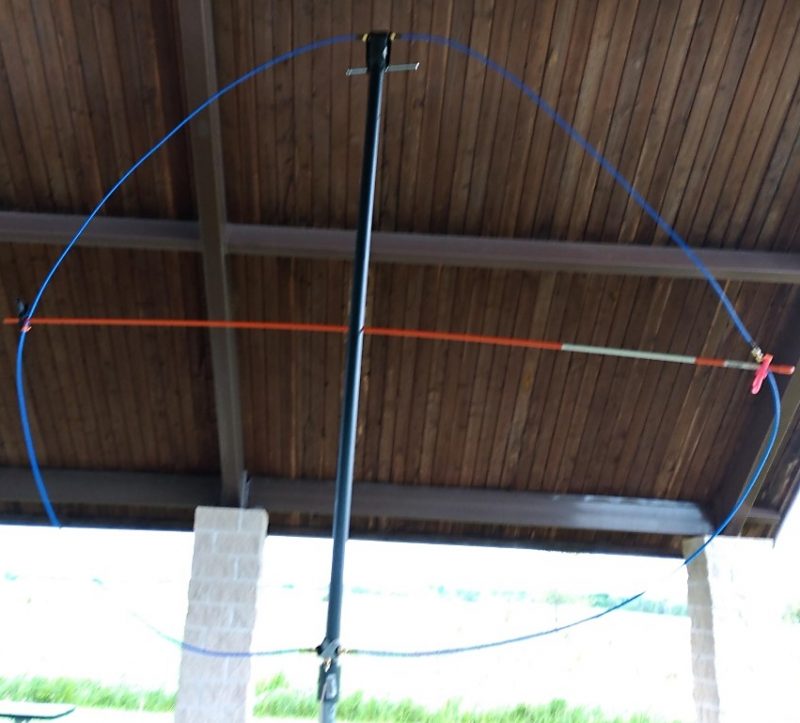
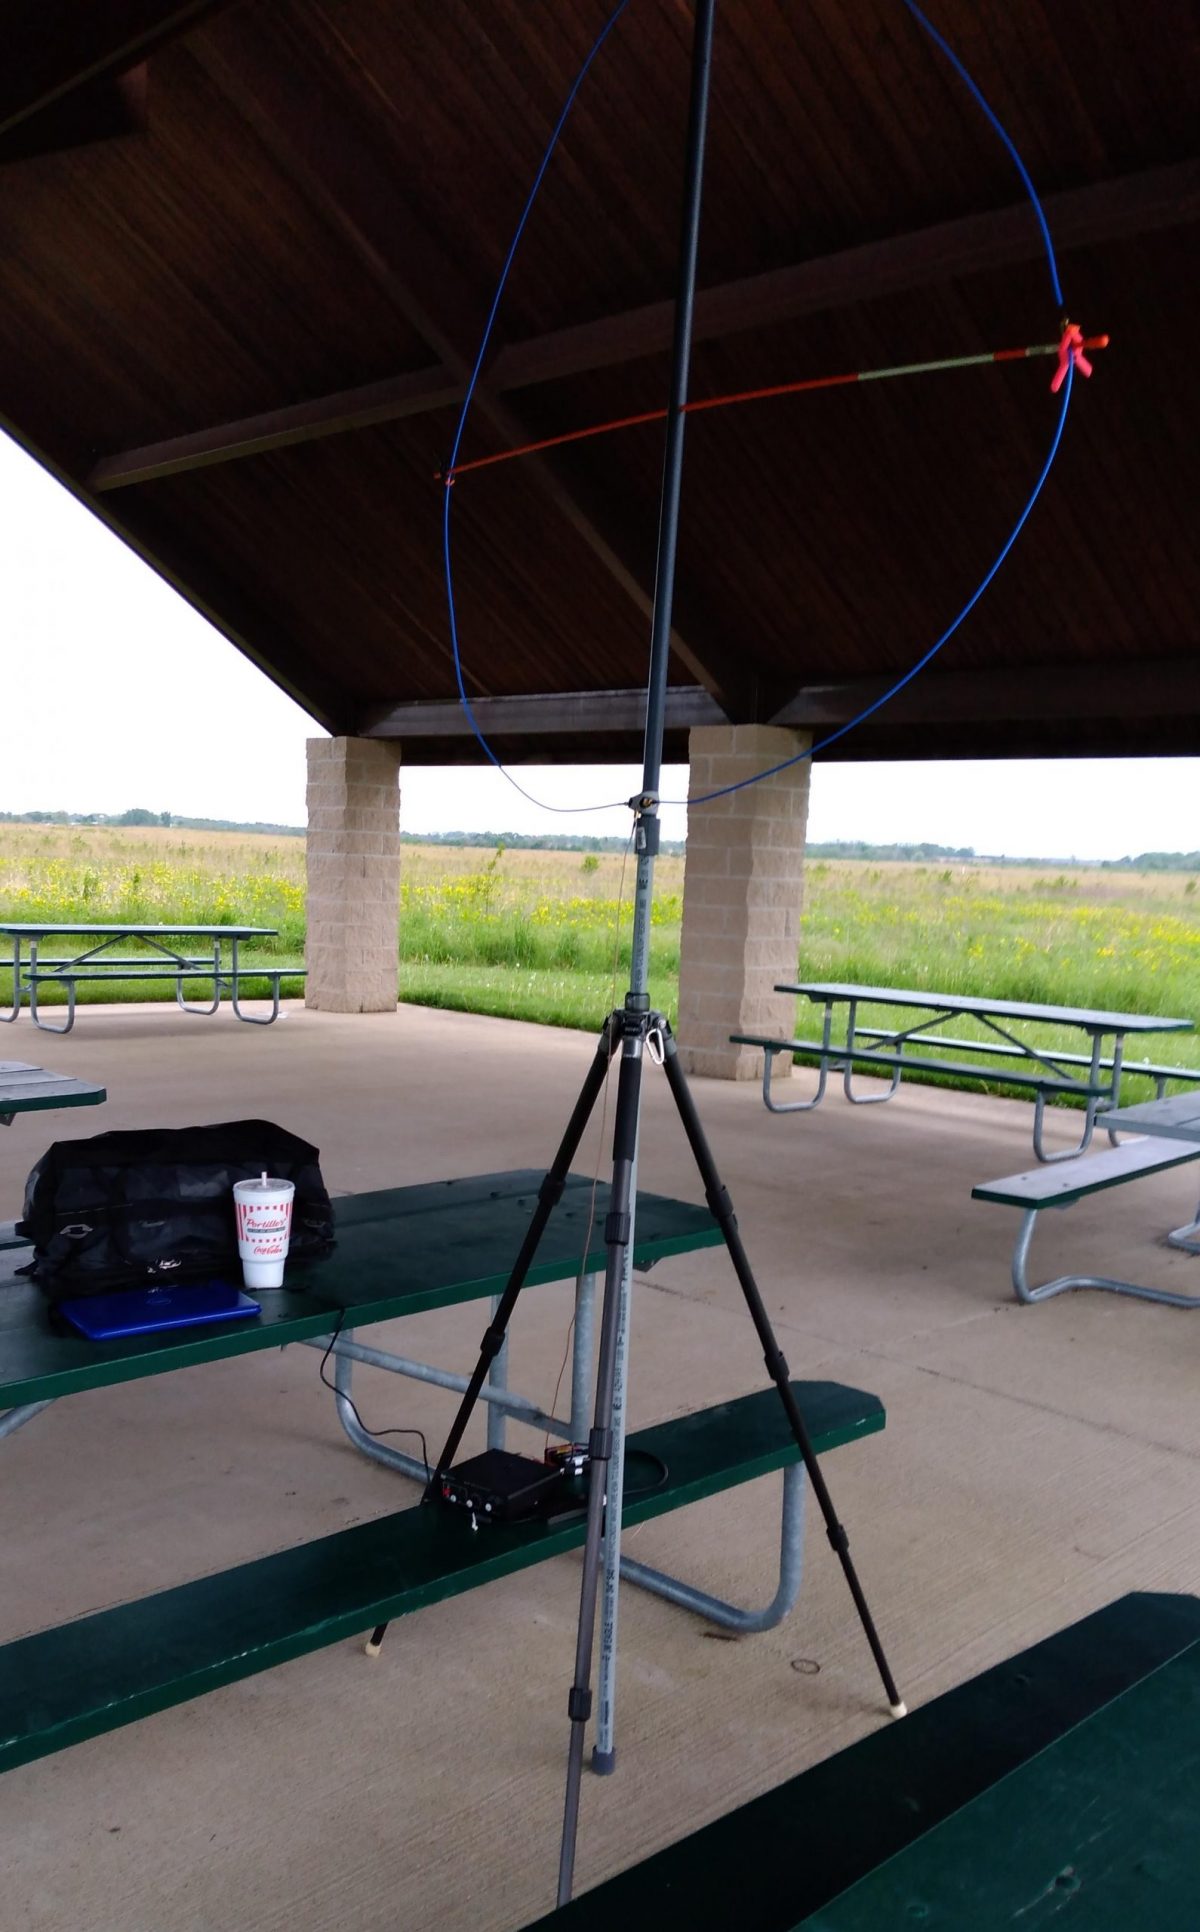
So, I finally got around to testing my Airspy YouLoop after the long shipping delay from China.It is simple in concept and will not repeat what others have written about it in previous articles.I find it a useful loop antenna for portable operations and sometimes for noisy home use.This report is focused on my usual field location from a Northern Illinois county park picnic table.
Setup
As you can see from the setup photo, it all fits into a backpack except for the two PVC pipes and crossbar which are easy carried.I modified my YouLoop to use the 2 meter transmission line as one half of the loop.The other half consists of the two shorter wires connected with a simple female-to-female SMA connector.This doubles the circumference of the loop and gives it a bigger capture area.
Crossbar
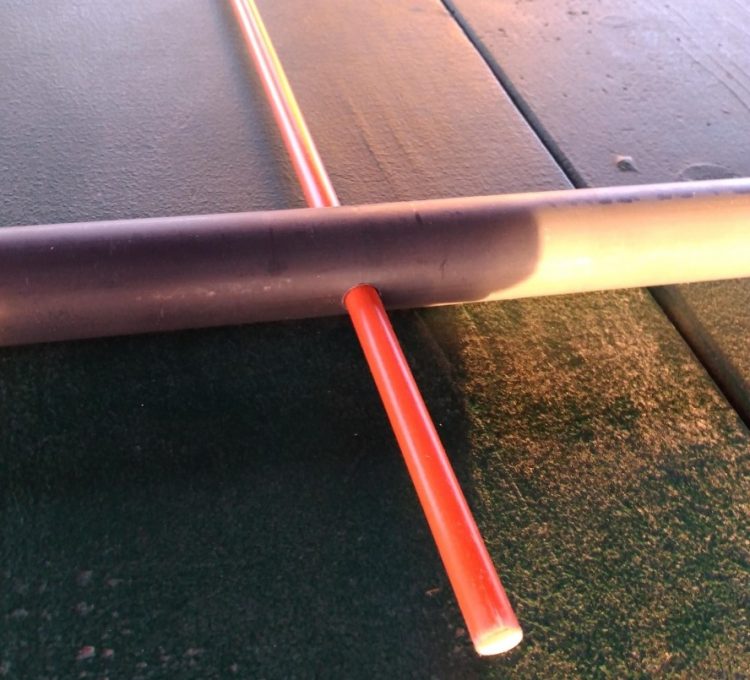
Because my setup is bigger than usual, I had to find a lightweight cross member to aid the solid conductor wire from sagging. I found just the thing in a larger-than-normal 6 foot fiberglass driveway snow marking stick sold at the local hardware store.I cut the tip off to make it 5 feet (Because, the loop as I configured it is 4 meters circumference, so, 4*39.37/Pi = Diameter in inches). I then drilled a 5/16th’s inch hole through the middle of the ¾ inch PVC threaded pipe I had from a previous project and fit the fiberglass stick through it as the crossbar. This is a special PVC 4 foot nipple pipe I had special ordered a long time ago when mounting a previous (heavy) Ferrite-Sleeve loop antenna.
Loop Mounting
Screwed onto both ends of the 4 foot nipple are threaded-to-coupler adapters also found at the hardware store.The adapter allows me to attach easily to the ¾ inch 5 foot long PVC pipe held by my trusty carbon fiber tripod below.This 5 foot pipe is held loosely by the tripod so I can grab the pipe and turn the whole loop mounted above.The result is not perfectly circular and there is room for improvement.I find it to be highly directional nonetheless and easy to turn. The phasing connector of the YouLoop mounts at the top and for now I am just using two medium sized cable ties to a long screw near the top for tension.I do not want to glue the connector to the top since this YouLoop may get used in other configurations in the future.
The Bottom connector for the radio input is held nicely with a couple of velcro wraps.
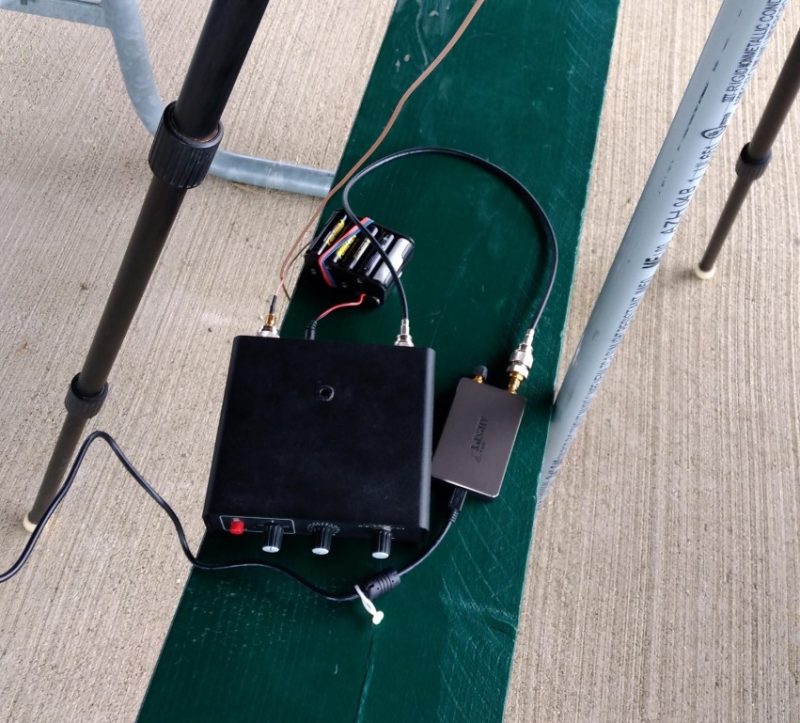
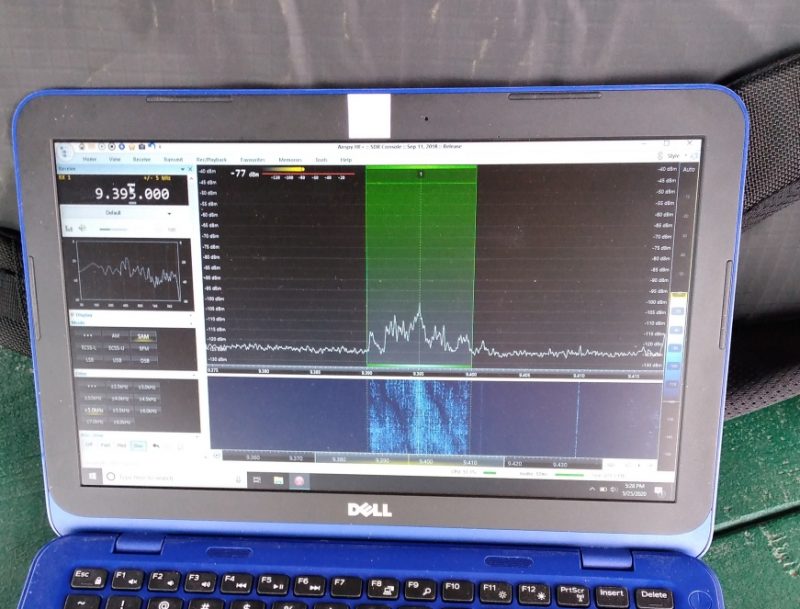
The wire from there goes to the usual setup of Palstar amplified preselector with battery pack and Airspy HF+, which goes into the USB port on the small Dell laptop.After some initial problems with a non-functioning HF+ and rebooting a few times, I was finally able to get a signal.At first I thought it was the antenna but the error condition acted the same way whether the antenna was connected or not.It could be that my HF+ is starting to exhibit the first signs of failure, which I have read about from complaints on the internet about the reliability of SDR’s used in the field.I may have to bring along my SDRPlay SDR2 just in case!In other words, don’t depend on computer hardware and software to work (especially if you happen to go on vacation and have no backup radio!!).I also have a couple of portable non-SDR radios I could bring with me as well.Enough said.
Using It
The screen of the laptop shows a very nice black background, very quiet, and a moderate signal level of WRMI on the 31 meter band.I did not have the time or processing power for real Data captures, so all I have to share are less optimal MP3 files.The signal level is somewhat low. I think this is typical for a single-wire loop antenna and seems adequate. I did have to crank my Palstar preamp to maximum the whole time while on shortwave (my Wellbrook amp would probably work slightly better).On mediumwave, the gain seemed more than adequate (I don’t have any recordings of that band at this time, maybe a future article).
Directionality is very good and usable across a very wide range of frequencies!It certainly worked well up to the 25 meter band where I started to notice a drop off of nulling ability.And this is good despite my lack of perfect circular mounting of the wire. Even though my county park is a “Forest Preserve” and not meant to have any development, there is increasing noise in the neighborhood and I find the loop to be very useful in cleaning up some background noise (as well as noise coming from the laptop!).This is especially seen with the Voice of Iran broadcast in French. The weak signal was aided by moving the loop to balance the signal level to local noise.
The loop is a bit flimsy using it this large.Keeping the connectors tight may be a problem in the future if subject to a lot of wind.I think you will find the smaller (usual) setup in the instructions to be less of a problem.My plastic clips at the sides of the crossbar and the plastic tie downs at the top are not optimal and will need something better (in other words, it would help if I had a better mounting for the wires).Also, the tripod definitely wanted to tip over as a storm blew past, so I need to make sure I tie down one or more legs to the picnic table in the future!!
Final Thoughts
In summary, this is a very useful loop for portable operations since it fits easily into a backpack. Mounting it in a repeatable manner will need some experimentation.Performance is good with usable nulling at a wide range of frequencies. Signal strength is moderate, so a good preamp is necessary in order to boost the signal into the sweet spot of your receiver RF stage.Parts quality is good, but the wire is thin solid conductor, so do not kink/fold it!.The connectors and housing for the phase change and balun are very small, with non-waterproof plastic housings that can be easily abused, so take care of them. The whole kit is small to pack and lends itself to experimentation.Highly recommended given its limitations.
Furthermore, I feel my old, original 14-inch “crossed-parallel loop” did as good a job as this larger diameter YouLoop.I wonder how the YouLoop can be modified to create a larger gain using, say, two or more wires in parallel (perhaps a future article!)?Generally, the deeper the loop design, the higher the gain.The YouLoop potentially could be a better performing, more portable version if I can replicate using more turns of wire.Although it is in disrepair now, pictures of my old 14-inch loop are found here, and also here.
Sample Recordings
Here are a bunch of sample recordings to enjoy, some of which are unique to shortwave radio and found no where else:
7315 kHz, Voice of Vietnam, from WHRI-1 transmitter
7350 kHz, Radio China International, in English from Kashi PRC
7375 kHz, Radio Romania booming in from Romania
7490 kHz, WBCQ (Spanish) from Monticello ME (guide says only 50 kw but sounded more than that)
6180 kHz, Radio Nacional Brazilia
6070 kHz, CFRX Toronto – discussion about some people with ashes of relatives in the home
6115 kHz, WWCR Nashville TN – discussion about Jesus saving a young woman from Satanic ritual abuse as a child
5850 kHz, Radio Slovakia International from WRMI booming in as usual
73’s & Happy Listening,
TomL
Thank you, Tom, for sharing your field-portable SDR setup! I like how you’ve made an inexpensive and packable support system for the larger diameter YouLoop. While I’ve yet to design a similar system around the YouLoop, I really should. I’ve always believed that for both SWL and ham radio field-portable operations, a self-supporting antenna system is a must as it gives you ultimate flexibility to cope with variable site conditions.
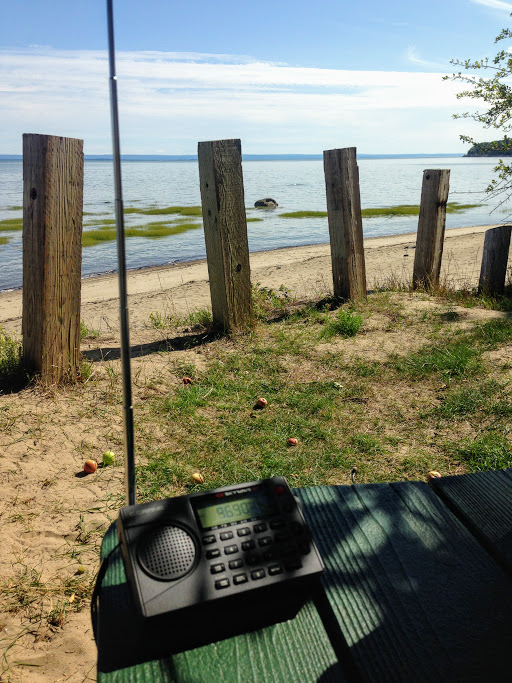
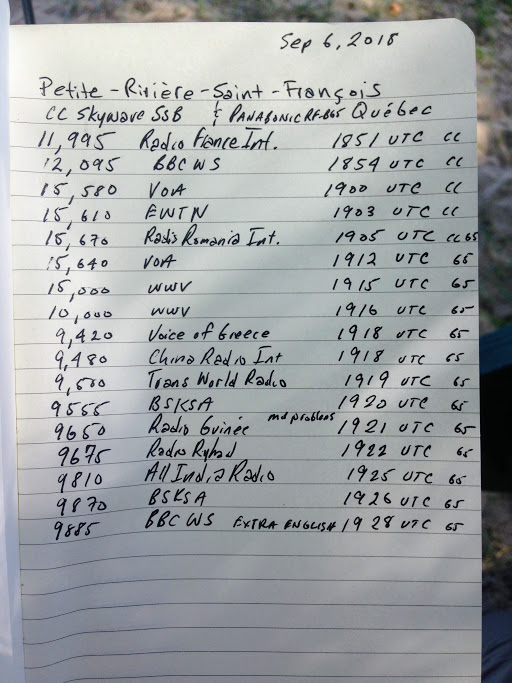
Yesterday, the weather was gorgeous here in Québec, thus a prime opportunity to find a beach, start a new book and, of course, play radio!
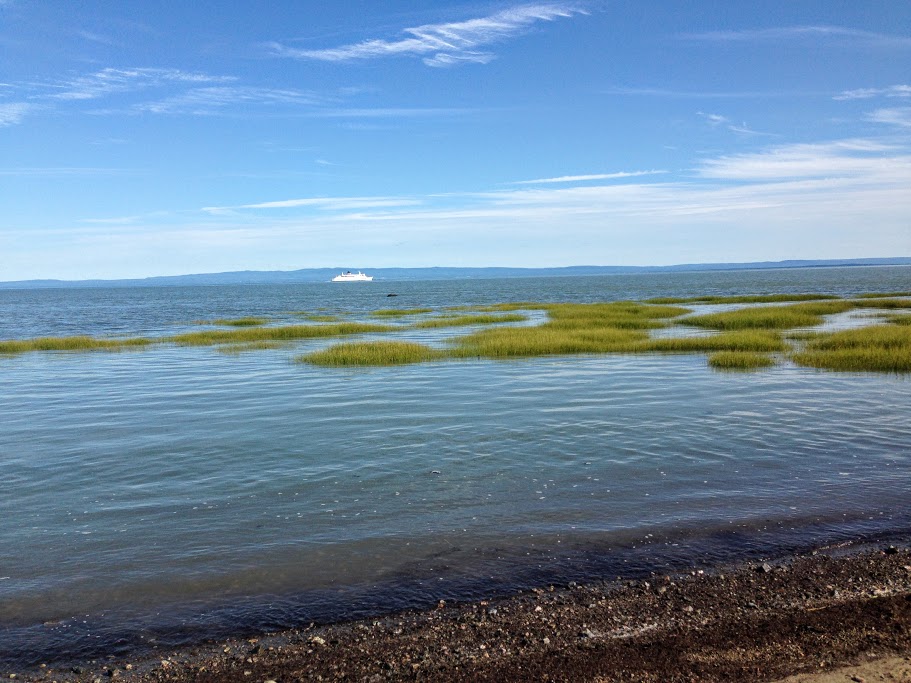
I found a fantastic spot on the north bank of the St. Lawrence river near Baie-St-Paul, Québec. There were only a few folks at the beach, so it was all very peaceful.
I found a picnic table perched on the edge of the beach shaded by an apple tree–a perfect spot to relax, play radio and start a new book: Dark Voyage by Alan Furst.
I had not checked to see if propagation was good, but tuning to WWV on 10 MHz and 15 MHz confirmed that signals were travelling. In fact, as I started tuning around–first with the CC Skywave SSB, then with the Panasonic RF-B65–I discovered some of the best propagation I’ve experienced in ages!
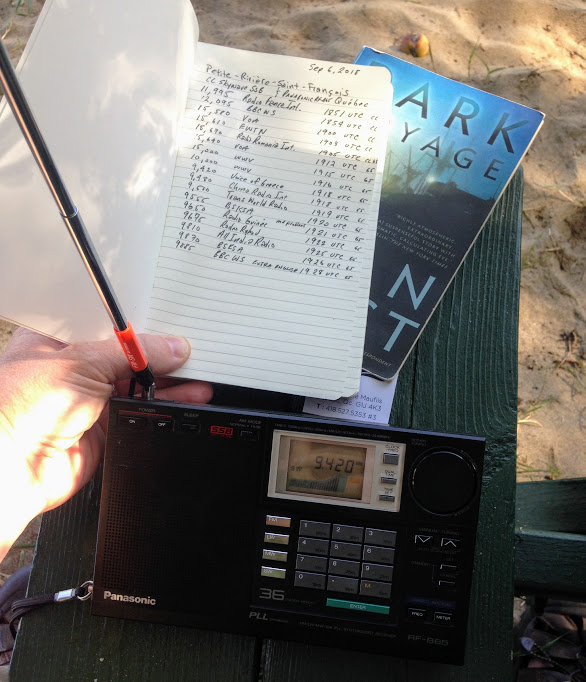
I did a relatively quick scan covering the 31 through 19 meter bands. Some signals were absolutely booming in.
I jotted down some of the broadcast details on a make-shift log and recorded a few videos.
Note that after making the first video, I discovered I had limited space on my phone, so most of the clips are quite short:
Many thanks to SWLing Post contributor, TomL, who shares a recording he made of the Voice of Korea on June 14, 2018. This English broadcast focuses on the Singapore summit and is, no doubt, historic in its content. [Note that we’ve posted other recordings on the Shortwave Radio Audio Archive.]
TomL notes:
Recorded on my noisy Lenovo laptop, SDRPlay RSP2, and an unamplified 18.5 foot antenna on the roof of my SUV.
I’m most impressed with the quality of his recording–VOK is not the easiest station to snag in the US midwest:

 Many thanks to SWLing Post contributor and noted political cartoonist, Carlos Latuff, who shares this special dive into the world of radio both in and targeting the Korean peninsula. His report includes off-air recordings along with his own original artwork.
 Korean Central Broadcasting Station (KCBS) Pyongyang is the DPRK’s domestic radio station, whose programming reaches North and South Korea, even being heard in Japan. News about the achievements of North Korean leader Kim Jong-un, music and attacks on Seoul government, seen by Pyongyang as a puppet regime.