Tag Archives: Raspberry Pi

Building a Raspberry Pi magnetometer network

Source: Ciarán D. Beggan and Steve R. Marple

(Source: Southgate ARC)

Ciarán Beggan of the British Geological Survey describes how a network of 9 Raspberry Pi magnetometers were deployed to schools around the UK to measure geomagnetic storms

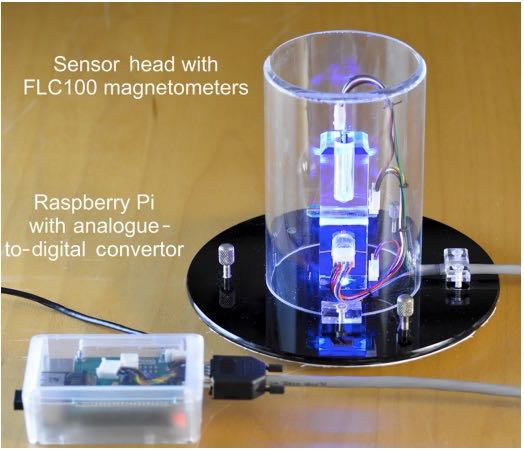
As computers such as the Raspberry Pi and geophysical sensors have become smaller and cheaper it is now possible to build a reasonably sensitive system which can detect and record the changes of the magnetic field caused by the Northern Lights (aurora).

Though not as accurate as a scientific level instrument, the Raspberry Pi magnetometer costs around 1/100th the price (about £180 at 2019 prices) for around 1/100th the accuracy (~1.5 nanoTesla). However, this is sufficient to make interesting scientific measurements.

During 2017, a network of 9 Raspberry Pi magnetometers were deployed to schools around the UK from Benbecula to Norwich. On September 8, 2017 a large geomagnetic storm was captured by the school magnetometers. Using these data and the array of other magnetometers around the North Sea, we were able to recreate the spatial and temporal changes of the magnetic field during the storm in great detail. The two phases of the storm show the westward (night time) and eastward (daytime) flow of the auroral electrojet currents in the ionosphere.

Source http://www.mist.ac.uk/nuggets

Download the paper Building a Raspberry Pi school magnetometer network in the UK
https://www.geosci-commun.net/1/25/2018/gc-1-25-2018.pdf

Click here to read at the Southgate ARC.

Spread the radio love

Updated Raspberry Pi image for SDRplay software defined radios

(Source: SDRplay via Jon Hudson)

SDRplay is pleased to announce the availability of an updated Raspberry Pi3 image: This release (V0.4) is a complete image for the Raspberry Pi 3 with a range of pre-built applications for SDRplay devices.

Please note the following:

1. This software is made available purely for the convenience of users to save them from having to build the software themselves from source code.
2. All software apart from ADS-B is provided by third party developers and SDRplay can take no responsibility for any faults or bugs and is unable to provide support. For any support for these applications, we recommend that users contact the original authors.
3. Where the RSPduo is supported by applications, it can only be used in single tuner mode.
4. Whilst this should work with all RPi3s, we have only tested with RPi3 B+ and that will provide the best performance.

List of known issues:

SoapyRemote

Will only work over LAN connections and locally. It will not work over Wide Area Networks

CubicSDR
Will only support the RSPduo in single tuner mode

Gnu Radio
No known issues

GQRX
Some limitations with tuner hardware control
Audio only via USB and HDMI audio
CPU load is quite high and may cause audio stuttering

ADS-B
RSPduo not currently supported
Port B is the default port for the RSP2

Qt-DAB
Will only support the RSPduo in single tuner mode

TCP Server – This is a fork of the RTL-SDR (TCP) server developed by F4HH. This software should work with any client that supports the RTL-SDR (TCP) server software with some limitations. This software should be viewed as being for experimental purposes.
RSP2 works only on port A
RSPduo not supported
Maximum sample rate limited to 3.2 MHz
Some limitations with RSP1A RF gain control

Download links:

https://www.dropbox.com/s/kvaatu0ndet5pns/SDRplay_RPi3_V0.4.img.xz?dl=0

or

https://www.sdrplay.com/software/SDRplay_RPi3_V0.4.img.xz

Size: 2249196664 bytes (2145 MiB)

Checksums:
CRC32: 204AE0BE
CRC64: 76FAA00F83A96F1D
SHA256: 2BDB44BFCA95241AA9FE26F02EFB78FD0370869AC2775F76832AC68F7E9DA153

Spread the radio love

Build a 433 MHz radio chat device with the Raspberry Pi

(Source: Southgate ARC)

Build a Secret Radio Chat Device

An article in Raspberry Pi magazine MagPi by PJ Evans of Milton Keynes shows how you can build a 433 MHz radio chat device to send wireless messages without needing WiFi

“Sure, WiFi is all well and good, but is it the only option for wireless communication on the Raspberry Pi? What if there isn’t a network available or you need a longer range? 433 MHz radio is where you want to be. In this tutorial we’ll add this capability to a pair of Pi boards and show how to send wireless messages from one to the other with no WiFi network. Then, we’ll increase the range with a touch of science and start talking to RF-based switchable main sockets. Have Pi-controlled sockets all around the house!”

The tutorial article appears on pages 44-47 of issue 75 November 2018 MagPi and can be seen online at
https://www.raspberrypi.org/magpi/build-433mhz-radio-chat-device/

Or you can download the PDF of MapPi magazine
https://www.raspberrypi.org/magpi-issues/MagPi75.pdf

PJ Evans
https://mrpjevans.com/bio/
https://twitter.com/mrpjevans

Spread the radio love

Raspberry Pi Vintage Radio

This project was a winner in the Maker Share Mission May contest. While not strictly shortwave, of course, many of SWLing Blog readers enjoy, as I do, all things radio, and especially creative and new expressions of radio. Here is a brief excerpt from the MakerShare posting:

Vintage radios are fascinating. At one point the radio was the main method for mass communication of news and entertainment and was manufactured in a variety of styles to be prominently displayed in a home. Unfortunately, many vintage radios that have been physically preserved no longer function and it is impractical for them to be repaired. Described is the design and implementation of the Raspberry Pi Radio (RPiRadio), a device that bypasses the analog electronics of a vintage radio and digitally recreates the behavior of a vintage radio that is able to be tuned to vintage radio programming.

The whole posting may be found here, with extensive details on the building of the radio and how it was programmed for sound replicating the vintage radio era.

While I love tinkering with old radios and trying to bring them back to life, some radios are just beyond reasonable repair. This can bring old radios back to life in a way which seeks to honor their past – a very cool idea indeed!

Robert Gulley, AK3Q, is the author of this post and a regular contributor to the SWLing Post.       Robert also blogs at All Things Radio.

Spread the radio love

Turning the Raspberry Pi 3 B+ into a stand-alone SDR

(Source: RTL-SDR.com)

Nexmon SDR: Using the WiFi chip on a Raspberry Pi 3B+ as a TX capable SDR

Back in March of this year we posted about Nexmon SDR which is code that you can use to turn a Broadcom BCM4339 802.11ac WiFi chip into a TX capable SDR that is capable of transmitting any arbitrary signal from IQ data within the 2.4 GHz and 5 GHz WiFi bands. In commercial devices the BCM4339 was most commonly found in the Nexus 5 smartphone.

Recently Nexmon have tweeted that their code now supports the BCM43455c0 which is the WiFi chip used in the recently released Raspberry Pi 3B+. They write that the previous Raspberry Pi 3B (non-plus) cannot be used with Nexmon as it only has 802.11n, but since the 3B+ has 802.11ac Nexmon is compatible.

Combined with RPiTX which is a Raspberry Pi tool for transmitting arbitrary RF signals using a GPIO pin between 5 kHz to 1500 MHz, the Raspberry Pi 3B+ may end up becoming a versatile low cost TX SDR just on it’s own.[…]

Click here to read the full article at RTL-SDR.com.

Spread the radio love

The new Raspberry Pi 3 B+ and a number of RPi projects

Last month, on “Pi Day” (March 14, 2018) an upgraded Raspberry Pi 3 B was announced on the Raspberry Pi website. The new $35 B+ sports a few performance enhancements over the original–most notably:

  • A 1.4GHz 64-bit quad-core ARM Cortex-A53 CPU
  • Dual-band 802.11ac wireless LAN and Bluetooth 4.2
  • Faster Ethernet (Gigabit Ethernet over USB 2.0)
  • Power-over-Ethernet support (with separate PoE HAT)
  • Improved PXE network and USB mass-storage booting
  • Improved thermal management

Here’s a short promo video posted with the announcement:

Click here view on YouTube.

I immediately navigated to my favorite Raspberry Pi source–AdaFruit–and requested a notification when the new units were available to purchase. A few weeks later, I got the notification and placed an order within minutes (you see, when the Pi 3 B was first released, I hesitated a day and had to wait a few weeks for the second shipment!).

I received my RPi 3 B+ a few days ago:

I immediately attempted to put this unit into service but learned that it requires the latest firmware which was only released a week or so ago. If you have have an RPi 3 B+, here’s where to fetch the latest firmware:

NOOBS:
https://www.raspberrypi.org/downloads/noobs/
or if you want Raspbian:
https://www.raspberrypi.org/downloads/raspbian/
and install on SD per instructions here:
https://www.raspberrypi.org/documentati … /README.md

After receiving this latest Pi, I quickly realized I’ve bought a number of Raspberry Pi models over the years and currently have them in service for a variety ofc projects.  Here’s a list of all of my current Pi-powered applications:

That’s a total of seven RPi projects that are in service at time of posting!

As I mentioned earlier, I try to buy most of my Pi equipment from the amazing AdaFruit retailer–I like supporting what they do even if I pay a small premium.

But AdaFruit seems to rarely have stock in some of my favorite Pi bundle packages. If I’m buying a Raspberry Pi for a new application, I look for a package with at least a case, a 2.5 amp power supply, a 32 or 64GB MicroSD card, and two heat sinks (though I’m not certain the B+ needs a heatsink). I tend to grab this one or this one from Amazon (affiliate links).

Post readers: Have you ever used a Raspberry Pi? If so, in what sort of applications? How many do you own?  Please comment!

Spread the radio love

Tudor demos his portable Raspberry Pi-powered AirSpy HF+

Many thanks to SWLing Post contributor, Tudor Vedeanu, who has kindly shared details about his portable Raspberry Pi system which now can run the AirSpy HF+ SDR.

Tudor writes:

I bought the RPi to use it as a Spyserver for my Airspy HF+ SDR.

My main radio listening location is a small house located on a hill outside the city and there is no power grid there (it’s a radio heaven!), so everything has to run on batteries and consume as little power as possible.

My first tests showed that the Raspberry Pi works very well as a Spyserver: the CPU usage stays below 40% and the power consumption is low enough to allow it to run for several hours on a regular USB power bank. If I add a 4G internet connection there I could leave the Spyserver running and connect to it remotely from home.

Then I wondered if the Raspberry Pi would be powerful enough to run a SDR client app. All I needed was a portable screen so I bought the official 7” touchscreen for the RPi.

I installed Gqrx, which offers support for the Airspy HF+. I’m happy to say it works better than I expected, even though Gqrx wasn’t designed to work on such a small screen. The CPU usage is higher than in Spyserver mode (70-80%) but the performance is good. Using a 13000 mAh power bank I get about 3.5 hours of radio listening.

I made a video showing how it works:

Click here to view on YouTube.

This is fantastic, Tudor. Thanks for taking the time to put together a video for us. I’ve just ordered the latest Raspberry Pi 3 (Model B+). It has slightly more horsepower than the previous Pi3. Tudor, you’ve inspired me to grab the 7″ touch display as well and try my hand at running the AirSpy HF+ portable.

I’m not sure if the Raspberry Pi 3 will be able to record spectrum without hiccups, but it’s certainly worth a try.

As you tweak your system, please keep us in the loop!

Spread the radio love