Tag Archives: Shortwave Audio

Audio Plugins For Radios, Part 3 – VST Technical Setup

Many thanks to SWLing Post contributor, TomL, who shares the following guest post. Click here to check out all of the posts in this Audio Plugin series:


Audio Plugins For Radios, Part 3 – VST Technical Setup

by TomL

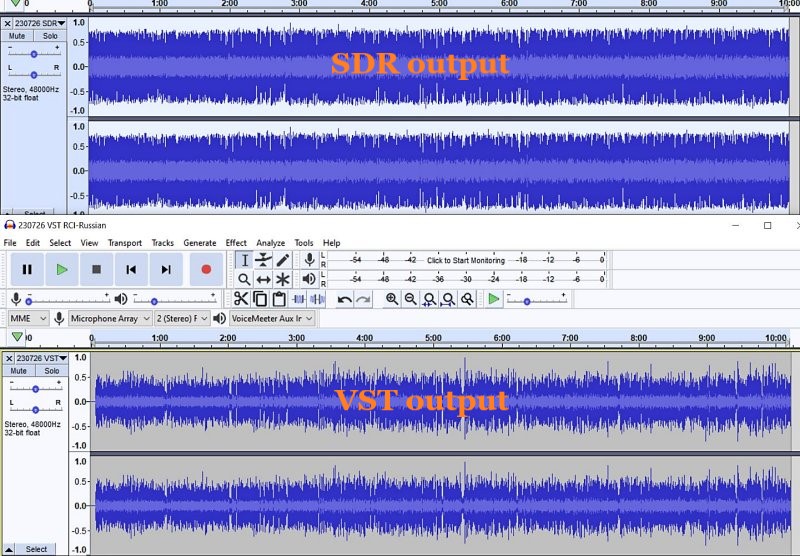
Processing legacy audio still has a place in an increasingly digital world for the time being.  The first article on this topic was strictly using the speaker jack output from an old Kenwood transceiver using a simple Behringer UCA-202 RCA-to-USB converter.  However, my main receive radio is the SDR based AirSpy HF+.  Either type of radio should work with the apps discussed below as long as the audio gets to your Windows computer unmolested.  There are VST apps for Mac and Linux, too.

VST apps: VST3/VST2/DLL files

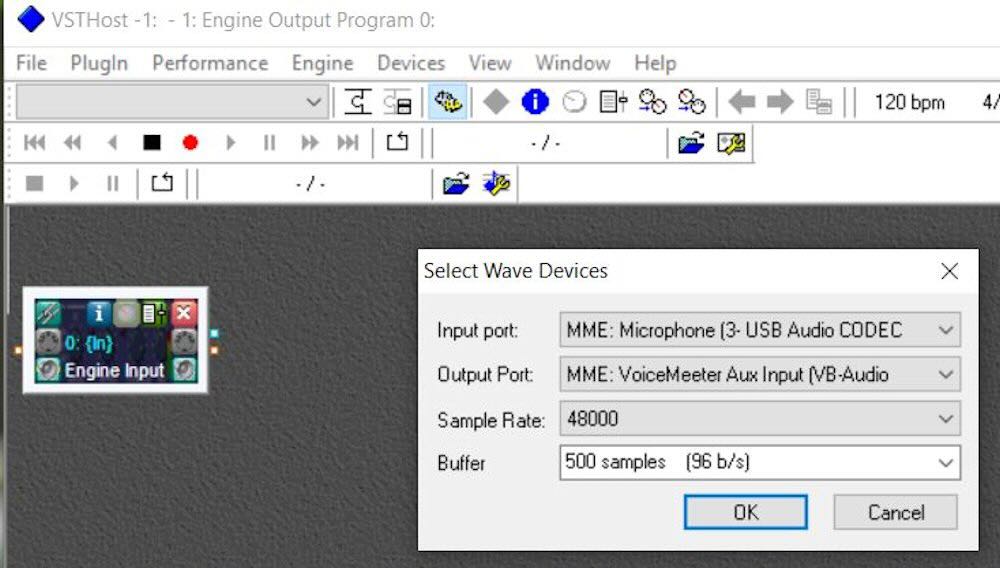
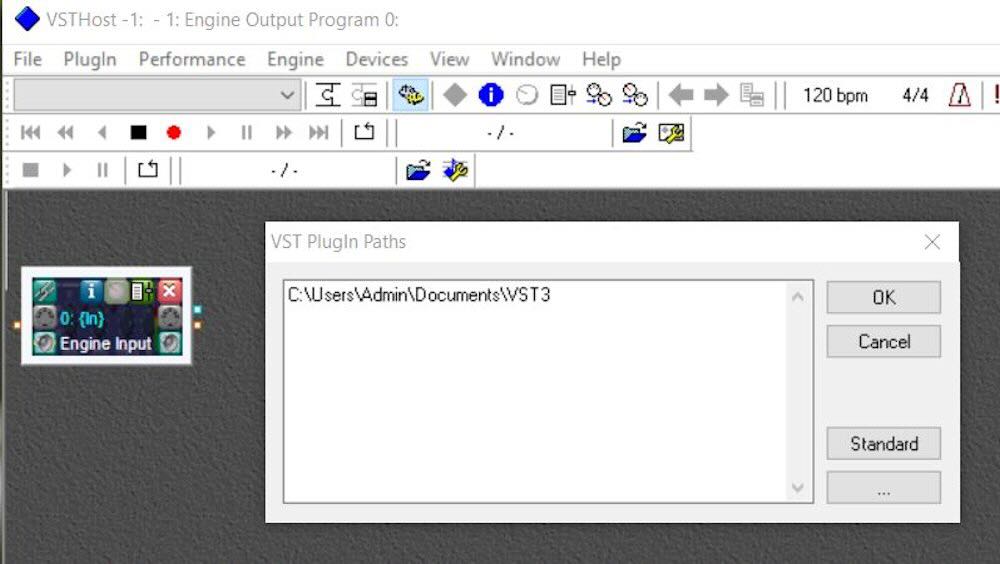
Also mentioned was how to install VST Host and the VST apps run inside it.  A simple reminder is that VST Host does not really install.  It just resides in any one Directory/Folder you want and you create a shortcut to run VSTHOST.EXE.  All the .XML files and profiles will be stored there.

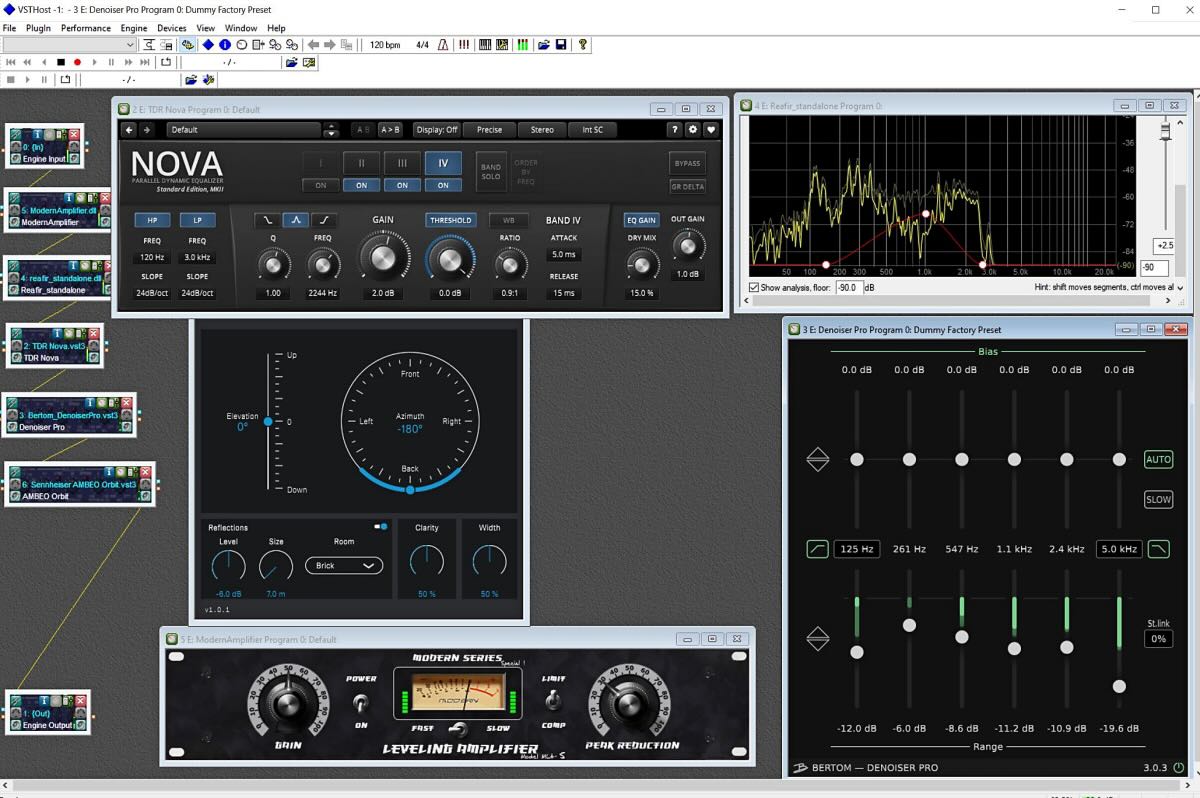
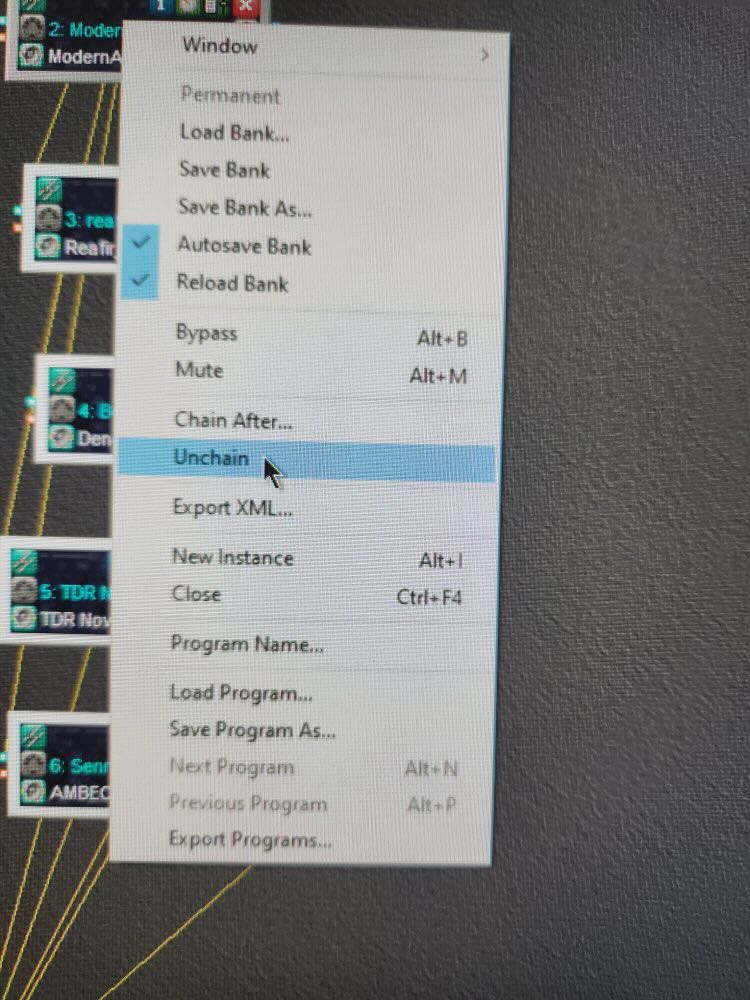
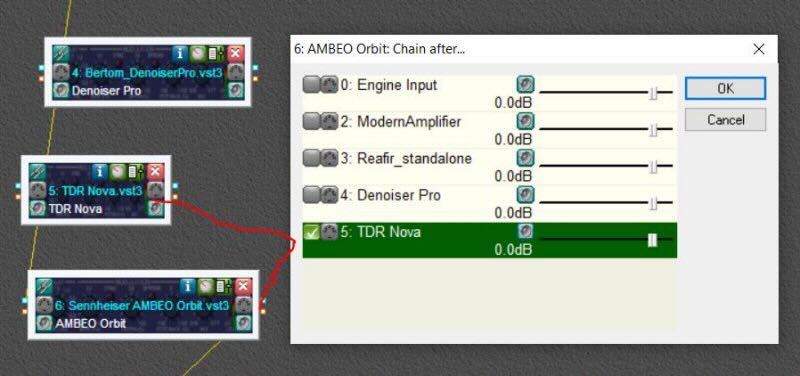
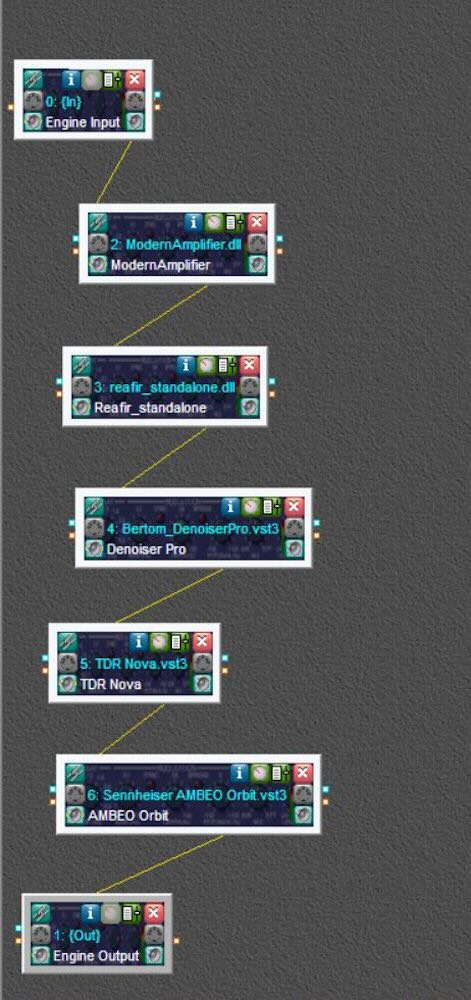
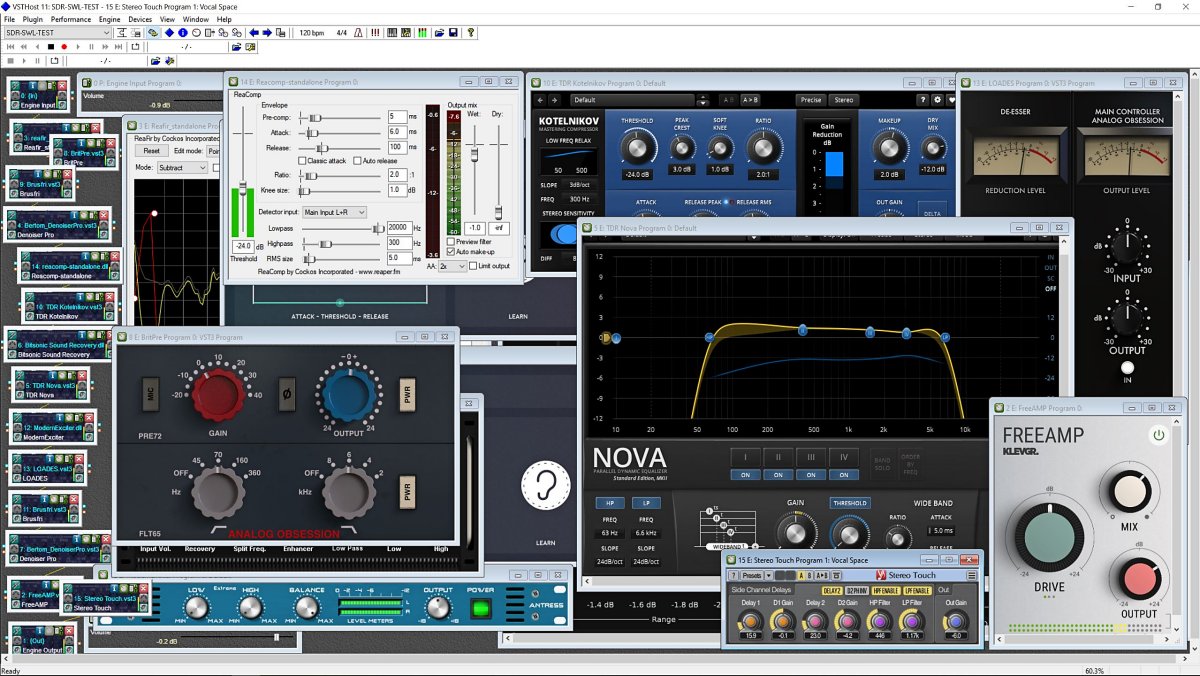
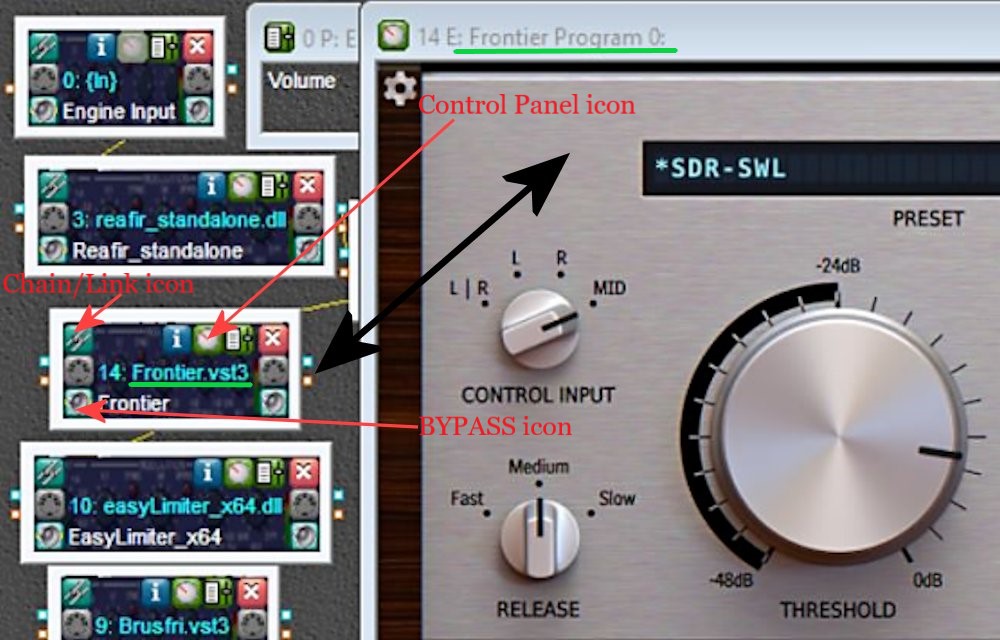
I like tinkering with many apps but you may prefer things a lot simpler.  I use 64-bit versions when possible, like VST3 and x64 DLL files.  Because of the myriad settings involved, I will just list the apps in order of processing with brief comments.  The second icon on the top of each app opens up its control panel and the bottom left icon will Bypass the app as if it is not in the audio chain.  The top-left icon Links to the Preceding app in the audio chain.  Most controls inside the apps let you double-click on that control to reset to a default.

The general functional order of these apps is:

  • Limiting/Compressing volume – dealing with shortwave signal volume spikes plus judiciously squeezing high & low volumes for a more even sound.
  • High Pass & Low Pass Filters – limit the frequency range apps will need to work on.
  • De-noising – the biggest challenge in shortwave is to reduce static and local noise without damaging the wanted audio.
  • EQ adjustments – frequency tweaks.
  • De-essing – getting rid of screechy “sss”, “shhh”, and “squeak” noises as well as fading distortion, perhaps the second hardest thing to do.
  • Then a final Drive/Gain control to feed into the Windows mixer.
  • Special Effects apps, like adding stereo, or reverb, etc.

I would suggest not to spend any money until you get to use apps from each of these broad categories to understand how they work.  It is very easy to destroy the audio with a couple of offending settings.  If you need help with understanding how plugins work, there are plenty of YouTube videos available.  One channel I like is “In The Mix” from a Scottish music production engineer, Michael Wynne (over 1 million subs!).  He gives simple to understand instruction videos (especially EQ and Compressors), among other topics.

Check out: YouTube – In The Mix

Welcome to the world of Audio Production.  Here are some plugins (most are FREE!):

Reaper ReaComp – A Compressor which I am using to limit volume spikes in the <300 Hz range.

Kotelnikov – A great dynamic Compressor that helps compress volume peaks in both Peak and RMS (average) levels.  Useful for highly variable signals and highly recommended.

Reaper ReaFir – A dynamic processor, the Subtract feature is a special “negative EQ” which only reduces specified frequency “Points”.  It is also used as a brick filter for low & high frequency limits.

Klevgrand Brusfri Denoiser –  In Swedish, “brusfri” means “noise free”, and is a Denoiser app that functions similarly to Audacity’s Noise Reduction feature but works in real time.  I move to a blank frequency on the same shortwave band, have Brusfri “Learn” for about 5 seconds, and it starts working.

Bertom Denoiser Pro –  A good Denoiser app but on noisy shortwave it can have digital artifacts that get very loud.  I use it sparingly immediately after Brusfri.

Bitsonic Sound Recovery –  This app beings midrange more forward and can brighten up dull audio.  However, it can lead to increased sibilances, accentuated fading distortion, and “boxy” sounding voices.

TDR Nova – A clean sounding parametric EQ; my settings are a work-in-progress for best settings.  I am experimenting with having the Wideband setting do most of the work with a slight expansion of the audio coming from the SDR.  Also used as a better Gain control for Bitsonic.

Modern Exciter – Set to MIN for shortwave, this app can enhance the extreme low and extreme high frequencies without increasing noise.

LOADES – A DeEsser from Analog Obsession, controls sibilance and squeaks  (beware of wonky controls!).

Klevgrand Brusfri Denoiser & Bertom Denoiser Pro run a second time.  More Denoising is needed after the processing done by Bitsound, TDR Nova, and Modern Exciter.

Klevgrand FreeAmp – A simple Drive and Gain control that was free when I purchased Brusfri.  It makes sure audio is driven correctly into Voicemeeter AUX Input.

Voxengo Stereo Touch – Allows adding “stereo” to a mono signal.  Various Presets are available, from narrow (Voice or Guitar) to wide soundspaces (Stage, Surround, and Wide).  Very interesting!

Here are three VST Host processed .MP3 files from an IQ recording of Radio Amazonia using 5.3 kHz & 7kHz filters in SDR Console 3.2 (Noise Reduction 4 was used but only 1dB Reduction).  The third one is using the Stereo Touch app using just the lowest setting (Voice).  I like it!  🙂 :

VST processed 5.3k:

VST processed 7 kHz:

VST processed 7 kHz with Stereo Touch:

Click here to download all VST processed 5.3k & 7k .MP3 files

Happy Listening & 73’s,

TomL

Spread the radio love

TomL’s Guide to Audio Plugins For Radios: Part 2 – SDR Recording

Many thanks to SWLing Post contributor, TomL, who shares the following guest post. Click here to check out all of the posts in this Audio Plugin series:


Audio Plugins For Radios, Part 2 – SDR Recording

by TomL

I started investigating using the old Kenwood transceiver to send audio to my laptop and process the receive audio using VST Host for a number of functions: Noise reduction, Equalization, reduce Sibilances and fading distortion, increase presence of vocals without sounding boxy, etc.  It was a qualified success depending on what VST apps I used, in what order they were used, and what settings each of them were set to.  In this episode of ongoing discovery, I will attempt to show how easy it is to OVER-process the shortwave broadcast audio plus comparisons to my regular Audacity post-recording treatment.

Audio Examples

I noticed for the first time that the SDR creates a somewhat compressed file which can be seen when comparing the Waveforms of SDR vs. VST Host output files.  This means that the unprocessed SDR file will always appear to sound louder because of this compression.  This loss of Dynamic Range makes it harder to do the comparison.  Therefore, the Audacity-only examples below are reduced 3dB or 5dB to maintain apparent loudness.

Example 1:  KBS Weekend Playlist – S6-S9 signal, somewhat severe fading and moderate polar flutter.

SDR Console 3.2 using my usual NR4 set to 2dB Reduction, 30% Smoothing, and 3dB Rescale plus a Blackman-Harris-7, 5.3 kHz filter.

AUDACITY file is using my usual Audacity noise reduction:

VST version 2: Used my first set of VST apps.  Sounds harsh with hash-noise and overdriven:

VST version 3: Used way too much bass, too much grunge, attenuated highs, still overdriven:

VST version 4: Using a different order to the Denoiser apps, added in Modern Exciter app, cut back on some bass but still too much, and overly forward sounding midrange:

VST version 5: My current Baseline setup.  Adjusted the Denoiser apps, less extreme bass & treble, adjusted the De-Esser app, set the midrange to be less forward with just a single setting:

To my ears, Audacity processing is nice but as discovered before, sounds compressed and does not reduce some of the other problems inherent in shortwave signal fading and loss of musicality.  It sounds utilitarian.  Also, the noise is a bit more gnarly.

Versions 2-5 go through iterations of listening to the exact same segment over and over (and over) and trying different VST apps and settings.  I think my comments are mostly accurate next to each version.  However, you may think differently and perhaps prefer the sound of one of the other versions?

Example 2: Encore Classical Music, WRMI (fading S9 signal) – Audacity vs. Version 5 VST settings.  VST is quieter and sounds less harsh than the Audacity version.  A generally more smooth sound.


Example 3: RCI in Russian, S7-S9 with moderate polar flutter – 7kHz filter in SDR Console but VST Host is using BritPre, an analog preamp using a 6 kHz low pass filter to try to reduce DSP filter “ringing”.  It shows some interesting possibilities.

Example 4: RCI in Russian – Music from the same broadcast and VST Host setup in Example 3.  The screeching flute is under more control and strings more defined in the VST version.

Conclusions

I like the results of the audio processing that eventually ended up with “version 5” (plus the possibilities at 7kHz, too).  It is not Earth-shattering but is an incremental improvement in my opinion (there is always room for improvement).  I can use it in a simple Workflow anytime I want to record something off of the SDR.  Also, I had already been using Voicemeeter Pro, a software audio mixer.  It is setup with different profiles to do SDR, Ham, FM Broadcast, and now, VST Host audio routing.  This process took a long time but seems satisfactory to use as a Baseline setup, which then can be tweaked slightly depending on various types of audio coming from the SDR.  These changes in VST Host can be stored as their own unique profiles for audio processing.

However, a word of warning!  Messing with Windows audio Sound settings and mixer software is potentially a confusing process and one can easily end up with a spaghetti-pile of conflicting connections, no audio output, doubled echo output, distortion, way too loud, way too soft, etc.  If you start this experimentation, make sure to write down your current Windows Sound settings, both the Playback and the Recording settings for each item listed.

Having an SDR radio + Voicemeeter + VST Host is a very flexible setup.  I can now safely say that the only thing I need Audacity for is to Normalize the peak audio to the -1 dB broadcast standard volume, which is a HUGE time saver.  The SDR Console IQ files can be scheduled and processed from there at a later time.  Also, the use of Voicemeeter Pro allows me to switch when to use VST Host anytime I feel like it, and Voicemeeter Pro comes with its own (manually engaged) Recorder.

Part 3 of this series will discuss Technical details for my setup.  Your setup may need different settings or you may find a better way than I did.  This will take some dedicated time.

Happy Listening and 73’s,

TomL

Click here to follow all of the articles in TomL’s audio plugin series.

Spread the radio love

TomL’s Guide to Using Computer Audio PlugIns with Older Radios

Many thanks to SWLing Post contributor, TomL, who shares the following guest post:


Using Computer Audio PlugIns with Older Radios

by TomL

Older radios have a way to get audio out to speakers or another audio input device, usually just a headphone jack.  Software for processing audio are plentiful and very useful tools, called VST’s.  Furthermore, most Plugins were made for Musicians needing full frequency spectrum capability.  I will use my Kenwood TS-590S amateur radio as a test case.  I have used its speaker output to a cheap Behringer UCA-202 RCA to USB converter (it has its own volume control to keep it from overloading).

Amazon Link: Behringer UCA202

My Windows 10 Sounds Properties sees this audio as “3-USB Audio CODEC” which I have enabled on a physical USB hub with individual power switches for each port.  Thanks to Steve (K1GMM) and his YouTube channel (K1GMM Green Mountain Maniac) for describing how to use Windows plugins for processing either Receive or Transmit audio.  This article only focuses on Receive audio.

For my simpler needs, I have chosen to use VST Host.  It will run the small “apps” that usually have a file extension of .VST or .DLL.  I downloaded it right from Steve’s website:

https://kc1egu.wixsite.com/essb-ham-radio/copy-of-icom-ic7300-others

I then downloaded a number of plugins suggested by Steve on his web site (“More” Menu pulldown, DAW’s/VST DOWNLOADS).  Each VST file can be copied to a central directory/folder on your computer and all read from the same place inside the VST Host.  Most of these are Windows types but there are some for Linux if that is something you use.  I found that VST Host does NOT like a write- protected directory, so it and the VST’s reside in my top-level Documents directory.

My resulting “chain” of VST’s process the audio from my 3-USB Audio CODEC in a sequential manner, which are:

  • ModernAmplifier (a Limiter to keep strong signals from overloading the processing)
  • ReaFir (an interesting “Subtract” feature where I cut down on the “roar” around 800-1200 Hz)
  • Bertom Denoiser Pro (EXCELLENT static & background noise reducer)
  • TDR Nova (a powerful, well-made Compessor & DynamicEQ combo)
  • Sennheiser-AMBEO-Orbit (a Binaural soundscape).

Once VST Host is installed, create a separate folder for the VST files.  Now just copy the VST3 or DLL file for each of the apps downloaded like the ones I list above.  If you have a 32-bit version of Windows, you will have to use the VST’s that are 32-bit, not 64-bit.

In VST Host, set the Wave Input and Output and sampling rate (Menu: Devices—Wave).  In my case it is the aforementioned 3-USB Audio CODEC for (Microphone) Input Port and VoiceMeeter Aux-Input for the Output Port.  The sampling rate is set to 48000  (You can choose Output to your “Default Speakers” which should be in the list if you do not use an extra mixer software like I do).

Now, go to Menu: File, Plugins and load each plugin that you want to use.  The VST3 or DLL files should all be in the same directory that you made earlier.  You may have to tell VST Host where to find them by setting the Plugin Path (Menu: File, Set Plugin Path…).

Now, once you have all the VST apps opened, you will notice that all of their individual outputs go directly to the VST Host Output.  Not good, since your computer will not have enough cores to parallel-process all of these apps at the same time.  So, Unchain them all by right-clicking on each app and choosing “Unchain”.

Now you will see all of the yellow connecting lines gone.  Arrange (click/drag) each app in sequential order on the screen.  Starting from the bottom up, right click on the app just above VST Output and choose Chain After…

Repeat up the chain, choosing the one above it to Chain After until you are left with a Daisy-Chain of apps, each output going to the Input of the next app in your desired order of processing:

Now turn on the radio to get audio going through the chain of apps.  Tweaking each app is part of the tedious process of learning if an app will help or not.  Just replace and Chain After in the order you want with other VST apps that you find more helpful.  Tinkering with this should yield some satisfactory results if you do not overdo applying features in each app.  To save the layout and VST settings, go to Menu: Performance, Save As and give it a name to store in the data file shown (just a name since it will put it into the default line 000 for you).  You can choose this in future sessions from the main pulldown Menu below File. (Note: It is called “Performance” because this stuff was written for Musicians to save their home studio music along with the settings for shaping the music tracks; 99% of planet earth calls this a “Layout”, a la, Microsoft Office)

Here are two examples of sound from the radio without processing and then adding in each app over a few seconds.

LZ1AA from Bulgaria. Processing 10 secs., off 15 secs., on again 8 secs.


CHU Canada. Processing on, space, processing off. Notice a little “water” effect since AM Broadcast needs quite different settings compared to SSB Ham Radio.

You can check out Steve’s “Green Mountain Maniac” YouTube channel and see for yourself what can be done with sound processing for Radio.  Some of his techniques can be used with old shortwave radio receivers as long as it has a working headphone jack or AUX Out jack:

K1GMM-RXDAP VST HOST YouTube video

Cheers and Happy Listening,

TomL

Spread the radio love

Ron’s Bluetooth solution for robust shortwave radio audio

S7600

Many thanks to SWLing Post reader, Ron Wagner, who writes:

Thanks very much for your informative SWL pages. With the, seemingly, shortsighted, contracting world of SW broadcasters, you keep our interest alive!

Recently, you called attention to Jay Allen’s modification and installment of a new speaker for the Satellit 800. Not quite ready to open up my 800, even with a scratchy volume pot, I setout to find another way, not only for the 800, but for all of those older radios that “SWLers” love.

J-Tech

Walla, a Bluetooth TX/RX device (by JETech Designs) which connects to the headphone or external speaker jack of the radios. Then, with a Bluetooth speaker, put the TX/RX device on TX and pair with the speaker, and your off to an audio improvement in all of your radios.

G_G3

G_800a

Attached, see the TX/RX with my 800, G3 and ICF 7600 and my outdoor Bluetooth speaker. With today’s Bluetooth speakers, you can spend to suit your budget and ears. Now, I’m on my way to find Bluetooth headphones to pair with the Bluetooth transmitter.

What a simple and relatively affordable idea, Ron. I had been considering the purchase of a Bluetooth receiver for the AUX in port in my minivan’s audio system. If I understand correctly, this one unit can both send and receive Bluetooth audio.  Very cool!

I could also imagine someone placing their shortwave portable outside–on a patio or deck–away from indoor radio interference, and using the Bluetooth link to port audio to a speaker inside the house. You wouldn’t have tuning control (and you’d have to remember to bring the radio inside if rain is in the forecast–!), but you would have audio control.

Looks like this JETech receiver/transmitter is available on Amazon or directly from JETech. Thanks again for the tip, Ron!

Spread the radio love

Improving audio fidelity with JBL C2PS monitor speakers

JBL-Monitor-Speakers

Last year at the W4DXCC conference in Sevierville, Tennessee, I spent some quality time with Bob Heil (K9EID). Bob is the mastermind behind Heil Sound as well as the host of HamNation, a show devoted to all aspects of amateur radio––yet this job description only scratches the surface of Bob’s fascinating career.

Bob Heil (left) me (right)

Bob Heil (K9EID, left) and yours truly (right) at the 2014 W4DXX conference in Sevierville, TN

One thing is for sure, however: there are few people in the radio industry who truly understand audio as profoundly as Bob Heil, so when he announced that he would host a forum at the W4DXCC to assist amateur radio operators in improving their received (and transmitted) audio, we were all ears, and signed right up.

Early in the forum, Bob described a set of self-powered and relatively affordable JBL monitor speakers that he highly recommended for amateur radio use. Everyone in the room noted the model number of the speakers, myself included.  So imagine my dismay after the convention when I simply couldn’t find my notes…

Thankfully, my buddy Gary Wise (W8EEY) recently jogged my memory. Gary purchased a set of JBL monitors and matching wall-mount brackets from Amazon, and has them hooked up to his Flex Radio FLEX-6700 SDR.  Gary tells me he’s very pleased with the set-up.  Here are the links:

Bob also suggests adding a small mixer to system, something like this Behringer Xenyx 802 or the XENYX502 (both of which are on my current wishlist).

Bob invited me to speak on HamNation about shortwave radio. I may take him up on the offer…well, as soon as I overcome my videophobia, that is.  At any rate, if you’ve not seen it, HamNation is certainly worth checking out.  And in all things radio, Bob Heil’s is a name to know; click here to visit Heil Sound.

Spread the radio love