
Many thanks to SWLing Post contributor, Mike Ladd, for the following guest post and overview of setting up and using the Soft66RTL3 SDR:
Soft66RTL3 SDR: A low cost…Good performer direct from Japan
by Mike Ladd
Much has changed in the last 8 years in the world of SDR radios. Fast forward to 2016 and just about everyone in the hobby has heard the buzz word “SDR radio”. When SDRs first came out to the market they were all aimed at HF listening and you had two types to pick from. The first being soundcard based and the second being direct sampling. The price gap between the two were several hundred dollars. The more expensive being direct sampling. As the hobby progressed, so did the technology and the prices started to shift dramatically.
You can now purchase a TV dongle for $10.00 and turn it into a SDR. The Soft66RTL3 is basically a TV dongle but with a lot more features.
The Soft66RTL3 comes from an engineer who is no stranger to the world of SDRS. Kazunori Miura (JA7TDO) has been designing and selling many models of SDRS over the internet and shipping them direct from Japan for about 7 years. The Soft66RTL3 is his latest of model hot off his bench. This SDR is a dual input RTL-SDR with a built in 50 MHz upconverter along with 4 user selectable band pass filters that greatly increase your signal to noise ratio in the HF bands.
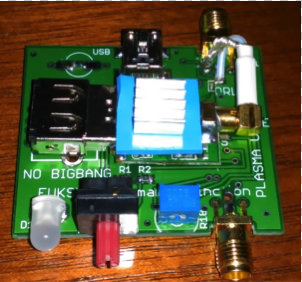

The frequency range of the RTL3 is from DC to Daylight (0.4 kHz to 1.7 GHz). Miura also addressed a heat issue with the previous version (RTL2) by adding a thermal pad and heatsink. RTL dongles are notoriously unstable due to overheating. In theory, the thermal pad should add frequency stability and keep drift to a minimal.
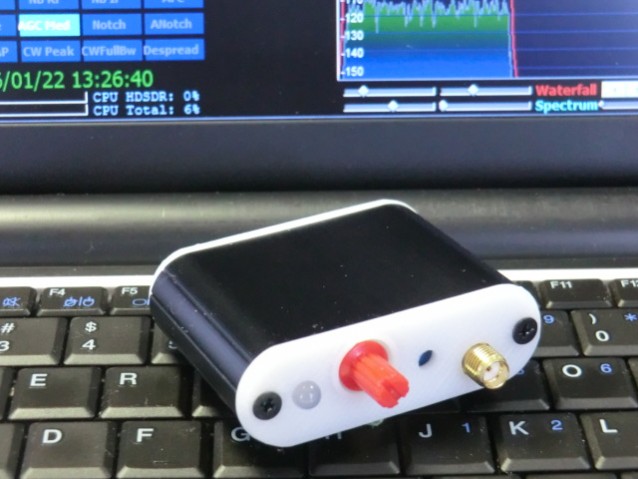
The last feature of the RTL3 is the input gain trimmer pot (see image above). The trimmer pot is for the HF side of the SDR and is already set before it’s shipped from Japan. If you would like to reduce or increase it the trimmer pot is easily accessible. I would suggest leaving it as is.
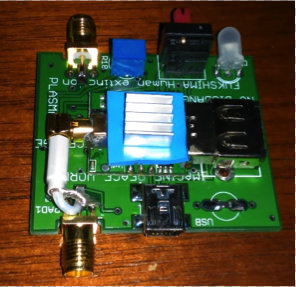
The RTL3 is broken down into two sections: the HF input side and the VHF/UHF input side.
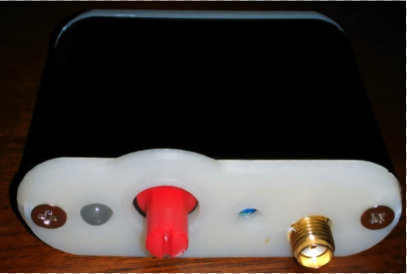
The HF side of the SDR (above) has a red rotary encoder and trimmer pot port. The VHF/UHF side (below) has the USB Mini-B connection.
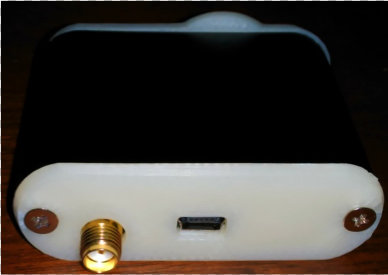
Both sides of the RTL3 terminate to a SMA-Male connection and Power comes from a single USB Mini-B cable.

Band pass filter selection
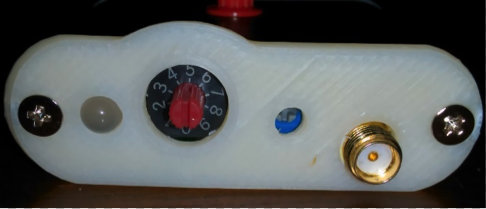
If you look at the rotary encoder (red cap cover) you will see a small notch window. The 12 o’clock position is #5 on the encoder dial. One click clockwise will take you to switch position #6 and one click counterclockwise will take you to #4. You should pull the red cap cover off to have a look and get your bearings.
The band pass filter selection is as follows:
- #4 enables BPF 0.4 to 1.2MHz
- #5 enables BPF 1.2MHz to 5MHz
- #6 enables BPF 5MHz to 15MHz
- #7 enables BPF 15MHz to 30MHz
- #8 or #9 enables the VHF UHF side of the SDR
All other positions will bypass the filtering section on the HF side of the SDR.
Installation
If you already have a RTL-SDR on your system then all you need to do is swap it out with the RTL3 and change the offset of -50,000,000 in HDSDR or SDR# to listen to the HF side of the RTL3–but if this is your first SDR we will need to install 2 items: the front end app and the driver.
I will assume your system is Win-7 or better and we will be using SDR# as our program of choice to drive the RTL3. The RTL3 runs just fine in HDSDR and SDR-Console, but by choosing SDR# it will reduce our setup time considerably.

- Plug in the RTL3
- Make a folder on your desktop and name it SDR#
- Download the latest version SDR# from www.airspy.com and copy the contents of the zip file to your newly created SDR# folder
- Inside of your SDR# folder, double click on install-rtlsdr
- After the batch completes, double click on the “zadig.exe” inside your SDR# folder
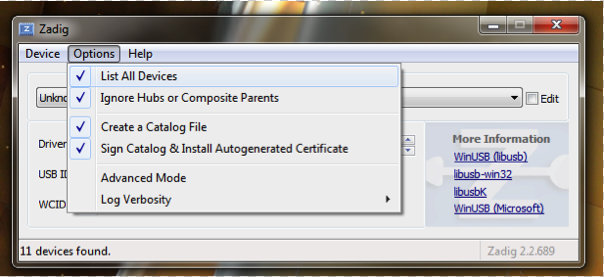
When you run the “zadig.exe” make sure you select “list all devices” as shown above.
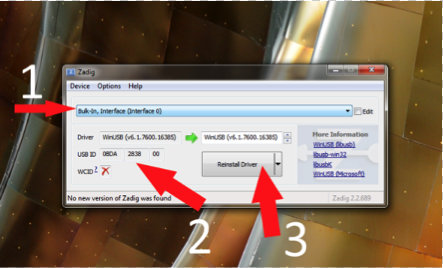
The next 3 steps are:
- Select “Bulk-In Interface” (Interface 0)
- Make sure the proper USB device is selected (2838)
- Click “install driver”
The RTL3 is now ready to be used and no further setup is required.
For a more detailed installation I would visit RTL-SDR.COM for a complete setup instructions: http://www.rtl-sdr.com/rtl-sdr-quick-start-guide
I will assume you did not have any issues setting up the ZADIG driver and now move on to using the RTL3 inside of SDR#. I will show you real world conditions that are not from any scientific standpoint.
Antenna wise, for the HF side I will be using a G5RV mini and for the VHF/UHF side I will be using a Scanntenna ST-2.
You can now launch SDR# and check the following settings (see image below).
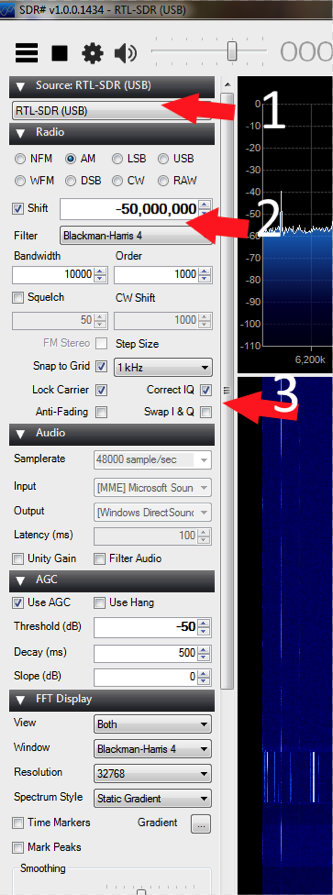
For the VHF/UHF side of the RTL3 you will want the rotary encoder on position #9. You want the cutout in the encoder cap showing the 5 o’clock position.
Summary
I have been using this SDR for a little over 3 months. Out of all the low cost SDR’S on the market, this one gives you the most bang-for-your-buck and it is a great entry level SDR with some “Pro” features.
Pros:
- Low Price
- HF VHF/UHF in one package
- Works with any app that supports the RTL-SDR front end
- 4 user selectable band pass filters for HF
- Highly sensitive user controlled input RF amp
- Small & very compact metal case
- Dual input SMA jacks
- ESD protection diode
Cons
- Some intermod in the 460-470 MHz range
- Inputs are on opposite sides of the SDR body
The Soft66RTL3 price is $40.00 US shipped–click here to order.
Mike, thank you so much for this excellent overview of the Soft66RTL3! I’m especially appreciative of the time you’ve taken to explain the installation process–for many, this is one of the more difficult RTL-SDR learning curves.
I’m very tempted to check this out for myself–I love the fact that this little SDR has bandpass filters.
Post Readers: I suspect Mike will monitor the comments in this post, so feel free to ask questions. Make sure to check out Mike’s website, where you’ll find more articles about software defined radios.