Shortwave listening and everything radio including reviews, broadcasting, ham radio, field operation, DXing, maker kits, travel, emergency gear, events, and more
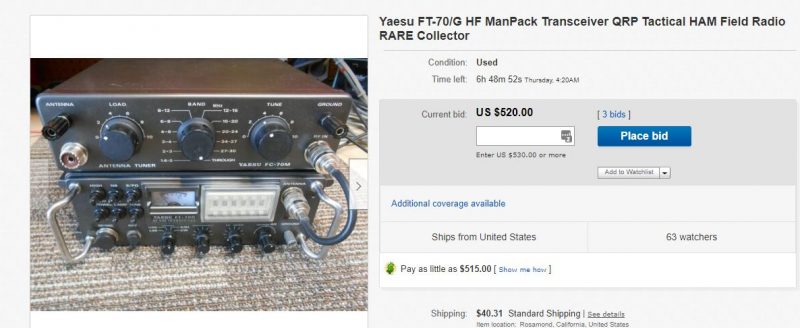
Earlier today, I stumbled upon a very unique transceiver in Universal Radio archives: the Yaesu FT-70G.
Here’s the description from Universal:
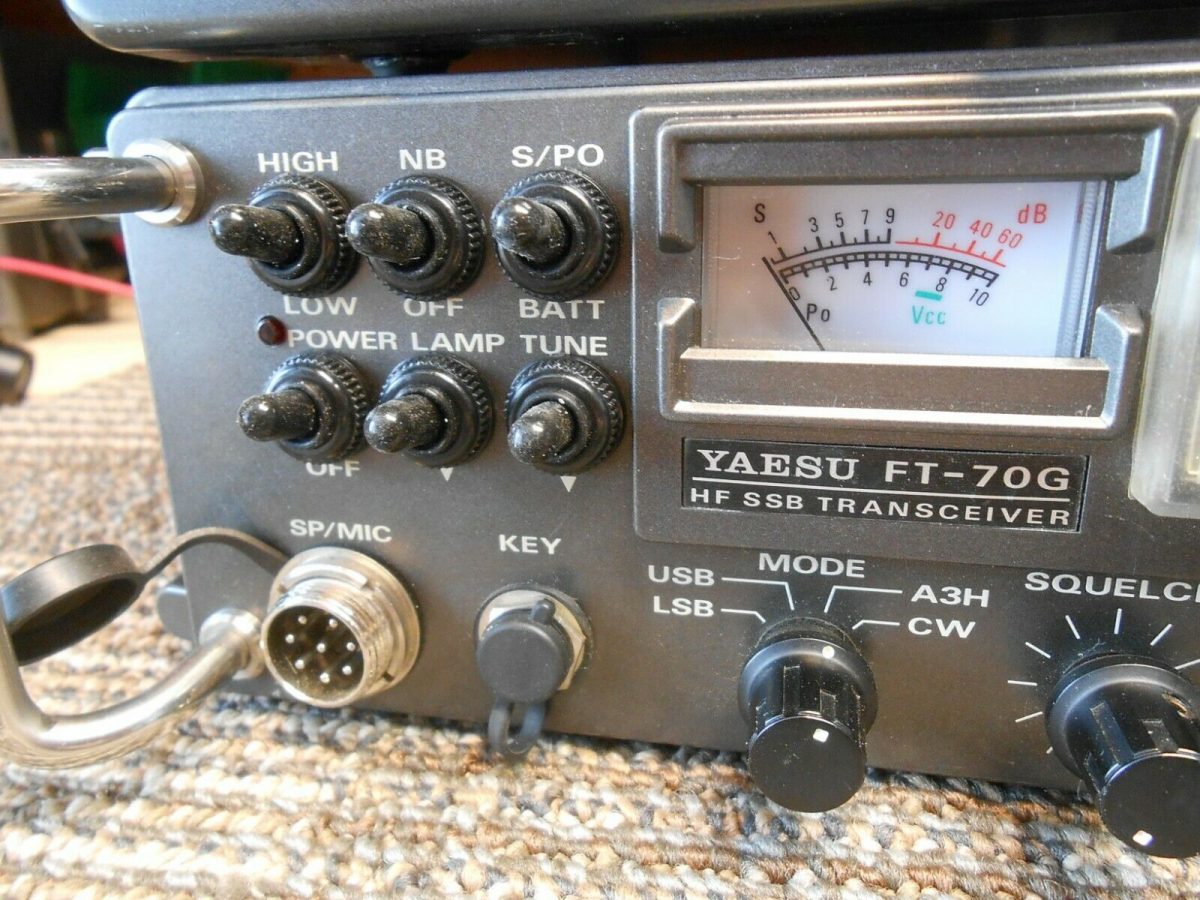
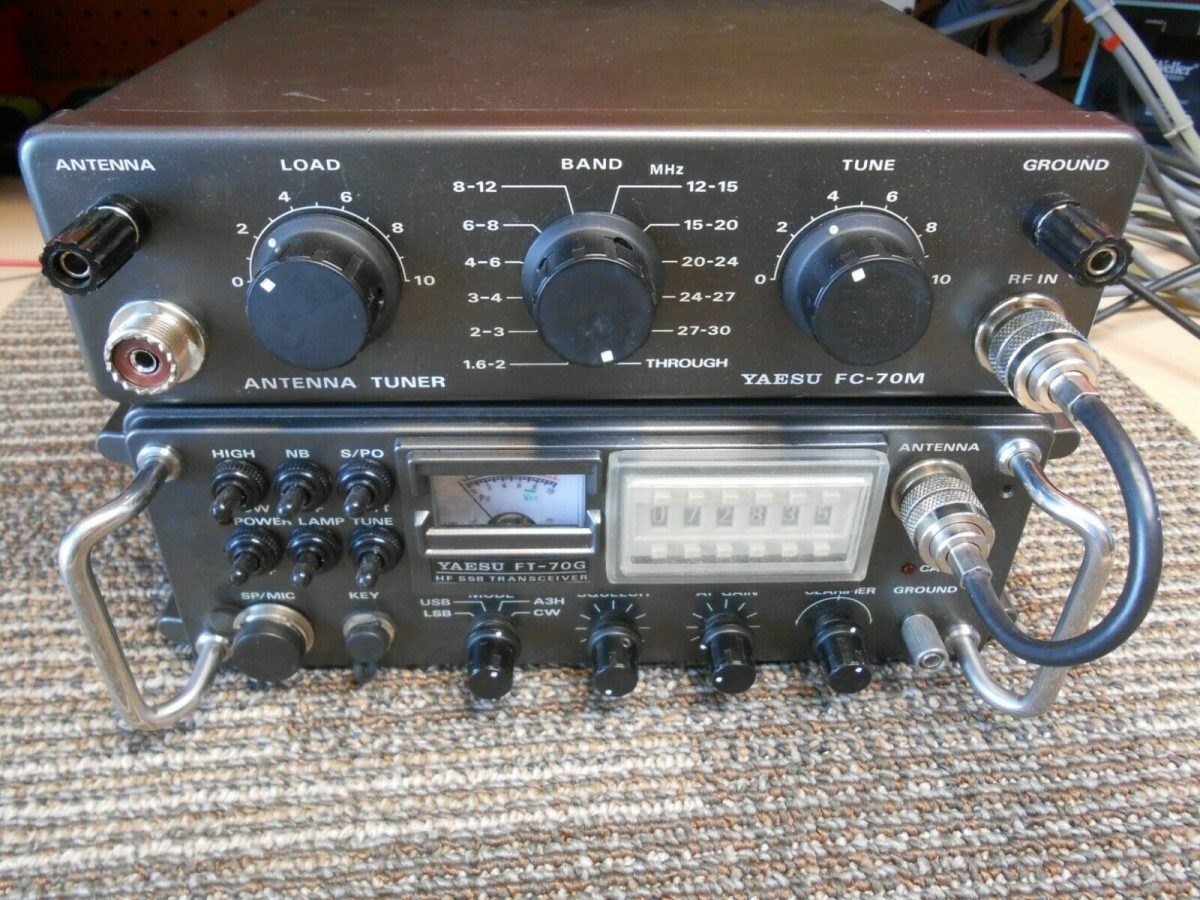
The Yaesu FT-70G is a portable HF transceiver covering 2 to 30 MHz transmit. Receive is from 500 kHz to 30 MHz. Frequency selection is via BCD switches to 100 Hz. There is a clarifier for fine tuning. Optional FNB-70 NiCad Battery. Please note that the optional 10F-2.4DL filter is required for LSB opeation.
The Yaesu FT-70F is similar, but is a channelized fixed version offering up to 11 frequencies.
Two hours ago, I was not aware that the FT-70G existed. Now? I want one!
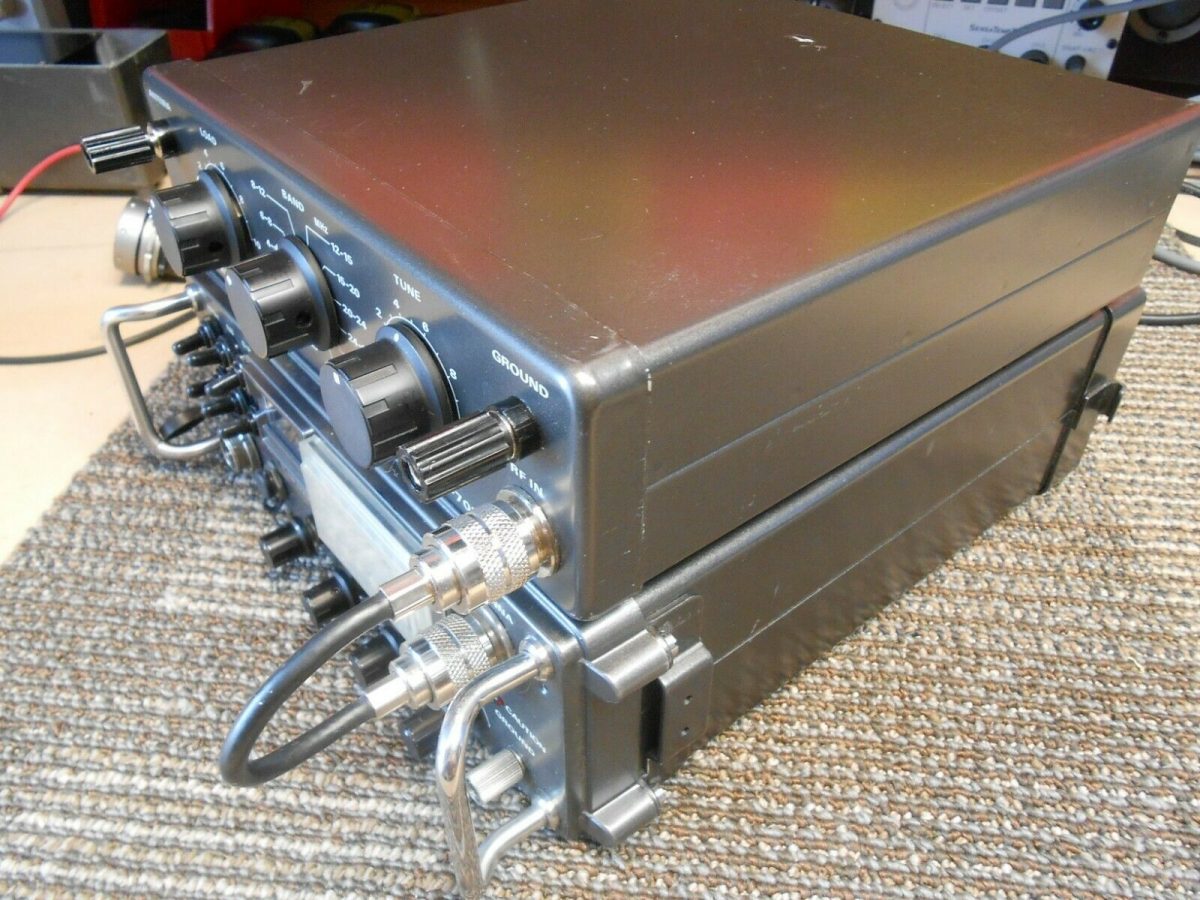
I’m a real sucker for vintage rugged field radio gear, so I never discovered the FT-70G until today. Turns out, they’re relatively rare. A little light research reveals that it’s a highly-desired transceiver in the world of HF Packers–those radio enthusiast who like “manpack” commercial and military gear.
The FT-70G has a distinct military look and feel with the BCD switches to change frequency, rugged toggle switches, chassis extensions to protect the front panel, and attached screw-on connector caps.
What’s really surprising is that the FT-70G has a general coverage receiver (500 kHz to 30 MHz). Admittedly, it would not be fun band-scanning with those BCD switches…but still!
This website has a number of photos. They also have a product description likely from the original Yaesu/Vertex Standard FT-70G description:
“The FT-70 series HF field portable manpack transceivers are designed to provide reliable communications under rugged conditions in the military and commercial environment. The frequency synthesized, all solid-state circuitry and die-cast anodized aluminum enclosure and battery pack make a highly portable, weatherproof station. Flexible operation for optimum communications under a wide range of propagation conditions are assured by SSB (USB, LSB), semi break-in CW, AM, or audio interfaced Data modes. All controls, antenna, and interface ports are available and selectable via the front panel for maximum effectiveness and ergonomics in field, base, and manpack applications. The companion antenna tuner FC-70 is compatible with walking manpack, field portable, or base configurations. The highly effective vertical tripod mount antenna system YA-70 is deployed and stowed easily and quickly, pulling double duty by converting to manpack whip while on manuevers. High quality handset YH-70 provides communications privacy and clarity.”
At time of posting, the bids are at $520. I fear this will soar well above my comfort level before bidding ends. (Like I need another field radio anyway, right?)
Post readers: Please comment if you’re familiar with the FT-70G and especially if you’ve ever owned one. I’d love to hear about your experience with this unique rig.
Many thanks to SWLing Post contributor, TomL, who shares the following guest post:
YouLoop Picnic Table Report
by TomL
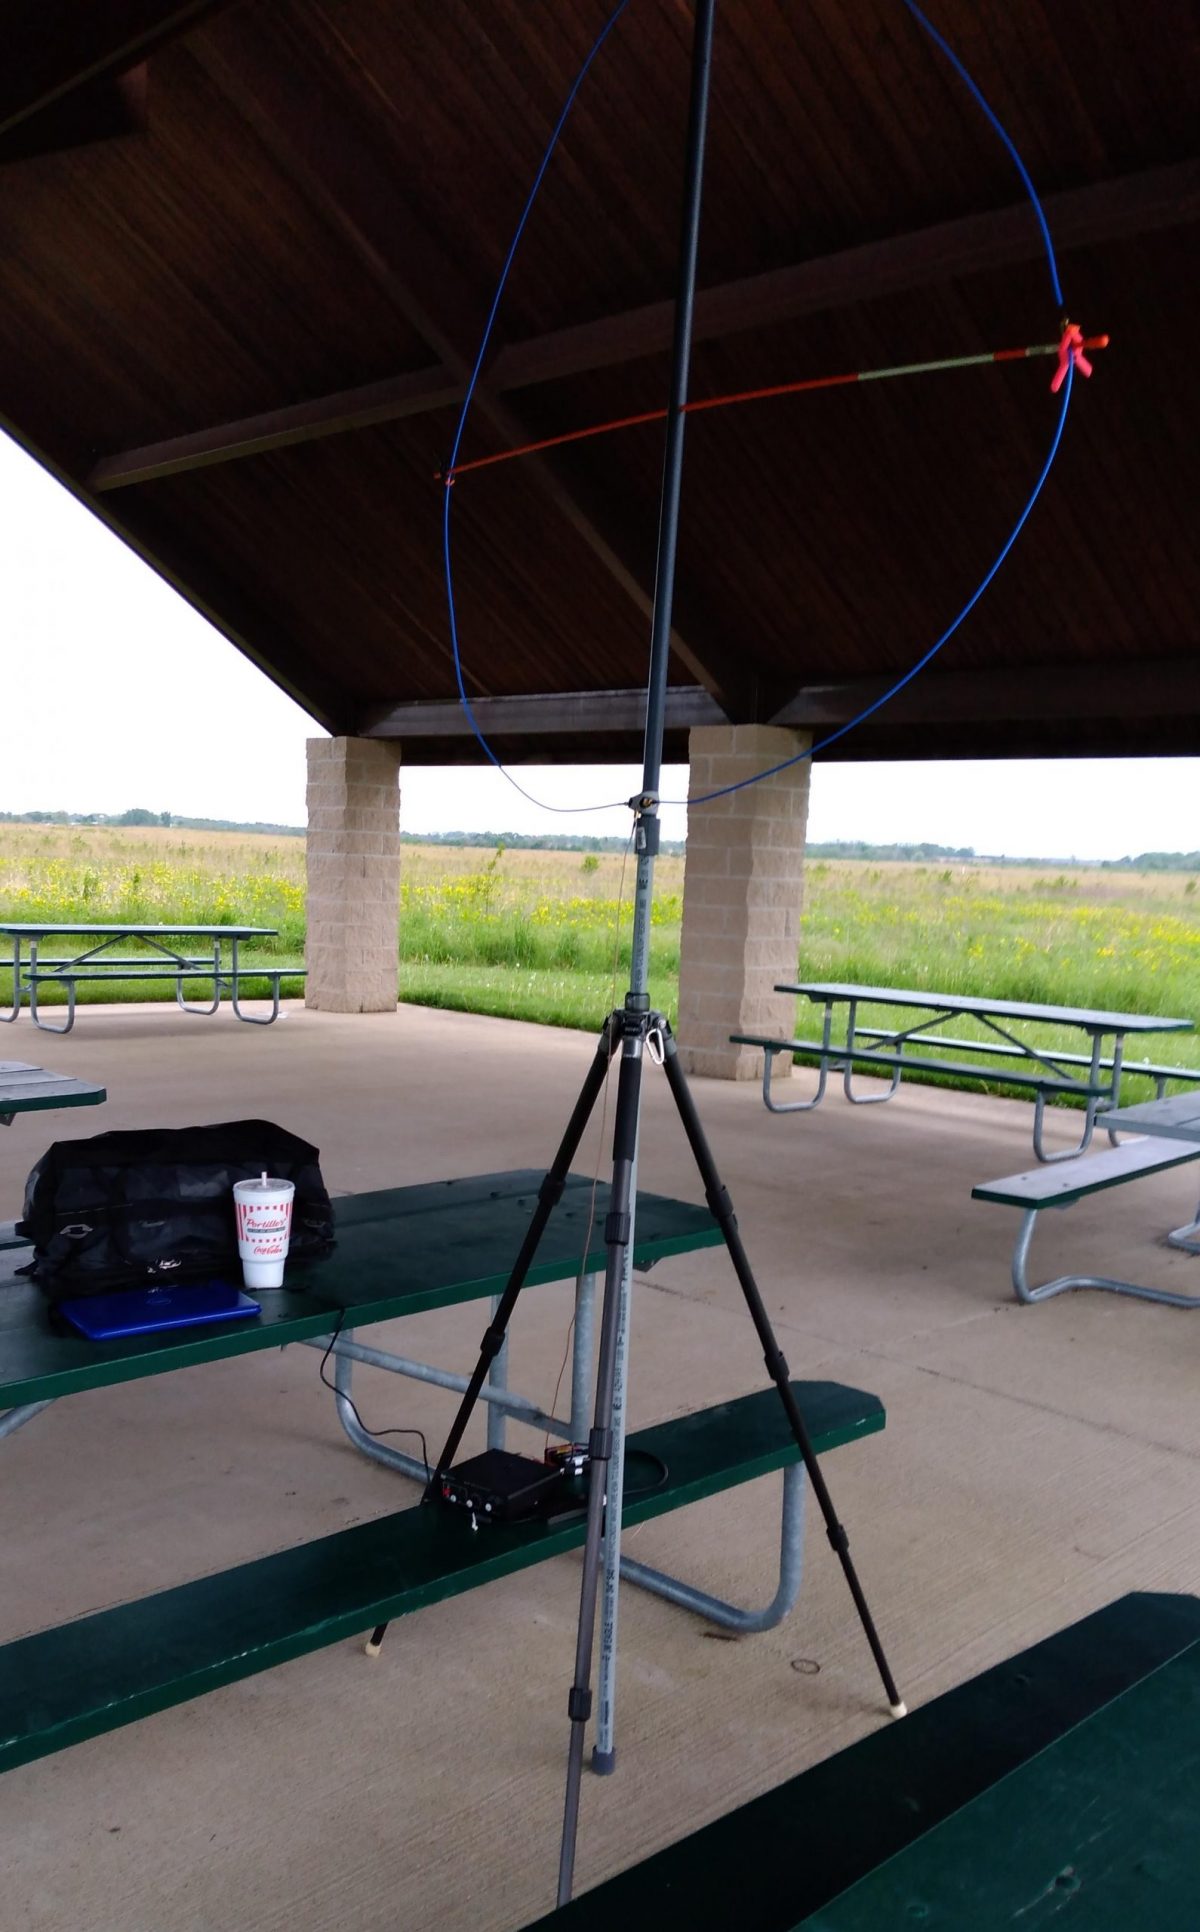
So, I finally got around to testing my Airspy YouLoop after the long shipping delay from China.It is simple in concept and will not repeat what others have written about it in previous articles.I find it a useful loop antenna for portable operations and sometimes for noisy home use.This report is focused on my usual field location from a Northern Illinois county park picnic table.
Setup
As you can see from the setup photo, it all fits into a backpack except for the two PVC pipes and crossbar which are easy carried.I modified my YouLoop to use the 2 meter transmission line as one half of the loop.The other half consists of the two shorter wires connected with a simple female-to-female SMA connector.This doubles the circumference of the loop and gives it a bigger capture area.
Crossbar
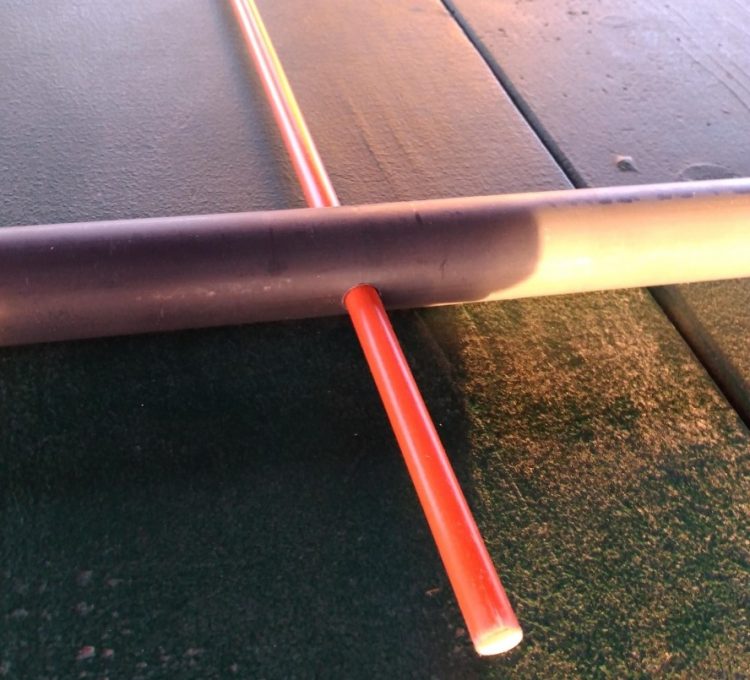
Because my setup is bigger than usual, I had to find a lightweight cross member to aid the solid conductor wire from sagging. I found just the thing in a larger-than-normal 6 foot fiberglass driveway snow marking stick sold at the local hardware store.I cut the tip off to make it 5 feet (Because, the loop as I configured it is 4 meters circumference, so, 4*39.37/Pi = Diameter in inches). I then drilled a 5/16th’s inch hole through the middle of the ¾ inch PVC threaded pipe I had from a previous project and fit the fiberglass stick through it as the crossbar. This is a special PVC 4 foot nipple pipe I had special ordered a long time ago when mounting a previous (heavy) Ferrite-Sleeve loop antenna.
Loop Mounting
Screwed onto both ends of the 4 foot nipple are threaded-to-coupler adapters also found at the hardware store.The adapter allows me to attach easily to the ¾ inch 5 foot long PVC pipe held by my trusty carbon fiber tripod below.This 5 foot pipe is held loosely by the tripod so I can grab the pipe and turn the whole loop mounted above.The result is not perfectly circular and there is room for improvement.I find it to be highly directional nonetheless and easy to turn. The phasing connector of the YouLoop mounts at the top and for now I am just using two medium sized cable ties to a long screw near the top for tension.I do not want to glue the connector to the top since this YouLoop may get used in other configurations in the future.
The Bottom connector for the radio input is held nicely with a couple of velcro wraps.
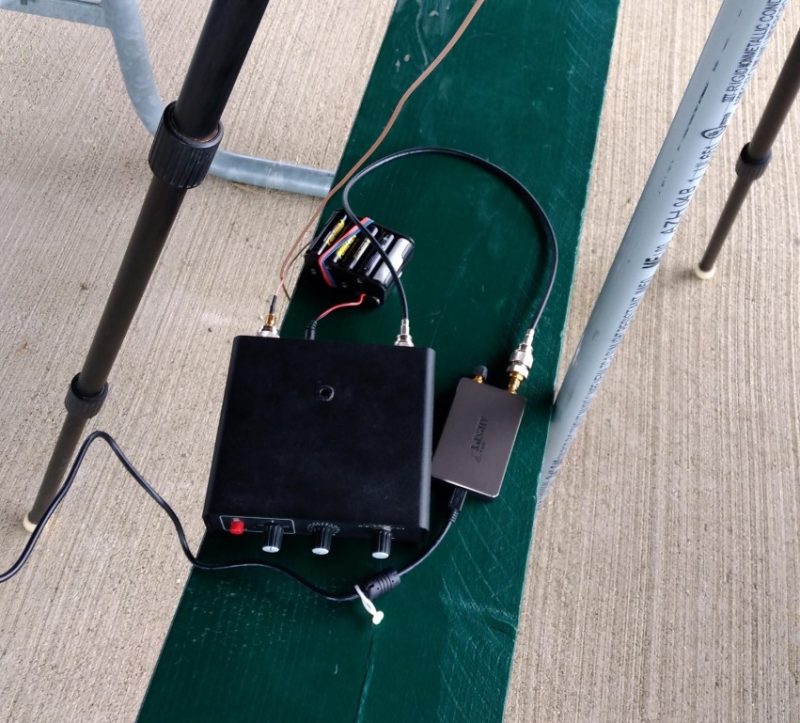
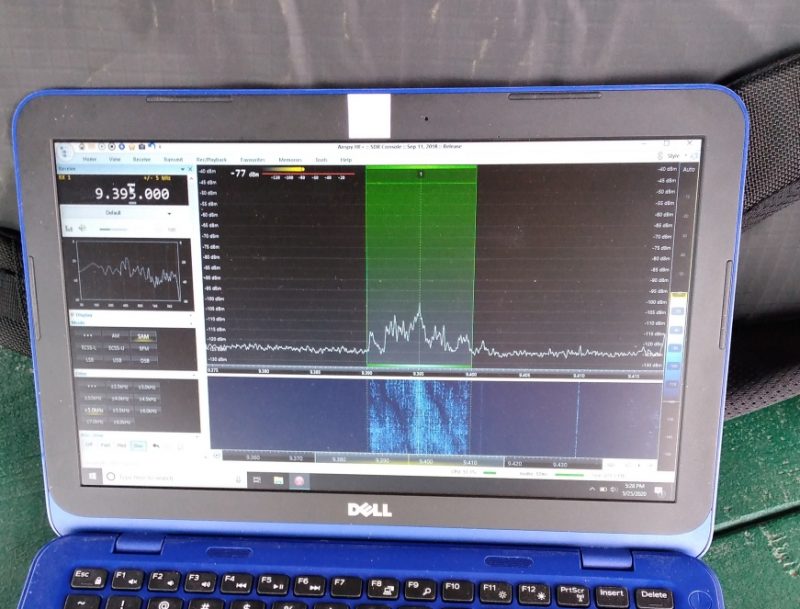
The wire from there goes to the usual setup of Palstar amplified preselector with battery pack and Airspy HF+, which goes into the USB port on the small Dell laptop.After some initial problems with a non-functioning HF+ and rebooting a few times, I was finally able to get a signal.At first I thought it was the antenna but the error condition acted the same way whether the antenna was connected or not.It could be that my HF+ is starting to exhibit the first signs of failure, which I have read about from complaints on the internet about the reliability of SDR’s used in the field.I may have to bring along my SDRPlay SDR2 just in case!In other words, don’t depend on computer hardware and software to work (especially if you happen to go on vacation and have no backup radio!!).I also have a couple of portable non-SDR radios I could bring with me as well.Enough said.
Using It
The screen of the laptop shows a very nice black background, very quiet, and a moderate signal level of WRMI on the 31 meter band.I did not have the time or processing power for real Data captures, so all I have to share are less optimal MP3 files.The signal level is somewhat low. I think this is typical for a single-wire loop antenna and seems adequate. I did have to crank my Palstar preamp to maximum the whole time while on shortwave (my Wellbrook amp would probably work slightly better).On mediumwave, the gain seemed more than adequate (I don’t have any recordings of that band at this time, maybe a future article).
Directionality is very good and usable across a very wide range of frequencies!It certainly worked well up to the 25 meter band where I started to notice a drop off of nulling ability.And this is good despite my lack of perfect circular mounting of the wire. Even though my county park is a “Forest Preserve” and not meant to have any development, there is increasing noise in the neighborhood and I find the loop to be very useful in cleaning up some background noise (as well as noise coming from the laptop!).This is especially seen with the Voice of Iran broadcast in French. The weak signal was aided by moving the loop to balance the signal level to local noise.
The loop is a bit flimsy using it this large.Keeping the connectors tight may be a problem in the future if subject to a lot of wind.I think you will find the smaller (usual) setup in the instructions to be less of a problem.My plastic clips at the sides of the crossbar and the plastic tie downs at the top are not optimal and will need something better (in other words, it would help if I had a better mounting for the wires).Also, the tripod definitely wanted to tip over as a storm blew past, so I need to make sure I tie down one or more legs to the picnic table in the future!!
Final Thoughts
In summary, this is a very useful loop for portable operations since it fits easily into a backpack. Mounting it in a repeatable manner will need some experimentation.Performance is good with usable nulling at a wide range of frequencies. Signal strength is moderate, so a good preamp is necessary in order to boost the signal into the sweet spot of your receiver RF stage.Parts quality is good, but the wire is thin solid conductor, so do not kink/fold it!.The connectors and housing for the phase change and balun are very small, with non-waterproof plastic housings that can be easily abused, so take care of them. The whole kit is small to pack and lends itself to experimentation.Highly recommended given its limitations.
Furthermore, I feel my old, original 14-inch “crossed-parallel loop” did as good a job as this larger diameter YouLoop.I wonder how the YouLoop can be modified to create a larger gain using, say, two or more wires in parallel (perhaps a future article!)?Generally, the deeper the loop design, the higher the gain.The YouLoop potentially could be a better performing, more portable version if I can replicate using more turns of wire.Although it is in disrepair now, pictures of my old 14-inch loop are found here, and also here.
Sample Recordings
Here are a bunch of sample recordings to enjoy, some of which are unique to shortwave radio and found no where else:
7315 kHz, Voice of Vietnam, from WHRI-1 transmitter
7350 kHz, Radio China International, in English from Kashi PRC
7375 kHz, Radio Romania booming in from Romania
7490 kHz, WBCQ (Spanish) from Monticello ME (guide says only 50 kw but sounded more than that)
6180 kHz, Radio Nacional Brazilia
6070 kHz, CFRX Toronto – discussion about some people with ashes of relatives in the home
6115 kHz, WWCR Nashville TN – discussion about Jesus saving a young woman from Satanic ritual abuse as a child
5850 kHz, Radio Slovakia International from WRMI booming in as usual
73’s & Happy Listening,
TomL
Thank you, Tom, for sharing your field-portable SDR setup! I like how you’ve made an inexpensive and packable support system for the larger diameter YouLoop. While I’ve yet to design a similar system around the YouLoop, I really should. I’ve always believed that for both SWL and ham radio field-portable operations, a self-supporting antenna system is a must as it gives you ultimate flexibility to cope with variable site conditions.
From the Isle of Music, May 31-June 6:
This week, we enjoy a Cuban dance party with four new releases from the Bis Music label. Special guest Ricardo Oropesa will be with us for part of the program.
The broadcasts take place:
1. For Eastern Europe but audible well beyond the target area in most of the Eastern Hemisphere (including parts of East Asia and Oceania) with 100Kw, Sunday 1500-1600 UTC on SpaceLine, 9400 KHz, from Sofia, Bulgaria (1800-1900 MSK)
If you don’t have a shortwave radio or are out of range, you can listen live to an uplink from a listening radio in the Netherlands during the broadcast at
http://websdr.ewi.utwente.nl:8901/?tune=9400am
2. For the Americas and parts of Europe, Tuesday 0000-0100 on WBCQ, 7490 KHz from Monticello, ME, USA (Monday 8-9PM EST in the US).
If you don’t have a shortwave or are out of range, you can listen to a live stream from the WBCQ website here (choose 7490): http://www.wbcq.com/?page_id=7
3 & 4. For Europe and sometimes beyond, Tuesday 1900-2000 UTC and Saturday 1200-1300 UTC on Channel 292, 6070 KHz from Rohrbach, Germany.
If you don’t have a shortwave radio or are out of range, you can listen live to uplinks from various websdrs in Europe.
The Facebook page for the program is https://www.facebook.com/fromtheisleofmusic/
The Patreon page for the program is https://www.patreon.com/tilford
Uncle Bill’s Melting Pot, May 31 and June 2:
In the first half of episode 167, Egyptian orchestral and Iraqi oud music. In the second half, our monthly Radio Balcony segment has special guests and new music including Jesse Charbonnier from the USA, César Rodríguez from Colombia, Ramiro Pinheiro from Spain and Nic Bennett from the UK.
The transmissions take place:
1.Sundays 2200-2300 (6:00PM -7:00PM Eastern US) on WBCQ The Planet 7490 KHz from the US to the Americas and parts of Europe
If you don’t have a shortwave or are out of range, you can listen to a live stream from the WBCQ website here (choose 7490): http://www.wbcq.com/?page_id=7
2. Tuesdays 2000-2100 UTC on Channel 292, 6070 KHz from Rohrbach, Germany for Europe.
If you don’t have a shortwave radio or are out of range, you can listen live to an uplink from different web SDRs in Europe including a live uplink from a listening radio in the Netherlands at http://websdr.ewi.utwente.nl:8901/?tune=6070am
The Facebook page for the program is https://www.facebook.com/UncleBillsMeltingPot/
The Patreon page for the program is https://www.patreon.com/tilford
A second test broadcast of both programs will take place on 7440 kHz from Germany to rule out a bad day during the first test on Friday, May 29 from 1600-1800 UTC.
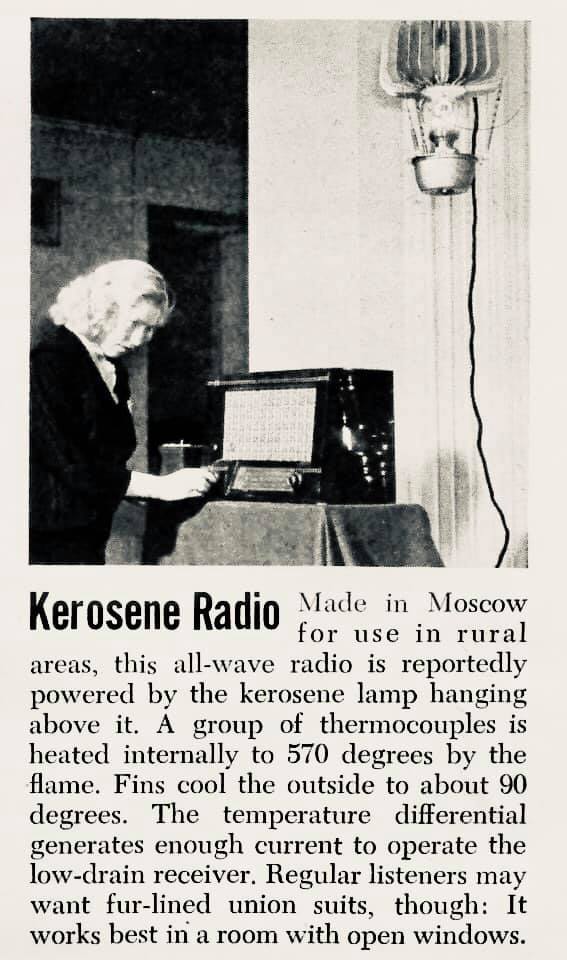
Many thanks to SWLing Post contributor, David Day, who recently shares the newspaper clipping above.
I was not aware of this Cold War era kerosene lamp generator, but it’s an ingenious use of the thermoelectric effect for power generation. I found yet another another clipping online:
Devices that work off of thermoelectric effect have been around many decades.
The original BioLite stove burns twigs/sticks to recharge USB devices with 3 watts of power.
At the end of the day, I find it so easy to use solar power to recharge larger LiFePo batteries, I’ve never invested in the BioLite.
With one large LiFePo battery, I’m able to power multiple devices including an inverter if necessary.
I’m very curious how many models of kerosene lamp generators were made back in the day and how useful they were for powering other low-drain devices.
Please comment if you’ve ever used a kerosene generator. We have readers from across the globe, so I imagine someone may have at least seen one of these in person and potentially used it to power a radio!
Many thanks to Amanda Dawn Christie, who notes that Spectres of Shortwave is once again viewable online:
Hi Thomas, the [Spectres of Shortwave] video is freely viewable online for a week now. The link just went live this week, hosted by Daziabo gallery… feel free to share!
It will be freely available to stream from 10am May 26 – 6pm June 1 on this site:
My apologies to those of you who tried viewing the film online from a link in a previous post. Though it was shared widely, it turns out that link wasn’t meant to be public yet. Apologies for that!
Many thanks to Matt Roberts (KK5JY) who has kindly given me permission to re-post the following article he recently published on his website KK5JY.net. Many thanks to SWLing Post contributor, Grayhat, for the tip!
Note: The Porch Loop project below is a re-configured Small Receiving Loop (SRL) antenna. For SRL construction details, check out Matt’s primer.
The Porch Loop
by Matt Roberts (KK5JY)
The small receiving loop, or SRL, is a versatile, effective, and very space-efficient receive-optimized antenna for the HF bands. They are easy to build, and can be made very inexpensively. Most typical designs use symmetric shapes, like circles, diamonds, octagons, etc., and are mounted on some kind of mast. This makes it easy(-ier) to install the antenna clear of nearby metal and electronics. It also makes the antenna rotatable, so that the nulls can be pointed at RFI sources.
These aren’t the only options for the SRL, however. These little loops can be made to fit in just about any available space. In fact:
They are effective at any reasonable installation height, including very close to the ground. The installation height doesn’t change the pattern shape, only the pattern strength.
They can be made nearly any shape. The shape does not have to be symmetric about any axis or combination of axes.
They can be fed at just about any point on the loop. A typical feed location is bottom-center, but off-center feeding has negligible effect on the pattern shape.
The wire can be bent out-of-plane; in other words, the loop doesn’t have to be “flat.”
There are a couple of requirements for obtaining predictable performance, however. First, the antenna does need to be an electrical loop. That is, it is a single wire connected between the conductors of the feedline, forming a complete circuit. Also, the circumference of the loop wire should be electrically small (i.e., significantly less than ? / 4) on the bands where it is to be used.
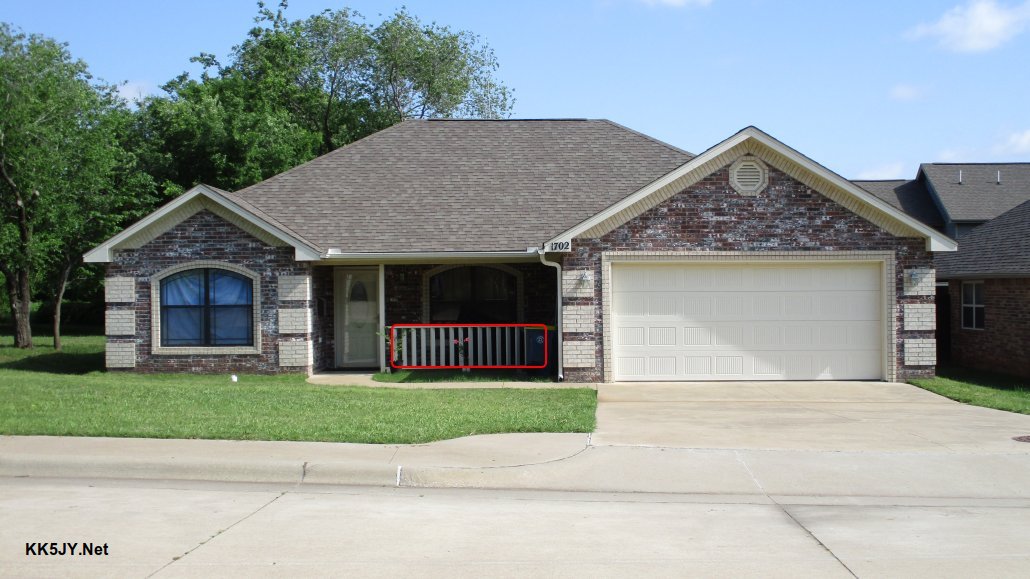
Figure 1. The antenna location (click to enlarge)
As a personal challenge, I recently installed such a loop on my front porch. Everything about this installation defies conventional wisdom — it was installed very close to the ground, it was an irregular shape, it was fed off-center, and the wire was wound in and around an irregular support structure, rather having all the wire in a single plane.
And the resulting antenna still performed very well.
Figure 2: Antenna Location Outlined in Red (click to enlarge)
The loop is essentially the same device as the one in the original SRL article. See that article for more construction details. This version is simply stretched and twisted to make it fit the space and supports available. The wire was woven around the boards in the porch’s deck rail, and fed off to one side, so that the transformer housing could be “hidden” behind the trash cans.
Figure 3: Feedpoint Transformer (click to enlarge)
The wire was insulated with an off-white THHN, which made it blend in with the color of the trim of the house.
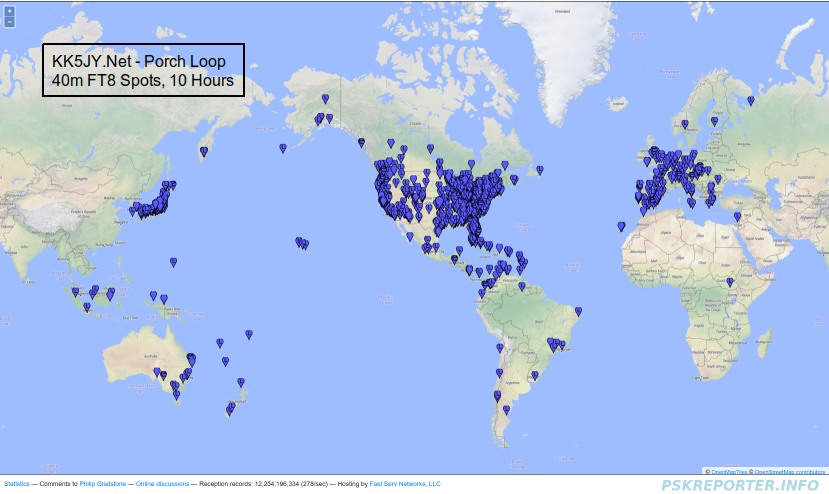
Figure 4: 40m Reception 10h Overnight (click to enlarge)
Even with its suboptimal installation details, the overnight 40m DX spots were numerous and well-distributed, as seen in Figure 4. There were DX spots at nearly 10,000 miles, there were NVIS spots, and there were countless at all distances in between. So the antenna was just as effective as its more ideally shaped brethren, despite it’s unconventional installation details.
Other ideas for possible locations of such a device could include:
In an attic. The antenna could be nailed to a vertical panel, or strung like a spider’s web inside the frame of a truss or other open area.
Under a tree. Taking another idea from the spiders, the antenna could be hung and pulled into shape using light guys or tree branches.
On a wooden fence. If you have a wooden fence, the antenna could be installed against the fence panels. This option could allow a wide range of circumference lengths.
Attached to an interior wall of an apartment. The shape could be chosen to keep the loop clear of in-wall wiring, to help preserve its performance.
The original mast-mounted SRL antennas still have some advantages. Perhaps the biggest advantage is that they can be easily rotated to null out a nearby strong noise source. That said, if you are looking for an antenna with better receive performance than a large resonant vertical, the SRL can be stretched and squeezed into service just about anywhere.
Many thanks for sharing this project, Matt! So many of our readers live in situations where they are forced to use stealthy and compromised antennas. What I love about your porch loop is that even though it breaks several loop antennas “rules,” it’s still amazingly effective.
I encourage SWLing Post readers to check out Matt’s website as he has written articles covering a number of interesting radio and antenna projects.
SDRplay has released a new downloadable Raspberry Pi SD card image which adds support for the RSPdx and simultaneous use of both the tuners in the RSPduo.
This V0.7 release is the first build to support the RSPdx and RSPduo in master/slave mode. The image also supports the RSP1, RSP1A,RSP2 and RSP2pro.
The list of software on this image is: SoapySDR/SoapySDRPlay, SoapyRemote, Cubic SDR, ADSB (Dump1090), and the updated RSP TCP Server
The V0.6 download, with some additional third party software, is still available for the RSP1, RSP1A,RSP2, RSP2pro and RSPduo in single tuner mode.

 At time of posting, the bids are at $520. I fear this will soar well above my comfort level before bidding ends. (Like I need another field radio anyway, right?)
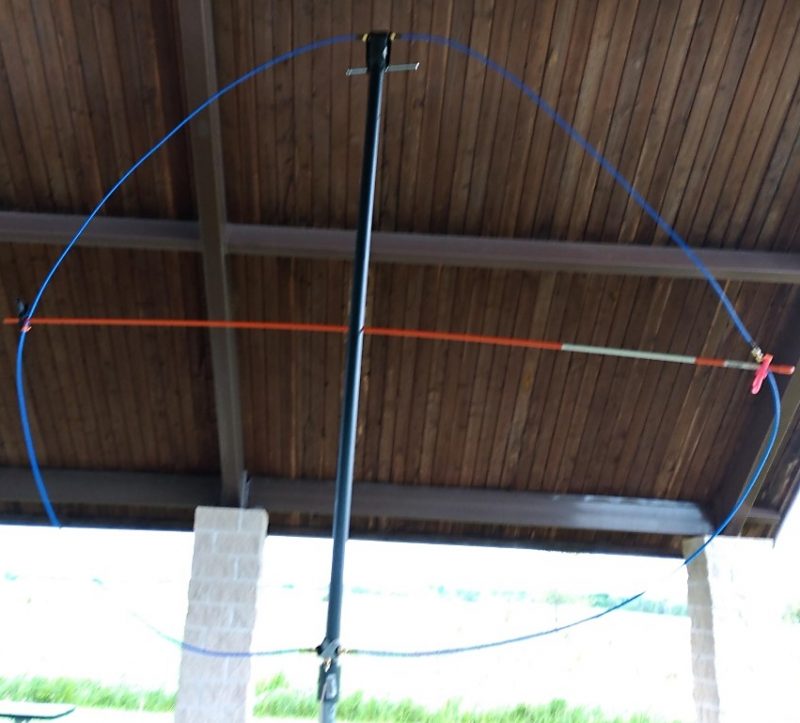


