
 Many thanks to SWLing Post contributor, Grayhat, who shares the following guest post:
Setting up a Mini Whip antenna
by Grayhat
I’ve been fiddling with my “balcony antenna” experiment for quite a while now, and I settled with a Linear Loaded Dipole (LLD, also known as “Cobra”) which, in my case, due to self-imposed limitations was a short one (about 9m total).
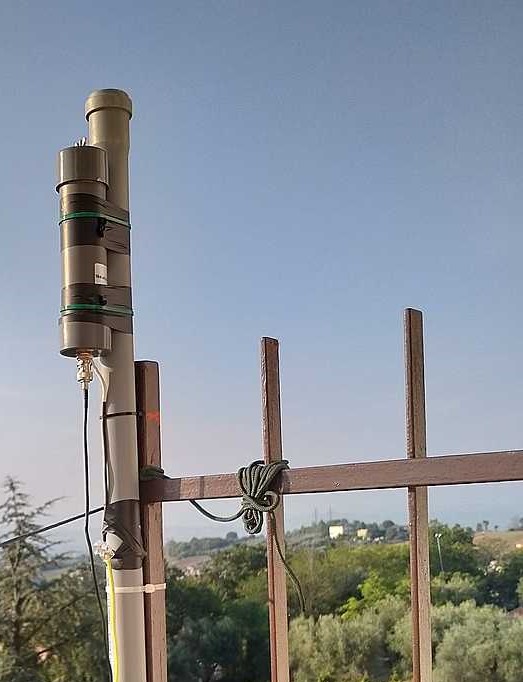
Since I mentioned it, here is a pic of the antenna showing its installation:

Click images to enlarge.
In the above image you can see the overall setup of the LLD, the modification I did, by adding additional wires to the end of the arms and also the Mini Whip location
The LLD served me well, from LW up to around 200MHz allowing me to listen to broadcasters, hams, aircraft communications, time signals and then more, and it’s definitely a keeper, but I wanted to give a try to the “Mini Whip” antenna, even if a lot of people discard it saying it’s a noisy antenna and not worth it; keep in mind the Utwente SDR uses it and it seems to work fine, so I had to give it a try !
Anyhow, after searching the internet for a suitable whip, I finally found this one:

I bought the antenna on Amazon, but it’s also available on eBay and while the price isn’t the lowest one, I chose it since it uses BNC connectors only (some models use a mix of UHF/BNC or the like). This one had a top wing nut allowing to connect an additional (optional) external whip (may be useful on lower bands) and, last but not least, its color; being gray, it is quite stealth, which may be useful for some people (not my case, luckily). So I went on and ordered the antenna, the delivery took about 10 days and the package contents were exactly as shown above. The supplied coax is thin (RG-174 I believe) and it would be a good idea replacing it with some runs of RG-58, but for the sake of the experiment, I used the original wire.
So, having the antenna, I looked around for informations about the correct installation for the “Mini Whip” and found that in most cases, the reported poor performances of the Mini Whip are due to people installing it the wrong way. For reference and information about how the whip works and about how to properly install it, please refer to the information from PA3FWM found here and here.
Now, if you can place the whip in a garden or yard, using a pole, the correct installation of the whip is the one shown in this pic:
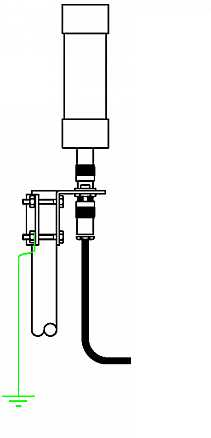
If you carefully look at the image you will notice that the whip sits above the supporting (metallic) pole and that the ground of the connector is electrically connected to the pole (through the clamp). Plus, the pole is then grounded (at the bottom) and the coax (which has chokes) runs away from the metallic pole.
What does the above mean ? Well, the Mini Whip antenna needs a “counterpoise” (ground) to work, and installing it as above, instead of using the coax braid as its counterpoise, the Mini Whip will use the supporting pole, this helps a lot minimizing the noise and it’s one of the tricks for a proper setup, the other one is placing the whip as far away from the “noise cloud” of your home as possible. In my case, I choose the far end of the balcony–also since I had a nice support there, the image below shows the whip installation using a piece of PVC pipe I bought at a nearby home improvement store:

At first, I just installed the antenna without the ground wire and with the coax coming down vertically from the connector. When I compared the whip to my LLD, the results were discouraging: the noise floor was much higher and a lot of signals, which the LLD received without problems, totally disappeared inside the noise floor.
Being the kind of hard-headed guy I am (and having read the documentation about proper setup) I went on and made further modifications.
Let me detail the installation a bit better with this first image (click to enlarge):
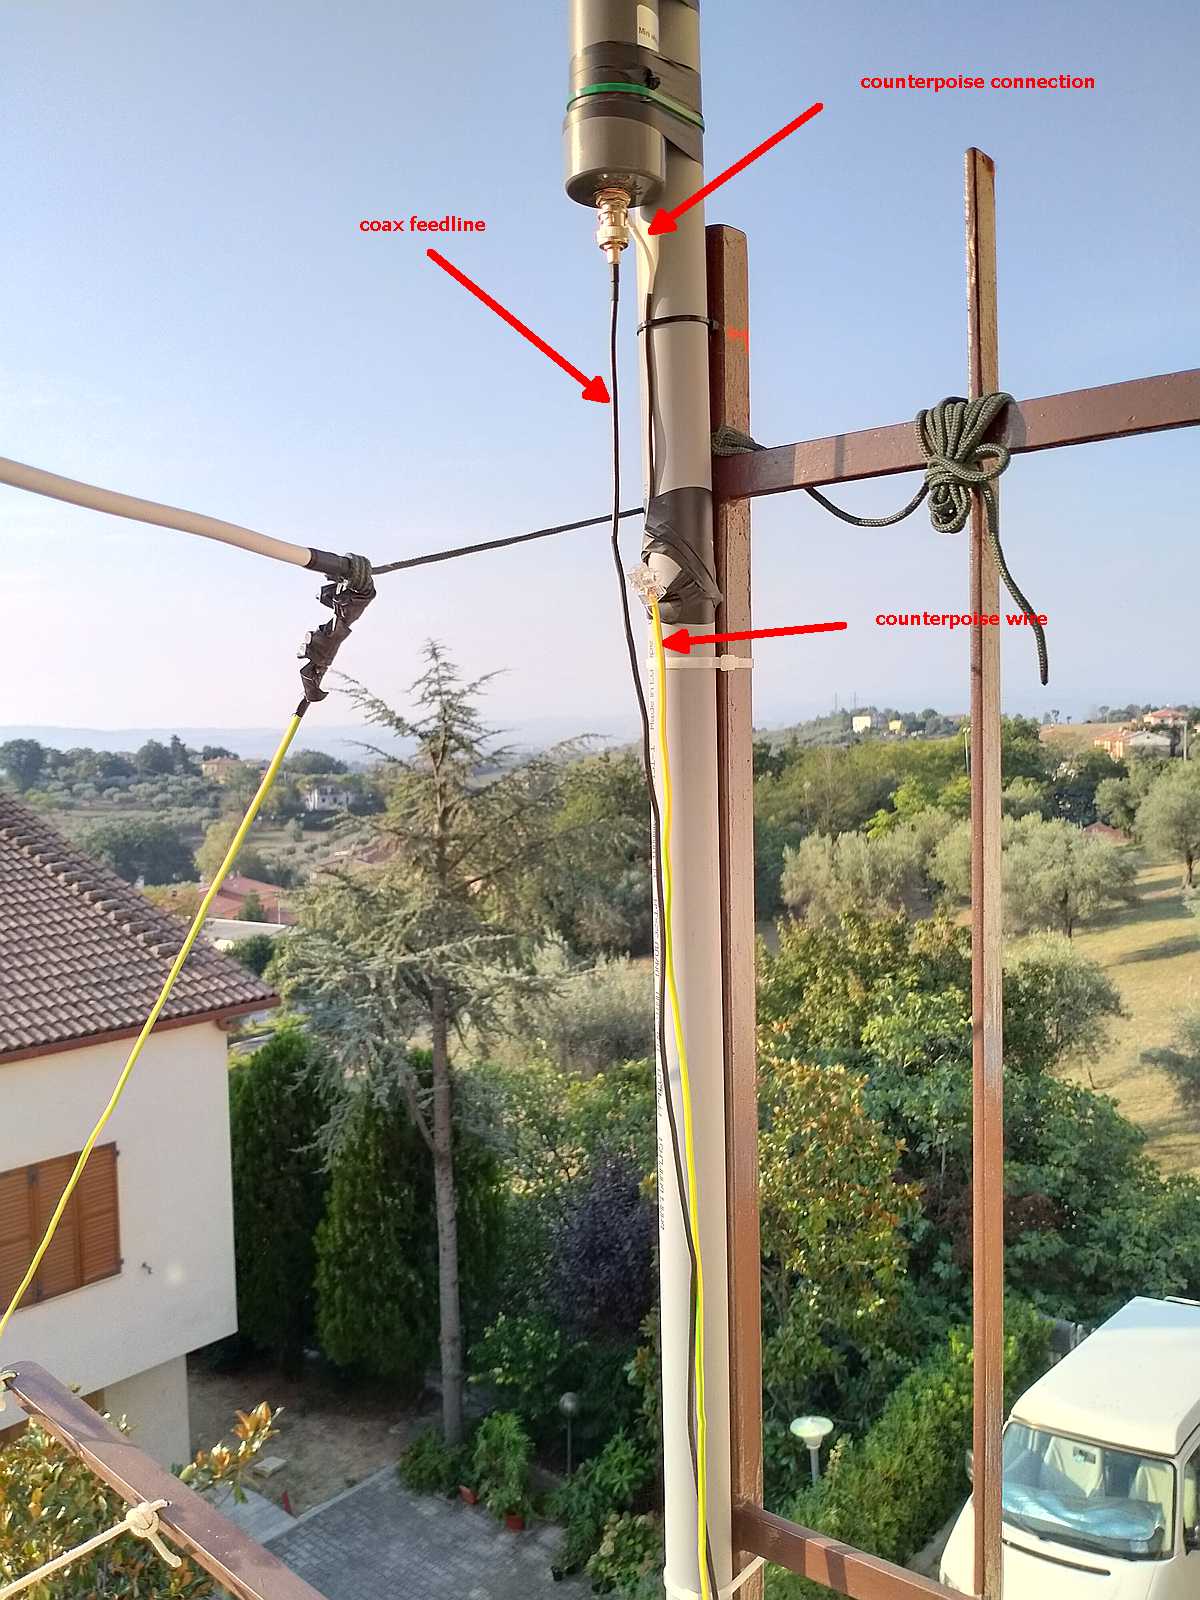
As you can see in the above image, the whip is supported by a piece of PVC pipe which keeps it above the metal fencing of the balcony (or a support pole if you’ll use it) and I also connected a short run of insulated wire to the ground of BNC plug at the bottom of the whip. This short run goes to a wire clamp which allows it to connect to the “counterpoise” (ground) wire.
In my case, since the balcony was at 2nd floor, I didn’t have a way to give to the antenna a real ground, so I decided to run a length of wire (AWG #11) down the pipe and then along my balcony fencing (10m total). An alternative, which will also work for roof installations, would be using chicken wire (fencing). In such a case, you may lay as much chicken wire as you can on the floor/roof and connect the wire coming down from the whip ground to it. I haven’t that that (yet!) but I think it may further lower the noise and improve performances.
Notice that in the case of the Utwente Mini Whip, the antenna support pole is connected to metallic roofing so it has plenty of (virtual) ground.
Later on, I improved the setup by raising the antenna a bit more and routing the wire (almost) horizontally from the feedpoint to reduce coupling with the vertical “counterpoise” wire.
The image below shows the final setup:
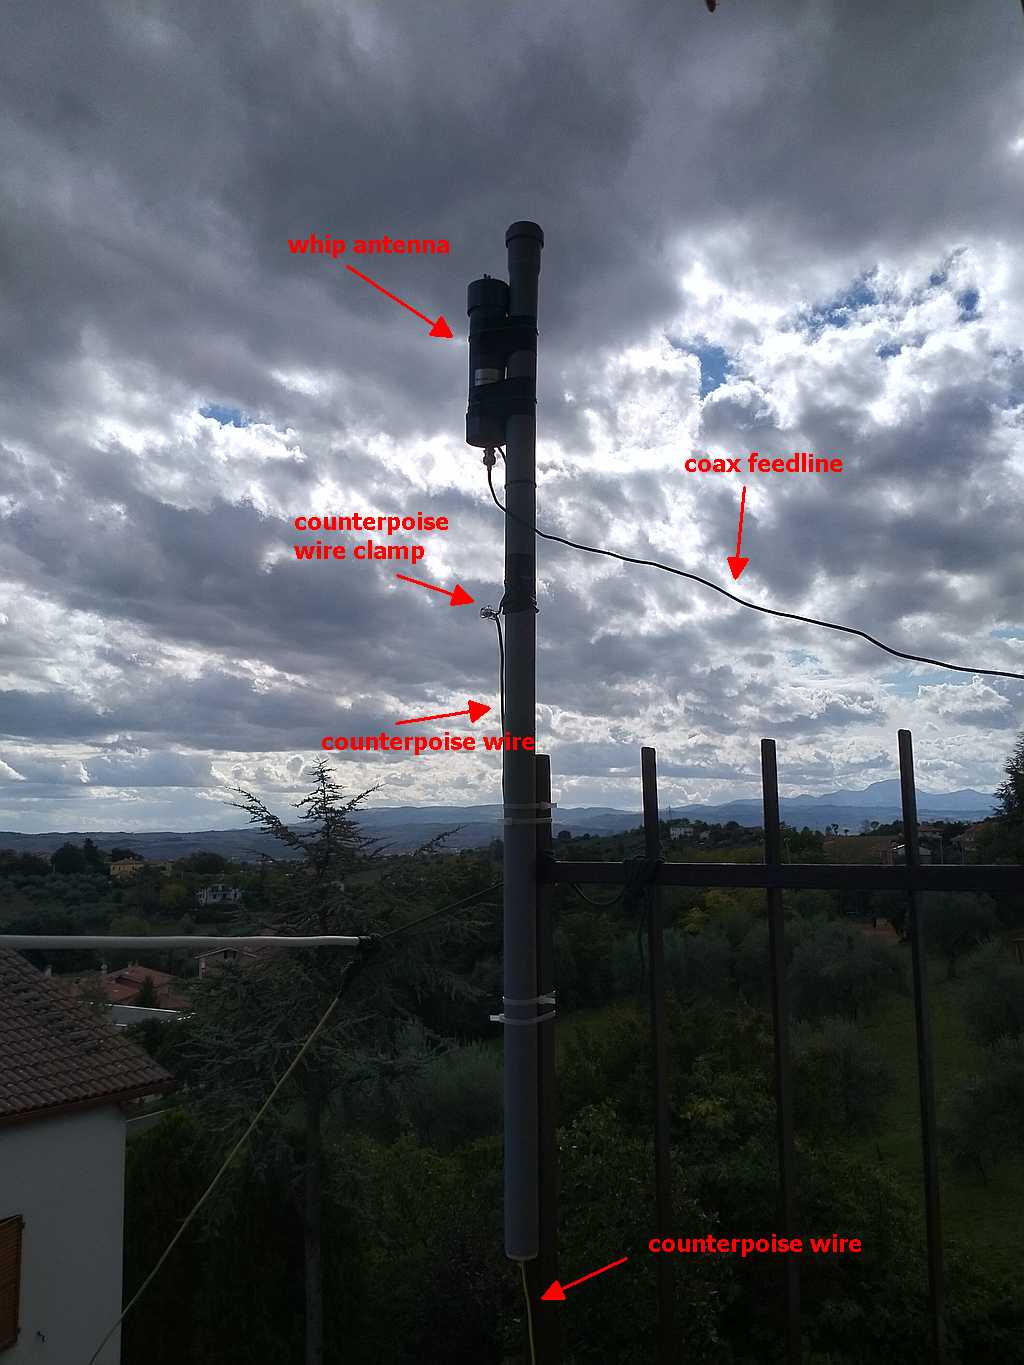
While not visible in the above image, I also wrapped the coax wire in a loop at the point where it’s held by the fencing and added some snap-on chokes to the coax at the point where it enters the building.
With all the modifications in place, the antenna started performing as it was designed to. The noise floor is still a bit higher than the one of the LLD, but given that it’s an active antenna, that’s to be expected
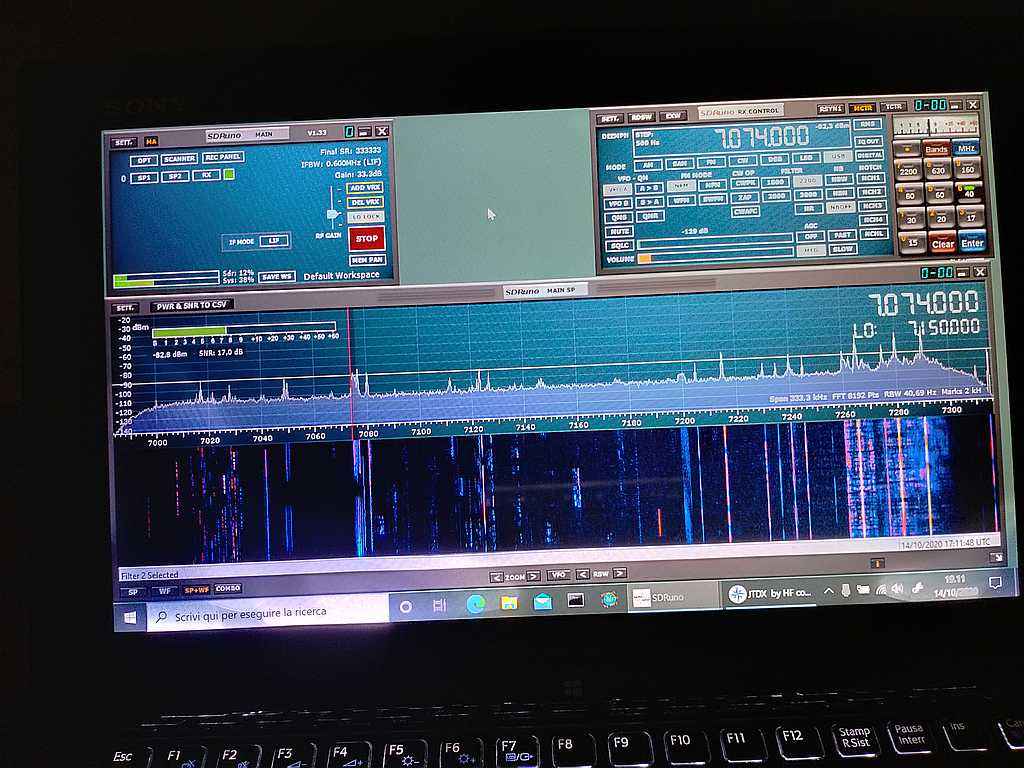
To give you an idea of the signals and noise floor, here are a couple of images taken from the screen of my laptop while running SDRuno. The first one shows the waterfall for the 40m band
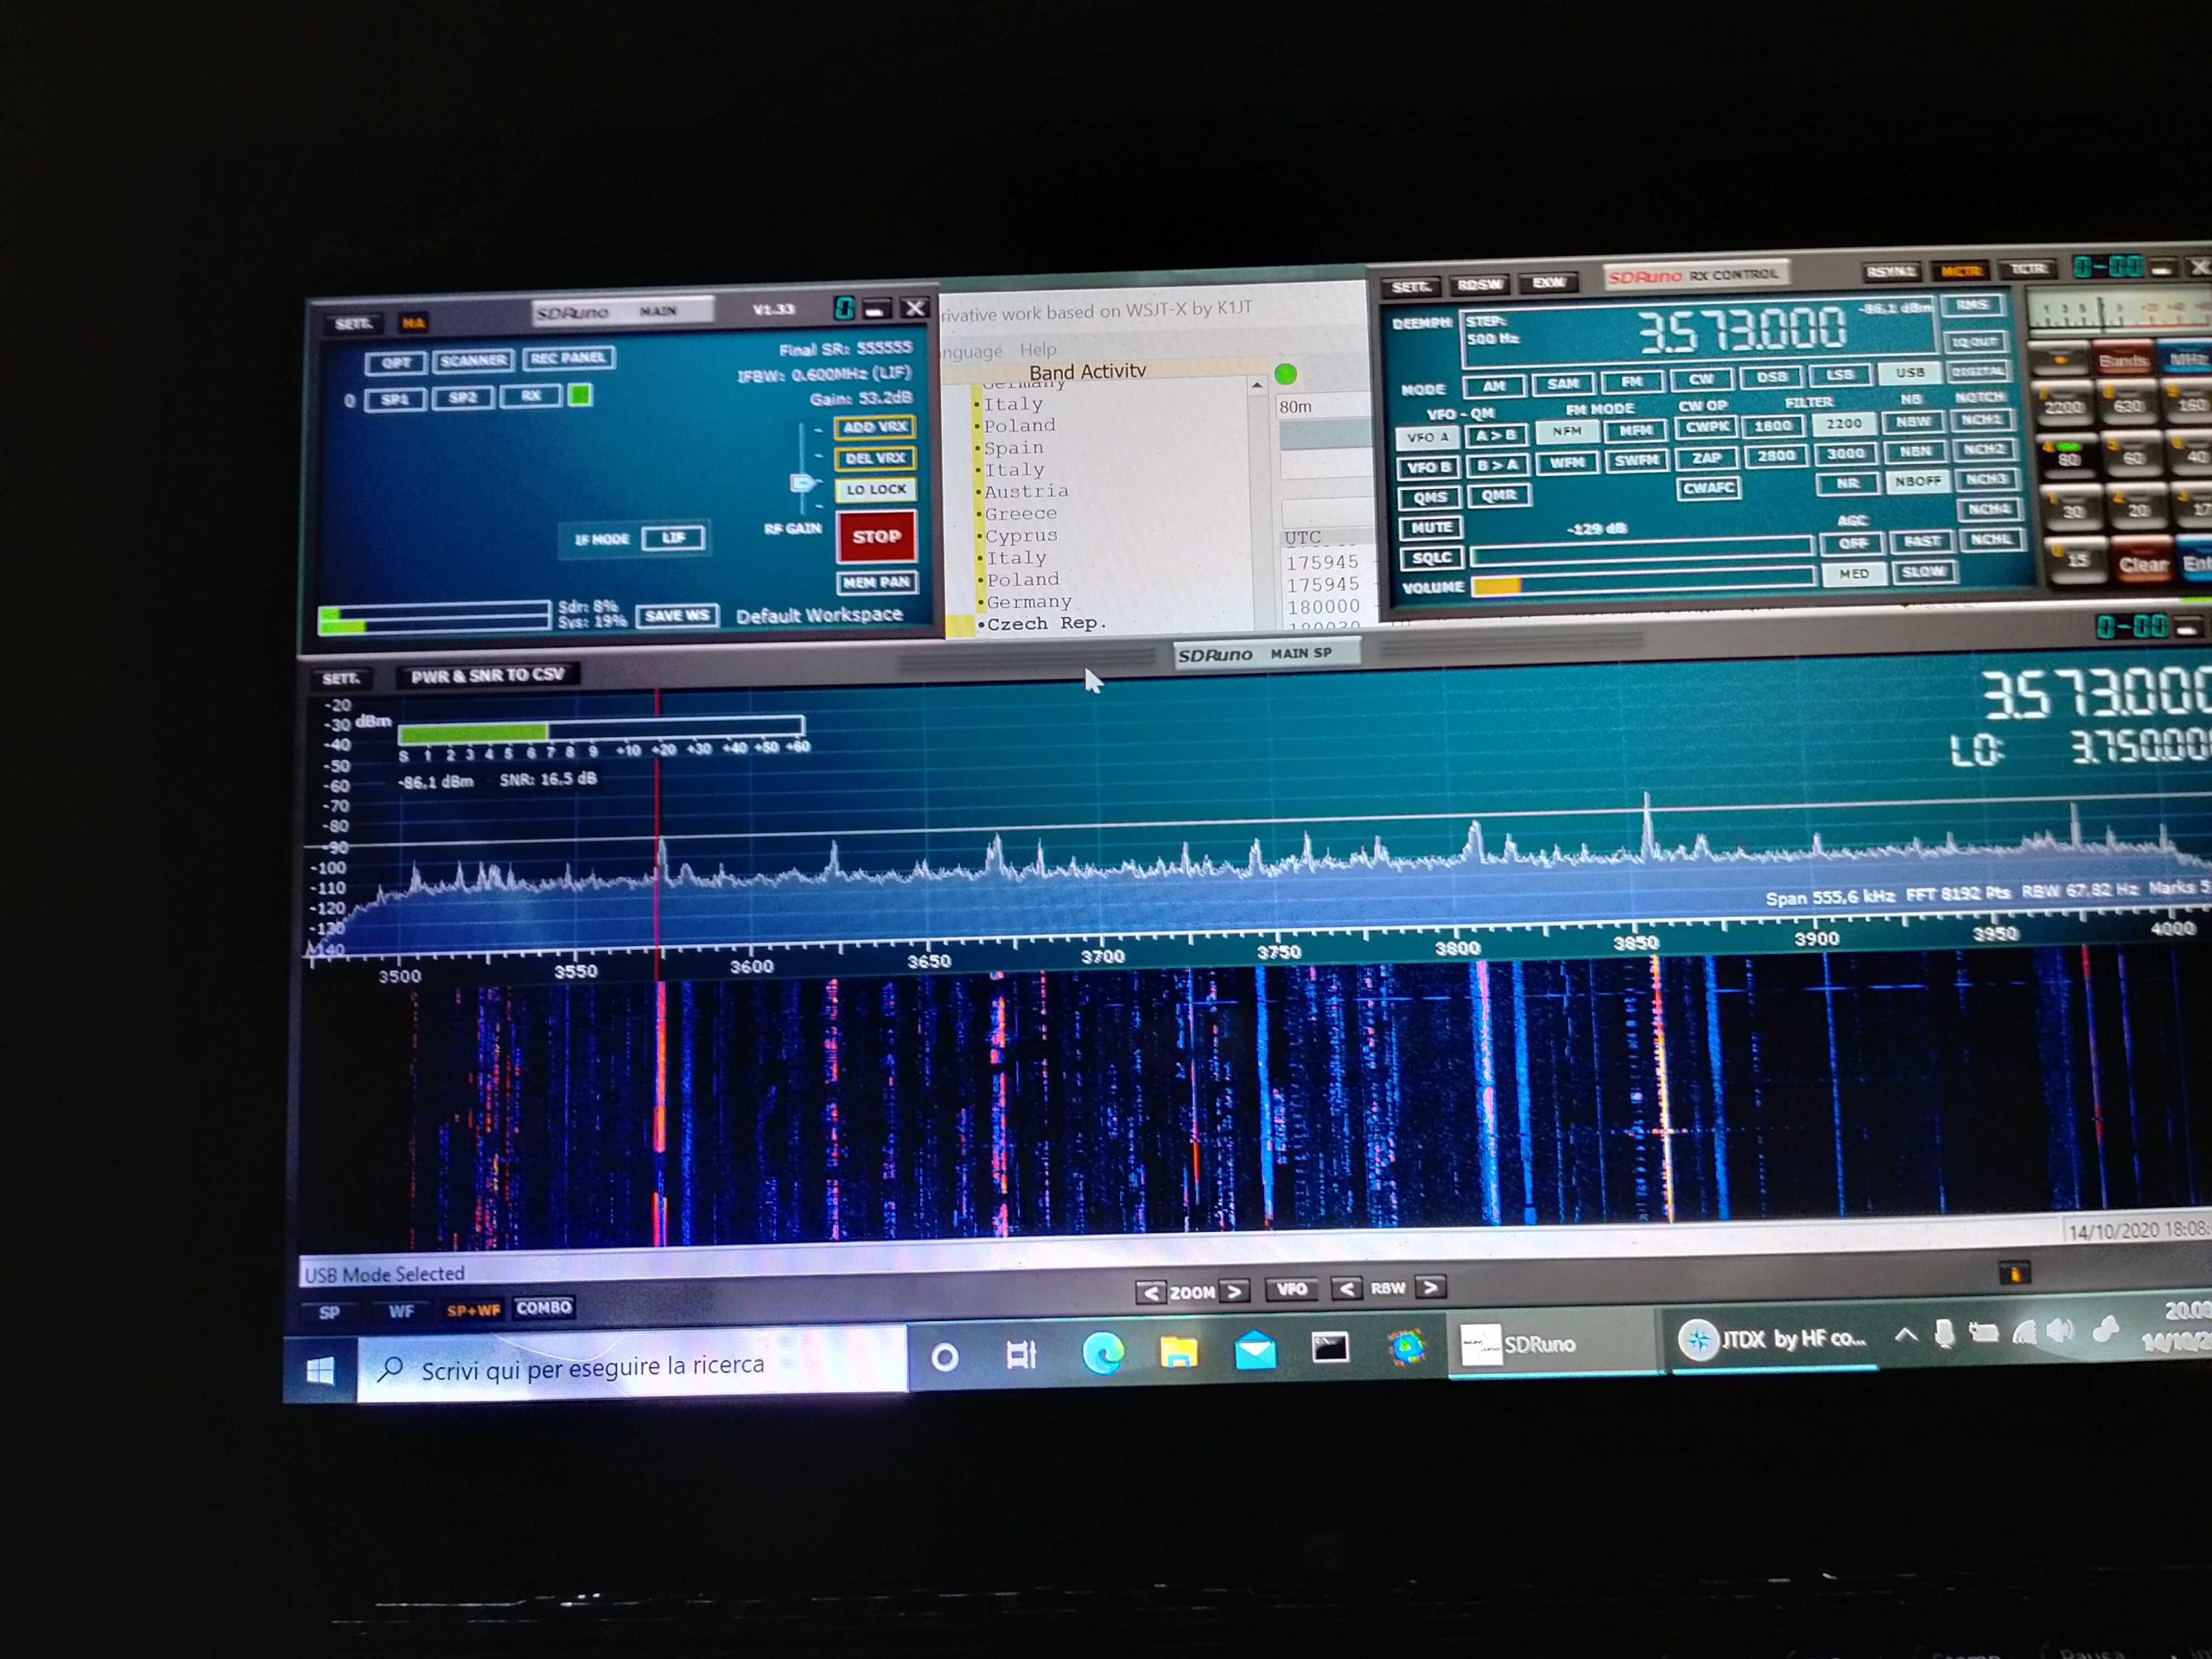
While the second one, below, shows the one for the 80m band:
At any rate, my usual way of testing antenna performance (and modifications effects), aside from some band scanning/listening, is to run an FT8 session for some hours (and optionally repeat it over some days) and then check the received spots.
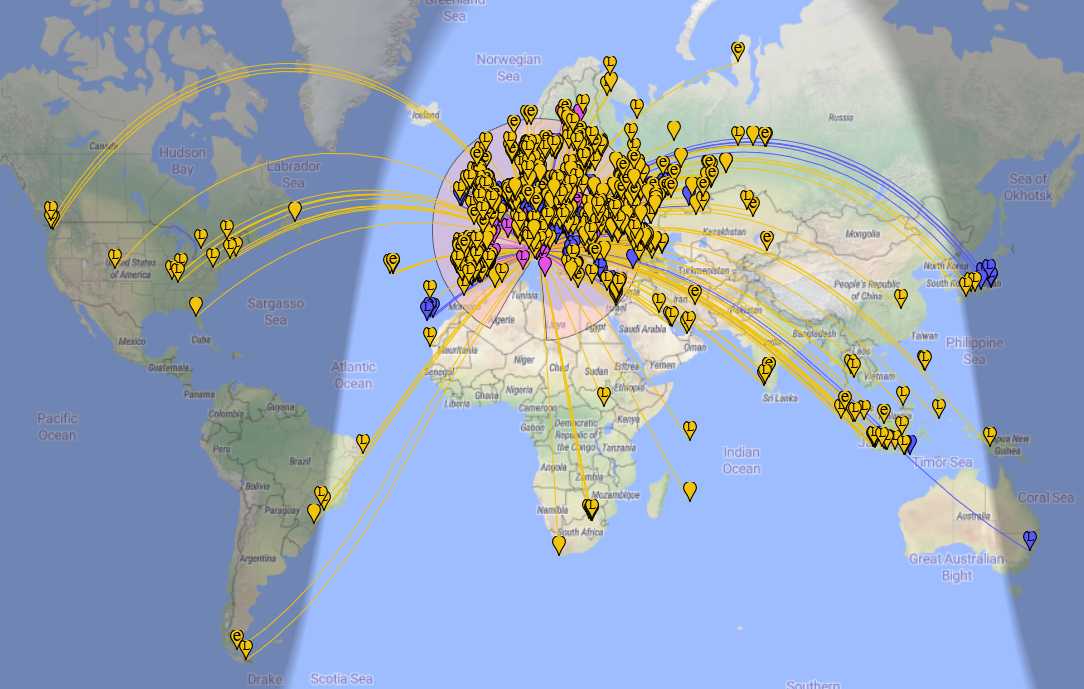
In the case of the Mini Whip, after all the modification to the setup, I ran an FT8 session using JTDX for some hours and the images below show the received spots. The first image shows the whole map of the received stations:
While the second one below is a zoom into the European region to show the various spots picked up there; the different colors indicate the 20m (yellow), 40m (blue/violet) and 80m (violet) bands:
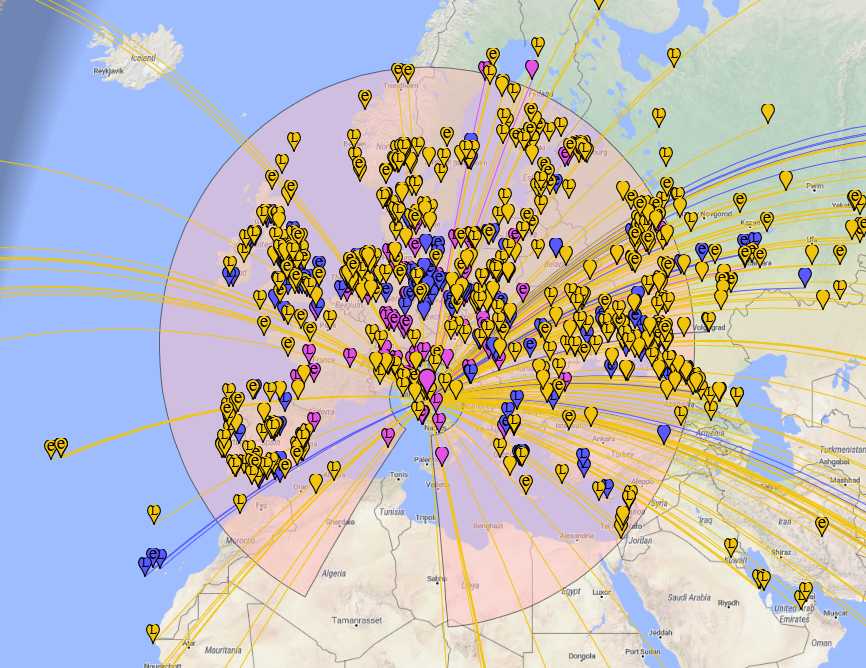
As you can see, the Mini Whip performed quite well despite the “not exactly good” propagation.
While some time ago I’d have discarded the Mini Whip as a “noise magnet”, as of today, with a proper installation, I think it’s a keeper. While it can’t be compared to bigger antennas, I believe it may be a viable antenna for space-constrained situations. The only thing it needs is a bit of care when setting it up to allow it to work as it has been designed to.
Brilliant job, Grayhat! Thank you so much for sharing your experience setting up the Mini Whip antenna. As you stated, so many SWLs dismiss the Mini Whip as “noisy”–but with a proper ground, it seems to perform rather well. The benchmark example of a Mini Whip’s performance must be the U Twente Web SDR.
Thank you again, Grayhat!
Hi all,
I just got this product. What I’m going to do is experimenting the, for my situation, best solution(s). WhatI’ve learned so far, reading all messages, is that there is no exact the same situation. There are just too many variables. I’ve experimented with an active loop to find the lowest noise floor. My findings are that even a few decimeters can make a difference. However, that depends also on the frequency to make things even more complicated. And also the type of noise can be one of those variables. Whatever the case, each and every antenna mean also you will have to accept some kind of compromise. Kicking in an open door, sure. But sometimes we tend to buy an antenna that has the best specifications whereas an antenna having slightly lesser specs might suit your needs better.
Interesting article about the installation of the miniwhip. I was wanting to ask what are you using for a power supply that hasnt got a lot of noise in it? Also I was wondering , do I have to use a counterpoise like you did in the picture or can I run a wire from the miniwhip’s power inserter box ground wing nut to a 4′ ground rod and get the same result…or do both?..Thanks
I’ve had such antenna for a long time, but I wasn’t particularly happy. I live in a town with local radio & TV stations plus a lot of interference from all the equipment in the neighborhood. After reading your article, I have now connected a grounding to the balcony railing and lead the antenna cable away at a right angle. Now the antenna delivers really good results. MANY THANKS for your article here!!!
Grayhat, you said you ran FT8 sessions! I’m curious how you disconnected the miniwip when transmitting! Didn’t the RF from the transmitter damage the MiniWip’s circuitry? Thanks. Fred PU2-UBB, Sao Paulo, Brazil
There is a very good chance the antenna circuit will be damaged by a transmitter nearby. That being said, the Mini-Whip I use seems to saturate when I transmit, but it has not failed yet. It’s been a few years now, so a good enough test, I think.
To avoid the risk of damaging the antenna circuit, use a receiver protector such as the DX Engineering Receiver Guard Electronic RF Limiters DXE-RG5000HD ( https://www.dxengineering.com/parts/dxe-rg5000hd ) or the Cross-Country Wireless Receiver Front-end protection unit ( https://www.crosscountrywireless.net/receiver_protection_unit.htm ). There are others, but these are the ones I use.
Search the web for circuits to build one yourself, if so inclined, much cheaper as well.
There is a very good chance the antenna circuit will be damaged by a transmitter nearby. That being said, the Mini-Whip I use seems to saturate when I transmit, but it has not failed yet. It’s been a few years now, so a good enough test, I think.
To avoid the risk of damaging the antenna circuit, use a receiver protector. They are available commercially or search the web for circuits to build one yourself, if so inclined, much cheaper as well.
The miniwhip is not an “antenna”: it is a “probe” for the electric field. For this reason it must be mounted at least at four meters over the ground and far from conductive objects as the fence in the photo. The coax shield must be connected at ground at the base. Check the Author’s document.
Generally speaking miniwhip on the market doesn’t use the original schematic diagram due to the cost of the second stage transistor. Check the
Linear Loaded Dipole is less efficient compared to a standard short dipole.
73s.
There is this internalized misinterpretation to connect a ‘counterpoise’ on the shield of the coax. The RF does not make any difference, anything that is electrical connected, will be a counterpoise. The braid (shield) of the coax or the wire will be part of the antenna system. A plastic coated shield of a coax does not prevent from being a part. Just human viewer may think so 😉 So, the yellow counterpoise wire is not required at all, it’s just a technical illusion.
I think there is a slight difference in this particular application between a counterpoise and a ground connection.
Some people say the coax shield is part of the antenna, it may be so, but a short ground connection does make a difference, instead of 100 ft/30 m coax shield, as in my my case, going back to the radio room.
I installed a wire going to a ground rod at the base of the antenna and the difference, for the better, was substantial.
I’m wondering what the longest ground wire I can run from the mini-whip to a ground rod without the ground wire becoming ‘resonant’??
I live in a 2nd floor apt and have nowhere to put up a mast other than a temporary PVC pole out of a window. My original plan was to try the mini-whip antenna connected to a male-to-male SMA barrel connector and another to the SDR dongle taped to the top of a PVC pole. Then use a long, active USB cable to the PC. My main problem is where to find an effective RF ground. Should I forget this and consider a different type of antenna?
Hi there, and forgive me for replying so late, but the email notification system doesn’t seem to work (at least it never worked for me)
Given your description, I believe that in your case a loop may fit better, so consider the idea of picking an MLA-30+
With a bit of easy mods that cheap loop will serve you decently well
Thanks, Andrew. I had a number of similar suggestions and went ahead and bought an MLA-30+. Unfortunately, I haven’t got around to trying it out yet but am looking forward to doing so.
Many thanks for the reply.
Trevor
What mods are suggested/required for the MLA 30+??
Thanks from yet another apartment dweller…
Theran
K7TMD
Do you connect the ground on the injector to the same ground as the miniwhip ? Does the voltage injector require a seperate earth for best performance and it uses induction across the soil/ground ?
Many thanks !
Alan / 2E0FWE
Hi, nice article, congratulations!
I’d like to know about the power source ground connection too. In my case I have an linear power supply to feed the mini-whip so I won’t any noise (I think). But I have the same doubt with the ground connection. I have a place like the article says: second floor and a large balcony metal rail to act as a counterpoise but in an urban place (potentially noisy).
Another question is where should I put the power feeder, nearest from mini-whip or nearest from my radio shack?
Thanks!
Interesting Set Up,It Gives Ideals On How To Improve My Own Set-Up,I Can Really Appreciate This, Thanks,Ok,CB,Call Sign,”KHW-6006,CB Handel,”Uncle Sam”,Signing Off !!!!
Nicely done article.
This is an interesting article, but it lacks an important detail. It mentions wrapping the coax in a loop, and using some snap on chokes. Some more details on the loop and chokes are needed. How big was this loop, was this used around a toroid (and if so, what are the specs?) and some details about the chokes (where you got them, their specs) are all missing from the otherwise well written article
Mike, the coil is on air, just wrap 5 or more turns of coax to form a coil of about 25cm diameter, as for snap on chockes, those are widely available #31 ones, use at least 6 of them grouped together, and, by the way, replace the thin coax with a better one (rg 58 will fit), the remainder should be pretty clear, or I hope so
Hi John, I’m not pretending that the miniwhip could stand (in a really noisy location) to, say, a loop; yet I believe that, in most cases, it was marked as a “noise magnet” just due to improper/quick (just for a test) setup; I’m not saying it’s better than a full size antenna, but if one is space constrained and cannot “aim” the antenna, then a properly installed whip could make a difference (then an LLD will be even better from the S/N standpoint, but that would require more space)
I do have limited space.
I’ve have had a lot of success with magnetic loops but this article is very informative!
Thanks!
Posts like this is why this site is the “go to” place on the internet for all things radio!
Thanks Grayhat and Thomas.