
Many thanks to SWLing Post contributor Don Moore–noted author, traveler, and DXer–who shares the following post:
 A Beginner’s Guide to ALE: Part Two
By Don Moore
Don’s traveling DX stories can be found in his book Tales of a Vagabond DXer [SWLing Post affiliate link]. If you’ve already read his book and enjoyed it, do Don a favor and leave a review on Amazon.
In the first part of this series, I explained what the digital ALE mode is and looked at an easy way to get started monitoring ALE stations. In part three, I’ll look in detail at the dozens of countries and hundreds of stations that can be logged in ALE mode. But first, let’s look at a way to let software do the hard work in adding those hundreds of stations.
The Black Cat Approach
Run by longtime DXer Chris Smolinski, Black Cat Systems is a provider of over two dozen quality software programs for radio hobbyists. The one we’re interested in is the Black Cat ALE Vacuum Cleaner. The name describes exactly what it does. The user feeds it a large number of SDR spectrum recordings, and the Vacuum Cleaner sucks up the ALE DX and lists them in a file.
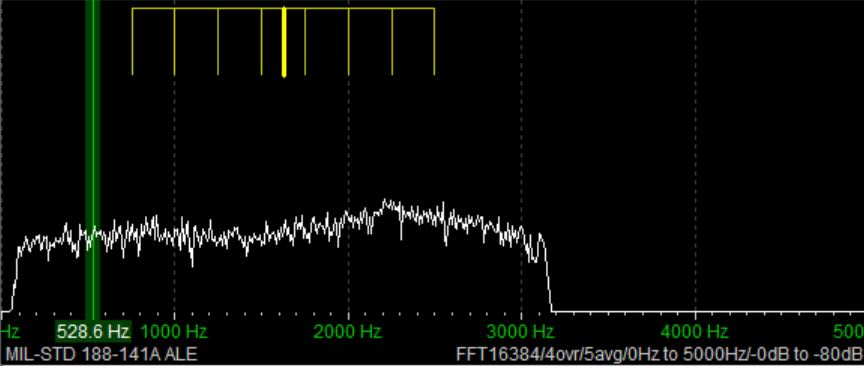
Let’s step through the basics of using the program. But first, you need at least an hour or two of SDR spectrum recordings covering frequencies with lots of ALE traffic. Some of my favorite ranges are 7500-9200 kHz, 10100-11500 kHz, and 15500-16500 kHz.
Here’s the main screen on the Vacuum Cleaner:
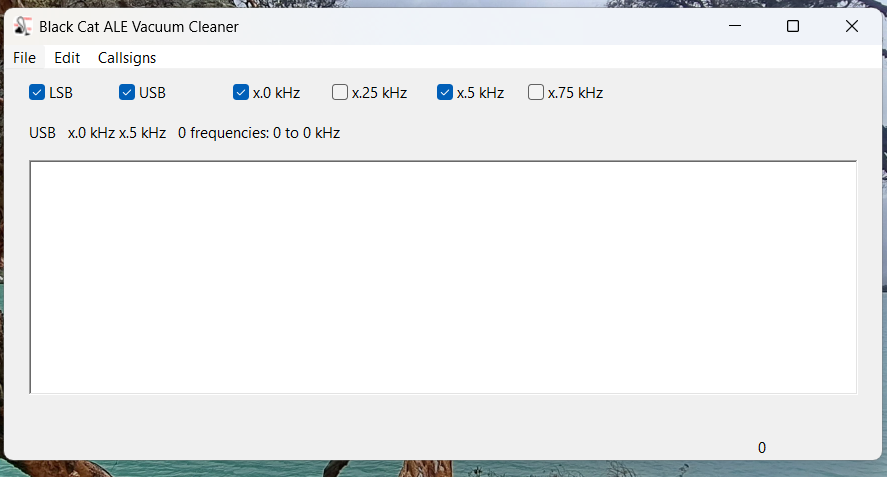
I recommend you check both USB and LSB. In the logs reported to the Utility DXers Forum, about 97% of all ALE transmissions are in USB mode. From my experience, if LSB is unchecked, the Vacuum Cleaner will step through the files about twenty percent faster, but you will miss a tiny number of stations.
The kHz settings determine how finely the application will tune in looking for ALE signals. I recommend just checking x.0kHz and x.5kHz. Almost all ALE signals on shortwave are transmitted on frequencies that end in either point-zero or point-five kilohertz. The main exception is the US Department of State, which uses frequencies ending in point-six kilohertz (e.g., 8058.6 kHz). Fortunately, the one-hundred Hertz difference from the point-five kilohertz setting isn’t enough to make a difference except maybe with the weakest of signals.
The next step is the Settings, which are found under the Edit menu. Most values can be left at the defaults.
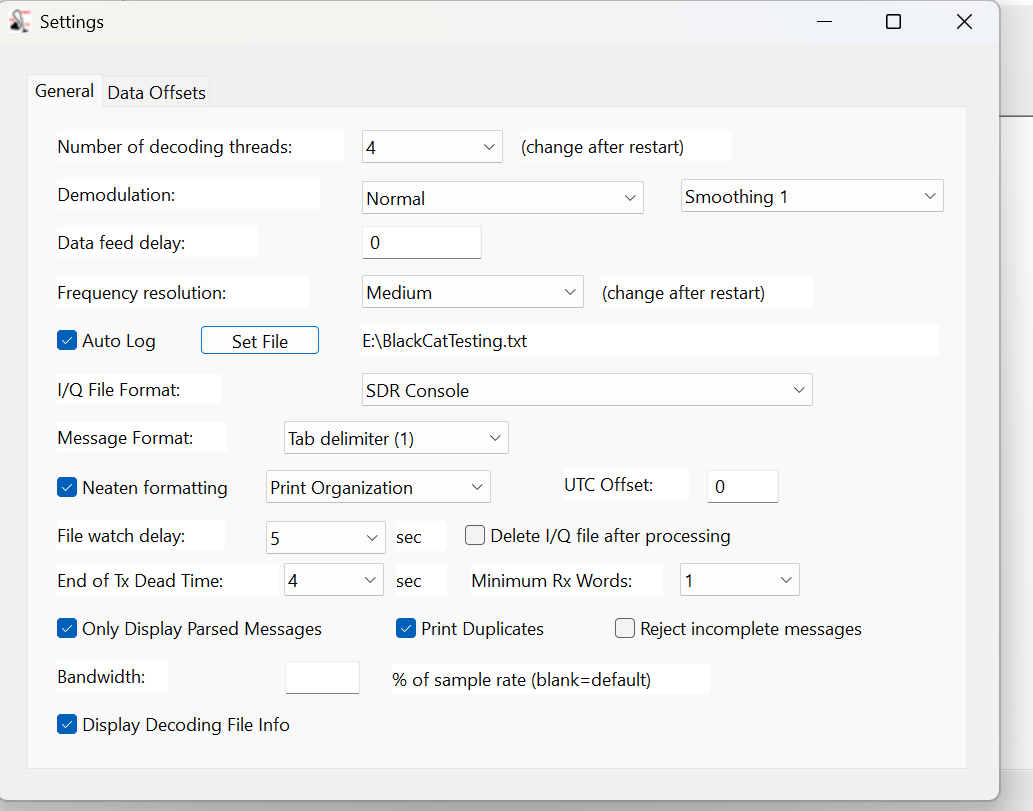
At the top, the number of decoding threads should be no more than the number of cores that your CPU has. Check the Auto Log box, then enter a destination path to record logs to a file. (Otherwise, the logs that show up in the window will be gone when you close the program.) Next, select the file format of the SDR program used in making the I/Q recordings. Finally, set the file format for your logs. I prefer the single tab format so that I can later import the logs into Excel and sort by frequency.
Now it’s time to decode. Under the File menu, select Open I/Q Files and browse to a folder of spectrum recordings to decode. Click on Open in the file selection box, and the Vacuum Cleaner will start decoding the files. Now take a break and come back in fifteen or twenty minutes. The main screen should look like this.
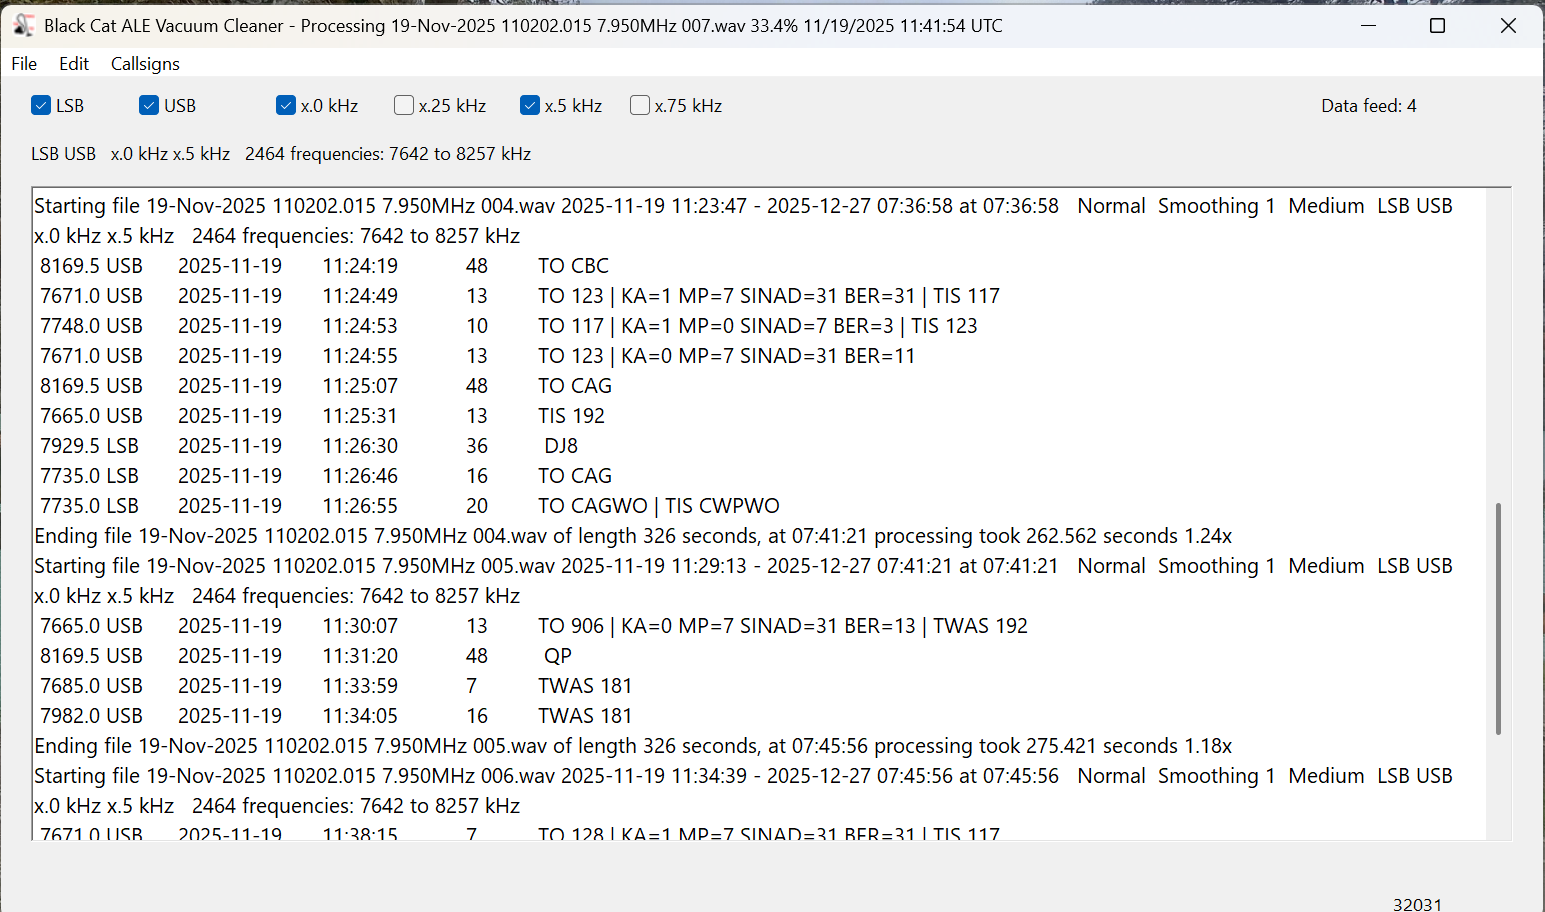
The current settings and the frequencies being scanned are displayed at the top, under the settings checkboxes. There are actually only 1232 distinct frequencies in that range, but the number is doubled as each one is being checked in both LSB and USB. Below that, the output window lists each file as it is being scanned and ALE logs as they are found. (But be sure you are also recording these to a text file.)
To see a list of files still in the queue, select File > Show I/Q Files Awaiting Processing. After a few files have been processed, this will also show an estimate of how much time is needed to complete the queue. To add additional files to the queue, select File > Pause Processing, add the files, and then select File > Resume Processing. Note that the Vacuum Cleaner processes files in date/time order. If you add files that were recorded earlier, they will go to the front of the queue.
How Long Does This Take?
In the above image, notice that after each file is finished, the time taken to decode it is displayed. These files were all exactly 326 seconds long, and the first one took 262 seconds to decode for a speed of 1.24x actual time. That may not seem important, but it depends on how much you have to decode. In a couple of days of serious DXing with my three Airspy receivers, I can easily accumulate a couple of terabytes of spectrum recordings.
Processing time depends on several factors. The first is the bandwidth/sampling rate. Those files above were recorded with SDR-Console at 768 kHz wide. All other things being equal, a narrower sample will process faster and a larger one more slowly. Depending on the band being monitored, I sometimes record with my Airspys at the 912 kHz bandwidth. Those typically take about 25% longer to decode than 768 kHz files.
Another factor is whether or not the Vacuum Cleaner has to share processing power with other running applications. That slows things down. I mostly decode overnight or at times when I’m not otherwise using the laptop. Under those conditions, my 768 kHz files decode at 1.75x and my 912 kHz ones at 1.45x. But those numbers are for my nearly four-year-old main laptop. An older laptop I have at home tops out at around 1.40x on 768 kHz files with nothing else running. If you have a high-performance gaming laptop, you should get much better numbers than I.
Then there are differences between the various SDR applications in how they store data. I won’t go into the technical details that Chris explained to me, but SDR-Console is more efficient in this regard. In my own testing, I found that files of similar bandwidth and time length recorded with SDR-Console decode at least fifty percent faster than those recorded with the default Elad and Perseus software. I’m satisfied with SDR-Console, so I haven’t tried any other programs. If you have other favorite SDR applications, I suggest doing some comparison tests to see what works best for you.
One application that you shouldn’t use is HDSDR. Chris didn’t have good documentation on the file format for this one and wasn’t fully successful in reverse-engineering it. The Vacuum Cleaner will work with HDSDR, but almost all the callsigns that it finds will be errors. And that brings us to an important question.
How Accurate Is It?
When I started using the Vacuum Cleaner, my main concern was whether it would miss valid signals. There was only one way to find out, so I ran several tests. I would give the Vacuum Cleaner a few hours of I/Q recordings to decode, and then I would process the same recordings manually using Sorcerer, as described in part one. Black Cat not only correctly identified every single ALE transmission that I found with my eyes but went way beyond that. It also found and decoded weak and noise-covered signals that I couldn’t see in the Data Analyzer window but were there when I played them back.
As Chris points out in his documentation, the emphasis on weak signal detection does cause the application to sometimes falsely report bogus callsigns. Some of these are produced by random noise, fooling the system. Others come from poorly received signals. He could have taken a ‘high confidence’ approach and only presented callsigns that had been clearly received. But that would have meant some valid callsigns not being reported. Instead, he went with displaying everything. It’s up to the user to weed those out.
If the decode doesn’t contain any of the keywords (TO, TIS, and TWAS) then it’s probably an error. But poorly received signals can cause partial and incorrect callsigns to be reported with a keyword. Spotting those just takes the knowledge and practice that comes from using the program and ALE reference materials. (That’s the topic of part three.)
Is It Worth the Price?
Black Cat ALE Vacuum Cleaner is a high-quality software available for Windows and macOS, and you can try it before buying. The cost is $99.99.
Is it worth it? If all you want to do is sample what ALE is all about, then probably not. But if you get serious about ALE monitoring and want to add hundreds of ALE stations to your logbook, this is the way to do it. I am 100% satisfied with the Black Cat ALE Vacuum Cleaner. I’ve decoded several thousand hours of I/Q files with it over the past few years. (When running multiple SDRs at a DXpedition, it’s easy to accumulate seventy or eighty hours per day.) The program also has a few other tricks I haven’t covered. For example, it is possible to actively monitor a folder and decode I/Q recordings as they are created.
In part three of this series, I’m going to take an in-depth look at the countries and stations that can be logged in ALE mode. Once you’ve seen how much DX there is to log, you might just be convinced, like me, that the program is worth the price. And you married guys can tell the wife that you’re buying a new vacuum cleaner that only you will use, hi!
The Vacuum Cleaner isn’t the only program that Chris has for ALE monitoring. Black Cat ALE is a different program that does live monitoring of up to twenty-four ALE frequencies simultaneously with SDR-Console, assuming your laptop has the resources to handle that.
Finally, Chris tells me that he’s been experimenting with using the Vacuum Cleaner with wide-bandwidth I/Q recordings on high-end laptops. On his M4 Max MacBook Pro, he’s able to process 32-MHz wide recordings at about 0.50X real time and 16-MHz wide recordings at about 0.97X real time. As he says, it won’t be long until it will be possible with the right equipment to monitor the entire HF spectrum for ALE signals in real time. And that will be fun!
Links
- Black Cat Systems main page: https://blackcatsystems.com/
- The ALE Vacuum Cleaner: https://blackcatsystems.com/software/black_cat_ale_vacuum_cleaner.html
Don (and Thomas):
This series is killer! Thank you for the overview to ALE for SWLs and others.
BTW, enjoyed your travel DX book, too.
73,
Frank
K4FMH