
Many thanks to SWLing Post contributor, Michael Schuster, who shares the following guest post:
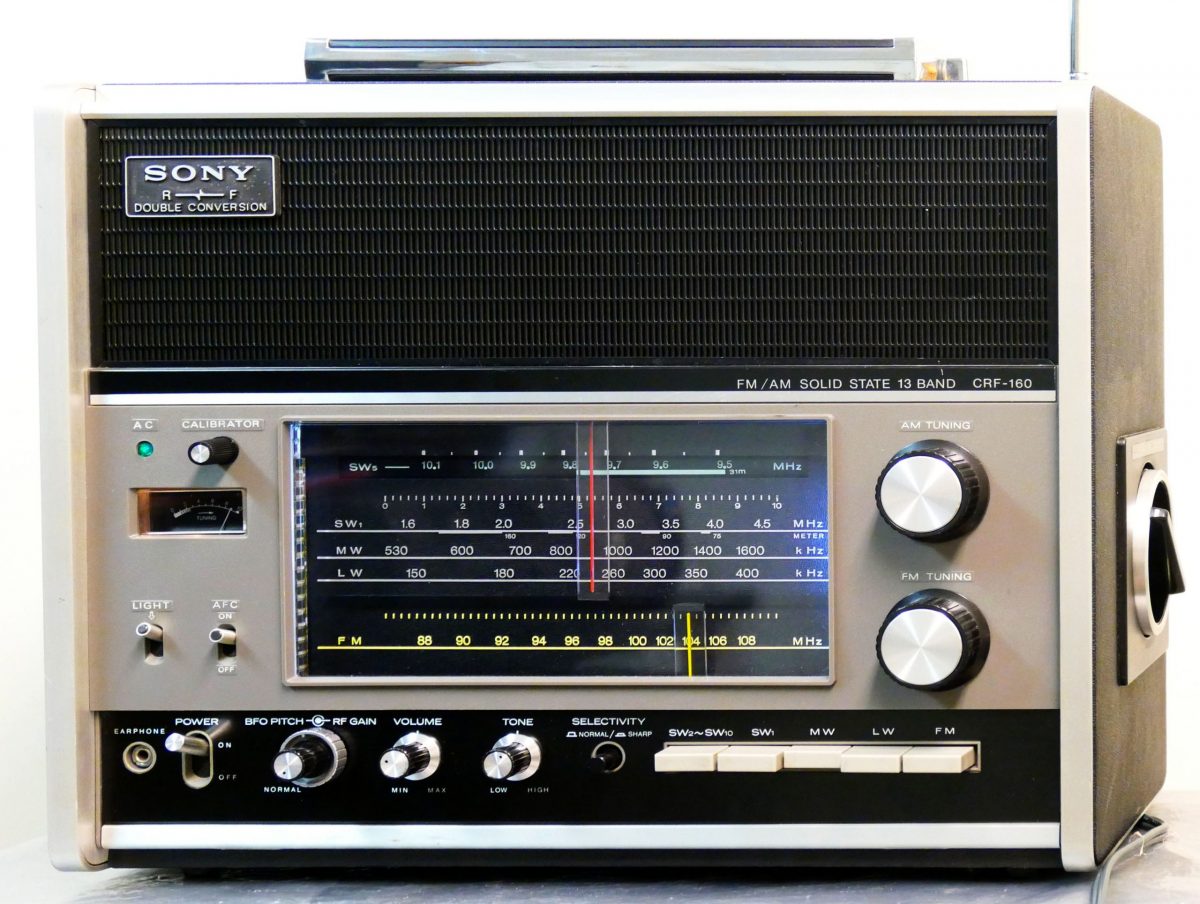
Vlado works his magic on my Sony CRF-160
by Michael Schuster
Back in the 1970’s my grandfather gifted this solid-state portable to me as it was more than he needed. It was the first “real” radio I can remember owning, and it initiated my habit of scanning the dials into the wee hours of the morning. I began my serious SWLing using this set as it had excellent sensitivity, dual conversion design, big booming audio, and generous bandspread tuning for each major SW broadcast band.
One of the best-known SWL programs at the time was Happy Station on Radio Nederland, and I have distinct memories of listening in our back yard one summer afternoon when the show came up on the African Service over the Madagascar relay. My family was astonished at the program coming from so far away and even more so when Tom Meijer happened to read my letter over the air during the mailbag segment!
Fast forward many years (and two moves) later, it sat on a shelf until, trying it out again, I was dismayed to find both slide rule tuning dials, and the rotary drum band selector, to be frozen in place. And so there it sat until….
In a few online forums I kept hearing about a magician named Vlado at Ham Radio Repair. He specializes in restoring old sets, and has the courage and curiosity to tackle just about anything. Thinking this might be my last chance to bring this fossil back to life, and armed with a scanned copy of the service manual downloaded from the Radio Museum web site (the Internet is a marvelous thing) I began a several months’ long email exchange with Vlado entitled “Would you be willing to work on…”
He is chronically swamped with sets to work on, and has little room to store pending jobs, but was more than willing to have a look. Several months, and one pandemic later, we touched base again and I arranged to ship this monster off to him. Vlado is especially interested in the stories behind old hardware, so I shared its history with him as it adds that extra “human factor”.
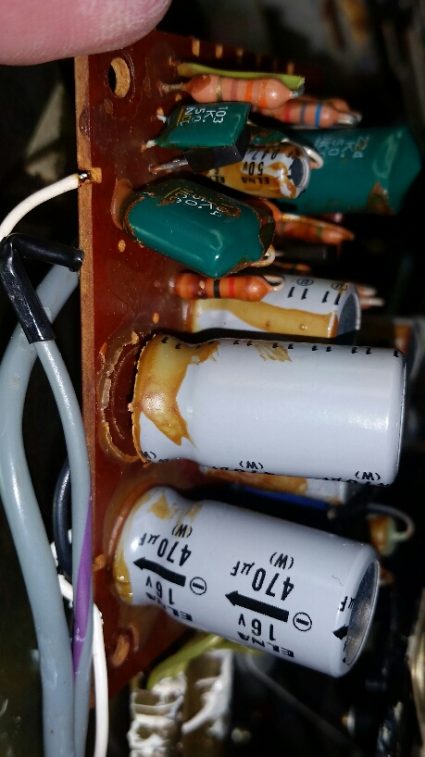
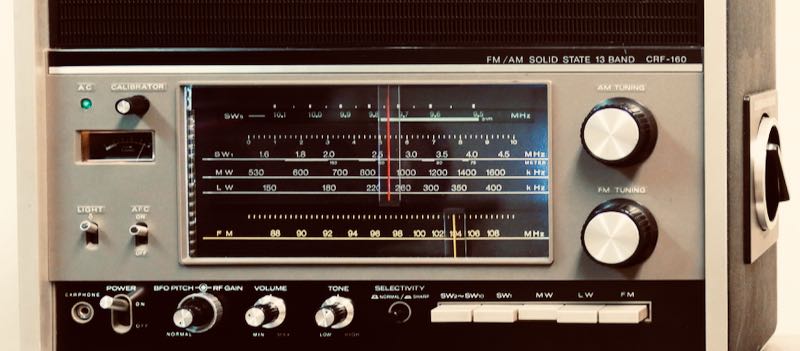
The radio is in great shape as he noted, but needed a total rework of the tuning dials and drum selector. He also replaced all of the electrolytic capacitors (most were leaking as pictured), replaced some tiny light bulbs with LED’s, and realigned all of the circuits for maximum performance.


Unpacking and trying out the restored set was a true blast and somewhat miraculous. It performs just as I remember and now sits on the shelf, this time in use rather than in storage, booming its audio across my basement work room.
Now this set will probably outlive me as it did my grandfather; hopefully it will end up in the hands of an appreciative recipient for the next generation of radio enthusiasts.
Thank you for sharing this repair story, Mike. I visited Vlado’s home a few weeks ago and saw the box labeled “Sony CRF-160” in-line to be repaired. As Vlado worked on it, he sent me a couple of photos, too, because I believe it was the first time he had ever worked on this particular Sony model. It is certainly a gorgeous radio–wow! And I do love your philosophy as it’s the one I adopt too: keep vintage radios alive and working beyond our generation.
Vlado is truly the most capable ham radio repair guy technician/engineer you’ll ever meet. He’s also as honest as the day is long. If you have a vintage or late-model solid-state radio that needs repair or restoration, contact him.
Just in the interests of clarity and accuracy (and because I’m getting a little over people pointing at allegedly ‘leaking’ caps and blaming them for all ills): while those caps may indeed be faulty (and probably are – after all, even if they are Elnas, they’re still ~50 years old!), the brown goop visible isn’t them ‘leaking’ – it’s the urethane glue used to secure them to the board. After a while the stuff becomes slightly corrosive, and then with age and heat eventually goes hard & becomes somewhat conductive, both of which can problems if it happens to be across terminals/tracks
It’s surprising, though, the number of times I’ve cleaned and picked that crap off and the cap has tested perfectly OK for capacitance, DF/ESR, & (electrical) leakage. Not to say I don’t bin them anyways – elderly electros are always suspect and just because they haven’t failed *yet* doesn’t mean they should remain – but quite often what *looks* like an obviously terrible failure to the layman isn’t the actual problem.
(In fact, at first glance of that picture of ‘leaking’ caps, I was more worried about the glue remnant that appears to be on the greencaps there – you expect those to have better AC performance than electros, and so any p/s/c due to electrically-conductive glue is often more of a problem than it is on the electros it’s meant to retain…)
You’re right Ron: I mis-labeled that. Thanks!
I’ve restored a number of old radios for personal use and you are correct about the glue, it appears on components. Exposed coils and many IF coils also have a type of protective wax or resin. You never know until you open up the case. Personally I first inspect for any leaking or puffed out caps and if none are found I refrain from replacing any without first doing an alignment. This is mostly due to laziness on my part but also because I will be the only end-user and am willing to take a chance on future problems. This is my approach but it’s not be the best. When in doubt have a reputable service person like Vlado work on your radio.
My favorite memory of capacitors is when I bought a used RDR (Radio Direction Finder) radio. The tuning capacitor had a large mud hornet’s nest encasing it. Completely cemented in place. Over time got it all cleaned up and the radio working.
I tend to approach things in a very similar way, particularly restorations – unless the fault is glaringly obvious I’ll give a quick once-over first, initial testing as needed (e.g. power/RF/IF/output transformers for continuity, & electros & critical coupling caps for leakage) – then, if nothing’s particularly amiss, power up gently and see if / how much is working. Only then do I get stuck in to the actual repair. Alignment is usually left to last, mainly because some sets are absolute b’stards and I really only want to do it once!
But whatever works for you is fine – there’s no “one right way” to approach things. Except to avoid the “stick a bigger fuse in and see what burns!” approach, which used to be a depressingly common method amongst many CBers and hams back when I was repairing transceivers…
(And though I wasn’t expecting a correction, Thomas, it’s appreciated – my comment was more letting off a bit of frustration over the number of ‘I replaced these obviously “leaking” caps and it still doesn’t work, tell me what’s wrong!’ enquiries I’ve seen/had in these COVID times, as people pull long-forgotten radios out and wonder why they don’t work!)
Vlado restored an RF-2200 I found on eBay. Luckily I live near Charlotte so I could drop it off at his house last summer. He actually got it back to me when he came to town to do some shopping. He’s a stand-up guy and it was a pleasure talking to him in person a couple of times. He even treated me to dinner!
I just had Vlado recondition my 33 yr. old Sony ICF-2010 & it’s now as good as new. He is a pleasure to work with.
Great story. Looks like complicated surgery for an old radio but well worth it. From an era when radios were really radios . Enjoy – and Vlado, you are a very talented professional. Thanks for posting Thomas.