
 Many thanks to SWLing Post contributor, Matt Blaze, for the following guest post:
The “Signal Sweeper”, a portable Wellbrook antenna setup
by Matt Blaze
Here’s a very simple construction project that’s really improved my travel shortwave and mediumwave listening experience.
When I go somewhere interesting (whether a day trip on my bike or a longer excursion to an exotic locale), the two things I’m sure to want with me are my camera gear and at least one good receiver. Fortunately, there are plenty of good quality shortwave receivers to choose from these days; the hard part is packing a suitably portable antenna that can do justice to the signals wherever it is I’m going.
I’ve long had a Wellbrook antenna on my roof at home. These wide-band amplified loops famously enjoy a reputation for excellent intermod and noise rejection, as well as an almost magical ability to pull in signals comparable to much larger traditional HF and MF receive antennas. A portable Wellbrook – something I could pack in my luggage that performs as well as the one on my roof, would be just ideal.
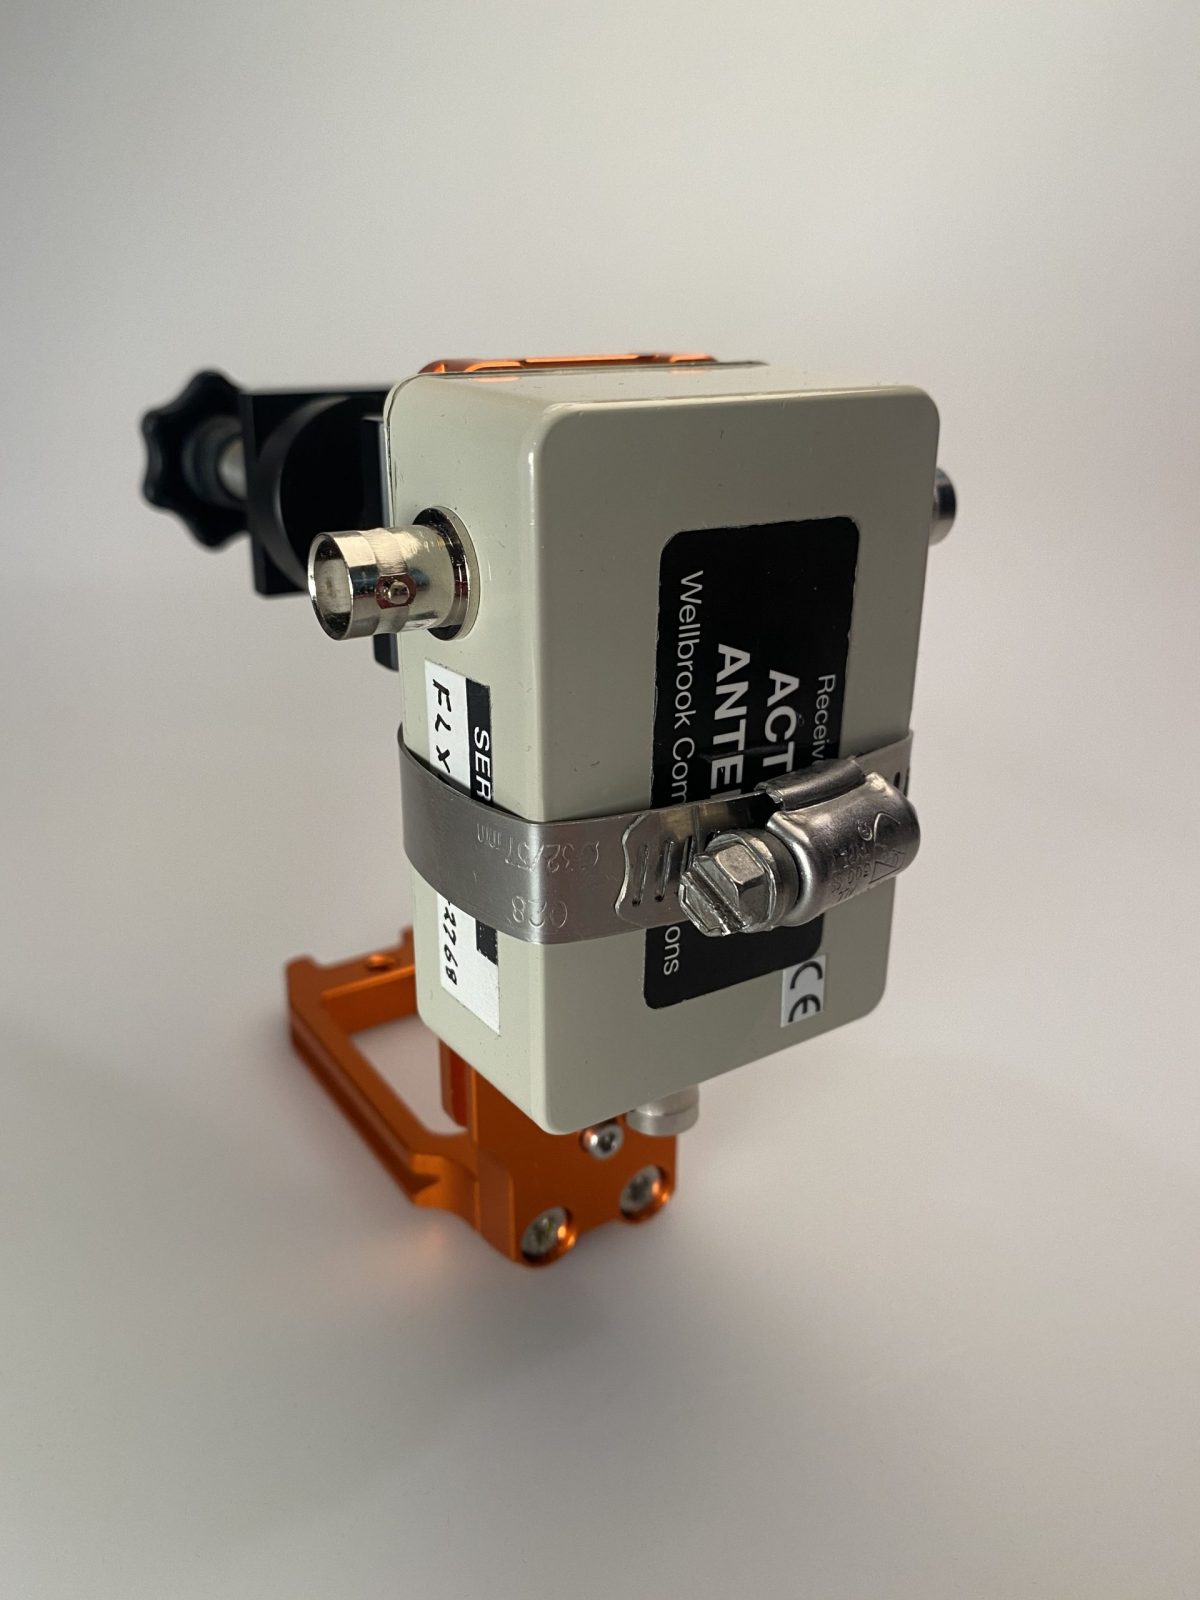
Fortunately, Wellbrook sells a “flex” version of their antenna intended for just this application, the model FLX1530LN. It’s essentially just the amplifier of their fixed-mount antennas, equipped with a pair of BNC connectors for you to attach a user-supplied ring of coaxial cable that serves as the antenna loop. This way, you don’t need to travel with the awkwardly large 1 meter diameter ring of aluminum tubing that makes up the normal Wellbrook. You can just bring a compact spool of coaxial cable and configure a loop out of it when you arrive at your destination.
The tricky part is how to actually form a stable loop out of coaxial cable without needing lot of unwieldy supporting hardware. In particularly, I wanted something that could be set up on a camera tripod to be freestanding and easily rotated wherever I happened to find myself wanting to play radio. The key would be finding or making some kind of mostly non-metalic support for the coaxial loop that could be folded down or collapsed to fit in my baggage or backpack for travel.
And then I found it: a humble 3-section telescoping broom handle sold on Amazon for about $15 that’s exactly the right size: the “O-Cedar Easywring Spin Mop Telescopic Replacement Handle“. It collapses to 22 inches (just short enough to fit in my suitcase), and extends to 48 inches (comfortably long enough for a one meter diameter loop).
Normally, a wire loop would need both vertical and horizontal supports in a cross configuration, but by using a reasonably stiff coaxial cable, I figured I could get away with just using the broom handle vertically. I found that LMR400 (the basic kind, not the “Ultraflex” version) holds its shape quite well in a one meter loop supported this way.
At this point, it was just a matter of the details of attaching and mounting everything together into a portable package.
A one meter diameter loop, which is the ideal size for the Wellbrook amp, can be made from 3.14 meters of cable (ask your middle-school math teacher). That’s about 10 feet for Americans like me. High precision is not required here, so I just cut 10 feet of LMR400.
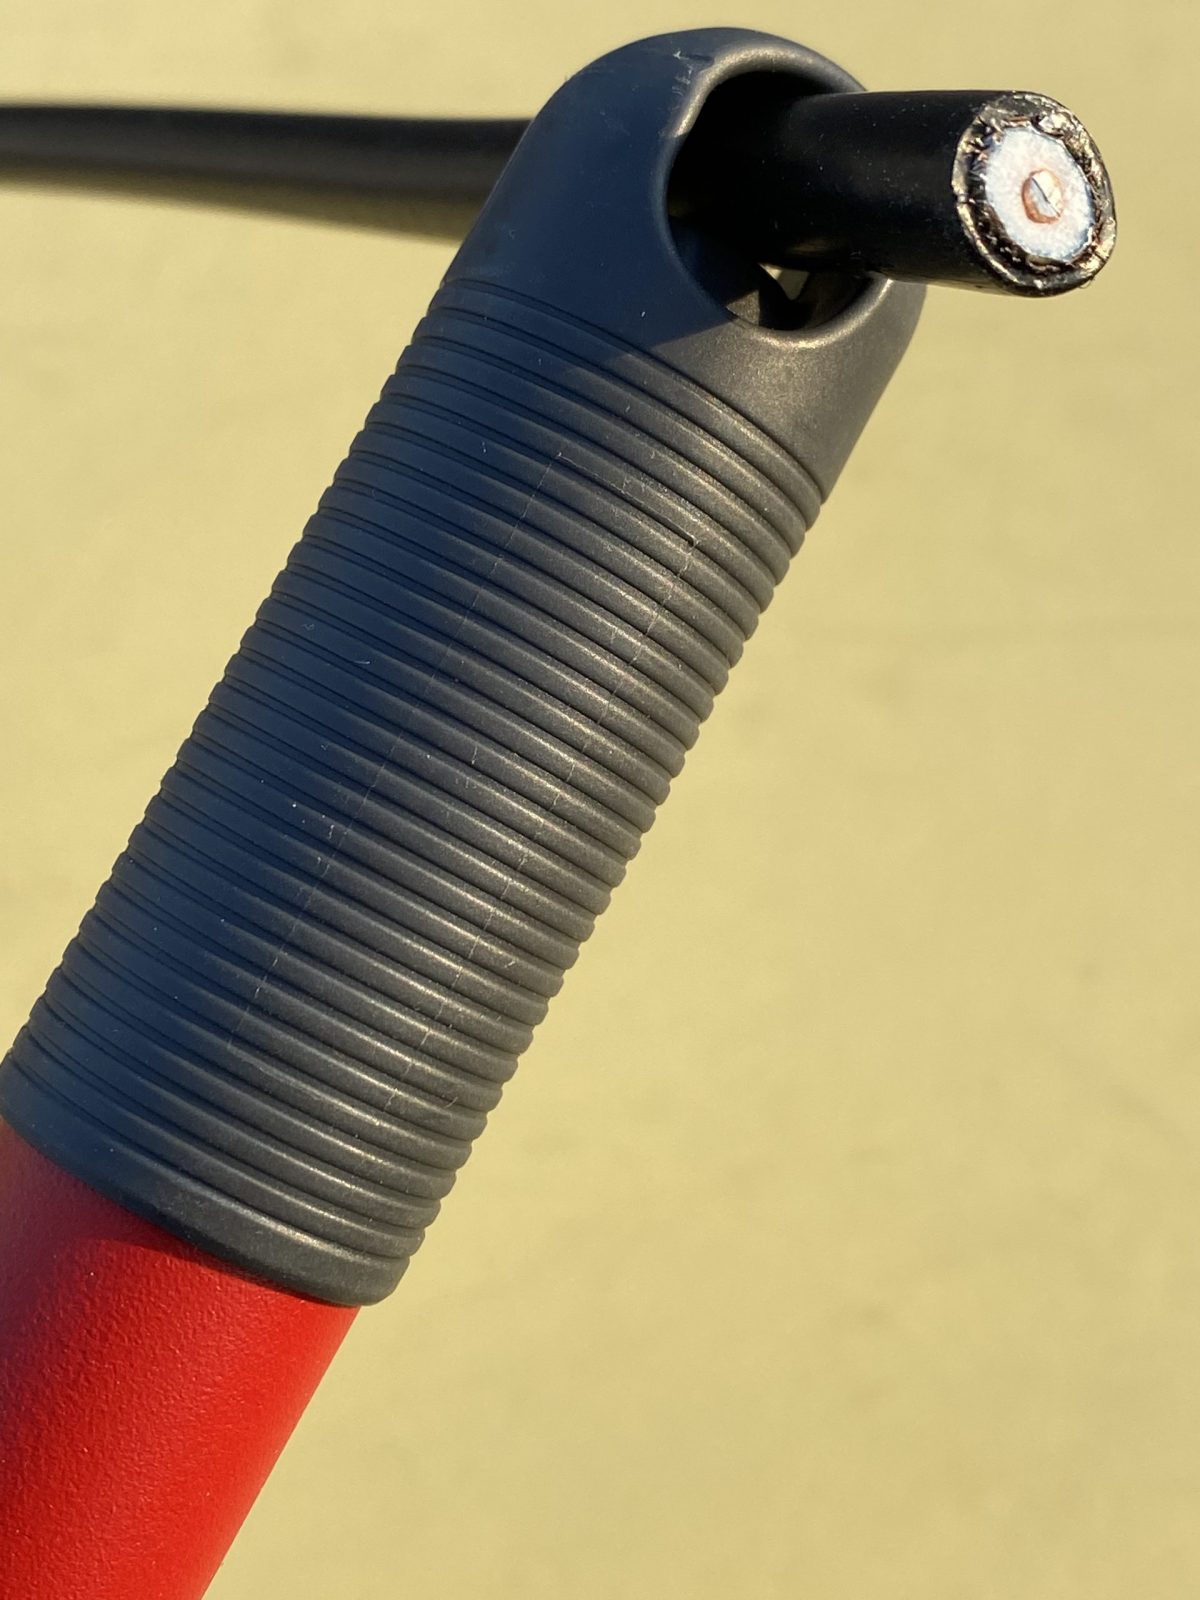
The next step is to attach the middle of the cable to the top of the broom handle. The O-Cedar handle has a loop at the end for hanging it on a hook in your broom closet. It happens to be just the right diameter for LMR400, but not with BNC connectors attached. So you’ll have to thread the cable through before you crimp or solder on the with connectors. (See photo above). I used the Times Microwave crimp-on BNC connectors, which I had some extras of lying around. I also put some shrink wrap on the cable at either side of the broom loop, just to keep it from slipping out and becoming unbalanced, but that was probably unnecessary.
Now I needed a way to to attach the Wellbrook amplifier to the other end of the handle, as well as some way of mounting the whole thing to a camera tripod. My first thought involved a lot of duct tape. But I wanted something more permanent and reusable.
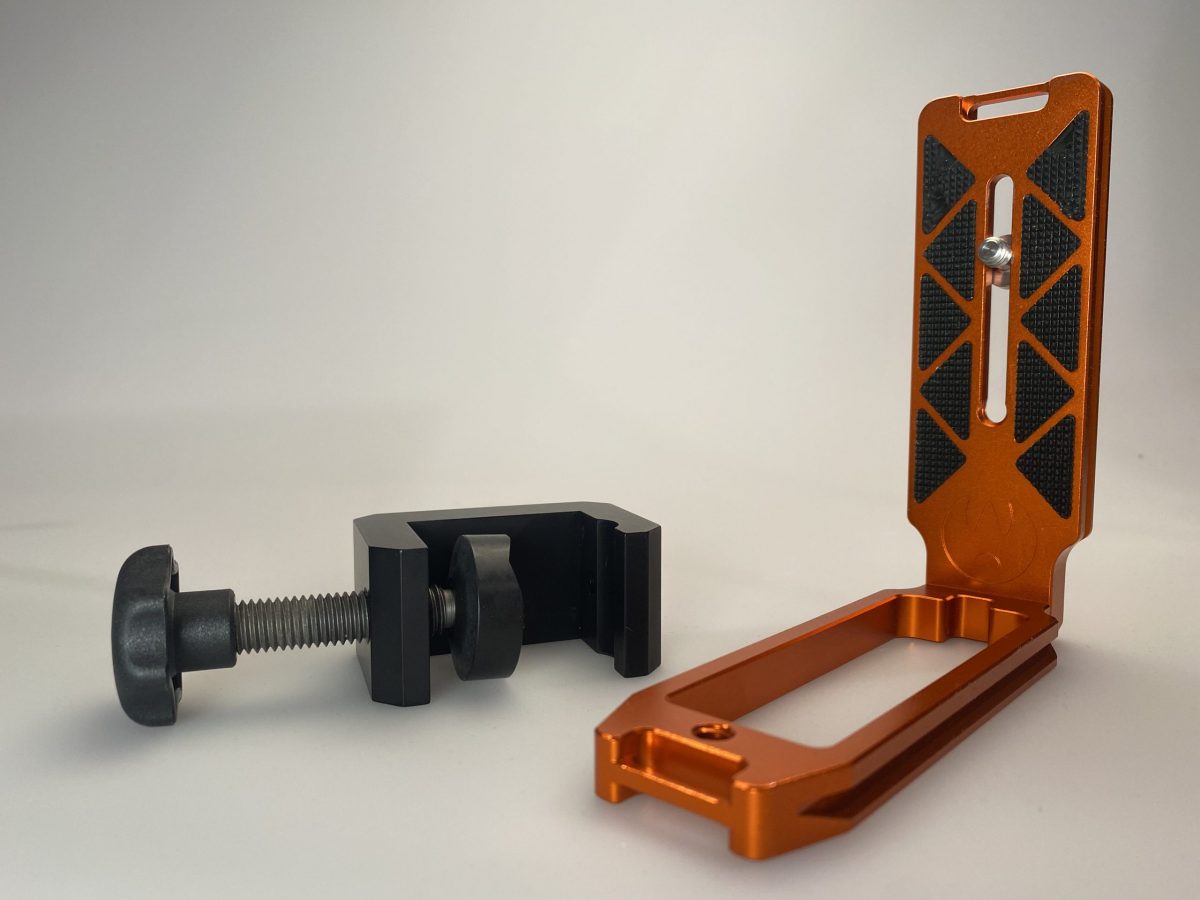
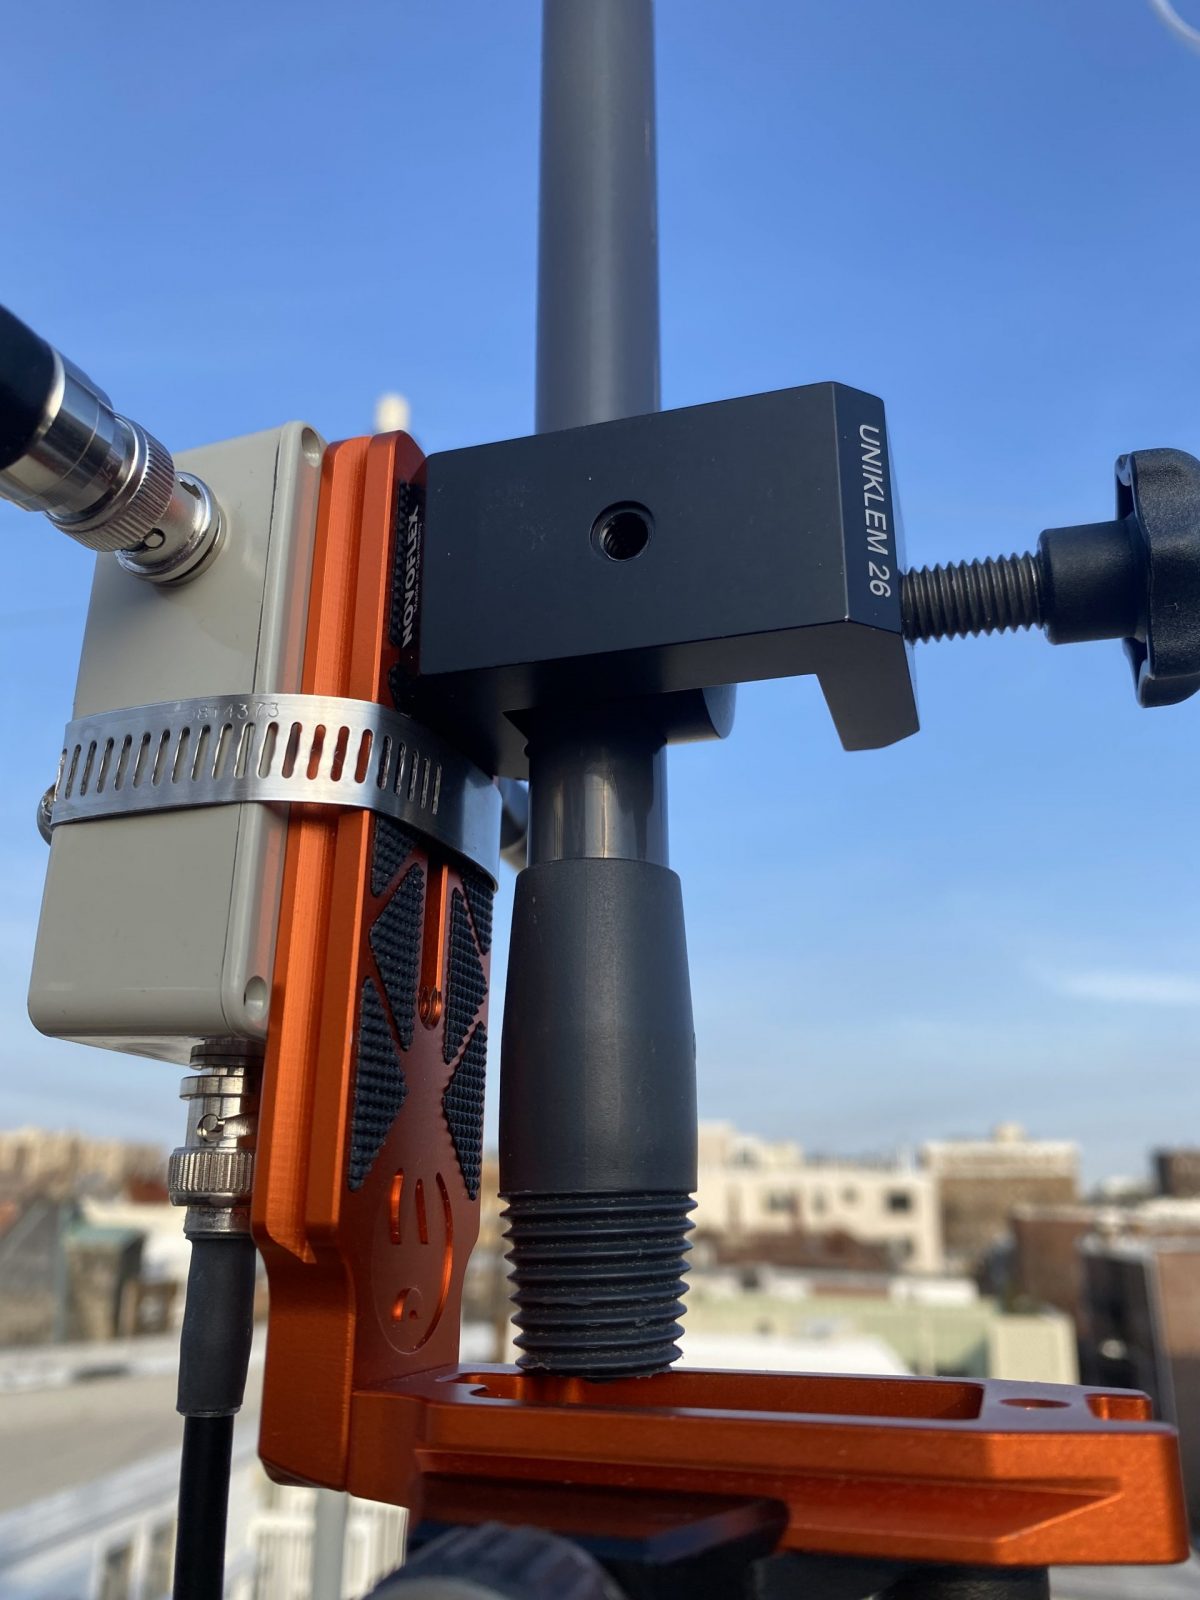
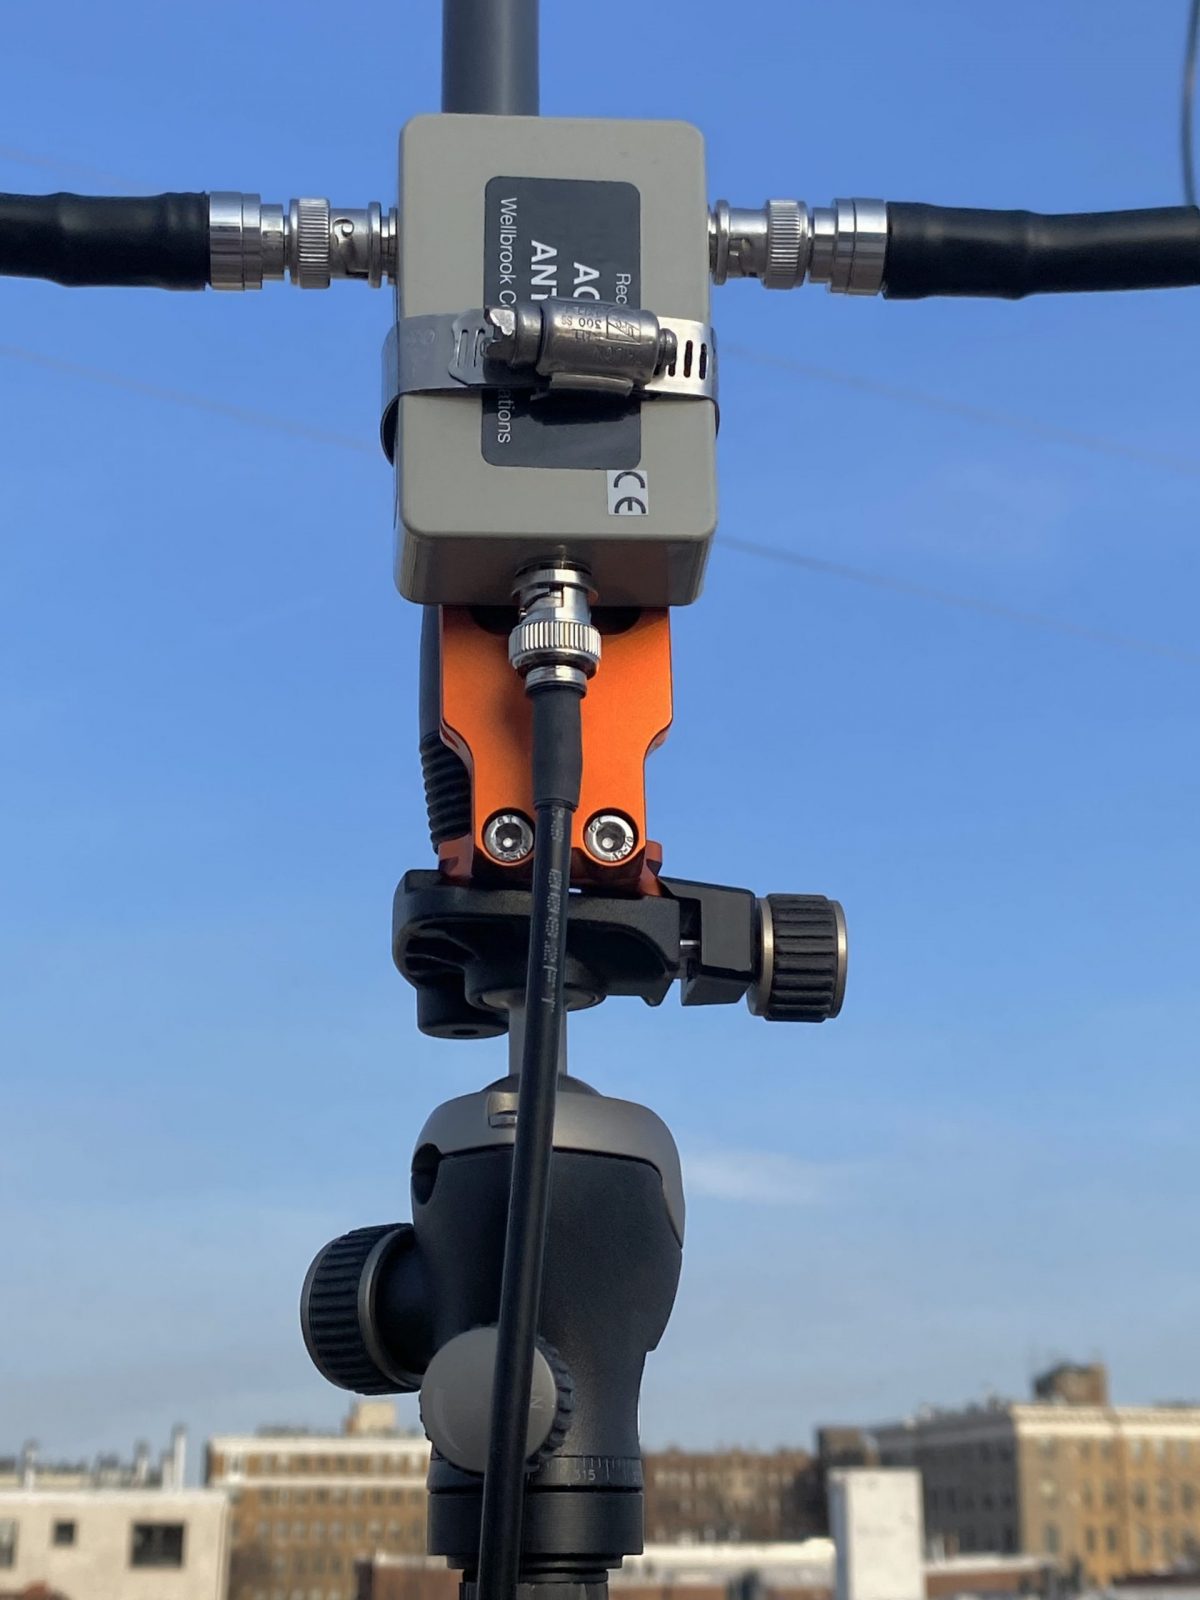
The key is something called an “L-Plate”, which is a piece of hardware intended to allow you to mount a camera to a tripod in either “landscape” or “portrait” mode. It’s basically two tripod dovetail mounts attached at a 90 degree angle. I used one that was in my junk box, but you can buy them new or used on eBay. I also needed a clamp to attach the L-plate to the broom handle. I used the Novoflex MiniClamp 26, which I got from B&H Photo. The clamp attaches to the inside of the L-plate with a captive screw. (See photos)
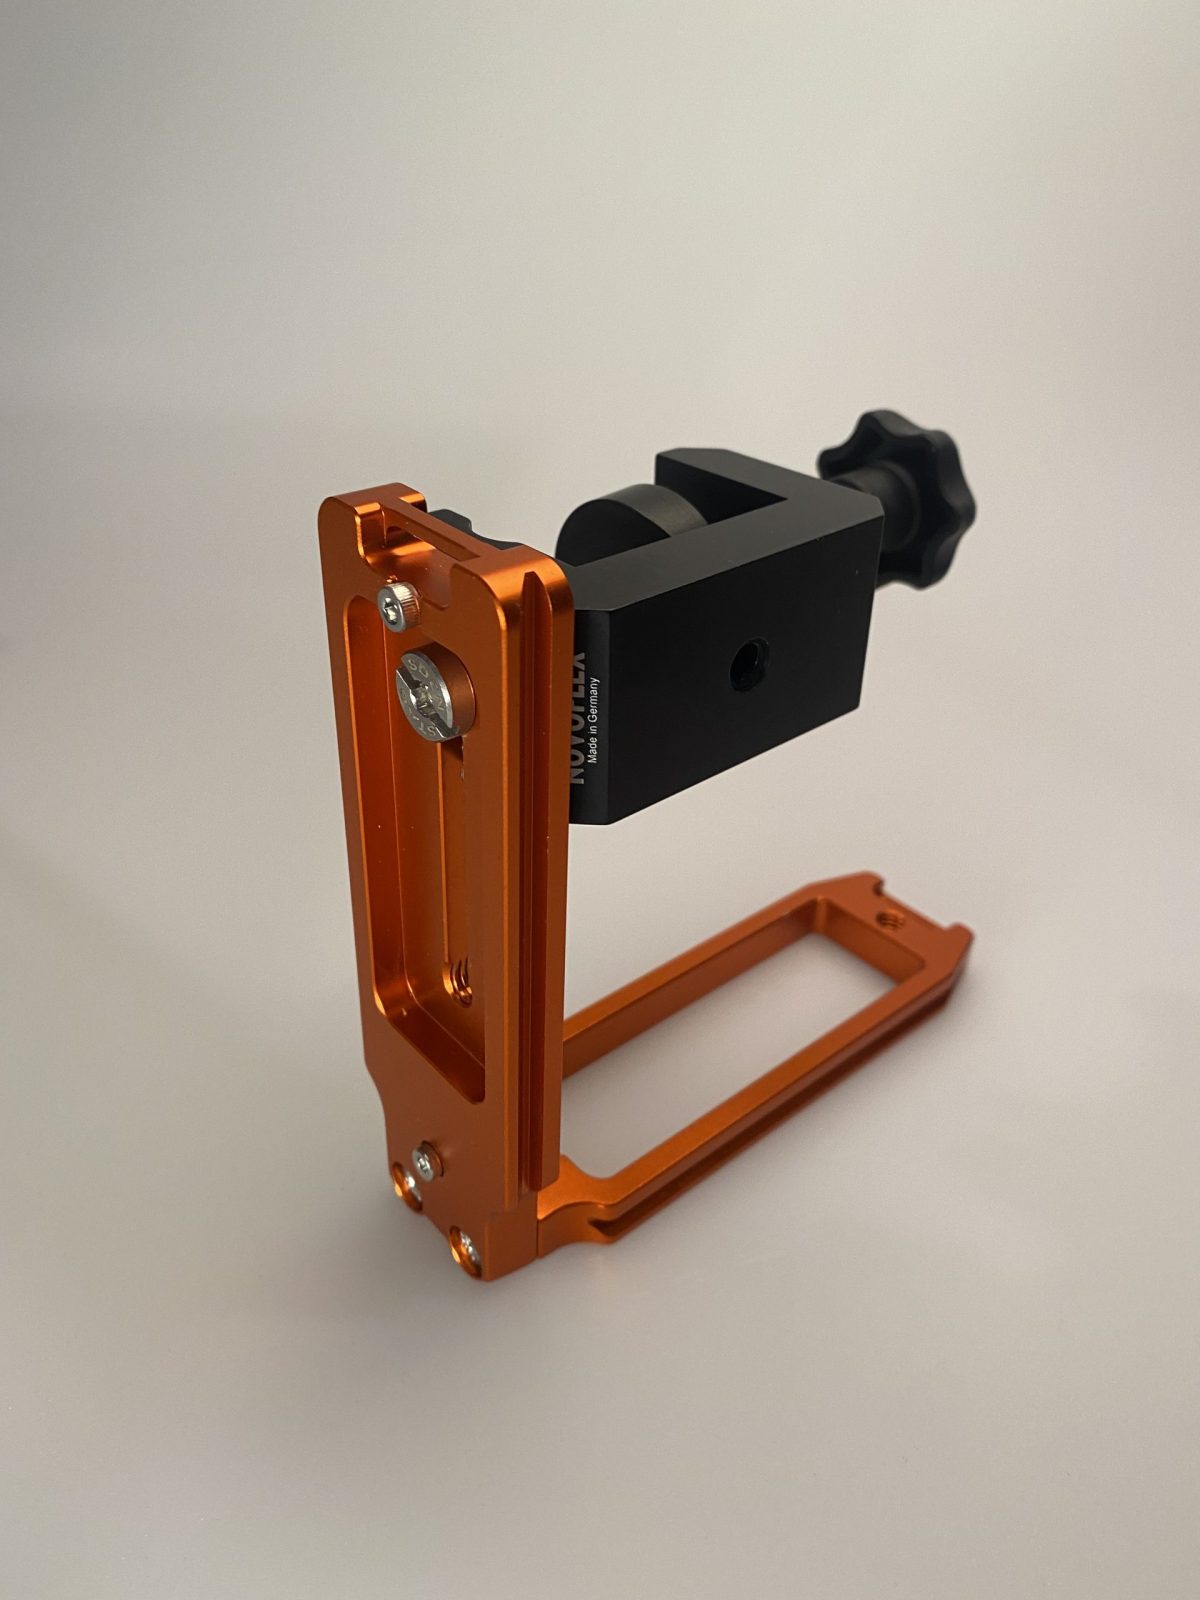
Next, I attached the amplifier to the other side of the L-plate using an ordinary screw-on hose clamp. Easy enough, and surprisingly sturdy.
And that’s it. To assemble the antenna, just extend the broom handle to about one meter, allowing for a roughly one meter diameter loop that’s as round as you can make it with the amplifier at the bottom. Then clamp the L-plate to the bottom of the handle so that the handle is just above the base of the plate, and attach to the tripod. (See the photos).
 The Wellbrook is powered over the feedline with a 12VDC bias-T injector. So you need a clean source of 12 volts. I use a cheap Talent Cell battery pack (available on Amazon in various capacities). These actually deliver 11.1 VDC (3x 3.7V), rather than the 12V the Wellbrook calls for, but it works fine in practice. I can also use the same pack to power the radio and digital audio recorder.
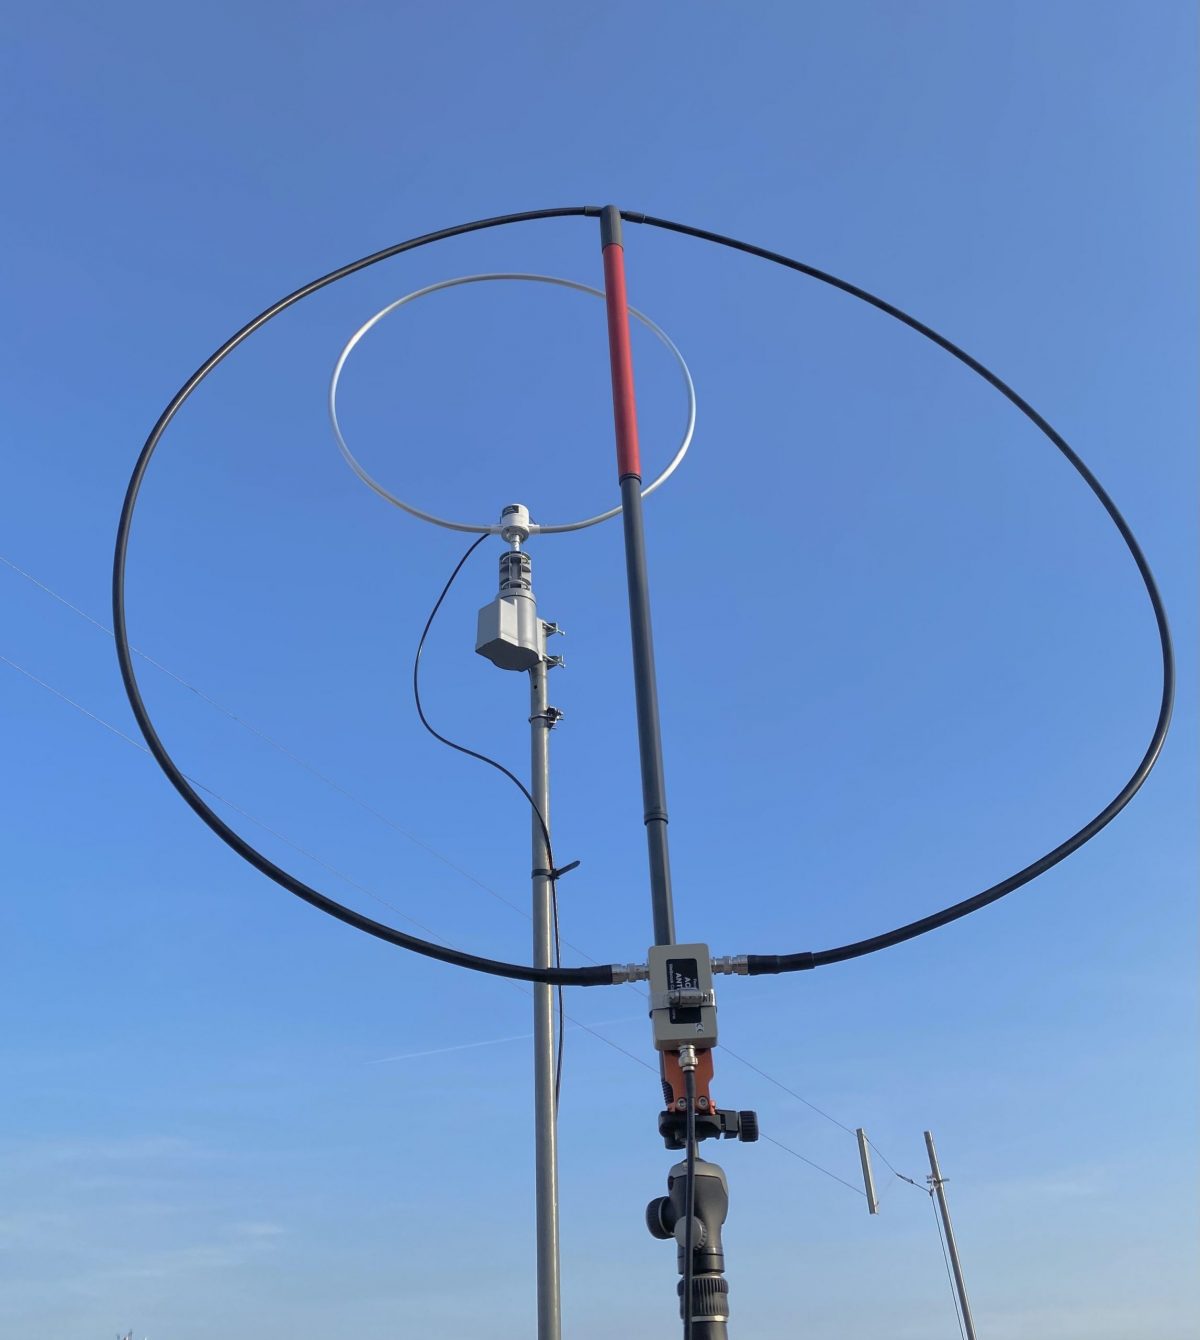
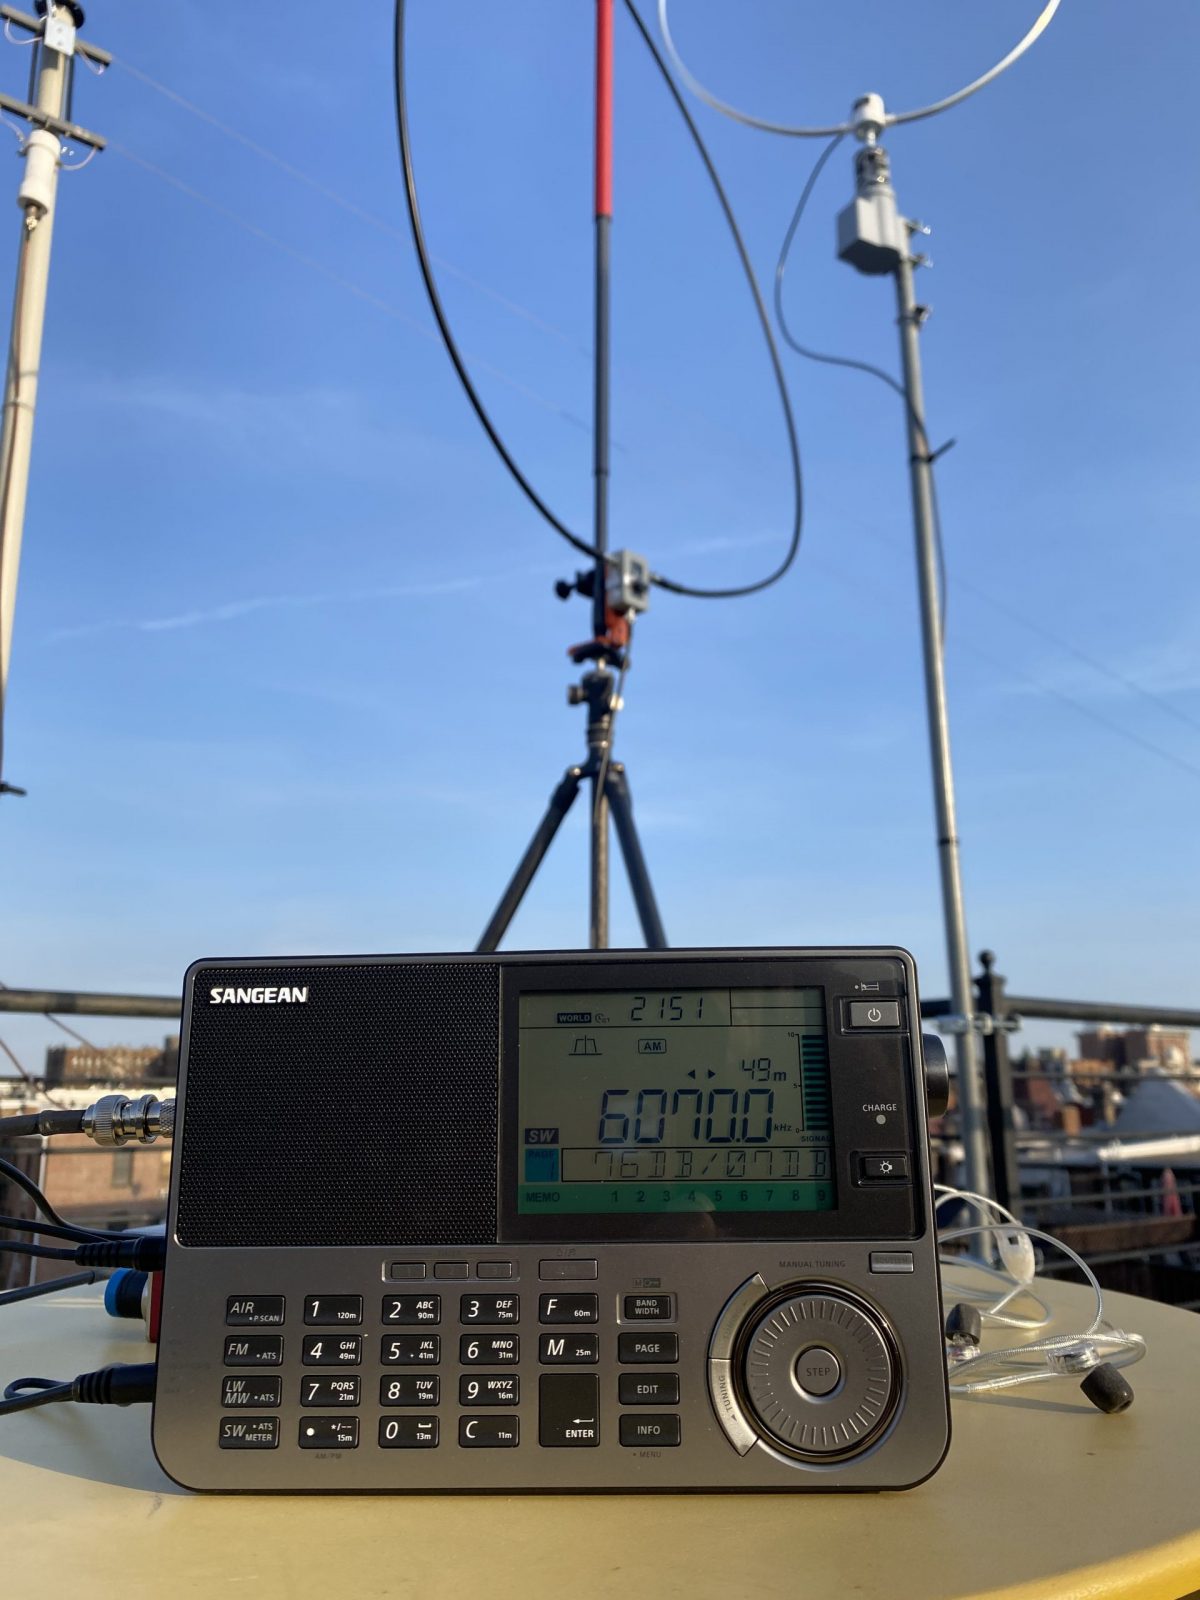
In the photos, you can see the finished antenna setup on my roof, with my permanent base Wellbrook on the rotor in the background. The performance of the two antennas is quite comparable.
(Note that there’s an eBay seller that makes a somewhat similar travel loop. The performance is quite good under normal conditions, but it is a bit more subject to MW overload when near a transmitter site. So I prefer the Wellbrook, which is much less susceptible to overload, I’ve found.)
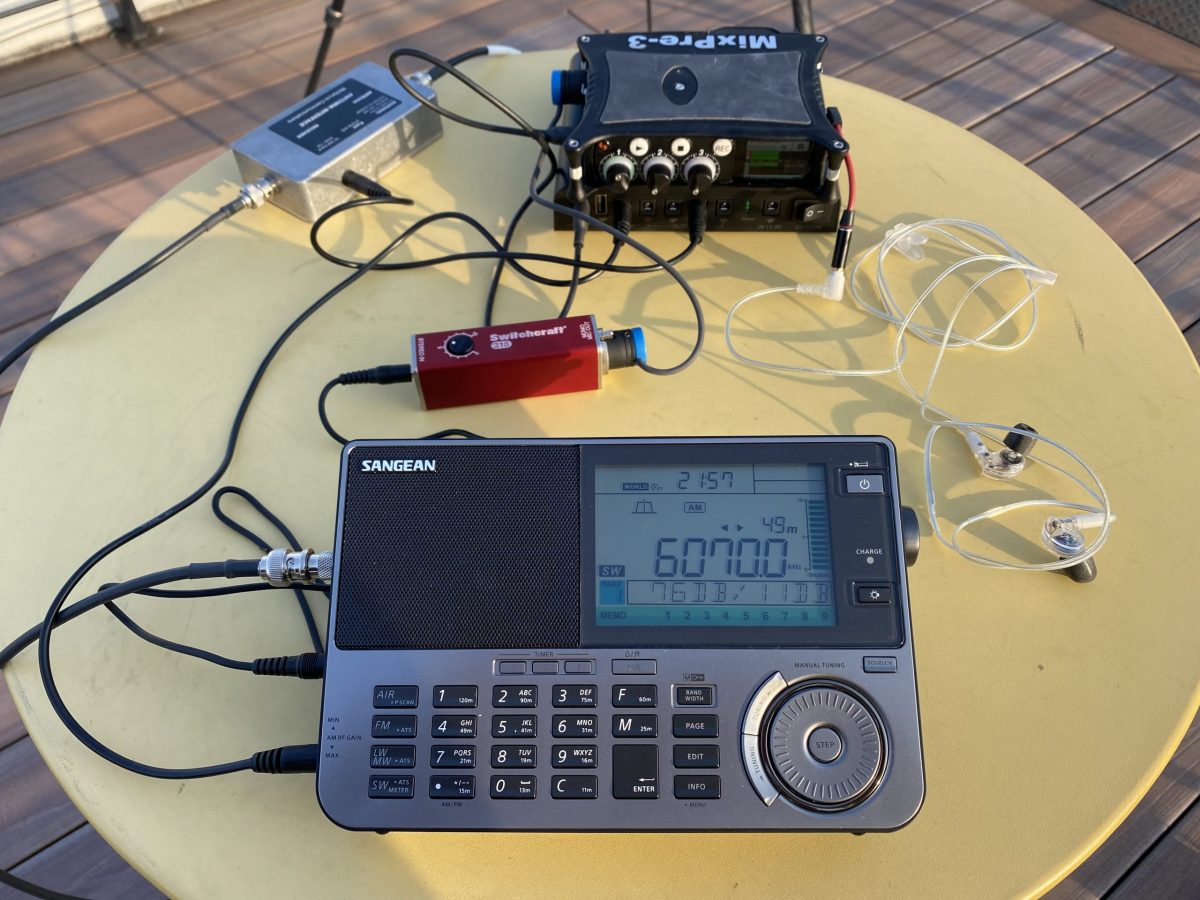
My usual complete travel setup is either a Reuter RDR Pocket C2 radio or a Sangean ATX-909X (recently upgraded to the X2 model). Both these radios work well with the Wellbrook. I use a Sound Devices Mixpre 3 to record airchecks in the field. In the photos, I’m on a rooftop DXpedition listening to Toronto traffic and weather from CFRX on 6070 kHz on a warm later winter afternoon.
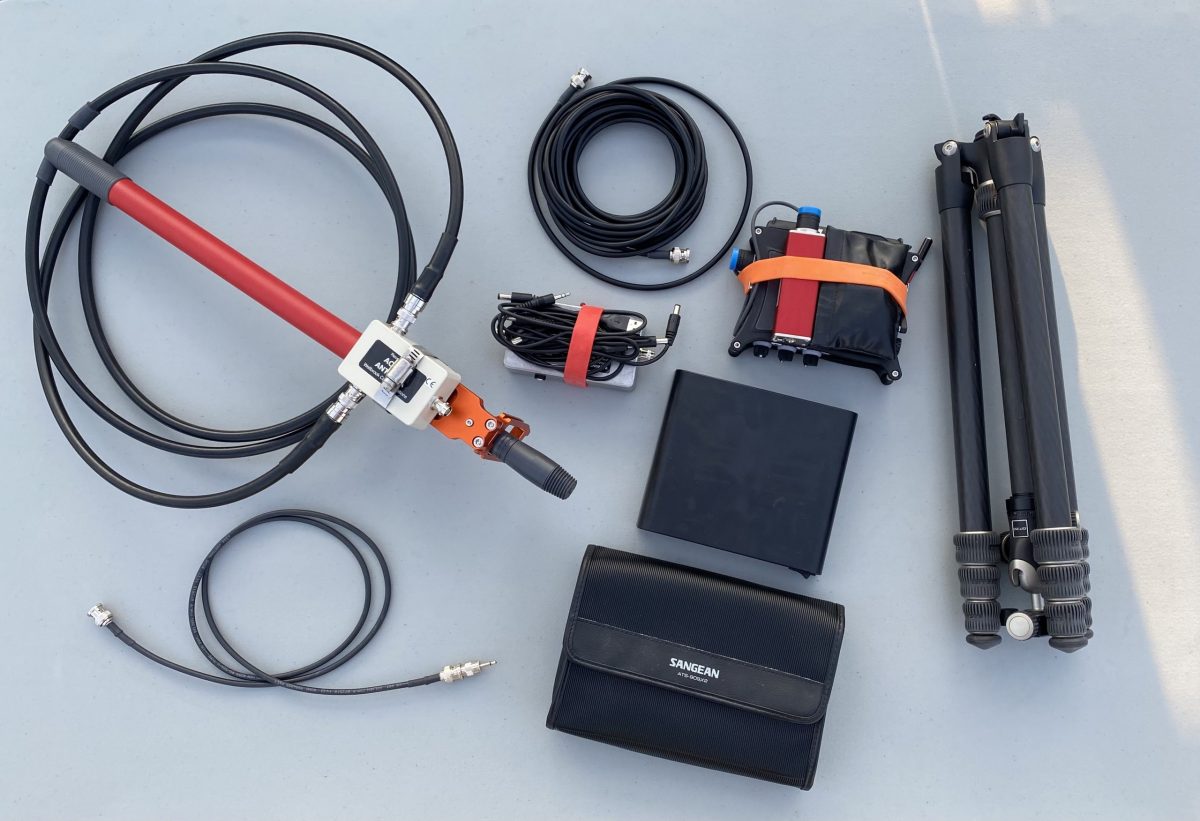
The whole setup breaks down for travel pretty easily, and fits easily in my suitcase, backpack, or bike bag (see photos). I usually bring a larger tripod than this if I’m also taking my camera.
The Wellbrook setup has really made bringing a receiver into the field a lot easier and less uncertain. There’s no worry about finding trees or other supports for wires, and packing and unpacking is quick and easy. Have fun!
If you didn’t receive the original bias-T box (DC interface) from the SK estate, you’ll need to get a replacement. I have two of these Chinese made ones and they are built well and work fine:
https://www.ebay.com/itm/394929843048
These units sent 12 volts DC to the Wellbrook via coax, and the radio signals out the other side to your receiver. You will also need a 12 volt, 1 amp DC supply or wall wart (LINEAR type only!!). A good brand is Jameco, in their Reliapro series.
It’s highly worth the effort to get the Wellbrook loop working. Not only are they top performing, they are collectable too.
I have a Wellbrook loop from a SK estate but no wiring or power supply. Can you tell me what the output voltage is on the power supply? I’d like to build one so I can try out this loop. I’ve read good things about it.
Is that O-Ceder mop handle made out of aluminum or a non-metal material? It would seem that a metallic tube would effect the loops performance.
It’s completely plastic. While I don’t have one on a loop (yet!) I have the exact mop it belongs to!
Thanks! Many times these rods are either wood or aluminum. The description on Amazon didn’t say what material it was, only that it has a steel handle.
Nice setup (and) write-up.
Very nice set-up. Very helpful photos, too. Thanks for sharing.
What a great idea, Matt! I wasn’t aware of those extendable broom handles when I came up with my own portable Wellbrook setup. Nice job!
For reference, this article shows the route I went with a 2-turn Wellbrook loop: https://swling.com/blog/2020/02/a-compact-rspdx-wellbrook-loop-kit-for-the-beach-my-approach/
73, Guy
Guy, what a great setup. Also, I especially like the part involving the Hawaiian beach!
I had considered using LMR600, but it doesn’t quite fit through my broomhandle hole, and I found that with that support the 400 is stiff enough to hold its shape well enough. In any case, it sounds like we both hit on similar ideas at the same time!
Matt, what an awesome set up
I have been raiding my studio photo hardware box for years for bits to put antennas up
I love your innovative spirit
73s John VE3IPS