Tag Archives: Mario Filippi (N2HUN)

Mario acquires an Index Labs QRP++ general coverage transceiver

May 1996 QRP Plus ad from QST (Source: WD8RIF)

Many thanks to SWLing Post contributor, Mario Filippi (N2HUN), who shares the following guest post that was originally published on the Delaware Valley Radio Association (DVRA) website:


Amateur Radios from the Past: The Index Labs QRP++

The Index Labs QRP ++ was an intriguing little radio manufactured back in the mid-‘90’s by Index Labs of Gig Harbor, WA.  For those interested in QRP (low power operating, generally less than five watts output) this transceiver filled the bill perfectly.  It supports CW and SSB, transmits on all WARC bands, covers 1.8 – 30 MHz receive, has full break-in CW and a built-in iambic keyer.  It boasts 20 memories, weighs four pounds (perfect for portable operation) and measures 5.5 x 4 x 6 inches.  It’ll run on a 12V 1.5 amp supply or a stout 12 volt gel cell.  The internals (see second pic) are an engineering masterpiece with stacked circuit boards reminiscent of commercial rigs.

Index Labs QRP ++ on the test bench

I recently acquired one of these radios as I was heavily into QRP in the 1970’s while using a TenTec Argonaut 509 and vertical on our apartment house’s roof.  Back then the sunspot numbers scored much higher than today and many contacts were made, most notably a CW contact with Japan with a paltry one watt.  So for nostalgic reasons I had to have one of these QRP++ rigs even though more modern and sophisticated versions are available.

At the moment bench tested is being done prior to sending it into action.  One important component needing replacement was the memory battery which was totally kaput.  Interestingly, this battery not only keeps the 20 memories alive but also brought back to life the CB radio-style S-meter reminiscent of radios from decades ago. Other items on the testing  “to do” list will be checking power output, frequency accuracy, drift, and finally, on-air performance.  The radio will feed a ground mounted 31’ vertical with 53 radials. With the right ionospheric conditions hopefully contacts will be aplenty.

Neatly stacked circuit boards and clean layout of QRP++

Unfortunately, no service manual exists for this gem, but it rates a 4.1 out of 5 on the eham.net Richter scale, and a number of ops have published helpful information on problems, solutions and modifications.  Notably the first run of these radios was later replaced with improved models boasting higher performance via a custom designed mixer, so knowing the serial number of your unit helps to determine if yours was an upgrade.

Rear panel control layout. Power is adjustable and tested at a hair under 5W.

You can read and see more photos from the author, Mario Filippi N2HUN, at https://www.qrz.com/lookup/n2hun

Click here to read this article on the DVRA website.


Thank you, Mario, for sharing this article and many thanks to the DVRA for allowing us to re-post it.

I owned a QRP++ for a few years and absolutely loved it. At the time, it was one of the most portable full-featured transceivers on the market. Although it can struggle in RF dense environments like Field Day or other contests, for daily use it was very effective. I eventually sold mine to fund the purchase of the Elecraft KX1 and, later, KX3.

I always loved the simple front-panel ergonomics of the QRP+ and QRP++. It’s an incredibly easy rig to operate in the field. Plus…it has a bit of a “cute” factor, if you like radios shaped like cubes.

There is a dedicated email discussion group for Index Labs transceivers–currently, they’re on Yahoo Groups but may migrate to another platform by end of year.

In addition, SWLing Post contributor, Eric McFadden (WD8RIF), has an archived webpage with a wealth of information about the Index Labs QRP+ series.

Thanks again for sharing this, Mario! I know you’ll enjoy the QRP++ once you get it on the air!


Do you enjoy the SWLing Post?

Please consider supporting us via Patreon or our Coffee Fund!

Your support makes articles like this one possible. Thank you!

Spread the radio love

Guest Post: ZIPWALL10 poles as antenna supports

Many thanks to SWLing Post contributor, Mario Filippi (N2HUN), who shares the following guest post:


ZIPWALL10 poles

Recently we had a remodeling job performed at the home QTH and the workers used telescoping poles to form a dust barrier.  When the job ended, they said I could have the telescoping poles, a product called ZIPWALL10, which when collapsed are four feet long but extend to ten feet.  This got me pondering about how handy these could be in the radio shack, especially for indoor impromptu antennas.

Close up of the ZIPWALL telescopic pole.

Indoor antennas, especially wire antennas usually have to be secured to a wall somehow, and should be as high as possible in the room.  That requires using adhesive tape to attach the wire and a ladder (most ceilings are eight feet), but using the ZIPWALL10 poles it’s easier and safer.  Below is a temporary random wire antenna in my shack using 26 gauge insulated wire strung between the two poles.

Random wire in shack room is a bit hard to see but it is strung between the two poles.

What’s nice about these poles is they have rubber feet to grip the floor and plastic pads on top to avoid damage to the ceiling. The top section is spring loaded to assure a tight fit.  The ZIPWALL10 model extends to ten feet in three telescopic sections. No tools are needed to set these up, and they conveniently collapse for storage.

ZIPWALL10 pair along with roll of 26 gauge wire for temporary indoor antenna installation.

These poles just happened my way due to a remodeling job, but surely other types are available on the market for those wanting to experiment with indoor antennas.  The price for a ZIPWALL10 pair on Amazon is around eighty dollars. Thanks for reading.


What a great use for ZipWall poles, Mario! I’ve spent the past few days at an ocean front condo and could have used two of those supports to suspend a small, lightweight passive loop antenna safely on the balcony. That’s fantastic your contractors simply gave you those poles! 

Thanks for the tip!

As you mention, Amazon sells a full line of ZipWall options (links below support the SWLing Post) but these can also be found at most home improvement stores. 

Spread the radio love

Guest Post: Repairing the National Panasonic DR22, the Panasonic RF-2200’s Euro-Sibling

Many thanks to SWLing Post contributor, Mario Filippi (N2HUN), who shares the following guest post:


National Panasonic DR22, the Panasonic RF-2200’s Euro-Sibling

By Mario Filippi, N2HUN

(All photos courtesy of author)

Thomas, your recent and thoroughly excellent post on the Panasonic RF-2200 was the inspiration for this short review of the RF-2200’s European sibling, the National Panasonic DR22.

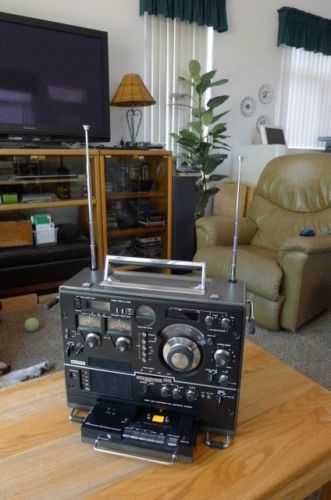
A few years back when I was hunting for a used RF-2200, a second-hand National Panasonic DR22 was for auction on eBay. These radios were sold in Europe and are almost an exact match for the RF-2200, with a few minor cosmetic differences.  It was so close in appearance that I decided to bid and won the auction. The cost was around $150.00 plus shipping.

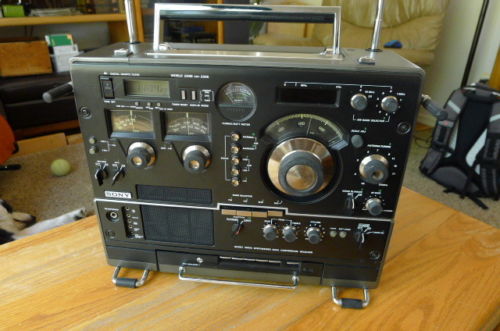
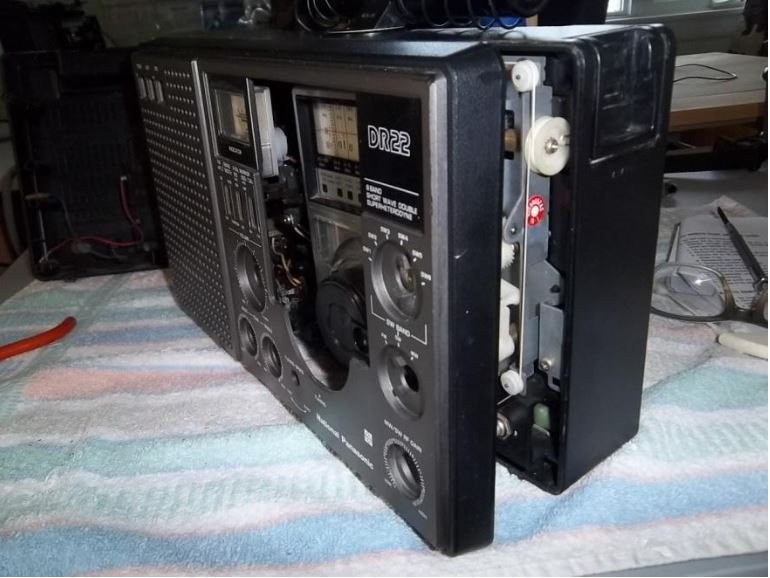
Author’s National Panasonic DR22, a.k.a. RF-2200BS

The seller described the unit as working, not a tech special, and was complete except for the original earphone.  The strap, which can be missing on some used models was in place, the antenna and all the knobs were there. When the radio was received, all appeared to be working well and most importantly the rotatable ferrite antenna was fully functional.  With the exception of tiny paint specks and years of accumulated dust the unit was cosmetically acceptable for a 40 plus year old radio. After a close olfactory inspection (smelling the unit hi hi) it was determined the radio was from a smoke-free home, which is important as smoke not only causes yellowing of plastic components, but it inundates the internal electronic components and coats them with a yellowish-brown stain.

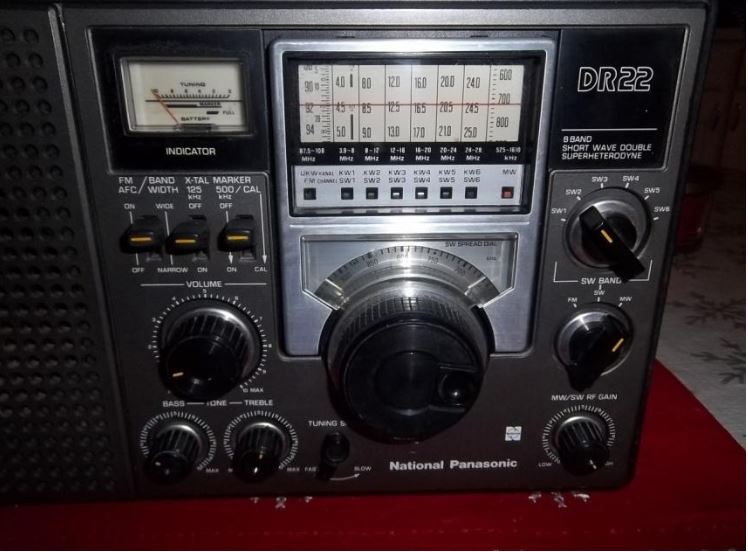
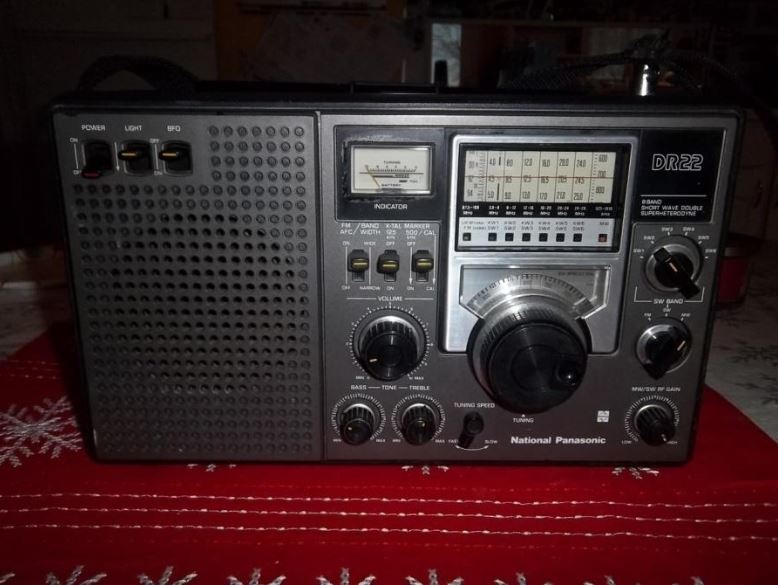
National Panasonic DR22 Dashboard Shows Slight Labeling Differences

On close inspection, the unit differs slightly from the RF-2200, in that it is branded as a “National  Panasonic” along with the “DR22” designation on the upper right of the unit. And, the National Panasonic logo can be seen to the left of the AM/SW gain control.  Another difference is the additional labeling found above each shortwave band, the designations are KW1, KW2, etc.

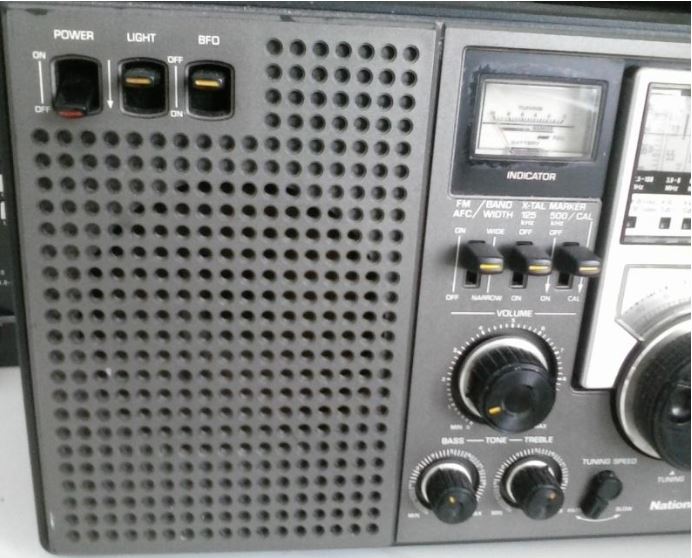
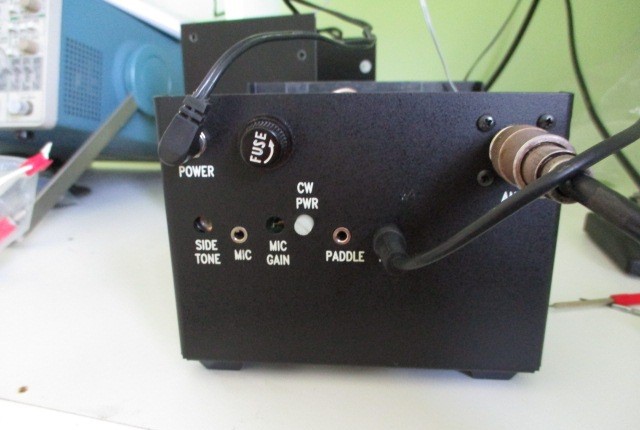
Power, Dial Light, and BFO Switches Are Identical to RF2200

As for the rear panel of the DR22, a major difference is the presence of a voltage selector which allows one to switch from European voltage (220) to the US standard (110).   Inside the unit there’s a transformer that handles this option. Alternatively you can simply use four “D” batteries to power the unit.

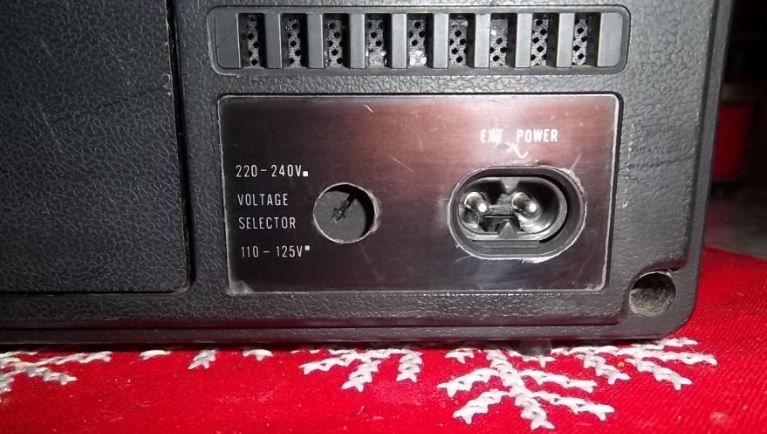
DR22 Line Voltage Selector Switch

After receiving the unit, first order of business was a good cleaning of the outer case with mild soap and water.  All the knobs and carrying strap were removed and soaked in a warm soapy solution. A toothbrush was put to work to remove years of human tactile residue from the sides of the knobs.

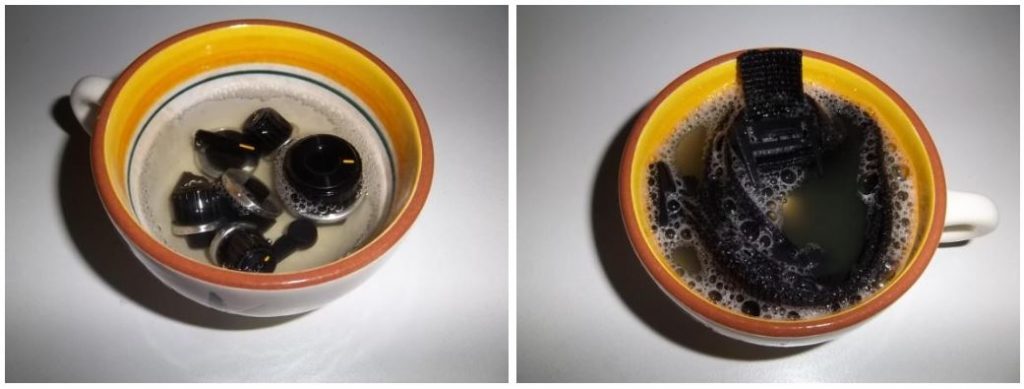
Knobs (left) removed for cleaning. Carrying strap (right) was inundated with decades of dirt.

Next on the “to do” list was to obtain a copy of the service manual, available on line.  You’ll find it under the title of National Panasonic RF-2200BA. It’s an excellent manual with detailed photos of the circuit boards, exploded diagrams of the mechanical parts, parts list, schematics, and of course the alignment procedure.   Cracking open the case required removal of all the case screws and very gently coaxing of the two panels apart. Years of use, rust on the screws, and dirt/dust buildup all contribute to the challenge of this endeavor.

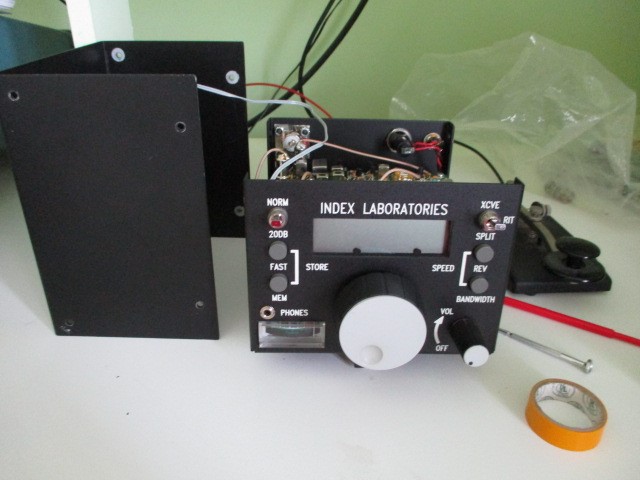
DR22 Case Disassembly

The alignment took several weeks as the radio was worked on in my spare time.  Note that I did not replace any electrolytic capacitors, and yes it was the lazy man’s way but a basic inspection of the caps for any evident leaks, explosions, or burns was conducted.  In short I did not want to replace capacitors at this time since the radio, as received from the former owner, was working well on all bands. Surely, as other operators have reported, cap replacement will restore full operational excellence but I felt if the radio passes the alignment specifications  that was good enough for me at this point.

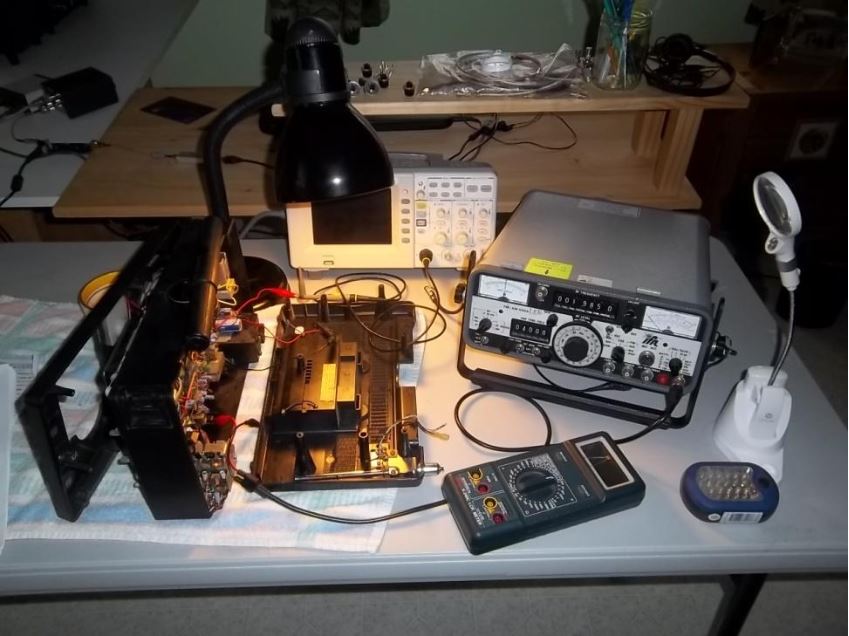
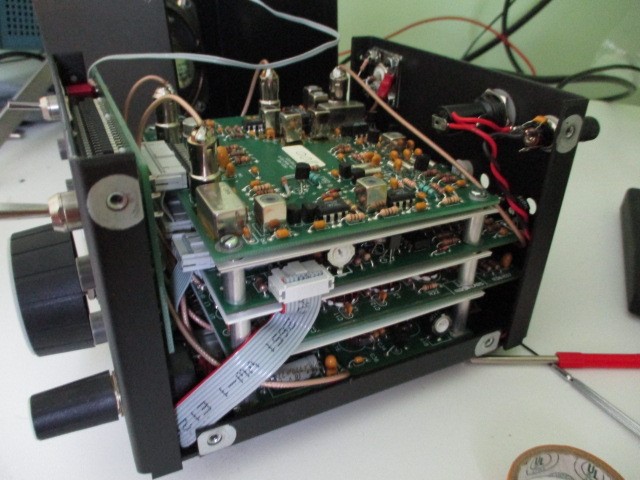
DR22 Undergoing Testing

After several weeks the radio was restored to specifications, all switches were cleaned and dusted and the radio reassembled.  This was done a few years ago and the radio continues performing well. Even the 125/500 KHz crystal markers are pretty much on the money when checked against WWV.  No scratchy pots either hi hi. So now the radio sits in my kitchen and is on at least a few hours a day and keeps company with its sister, my RF2200. Note that recently DR22s have sold on eBay for $150 – $300US. Tech specials/parts radio run considerably less.  Thanks and 73’s de N2HUN.


Thank you, Mario! It looks like you scored an excellent deal on the DR22 and it’s serving you quite well! I’m glad you spent time checking for leaky capacitors after opening the chassis. Using the DR22 so frequently will keep those caps “juicy!”

Post Readers: Please comment if you love the National Panasonic DR22!


Do you enjoy the SWLing Post?

Please consider supporting us via Patreon or our Coffee Fund!

Your support makes articles like this one possible. Thank you!

Spread the radio love

Sony CRF-330K fetching top dollar on eBay

Many thanks to SWLing Post contributor, Mario Filippi (N2HUN), who writes:

Saw this Sony receiver at a current high price on eBay:

Interesting that it has a cassette recorder, although back in those days cassettes were popular and other radios had ’em installed to record your favorite shows or to just use as a player.

Yes indeed, Mario! I remember absolutely lusting after a few radio models with built-in cassette recording features when I was much younger. It would have made off-air recordings much easier!  Of course, the most affordable (and accessible) model I remember in the past couple of decades was the vulnerable Sangean ATS-818cs or RadioShack DX-392.

I’ve never seen a pull-out cassette tray like the CK-330K’s:

It appears this Sony CRF-330K only has a few hours left of bidding at time of posting. There’s a bit of a bidding war going on, it seems, based on the bid history.

Click here to view on eBay.

I assume the CK-330K is a performer. Perhaps our resident expert, Dan Robinson, will share his comments?

Thanks for the tip, Mario!

Spread the radio love

Guest Post: Review of the TYT SF-401 Plus Frequency Counter/Tone Meter

Many thanks to SWLing Post contributor, Mario Filippi (N2HUN), for sharing the following guest post:


TYT Frequency Counter/Tone Meter Review

by Mario Filippi (N2HUN)
All photos courtesy of author

Most hobbyists own some type of transceiver whether it is a handheld, mobile, or base station. Some examples are amateur radio HF/VHF/UHF transceivers, Citizen’s Band radios, FRS (Family Radio Service) and GMRS (General Mobile Radio Service) handhelds.

A useful tool for the shack or the field is a frequency counter/tone meter since it can measure frequencies and analog/digital tones from transmitters/transceivers. At times ascertaining that a UUT (Unit Under Test) such as a 2 meter handheld is transmitting accurately may be indicated due to problems communicating with other stations. In addition, if the UUT transmits a sub-audible tone (either analog or digital) to access a repeater, a frequency counter/tone meter can detect the presence and verify accuracy of the CTCSS/digital tone.

Author’s TYT SF-401Plus, includes instructions, antenna, rechargeable battery and charger/cable. Covers 27 MHz – 3 GHz

Frequency/tone meters can be purchased for less than twenty US dollars but normally do not include a rechargeable battery and BNC connector for attaching an external antenna. Having had experience with these types, the time finally came for an upgrade.

After shopping around a decision was made to purchase the Tytera TYT SF-401 Plus. This model includes an instruction sheet, antenna, internal rechargeable battery, USB charger and cable. It represents a significant improvement over my previous, inexpensive meter, as the TYT has a BNC connector to attach a larger antenna and has four control buttons on the front panel. It also has, via a system menu, options to adjust the frequency/tone offset, dimmer levels, three or four decimal display and auto power off. All these valuable features warrant a higher cost, which was about $50, but well worth it. This price fits the budget of most hobbyists. However, higher end frequency/tone meters are available and cost several hundred dollars for those requiring that level of quality.

Out of the box the TYT SF-401 Plus, when checked against an IFR FM/AM-500A communications service monitor, was right on the money as far as accuracy. Note that the IFR-500A was calibrated against a high precision internal 10 MHz crystal in an “oven” and this is my gold standard reference for frequency accuracy in my shack.

TYT accuracy checked against an IFR FM/AM-500A communications service monitor transmitting a 146.52 MHz/131.8 Hz tone. Note frequency readout to four decimal places.

Now, it was time to check typical radios around the shack using the TYT. The first radio tested for frequency accuracy was a BTECH GMRS-V1 HT which I use to communicate with the home QTH while running errands around town. See photo for results. The BTECH and TYT agreed perfectly. Note that the TYT’s display includes a battery status indicator on top left and a timer use indicator, which resets every time the TYT is turned on. If you are going to measure digital signals (not included in this review) there is an option in the Setup Menu for that. With the BTECH handheld running 2 watts the TYT could detect its’ frequency at roughly four feet away.

Confirming BTECH transmit frequency against the TYT. Output is 2 watts. TYT multicolor display is super.

For VHF/UHF operating, especially when afield with other hams or groups such as CERT (Community Emergency Response Teams), problems can ensue if one does not have the correct frequency or tone programmed, so having the TYT in your shirt pocket to confirm these parameters when trouble occurs can be a quick way to get to the problem. See photo of an Icom IC-2300H 2 meter transceiver checked against the TYT for proper offset and tone. The Icom was putting out 65 watts and a repeater with an offset of -1.3 MHz and 88.5 Hz tone was checked.

TYT confirming unusual offset (-1.3 MHz) and tone for a repeater. Icom IC-2300H was at high (65W) setting and connected to an outdoor discone antenna.

According to the instructions included with the TYT SF-401 Plus, the operating range is from 27 MHz – 3000 MHz with a note stating “27 MHz – 100 MHz it can not be guaranteed and the corresponding normal emission appliance” which I interpret as accuracy is not guaranteed in this frequency range. Well, I checked the TYT against the IFR FM/AM-500A service monitor transmitting an AM signal on CB Channel 19, 27.185 MHz, and the TYT measured it exactly. One other important note is that according to the instructions, the tone decoder operates in the 136 MHz – 174 MHz and 400 MHz – 520 MHz frequency range. So that may limit its use in certain areas of the spectrum. One other item if interest is that the TYT has a 10 dB attenuator when dealing with high power signals.

All in all, I’m very happy with this purchase, and find the TYT SF-401 Plus useful for “first pass” troubleshooting and helpful when aligning older rigs which due to age are off frequency /tone. It definitely has a use in this shack.


Wow–what a bargain tool for the radio shack! Thank you for sharing your review, Mario.  Once again, however, you have tempted me with a purchase!  I remember when frequency counters would set you back a couple hundred bucks–it’s insane to think that you can grab one for $40-50 US shipped.

SF-401 Plus Retailers:

Note that the TYT SF 401 Plus is also marketed as the Surecom SF401 Plus:

Spread the radio love

The Lazy Susan: Mario’s mediumwave companion

Many thanks to SWLing Post contributor, Mario Filippi (N2HUN), who writes:

Grundig AN-200 Loop Antenna and Lzy SusanHere is a handy tip for those using small magnetic loops, like the Grundig AN-200. Using a simple Lazy Susan makes rotating the loop a lot easier as in the picture attached. It gives you a very smooth 360 degree rotation using a simple flip of a finger. Lazy Susans come in all sizes and luckily I had one already which fits the AN-200 perfectly.

This is a handy tip, indeed! In fact, I once spoke with a mediumwave DXer who told me that when he prepares for a DXpedition, he packs the Lazy Susan before he packs his portable’s batteries!

Lazy Susans are quite easy to find. Most “big box” retailers have them, Amazon.com has a massive inventory (affiliate link), IKEA and I’ve had incredible luck finding them at thrift stores for next to nothing! In fact, if you have a local thrift store with a large selection of kitchen accessories, you’ll likely find a Lazy Susan or two on the shelves.

Thank you for the tip, Mario!

Spread the radio love

Guest Post: Battery Testers–Don’t Get Caught Without One!

Many thanks to SWLing Post contributor, Mario Filippi (N2HUN), who shares the following guest post:


Battery Testers; Don’t Get Caught Without One!

by Mario Filippi, N2HUN

(All photos by author)

Ever consider what life today would be like without the humble dry cell battery? Old timers know the term “dry cell” as opposed to “wet cell.” The dry cell is your garden variety battery for sale composed of a semi-dry composite or paste of chemicals designed to make electrons flow when the circuit is complete, such as in flashlights, radios, remotes, watches, etc. “Wet cells” on the other hand have fluids, such as sulfuric acid that work in conjunction with lead plates. But let’s stay with dry cells for now. Walk into any house and you’ll find some form of battery powering a plethora of devices that contribute to the quality of daily life. In short, life without the humble battery would be unfathomable.

Electronic Menagerie: Radios, Timepieces, Flashlights, Remotes, Test equipment, Mouse.

Batteries, like humans, unfortunately expire due to age or use. True, they toil tirelessly while out of sight and mind, hidden behind plastic compartment panels somewhere in the bowels of a device and for the most part are ignored or taken for granted. That is until the device they are powering ceases to function. We’ve all been there and done that countless times in our lives with an array of consumer products. Most instances of battery failure tend to occur at the most inconvenient times, that is when the device they are powering is needed most (a corollary of Murphy’s Law hi hi). A good example is the toolbox flashlight. It can sit amongst the tools quietly and ready to go (at least in our minds) until we switch it on while working in some dark, cramped location. Or late at night when under the covers and the bedside shortwave radio starts spewing out distorted audio. To boot, the radio’s convenient dial light is too weak to determine where you are in the shortwave spectrum.

Motley Crew of Cells in Author’s Armamentarium Awaiting Call to Duty.

Well, all is not lost my fellow hobbyists; it is time to do some cell (dry cell that is) soul searching and plan for future failures. I propose a useful acquisition for the home, shack, Go-Bag (or what have you) that won’t break the bank; a simple battery tester that’ll be the end to your power problems.

At this QTH an AMPROBE BAT-200 was purchased a few years back from Amazon and has proved its worth and utility many times over. This simple tool, which ironically needs no batteries, will test many of the common batteries around the shack and home such as AAA, AA, C, D, 9V, and button batteries.

Pocket-size BAT-200. A Snap to Use.

Since purchasing the BAT-200, life in the battery cosmos has become a lot less complicated. Armed with one of these, you can immediately rule out battery failure when troubleshooting myriad devices. You can also test outdated batteries to determine their status.

Flashlight, Magnifying Light, and Head Lamp…

…Test meter…

…And Various Remotes Use A, AA or Button Batteries.

AA Battery from Remote Tests “Good.”

An item such as the BAT-200 can be found for less than five dollars if you shop around, and will pay for itself by taking the guesswork out of the bad battery scenarios. You’ll wonder how you ever did without one!


Thank you very much for sharing this post, Mario!  

At the SWLing Post HQ, we keep all of our loose batteries in a “battery box.” All new cells stay in the packaging where we mark the date purchased (although many alkaline cells now have a “best by” date). We recently pulled all of the loose/orphan batteries out of the box–there must have been 40+–and tested the voltage of each one. I used the test meter from my toolbox to do this, but I’ve just ordered one of the BAT-200 chargers from Amazon and will now keep this in the battery box permanently.

Thanks for enabling me, Mario! Ha ha!

Click here to check out the BAT-200 in Amazon.com (affiliate link).

Spread the radio love