Tag Archives: Milk Crate Loop Antenna

Giuseppe’s Multi-Band Milk Crate Loop Antenna

Many thanks to SWLing Post contributor Giuseppe Morlè, who shares the following guest post:

Dear Thomas and Friends of SWLing Post,

I am Giuseppe Morlè from Formia, a town in central Italy on the Tyrrhenian Sea.

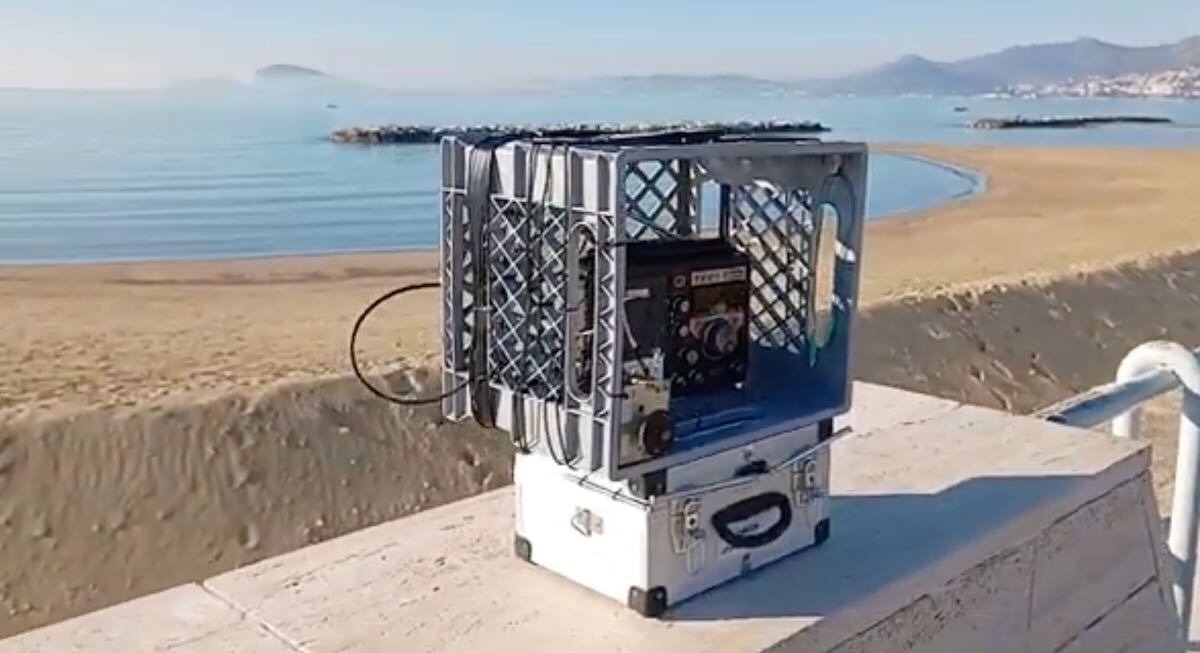
I have built a new “Multiloop” antenna using a 40 cm diameter milk crate. The crate is very sturdy and shockproof, making it an excellent base for this project.

Construction Details

I wound three different loops on the crate:
1. A single shortwave coil
2. Two shortwave coils
3. Twelve medium-wave coils

The design includes a single coil placed between the two shortwave coils, which picks up the signal by induction and transfers it to the receiver via an RG58 cable.

The heart of this system is a 2,100 pF variable capacitor with sockets connected to the rotors. Inside the crate, I added another 18 cm diameter loop positioned just below the two main coils.

The ends of this small loop are attached with crocodile clips to the external ends of the rotor. This small loop allows me to exploit induction and, by turning the capacitor, access all decametric bands from 160 to 10 meters.

Tuning Ranges

The variable capacitor enables tuning as follows:

      • In the lower ranges, it covers 80 to 20 meters.
      • When reversed, it tunes all higher ranges from 10 to 20 meters.

This works because the small loop and capacitor couple inductively with the primary turns. By increasing capacity with cables on the rotors, the antenna can even tune up to 160 meters.

The medium-wave turns cover frequencies from 300 kHz to 1,900 kHz. Essentially, this Loop Milk Crate antenna can access a wide range from 300 kHz to 30 MHz.

Testing and Comparisons

I tested the antenna using the Tecsun PL-660 and the Tecsun S-8800 receivers. I also compared the Loop Milk Crate with my “Ferritona” antenna and found surprising results!

Some of the videos were filmed in my shack because it was too cold to work on the balcony. Other videos were shot outside, either on my balcony or on the beach in Formia.

Videos

Final Thoughts

I hope you enjoy my “crazy” constructions. Always remember, I’m not a technician—just a passionate listener who loves building with recycled materials.

Wishing everyone a year full of happiness and satisfaction!

Best wishes to all,
Giuseppe Morlè

Spread the radio love

How to build a Milk Crate AM Broadcast Loop Antenna

Many thanks to SWLing Post contributor, James Townley, who shares the following guest post originally posted on his Shortwave/Medium Wave blog:


540 kHz to 1700 kHz Loop Antenna (Click to enlarge)

AM Broadcast Loop Antenna

by James Townley

Several years ago, I became interested in medium wave DXing. One of my limitations was the size of my yard, so I developed an interest in tuned loop antennas to compensate, because setting up a beverage antenna was out of the question. I experimented with different sizes of loops, and found that the bigger the aperture, the more gain the loop would have. The tuned loop antenna is also very directional, which allows you to reject, or null out interference from either noise or other stations. Loops are considered bi-directional in that they receive to the front and back, but not to the sides. The tuned loop antenna quickly became my weapon of choice for medium wave DXing.

Recently when the weather began allowing me to enjoy the outdoors, I decided to make another smaller loop antenna from a plastic milk crate I had lying around. I saw the idea on the internet when I observed that someone had used a milk crate for their loop. Click here to see a variety of tuned loop antennas that others have made. Whichever material you decide to make your loop antenna from, just make sure that it is not a conductive material. Wood, plastic, and cardboard seem to be popular materials for loop making. In the photo above, I am using my Sony ICF-2010 to listen to WCCO on 830 kHz. This station is nearly 200 miles south of me, but I am able to receive it with 9 LEDs lit on my signal strength meter while using the loop. There is no direct connection of the loop to the radio, it is inductively coupling with the radio’s own ferrite rod antenna.

If you are interested in making a loop antenna like mine, here are the materials you will need:
120 ft of 18ga insulated wire (I bought a 100 ft spool of cheap speaker wire and pulled the 2 conductors apart):

1 – Plastic milk crate
1 – 15 to 365 pF air variable capacitor (found in many old radios, or a google search to buy one from an internet store)
1 – Tuning knob. Any knob will do as long as it fits the shaft on the variable capacitor.
1 – Tape or wire ties. I used tape to secure the wire while winding, then hot glue when finished.

When you begin to wind your coil, use tape or a wire tie to secure the wire, and leave about a foot of wire. This extra foot of wire will later be soldered to the frame on the capacitor. As you wind your coil, pull the wire snugly and with each turn leave about a quarter inch spacing between each turn. The spacing isn’t critical as long as the spacing is consistent.  I wound 21 turns on my crate. This may differ for you, depending on the size of your crate, or the value of you capacitor. If you find that the bottom frequency isn’t low enough, you can add more wire to make a few more turns. This will lower the bottom frequency for you.

After winding the coil, you can solder each end of the coil to your capacitor. The beginning of the loop gets soldered to the frame of the capacitor, and the other end of the coil to the rotor solder lug on the side of the capacitor. If you do not have a soldering iron, you can use alligator clips to connect your loop coil to the capacitor as well. I secured my capacitor to the inside corner of the crate with hot glue. I put a generous amount of the hot glue onto the bottom of the capacitor frame, and held it to the crate until the glue cooled enough for the capacitor to stay on it’s own. I used enough to get the job done, but not so much that it interfered with the plates in my capacitor. The hot glue seemed to adhere very well. I then checked the spacing of my coil turns, and secured them with the hot glue as well.

I was very impressed with the results after spending some time with the loop. It’s small enough to maneuver around easily, but big enough to give it some gain, so I can listen to daytime DX. I may make another tuned loop using two crates to see how much more gain I get with the larger aperture.

Happy DXing,
James Townley


Many thanks, James, for sharing your project with us! This loop appears to be relatively simple and accessible even to those with little knowledge of soldering or homebrewing. I’m now wondering how a loop made of four milk crates might perform!

Click here to view James’ Shortwave/Medium Wave blog.

Spread the radio love