
The WinRadio WR-G31DDC “Excalibur” Software Defined Radio
I confess, I’m one of those shortwave radio listeners who has always believed the best tabletop radio is one that looks like a radio–a radio with knobs, buttons, a digital or analog display, and one sole purpose in life: to tune in the stations I want to hear. When software defined radios (SDRs) came to the market many years ago, I honestly thought I’d never use one, certainly never as my main receiver–after all, who wants to turn on a computer just to listen to the radio?
Who, indeed? I’ve discovered that I do!
The WinRadio WR-G31DDC “Excalibur”
Over the past year, since I’ve become more and more engaged in shortwave radio audio archiving, I realized I needed to get a tool for making this a simpler, even more automated process. Clearly, I needed to find an SDR for the job. So, last year, I started the process of evaluating SDRs to find the one that would best suit my needs as a discriminating shortwave radio listener, ham radio operator, and amateur radio archivist. And since I wanted to be able to record spectrum, I needed a true SDR, not a PC-controlled IF receiver.

The Excalibur packages includes the receiver, application software CD, low-noise power supply, USB cable, SMA to BNC connector, and, an excellent user’s manual.
Several considerations steered me toward the WinRadio Excalibur over, say, the Microtelecom Perseus, the RF Space NetSDR, SDR IQ, or the QS1R Quicksilver–all models with which the Excalibur is often compared. It was a tough decision, and I’ll go into greater detail about my selection criteria in a future post on SDRs. But the overarching factor that guided my final decision–? Simply put, it was the Excalibur’s robust recording functionality.
I’m grateful to WinRadio for giving me a loaner Excalibur to evaluate over a two month period of time–at the end of which, I decided that I liked the radio so much, I purchased it from them for the same price they offered to their customers at the 2012 Dayton Hamvention.

The WinRadio Excalibur is manufactured in Australia
First impressions–and installation
When I first held the Excalibur receiver in my hands, I was a little surprised by its size–it’s a bit smaller than I expected. The radio itself is not much larger than a typical portable shortwave radio, thus, it’s quite easy to fit into a laptop case for mobile DXing. The unit itself has very few connections; just three, in fact:
- an SMA type RF connector (WinRadio supplies an SMA to BNC adapter), for external antennas
- a control cable port
- a DC power supply port
On the “front” of the radio, there’s only a blue LED light (which can be controlled by the Excalibur software), and a power button.
The chassis is made of a durable transparent polymer, and inside, the receiver is protected by a metal enclosure. Frankly, it’s a pretty sleek looking piece of gear, and its footprint is small enough not to take up much space on a desktop. In fact, it resembles an external hard drive more than it does a receiver.
The Excalibur application software: a brief introduction
Allow me to begin by saying, the WinRadio Excalibur application software is very easy to install. The install package is surprisingly small–a little less than 10MB–thus it installs very quickly. In fact, if you want to check out the application for yourself, it’s a free download from WinRadio’s website. If you don’t have an Excalibur radio hooked up to your computer, the software will allow you to run in “Demo Mode,” in which you can explore settings, customization, etc.
Good news: the WinRadio Excalibur is purely “plug-and-play.” You load the application, you plug the radio into your PC, and it works.
The virtual control panel
The application software’s graphic user interface (GUI)–or as WinRadio calls it, the “virtual control panel”–has a very logical layout:

In the upper left part of the window (see screenshot below) you’ll find the frequency display and tabs for each of the three individual virtual receivers you can use within the allotted spectrum bandwidth (see above). In the middle of this section, you’ll find a tuning knob and configurable analog-styled meter. In the right portion of the upper pane, you’ll find all the mode controls, along with memory, filters, audio mixing, notch, squelch, gain, and the noise blanker.
 The control panel, otherwise, is divided into three main spectrum windows:
- The top right window displays the spectrum as seen by the currently selected virtual receiver. It’s within this window that you can tune, change the passband, visually adjust the notch filter, and even view the audio spectrum. It is, essentially, the IF spectrum–WinRadio calls this the “Demodulator Spectrum.”
- The top left window contains the DDC spectrum, the bandwidth of which can vary anywhere from 20 kHz to 2 MHz, selectable in 21 steps. All three virtual receivers can be used simultaneously within the DDC spectrum bandwidth; in other words, if the DDC is set to a 1 MHz bandwidth between 9,200-10,200 kHz, you could listen to and/or record broadcasters on 9,580 and 9,625 kHz and 9,990 kHz. The DDC spectrum window will show shaded areas which represent the location and bandwidth of each virtual receiver.
- The wide lower window contains the Wideband Spectrum Scope, which, essentially, gives you a view of the entire HF spectrum from 0-30 or 0-50 MHz. I typically keep mine set to 0-30 MHz, as I rarely use the 30-50 MHz portion, and it otherwise shrinks the wideband spectrum view to display the additional coverage. Perhaps what’s most useful about this scope is that it imparts the ability to “see” propagation conditions across the HF band. Also, in this setting, I can switch between two antennas in order to see what portions of the HF spectrum each one best receives.

The DDC window displaying spectrum (click to enlarge)
The DDC and Wideband spectrum windows are selectable between a standard spectrum look or a waterfall display. The waterfall has several color schemes to select from, as well. In the image above, I show a standard spectrum display for the DDC window, and the yellow waterfall display for the wideband spectrum. Unlike the Microtelecom Perseus, the Excalibur GUI is re-sizeable, meaning, it can be minimized or maximized to fill your monitor screen. Additionally, the spectrum windows can also be re-sized to your liking.

The DDC window displaying waterfall–note that there are several waterfall color schemes (click to enlarge)
Tuning in
Ease of tuning is a very important factor for an SDR–especially for someone like me, who really has an appreciation for the traditional, tactile tuning knob of a tabletop radio. Fortunately, the Excalibur is very simple to tune, and you have options in this respect, too. While you can use your mouse pointer to “turn” the virtual tuning knob at the top of the control panel, I find using my PC’s keyboard’s up and down arrows to be even easier, and using these allows me to retain a sense of tactile control. If you have a mouse with a scroll button (which I highly recommend) you can tune with this, as well. Of course, you can also easily tune the receiver by clicking or dragging the mouse pointer within the DDC or DEM spectrum windows.
So many SDRs and IF receivers I’ve reviewed or used have some limitations with tuning. For example, the Perseus requires that you click a button to display a keypad box before you can enter a frequency directly. On the Excalibur, you simply type the number–and if you wish, you can even specify MHz or kHz by trailing with an “M” or “K.” So, if you want to go to 15,550 kHz, you simply type “15550.” If you want 15,000 kHz (a.k.a. 15 MHz), you can simply type “15M.” No extra keypad windows to open. You can also assign frequency memory locations to your keyboard’s function keys.
Performance
Though the look-and-feel, layout, and overall usability of the Excalibur are important, the “rubber meets the road” in real receiver performance. The fact is, if you’re spending $900 US for a receiver, you want to know that you’re getting a good value.
Rest assured–with the Excalibur, you are.
I don’t often become giddy over a receiver, but I must confess…I love this Excalibur. Despite my initial hesitancy, this radio has proven itself, and thoroughly won me over. The Excalibur is, in short, the best SDR I have ever used. As far as I can tell, it runs neck-and-neck with the Microtelecom Perseus in sensitivity, selectivity, and overall receiver performance. The Perseus may have an edge with its adjustable DSP, but the Excalibur has an overall edge with its AM sync detector and flexible filter/mode controls. This is my SDR.

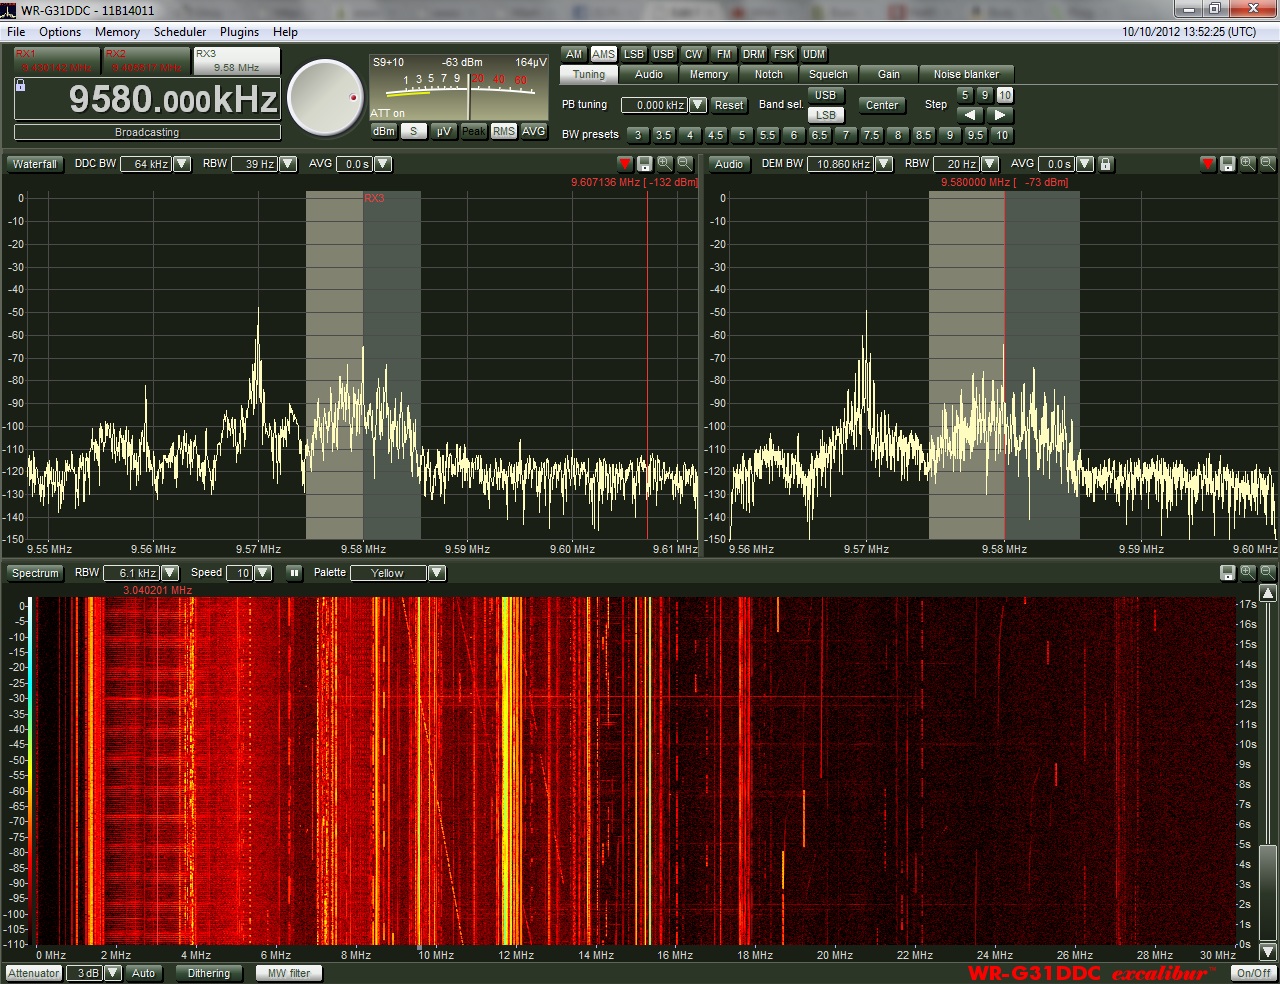
By using the AMS mode and only selecting the lower side band sync, the interference seen in the upper side band is completely eliminated from the reception (click to enlarge)
AM Sync Detection (AMS mode)
The AM sync detector (AMS) on the Excalibur is nothing short of amazing. Though it can be a little slow to lock and is noticeably slow to self-adjust if a transmission drifts off-frequency, it’s a highly effective tool to cope with weak signal selective fading.
I’ve even found that adjacent signal noise (or QRM) that bleeds into the passband can be effectively and often completely eliminated by simply engaging the AMS on the sideband that is clear of the adjacent noise. This is remarkable. For example, if you are listening to a weak signal on 15,585 kHz but a strong signal on 15,590 kHz is causing interference in the upper side band (easily seen on the spectrum scope), simply engage the AMS on the lower side band. Time and time again, I’ve found this to be even more effective than using a combination of the passband and notch filtering.
With strong signals, AMS is simply not needed most of the time. I have, however, engaged it several times while recording music (say, the Voice of Greece) to either lower noise from adjacent broadcasts, or simply to decrease the noise floor.
Automatic Gain Control (AGC)
The Excalibur’s pre-defined AGC levels of slow, medium and fast are quite effective, and easy to switch between. But if you wish, you can actually adjust the AGC yourself–controlling the attack and decay, setting the reference level and max gain to your own specifications, and even saving it as a personalized user setting. This personalized option will then appear as a selection under the pre-defined AGC settings.
Of course, you can also adjust the gain manually, but I find that I rarely need to do so.

The Excalibur’s notch filter can be adjusted by frequency and width (click to enlarge)
Notch
At first, I found using the Excalibur’s notch filter a little clumsy to use as compared with that of the Perseus. As with other mode adjustments and filters, the Excalibur employs a set of drop-down menus to adjust the notch. Initially I found it cumbersome to move the notch on top of interference by selecting the exact frequency from the drop-down menu. But as I’ve worked with the Excalibur a bit more, I find I now actually prefer the Excalibur’s method.
Here’s why. To use the notch, you simply select the notch tab, click the engage button, and then the center frequency button. Now, by selecting the frequency drop-down menu and using the scroll wheel on your mouse, the notch will move across the passband accordingly. Once you’ve covered the interference with the notch, you can adjust its width with a drop-down menu–it can be widened up to 2 kHz, if needed.
You’ll find the notch especially valuable when listening within crowded ham bands or where the ham bands and AM broadcasters overlap, of course. Again, most of the time, I turn to the AMS for eliminating QRM on the broadcast bands.
Other features
Frankly, the Excalibur has so many features that it’s beyond the scope of my review to include them all. By and large, I find I like them all. Though I rarely need or use the squelch feature on HF, it is effective and highly adjustable. The Excalibur also has a noise blanker which I rarely need to use, since I no longer live in an area with RFI or an electric fence (though I would love reader comments on this). The noise blanker is so adjustable, I imagine there must be a modest learning curve, but it will probably pay off to master it if needed.
The Audio filters are also amazing–I use them frequently to tweak audio fidelity while making broadcast recordings with wide bandwidth. Indeed, in the Demodulation window, you can select the audio spectrum and actually move the filter threshold within the spectrum. This is a great–and highly visual–way of eliminating unwanted audio noise.
 The only feature I feel like WinRadio falls short in, is its Memory. I don’t have an issue with assigning user memories–this is a quite simple process, and you can even assign key memory locations to the function buttons on your keyboard–but I don’t like the display of frequency databases like EIBI and HFCC. The scrollable window for the frequency databases is simply too small, and doesn’t contain enough information. I find that the Microtelecom Perseus’ memory display strikes the right balance–it reads the broadcast times and only displays what should be on frequency. The Bonito RadioJet (an IF receiver I recently reviewed) even has the option of displaying the broadcaster info within the spectrum display. While this isn’t a make-or-break item for me, as I routinely check my copy of WRTH or other online sources for frequencies and schedules, I just hope WinRadio takes note, and considers enhancing this feature in a future update.
Recording
Recording, in my opinion, is where the Excalibur really shines. For many readers, the recording feature may be one of the least important. But for me, a busy dad with an active family life who enjoys recording and archiving shortwave broadcast, as well as listening at my leisure when my home is quiet, I rely on both automatic recording and spectrum recordings.
With the ability to record up to 2 MHz of bandwidth, you can easily capture an entire meter band, and play back the DCC recording later as if it were live–meaning, you can fully adjust every receiver parameter and every filter. Indeed, each of the three virtual receivers can be adjusted and filtered independently of each other, and are only limited within the bandwidth of the captured spectrum.

One glance at the wideband spectrum display–in the lower portion of the display– will tell you what meter bands the current propagation conditions favor (click to enlarge)
I often use this recording method to capture late-night openings or broadcasts I might miss while sleeping or away from home. I have even recorded the entire medium wave band throughout the night, then listened later for late-night trans-Atlantic DX.
Capturing large chunks of spectrum, however, is not for the hard drive-challenged. A 2 MHz recording could easily use up 100 GB of hard drive space per hour (depending on other factors, like your demodulator filter length). In reality, though, there’s never really a need to capture that much spectrum at once.
You can also make a basic audio recording within a virtual receiver without recording the spectrum. This is an important feature that the Perseus lacks–it can only record spectrum. You can actually schedule the Excalibur to record broadcasts automatically–it even allows you to set the bandwidth, mode, and other parameters you prefer.
If I want to record something particularly important, like a one-time event on one frequency, I record the spectrum at 20 kHz wide. This does not take up much hard drive space and allows me to go back later and tweak the filters throughout the broadcast (say, if QRM appears halfway through).
Again, the remarkable recording functionality of this SDR is truly what prompted me to pull the trigger on the Excalibur over other similarly-priced SDRs.
Owner’s manual
I generally find that manufacturers give very little thought to writing a proper owner’s manual. In fact, perhaps some of the worst culprits are manufacturers of SDRs and PC-controlled radios: instead of including a printed, informative, and edited owner’s manual, they opt for either online discussion boards, or inadequate built-in/online FAQs and help databases.
Thankfully, WinRadio bucks this trend! I am very impressed with their English owner’s manual. While the Excalibur and its software are fairly intuitive, the owner’s manual explains very thoroughly how the Excalibur works, how to tweak settings, how to customize the interface and function keys, and how to troubleshoot simple problems. I have learned a lot by simply reading the manual from cover to cover. I hope other receiver manufacturers take a note from WinRadio’s book, and follow suit.
At this price point, it is the least the buyer/user can expect.
Excalibur limitations
The Excalibur is not perfect, and like all radio receivers, it lacks some capabilities that may actually be deal-breakers for some.
Firstly, the Excalibur is a Windows (XP/Vista/7) only device. You cannot use the Excalibur with Mac OS X, Linux, or Free BSD operating systems, unless (as with some Mac OS X devices) you can run the Excalibur application within a Windows partition. Many other SDRs, noting the RF Space line, can be used with a variety of open-source SDR applications. As the name implies, with WinRadio, you’re stuck with Windows.
Also, unlike the Perseus and NetSDR, the Excalibur cannot be networked over the internet. While it may be possible to use a remote desktop application to control the Excalibur, the Excalibur application does not allow for native remote operation. By contrast, the Perseus makes this quite easy–you can even find remote stations via a dedicated server.

The lock icon on RX2 indicates that this receiver is locked, however, the frequency is not locked. One touch of the tuning knob, or one click a spectrum window can move the receiver off frequency.
This may be a personal preference, but I find the tuning lock function is a bit misleading. It does, effectively, lock a virtual receiver on frequency so that the DDC spectrum swatch can’t be moved beyond that frequency. It does not, however, prevent one from accidentally moving the frequency within the virtual receiver. In other words, it does not “lock” the frequency as other receiver locks do.
Finally, I wish the Excalibur software would embed UTC time code into recorded DDC-captured spectrum. I got used to this feature while testing the Microtelecom Perseus, and find it a very useful. While going back through recorded spectrum, I could see the actual time passing in the spectrum. When I asked WinRadio about this feature, they didn’t say that this will/could be added to the Excalibur, but they pointed to the fact that their new Excalibur Pro’s application embeds time code. Yet I wish they could sneak this feature into a future WR-G31DDC software update…(Are you listening, WinRadio?)
Summary
When I begin a radio review, I keep a checklist of pros and cons as I discover them to remind myself of my initial discoveries.
Here’s my list from the WinRadio Excalibur:
Pros:
- Top-class receiver in every respect—especially at a price point below $1,000 US
- Superb sensitivity
- Superb selectivity and adjacent signal rejection
- Effective, visual notch-filtering
- Effective pass band control
- Amazing sync detector with switchable sidebands
- Highly customizable RF gain and noise blanker (see con)
- Spectrum/waterfall displays are responsive on my 2 year old laptop (see con)
- Graphic user interface is
- stable,
- somewhat customizable,
- intuitively designed,
- and resizable
- Three virtual receivers can be used independently within a max 2 MHz spectrum
- Superior recording functionality
- From 20 kHz up to 2 MHz of spectrum recording with 21 levels selectable
- All three virtual receivers can record independently and simultaneously
- Programmable recording with built-in scheduler
- Wideband spectrum display shows 0-30 or 0-50 MHz of live spectrum
- Simple DRM implementation which has been well-reviewed elsewhere
- Extensive, programmable keyboard shortcuts
- Direct frequency entry from keyboard number pad
- Small footprint and sleek design even blends in with home office peripherals
- Excellent, well-written proper owner’s manual
- Courteous and responsive WinRadio customer service
Cons:
- Windows only–not available on Mac OS X or Linux operating systems
- WinRadio GUI cannot be easily replaced with an open source GUI (see pro)
- When recording spectrum, time code is not embedded in the waterfall display as with the Perseus and other SDRs
- Not natively networkable (like the Perseus and RFSpace NET SDR)
- RF gain and noise blanker are slightly complicated to tweak (see pro)
- Lock feature does not lock tuning, it only limits DDC spectrum movement
- A 2 GHz dual core CPU is the minimum system requirement. In truth, I’ve found that a much faster PC is needed if you want to avoid stuttering in wide (1 MHz +) spectrum playback. Extra RAM will also help
Conclusion
If you’re in the market for a high-performance software defined Windows-based receiver, I suggest you seriously consider the WinRadio WR-G31DDC Excalibur.
It is, quite simply, the best SDR I have used to-date. And if, like me, recording functionality is a high-priority, then the Excalibur is your best choice, hands-down.
I’ve been using the Excalibur extensively since June 2012 to make recordings of broadcasts, many of which have been posted on the SWLing Post (check out a few).
Again, though WinRadio was kind enough to loan me the Excalibur for review on the SWLing Post, I put my money where my mouth is, and purchased it from them. Honestly, I can’t imagine my radio shack without it, now. Though I still love my traditional analog and digital tabletop radios, the Excalibur has proven to be not only an excellent tool, but also a superb receiver.
If you are an Excalibur owner, or have any comments/questions, please leave them in the comments section below.


 Though not available for the shortwave bands, Google Play reviews are mostly positive for the new software defined radio application that will run on your Android phone or tablet:


