Many thanks to SWLing Post contributor, Bob Colegrove, who shares the following guest post:
The Model L87 Voice Recorder
Reviewed by Bob Colegrove
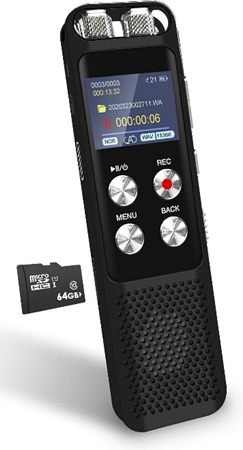
L87 Voice Recorder (Source: Amazon)
Introduction
Whenever I read a radio product review, the author invariably says whether the device has a line-out port. This seems to say a lot about the importance attached to this feature by a great number of our fellow radio enthusiasts. Besides audio recording, the port can be used for computer processing of facsimile and teletype signals. For basic recording, it seems to boil down to three purposes:
- to provide a permanent archive of some things we have heard,
- to replay portions of a weak signal to determine its identity, or
- to share our catches with fellow enthusiasts.
There was a time before cassettes (BC) when I used a mini reel-to-reel tape deck to record radio broadcasts. This was not much bigger than a cigar box. It used 3-inch magnetic tape reels. There was no capstan. The take-up and supply reels rotated at constant speeds to provide tape motion for recording and rewinding. Thus, the tape would gradually accelerate past the heads as the diameter of the take-up reel increased. Consequently, a recorded tape did not travel at a constant speed and could only be played on the original recorder. I never used it much, and when it stopped working, I never bothered to replace it.
This winter I seem to be focused once again on medium wave DXing, and I began to think a recorder would be useful to help identify stations. I couldn’t get much of a consensus as to what recorders other hobbyists were using, so I went on the Internet to explore the market. Long story short, I wound up with an unbranded voice recorder. Neither the hardware nor the manual gives much of a clue as to who made it. The state of today’s small electronics market is replete with anonymous items. Anyway, the price was reasonable, and I have it.
There are probably a dozen or more equally capable recorders currently available, including those from Sony. So, this is not a model versus model comparison, but rather an enumeration of salient features of the Model L87 Voice Recorder and a conclusion as to its usefulness as an accessory for radio listening.
My recorder is marketed by Amazon [affiliate link] under the brand name of “G” (http://gtoptc.com/). It has 8 GB of system storage and 64 GB on a removable SD (TF) card. If you Google “L87 Voice Recorder” you will see that Amazon, Walmart, and eBay sell, what are by all appearances, identical recorders with greater or lesser system memory and different size SD cards. Some include an external microphone.
Description
To say the voice recording industry has come a long way since my reel-to-reel experience is an understatement. Digital media, miniaturization, and functionality pretty much sum up the improvements.
This device is billed as a voice recorder. It is intended to be used in dictation or brought into a classroom, conference, or other meeting to gather an audible transcription of the proceedings. Attaching it to the line-out jack of a radio is not an application that is listed in the promotional literature. So, in selecting a device a radio enthusiast must be assured that line-in capability is available.
Also, there is a matter of compatibility. The L87 voice recorder works very well with the Eton Elite Executive, Tecsun PL-880, Sony ICF-SW7600GR and Grundig Satellit 800. The recorder was tested on a Sony ICF-2010 and did not work. Apparently, the 2010s were designed to operate with older recorders having high-impedance microphone inputs.
Specifics
- Memory – built-in system 8 GB, plus an included 64-GB SD (TF) card, 72 GB total. This we are told will produce 3,343 hours of recording at 32 kbps.
- Battery – 500 mAh rechargeable lithium ion, having up to 13 hours continuous recording at 512 kbps, and 24 hours of playback with earphones.
- File formats – Recording: WAV or MP3; or it can act as a player for any uploaded MP3, WAV, FLAC, APE, OGG, or WMA file.
- Recording bit rates – for WAV: 512, 768, 1024, or 1536 kbps; for MP3: 32, 64, 128, or 192 kbps.
- Gain settings – seven.
- Voice activation – auto recording begins once the sound reaches a settable decibel level and stops when there is no sound. Probably of minimal use for the radio monitoring purpose.
- File management – files are named with a time stamp (year, month, day, hour, seconds).
- Optional password protection.
- A-B repeat function – a portion of recording can be blocked for repetition. The A and B start-stop points do not alter the file and disappear when the file is closed.
- Physical – dimensions: 4.13 inches long × 1.06 inches wide, × 0.39 inch thick; weight: 2.8 ounces.
- Numerous other recording settings, including those for noise reduction.
- First available – April 26, 2022.
- Website – https://gtoptc.com/.
Experience
Being quite small, ergonomics is a consideration, and may take some practice. As I am right-handed, I unexpectedly realized that I grabbed this little device in my left hand, like a cell phone. That leaves my right hand free to press buttons, but I also tend to operate the controls with my left hand. Like many small travel radios, many buttons are dual purpose, and one must get used to short presses, long presses, and correct button sequences.
As an example of complexity, a change in volume requires a quick press of the VOL button, then repeated presses of the up/down buttons to arrive at the desired level. Fast forward and rewind are somewhat problematic. A short press of either button will quit the file you are listening to and queue up the preceding or next file, while a long press will incrementally rewind or fast forward the file you are listening to.
As it is marketed, this is a “voice recorder.” It provides a line-in capability, but you will have to supply your own stereo patch cord. Once programmed to line-in, you will not have to reset it when making follow-on recordings. Although it comes with an internal speaker, you can also swap out the patch cord with earphones for playback without changing any settings. Just to try it out, I used the built-in microphones to record a radio at normal volume. While the recording was acceptable, it was prone to any noise produced in the room or pressing recorder buttons.
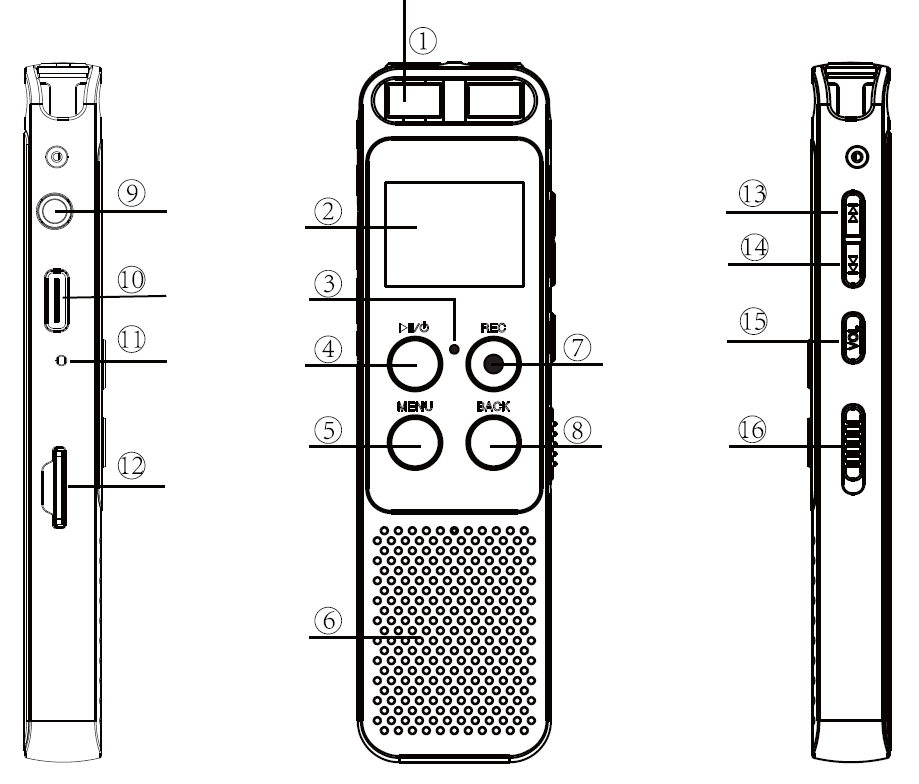
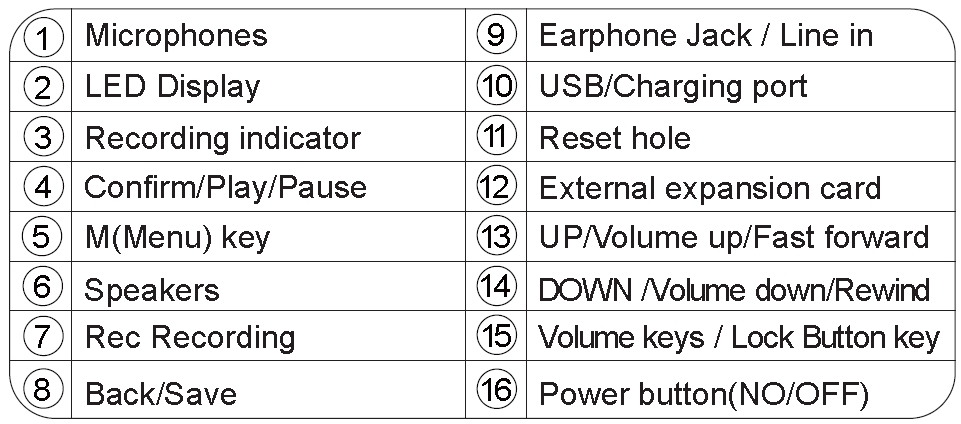
L87 Buttons and Ports (Source: L87 Voice Recorder Instruction Manual)
Battery and storage capacity will not likely be a problem, as this device will continue to operate for many hours when properly prepared for use.
The device records in stereo, which likely doubles the file size for our purpose of generally needing only monaural recording. I have not found a way to change it. On the other hand, I recorded some classical music content from a local stereo FM station and connected the recorder to a nice set of shelf speakers for playback. The sound quality of the MP3 file at 128 kbps was excellent, at least to my ears.
The display is quite small, but very sharp and colorful showing essential information such as file name, time, file format, bit rate, and volume setting.
File management is neither intuitive nor very versatile. I could not find a way to create new folders or move files using the recorder. Connecting the recorder to the computer, I could create new folders which were recognized in the recorder’s folder function, but the display would indicate an incompatible format when I tried to save a new file to the computer-created folders. The recorder would however play prerecorded files transferred to the new folder by the computer. Lesson: just stick with the basic file functionality and save the manipulations for the computer.
The recorder comes with a USB-C cable which is used to recharge the battery and transfer files to or from a computer. Or, if the included SD card is used for storage, it can be removed and used on the computer for file transfer.
As a retired technical writer, I tend to be quite critical of user manuals that come with appliances and electronic gear. This one is only fair – no better or worse than most others I have come across recently. We’re not just talking picky grammar issues here. Some explanations are entirely missing, for example how to properly set the recorder input gain.
File Processing
A few years ago, I used an open-source audio file processing program called Audacity to digitize our collection of vinyl and tapes. Such applications serve as a quick way to process or edit the recorder files, for example, trimming the files to a desired size or normalizing their amplitude.
Conclusion
In retrospect, there are some things I should have recorded off the radio back in the ‘60s and ‘70s. But the fact that I’ve enjoyed the radio hobby without a recorder all these years probably does not qualify it as essential equipment in my radio shack. Useful? Yes. If you are interested in recording from your radio, and are a frequent traveler, these recorders are convenient, requiring very little space in the bag. Because of its small size, hand dexterity and attentive thought processes must be developed to use it effectively. This recorder has amazing capability, is well constructed, and appears to work as intended.
The Model L87 Voice Recorder on Amazon.com (Note: This affiliate link supports the SWLing Post at no cost to you.)