Tag Archives: NCPL antenna

Patrizio’s simple homebrew NCPL antenna

Many thanks to SWLing Post contributor, Patrizio Cardelli, who writes:

I’m Patrizio (SWL I – 5184 /AN) from Riva del Garda, Italy.

A few days ago, I built a Noise-Cancelling Passive Loop (NCPL) antenna. I built the 1:1 balun with a couple of ferrite 175 – 285.

I got a good result on medium wave on my ICOM IC R 71 E with the antenna inside my house installed behind the desk just to avoid any problems with my wife.

On shortwave, the signal was low in comparison with the Bonito mini whip but in my QTH I have a lot of QRM and with this antenna I solved my problem.

Yesterday I tried the balun with my random wire (15,2 meter long) also with good results.

About my NCPL antenna: I made mine with RG-58 coaxial cable just to have easy portability in SOTA (please see photo) and also the feed line is made by the same coaxial cable. OK, you are right…it’s ugly:

Electrical connections are not soldered, still I don’t see any mechanical issues and this antenna since it is made for SWL / BCL purposes (meaning, RX only, no TX).

Concerning the binocular ferrite core, I didn’t have one, so I used two ferrite core type 175 – 285 (28,5 mm length, external diameter 17,5 mm and internal diameter 9,5 mm) normally used to reduce HF interference:

For the winding I used PVC insulated cable cat no: 7/0,2 type 2 (def61 – 12) conductor 7/0,2mm TSCu X 0,3mm R/T type single (4 turns primary and 4 turns secondary). It’s the same cable with which I built my random wire antenna (also portable for SOTA but now installed on my balcony until the COVID – 19 emergency is over).

The attached videos show the situation in comparison with my BONITO MINI WHIP active antenna (also installed inside my house). Recently I changed my QTH and unfortunately here I have a lot of interference both on MW and SW. The better results that you can hear are achieved with my NCPL antenna.

I have made this test with my ICOM IC R 71 E + BHI noise cancellation speaker…..you can assess yourself, the better results that you can hear are achieved with the NCPL antenna and in the case of Tecsun PL-660 without any noise cancelling filter (BHI speaker off).

Thanks for sharing this, Patrizio! As you say, the NCPL loop seems to do a fine job helping to eliminate local RFI/QRM. The Bonito Mini Whip is a fine antenna, but not optimal for environments with a lot of radio noise–that’s where the NCPL antenna really shines.

You also make a good point that if you’re simply experimenting and only using an antenna for receiving, you can be more relaxed about the build because you’re not sending RF through it. In the end, however, properly soldered and protected connections will last much longer and provide better, more reliable performance.

Thank you, again, for sharing your build, Patriio! Those reception results speak for themselves!

Spread the radio love

John adds a pre-amp and rotatable stand to his homebrew NCPL antenna

A couple weeks ago, we featured John Mills’ homebrew Noise-Cancelling Passive Loop (NCPL) antenna (see photo above) in a post with two other Post community designs.

John recently shared an update to his project:

As promised, some more pictures of my antenna mounted on a rotatable stand. I have used standard (in the UK) 20mm electrical plastic conduit and fittings to make the frame.

Fitted a small plastic box to house the balun and have put a BNC socket on the underside of it for connection the coax cable to my Rx.

I have also been experimenting with cheap low cost amplifiers (LNA) found on eBay (see picture) which do seem to improve the general strength of signals by 10-15db, but the baseline noise also rises.

I did manage to hear a QSO on 160M using one of these which was inaudible without the LNA but I cannot say for sure yet if they are worth the extra noise introduced.

Thank you for sharing your update, John! The plastic conduit support is simple and effective! Indeed, it looks very professional. What I love about your NCPL build (loop, stand, and LNA) is it that it’s all incredibly affordable as well.

Read more about John’s NCPL build in this post.

Post Readers: Has anyone else experimented with implementing a pre-amp in their NCPL antenna design? Please comment!


Do you enjoy the SWLing Post?

Please consider supporting us via Patreon or our Coffee Fund!

Your support makes articles like this one possible. Thank you!

Spread the radio love

More about hacking VGA cables to make binocular ferrite cores

A few days ago, we posted an a short article showing how Oscar hacked a VGA cable to make a binocular ferrite core for his homebrew NCPL/Youloop antenna. Many thanks to SWLing Post contributor, Grayhat, who explored this clever hack a little further:

Hi Thomas, Having some time in my hands Sunday afternoon I decided to try pulling out the ferrite chokes from a VGA cable I had around, and while doing so, I decided to coarsely document the process with some pics.

Figure 1

The first thing to do is use a cutter to carefully cut around the “washer” shaped plastic at the connector end of the choke (fig.1, #1,#2, #3 above), then on the same side, after cutting the plastic also cut the inner conductors (fig.1, #1).

Move to the other side of the choke, gently cut around the “washer” w/o cutting the inner conductors, now pull the cable to extract it from the choke (fig.1, #3), repeat the process for the other choke.

Now look at the “cans” containing the chokes, one side of those will show a “cap” (fig.1, #4), insert a small screwdriver into the center hole and gently ply to one side to raise the cap and extract it (fig.2, #1).

Figure 2

The result will be as in fig.2, where #1 is the closing cap, #2 is the ferrite choke and #3 is the “can” containing the choke. Repeat the process and you’ll have two ferrite chokes as shown in fig.3 (the VGA connector is there to give an idea of the dimensions):

Figure 3

At this point, use some tape (duct tape will be a better idea, I used clear tape just to make an example) to tie the two ferrites together as in fig.4 and you’ll have your “binocular ferrite”:

Figure 4

Willing to use whatever you have there to wind the transformer, you may now extract the tiny insulated wires from the VGA cable (fig.1, #3, see wires) and use them for the windings.

Notice that other cables may use different choke “cans” which may need to cut a larger portion around the flat faces at the ends. But remember that in any case, those are just “snap-in” cans containing the ferrites, so with a bit of attention and patience, it shouldn’t be difficult extracting the ferrites.

Based on a little online research, it sounds like the ferrites used to choke the VGA cables (HDMI ones too) are generally type #31.

Looking at some #31 datasheets it appears that while #73 is works fine at frequencies below 50MHz, the #31 is best suited for the 1-300MHz range.

This means that #31 won’t be the best pick for mediumwave, although if one doesn’t have another choice… well, go for that! Also notice that the ferrite permeability is different:1500 for #31 and 2500 for #73. This means that we’ll need to increase the number of windings to achieve acceptable signal transfer, otherwise the transformer loss will make our antenna deaf.

One might try increasing the number of windings to say 8:8 or 16:16; as long as the winding
ratio will remain the same, there won’t be problems (although the resulting bandwidth will become narrower).

Thanks for documenting and sharing this, Grayhat! Since most of us have more time on our hands at home, I think it would be worth experimenting with the number of windings to see how it affects the antenna performance. That’s a clever thought, too, to use the VGA wires to wind the Balun. As long as the cable is long enough for the amount of turns, it’s certainly the most efficient use of resources!

Spread the radio love

Hack a broken VGA cable to make a binocular ferrite cores for your NCPL antenna

Many thanks to Oscar (EA3IBC) who shares this simple hack.

I’ve gotten quite a few emails from Post readers telling me that the only thing holding them back from building a NCPL antenna is the BN-73-302 binocular ferrite core needed for the 1:1 Balun. While so much of the world is sheltering at home due to Covid-19, it’s less convenient to purchase one just for this purpose.

But almost everyone has an old VGA or USB cable with ferrite cores they can cannibalize for this  very purpose. Oscar shared this super-simple hack on Twitter:

1. Cut the cable and remove the ferrite cores

2. Tape the two cores together

3. And wind four turns on both sides

Admittedly, this 1:1 balun might not have the same properties as the BN-73-302 from our tutorial, but it seems to be working for Oscar. Check out this screenshot he shared from SDR# while hooked up to his NCPL antenna:

Thanks again!

Readers, you can follow Oscar on Twitter by clicking here.

Spread the radio love

Beating the Quarantine Blues: Readers build homebrew NCPL antennas

My homebrew version of the NCPL antenna.

Recently, I published a step-by-step guide on building a Noise-Cancelling Passive Loop (NCPL) antenna. Evidently, this antenna project really resonated with readers! [See what I did there? If so, my apologies!]

I think this passive loop antenna project has been so appealing because (1.) most of us around the world are sheltering at home due to the Covid-19 pandemic and (2.) this project is simple and you likely have all of the components in your tool shed or junk box at this very moment.

A number you have written to tell me about your antenna builds and some of you have agreed to allow me to share your projects with the SWLing Post community.

Below, you’ll find three fine homebrew examples of the NCPL antenna–all of which were made with what these fine radio enthusiasts had on-hand:

Jerome van der Linden

Jerome’s NCPL antenna

Jerome writes:

Hello Thomas,

Well, I took up the challenge and built a NCPL antenna pretty close to your instructions.

Unfortunately, the coax I had available used (had aluminium shielding, and too late into the project I discovered solder would not take to it. My solution was to cannibalize a coax cable joiner (see photos attached), where – normally – the centre conductors are joined / held by a plastic centre piece and screw fittings.

The braid / shield for the two bits of coax is clamped / squeezed by an outer metal piece. My cannibalising effort involved removing the plastic centre bit which joins the two centre cores, and keeping just the outer metal component which I used (after completely cutting through the coax) to clamp the two metal braid sections, while the two centre copper bits were far enough apart for me to solder the leads for the ferrite balun.

Of course, I could not do the same at the top of the loop where the internal and external conductors need to swap over. I soldered some quite thick copper wire (perhaps 2mm in diameter) to each center core, pushed the center core into the opposing coax and coiled the 2mm thick copper tightly around each end of the coax.

Once it was all taped up it looks no worse than yours, and it does indeed WORK! [see photo above]

Here in Oz, I could not source the identical ferrite, but I think it’s pretty close. Best performance for me is on 11MHz, where the Radio New Zealand signal on 11725 is markedly better using the loop than the internal whip on my Tecsun PL-880. Other bands not quite so significant, but the Noise level is definitely lower.

As you say, Jerome, once all packaged up, it looks great! Sure, the mixture of materials you had on hand wasn’t ideal (aluminium shielding, etc.) but you found a way to make it work from the resources you had in your home. And I love the fact it’s lowed your RFI level!  Thanks for sharing!

Giuseppe Morlè (IZ0GZW)

Dear Thomas,

I’m Giuseppe Morlè (IZ0GZW), from Formia, central Italy, on the Tyrrhenian Sea.

I wanted to build your noise canceling loop seen on SWLing Post …
seems to work well especially from 40 meters. upward…
the diameter is 50 cm.
I will do other tests soon.
You can see the initial test on my YouTube channel via this link:

Thanks for the nice idea and a greetings from Italy.
73. Giuseppe IZ0GZW

Thank you, Giuseppe! What an amazing view you have there from your balcony! I’m quite impressed your PL-660 can take advantage of this design so well. We look forward to your other tests! Grazie mille!

John Mills

Hi Thomas,

My idea was to use a fitness hoop 75cm diameter bought off eBay. I removed the flashy striping to reveal a plastic like hoop that was joined in one spot with a plastic insert.

I have wrapped the whole hoop in tin-clad copper foil tape that has a conductive adhesive backing, but to be sure I have soldered all the overlapping seams. I drilled two holes opposite each other for the upper foil connections and the lower exit to the Balun.

Hopefully the three pictures will be helpful, I did the 4 turn design on Airspys website and it works really well connected to my RSPdx.

73

John

Thank you, John. What a fantastic way to build the NCPL antenna without using a coax for the loop. Indeed, since your plastic hoop has a small insert in the middle, you’ve an ideal spot to make the shield to center conductor cross-over.  Very clever! I also like how you mounted the 1:1 Balun (or Unun) on a small board. Thanks for sharing this.

Got Loops?

Post readers: If you have your own unique NCPL antenna design, please consider sharing it with us! Contact me with details and photos. I’ll plan to publish at least one more post with examples here in the near future.


Do you enjoy the SWLing Post?

Please consider supporting us via Patreon or our Coffee Fund!

Your support makes articles like this one possible. Thank you!

Spread the radio love

DIY: How to build a Noise-Cancelling Passive Loop (NCPL) antenna

I’ve gotten an number of inquiries from SWLing Post readers asking for a step-by-step guide to building the passive loop antenna I’ve mentioned in a number of previous posts. This antenna is the homebrew version of the commercially-available  Airspy Youloop.

It works a treat. And, yes, folks…it’s fun to build.

There are a number of loop designs out there, and to distinguish this one, I’m going to henceforth refer to this loop as in the title above:  the Noise-Cancelling Passive Loop (NCPL) antenna.

Before we start building, a little antenna theory…

I’m neither an engineer nor am I an antenna expert, so I actually turned to Airspy president and engineer, Youssef Touil, to learn how, exactly, this passive loop works. Youssef was the guy who experimented with several loop designs and ultimately inspired me to build this loop to pair with his HF+ Discovery SDR and the SDRplay RSPdx. “The main characteristic of this loop,” Youssef notes,  “is its ability to cancel the electric noise much better than simpler loop designs.” Got that!  [See loop diagram below]

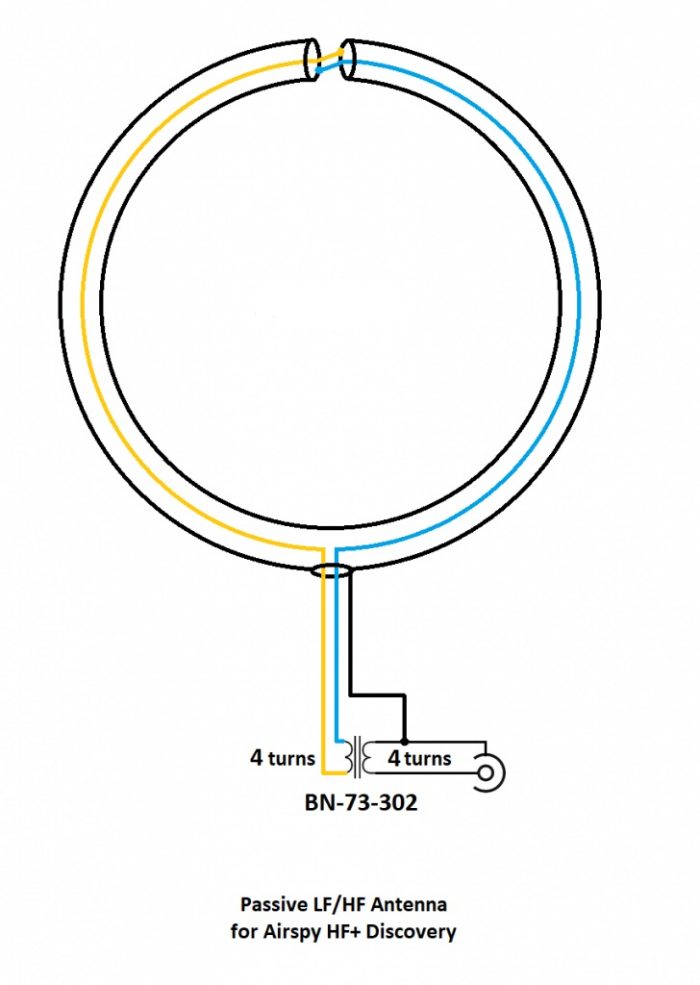
“The second characteristic of this loop antenna is that it is a high impedance loop, which might appear counterintuitive. This means it can work directly with many receivers that have a low noise figure, in order to mitigate the impedance mismatch loss.

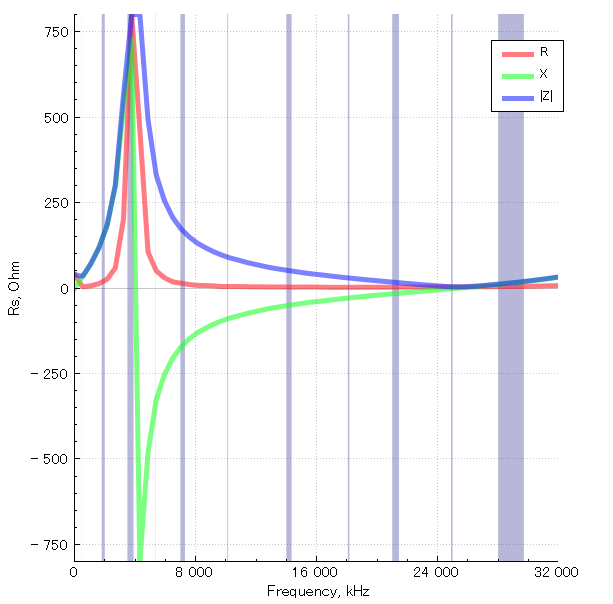
Note the resonance lobe near 4MHz. The resonance frequency is controlled by the diameter of the loop, the parasitic capacitance of the cable, and the loading from the transformer. It happens to be located right where we need it the most.

The transformer is basically a 1:1 BALUN that covers the entire HF band with minimal loss. Our BALUN has typically 0.28 dB loss.

[…]By connecting the center of this outer shield to the ground of the transmission line, you effectively cancel all the electric noise. The BALUN is required for balancing the electric noise, not for adapting the impedance.

[…]If you want to boost the performance in VLF, LW and MW, you can try a different impedance ratio, but this will kill the higher bands.”

What makes this loop so appealing (to me) is that it can be built with very few and common parts–indeed, many of us have all of the items in our junk boxes already. As the name implies, it is a passive design, so it requires no power source which is incredibly handy when you’re operating portable.

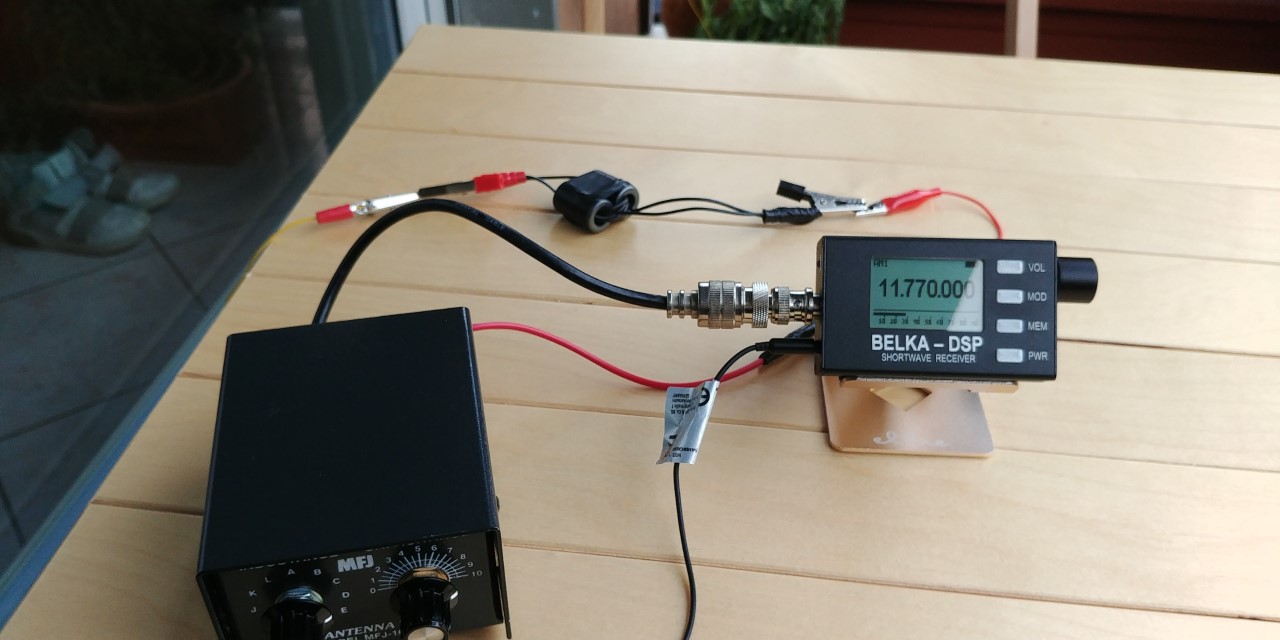
When paired with a high-dynamic range SDR like the Airspy HF+ Discovery or SDRplay RSPdx, you’ll be pleased with the wide bandwidth of this antenna and noise-cancelling properties.

If you don’t care to build this antenna, Airspy sells their own version of this loop for a modest $35 USD.

But building an antenna is fun and you can tweak the design to customize performance, so let’s get started:

Parts list

  • A length* of coaxial cable for the loop (see notes below regarding length)
  • Another length of cable terminated on one end with a connector of your choice as a feed line
  • A BN-73-302 Wideband 2-hole Ferrite Core
  • Enough coated magnet wire for a total of eight turns on the BN-73-302
  • Heat-shrink tubing or some other means to enclose and secure the cable cross-over point and balun. (You may be able to enclose these connection points with PVC or small electrical box enclosures, for example)
  • Electrical tape

Tools

  • A cable stripper, knife, and/or box-cutter
  • Soldering iron and solder
  • A heat gun (if using heat shrink)
  • Some patience 

*A note about loop cable length: Vlado and I made a loop with 1.5 meters of cable. The Airspy Youloop ships with two 1 meter legs that combine to give you an overall loop diameter of about 63.6 cm.

Step-by-step guide

When I first decided to build this loop, it was only a day prior to a trip to the South Carolina coast where I planned to do a little DXing. I didn’t have all of the components, so I popped by to see my buddy Valdo (N3CZ). Vlado, fortunately, had all of the components and was eager to help build this loop. As I’ve mentioned in previous posts, Vlado is an amazing engineer and repair technician, so when I say “we” built it, what I really mean is, Vlado did!  But I could’ve done it myself.

This is actually a very simple build––something even a beginner can do, as long as they’re okay with using a soldering iron. It does take patience preparing the loop cable properly. Take your time as you start, and you’ll be on the air in an hour or two.

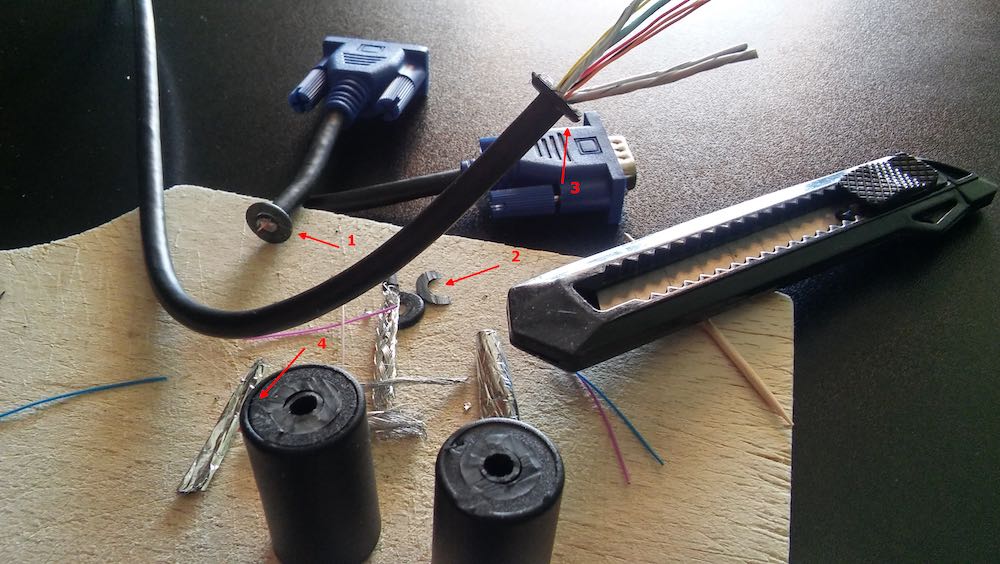
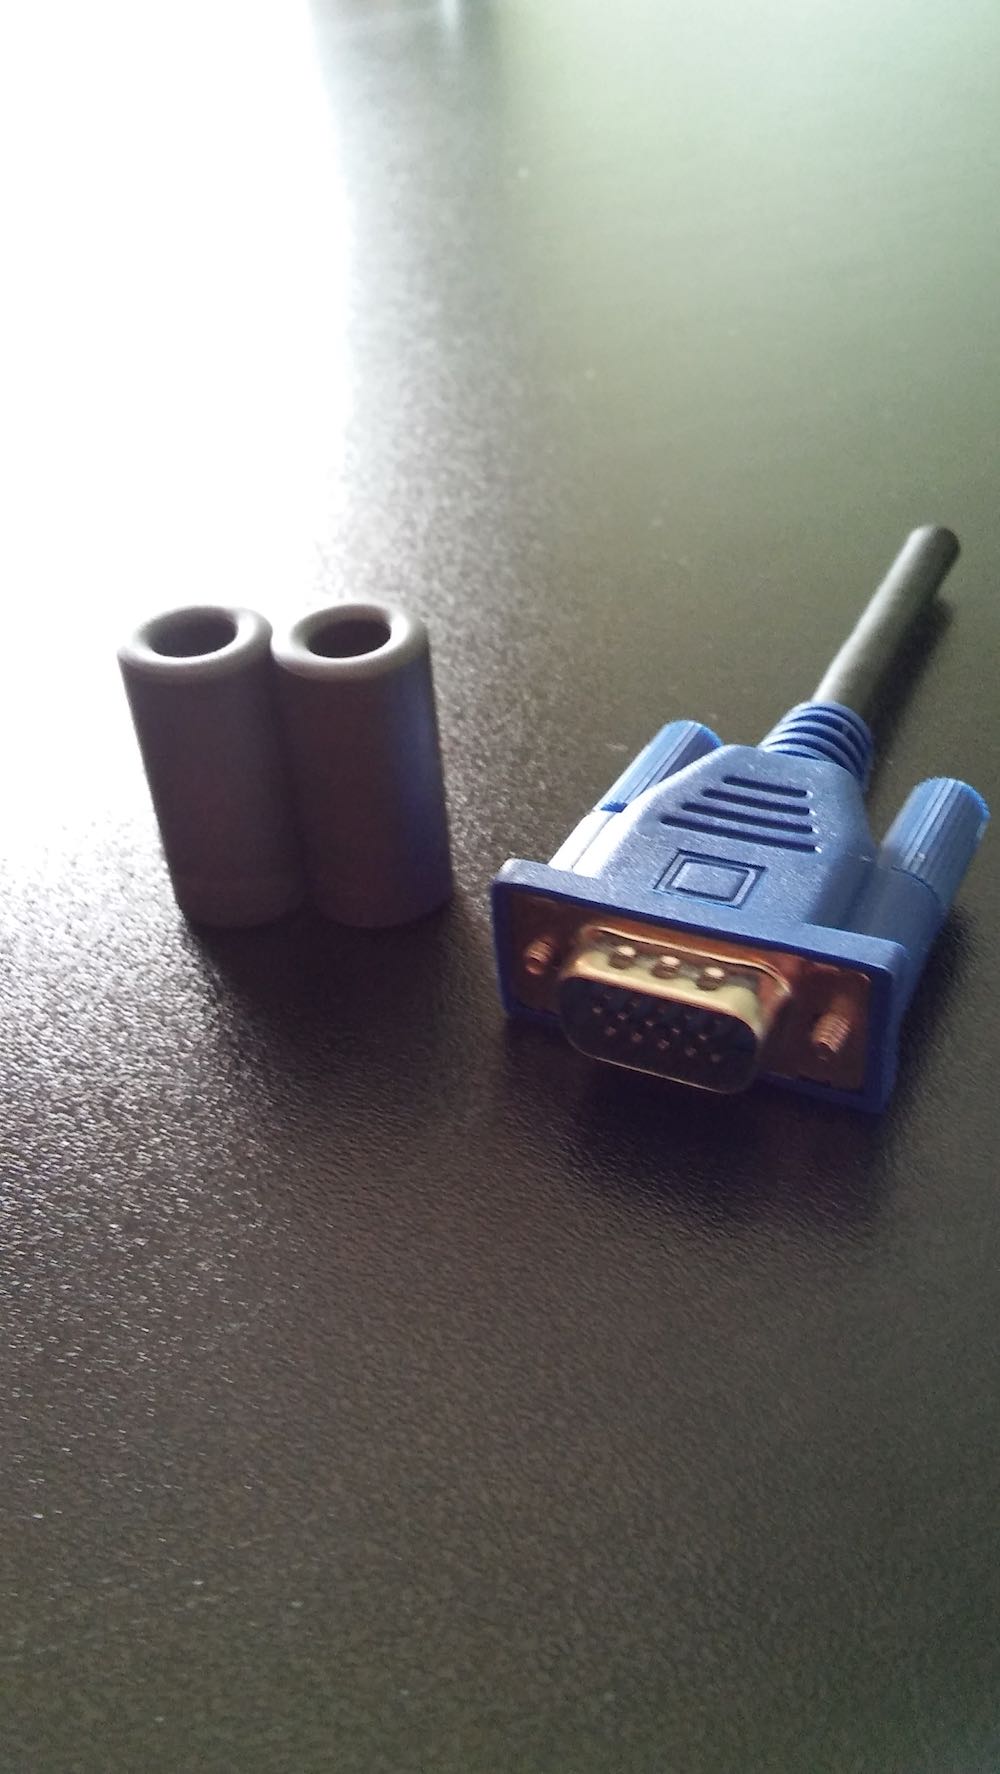
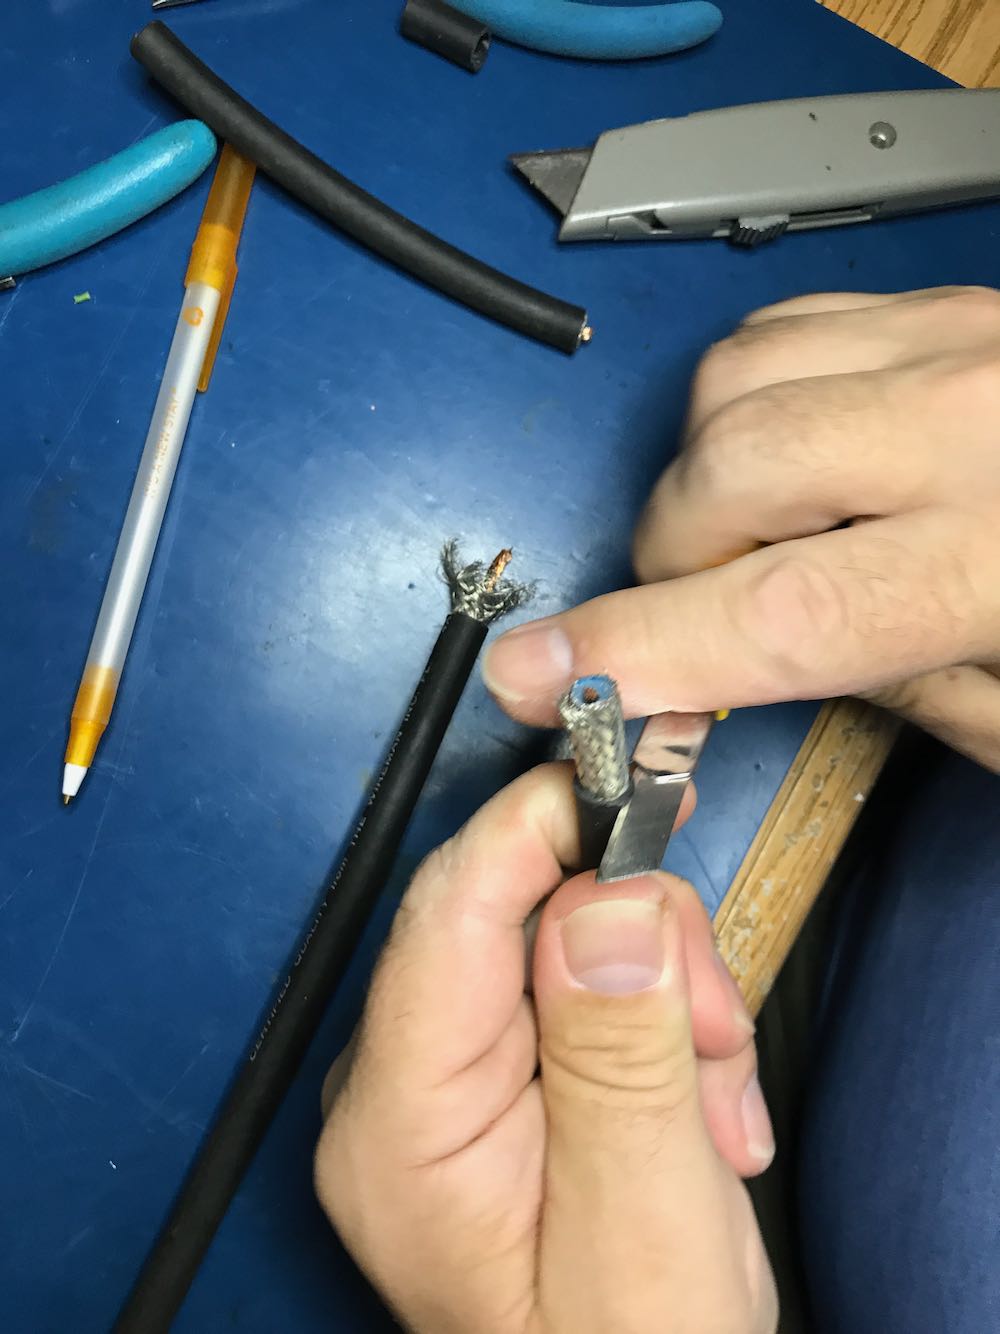
1. Strip the ends of the loop cable.

Although your cable type and diameter may vary, strip back the cable ends roughly like this.
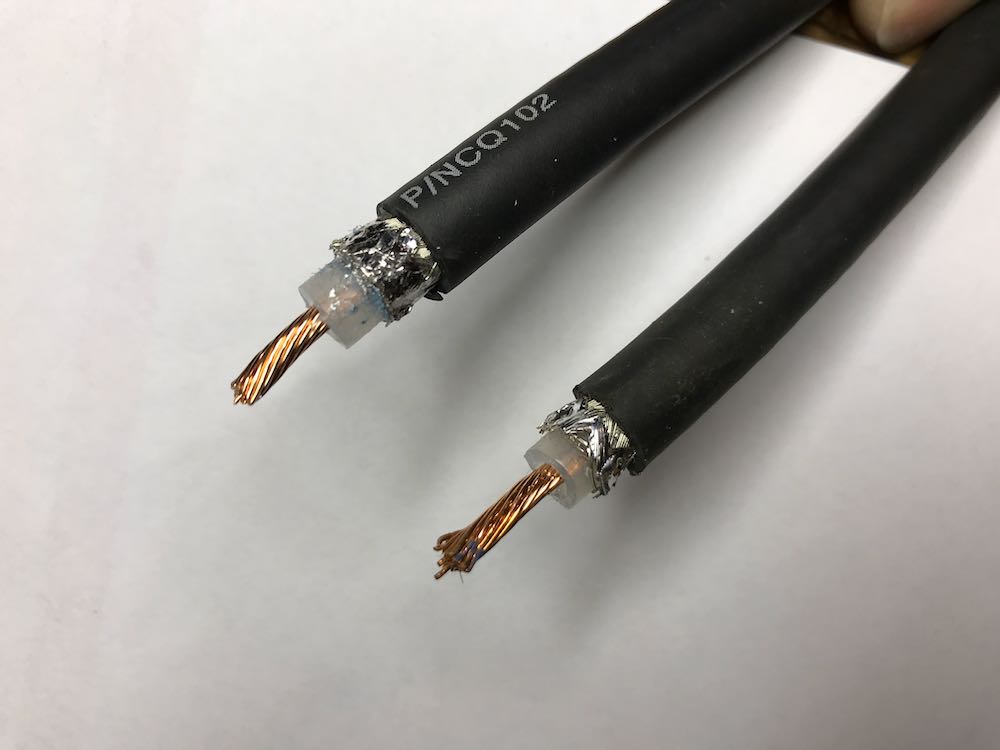
To make finding the middle of the cable easier, we taped off the ends.

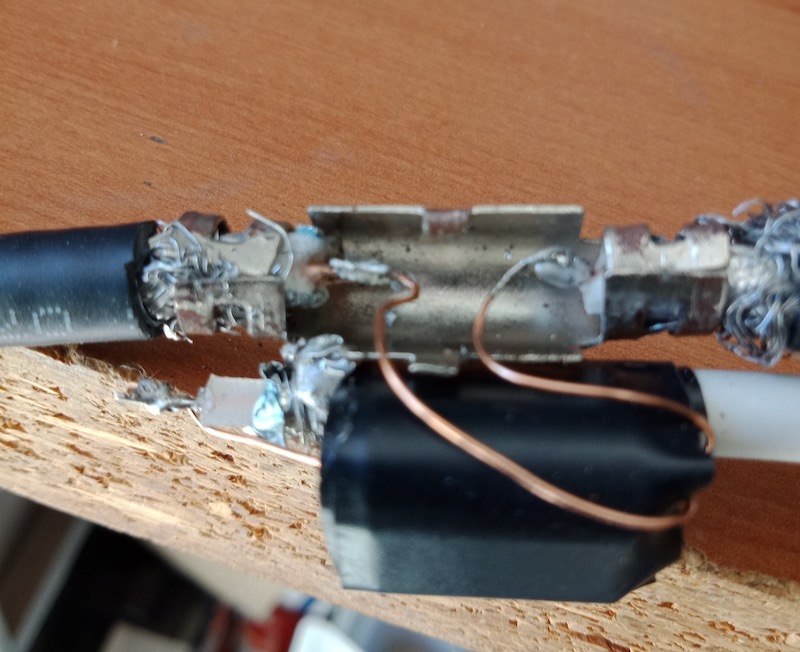
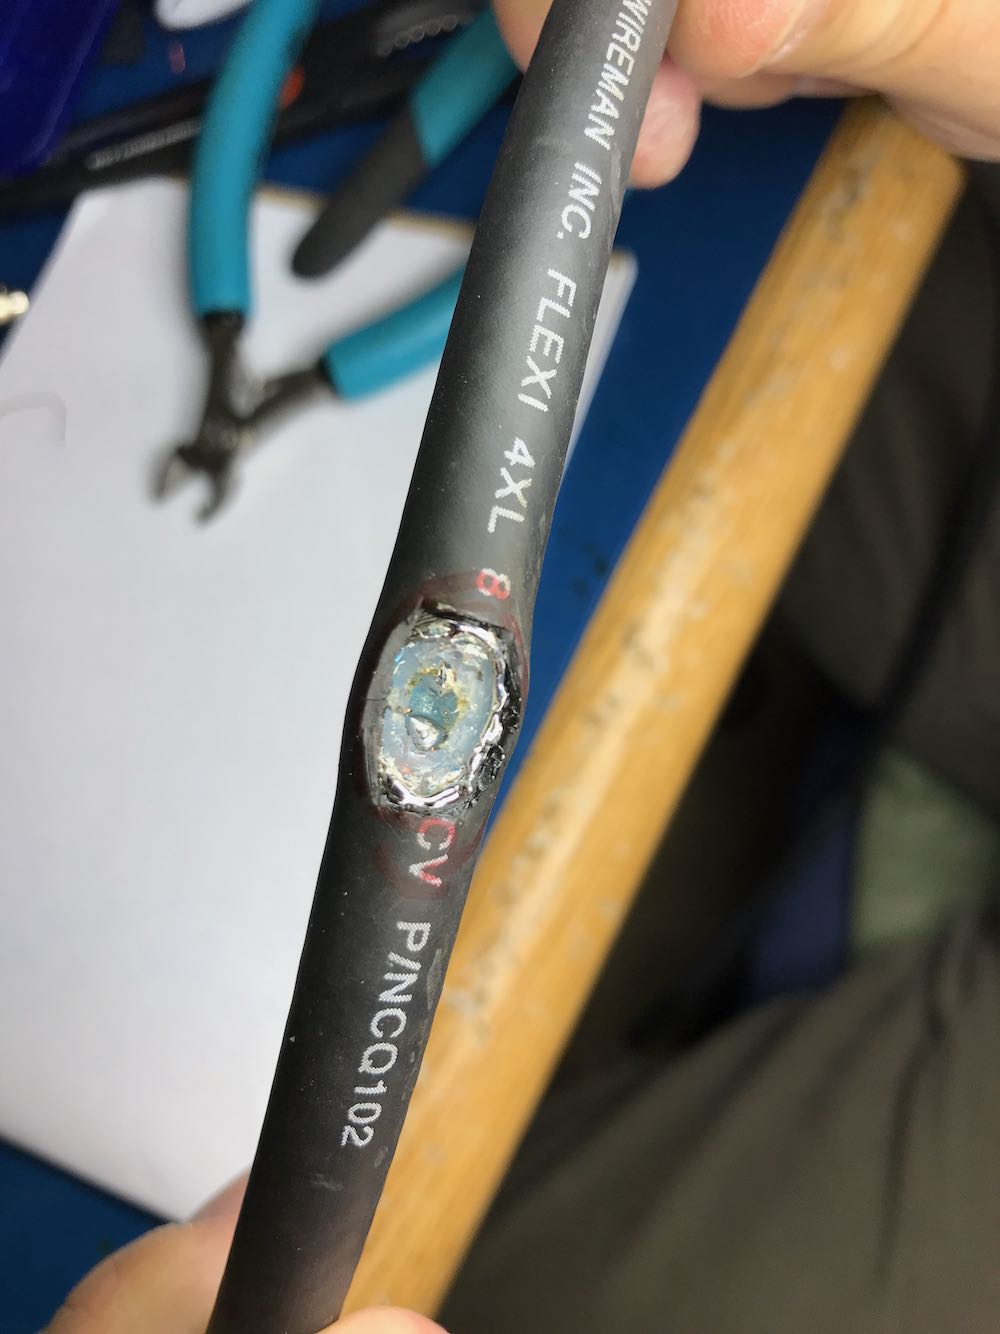
2. Make an opening in the middle of the cable to attach Balun leads to center conductor.

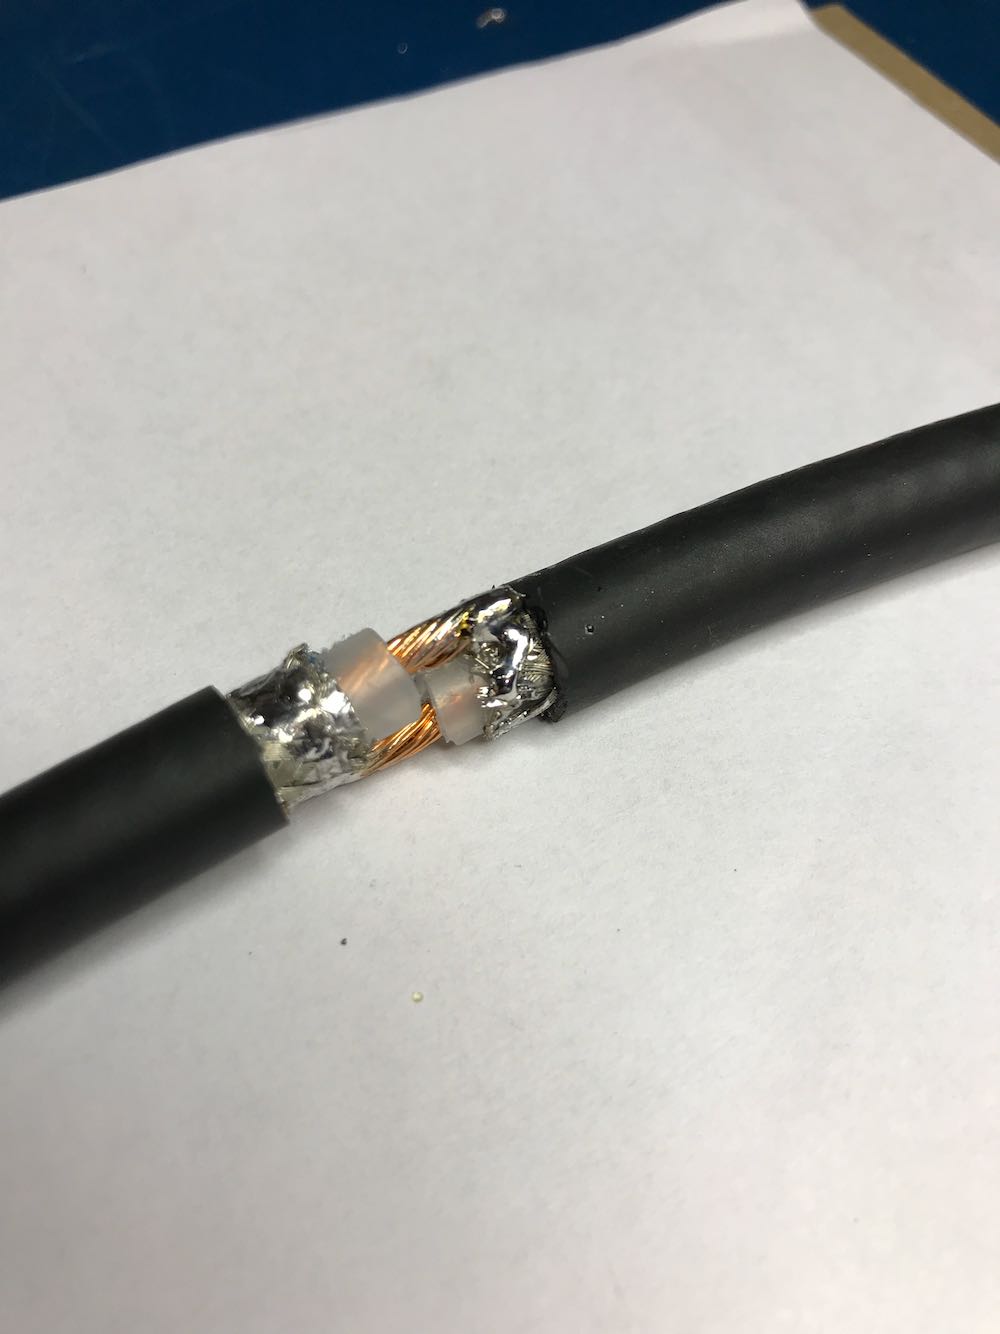
This is the trickiest part of the whole operation. The goal is to create an opening to tap into the center conductor of the cable.

You need to open a hole in the middle of the cable by

1 cutting away a portion of the outer jacket;

2 carefully separating and opening the shielding;

3 digging through the dielectric core, and finally

4 exposing the center conductor of the cable

Try to make an opening just large enough to gain access to the cable’s center conductor, but no bigger. Don’t allow any piece of the shielding to touch the center conductor.

When you reach the center conductor, expose enough of it so that you can clip it in the middle and create an opening to solder your balun leads to both conductor ends.

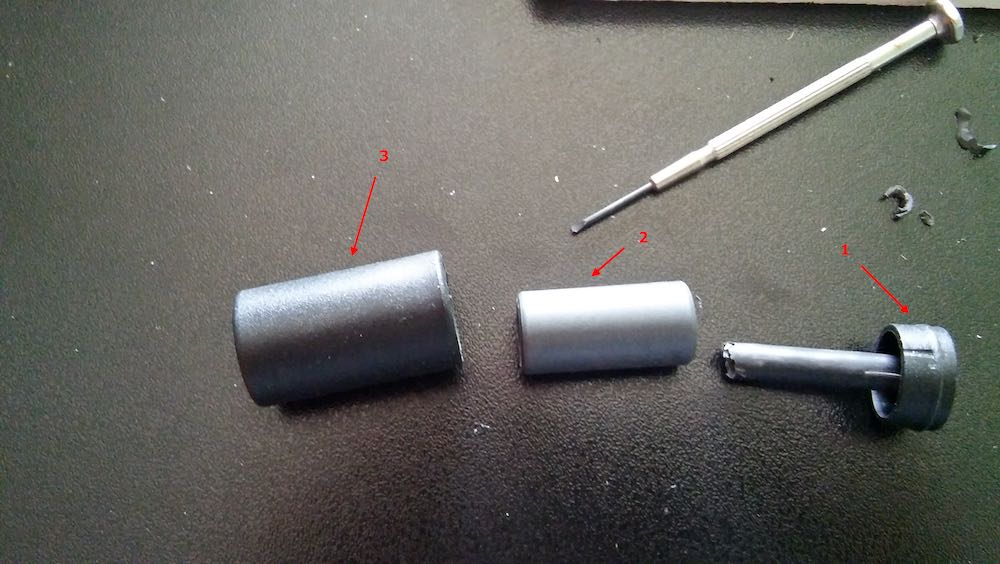
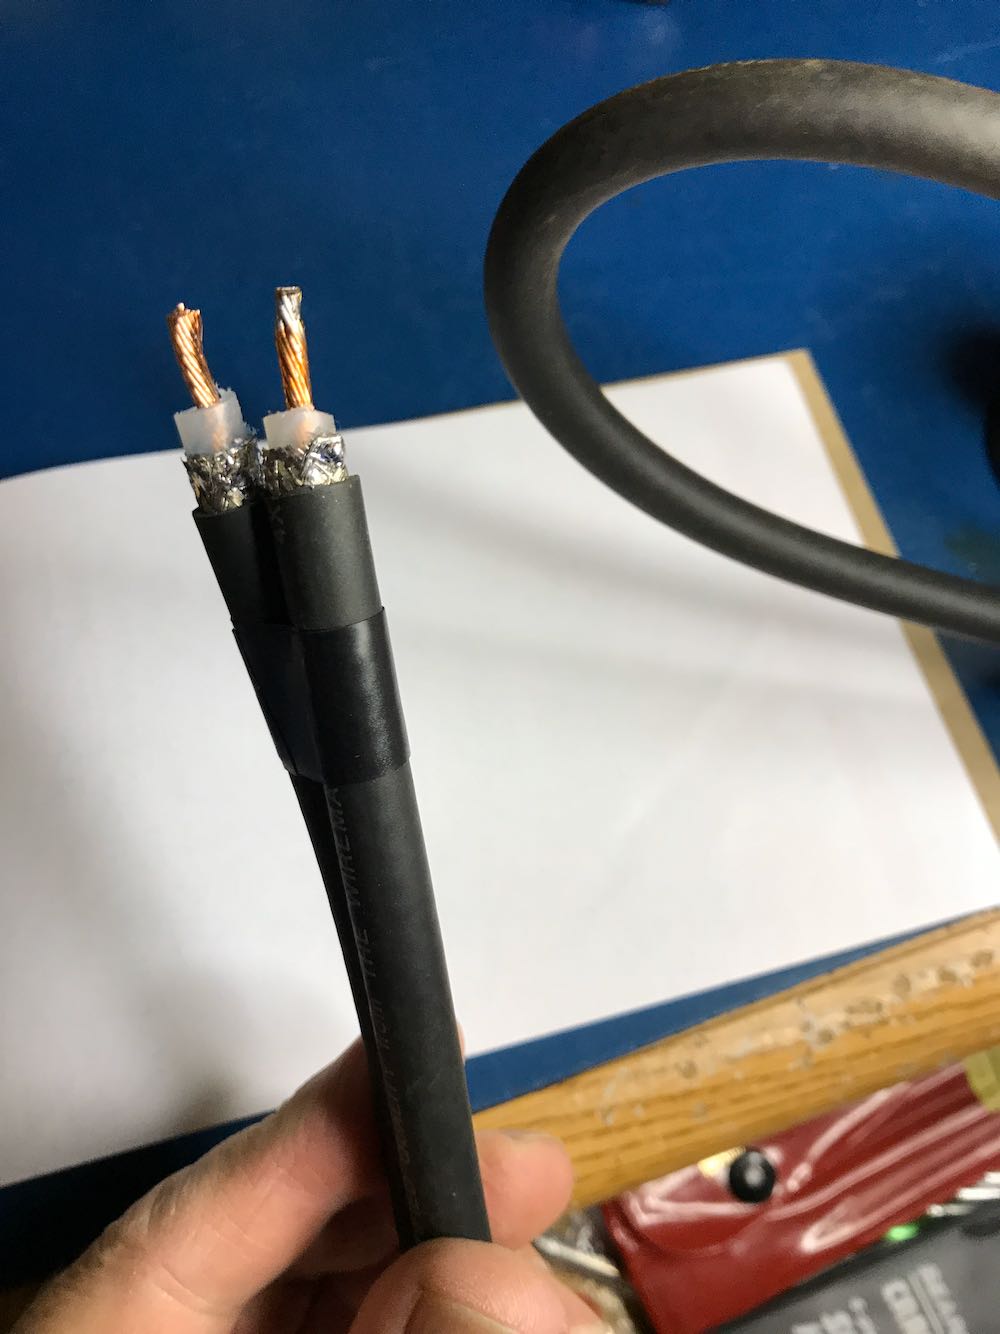
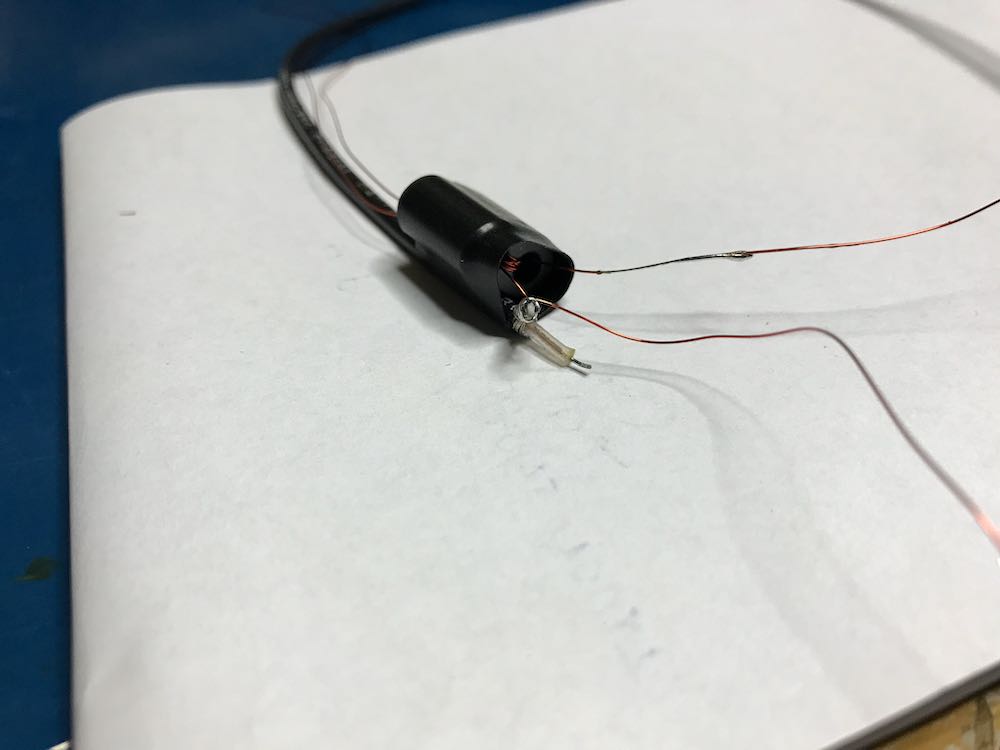
Once you’ve finished with this step, your cable should look something like this…

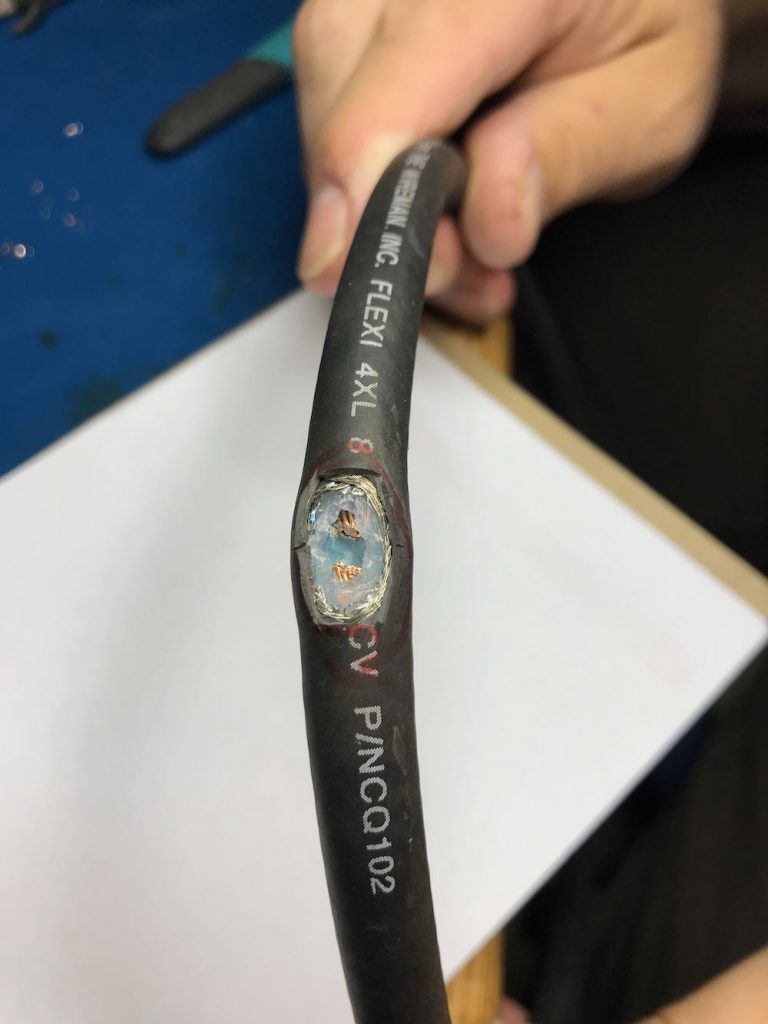
In the photo above, note that the shielding is completely pulled away, the dielectric core has been cut through, and we’ve clipped the center conductor, leaving a gap large enough to solder.
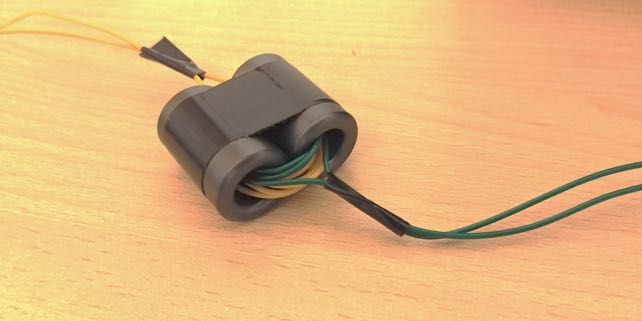
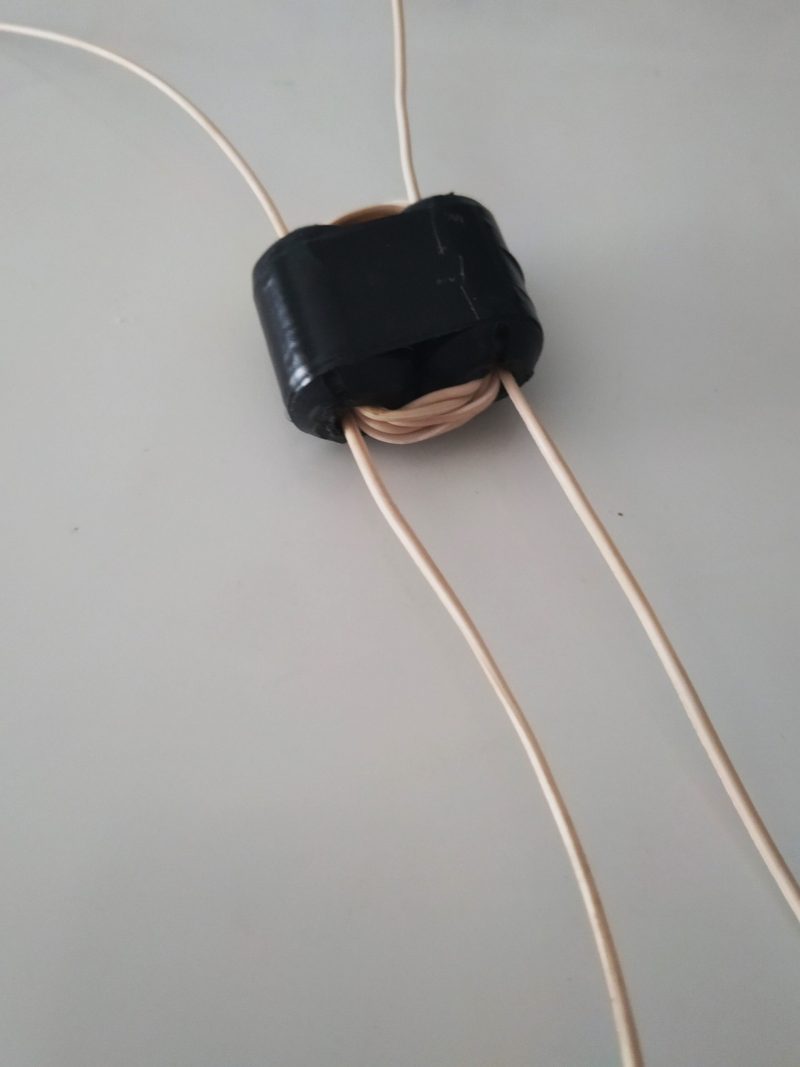
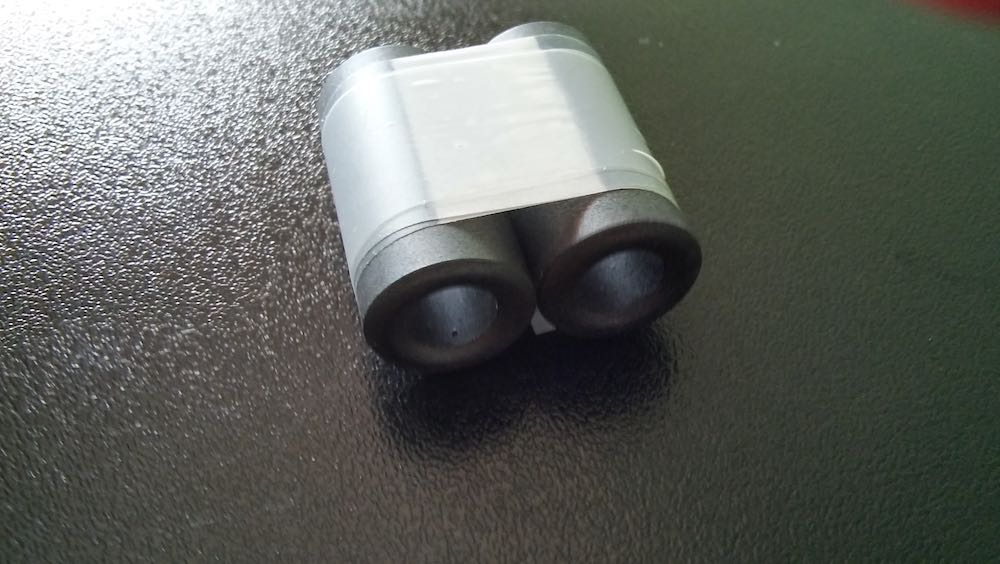
3.  Make a 1:1 Balun

Grab your BN-73-302, and with the coated magnet wire, make four windings on one side, and four on the other. It should look like this:

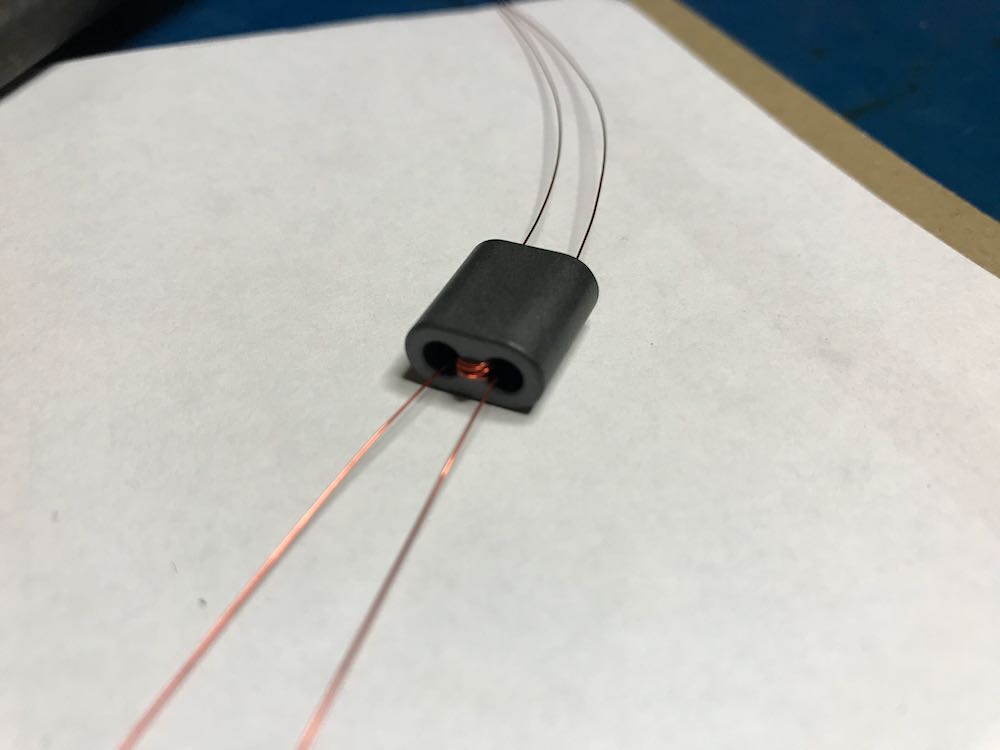
Don’t have a binocular ferrite core like the one above? If you have a broken cable with ferrite cores, you can hack one! Click here to learn more.

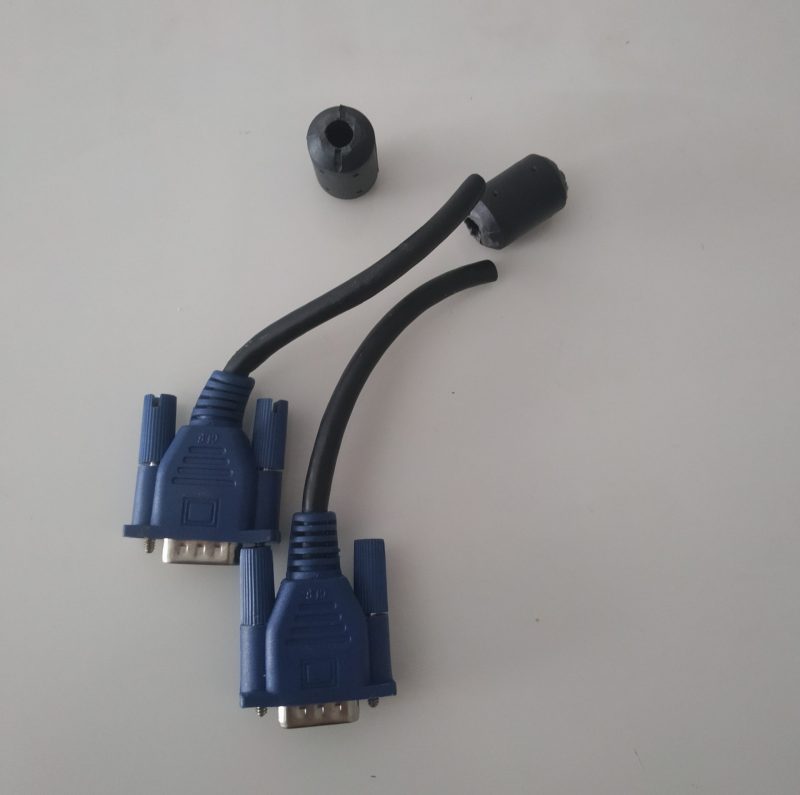
4. Connect the Balun to a feed line.

Vlado just happened to have a BNC pigtail in his shack (he’s that kind of guy), so we cut and stripped one end, then connected the center conductor and shield to one side of the balun. We then enclosed the balun in heat shrink tubing to make it a little easier to attach to the loop later:

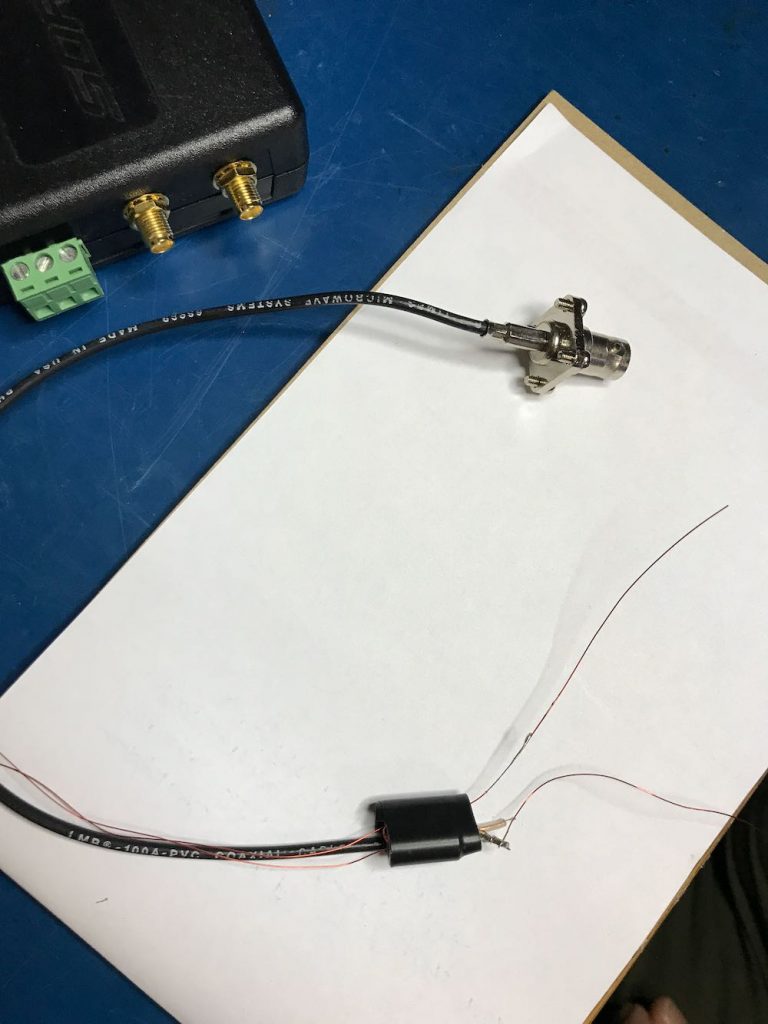
Of course, you could also create this junction in a small enclosure box or short cross-section of PVC. There are a number of ways you could secure this.

Youssef also added the following note about the feedline:

To use the NCPL antenna without a preamp, it is recommended to keep the length of the cable below 10 meters. The supplied Youloop 2 meter cable [for example] is sufficient to keep the antenna away from the magnetic interference of a computer or a tablet, and has very low loss and parasitic capacitance.

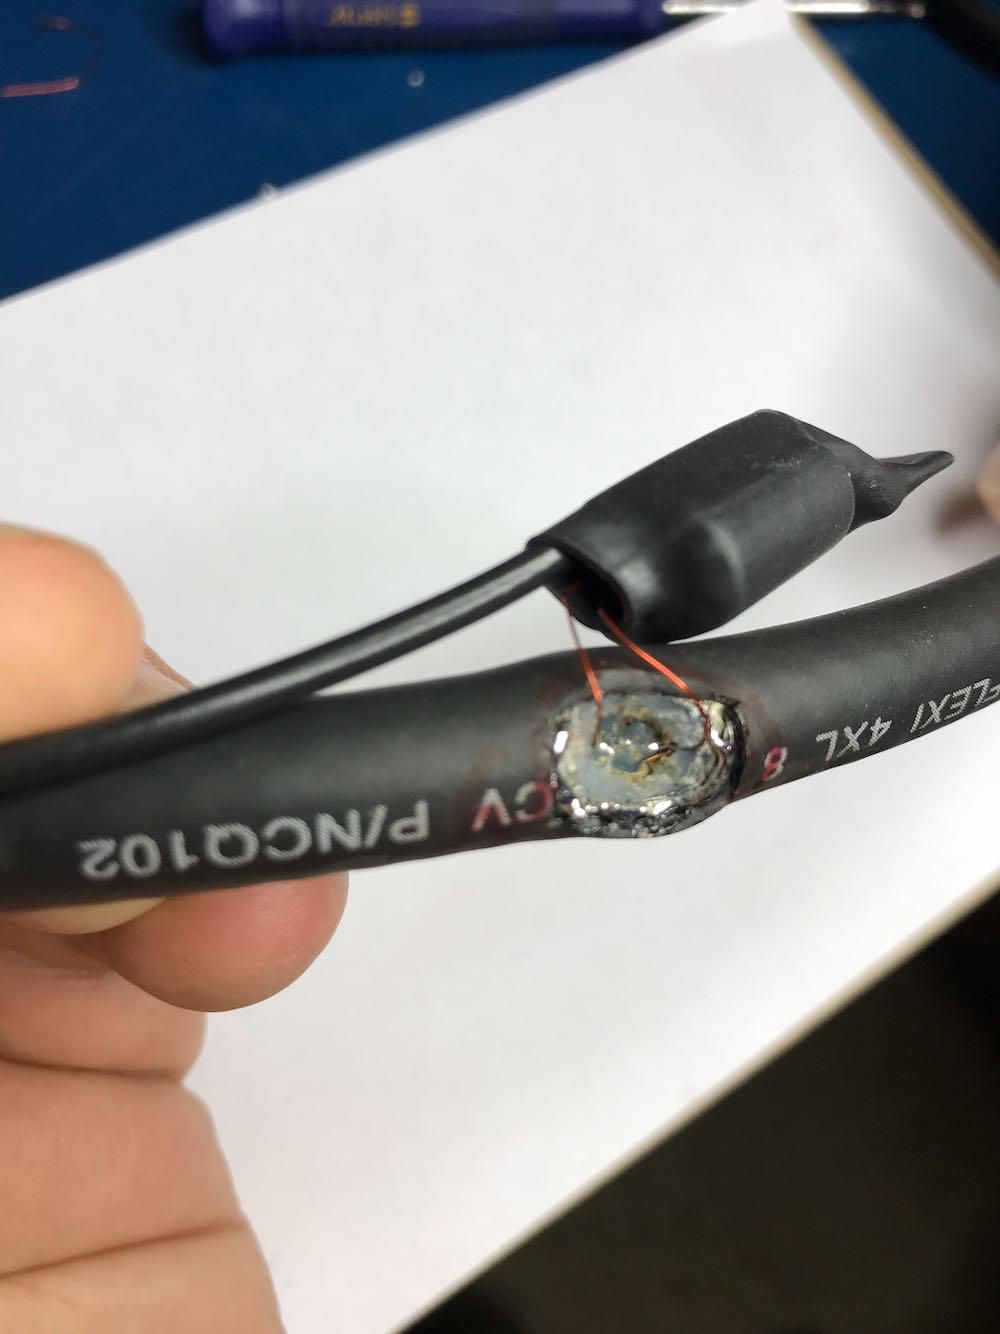
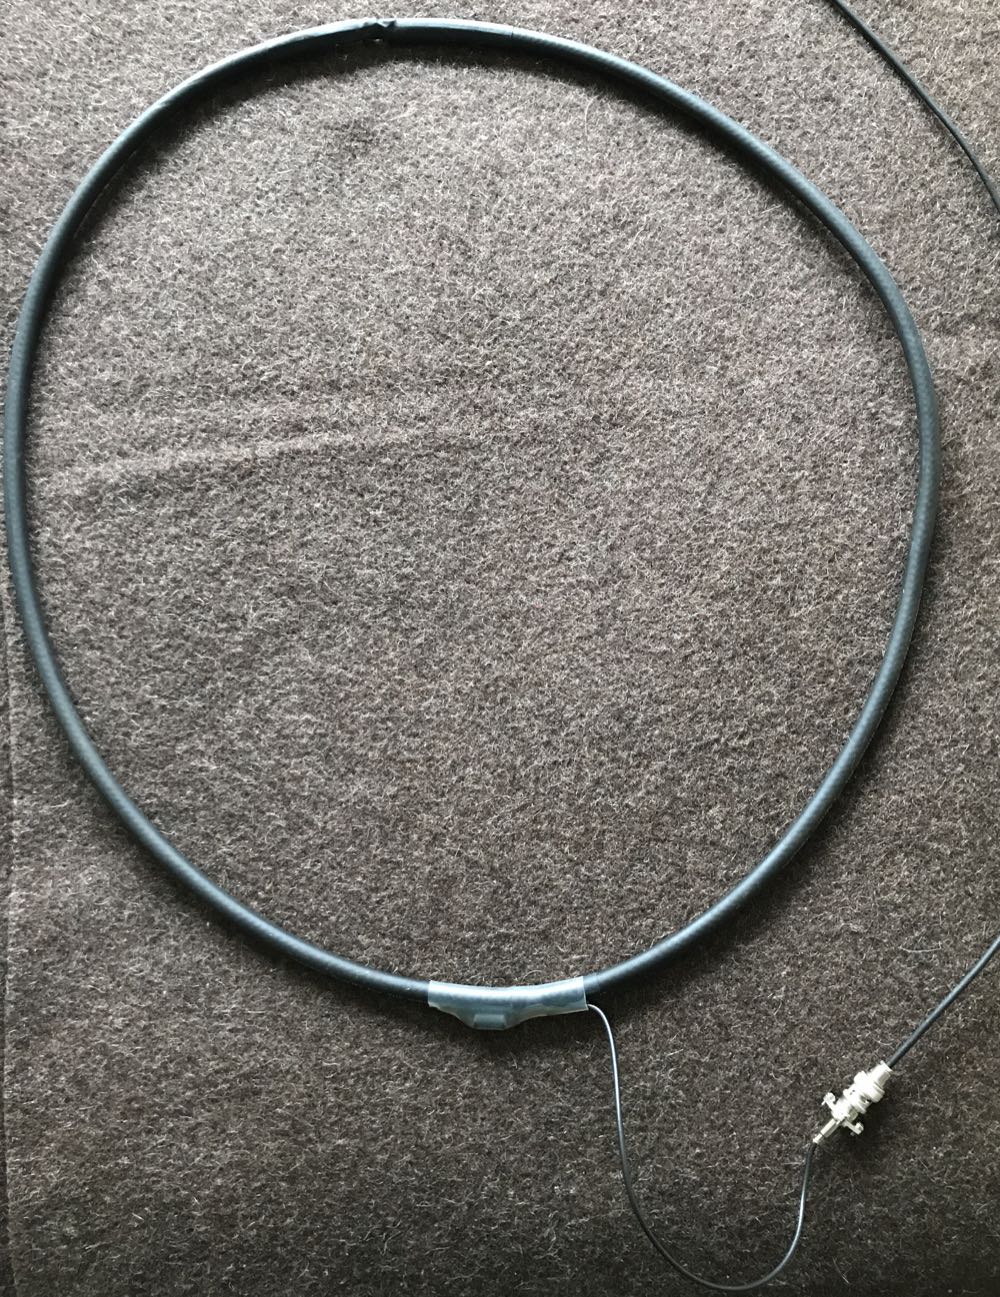
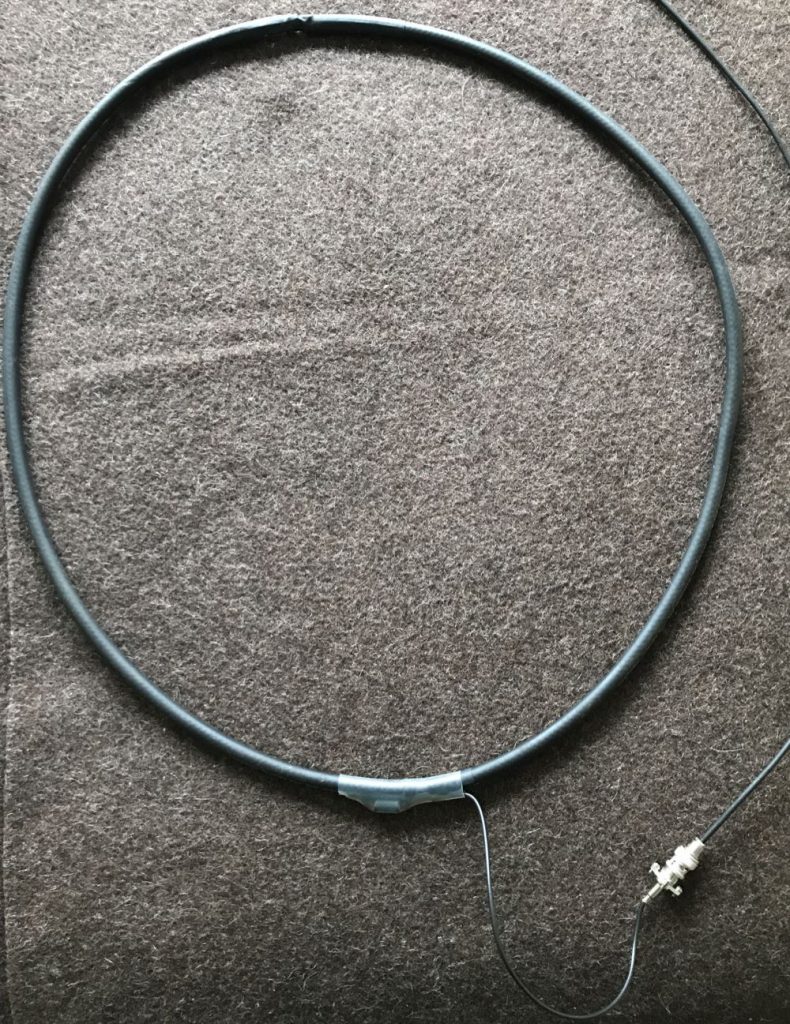
5. Connect Balun to the coaxial loop.

To make a solid connection, tin both sides of the center conductor. Next, attach the other end of the balun leads to each portion of the center conductor, as seen below:

Update: Note in the loop diagram near the top of the page that the ground wire on the output connector connects to the loop coax shielding on the primary side of the balun. I don’t recall that we did this in the build, but I would encourage you to do so. This should result in even lower noise, although admittedly, I’m very impressed with the performance of ours without this connection. Thanks to those of you who pointed out this discrepancy!

6. Secure the Balun/Coax junction.

Since this loop is intended to be handled quite a lot in the field, make sure the junction point of the balun and coax loop is secure. Again, we used several layers of heat shrink tubing since we had some in the shack.

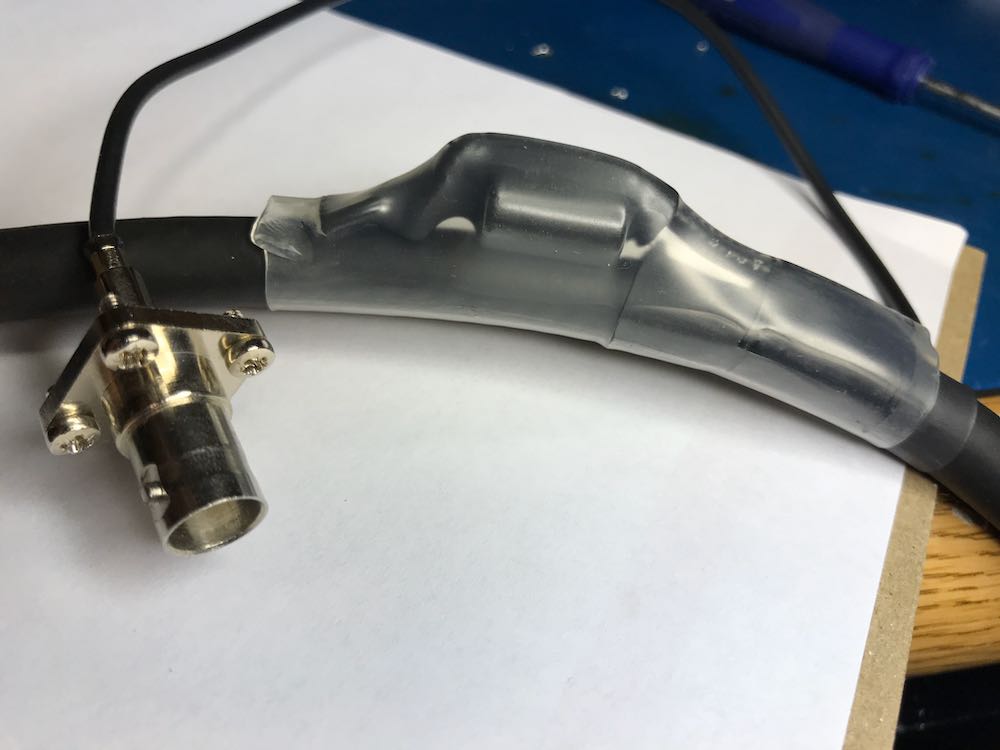
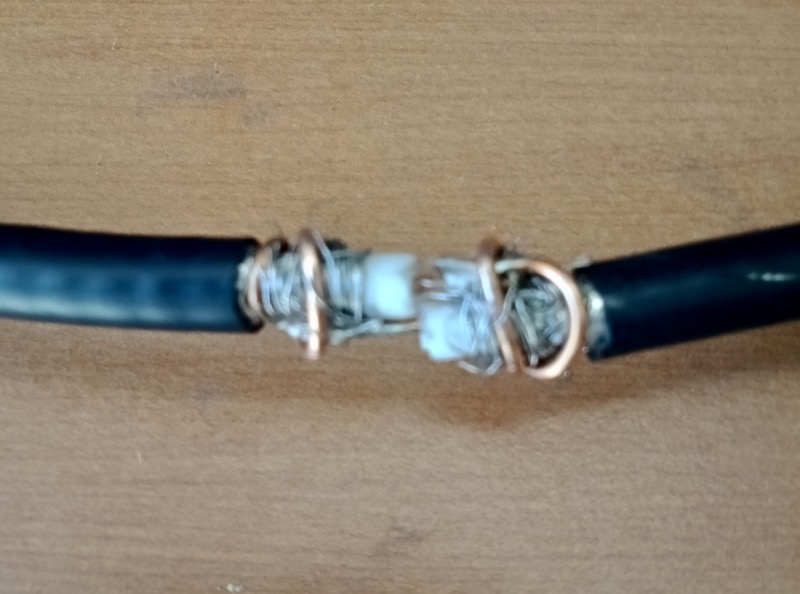
7. Solder and secure the cross-over point.

Next, create the cross-over point of the loop by simply attaching the center conductor of one end of the cable to the shielding on the other end…and vice versa.

Before you grab the soldering iron, howeverif, like we did, you’re using heat shrink tubing to secure the cross-over point of the loop in the next step, you’ll first need to slide a length of tubing onto the coax before you solder the ends together. Vlado, of course, thought of this in advance…I’m not so certain I would have!

Take your time soldering this connection and making it as solid as you can. If you solder it correctly, and you’re using a high-quality cable as we did, the cross-over point will be surprisingly durable. If you’re using a thinner cable, simply make sure the connection is solid, then use something to make the junction less prone to breaking––for example, consider sealing a length of semi-rigid tubing around this point.

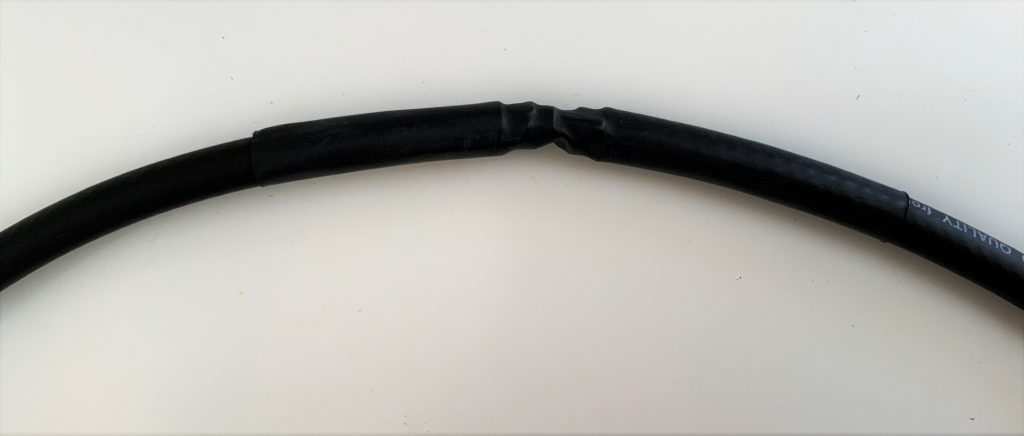
Vlado cleverly added heat shrink tubing around the cross-over point to protect and secure it.

You’re done!

That’s all, folks! Now you’re ready to put your loop on the air.

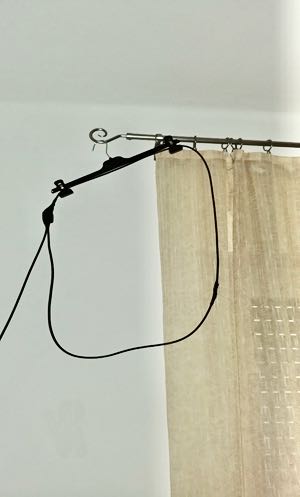
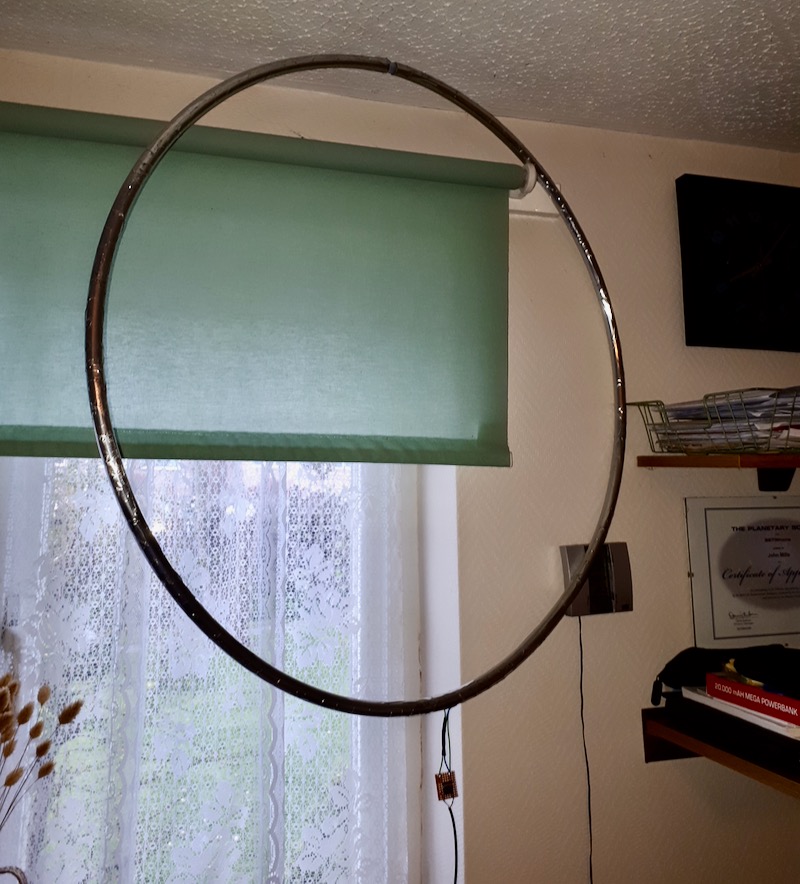
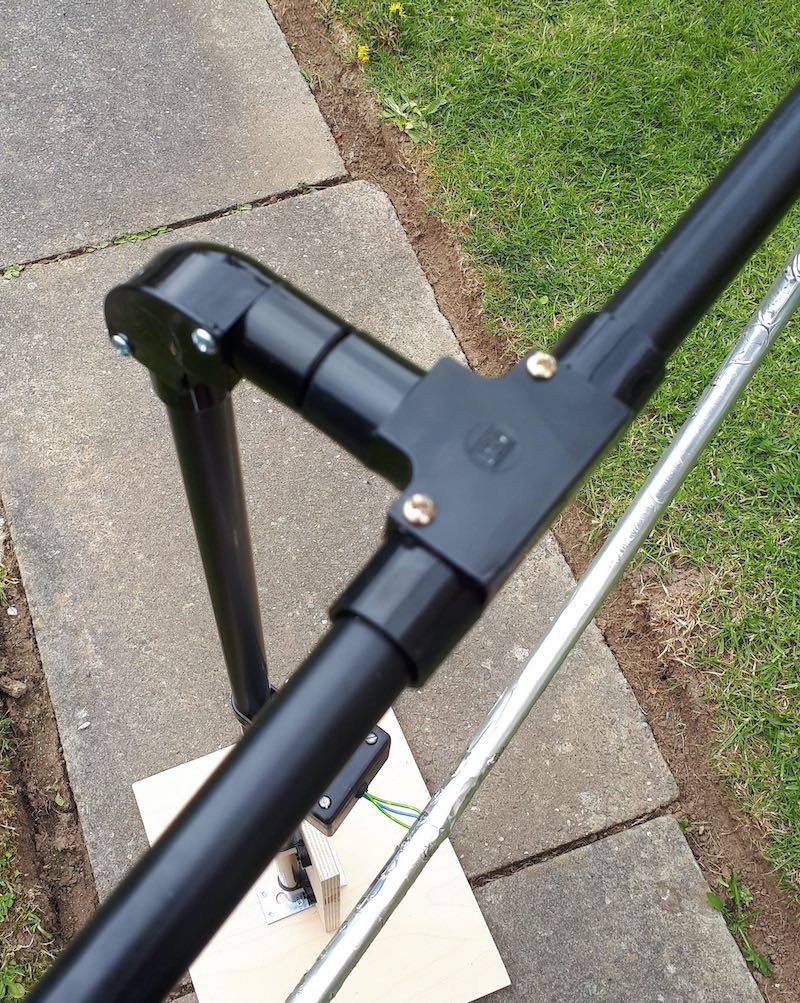
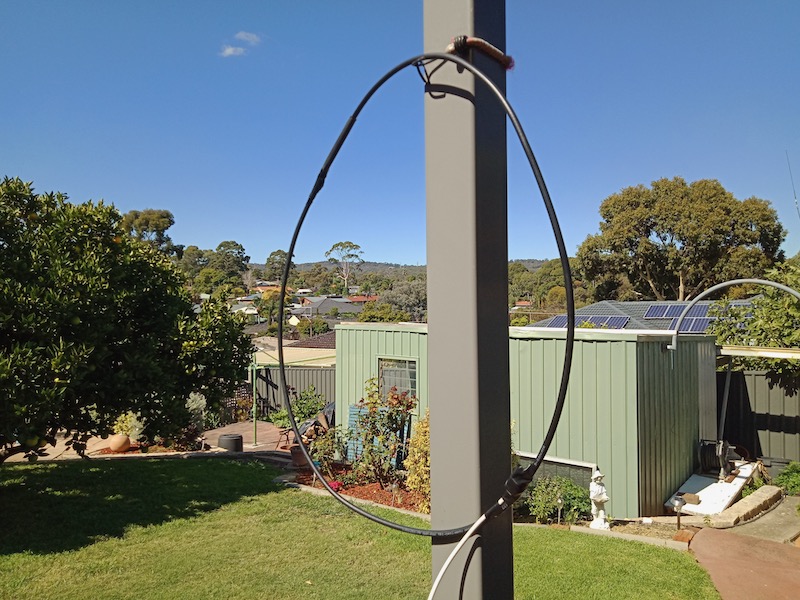
Depending on what type of cable you used for this loop, you might require or prefer some sort of dielectric structure to support the loop so that it maintains the ideal round shape. My loop maintains its integrity pretty well without supports. I’ve supported it a number of times with fishing line/filament from two sides (tying on at 10 and 2 o’clock on the loop). That seems to work rather well.

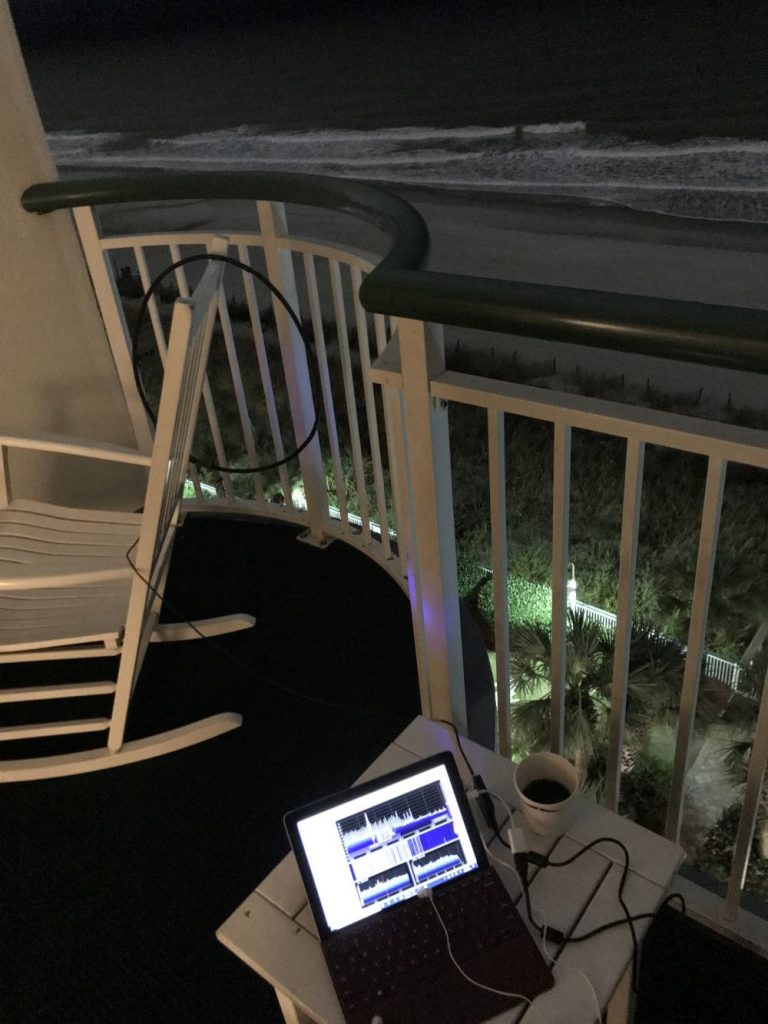
In this setup, I simply used the back of a rocking chair to hold the antenna. As you can see, the loop maintained its shape rather well.

If you’d like to see and hear how this antenna performed on its first outing, check out this post.

Show the Post your loop!

If you build a NCPL antenna, please consider sharing your design here on the SWLing Post! Considering that there are a number of ways this loop can be built, and likely even more optimizations to improve it or make its construction even easier, we’d love to see your designs and/or construction methods. Please comment or, if you prefer, contact me.

And many thanks to my good friend Vlado (N3CZ)  for helping me with this project and allowing me to document the process to share it here on the Post. Got a radio in need? Vlado’s the doctor!


Enjoying the SWLing Post?

Please consider supporting us via Patreon or our Coffee Fund!

Your support makes articles like this one possible. Thank you!

Spread the radio love