Shortwave listening and everything radio including reviews, broadcasting, ham radio, field operation, DXing, maker kits, travel, emergency gear, events, and more
My friend Andy, who is an expert medium wave DXer, calls it his “weapon of choice” and a “DX machine.” In fact, just a night ago, using a YouLoop passive antenna hanging from a birdfeeder on his porch in upstate New York, he snagged a couple of tiny Mexican stations above 1600 kHz at a distance of over 2000 miles. He was surprised the stations were there, and it was a bit of a hunt on the internet to find their livestreams and ID them.
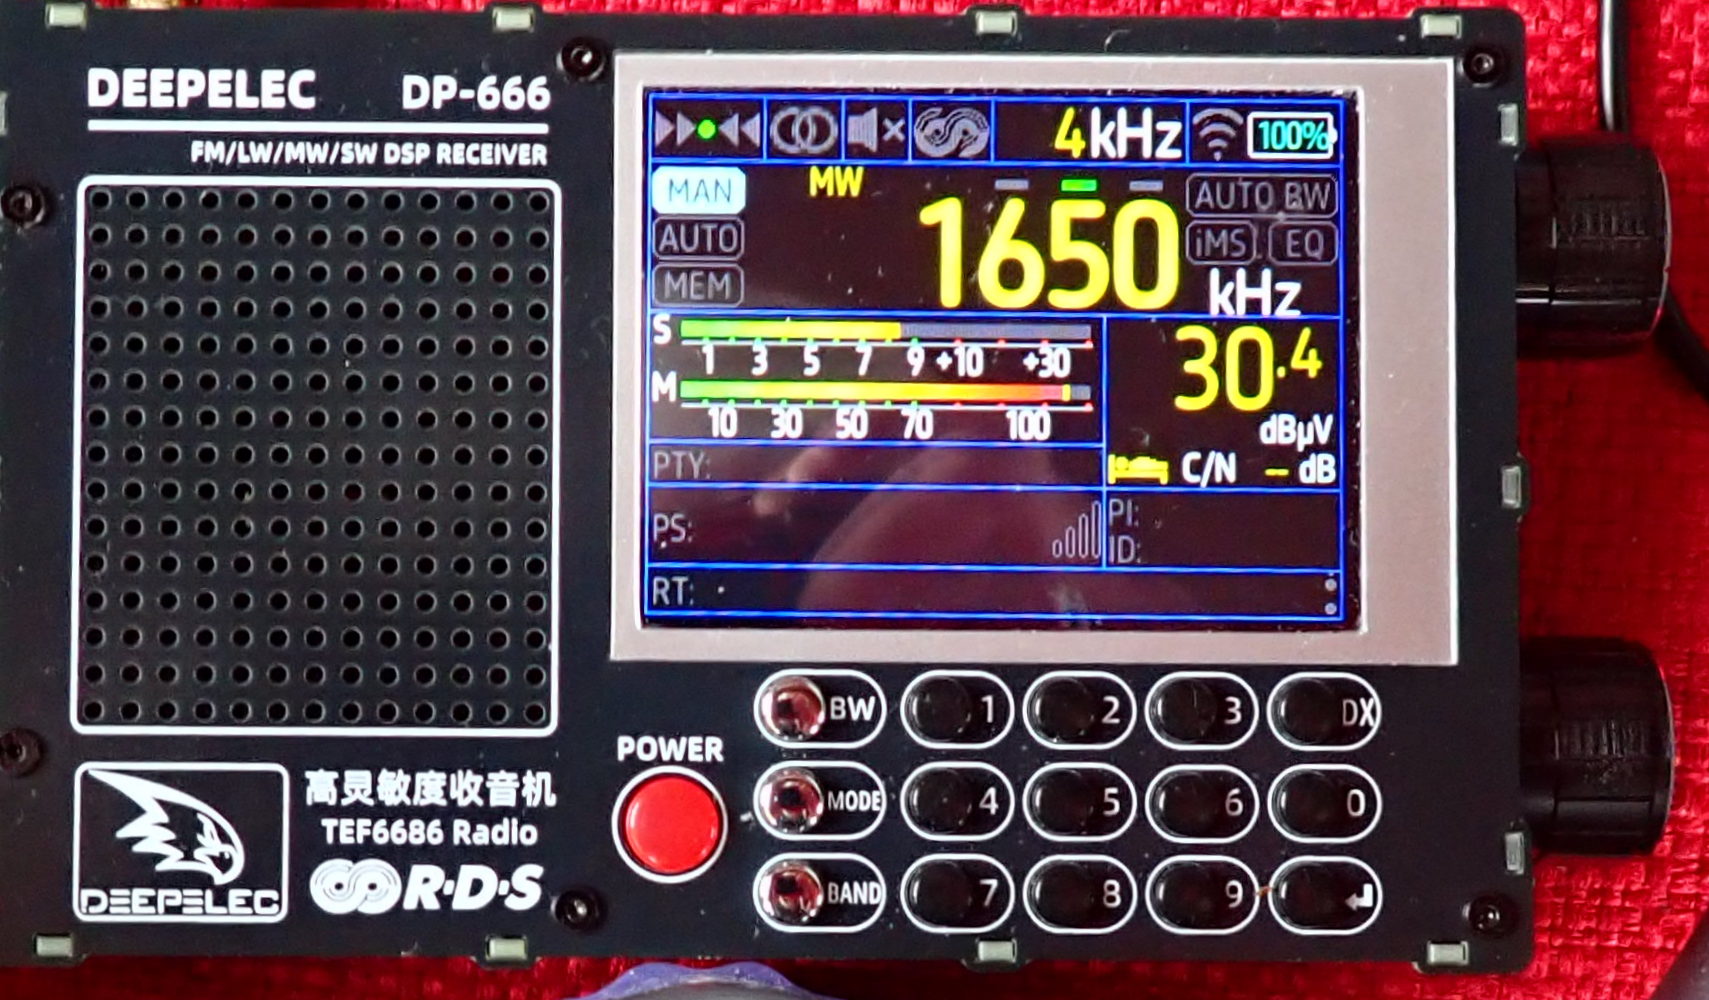
The radio that made hearing these diminutive stations possible is the Deepelec DP-666, a radio based on the high-sensitivity, high-selectivity TEF6686 chip which is used in automotive radios. The DP-666 measures 5 inches wide (excluding knobs) by 3 1/8 inches high by 1 1/8 inch deep. On the front panel are a speaker grill, a 2.8-inch color display, and 15 buttons for various radio functions (including a full numeric keypad for direct frequency entry) and a red power button. On the right side are tuning and volume knobs. On the bottom panel is a master switch for power. On the left panel are a 1/8-inch headphone socket and a USB-C port for a communication interface and for charging the 5000 mAh rechargeable battery, which is not user-accessible.
The DP-666 can receive FM (from 65-108 MHz with various frequency ranges selectable for different parts of the world and over a dozen different bandwidths), SW (from 1700-27000 kHz), MW (522-1791 kHz, 9 kHz steps; 520-1720 kHz, 10 kHz steps) and LW 144-513 kHz. In AM mode, 3/4/6/8 kHz bandwidths are available. The DP-666 does not offer single-sideband reception.
You won’t hear anything, however, unless you connect an antenna to the standard SMA female connector on the top panel of the radio, because the DP-666 has no internal antenna. The DP-666 comes with a 29 ½ inch whip antenna that does a yeoman job of receiving MW and FM. For MW DXing, Andy prefers the passive YouLoop, and he uses the DP-666/YouLoop combo frequently. “It’s quiet,” he says.
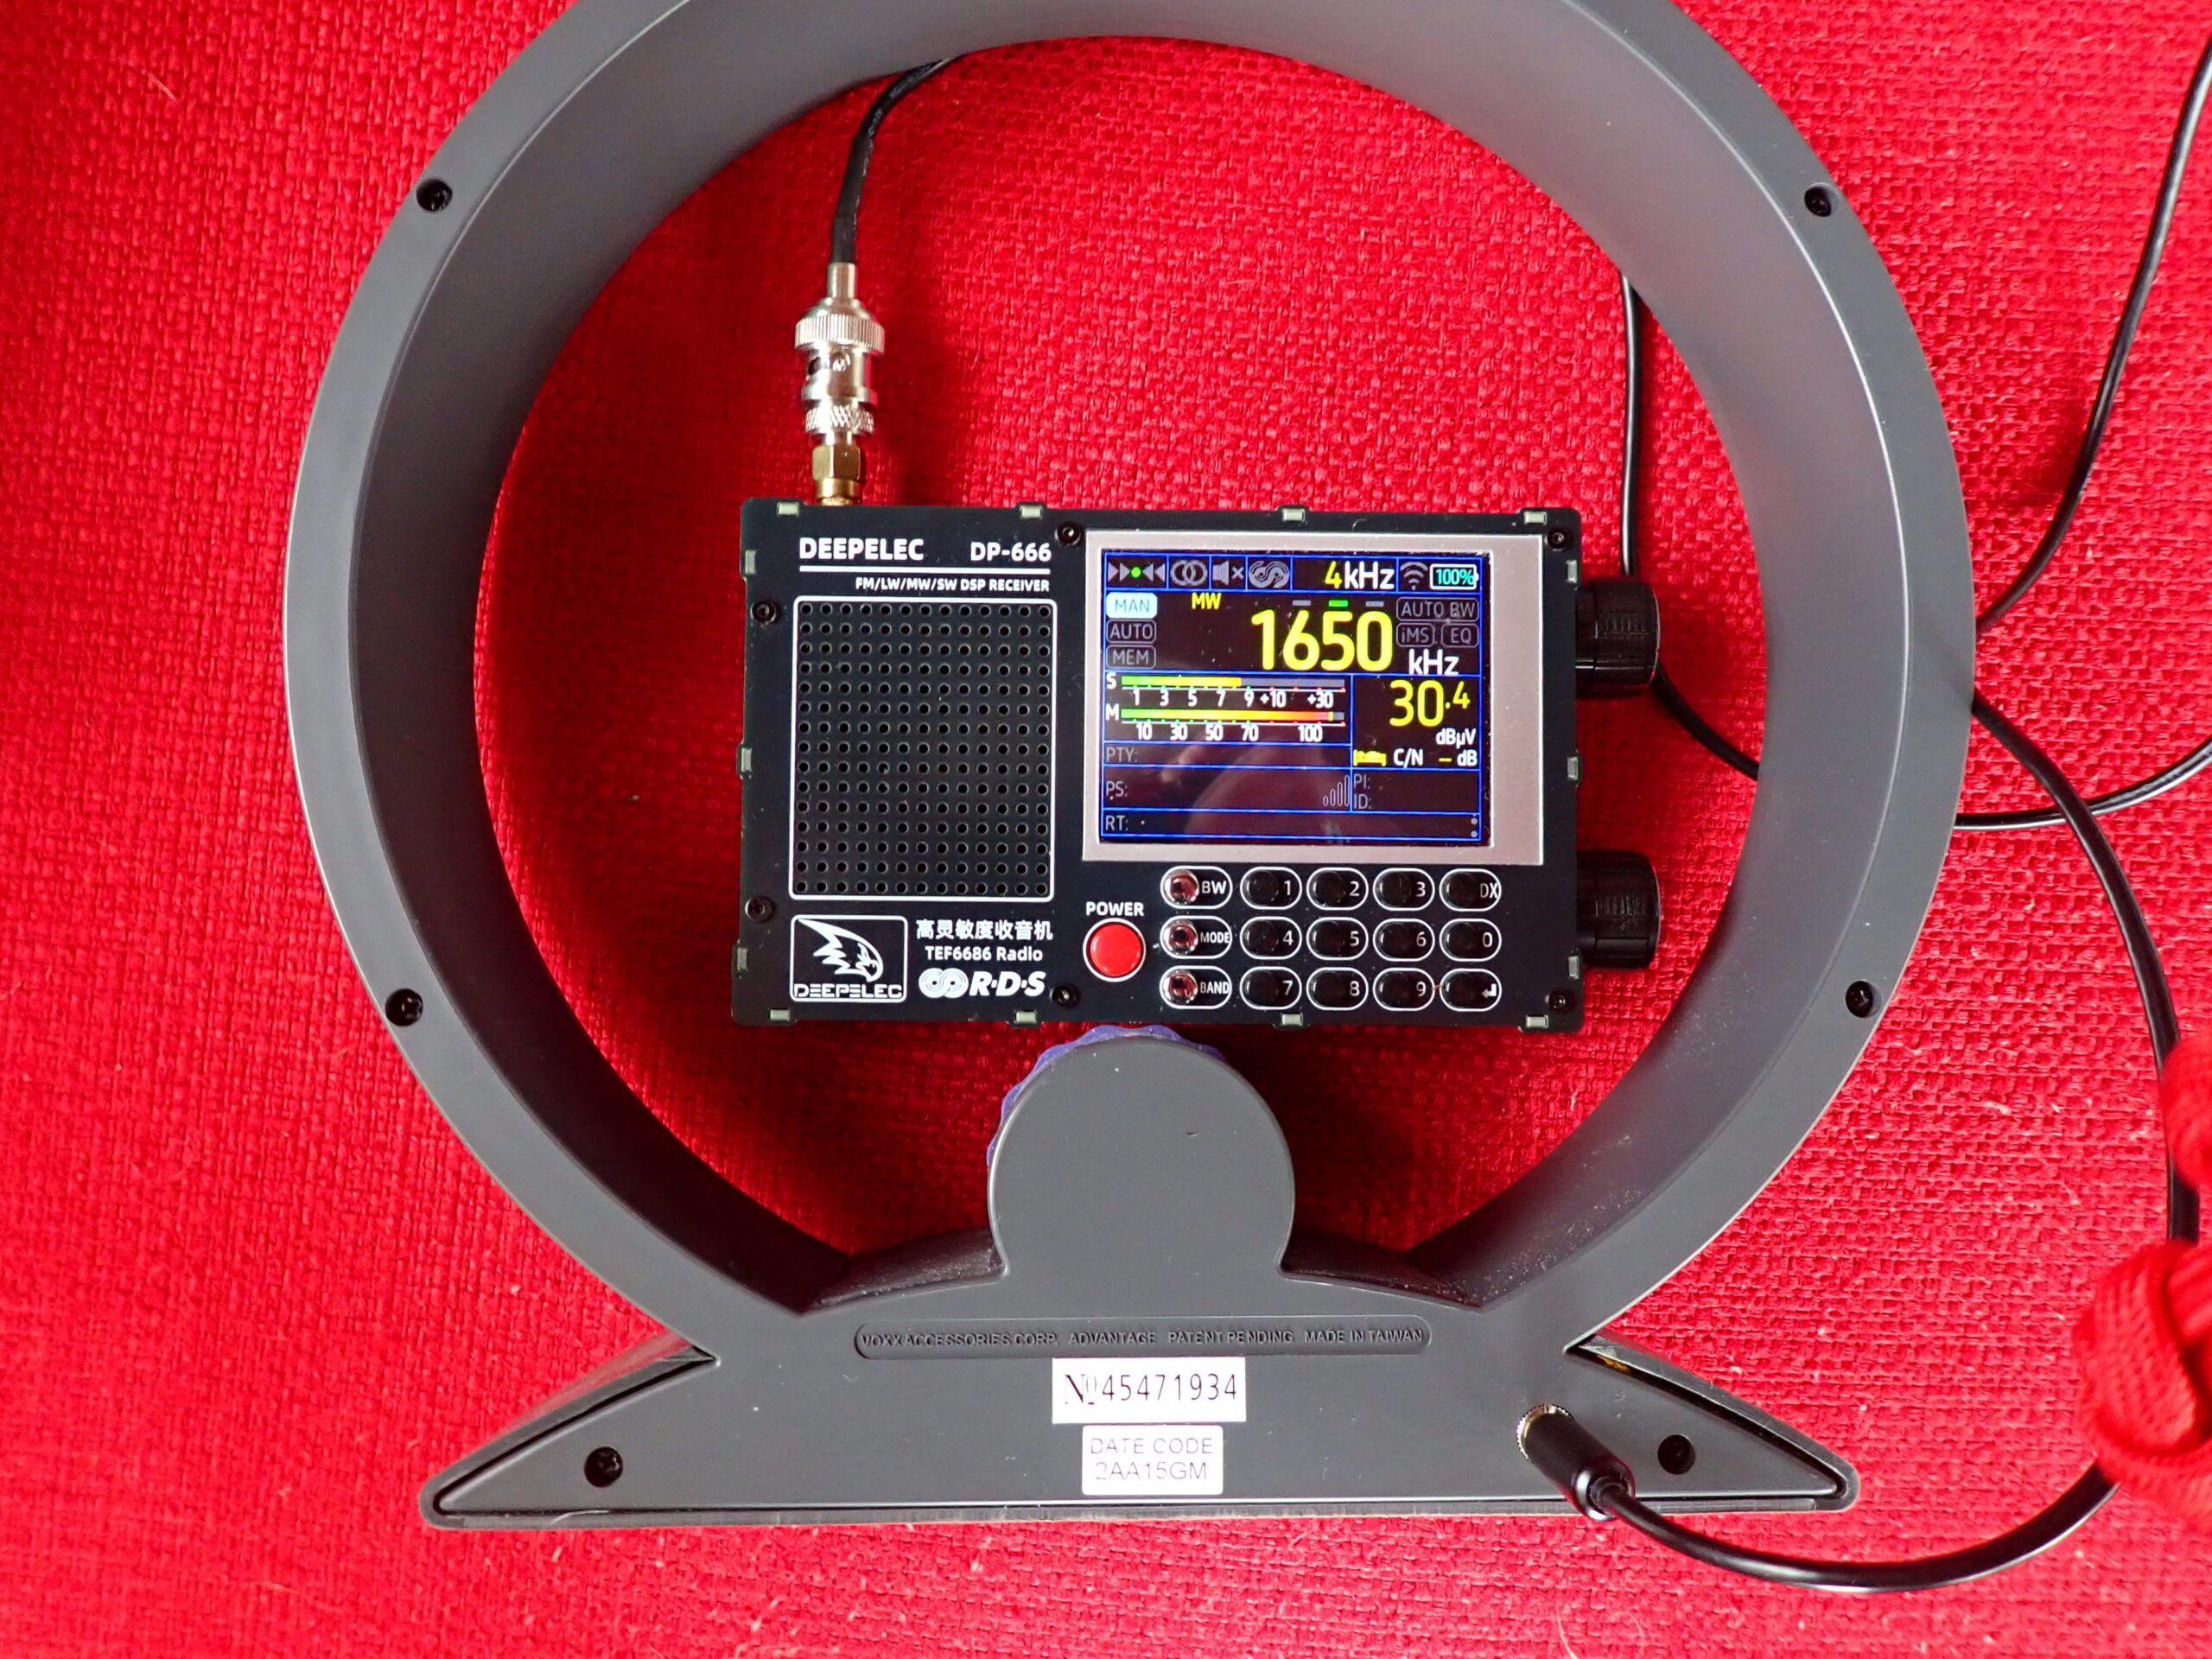
For MW reception, I like a direct cable connection between the DP-666 and a Terk AM Advantage, which is an un-amplified loop antenna with capacitive tuning. I can hold the Terk antenna in my left hand (which allows me to rotate it from side to side and even tilt it for improved reception), and with my thumb, I can rotate the antenna’s tuning wheel for peak reception. At the same time, I hold the DP-666 in my right hand and operate the tuning knob with my thumb and forefinger. It looks a little weird, but works really well.
For FM reception, I use a scanner antenna, a Comet W100RX extended to about 31 inches. The DP-666 display offers a full complement of RDS information if transmitted by the FM station. I am not, by any means, an expert FM DXer, but it seems to be a “hot” receiver.
For SW reception, the DP-666 also works pretty well with the whip antenna that comes with it. When connected to my 50-foot indoor horizontal room loop antenna, it detected a lot of shortwave stations on auto-scan. My guess is that dedicated shortwave DXers will be pleased with this pocket-sized radio.
In addition to its excellent electrical performance on MW, SW, and FM (I did not test LW), there are a couple of things about the DP-666 that I really love. The first is that, straight out of the box, the DP-666 is easy to use without consulting the manual. However, if you want tons, and tons, and TONS of customizability, press and hold the MODE button to access the MENU screens, where you can “fiddle the bits” to your heart’s delight. I have never used any of these settings, but they are there if you want them. (I think I consulted the manual just once to learn how to store stations in memory.) The well-written manual can be downloaded in PDF format here: https://deepelec.com/files/dp-666/DP-666_Product_Manual_EN.pdf .
The second thing that delights me about the DP-666 is that it is a quiet radio to operate. The clicks from the buttons are soft, and the tuning knob has detents that are felt, not heard. With headphones on, I can seek distant stations without disturbing others in the room.
Bottom line, the Deepelec DP-666 is a sensitive and easy to use radio that delivers pleasing results on MW, SW, and FM. I would be delighted to hear from others who have used it, particularly with high-performance antennas.
Many thanks to SWLing Post contributor, Bill Hemphill, who shares the following guest post:
YouLoop Antenna Fun
by Billy Hemphill WD9EQD
Like many listeners, I live in an antenna restricted community. While I have strung up some hidden outdoor wire antennas, I have found that they didn’t really perform that much better than just using the telescoping antenna with maybe a length of wire attached. The biggest problem (whether indoor or outdoor antenna) has been the high noise floor.
A few months ago I bought an AirSpy HF+ Discovery SDR receiver. I had already owned a couple of SDRPlay SDR receivers, but the high noise floor limited their performance. I had read good reviews about the AirSpy, especially its performance on the AM Broadcast band and the lower shortwave bands.
I have about 80 feet of speaker wire strung from the second floor and across the high windows in the living room. This does perform fairly well, but the high noise floor still exists.
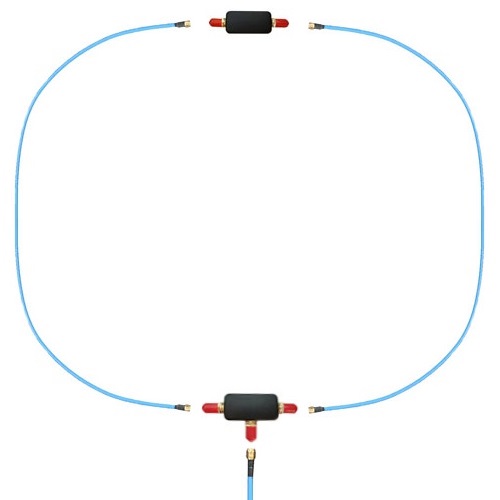
A couple of weeks ago, I bought the YouLoop Magnetic Loop antenna from AirSpy. I gave it a try and am amazed at the lower noise floor compared to the indoor wire antenna.
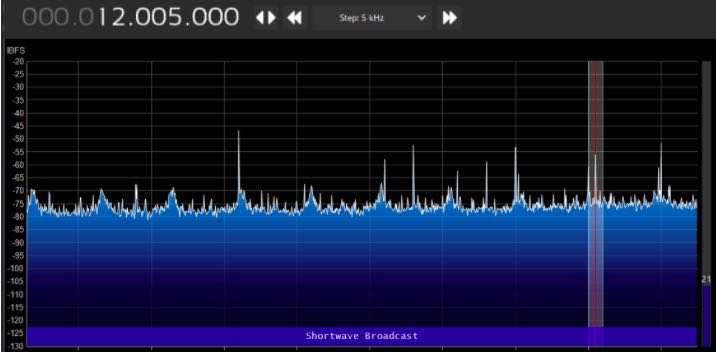
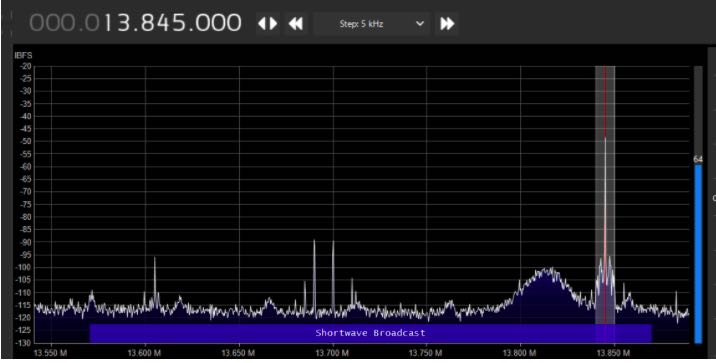
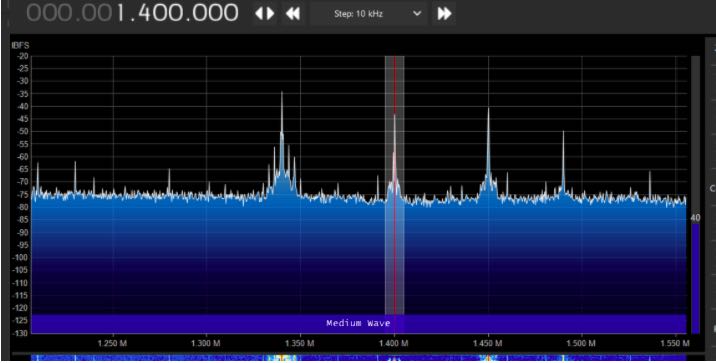
Wire Antenna vs. YouLoop–some examples:
AirSpy with Wire Antenna
AirSpy with YouLoop
AirSpy with Wire Antenna
AirSpy with YouLoop
AirSpy with Wire Antenna
AirSpy with YouLoop
Dramatic reduction in the noise floor. I’ve done a lot of playing around with it and find that the YouLoop picks up just about the same stations as the indoor wire antenna does. But with the lower noise level, the YouLoop makes it more enjoyable to listen. Overall, the YouLoop is now my main antenna.
YouLoop with a Portable Radio
It works so well with the AirSpy, I started wondering if I could use it with a portable radio, like the Tecsun PL-880. But the AirSpy website has the following note:
Note: It is very likely your third party radio will not be sensitive enough to operate with the YouLoop properly. We have even seen self-documented failed attempts to build pre-amplifiers to compensate for the lack of sensitivity and/or the required dynamic range in third party radios. Use your brain, and eventually an Airspy HF+ Discovery.
Doesn’t sound like it will work with portable radios. BUT, I’m always one to try anyway.
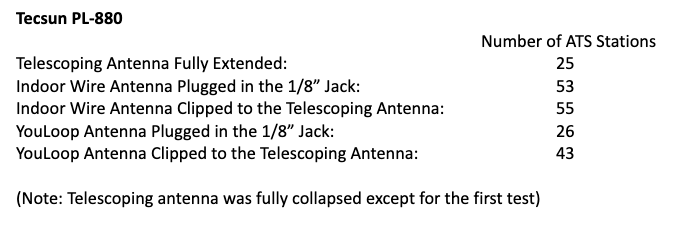
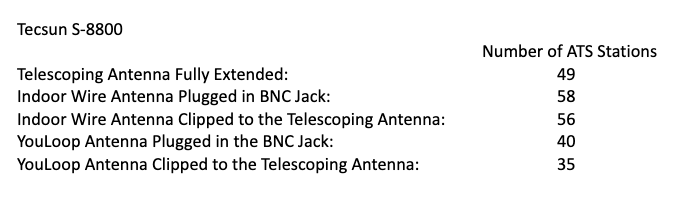
Tecsun PL-880
Since the YouLoop has a SMA connector, I bought a SMA to 1/8” phone jack cable. Plugged it into the PL-880 antenna jack and found I had almost a dead radio. Very few stations heard. But in playing around, I accidentally touched the phone plug to the telescoping antenna and instantly got strong signals.
I did some very unscientific tests. I attached the YouLoop through the side antenna jack, did an ATS scan, then did the same with the YouLoop clipped to the telescoping antenna. Also did a scan with just the telescoping antenna fully extended.. I got some very interesting results. These were done one after the other, so there can be differences in signal fading, etc.
I have repeated the above test several times at different hours. While the actual number of ATS stations varied, the ratio between them remained fairly consistent to the above numbers.
From the above, it appears that the telescoping antenna circuit is more sensitive than the 1/8” antenna jack circuit. Maybe some attenuation is being added to the 1/8” jack since it’s more likely a higher gain antenna would be used there. Can anyone confirm that the circuit indeed attenuates thru the antenna jack?
The YouLoop seems to be a decent performer when directly clipped to the telescoping antenna. While not as good as a high gain outdoor antenna would be, it definitely is usable for indoor uses.
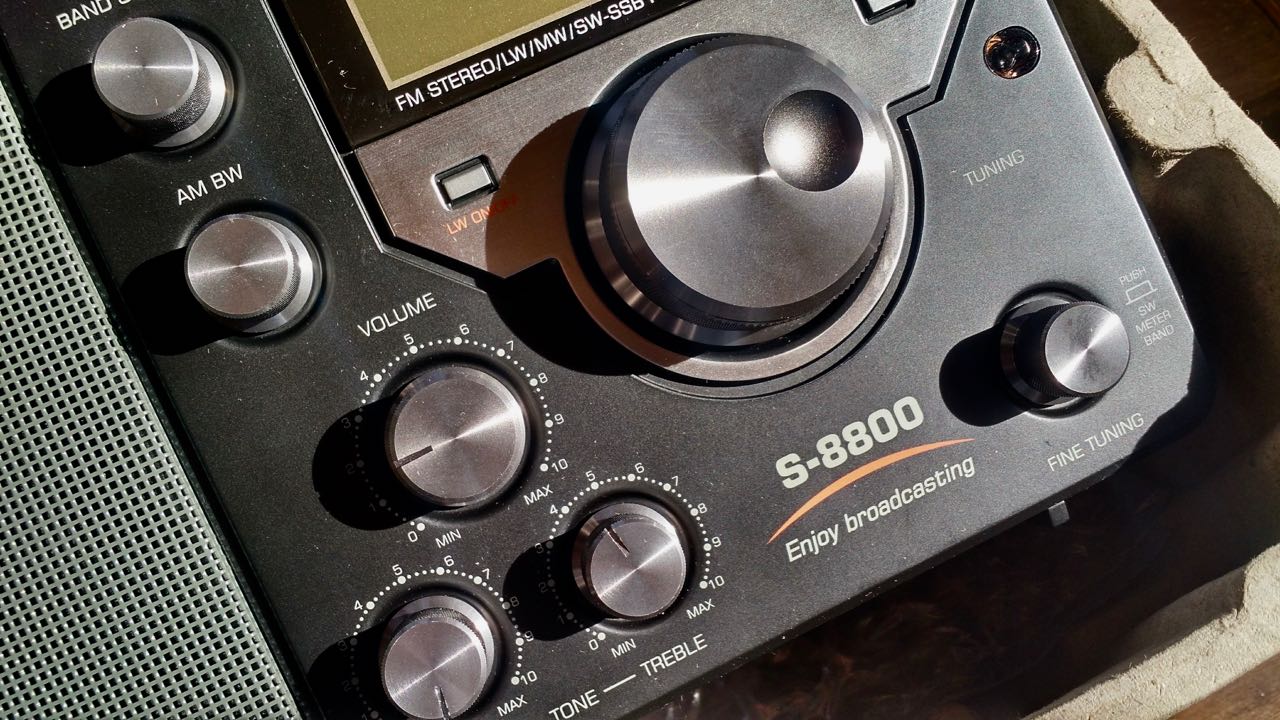
I also tested it clipped to the antennas of some other portable receivers. Tecsun S-8800, PL-330, Panasonic RF-2200 and Philco T-9 Trans-World receivers. All showed an increase over just using the telescoping antenna.
Some interesting notes:
The Tecsun PL-330 saw the same reduction in signal when directly plugged into the antenna jack as opposed to clipping on the telescoping antenna.
The Tecsun S-8800 did not show that much of a drop. I basically got the same number of stations when clipped to antenna as when I connected to the BNC jack:
In conclusion, I find that I can use the YouLoop with my portable radios to increase the signals on strong stations when used indoors. And it is quite the performer when used with the AirSpy HF+ Discovery SDR receiver. It easily portable and I find that I move it around the house as I need to. I just hang it off a window curtain rod. I may just order a second one so that my family room radio has one permanently attached to it.
Many thanks to SWLing Post contributor, Bruce (VE3EAR), who writes:
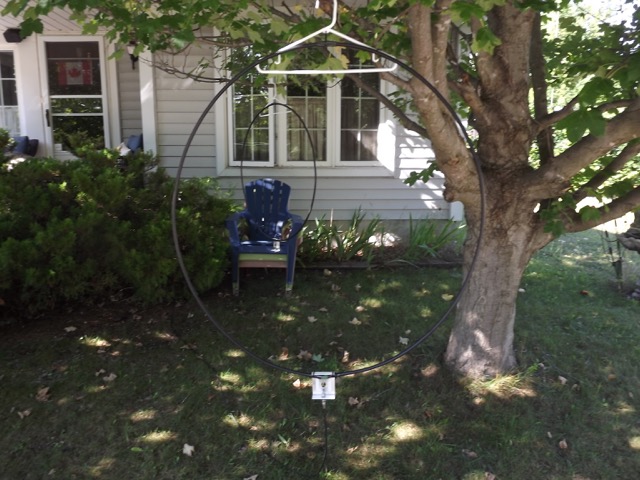
I decided that more testing of the Noise-Cancelling Passive Loop (YouLoop) antenna was needed, but I wanted to start with a clean page.
I built two identical loops using some 3/8 inch heliax scraps I had on hand. Both are one metre in diameter and employ the same feed arrangement, with a balun wound on a half inch square binocular core of type 75 mix. There are four turns on the antenna side and eight on the feed line side, of #24 gauge plastic insulated wire. The feed line shield connects to the antenna shields. The only difference between the two antennas is at the top of the loop, opposite to the feed point. One has a simple one inch gap in the shield, with the centre conductor passing across the gap, while the second one uses the crossover connection of the YouLoop design.
I’ve been running some A-B comparison listening sessions, both mid-day and in the evenings after local sunset. The testing is done outside, with the antennas hanging on a low limb of a maple tree in front of the house. The feed line is about twenty feet of coax which connects to my Realistic DX-440 receiver on the front porch. Testing is done listening to the AM broadcast band and the 160, 80, and 40 metre ham bands, with the loop aligned both E-W and N-S and about one loop diameter off the ground.
Both loops work well, but I do have to give the nod to the YouLoop (by Airspy), which produces a stronger signal of two S-units higher than the conventional loop. It also has deeper and sharper nulls, which can sometimes produce total nulling of the station!
73, Bruce, VE3EAR
Thank you so much, Bruce, for sharing your findings with us! I, too, have found that the Youloop generally outperforms my homebrew NCPL antenna. I believe one of the reasons for this as Youssef at Airspy once told me is because the Youloop has a lower loss transformer than anything that can be wound by humans (0.28 dB)–this improves gain.
Many thanks to SWLing Post contributor, Jorge Garzón (EB7EFA · EA1036 SWL), who shares the following guest post which was originally published on his @IberiaDX blog:
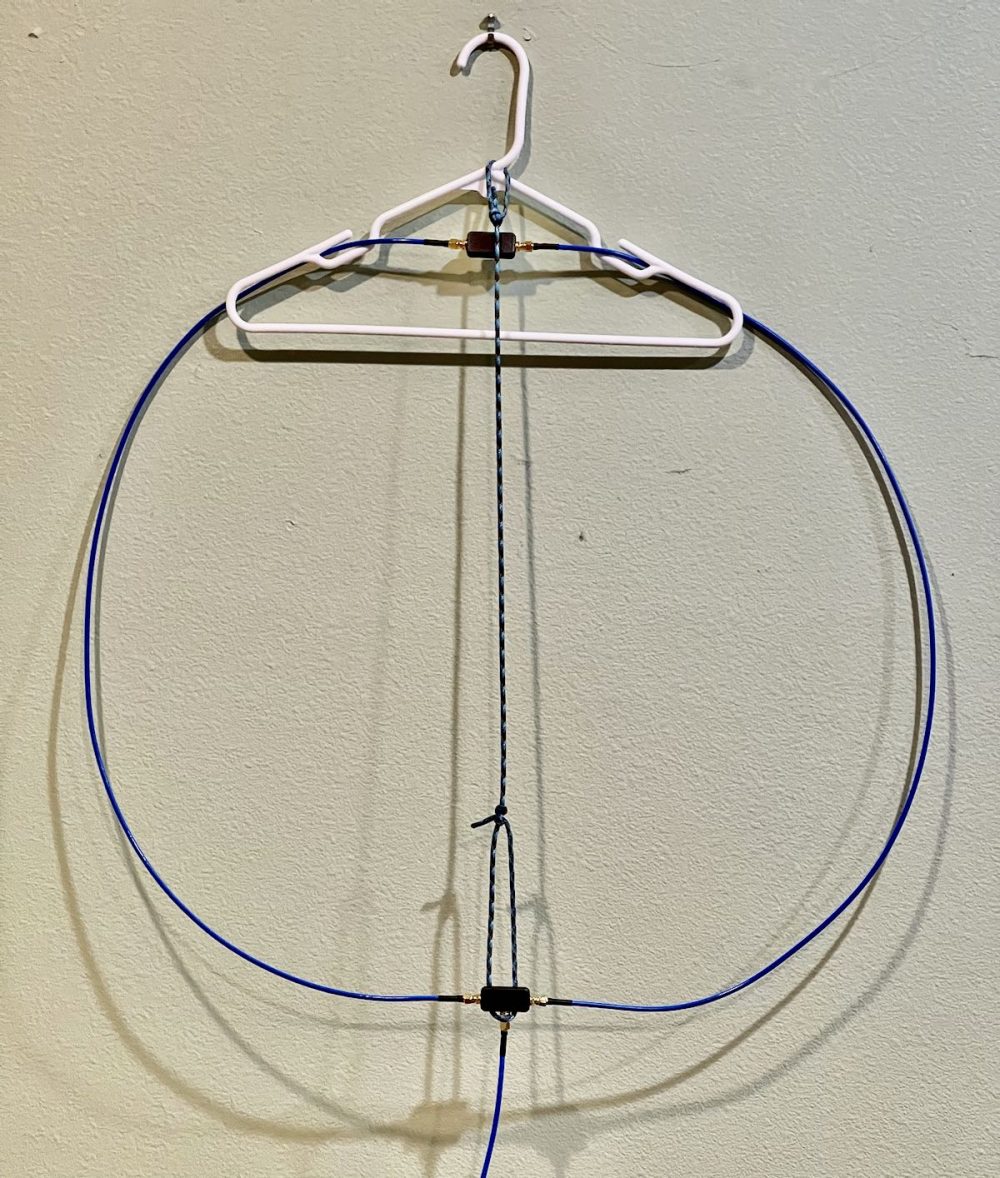
BricoDX: A YouLoop portable frame
by Jorge Garzón (EB7EFA · EA1036 SWL)
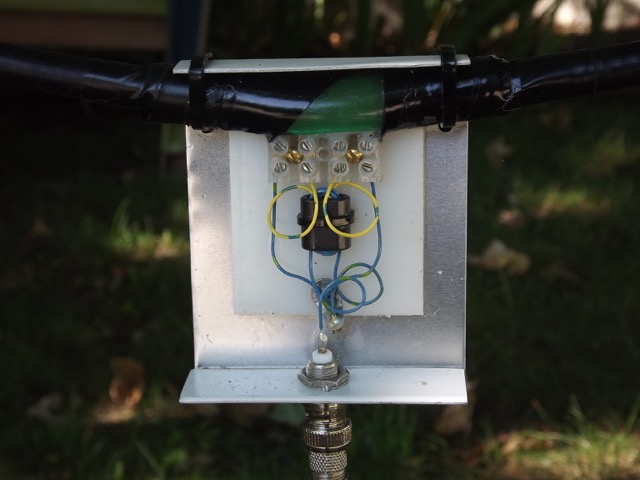
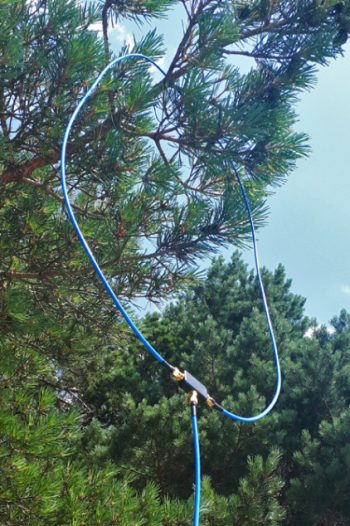
Youloop ‘in the forest’
One of the aerials I wanted to test was the Youssef Loop (YouLoop). I own a good passive loop antenna made by Tecsun (AN-200) but this is a mini one to use with portable receivers. A video showing the test of this ‘mini-loop’ can be seen in my YouTube channel.
My main loop for serious DXing is the Wellbrook 1530LN, but this is an active loop that easily beats any other passive ones. It’s close to be the perfect loop for me as I live in a rural valley with low noise level in the bands so I enjoy every minute of my listening sessions. However I wanted to test this newcomer passive loop, but wasn’t satisfied just hanging it from a pine tree branch, so I decided to bring about my DIY YouLoop portable frame project.
So I had to find something to get a rigid (but light) support for the loop itself allowing an easy rotation to achieve deep nulls. So… what could I built?
Fiberglass tubes, hooks and crossed arms.
I am professionally involved in the heritage and communication sector, so was easy for me to refit some dismissed display rolls where I found a 1,5 m thin supporting tube made in fiberglass that suited my needs. I cut a piece of 120 cm and then split it into 2x60cm, tightening both in the middle with a fine bolt. I placed two plastic hooks up and down of the vertical tube to hold both Youloop modules. The horizontal arm was lengthened with two bamboo meat skewers firmly inserted into the tube, allowing to slide onto it. Two small holes in the bamboo pieces were good enough to secure the cable with a short wire. All this was well fixed with clamps and vulcanized tape to an extra piece of vertical tube.
Bamboo meat skewer and tied cable.
Finally all this was inserted into a thicker aluminium tube and then into a wider one in order to fit everything into the tripod hole and then get a smooth and efficient rotation of the antenna. As a base I re-fitted an old heavy metallic tripod manufactured by Manfrotto (Italy) that I used it often for birdwatching day trips. I gave back an unexpected new life for this piece of metal, always in the field close to Nature!
The whole assembly can be easily transported in the car. Aluminium tubes slide one into the other, being rapidly detachable from the loop itself. This is a cheap and DIY project to get the maximum of this surprising and low noise passive loop.
This aerial gives its best performance when used in the field. There, QRM levels are low or non existent at all. It is a must to rotate it easily and then get sharp nulls. SMA connector nuts must be well tightened as they tend to loosen easily, but beware to force them as an extra twisting could damage inner connections.
This is the first post of a series called «BricoDX» where I will show how to refit or build accessories to get inexpensive and practical DIY projects for our listening sessions.
Many thanks for sharing your article with us, Jorge! That’s a brilliant loop support.
Readers: check out more of Jorge’s articles on his blog, @IberiaDX. Also check out his YouTube channel where he posts videos.
Many thanks to SWLing Post contributor, Rob, who writes:
Thank you for your informative blog. As a longtime SWLer I enjoy reading up on your posts.
A few months ago I was considering the purchase of a magnetic loop antenna. Based on your “YouLoop is a freaking brilliant passive loop antenna” article, and the fact that I live in a fairly noisy RF environment, I made the purchase.
Since doing so I’ve been having plenty of fun with the YouLoop hanging in my loft. I have it connected to an Airspy HF+ Discovery.
I’ve made a couple of videos which I popped up on YouTube which show the YouLoop in action.
The first video shows a mix of utility and broadcast reception on HF.
Perhaps these would be of interest to readers, like me, who had seen your initial reviews and had been considering purchasing.
Thank you for turning me onto this little antenna, and keep up the great work in your blog!
Kind regards,
Rob (Frugal Radio)
Excellent videos, Rob, thank you for sharing! The YouLoop is an incredibly effective antenna when combined with a receiver that has a high dynamic range.
Readers, if you’d like to check out more of Rob’s videos and and subscribe to his YouTube channel, click here!
Many thanks to SWLing Post contributor, TomL, who shares the following guest post:
YouLoop Picnic Table Report
by TomL
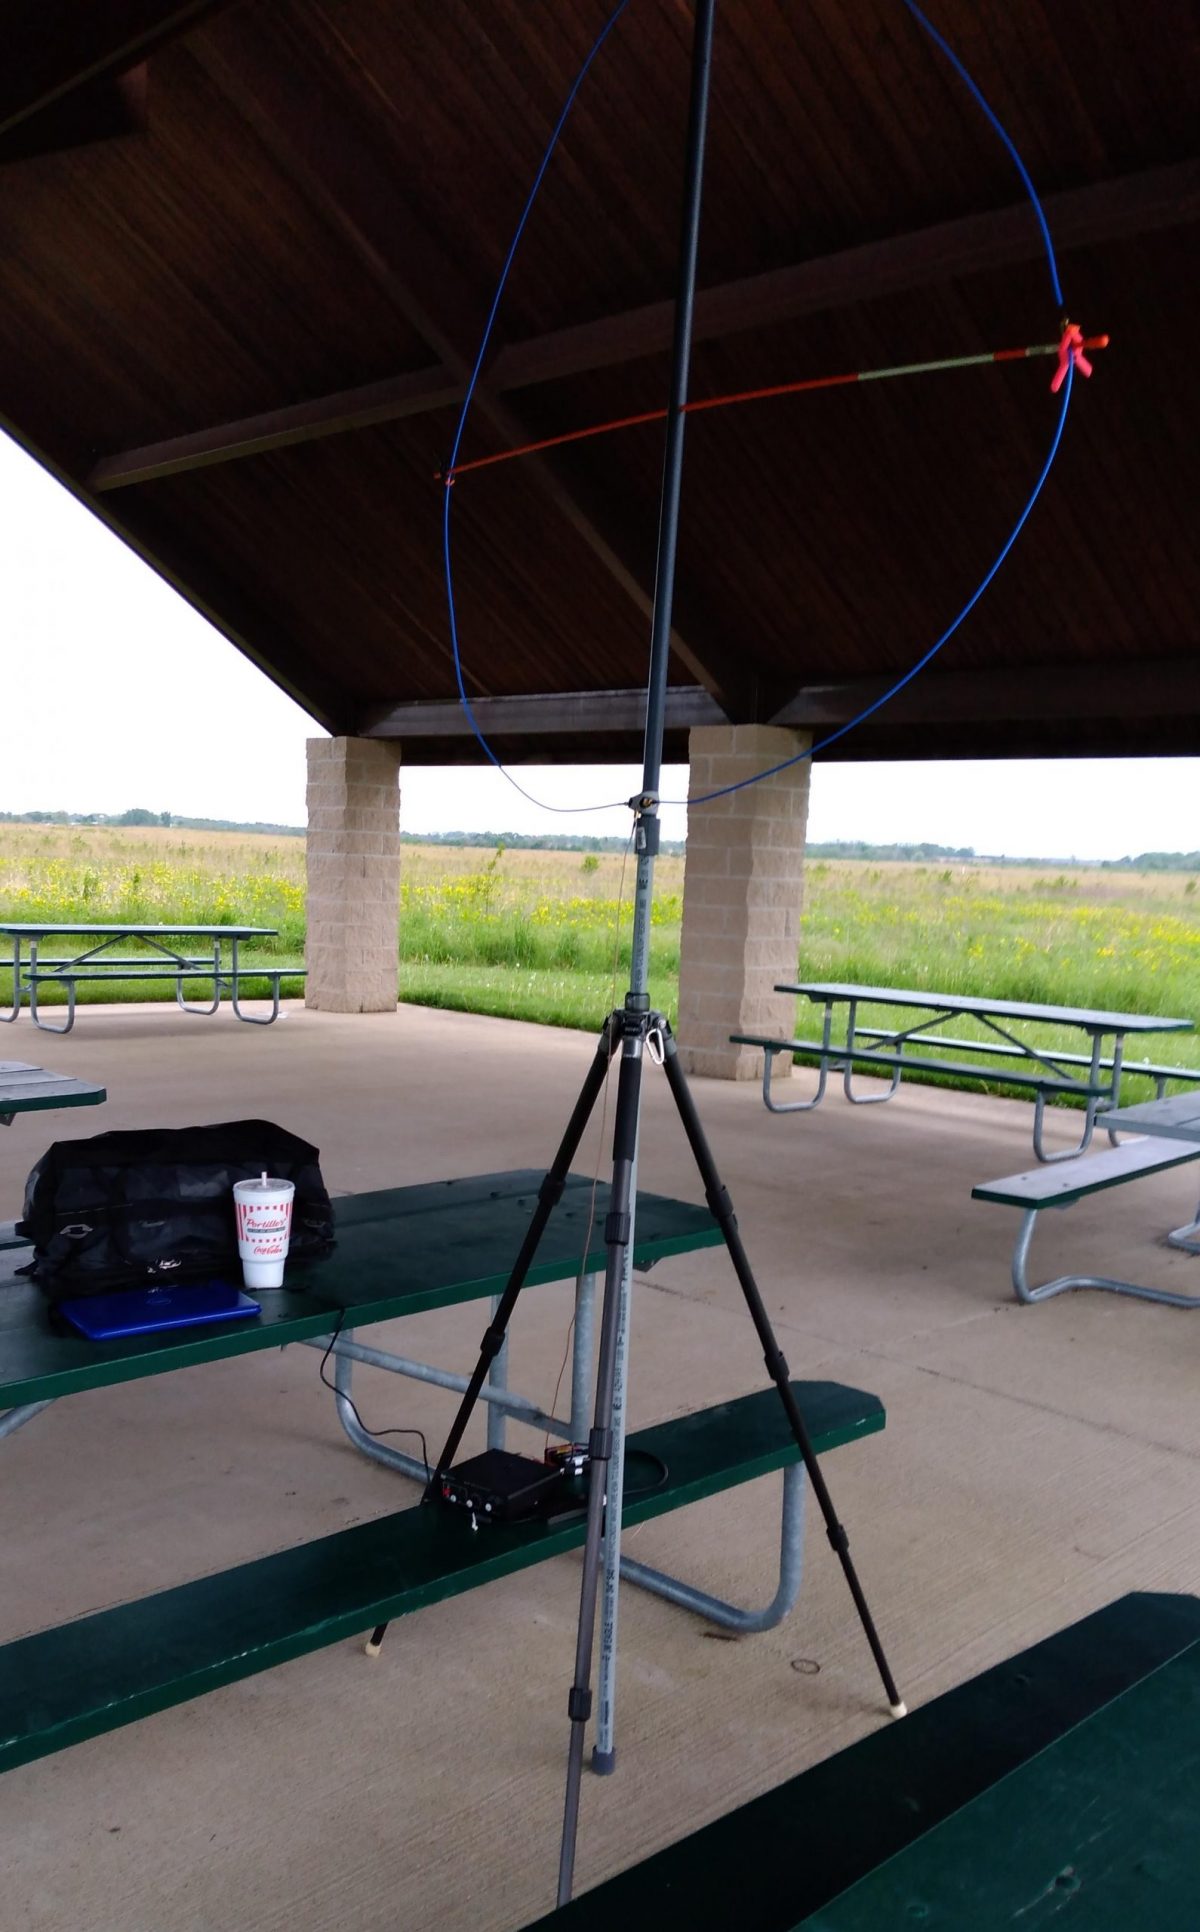
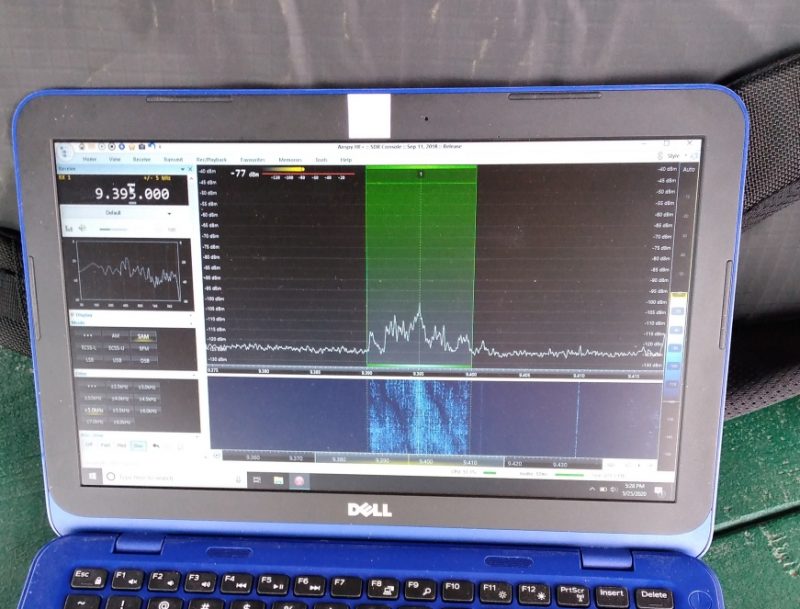
So, I finally got around to testing my Airspy YouLoop after the long shipping delay from China.It is simple in concept and will not repeat what others have written about it in previous articles.I find it a useful loop antenna for portable operations and sometimes for noisy home use.This report is focused on my usual field location from a Northern Illinois county park picnic table.
Setup
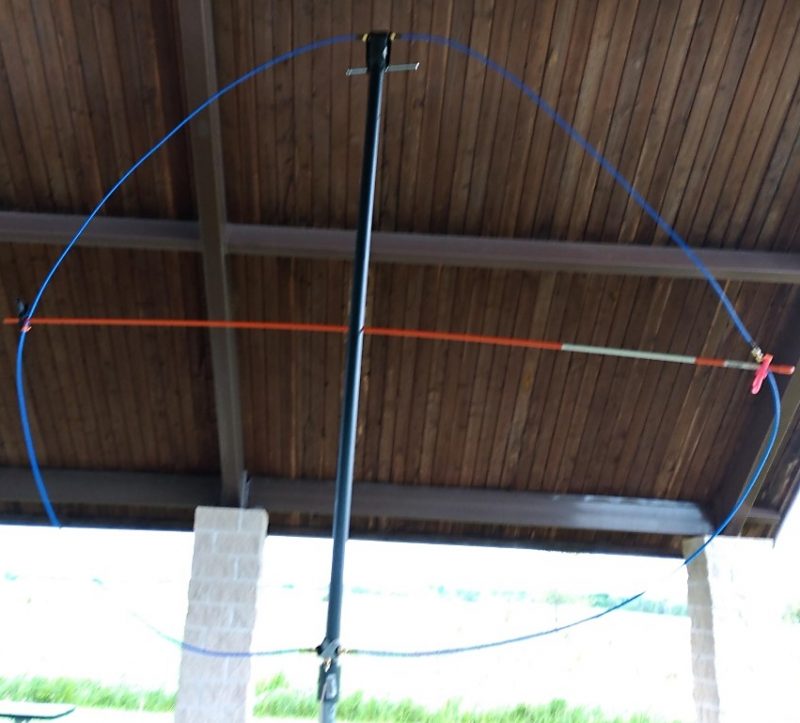
As you can see from the setup photo, it all fits into a backpack except for the two PVC pipes and crossbar which are easy carried.I modified my YouLoop to use the 2 meter transmission line as one half of the loop.The other half consists of the two shorter wires connected with a simple female-to-female SMA connector.This doubles the circumference of the loop and gives it a bigger capture area.
Crossbar
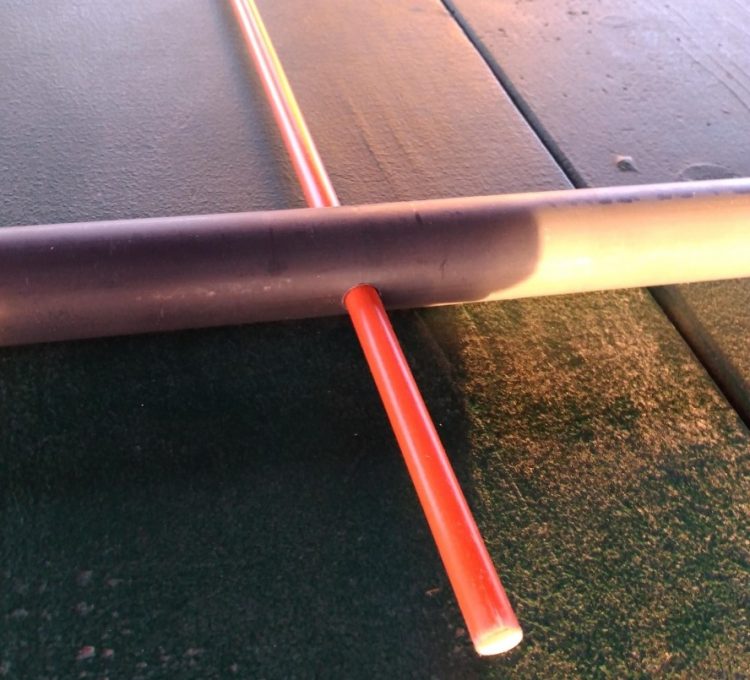
Because my setup is bigger than usual, I had to find a lightweight cross member to aid the solid conductor wire from sagging. I found just the thing in a larger-than-normal 6 foot fiberglass driveway snow marking stick sold at the local hardware store.I cut the tip off to make it 5 feet (Because, the loop as I configured it is 4 meters circumference, so, 4*39.37/Pi = Diameter in inches). I then drilled a 5/16th’s inch hole through the middle of the ¾ inch PVC threaded pipe I had from a previous project and fit the fiberglass stick through it as the crossbar. This is a special PVC 4 foot nipple pipe I had special ordered a long time ago when mounting a previous (heavy) Ferrite-Sleeve loop antenna.
Loop Mounting
Screwed onto both ends of the 4 foot nipple are threaded-to-coupler adapters also found at the hardware store.The adapter allows me to attach easily to the ¾ inch 5 foot long PVC pipe held by my trusty carbon fiber tripod below.This 5 foot pipe is held loosely by the tripod so I can grab the pipe and turn the whole loop mounted above.The result is not perfectly circular and there is room for improvement.I find it to be highly directional nonetheless and easy to turn. The phasing connector of the YouLoop mounts at the top and for now I am just using two medium sized cable ties to a long screw near the top for tension.I do not want to glue the connector to the top since this YouLoop may get used in other configurations in the future.
The Bottom connector for the radio input is held nicely with a couple of velcro wraps.
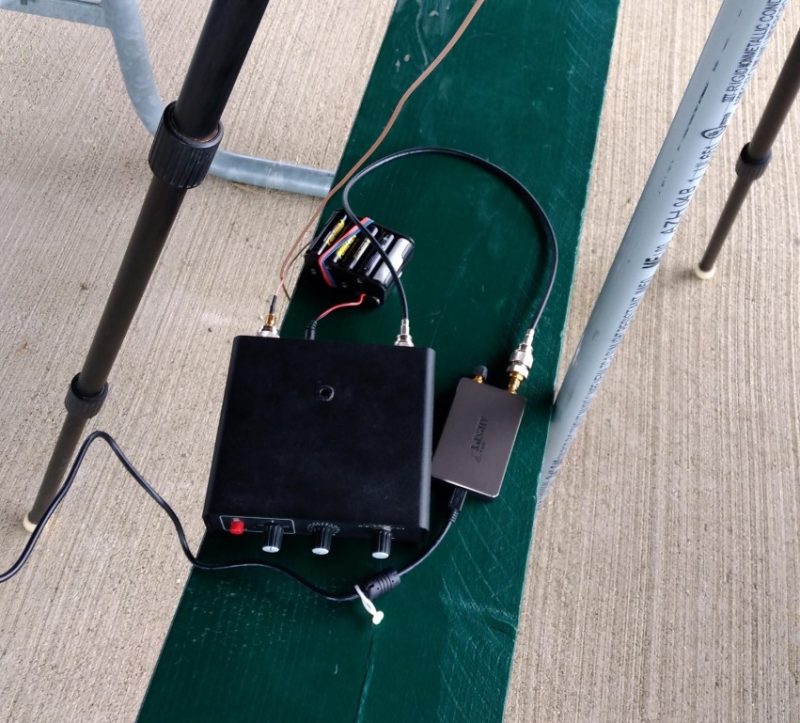
The wire from there goes to the usual setup of Palstar amplified preselector with battery pack and Airspy HF+, which goes into the USB port on the small Dell laptop.After some initial problems with a non-functioning HF+ and rebooting a few times, I was finally able to get a signal.At first I thought it was the antenna but the error condition acted the same way whether the antenna was connected or not.It could be that my HF+ is starting to exhibit the first signs of failure, which I have read about from complaints on the internet about the reliability of SDR’s used in the field.I may have to bring along my SDRPlay SDR2 just in case!In other words, don’t depend on computer hardware and software to work (especially if you happen to go on vacation and have no backup radio!!).I also have a couple of portable non-SDR radios I could bring with me as well.Enough said.
Using It
The screen of the laptop shows a very nice black background, very quiet, and a moderate signal level of WRMI on the 31 meter band.I did not have the time or processing power for real Data captures, so all I have to share are less optimal MP3 files.The signal level is somewhat low. I think this is typical for a single-wire loop antenna and seems adequate. I did have to crank my Palstar preamp to maximum the whole time while on shortwave (my Wellbrook amp would probably work slightly better).On mediumwave, the gain seemed more than adequate (I don’t have any recordings of that band at this time, maybe a future article).
Directionality is very good and usable across a very wide range of frequencies!It certainly worked well up to the 25 meter band where I started to notice a drop off of nulling ability.And this is good despite my lack of perfect circular mounting of the wire. Even though my county park is a “Forest Preserve” and not meant to have any development, there is increasing noise in the neighborhood and I find the loop to be very useful in cleaning up some background noise (as well as noise coming from the laptop!).This is especially seen with the Voice of Iran broadcast in French. The weak signal was aided by moving the loop to balance the signal level to local noise.
The loop is a bit flimsy using it this large.Keeping the connectors tight may be a problem in the future if subject to a lot of wind.I think you will find the smaller (usual) setup in the instructions to be less of a problem.My plastic clips at the sides of the crossbar and the plastic tie downs at the top are not optimal and will need something better (in other words, it would help if I had a better mounting for the wires).Also, the tripod definitely wanted to tip over as a storm blew past, so I need to make sure I tie down one or more legs to the picnic table in the future!!
Final Thoughts
In summary, this is a very useful loop for portable operations since it fits easily into a backpack. Mounting it in a repeatable manner will need some experimentation.Performance is good with usable nulling at a wide range of frequencies. Signal strength is moderate, so a good preamp is necessary in order to boost the signal into the sweet spot of your receiver RF stage.Parts quality is good, but the wire is thin solid conductor, so do not kink/fold it!.The connectors and housing for the phase change and balun are very small, with non-waterproof plastic housings that can be easily abused, so take care of them. The whole kit is small to pack and lends itself to experimentation.Highly recommended given its limitations.
Furthermore, I feel my old, original 14-inch “crossed-parallel loop” did as good a job as this larger diameter YouLoop.I wonder how the YouLoop can be modified to create a larger gain using, say, two or more wires in parallel (perhaps a future article!)?Generally, the deeper the loop design, the higher the gain.The YouLoop potentially could be a better performing, more portable version if I can replicate using more turns of wire.Although it is in disrepair now, pictures of my old 14-inch loop are found here, and also here.
Sample Recordings
Here are a bunch of sample recordings to enjoy, some of which are unique to shortwave radio and found no where else:
7315 kHz, Voice of Vietnam, from WHRI-1 transmitter
7350 kHz, Radio China International, in English from Kashi PRC
7375 kHz, Radio Romania booming in from Romania
7490 kHz, WBCQ (Spanish) from Monticello ME (guide says only 50 kw but sounded more than that)
6180 kHz, Radio Nacional Brazilia
6070 kHz, CFRX Toronto – discussion about some people with ashes of relatives in the home
6115 kHz, WWCR Nashville TN – discussion about Jesus saving a young woman from Satanic ritual abuse as a child
5850 kHz, Radio Slovakia International from WRMI booming in as usual
73’s & Happy Listening,
TomL
Thank you, Tom, for sharing your field-portable SDR setup! I like how you’ve made an inexpensive and packable support system for the larger diameter YouLoop. While I’ve yet to design a similar system around the YouLoop, I really should. I’ve always believed that for both SWL and ham radio field-portable operations, a self-supporting antenna system is a must as it gives you ultimate flexibility to cope with variable site conditions.