Many thanks to SWLing Post contributor, Bill Hemphill (WD9EQD), who shares the following guest post:
A Most Unusual Sony Radio
By Bill Hemphill WD9EQD
Over the years, I have owned many of the various Sony shortwave radios. From analog to digital, I would buy the latest and sell my current radio. For the past few years, I have been using mainly Tecsun radios and didn’t own any Sony radios anymore. This changed last year. I got the urge to acquire a few of the Sony’s that I remember so fondly. Over several months I bought off eBay four ICF-2010 (one of which works), two ICF-SW100 (one of which works), four ICF-SW1 (none of which works). After spending way too much money just to acquire two working Sony radios, I started realizing that any Sony radio was probably going to need re-capping – a chore which I am not skilled at. I could have saved money by just paying the high price for a radio that had already been completely re-capped and working.
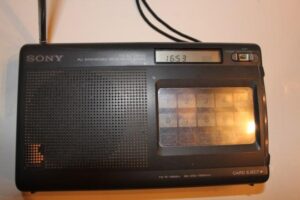
During the many hours spent watching eBay, I would occasionally come across a Sony radio that I was not familiar with – the Sony ICF-SW800. This is a very unusual radio in that it has only two bands – FM and SW. And the SW band only covers 3.7 to 17.9 MHz It also has these small credit card size pre-programmed memory cards. I ended up buying a couple of the radios just to learn what was going on with the memory cards.
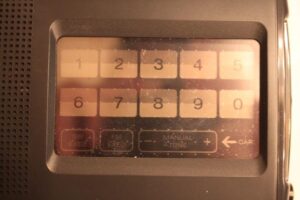
The radio is very plain and simple. Dull black plastic, telescoping antenna, nice flip out tilt stand on the back, very small LCD display that shows time when off or in stand-by and band (FM or SW), frequency and card Preset memory number when card is inserted. Following are photos of front of radio, without and with card inserted:
Removing the battery cover reveals a storage area for the cards when not in use:
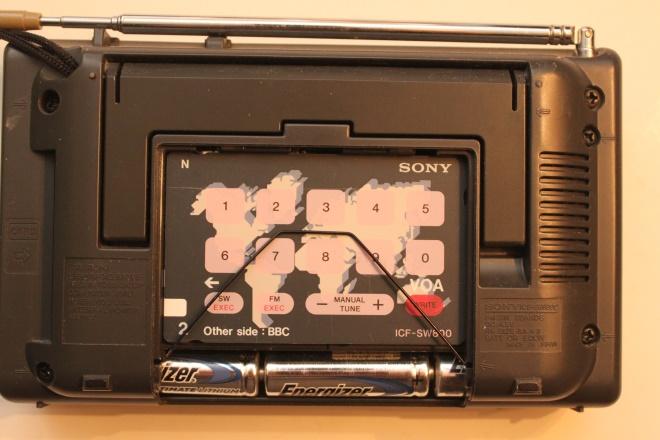
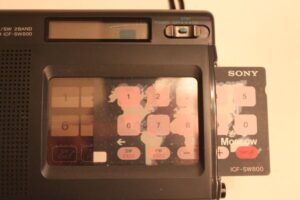
The cards are slid into the slot on the right of the radio. There is a plastic cover over the keyboard. This cover is touch sensitive. The plastic has imbedded in it small dots which can detect which part of the screen is being touched. Without a card inserted, you can select the band (SW EXEC or FM EXEC) and directly enter a frequency using the 0-9 keypad. Or you can use the manual +/- tune keys.
I had originally thought that the memory cards must be storing the memories in circuitry within the cards. When I got the first radio and looked at the cards I was really surprised to see that they were just cardboard cards – no circuity. So how was the radio knowing which card was inserted and what was stored in the memory.
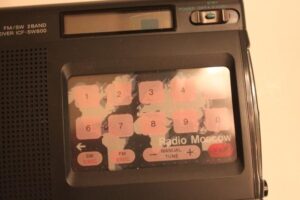
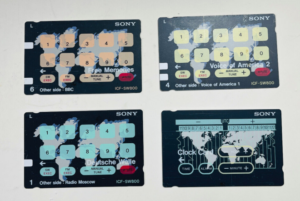
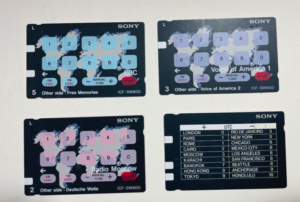
The radio comes with four double side cards. Three of the cards are for the memories while the fourth is a card used to set the clock. Following are photos of the “L” series cards:
As you can see some cards are pre-programmed for Radio Stations and some are Free Memories for you to program your own station. But since the memories are NOT stored on the cards, how does the radio know which card is inserted and which memory on the card is selected?
Each card has one or two white tabs on the left of the card. There are three possible tab locations. A review of the service manual and the wiring diagram shows that the locations of these tabs make up a binary code for 1 to 7. (only 7 is needed since the clock card is single sided while the other three cards are double sided) The clock card has all three white tabs and is thus seven (Tab 1 = 1, Tab 2 = 2 and tab 3 =4 for 1+2+4 = 7). Then each of the other cards are 1 thru 6 depending on the tab locations. The radio has infrared leds along with sensors. By shining a LED light onto the card, the radio can sense which card is inserted and then reference the correct ten memory locations in the storage..
The memories are stored in an EEPROM chip soldered into the radio. Depending on where the radio was purchased, a different set of memories would be pre-programmed into the chip in the radio. An associated set of memory cards would be provided with the radio. There were at least the following different set of memories manufactured with associated card sets as follows:
Area 5/AE7 Austria:
- (Card Series “I”)
- Card 1: Austrian Radio 1/Austrian Radio 2
- Card 2: Omnibus 1/Omnibus 2
- Card 3: Free Memories 1/Free Memories 2
Area 3/AE7 Swiss:
- Card 1: Omnibus 1/Omnibus 2
- Card 2: Omnibus 3/Free Memories 1
- Card 3: Free Memories 2/Free Memories 3
Area AE6 Germany:
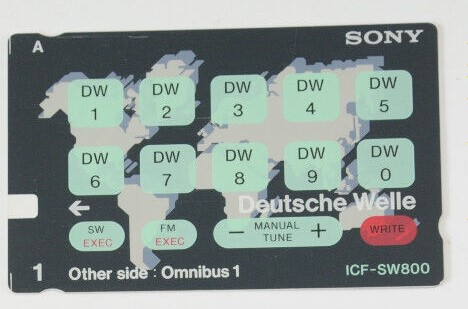
- (Card Series “A”)
- Card 1: Deutsche Welle/Omnibus 1
- Card 2: Omnibus 2/Free Memories 1
- Card 3: Free Memories 2/Free Memories 3
Area 2/AE7: Scandinavia:
- Card 1: Danmarks Radio/Norsk Rikskringkasting
- Card 2: Sveriges Radio/ Yleis Radio
- Card 3: BBC/Free Memories
Area 6/AE7 Portugal:
Area 7/AE7 Europe:
- (Card Series “N”)
- Card 1: BBC/VOA
- Card 2: Free Memories 1/Free Memories 2
- Card 3: Free Memories 3/Free Memories 4
Area 7/AE7 International Sales Division in Europe:
- Card 1: BBC/Omnibus FM
- Card 2: Free Memories
- Card 3: BBC/Omnibus SW
Area US United States:
- (Card Series “L”)
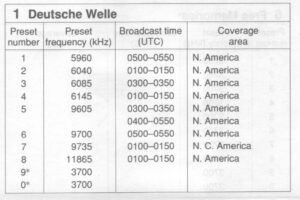
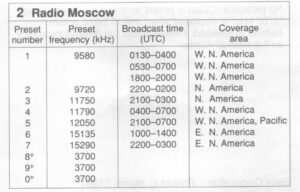
- Card 1: Deutsche Welle/Radio Moscow
- Card 2: Voice of America 1/Voice of America 2
- Card 3: BBC/Free Memories
Area UK United Knigdom:
- (Card Series “B”)
- Card 1: BBC (FM)/Omnibus (FM)
- Card 2: BBC World Service/Omnibus (SW)
- Card 3: Free Memories 1/Free Memories 2
It should be noted that even though a memory is preprogrammed (in the chip), you could re-program the memory using the “WRITE” feature on the card. Most of the cards just show memory location 0-9 with no indication of the frequency. Some cards do indicate the radio station but not the frequency. For example, Card Series “A”, Deutsche Welle has DW 0 thru DW 9 on the card:
In the packing material that came with my US version, there is a small fold out piece of paper that lists the Memory Presets for each card along with the preset frequency, broadcast time and coverage area:
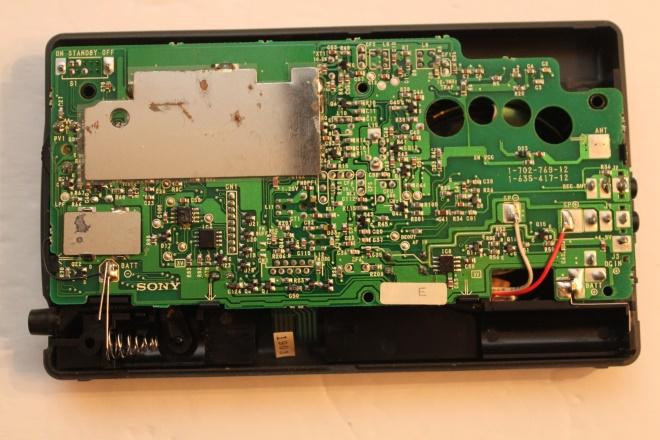
There is no way to know from the outside of the radio which memory chip was pre-programmed at the factory. The model number does not differentiate between the regions. If the back cover of the radio is removed, then there is a printed sticker on the circuit board denoting which region the radio is for.
For example, one of my radios has a sticker with “E” on it to denote that it for the Europe market:
At this point, Sony was trying to market to people who just wanted to listen to their favorite station, be it FM or SW. Thus a simple to use. pre-programed radio. Never mind the fact that radio stations may change frequencies, or even disappear entirely. At least the ICF-SW800 allowed the user to re-program all the memories.
Sony also made two other radios that used the cards for memory.
The first was the ICR-SW700. This was a two band receiver covering MW and SW.
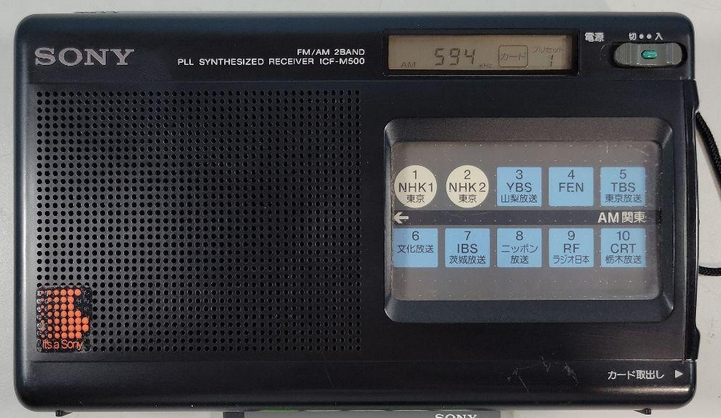
The second radio was the ICF-M500 which was made for the Japanese market. This radio was FM/AM two band radio: