Tag Archives: Field Recordings

Dan’s in-depth review of the new Raddy RF-919 shortwave portable radio

Many thanks to SWLing Post contributor, Dan Robinson, who shares the following review:

[Note that all Amazon and Radioddity links are affiliate links that support the SWLing Post.]


Raddy RF-919 Receiver: Best Portable in Years – Held Back Only By Soft Muting While Tuning

by Dan Robinson

It’s quite extraordinary that in these days of reduced use of shortwave some manufacturers continue to develop portable receivers for the worldwide community of radio listeners.  We have the Choyong LC90, which for the first time attempted to combine HF, MW, FM and Internet radio (still a work in progress). And now out of nowhere comes the Raddy RF919.

Like many receiver enthusiasts, I was excited when I saw the first photos and videos of the 919, by Shenzhen Hanrongda in China.  The company has an amazing number of portables in its lineup–in addition to the 919 there are the:  RF320, RF760, RF747, RF75A, and RF750 along with various hand crank emergency sets.  The RF919 under the Raddy label also sells as the Retekess TR113 (which can be seen on its Amazon page).

It is interesting that the RF919 (TR113) appeared on the market just as the Choyong receiver continues to experience growing pains, but obviously both had been in the planning stages for some time.  One of the strengths is its very decent SSB performance, though see my comments below about one of the issues with the RF919.

The number of reviews of the 919 by YouTube influencers is rapidly increasing as the radios get into the hands of more users.  For the purposes of this commentary I won’t go into every single feature other than to observe the high points.  And here’s a headline – from a software standpoint this is a very complex radio with a steep learning curve requiring regular looks at the manual.  But enough use brings familiarity with the many features it offers:

Displays

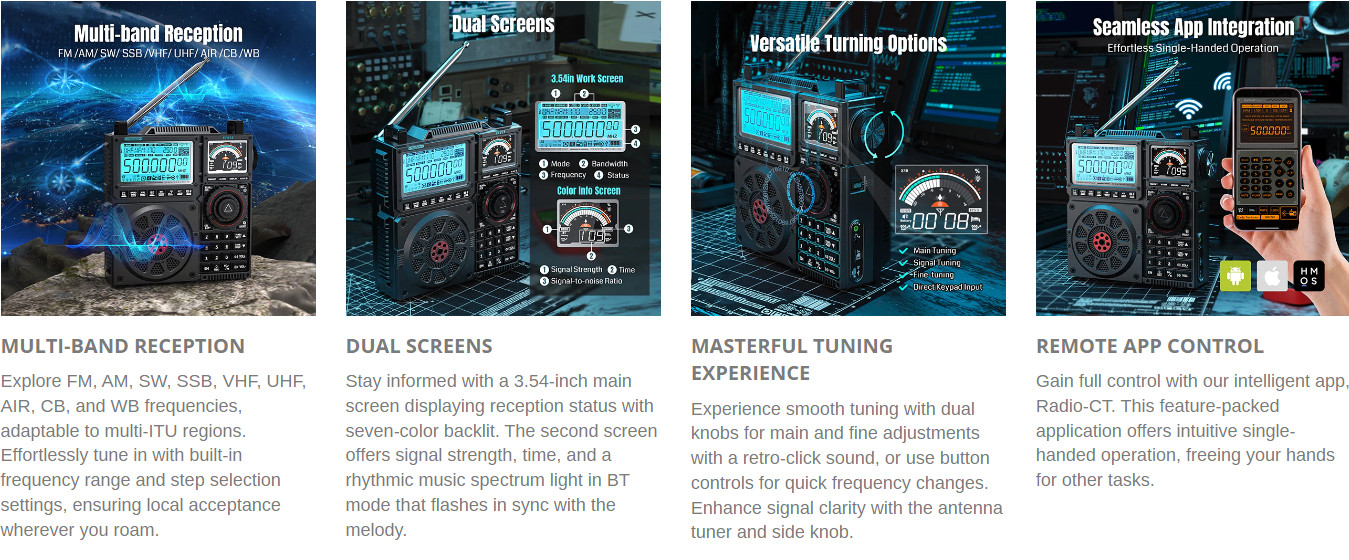
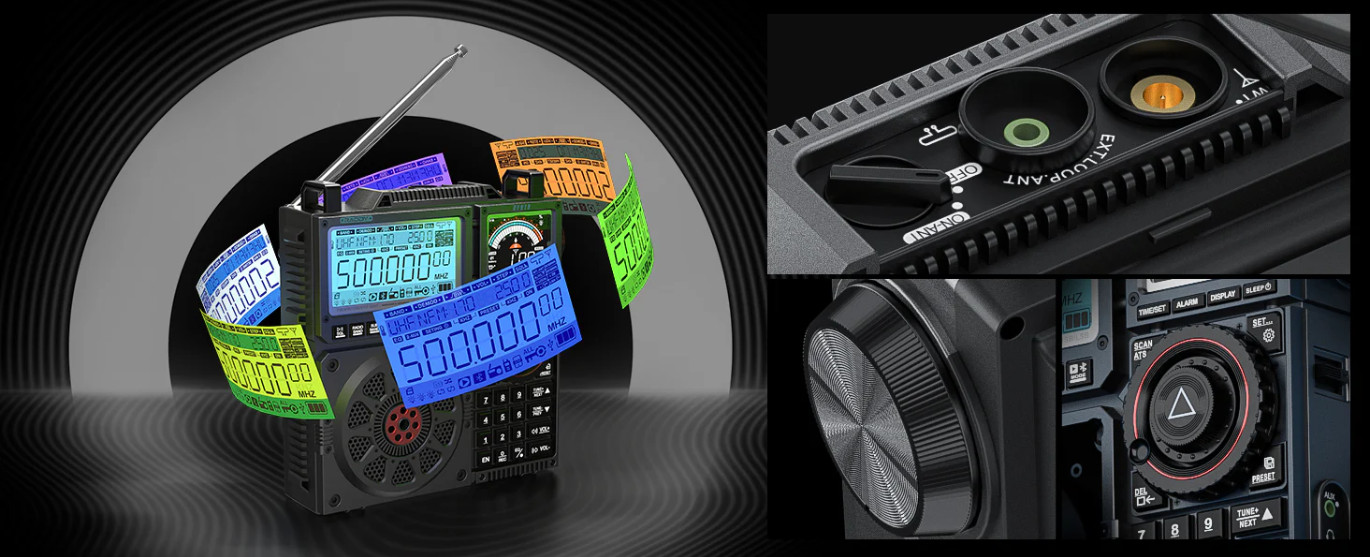
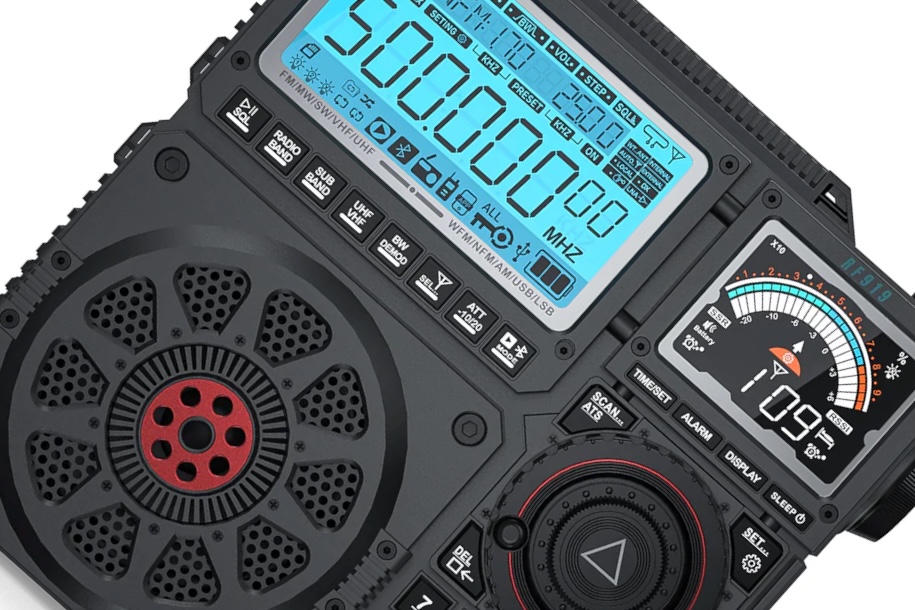
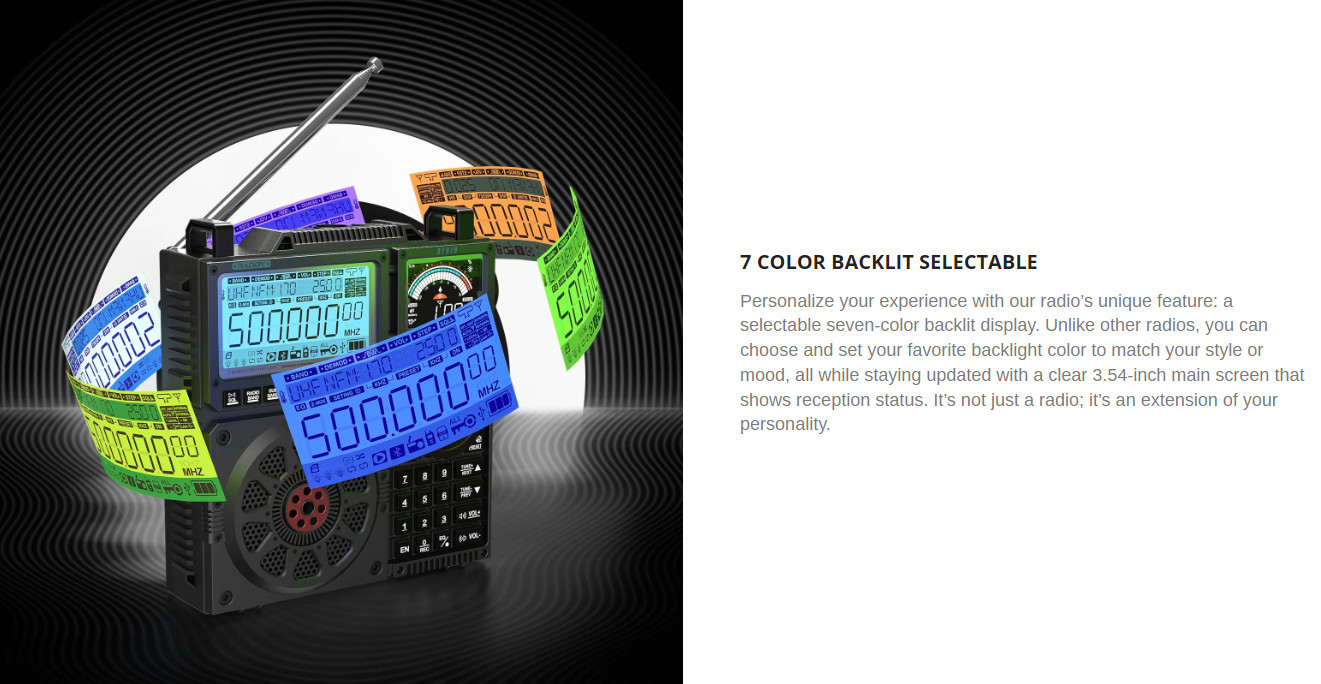
The RF919 has two superb displays:  a main information center under which there are buttons for activating various functions and options, and a second beautiful signal level screen that has a lot of information on its own, under which there are four buttons for TIME SET, ALARM, DISPLAY, and SLEEP.   These displays are probably the best we have ever seen in a portable, offering 7 colors selectable from the front panel!  The Eton Elite Satellit (no longer made) offered a few colors on its display but it was nothing like this.  Raddy publicity materials focus on this:

“Unlike other radios, you can choose and set your favorite backlight color to match your style or mood, all while staying updated with a clear 3.54-inch main screen that shows reception status. It’s not just a radio; it’s an extension of your personality.”

Body Design

The 919 is quite a throwback to such classic receivers as the SONY ICF-5900W and other “military style” portables from decades ago – one user noted the similarity to the old National Cougar 877.

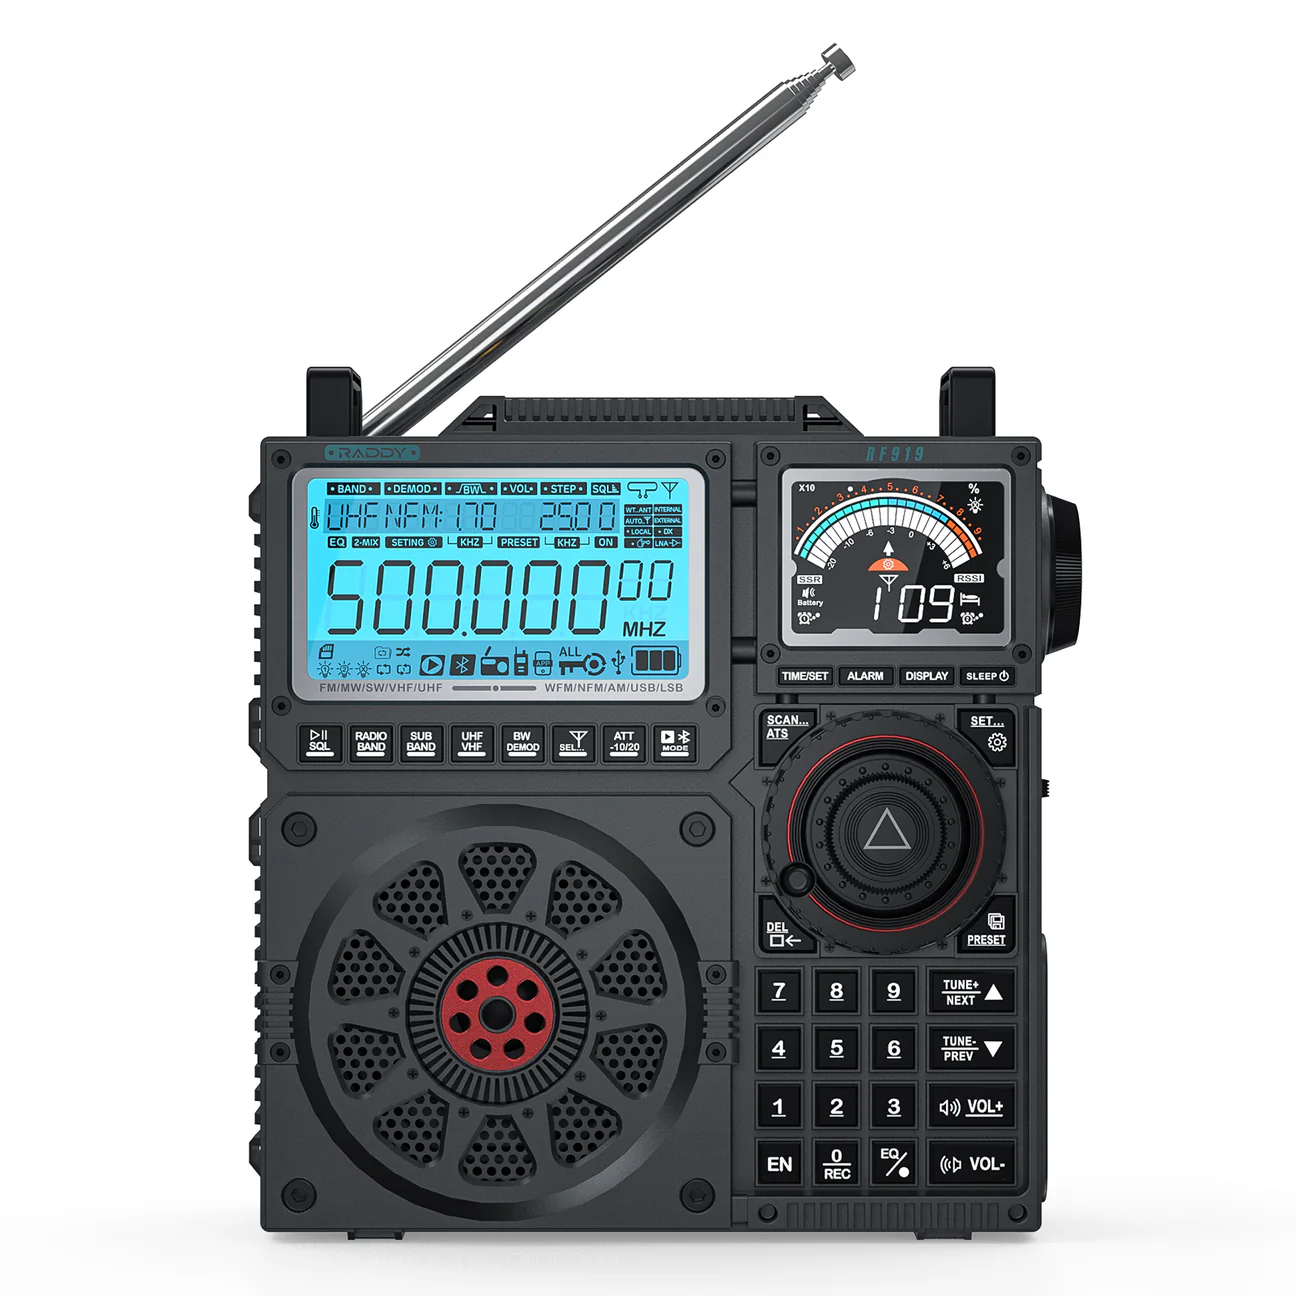
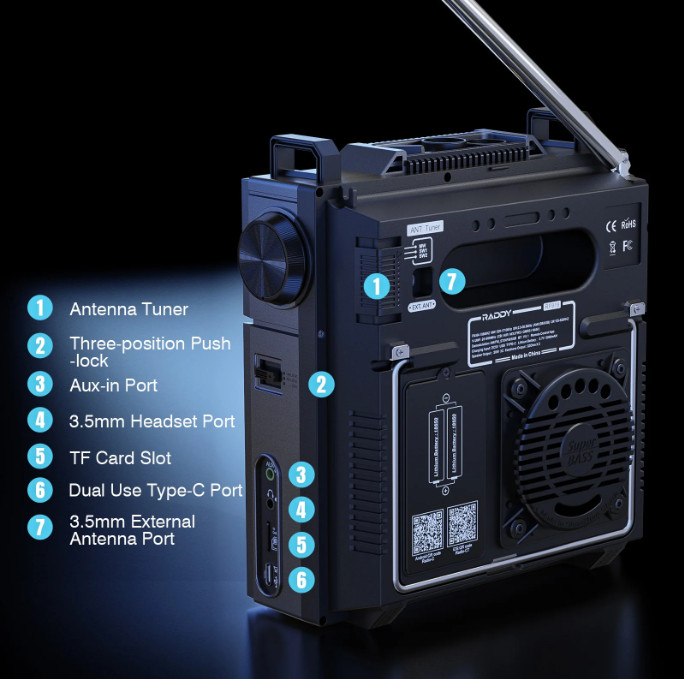
The 919 has a solid, confident, body with a space at the top rear that functions as a hand grip.  On top are two jacks for a LOOP ANTENNA, and a mobile WHIP style antenna with an OFF/ON rotary switch.  That switch is awfully close to the LOOP jack.  On the back is a 3.5 mm antenna jack with a three position slider control for specific tuning ranges.  The backstand is basically the same type found on the Tecsun H-501.  One wishes that there would have been a rubber friction grip placed on it and that it had some additional tension to allow it to hold the radio up in other degree positions.

Antenna

The telescopic whip antenna is impressive – robust, and notably designed to work while the radio is positioned on a desk using its backstand, something that the Choyong LC90’s antenna is not able to do.

I will note that the whip antenna cannot be extended up and out of the radio cabinet which limits it to a single angle when the radio is used with the backstand – placement of the 919 left carrying strap hook on top left is the limiting factor here. 

Again the 919 telescopic design is a contrast to the LC90 which both lacks a backstand, and flexibility in the antenna.

A major headline is the manual antenna tuning feature on the RF919. Utilizing the rear antenna jack and switch with MW, SW 1, and SW 2 options, along with the side adjust knob, the user can fine-tune signal strength, with the secondary screen providing real-time viewing of signal strength changes.  On top of the radio, there is a mini jack input next to an ON/OFF switch that, according to the instruction card explanation, enables selection of the LOOP (they call it “ring”) position.  Wow.  The last time we saw this kind of peaking capability on a portable was the SONY ICF-2001 back in the late 1970’s and perhaps the Grundig Satellit 700.  Hats off to Raddy for this design!

Controls

The RF919 has a large central concentric tuning outside “shuttle” knob for fast tuning, and a smaller center knob for fine tuning – the center shuttle doubles as a selector with a push function.  I am not a fan of encoders that rock back and forth as the outside concentric ring does.  At least one user remarked that this feels flimsy.  Time will tell whether these hold up in daily use.  The keyboard, which is nicely backlit, appears to be quite good.  Frequency entry is accomplished by hitting ENT, then the frequency, then ENT again.  You can enter in MHz or kHz.  There are buttons for VOLUME UP/DOWN, and for TUNE/NEXT, TUNE/PREVIOUS.

One curious thing:  if you’re tuning to 22 MHz you can just hit 22 and ENT.  But you can’t do that at 23 MHz and above – you have to enter 23.000 and ENT.  If you don’t, you get 2.300 MHz.  At least that is what I notice on my 919 – perhaps Raddy will be able to clarify why this is so.  Another point on controls: the MW/SW1/SW2 switch on the back of the radio is very flimsy and should be improved by Raddy.

Audio

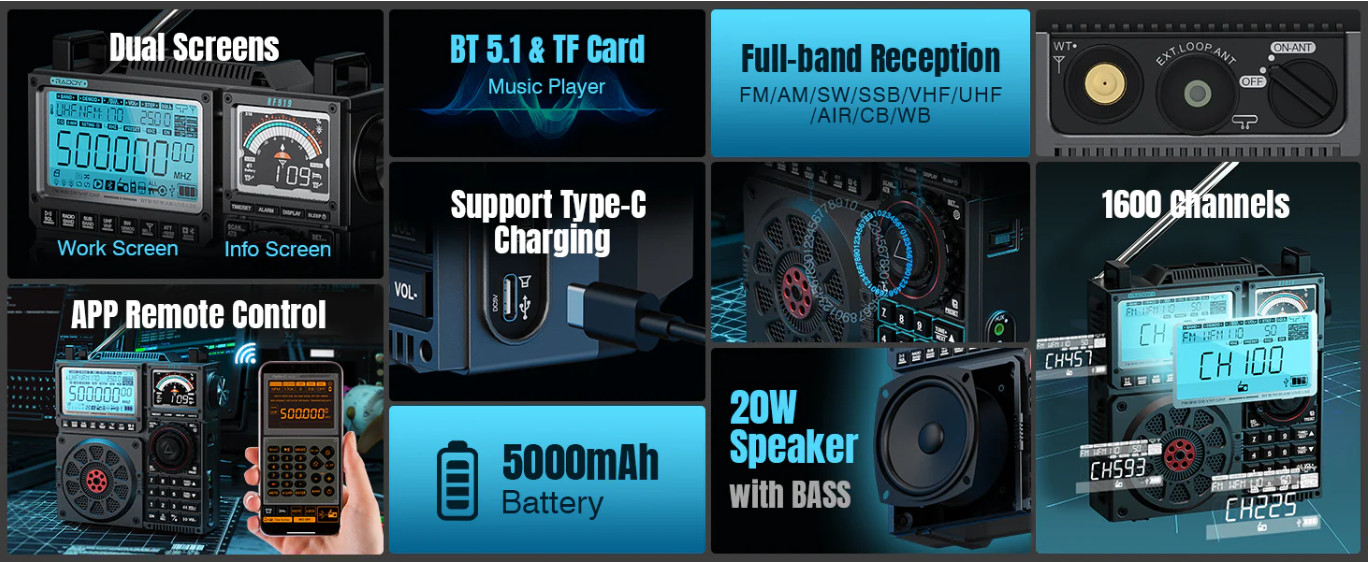
The huge front-firing speaker on the 919 produces superb audio in all tuning ranges.  Rated at 20 watts, it rivals the wonderful audio of the Choyong LC90 and combined with the 10 position EQUALIZER makes the 919 even more attractive for someone purchasing it for this level of sound production not to mention a receiver that tunes from LW all the way up to 999 MHz.

Fire up the BLUETOOTH on the 919 and you can not only use it as a speaker linked with your phone, but it will play tracks from the microSD.

ATS/Memories

We have all become accustomed to the convenience of ATS, from the excellent performance on Tecsun radios, and the 919 falls right in line.  A scan conducted on FM here in Maryland stored 23 stations and I found sensitivity to be excellent. 

Though noise levels were still high from the recent solar activity, a scan on HF yielded a number of stations.  It did take quite a long time to complete ATS on shortwave – about 15 minutes, so one hopes this could be improved in future firmware versions.  And there is this:  when scanning with ATS, the 919 scans the entire HF range rather than just bands.  In comparison, ATS on a Tecsun S-8800 takes about 3 minutes, and includes only the main SW bands. 

I am not yet sure if the 919 can be made to scan this way, but if not it’s something Raddy should consider.  Both displays remain on during ATS.  This avoids the need to mess with the display functions while scans are ongoing.

Presets

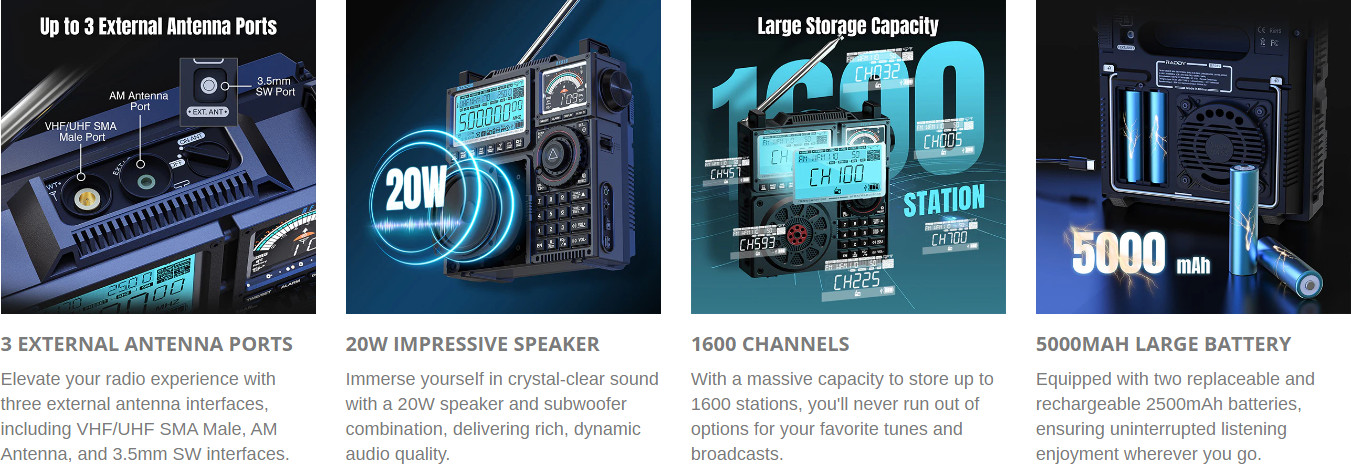
There are 1600 memory channels on this radio!   Once stations are memorized, they can be accessed by hitting the PRESET button on the lower right edge of the main shuttle dials and using the TUNE/NEXT and TUNE/PREV buttons on the keyboard.  Note that when going from one present to another the first thing that appears on the display is the CHANNEL number, followed by the frequency.  That seems logical but it prevents the user from seeing first exactly what frequency has been memorized without having to wait for the display to shift to the frequency itself.

Bandwidths

The 919 provides bandwidth options not only on shortwave, varying depending on whether one is using AM or LSB/USB, but also in FM – a truly great feature for a portable, and something seen on Malahit SDRs.  Bandwidth clarity in SSB is excellent.  Maximum bandwidth in AM mode is 6 kHz, similar to portables by Tecsun, with 4 kHz the maximum in SSB.  Some users have observed that they would like an 8 kHz AM filter position.

Manual

An extensive manual goes over all of the controls, modes, etc. – the drawback here is that the printing is so small as to make reading it impossible, so better to download the manual in pdf form from the Raddy website and print it out.  A bonus is that a three page card guide comes with the radio showing the circuit design and tips for manual antenna tuning and the antenna switching on the back.  A very thoughtful addition to the package!

Battery

The 919 continues the trend of radios using 18650 batteries, familiar to professional flashlight users and also seen in Tecsun and other receivers.  It takes not one, but two 18650s like the Tecsun H-501.  I recommend purchasing a good quality multi-bay battery charger in addition to the ability to charge the radio directly on its USB-C port.  Keep in mind that using these radios while charging will create noise, so don’t expect to have the best reception doing it that way.

Recording Capability

Wow!  After years of seeing radios with a microSD slot but no recording function, Raddy has gone ahead and done it. You can record any audio to the card and play it.  Seems like we could have seen this feature years ago from receiver manufacturers, but we didn’t.  Thank you Raddy!  That said, I have not yet been able to get recording to work on my unit, using a 64 GB microSD (see below).

Reception Performance

I am very impressed so far with the 919.  Sensitivity on HF and AIR appears to be excellent.  MW reception is good as well and can be further improved using the antenna tuning feature and the ability to use a loop antenna connected to the receiver.  FM reception appears to be quite good.  On long wave I was able to hear beacons at levels equal to what I hear on some premium communications receivers.

One observation:  when using the RF919 inside my home here in Maryland, I noted what appeared to be some break-in on shortwave from AM or FM signals.  I am still investigating this and will report later.

There are many more details to discuss for the RF919.  But I need to talk about what I would call the elephant in the room on a relatively short list of CONS, but this is a big one and a bit of a disappointment.  The 919 suffers from the issue that is so familiar to us from other portables:  MUTING WHILE TUNING.  See my video discussing this at:

This is more noticeable when in 1 kHz and 10 Hz increments, and at times of the day when signals are less strong, and seems to be a bit better in the evening when signals improve.  But it is there nonetheless.

It’s not the worst soft muting I have ever heard on a portable. It’s certainly survivable.  But for those of us who value what I call a continuous listening experience, even the slight muting experienced on the 919 is annoying.  It may well be that this can be improved with a firmware update – it’s unclear though whether firmware can be updated via the microSD if new versions were made available on the Raddy website. 

Ironically, what soft muting on any receiver does is make the receiver more useful for those of us who over decades of shortwave listening have memorized multiple SW frequencies – using the 919 I prefer to use the keypad to go directly to a frequency rather than put up with the frustrating experience of using the two shuttle knobs specifically because of the soft muting problem.

I should note that there is a harshness one hears from this radio when using the shuttle dials to tune – what I would describe as AGC crashes when going from frequency to frequency.  This is nothing new for DSP radios, though some do a better job than others, such as the Tecsun PL-990 and 501 and Data/Sihuadon D-808.  It’s clear that when a manufacturer decides to build a radio around these chips, such as the Si4735, there is very little that can be done to smooth out how the chip handles AGC, though I do not claim to be an expert in this area.

Zero Beat Variations

The other issue I observed on the unit sent to me is also familiar – in SSB, the radio isn’t calibrated well enough, so zero beat in LSB or USB vary quite a bit off the actual tuned frequency.  While we don’t usually expect DSP portables to be exactly on frequency, this can be annoying as well since in an ideal world we don’t want to have to off-tune from a known frequency of a broadcaster, or amateur operator, to achieve clarity.  Tecsun provided a recalibration feature on its portables that enables the user to adjust zero beat.  One wishes that other manufacturers would do the same – if the 919 were to have this it would be a welcome addition.

Other Issues

Though the 919 manual states that the receiver accepts up to 256 GB microSD, my first attempt to get a 64 GB card did not succeed.  The card is correctly formatted so I am at a loss to determine why this is.  Obtaining the Radio-C app was also an adventure – it comes up as an APK file which then installs.  Two Bluetooth connections appear, but understanding the process is complicated.  I was finally able to get the app working with the radio and continue to experiment with the flexibilities it provides.

Overall, the app provides some great controls over the radio, but the fact that it does not appear on Google Play and has to be downloaded via a QR code may give some users pause.  Additionally, temperature appears to display only in Celsius – something I am sure will be corrected in future firmware updates.  Also, on the phone app, pressing CB brings the radio to 25 MHz rather than the CB range.  When initiating a scan inside one of the SW bands, the scan does not stop at the top of that band.  And there does not appear, based on my first tests, to be a way to control SQUELCH from the phone app.  Hitting V-UHF on the app screen brings the radio to 20,000 kHz.  So, there need to be refinements to the app to clear things up.

Conclusion

So, here’s my summary of the RF919:

Swooping down on us out of the blue, this is an extraordinary entry into the portable category, taking us by surprise with its thoughtful design, seemingly high quality construction, and features that set it apart from other radios on the market today. 

Whoever designed the 919 surely had to have some significant experience as a listener because the features included in the receiver move it straight to the top of the list of portable receivers available in 2024.

Comparing the 919 with a receiver such as the Sangean ATS-909X2 there really is no contest.  Where coverage is concerned, the 919 blows Tecsun and Sangean offerings out of the water – on this receiver you can listen from LW all the way up to 999 mHz, along with AIR band, weather frequencies, public service, and CB (though as observed by users there is no FM mode reception for CB).

I have not been impressed by other Hanrongda (labeled Raddy/Retekess) offerings.  At one point I tried a 747 only to be thoroughly disappointed with its hard-to-see display, terrible SSB, and thin telescopic antenna along with laborious thumb wheel tuning.  I was cautious when I saw initial videos of the RF919.  But this receiver truly is a major step forward for a portable:  superb displays, wide coverage, excellent SSB (aside from the zero beat/calibration issue), wonderful audio, bluetooth capability and phone app control, microSD recording capability – all of these add up to one hell of a radio.

In response to my initial comments on the soft muting and calibration issues, Raddy responded:

“We would like to thank you for bringing two important concerns to our attention: muting during tuning and frequency accuracy. Please rest assured that we are actively discussing these issues with our technical team to gain further insights and potential solutions. We value your input and will keep you updated on any progress made.”

At a price of $269 as this is being written, the RF919 could be a 5 star radio were it not for the aforementioned issues of soft muting while tuning and calibration variation.  We can only hope that the designers can address these issues with future firmware updates and possibly make updating something we can do after purchase.  The 919 website by the way also offers antennas for the 919 including the Radioddity RD-771 which is described as an upgrade of the popular Nagoya NA-771, and the Radioddity RD-371 “Tri-band” antenna for 144-220-440 mHz.

As of this writing I am not aware of any reviews of the Retekess version of the 919, the TR113, but have to assume that there are no differences.  It will be interesting to see how firmware updates occur and again, one would hope that this will be a simple process of being able to download the updates from Raddy/Retekess and be installed on the radio.  But so far, there is no sign of this so clarifications from the manufacturer would be appreciated.

It is amazing that in 2024 we still have ANY radios coming to market as advanced as the RF919.  This is a receiver that obviously was influenced in design by someone who knows their stuff and included numerous features such as antenna tuning, decent SSB, and the ability to record content.  It is frustrating that there have been no advances in chip technology that would allow SSB performance that more closely matches what we had in many classic portables of decades past.  But for those who don’t mind things like soft muting while tuning, and can tolerate harsh AGC characteristics of DSP, right now there isn’t anything on the market that matches the RF919 in terms of just wide tuning range and reception tools as well as superb audio.  

As for BUY or DON’T BUY, I would edge toward the former with a caution to perfectionists like myself who would be bothered by muting.

If Raddy can fix that issue, and ensure a calibration process that brings LSB and USB closer to zero beat on frequency, and/or include a recalibration function as Tecsun has on its radios, the RF919 would then be an easy YES recommendation.  Right now it gets a 4.5 from me, but could easily be a 5.0 if those issues are resolved.

Retailers

    • Amazon.com
    • Radioddity (note: using this link will include a $15 discount for you and a commission to the SWLing Post)
Spread the radio love

Tuning In: An Artistic and Auditory Exploration of Korean Radio by Carlos Latuff

Many thanks to SWLing Post contributor and noted political cartoonist, Carlos Latuff, who shares this special dive into the world of radio both in and targeting the Korean peninsula. His report includes off-air recordings along with his own original artwork.


Koreas’ Radio War

by Carlos Latuff, a special for the SWLing Post

The war that divided Korea in two began in 1950. A truce was signed by both sides in 1953, but a peace agreement never came to fruition. Therefore, North Korea and South Korea remain at war. And this war is not just happening on the ground, but also over the airwaves.

Every day, a battle for hearts and minds takes place on AM, FM and shortwave. Whether the DPRK broadcasts are directed to South Korea, or South Korean broadcasters (including clandestine ones) broadcast to the DPRK.

I bring here a small collection of radio listenings made between February 29th and March 17th, all of them happened in Porto Alegre, Brazil, using a XHDATA D-808 receiver, with long wire antenna (outdoor), except for Radio Free Asia, listened with a Toshiba TR 486 receiver, using a telescopic antenna (indoor). Translations from Korean to English were made using transcription and translation apps.

KBS World

KBS World Radio was created in 1953, the year the truce was signed between the two warring Koreas, under the name “The Voice of Free Korea”, and today, as a public radio station, it broadcasts to several countries in different languages. Its programming includes news, music, variety, and of course, opposition to the DPRK government.


As part of the effort to promote “regime change” in the DPRK, the Seoul government, through its intelligence service, maintains clandestine radio stations (“Echo of Hope” and “Voice of the People”) whose role is basically broadcast 24 hours a day anti-Communist propaganda to North Korea, along South Korean and American pop music.

Echo of Hope

Voice of the People

Radio Free Asia

Created by the CIA in 1951, at the height of the Cold War and the conflict in Korea, Radio Free Asia has undergone changes throughout its history, but continues to be operated by the United States government and aims, in its own words, to “provide independent, uncensored and accurate local news” for countries like China, Vietnam and, of course, North Korea. Content directed at the DPRK follows the same principle as South Korean clandestine broadcasters: basically anti-Communist orientation, in order to achieve a “regime change”. The articles broadcasted on the radio are the same as those published on the Radio Free Asia’s website.

KCBS Pyongyang

Korean Central Broadcasting Station (KCBS) Pyongyang is the DPRK’s domestic radio station, whose programming reaches North and South Korea, even being heard in Japan. News about the achievements of North Korean leader Kim Jong-un, music and attacks on Seoul government, seen by Pyongyang as a puppet regime.

Voice of Korea

On October 14, 1945, the year Japan was defeated in World War II, KCBS Pyongyang and Voice of Korea were founded (domestic and international radio stations respectively). Voice of Korea broadcasts programming in several languages ??to the world via shortwave. The content is not much different from KCBS Pyongyang: achievements of North Korean leader Kim Jong-un, attacks on Seoul government and the United States, and traditional/patriotic music.

Spread the radio love

Carlos’ Art and Recording of a NOAA Weather Bulletin via the US Coast Guard

Many thanks to SWLing Post contributor and noted political cartoonist, Carlos Latuff, who shares his radio log art of a recent NOAA Weather Bulletin from the US Coast Guard:


Carlos writes:

NOAA bulletin (partial), US Coast Guard, Chesapeake, VA, 13089 kHz USB, high seas forecast and hurricane information. Listened in Porto Alegre, Brazil.

Carlos’ listening post and gear.

Click here to listen via YouTube.

Spread the radio love

Guest Post: Recording Music on Shortwave Part 2 – Weak signal recovery

An example of an AirSpy SDR# software screen.

Many thanks to SWLing Post contributor, TomL, who shares the following guest post:


Recording Music on Shortwave Part 2 – Weak signal recovery

by TomL

The QRM noise cloud surrounding my condominium motivated my first foray into noise reduction software to find a little relief (Please refer to Part 1 posted here) using SDR recordings.  I was able to use the freeware software Audacity to reduce some of that type of noise to tolerable levels on strong broadcasts.  But what about non-condo noise, like out in the field??

NHK Japan

I took my trusty Loop On Ground antenna to the usual county park Forest Preserve which is relatively low in RF noise.  I did some usual recording on 25 meters and poked around for something being captured by SDR Console.  On 11910 kHz is NHK broadcasting daily from Koga, Japan.  It is hearable at this location but is always an S7 or weaker signal despite its 300 KW of power no doubt due to being beamed away from the Midwest USA.

I recorded it using the SDR Console 10kHz bandwidth filter and created a separate noise recording from a nearby empty frequency.  Here is the 2 minute portion of a Japanese music teacher. No noise reduction was applied:

I opened the noise and broadcast recordings in Audacity to see what I could do.  Part 1 of my previously mentioned post details how I apply the Noise file.  A big downside of using any kind of noise reduction software is that it is ridiculously easy to destroy the desirable characteristics of the original recording.  Applying too much noise reduction, especially in the presence of constant, spiky lightning noises, will create both digital artifacts as well as very dull sounding results.  So I used the Effect – Noise Reduction (NR) feature very carefully.

In this example, I used the Effect – Amplify feature on the one minute noise file.  I applied just +1dB of Amplify to the whole file.  Then I highlighted a 10 second section I thought was representative of the general background noise and chose Edit – Copy.  Then, I opened the broadcast file, Pasted the 10 seconds of noise to the END of the file and highlighted just the 10 seconds of noise. Then I chose Effect – Noise Reduction – Get Noise Profile button.  Amplifying the noise file by +1db does not sound like much but it seems to help according to my tests.  Anymore than this and the Noise Profile would not recognize the noise without destroying the music.

I used the NR feature three times in succession using the following (NoiseReduction/Sensitivity/FrequencySmoothing) settings:  Pass1 (3dB/0.79/1), Pass2 (2dB/1.28/1), Pass3 (1dB/2.05/0).  Part of what I listened for was choosing the Residue circle and Preview button for any music or dialog that was being filtered out.  If I heard something that came from the desired part of the recording in Residue, I knew that I hit the limit concerning the combination of Noise reduction and Sensitivity settings to engage.  I used those Residue & Preview buttons over and over again with different settings to make sure I wasn’t getting rid of anything wanted.  I also used the higher Noise reduction with lower Sensitivity to try to get rid of any momentary spiky type noise that is often associated with SWLing.

I messed around with a lot of test outputs of differing dB and Sensitivities and a lot seemed to depend on the strength of the broadcast signal compared to the noise.  If the broadcast was weak, I could push the dB and Sensitivities a little harder.  I also noted that with strong signal broadcasts, I could NOT use more than 1 dB of Noise reduction beyond a Sensitivity of about 0.85 without causing damage to the musical fidelity.  This was a pretty low level of nuanced manipulation.  Because of these minor level Audacity software settings, it dawned on me that it is very helpful to already be using a low-noise antenna design.

If the Sensitivity numbers look familiar, that is because I tried basing the series of Sensitivity on Fibonacci numbers 0.618 and 0.786.  Don’t ask me why these type of numbers, they just ended up sounding better to me.  I also needed a structured approach compared to just using random numbers!  Probably any other similarly spaced Sensitivity numbers would work just fine, too.

Now if you really want to go crazy with this, add Pseudo Stereo to your favorite version of this file (also detailed in Part 1) and playback the file using VLC Media Player.  That software has a couple of interesting features such as an Equalizer and a Stereo Widener.  You may or may not like using these features but sometimes it helps with intelligibility of the voice and/or music [VLC will also let you right-click a folder of music and choose to play all it finds there without having to import each MP3 file into a special “Library” of music tracks where they bombard you with advertisements].

You can also turn on Windows Sonic for Headphones if you are using the Windows operating system.  However, this can sometimes be too much audio manipulation for my tastes!

Here is the resulting NHK noise-reduced file with 9ms of delay with High & Low Filters:

Radio Thailand

Five days later I was out in the field again.  This time I found Radio Thailand on 11920 kHz finishing up a Thai broadcast.  It was a weaker S5 signal than the NHK example, so it would be a good test.

When I got home, I recorded the broadcast file at a Bandwidth filter of 8 kHz and using Slow AGC and the extra Noise file at 12kHz using Fast AGC.  In a previous test I had noticed a very slight improvement in sound quality in the way noise seems to get out of the way quicker compared to Slow AGC (which is usually how I listen to shortwave broadcasters).  I now try to remember to record the Noise file with Fast AGC.

Here is the original without any noise reduction:

This time the Noise file using Amplify +1dB did not help and I used it as-is for the 10 second Noise Profile.  I then tried multiple passes of NR at higher and higher Sensitivities and ended up with these settings the best: Pass1 (1dB/0.79/0), Pass2 (1dB/1.27/0), Pass3 (1dB/2.05/0), Pass4 (1dB/3.33/0).

As a comparison, I tried recording only with SDR Console’s noise reduction NR1 set to 3dB and got this.  I hear more noise and less of the music coming through:

Now for more crazy Pseudo Stereo to finish up the Audacity 4Pass version (nice Interval Signal of Buddhist bells ringing and station ID at the very end):

Summary

I do not understand why applying 3 or 4 separate 1dB Sensitivities of noise reduction is superior to just one Pass at 3dB Sensitivity (in Audacity) or the one 3dB noise reduction (in SDR Console).  My guess is that doing 1 dB at different Sensitivities shaves off some spiky noise a little at a time, somehow allowing for more of the musical notes to poke through the noise cloud.  Who knows but I can hear a difference in subtle musical notes and sharpness of voice and instruments.  Probably the Fast AGC helps too.

Music is a Universal Language that we can share even when we don’t understand a word they are saying. And there is more music on the air than I thought.  Some of these recordings sound surprisingly pleasing after noise reduction. The fake stereo is pumped through a CCrane FM Transmitter to a few radios in the home, or I can use the Beyerdynamic DT990 Pro headphones.

Enjoying the Music!

TomL

Spread the radio love

TomL’s guide to making and optimizing shortwave radio SDR music recordings

An example of an AirSpy SDR# software screen.

Many thanks to SWLing Post contributor, TomL, who shares the following guest post:


Recording Music on Shortwave

by TomL

I recently became curious about the seasonal music updates posted by Alan Roe.  It is a nicely detailed list of musical offerings to be heard.  Kudos to Alan who has spent the time and effort to make it much easier to see at a glance what might be on the airwaves in an easy to read tabular format.  I do not know of any other listing specifically for shortwave music in any publication or web site.  I especially like the way it lists everything in UTC time since I might want to look for certain time slots to record.  For some listings, I would need to go outdoors away from noise to listen to certain broadcasts.  Current web page is here:  https://swling.com/blog/resources/alan-roes-guide-to-music-on-shortwave/ .

As a side note, I have also found a lot of music embedded in the middle of broadcasts that are unannounced, unattributed, and not part of a regular feature program.  That can be a treasure trove of local music you might not be able to find anywhere on the internet.  It can be worth recording a spectrum of frequencies using the capabilities of the SDR and then quickly combing through the broadcasts at two-minute intervals (most songs are three minutes or longer).  In maybe ten minutes, I will have at least identified all of the listenable music that may or may not be worth saving to a separate file.

Whether at home or outdoors, I have wanted to try to record shortwave broadcasts of music using my AirSpy HF+ but never getting around to it until now.  There is a certain learning curve to dealing with music compared to just a news summary or editorial.  I found myself wishing I could improve the fidelity of what I was hearing.  From static crashes, bad power line noise, fading signals, and adjacent channel interference, it can be quite difficult to get the full appreciation from the musical impact.

I am starting to monitor the stronger shortwave stations like WRMI, Radio Romania International, Radio Nacional do Amazonia, etc.  These type of stations can be received in a strong enough manner to get good quality recordings (at least according to shortwave listening experience).  I am also finding that I appreciate much more than before the effort that these broadcasters put into creating content/commentary to go along with the music and little pieces of background info about the music or the artist.  I have also noticed how exact some broadcasters are in timing the music into the limited time slots.  For instance, Radio Romania International tries to offer one Contemporary piece of music exactly at 14 minutes, Traditional music exactly at 30 minutes, and a Folk tune exactly at 52 minutes into the program (whether in English, French, or Spanish), with nice fade-outs if the music goes too long.

One thing I ran into was to bother checking my hearing range.  If someone has impaired hearing, it does not make much sense to create files that have a lot of sound out of one’s hearing range.  I found this YouTube video (among a bunch of others) and listened to the frequency sweep using my Beyerdynamic DT-990 Pro headphones (audiophile/studio type headphones).   My hearing is approximately from 29 Hz through 14400 Hz.  Of course, the extremes fall off drastically, and as with most people, my hearing is most sensitive in the 2000 through 6000 Hz range.

Recording Workflow

Let’s assume that you already know how to record IQ files using your SDR software and can play them back (In the example below, I recorded the whole 49 meter band outputting a series of 1GB WAV files).  Then, when playing back to record to individual files, I have to choose the filters and noise reduction I want.  This gets subjective.  If I do not want to keep huge numbers of Terabytes of WAV files over time, I will want to record to individual WAV files and then delete the much larger spectrum recording.  You might tell me to just record to MP3 or WMA files because there is that option in the SDR software.  We will get into that as we go along.  For the time being,  I do not want to keep buying Terabytes of hard drives to hold onto the original spectrum recordings.

After lots of trial and error, I came up with this workflow:

  1. Record the meter band spectrum of interest using the SDR software.
  2. Record individual snippets of each broadcast in that spectrum to new individual WAV files.  This includes not lopping-off any announcer notes about the music I want to retain.  I also have to choose the bandwidth filter and any noise reduction options in the software.  Because I am not keeping Terabytes of info, this is a permanent decision.
  3. Take an individual recording and apply more processing to it.
  4. Convert the processed  recording to any number of final output formats for further consumption and/or sharing.
  5. Repeat steps 3 & 4 to take care of all the individual WAV files.

Step 4 allows me to create whatever file format I might need it to be: WAV, MP3, WMA, or even use it as background sound to a video if I so choose.  There are also different ways to create some of these files with different quality settings depending on what is needed.  I have chosen to listen to the individual WAV files for personal consumption but there may come a time to create high quality MP3 files and transfer those to a portable player I can take anywhere (or share with anyone).

The example below is a snippet from the latest Radio Northern Europe International broadcast on WRMI.  WRMI has some decent equipment and I like how clean and wide is the bandwidth of many of the music programs.  This is captured on the AirSpy HF+ using SDR Console V.3 with a user-defined 12kHz filter (11kHz also seemed somewhat similar sounding).

If you click on the ellipses, you can Copy an existing filter, type in a new title and change the bandwidth.  I also played around with the different Windowing types and found that I like the Blackman-Harris (7) type best for music and the Hann type for smooth speech rendering (the Kaiser-Bessel types can also have more “punch” for voice recordings).  Click OK TWICE to save the changes.

I also use Slow AGC and the SAM (Sync with both sidebands) to reduce the chance of distortion as the signal fades.  I found that trying to use only one sideband while in Sync mode would make the reception open to loss of Sync with the musical notes warbling and varying all over the place!

Noise Reduction

The SDR Console software has a number of noise reduction choices.   I tried NR1 through 4 and found the smoothest response to music to be NR1 with no more than 3 dB reduction.  More than this seemed to muffle the musical notes, especially acoustic instruments and higher pitched voices. Part of the problem has to do with trying to preserve the crispness of the articulation of the sound and combating shortwave noise at the same time.  At this time, I have chosen NOT to use any NR mode.  More about noise reduction below.

Generic MP3 sounds really bland to my ears, so creating higher quality files will be important to me.  I have been using Audacity which can apply processing and special effects to WAV files and export to any number of file formats.  WAV files are a wonderful thing.  It is a “lossless” file format which means that every single “bit” of computer input is captured and preserved in the file depending on the resolution of the recording device.  This allows one to create any number of those “lossy” output formats or even another WAV file with special effects added.  You can get it here:

https://www.audacityteam.org

One special effect is listed as “Noise Reduction”.  I literally stumbled upon it while reading something else about Audacity (manual link).  Here is how I use it for a shortwave broadcast.  Open the original spectrum recording (in this example the 49m band).  Tune about 25kHz away from the broadcast that was just recorded.  Remember, my hearing extends at least to 14.4k plus there is still the pesky issue of sideband splatter of bandwidth filters.  The old time ceramic and mechanical filters use to spec something called “skirt selectivity” -60db or more down from the center frequency.  This is still an issue with DSP filters even though they SAY they are measured down to -140dB; I can still hear a raspy sideband splatter from strong stations!

Find the same time frame that you recorded the broadcast and make sure it is the same bandwidth filter, AGC, and any noise reduction used.  Now record one minute of empty noise to a WAV file.  Fortunately on 5850 kHz, WRMI has no adjacent interference.

Now in Audacity, open the noise sample and listen for a 5 to 10 second space to copy that is relatively uniform in noise.  We don’t want much beyond that and we don’t really want noise spikes.  The object is to reduce background noise. In this case, I chose Start 39 seconds and End 44 seconds.  Choose Edit – Copy (or CTRL-C).

Choose File Open and find the broadcast WAV file in question.  Now click on the end-of-file arrow or manually type in the Audio Position (in this example 1 minute 15 seconds).  Now Paste (or CTRL-V) the 5 seconds of noise to the end of the broadcast file.  Now, while the pasted noise is still highlighted, go immediately to Effect – Noise Reduction and choose the button Get Noise Profile.  It will blink quickly to read the highlighted 5 seconds of noise and disappear.

Now select all with CTRL-A and the whole file is selected.  Go immediately to Effect – Noise Reduction and choose the parameters in “Step 2”.  Through some trial and error, I found 3db reduction has a noticeable effect without compromising the music.  I have used up to 5 db for some music recorded with narrower bandwidths.  Higher levels of noise reduction seemed to create an artificial flatness that was disturbing to me.  I also use a Sensitivity of 0.50 and Frequency smoothing of 0.  You can choose the Preview button while the Residue circle is checked to actually hear the noise being eliminated.  Press OK in order to process the noise reduction.  You should now see the waveform change slightly as the noise is filtered.  In a nutshell, I find this to be a better noise reduction than using 3db of NR1 in the SDR Console software.  Don’t forget to snip off those 5 seconds of noise before saving the file.

Pseudo Stereo

The SDR Console software has an Option for Pseudo Stereo (for playback only) and it can be useful for Amateur Radio receiving, especially in noisy band conditions when one is straining to hear the other person’s call sign and location.  There is a way in Audacity to add a fake kind of stereo effect to mono audio files.  I found a useful YouTube video that explained it very clearly.

I  do everything listed there except for the Reverb effect.  I find that too fake for my tastes.

I found the added 10ms of Delay on the right channel to be a little too much, so I use 9ms.

My High Pass filter settings are 80 Hz and 24dB/octave.  This is based partly on my hearing preferences as well as established industry standards.  There was a lot of science and audio engineering that went into creating the THX home theater crossover standard.  There is also science that says that anything below 200 Hz is omnidirectional.  The suggested 48dB/octave is too steep in my opinion.

My Low Pass filter settings are more squishy.  The YouTube video suggests 8000 Hz and 6dB/octave.  I feel that is too gentle a rolloff into the upper midrange.  I use 9000 Hz at 12dB/octave for very strong, high quality shortwave broadcasters like WRMI. For more constrained quality broadcasts, like due to limited bandwidth (Cuban broadcasters) or adjacent channel interference, I will decrease down to 8000 or 7000 Hz but still use a 12dB/octave rolloff.  This is subjective but it also means I am making a conscious decision to add that processing to the recording for future listening.

MP3 Quality

Typical MP3 files are a Constant Bit Rate of 128k.  Some interviews and voice-only podcasts are only 64k.  This is adequate but for recording detail in the music I prefer higher quality settings.  Frankly, with these days of 4G cell phone service and Unlimited Data minutes on cell phone plans, there is NO good reason to limit MP3 files to just adequate quality levels.  The typical MP3 file sounds limited in frequency range (muffled sounding) to me and very lacking in dynamic range (narrow amplitude).  This would include limits on stereo files which are about twice the file size of mono files.

I have tried creating WMA files and I actually like the quality a little better than high quality MP3 files.  The WMA files seem slightly more “airy” and defined to my ears.  But it is a proprietary format from Microsoft and not all web sites or devices will easily play them.  They are also a fixed standard and one cannot easily change the quality settings if forced to use a lower quality rendering.

There are many web sites talking about MP3 files, but I found this blog post helpful in summarizing in one paragraph the higher quality settings for a nice MP3 recording using VBR-ABR mode.

https://technical-tips.com/blog/software/mp3-encoding-right–1334

One Minute Samples

So finally for my examples.  Since most web sites still prefer MP3 files, I have created these using that  blog post’s suggestions.  Typically this is Min bitrate=32, Max bitrate=224, VBR quality=9, and Quality=High (Q=2).  Let’s see if you can hear the differences.  It would be much easier to hear if we were listening to WAV files, but those are way too big to post on this web site!  The software I used is Xmedia Recode and I find it easy to use.

https://www.majorgeeks.com/files/details/xmedia_recode.html


Example 1: No noise reduction in SDR Console, no further processing


Example 2: 3dB of NR1 in SDR Console, no further processing


Example 3: No noise reduction in SDR Console, Audacity Noise Reduction of 3dB


Example 4: No noise reduction in SDR Console, Audacity Noise Reduction applied 3 times (3db,0.33+2db,0.50+1db,0.80)


Example 5: No noise reduction in SDR Console, Audacity Noise Reduction applied 3 times (3db,0.33+2db,0.50+1db,0.80), Pseudo Stereo added


I would love to hear comments since I am new to recording music on shortwave and any further tips/tricks would be fun to learn.  Enjoy the music!

TomL

Spread the radio love

Guest Post: Tom takes the AirSpy HF+ and YouLoop to the field!

Many thanks to SWLing Post contributor, TomL, who shares the following guest post:


YouLoop Picnic Table Report

by TomL

So, I finally got around to testing my Airspy YouLoop after the long shipping delay from China.  It is simple in concept and will not repeat what others have written about it in previous articles.  I find it a useful loop antenna for portable operations and sometimes for noisy home use.  This report is focused on my usual field location from a Northern Illinois county park picnic table.

Setup

As you can see from the setup photo, it all fits into a backpack except for the two PVC pipes and crossbar which are easy carried.  I modified my YouLoop to use the 2 meter transmission line as one half of the loop.  The other half consists of the two shorter wires connected with a simple female-to-female SMA connector.  This doubles the circumference of the loop and gives it a bigger capture area.

Crossbar

Because my setup is bigger than usual, I had to find a lightweight cross member to aid the solid conductor wire from sagging. I found just the thing in a larger-than-normal 6 foot fiberglass driveway snow marking stick sold at the local hardware store.  I cut the tip off to make it 5 feet (Because, the loop as I configured it is 4 meters circumference, so, 4*39.37/Pi = Diameter in inches). I then drilled a 5/16th’s inch hole through the middle of the ¾ inch PVC threaded pipe I had from a previous project and fit the fiberglass stick through it as the crossbar. This is a special PVC 4 foot nipple pipe I had special ordered a long time ago when mounting a previous (heavy) Ferrite-Sleeve loop antenna.

Loop Mounting

Screwed onto both ends of the 4 foot nipple are threaded-to-coupler adapters also found at the hardware store.  The adapter allows me to attach easily to the ¾ inch 5 foot long PVC pipe held by my trusty carbon fiber tripod below.  This 5 foot pipe is held loosely by the tripod so I can grab the pipe and turn the whole loop mounted above.  The result is not perfectly circular and there is room for improvement.  I find it to be highly directional nonetheless and easy to turn. The phasing connector of the YouLoop mounts at the top and for now I am just using two medium sized cable ties to a long screw near the top for tension.  I do not want to glue the connector to the top since this YouLoop may get used in other configurations in the future.

The Bottom connector for the radio input is held nicely with a couple of velcro wraps.

The wire from there goes to the usual setup of Palstar amplified preselector with battery pack and Airspy HF+, which goes into the USB port on the small Dell laptop.  After some initial problems with a non-functioning HF+ and rebooting a few times, I was finally able to get a signal.  At first I thought it was the antenna but the error condition acted the same way whether the antenna was connected or not.  It could be that my HF+ is starting to exhibit the first signs of failure, which I have read about from complaints on the internet about the reliability of SDR’s used in the field.  I may have to bring along my SDRPlay SDR2 just in case!  In other words, don’t depend on computer hardware and software to work (especially if you happen to go on vacation and have no backup radio!!).  I also have a couple of portable non-SDR radios I could bring with me as well.  Enough said.

Using It

The screen of the laptop shows a very nice black background, very quiet, and a moderate signal level of WRMI on the 31 meter band.  I did not have the time or processing power for real Data captures, so all I have to share are less optimal MP3 files.  The signal level is somewhat low. I think this is typical for a single-wire loop antenna and seems adequate. I did have to crank my Palstar preamp to maximum the whole time while on shortwave (my Wellbrook amp would probably work slightly better).  On mediumwave, the gain seemed more than adequate (I don’t have any recordings of that band at this time, maybe a future article).

Directionality is very good and usable across a very wide range of frequencies!  It certainly worked well up to the 25 meter band where I started to notice a drop off of nulling ability.  And this is good despite my lack of perfect circular mounting of the wire. Even though my county park is a “Forest Preserve” and not meant to have any development, there is increasing noise in the neighborhood and I find the loop to be very useful in cleaning up some background noise (as well as noise coming from the laptop!).  This is especially seen with the Voice of Iran broadcast in French. The weak signal was aided by moving the loop to balance the signal level to local noise.

The loop is a bit flimsy using it this large.  Keeping the connectors tight may be a problem in the future if subject to a lot of wind.  I think you will find the smaller (usual) setup in the instructions to be less of a problem.  My plastic clips at the sides of the crossbar and the plastic tie downs at the top are not optimal and will need something better (in other words, it would help if I had a better mounting for the wires).  Also, the tripod definitely wanted to tip over as a storm blew past, so I need to make sure I tie down one or more legs to the picnic table in the future!!

Final Thoughts

In summary, this is a very useful loop for portable operations since it fits easily into a backpack. Mounting it in a repeatable manner will need some experimentation.  Performance is good with usable nulling at a wide range of frequencies. Signal strength is moderate, so a good preamp is necessary in order to boost the signal into the sweet spot of your receiver RF stage.  Parts quality is good, but the wire is thin solid conductor, so do not kink/fold it!.  The connectors and housing for the phase change and balun are very small, with non-waterproof plastic housings that can be easily abused, so take care of them. The whole kit is small to pack and lends itself to experimentation.  Highly recommended given its limitations.

Furthermore, I feel my old, original 14-inch “crossed-parallel loop” did as good a job as this larger diameter YouLoop.  I wonder how the YouLoop can be modified to create a larger gain using, say, two or more wires in parallel (perhaps a future article!)?  Generally, the deeper the loop design, the higher the gain.  The YouLoop potentially could be a better performing, more portable version if I can replicate using more turns of wire.  Although it is in disrepair now, pictures of my old 14-inch loop are found here, and also here.

Sample Recordings

Here are a bunch of sample recordings to enjoy, some of which are unique to shortwave radio and found no where else:

9830 kHz, Voice of Turkey

10000 kHz, WWV

9395 kHz, WRMI

9420 kHz, Voice of Greece

11760 kHz, Radio Habana Cuba

11780 kHz, Radio Nacional Brazilia

11940 kHz, Radio Nationale Espana

7193 kHz, W3M – special Amateur Radio event to celebrate the birthplace of Memorial Day (Boalsburg, Pennsylvania) 

7230 kHz, Voice of Iran (French)

7315 kHz, Voice of Vietnam, from WHRI-1 transmitter

7350 kHz, Radio China International, in English from Kashi PRC

7375 kHz, Radio Romania booming in from Romania

7490 kHz, WBCQ (Spanish) from Monticello ME (guide says only 50 kw but sounded more than that)

6180 kHz, Radio Nacional Brazilia

6070 kHz, CFRX Toronto – discussion about some people with ashes of relatives in the home

6115 kHz, WWCR Nashville TN – discussion about Jesus saving a young woman from Satanic ritual abuse as a child

5850 kHz, Radio Slovakia International from WRMI booming in as usual

73’s & Happy Listening,

TomL


Thank you, Tom, for sharing your field-portable SDR setup! I like how you’ve made an inexpensive and packable support system for the larger diameter YouLoop. While I’ve yet to design a similar system around the YouLoop, I really should. I’ve always believed that for both SWL and ham radio field-portable operations, a self-supporting antenna system is a must as it gives you ultimate flexibility to cope with variable site conditions.

Click here to check out Tom’s previous guest posts and portable adventures!

Spread the radio love

Radio in the field: SWLing on the coast of the St. Lawrence river

Yesterday, the weather was gorgeous here in Québec, thus a prime opportunity to find a beach, start a new book and, of course, play radio!

I found a fantastic spot on the north bank of the St. Lawrence river near Baie-St-Paul, Québec. There were only a few folks at the beach, so it was all very peaceful.

I found a picnic table perched on the edge of the beach shaded by an apple tree–a perfect spot to relax, play radio and start a new book: Dark Voyage by Alan Furst.

I brought two portables: the C. Crane CC Skywave SSB and the recently acquired Panasonic RF-B65.

I had not checked to see if propagation was good, but tuning to WWV on 10 MHz and 15 MHz confirmed that signals were travelling. In fact, as I started tuning around–first with the CC Skywave SSB, then with the Panasonic RF-B65–I discovered some of the best propagation I’ve experienced in ages!

I did a relatively quick scan covering the 31 through 19 meter bands. Some signals were absolutely booming in.

I jotted down some of the broadcast details on a make-shift log and recorded a few videos.

Note that after making the first video, I discovered I had limited space on my phone, so most of the clips are quite short:

The Voice of America

Click here to view on YouTube.

Radio France International

Click here to view on YouTube.

Radio Guinée

Click here to view on YouTube.

BBC World Service Extra English

Click here to view on YouTube.

Here are the stations I logged in the clear:

All in all it was a brilliant afternoon and the short band scan reminded me that there is still so much content to be found on the shortwaves.

You just need a little propagation, and some time to listen and explore!

Post readers: Have you snagged any elusive DX recently?  Please comment!

Do you enjoy the SWLing Post?

Please consider supporting us via Patreon or our Coffee Fund!

Your support makes articles like this one possible. Thank you!

Spread the radio love