Shortwave listening and everything radio including reviews, broadcasting, ham radio, field operation, DXing, maker kits, travel, emergency gear, events, and more
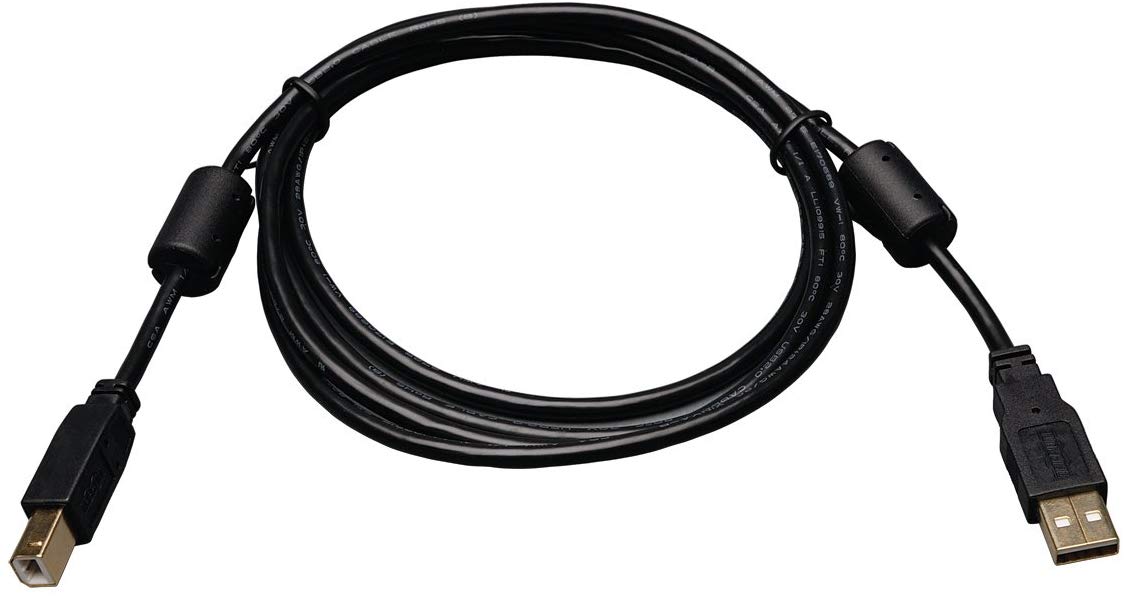
I was having a lot of trouble with local noise and not getting really good signal spikes. Well I took a chance after reading many articles on using better USB cables. The picture below is what I purchased from amazon. It’s a USB with dual ferrite cores mounted at each end. Well this did wonders for me. It’s like less than 10 bucks. Well worth it. Try it for yourself. Using with SDRplay RSP1a.
Lorne has a good point. All of my SDR USB cables have at least one in-line ferrite choke. Cables with dual chokes like the Tripp Lite are pretty rare. Note that this USB cable fits SDRs (like SDRplay models) with a USB-B port. I’ve had a difficult time in the past finding dual ferrite choke USB-A to Mini or Micro USB ports. In those cases, I often employ these inexpensive snap-on ferrite chokes.
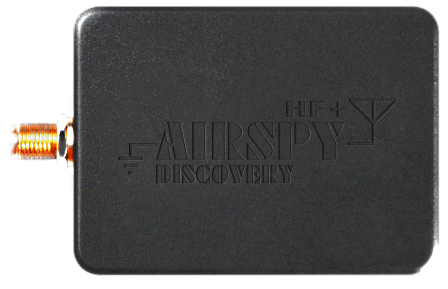
The highly anticipated AirSpy HF+ Discovery SDR has been in the hands of early adopters for about two weeks–and I’ve seen nothing but positive comments!
After a long run (2007-2013) with a Microtelecom Perseus, my SDR of choice became the Elad FDM-S2, and more recently an Elad FDM-DUOr “hybrid” SDR receiver. The two Elads have the same core processing components and identical performance when the DUOr is connected via SDR software.
This week I’ve compared the HF+ Discovery ($169) against the FDM-DUOr ($899) using Studio 1 software and identical modes & settings. The following video features the radios’ performance on a crowded daytime medium wave band from suburban Seattle-Tacoma USA.
Mode, filter bandwidth, AGC, etc. are the same for each radio
768 kHz sampling bandwidth used for both receivers
Stations tuned are:
1320 KXRO Aberdeen WA, 74 miles @ 5 kW (in-line with antenna)
1110 Oak Harbor WA, 78 miles @ 500 watts (in antenna’s null)
1040 CKST Vancouver BC, 147 miles @ 50 kW (in antenna’s null)
1430 KBRC Mt. Vernon WA, 85 miles @ 5 kW (in antenna’s null)
750 KXTG Portland OR, 118 miles @ 50 kW (in antenna’s null)
I purposely sought out signals difficult to hear in the presence of powerhouse stations. Only 1320 kXRO (in-line with my antenna) and 750 KXTG are what you might consider average or fair quality signals. Headphones are recommended for most of these, particularly 1040 kHz.
You’ll note that the pass band has been “pulled” over the edge of the carrier frequency by a few hundred Hertz. This is an excellent trick that can often reduce noise and/or improve intelligibility. It’s a feature unique to Perseus, Studio 1, and SDRuno software; it works in sideband modes and in selectable sideband Sync AM (SAM) mode.
After listening to the signal comparisons, what are your thoughts on the HF+ Discovery? Please leave your comments below.
Guy Atkins is a Sr. Graphic Designer for T-Mobile and lives near Seattle, Washington. He’s a regular contributor to the SWLing Post.
Many thanks to SWLing Post contributor, Mike Ladd (KD2KOG), who shares the following guest post. Note that the following tutorial is also available as a PDF (click here to download).
Basics to decoding Inmarsat L-Band signals using the RSP SDR
by Mike Ladd
Note: CHECK WITH YOUR LOCAL LAWS BEFORE DECODIING ANY SIGNALS FROM THE INMARSAT SYSTEM
(some text taken and edited from the RTL-SDR Blog website)
This document is not a definitive guide to Satcom, L-Band transmission or the Inmarsat system. This is a collection of information that I have found scatter throughout the internet and re-compiled into a document, this document. My aim is to help you get started and hopefully guide you in the right direction. Expect typographical mistakes, inaccuracies, or omissions
Inmarsat is a communications service provider with several geostationary satellites in orbit. Inmarsat provides services such as satellite phone communications, broadband internet, and short text and data messaging services. Geostationary means that the Inmarsat satellites are in a fixed position in the sky and do not move.
The Inmarsat 3-F(x) satellites have transponders transmitting data in L-Band (1.5 GHz) that can be decoded.
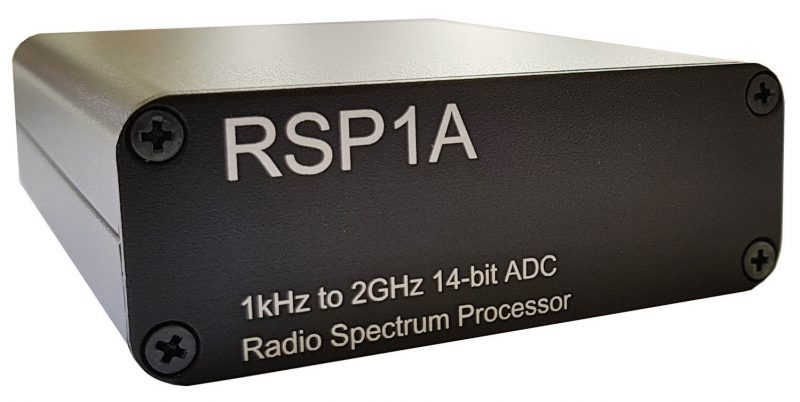
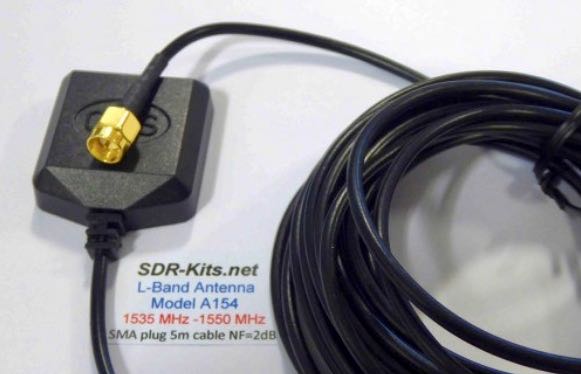
The modes we will cover in this document are Aeronautical (Classic Aero or ACARS) and Inmarsat-C (STD-C) using an RSP1a, RSP2/2pro or RSPduo connected to the SDR-Kits modified L-Band patch antenna. The Inmarsat system is not limited to only these types of networks. We are limited to the decoders available. https://en.wikipedia.org/wiki/Inmarsat
Two of the most popular decoding applications are JAERO used for ACARS and Tekmanoid STD-C Decoder used for decoding STD-C NCS transmissions on the Inmarsat 3-F(x) satellites
Virtual Audio Cable: A virtual audio cable allows you to pipe audio from application (SDRuno) into another application (a decoder like JAERO) digitally. I will assume SDRuno is already installed with your device attached and functioning properly.
You can now download a virtual audio cable package.If you already have a virtual audio cable package installed, you can skip to the next section. If you don’t have a virtual audio cable application installed, you only need to choose one and only install one of the two, either one works fine
Close any running apps, install the virtual audio cable and reboot your computer. When your computer boots back to your desktop, your computer will now have a virtual audio cable pair installed on the system.
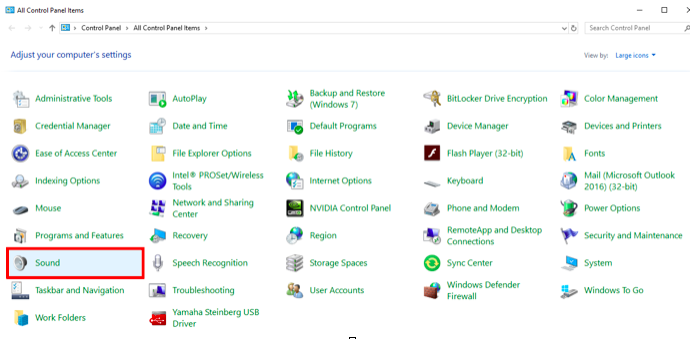
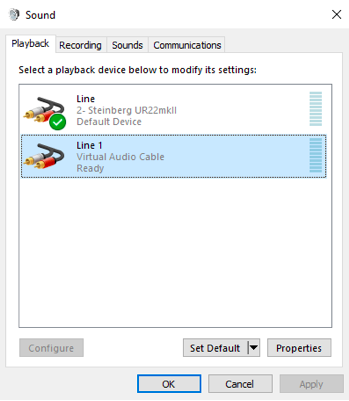
You can verify by going to your Control Panel and double clicking the Sound icon. VB-Cable and Virtual Audio Cable will only install a single virtual audio cable pair, one is for the input (Recording) and one is for the output (Playback). A single pair is all that is needed (as shown below).
JAERO
(some text taken and edited from the JAERO website)
JAERO is a program that decodes ACARS (Aircraft Communications Addressing and Reporting System) messages sent by satellites (in this case Inmarsat) to Airplanes (SatCom ACARS). This is commonly used when airplanes are well beyond VHF range.
JAERO also allows for decoding and demodulation of voice calls, due to local laws and privacy, I will not show or discuss how to do this. You can find more information about that JAERO feature online.
JAERO can be downloaded from the link provided on the first page of this document. After downloading the installer, simply double click the setup file and install it on your primary drive.
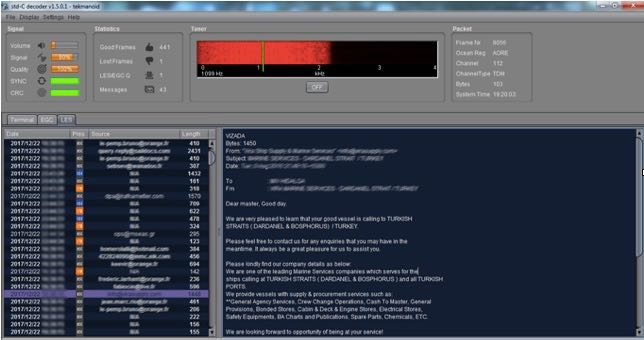
Tekmanoid STD-C Decoder
(some text taken and edited from the USA-Satcoms website)
Inmarsat STD-C is a data or message-based system used mostly by maritime operators. An Inmarsat C terminal transmits and receives on L-Band to various geosynchronous satellites that service each major ocean region.
The Tekmanoid STD-C decoder will decode STD-C Inmarsat EGC (enhanced group call) and LES (land earth station) messages. Some of these messages contain private information. Reception of these messages may not be legal in your country; therefore, your local laws should be checked.
The Enhanced Group Call (EGC) service is a message broadcast service with global coverage (except the poles) within the Inmarsat-C communications system. Two of the services provided are:
FleetNET and SafetyNET
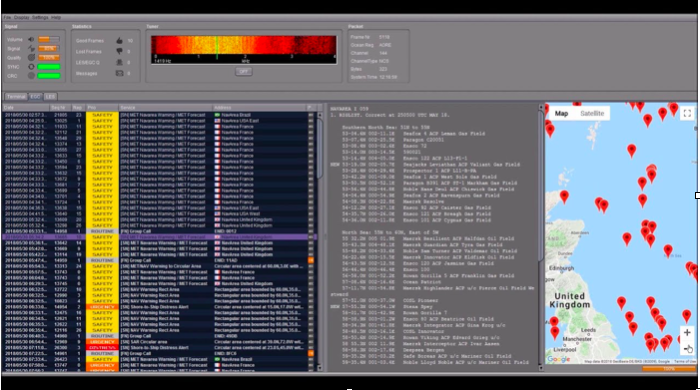
FleetNET is used to send commercial messages to individuals or groups of subscribers (for example, individual companies communicating with their own Mobile Earth Stations (MES). SafetyNET is used for broadcasting Maritime Safety Information (MSI) such as Navigational warnings, meteorological warnings, meteorological forecasts and other safety related information (including Distress Alert Relays) from official sources.
The LES station acts as an interface (or gateway) between the Inmarsat space segment and the national/international telecommunications networks.
The Tekmanoid STD-C decoder requires Java JRE in order to run. The link for the Java runtime environment is on page 2 of this document. For information contact the developer direct [email protected]
There are alternatives to using the Tekmanoid STD-C decoder, but in my opinion the other decoders available do not perform as well on low end systems or even work without needing “helper” applications to be installed. Tekmanoid STD-C decoder is very easy to use and works great on my low-end system using minimal system resources.
Putting all the pieces together
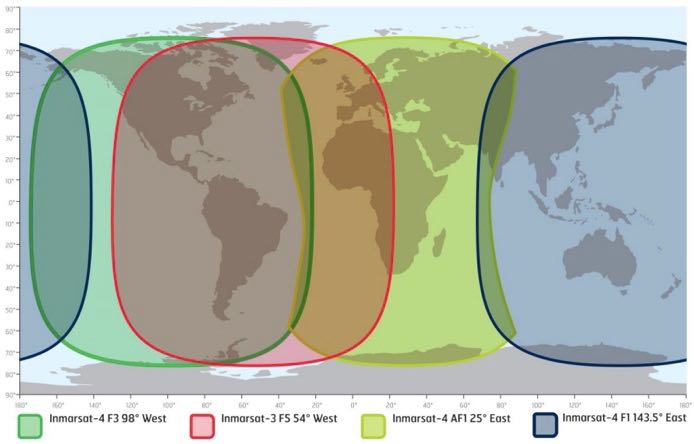
ACARS and STD-C messages will transmit via the Inmarsat satellite deployed within your coverage area/region, you will need to choose the Inmarsat satellite that is closest to your coverage area.
Note that only different frequencies are used between ACARS transmissions and STD-C transmissions. You will only need to receive from one of the available 3-F(x) Inmarsat satellites.
L-Band ACARS transmissions are in the 1.545 GHz range but STD-C messages are on fixed frequencies (shown on page 8)
Since STD-C transmissions are broadcasted on fixed frequencies, we want to monitor the TDM NCSC channel, again these are fixed for the following Ocean Regions. Choose the region closest to your location (page 9).
Inmarsat satellite: Inmarsat-4 F1 (IOR) Direction: 25° East Frequency: 1.537.10 GHz
Inmarsat satellite: Inmarsat-4 F1 (POR) Direction: 143.5° East Frequency: 1.541.45 GHz
I will assume you have located the Inmarsat satellite that covers your region. I suggest using a compass on your mobile phone to pinpoint the general direction. The direction is in ° (degrees). I am referencing true north, not magnetitic north (traditional analog compass). https://en.wikipedia.org/wiki/Magnetic_declination
You can also download an app for your smartphone called Satellite AR (Android and IOS). After you locate the correct direction of the Inmarsat satellite, you will want to place the L-Band patch on a flat metal surface. I have read that the receive pattern of this patch antenna is z (about 85-90°, straight up). Point the top of the antenna facing the Inmarsat satellite. Using the roof of my car worked just fine, just remember to point the front of the antenna at the satellite.
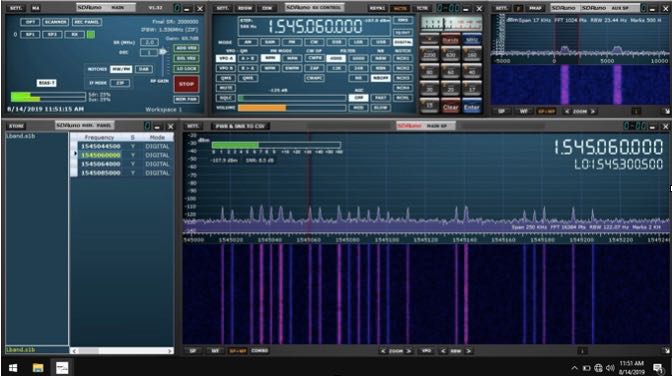
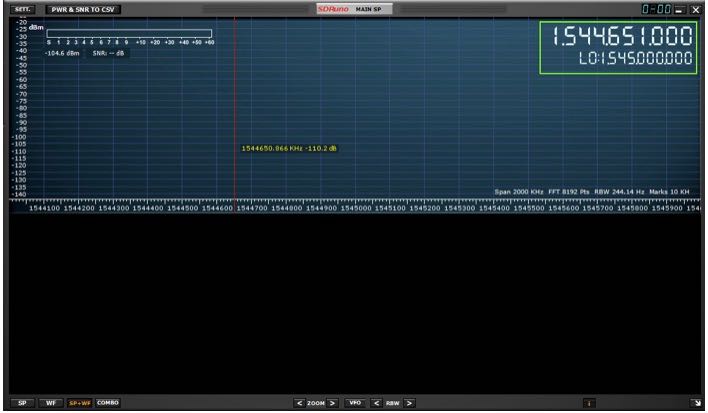
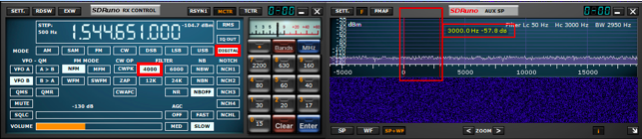
Launch SDRuno and click the PLAY button, remember that if the RSP(x) is in ZERO IF mode, give frequency separation between the VFO (top frequency) and LO (bottom frequency). In LOW IF mode this is not needed. I suggest running a sample rate of 2 MHz, larger bandwidths are not needed.
The SDR-Kits patch antenna requires that the RSP(x) Bias-T be enabled. The Bias-T option is enabled within the MAIN panel of SDRuno. See the SDRuno manual located here. https://www.sdrplay.com/docs/SDRplay_SDRuno_User_Manual.pdf view page 17.
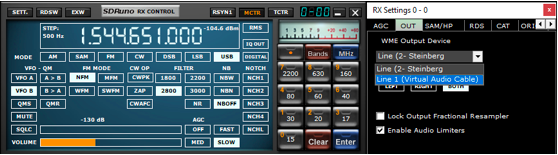
Select the Virtual audio cable as the output in SDRuno, this is selected via the RX Control panel. SETT. button and clicking on the OUT tab.
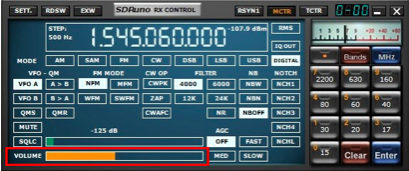
Have SDRuno’s Volume slider (RX Control) at about 35-40%
Upper sideband is recommended but I found the best mode to use for L-Band ACARS or L-Band STD-C decoding is DIGITAL with a filter width of 3k.
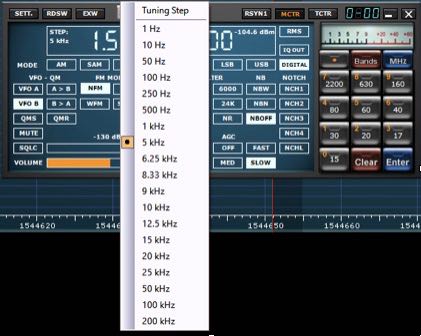
Be sure to set a proper step size (right click the RX Control frequency readout). The step size is not important for STD-C transmissions because these signals are only on one frequency for the satellite in your region but L-Band ACARS signals will be on many frequencies. Setting the proper step size will avoid issues when you point and click on signals you want to decode using the JAERO decoder.
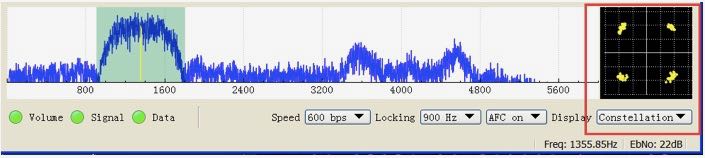
You will want to center the signal with a little breathing room within the AUX SP filter passband. The filter slopes are very sharp. Keep the signal centered and away from the extreme edges (red markers).
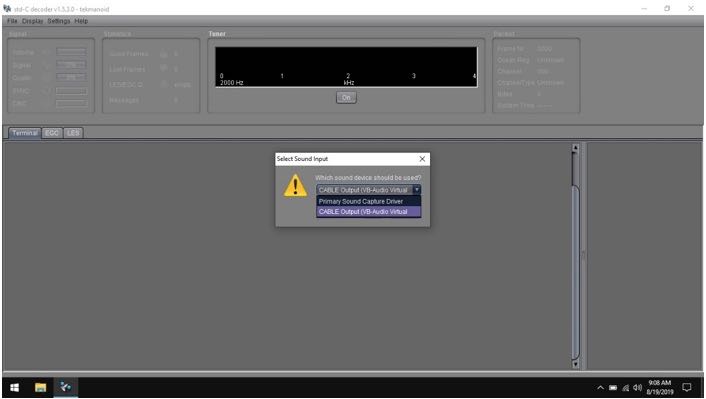
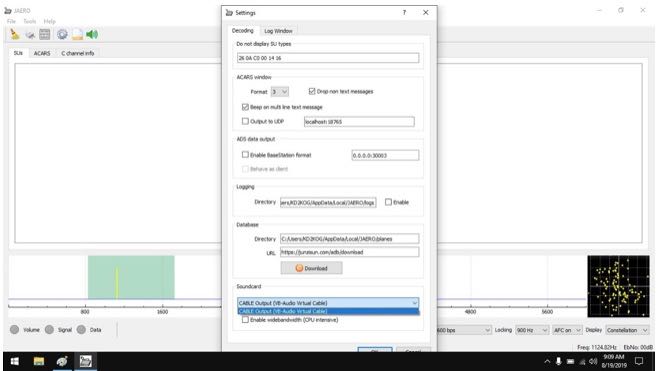
Select your virtual audio cable within the decoder’s audio input preferences.
The Tekmanoid STD-C decoder sound properties are located under Settings in the toolbar menu.
JAERO’s sound settings is located under the Tools menu and Settings.
For STD-C decoding use the frequency from page 8 of this document, remember we only want to monitor the TDM NCSC channel in the Tekmanoid STD-C decoder.
For JAERO decoding, I suggest you start in the 1.545 GHz portion and observe the constellation in the JAERO decoder.
The signal to noise ratio (SNR) needed for successful decoding in these decoders will need to be greater than 7dB. When working with a weak satellite signasls, try decimating the signal using SDRuno’s decimation feature. (MAIN panel, DEC).
I hope this document helps you get started decoding Inmarsat L-Band transmissions from the I3-F(x) satellites. I am sure I missed some key features, remember this is only a primer/basics to decoding these types of transmissions.
Warmest of 73,
Mike-KD2KOG
Many thanks for sharing your tutorial here on the SWLing Post, Mike! This looks like a fascinating activity that really requires little investment if one already owns an RSP or similar SDR. I’m certainly going to give L-Band a go! Thank you again!
Using the same W6LVP loop. 3 PM local time daytime propagation. Testing on Medium Wave and Short Wave, no VHF. AM broadcast signals only.
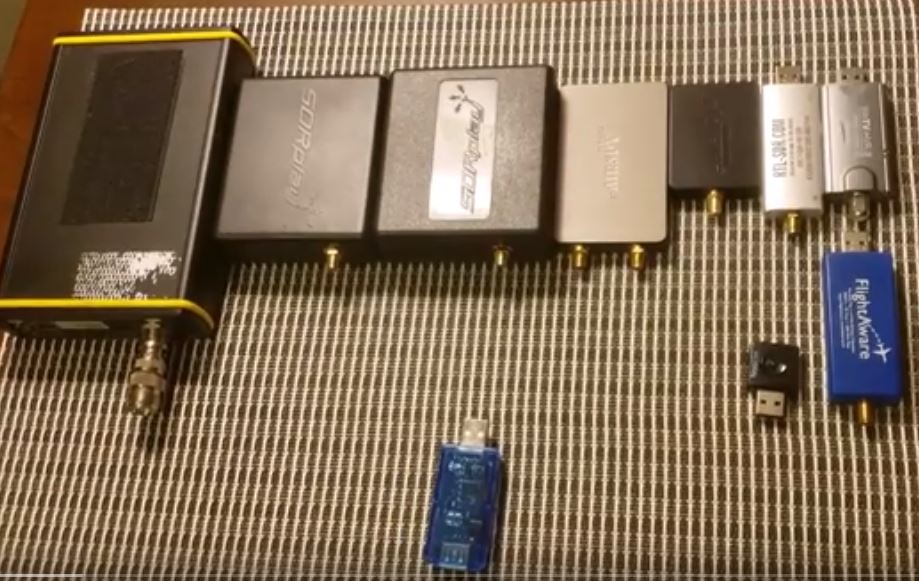
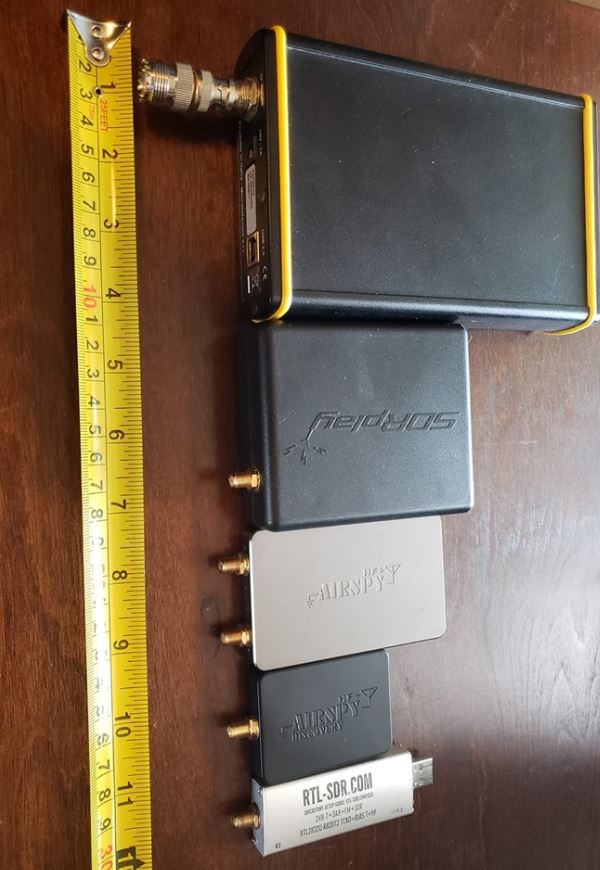
Ivan also included an image comparing the size of the HF+ discovery with other popular SDRs:
From top to bottom: the Microtelecom Perseus, SDRplay RSP, AirSpy HF+, Airspy HF+ Discovery, and the RTL-SDR.com SDR dongle.
When I demo the AirSpy HF+ to radio clubs, folks are amazed that such a tiny SDR can provide benchmark performance. It’s hard to believe the HF+ Discovery might even provide more performance from an even smaller package!
Fernando Duarte of Fenu-Radio has just posted his review of the AirSpy HF+ Discovery SDR prototype. I trust Fenu’s reviews because they’re always thorough and based on actual listening sessions.
In short, he’s quite impressed with the prototype. In many instances the Discovery outperformed his benchmark Winradio G33DDC Excalibur Pro. Quite an accomplishment for a $169 SDR!
I will evaluate a first production run AirSpy HF+ Discovery. Since it’s incredibly lightweight and compact, I believe I’ll try to even build a small portable SDR station around it. Stay tuned.