Shortwave listening and everything radio including reviews, broadcasting, ham radio, field operation, DXing, maker kits, travel, emergency gear, events, and more
Following up on our recent MFJ post, SWLing Post contributor, Ron, writes:
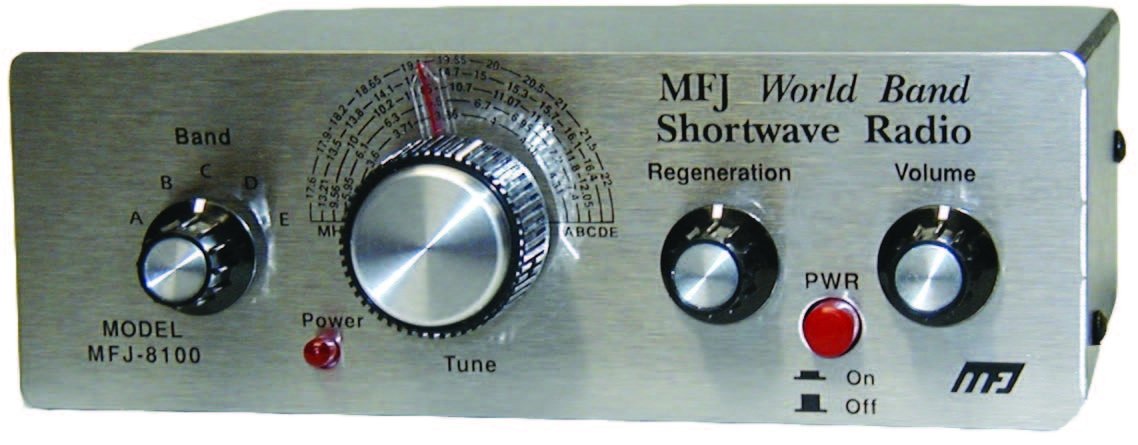
Another thing about MFJ is they still offer the MFJ-8100 as a kit or built. This is the only regenerative receiver available as far as I know.
Mr. Jue and his guys did a couple of tweaks like limiting band coverage to insure stability, using 1/8 inch 3.5mm stereo phone jacks and use an LM386 audio IC to drive headphones or speaker.
The whole thing is in a metal enclosure to minimize hand capacitance found in most regens.
The QRP crowd likes to use the 8100 with flea power CW rigs, it’s that good.
And it’s been in production far longer than the Heathkit GR-81 or any of the Knight Kit regens, too.
Thank you for sharing that, Ron! I had completely forgotten about this little kit when someone recently asked about the availability of Ten-Tec regen receiver kits (that are, sadly, no longer on the market to my knowledge)! I might have to grab one of these kits–looks like a fun one to build.
Many thanks to SWLing Post contributor, Frank (ON6UU), who shares the following guest post which expands upon his previous DB4020 article:
The EA3GCY DB4020 transceiver now has CW mode
by Frank Lagaet (ON6UU)
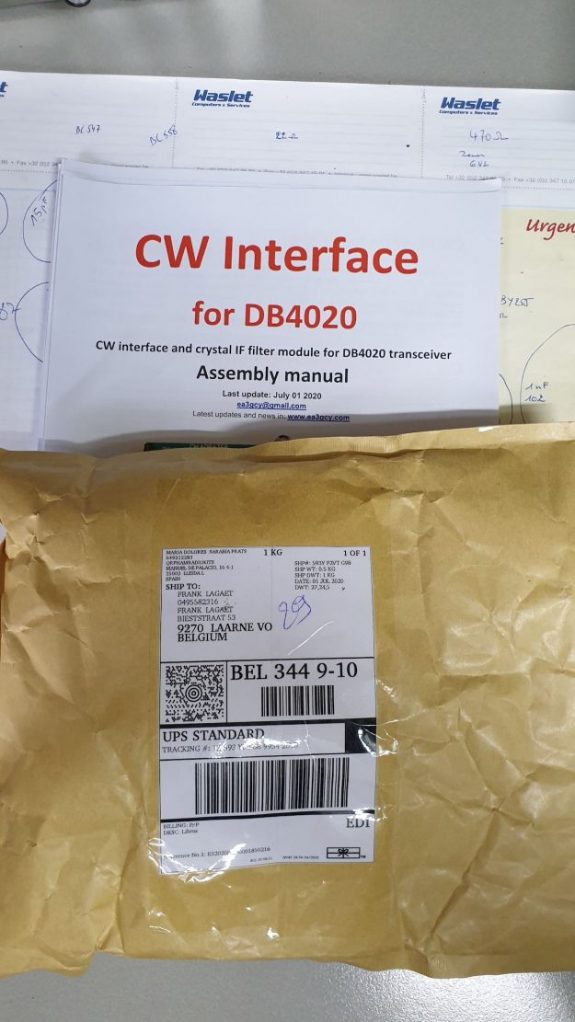
After telling you all about the DB4020 SSB build I’m here with the CW part of the kit, let’s say this is part 2. At a certain moment Javier let me know the CW interface kit was ready for shipment and some week later it was delivered to my QTH.
Again, a well packed kit arrived in a brown envelope, components and boards well packed in bubblewrap. I found even a board I did not expect which can hold a push button, a switch and the connector for your morse key. Javier thinks of everything it seems!
Unpacking the bubblewrap gave me this result, all components in 2 bags. In the bigger bag another 2 bags with 2 printboards, one for the CW interface, one for the CW filter. Great !! Checking the material bill resulted in all components there, another thumbs up.
I started, of course, immediately building it because I wanted CW in the transceiver as soon as possible. I don’t do much in SSB mode anymore and I already started missing CW on the DB4020, so I started my KX3 to listen to while I was populating the boards. I never thought CW was going to have this impact on me! …. ..
I started building the CW interface, again starting with all small items. I soon saw that the 2 relays which need to be soldered in were ideal to protect all components when the board is upside down, so I soldered them in very quickly. I then soldered in all other components ending with the elco’s.
Next phase was the CW filter. This board is small and came together in a blink of an eye, no problems there, the long legs of the 3 and 4 pin headers went in last.
The following day, I made all wire connections and soldered a 13pin connector, leaving one pin out since I want to have the option to choose the width of the CW signal I’m listening to. By cutting the FL CW + pin and adding an additional switch, I have now 500Hz or 2400Hz. Great option, for very little effort and simple. Another thumbs up here.
Now it was simply a matter of inserting the sub boards in the main board and all should be working. And it did! Hurray! The 500Hz filter works perfectly, filtering away all above or below stations nearby my operating frequency.
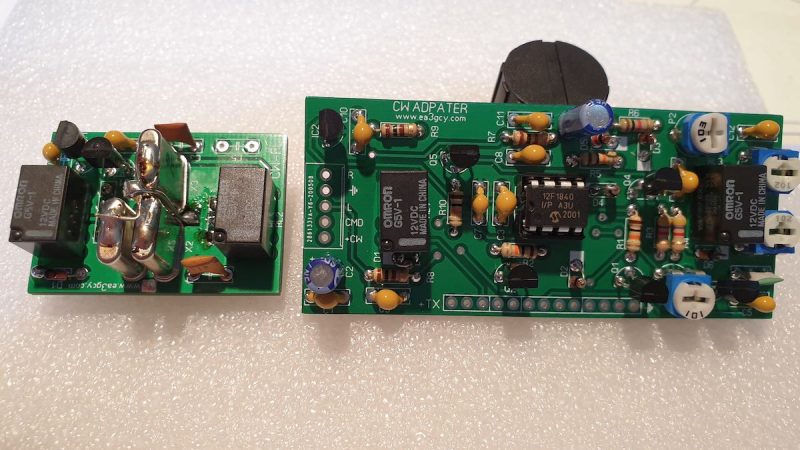
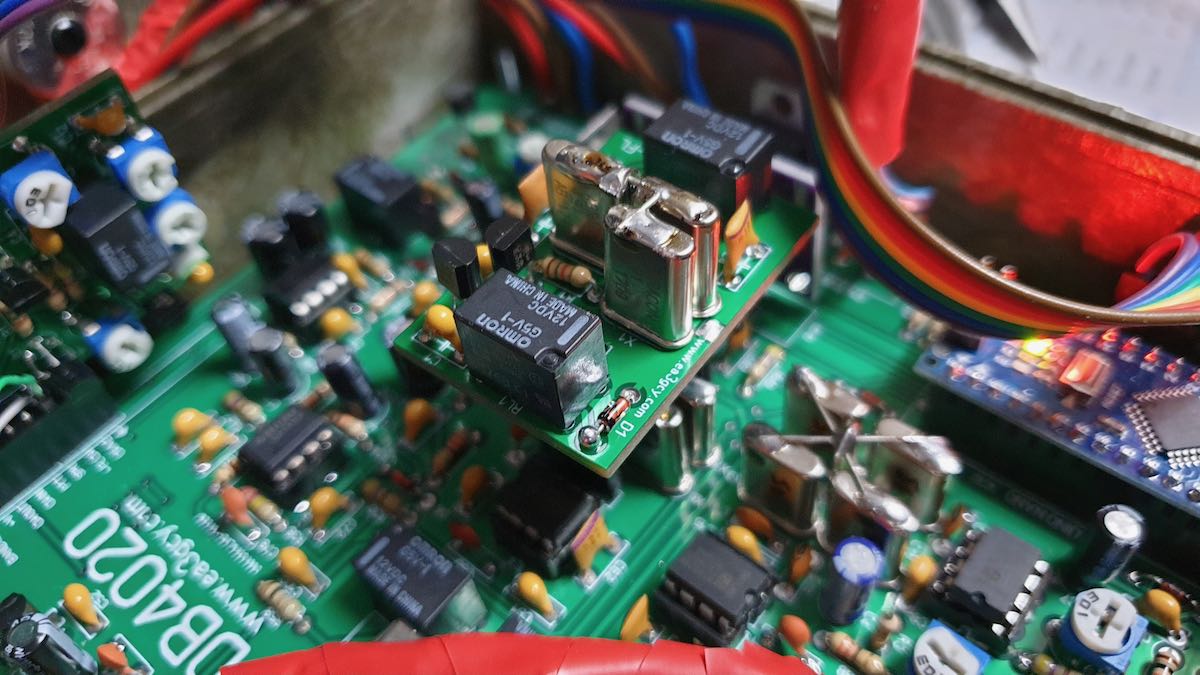
This is the result of the soldering work, 2 small boards which need to be inserted in the main board:
The CW interface still needs the 13pin header of which I cut one pin and mounted a switch to have the 2400Hz width.
The IC you see in the middle of the CW interface is the KB2 keyer which gives you several functions like 4 memories and beacon mode. The 4 potmeters are used to set the level on 40 and 20 meters, to set the delay between TX and RX switchover and to set side tone monitor level. The keyer also provides functions as keyer mode A or B, straight key function and can be set for speeds between 1 and 50WPM. WPM speed can be set in 2 different ways. Handy!
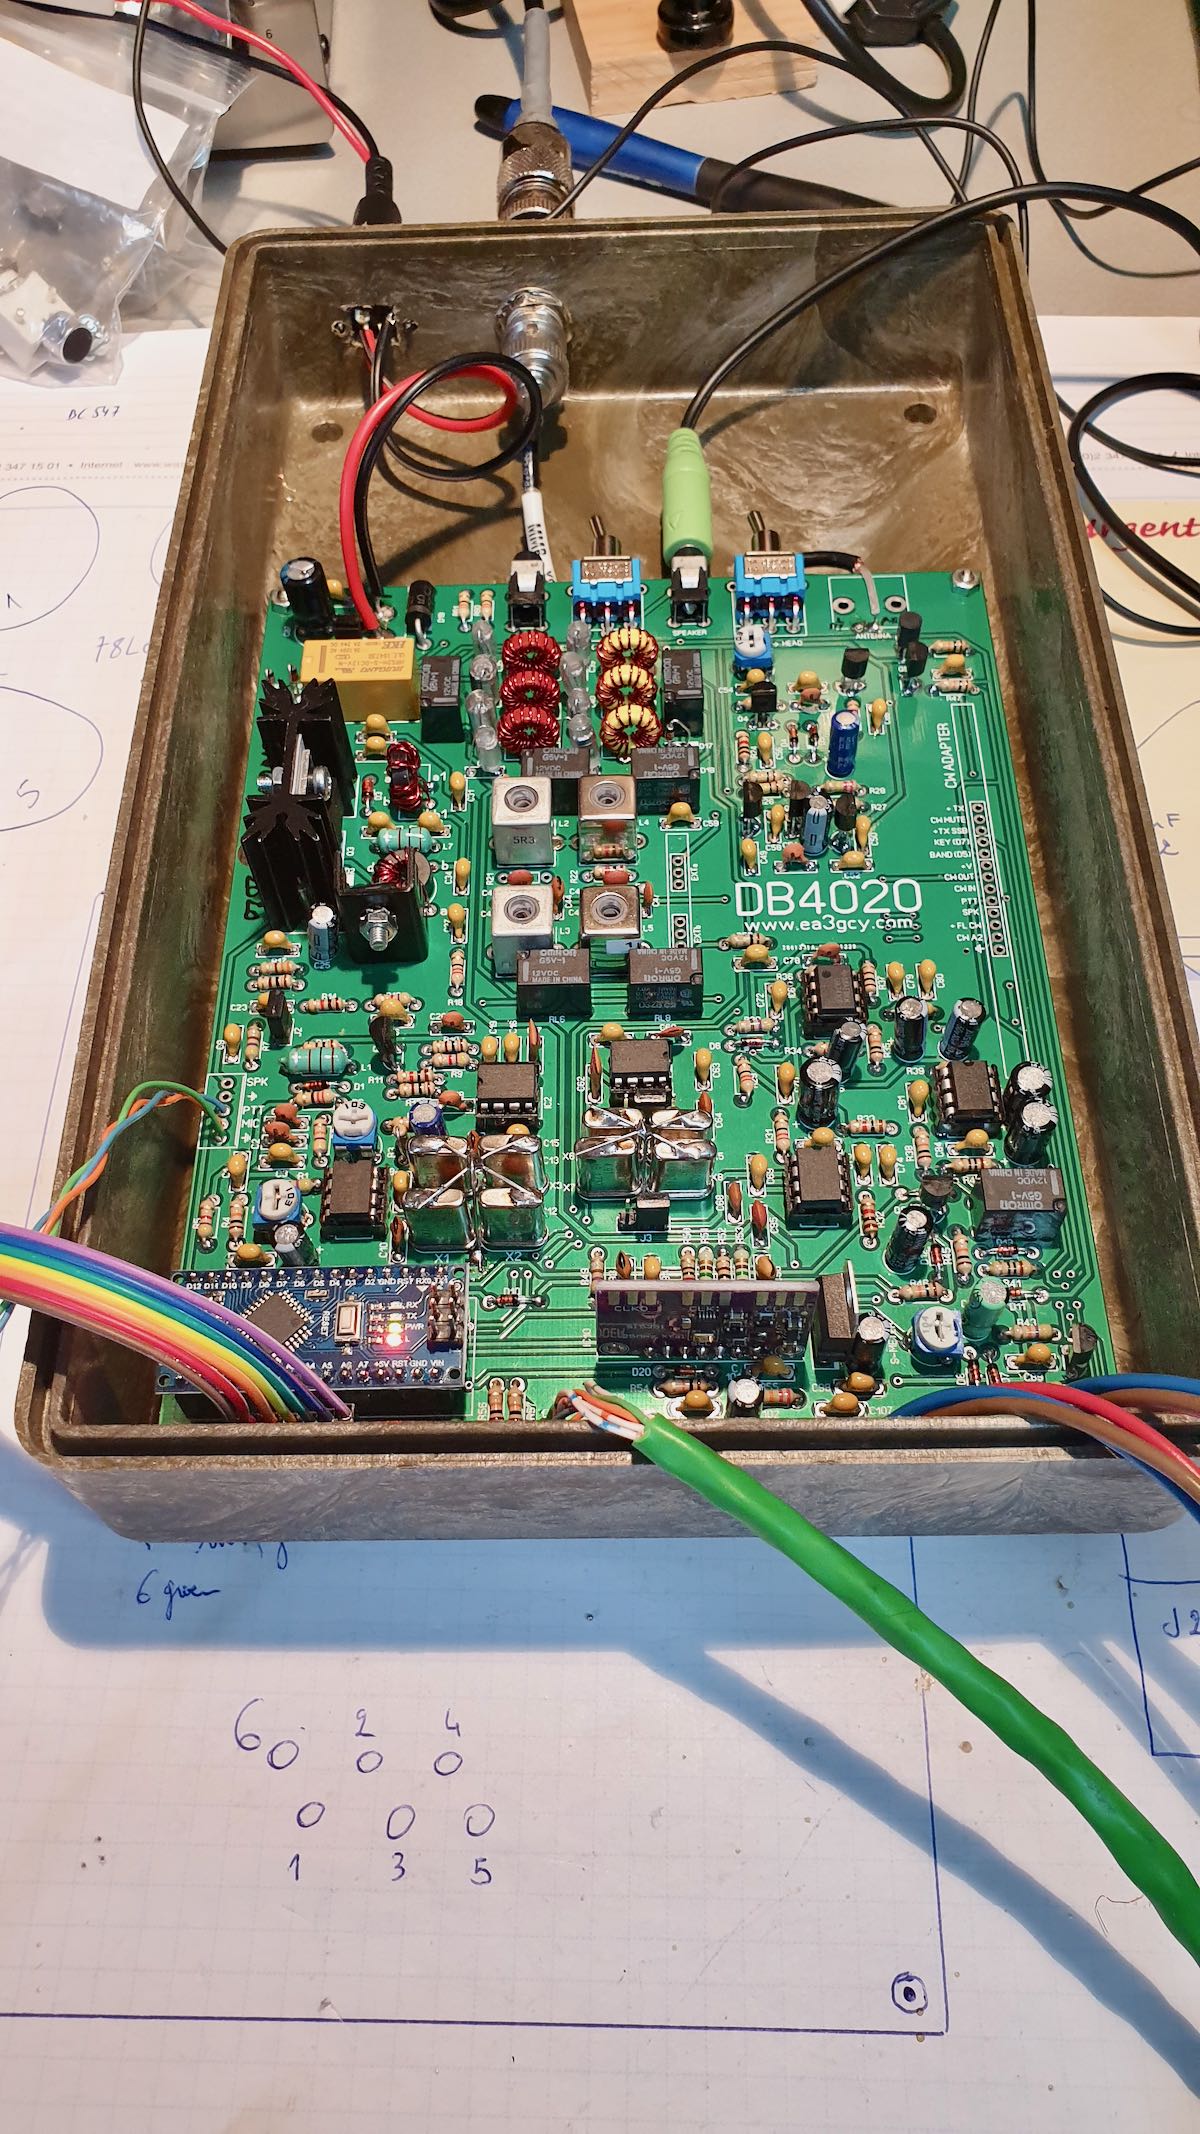
Here a picture of the CW filter inserted on the main DB4020 board.
The CW interface is inserted at the side of the main board, notice the 2 wires which go to the switch to allow switch-over between 500 and 2400Hz.
(Wiring still needs to be cleaned up in this picture.)
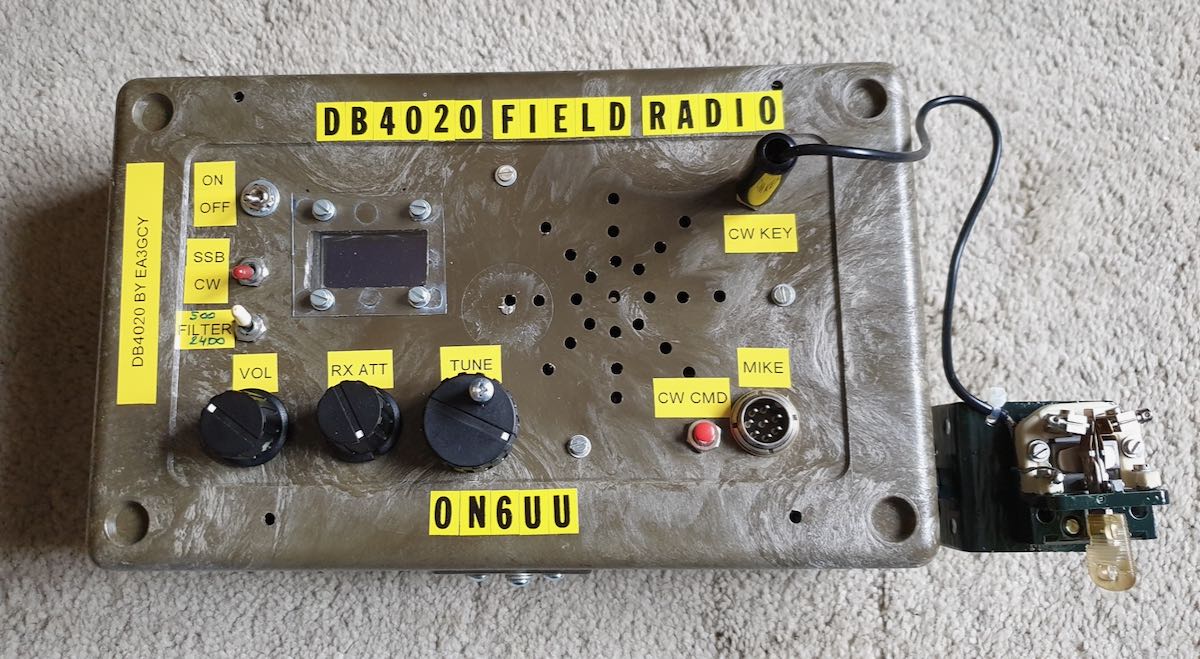
Finally, the result: a good working multimode QRP transceiver with 2 bands. It should be possible to make close to medium range with it as well as DX, even with QRP power.
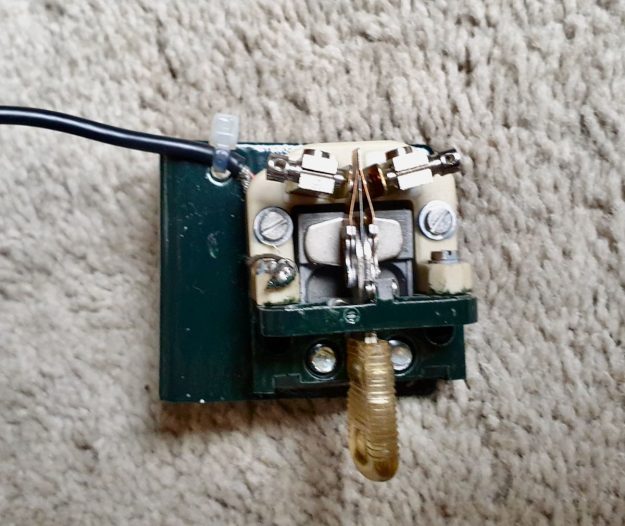
And while I was building I also made a new key for this radio, it is made out of a relay and cost nearly nothing, looks good doesn’t it ? hihi.
Homebrew key
The key, when in practiced hands (fingers hi), can do 50 WPM without a problem. My friend HA3HK does without blinking an eye at 40WPM with this kind of key and tells me that he can go faster if needed. Me? I’m going it a bit slower.
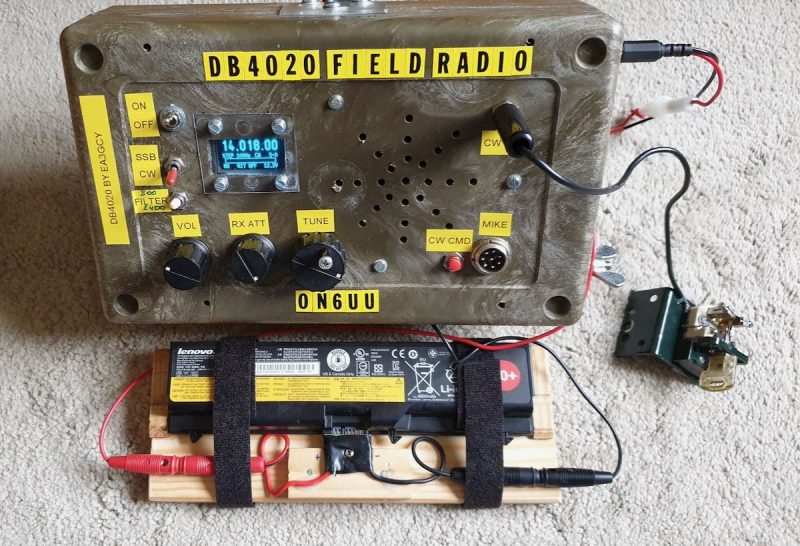
Battery pack
As this radio is only using little power (0.4A in RX, 1 to 2A in TX depending the power you set it) I thought, let’s make a battery pack for the radio.
The first plan was installing it in the box. I did not do that because the batterypack is also powerful enough to feed my KX2 and other QRP transceivers. Since I can use it with all of them, a loose battery works out better for me.
I started with an old laptop which had a broken screen and some other malfunctions, but still had a good battery, although I needed the battery connector of course. A piece of wood to mount the connector on was my next goal. And since I still have another laptop using the same batteries, I can charge the battery without problems. Simple, but good and it weighs much less than a gel cell battery.
The battery provides me with 12.5V and some 5Ah. Enough to last for hours on RX and for sure good enough to activate 2 SOTA sites in one day. It doesn’t look great but works great– that is what matters and to test it was more then good. Next will be getting the battery pack in a nice box. Better to re-use stuff than throwing it away I’m thinking.
I need to do something about the cover of the OLED display, there is still some work there to make it look nicer.
Some video can be seen on YouTube :
Finallym I’d like to thank you all for reading my articles about the DB4020. I had big fun soldering, tinkering with the box, making the key, and batteryholder/batterypack. My Hungarian friend HA3HK told me it looks a bit like a spy radio. …. ..
I also include one more time the link where you’ll find this kit :
Thank you so much, Frank. No doubt, you had a lot of fun putting this excellent little kit together.
Implementing a filter switch was a fantastic idea and, obviously, not terribly difficult to do.
Based on the videos, the DB4020 has a low noise floor and very good receiver characteristics. I’m impressed that the CW portion of the radios has so many features as well, such as a memory keyer and beacon mode.
I also love how you reused that 5Ah laptop battery! I think that could almost give you a full day of SOTA activations at those consumption levels!
Thanks again for sharing this with us, Frank! We look forward to your future articles!
Many thanks to SWLing Post contributor, Frank (ON6UU), who shares the following guest post:
Building EA3GCY’s DB4020 QRP Transceiver kit
by Frank Lagaet (ON6UU)
In May, I discovered via a newsletter that a new kit was available from Javier EA3GCY in Spain. I was immediately sold as this was a kit from my favourite kit producer and it has 2 bands–it will also be able to do CW and there also will be a CW filter.
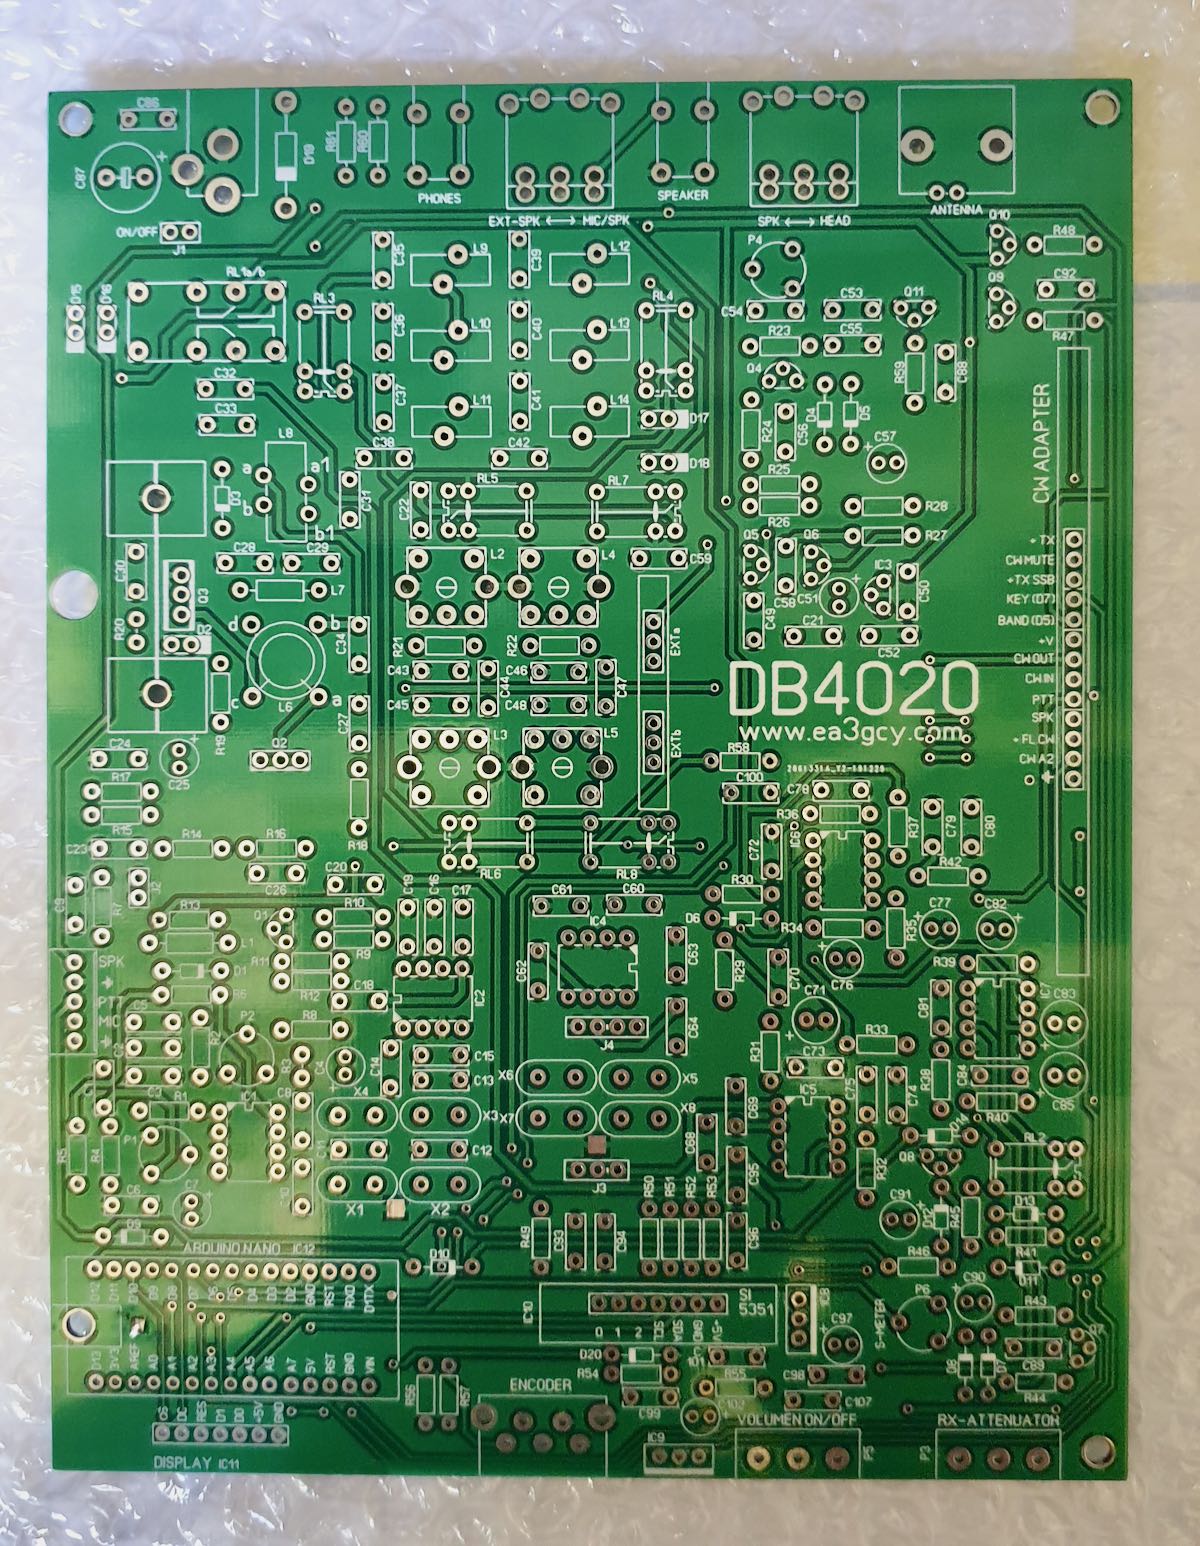
After building 2 MFT’s from Javier which work without problems, I needed to have the DB4020. The MFT’s are for 20 and 40 mtrs and do DSB (double side band). I did put them in a not-so-graceful box but they do what they are intended for which is QRP phone (SSB). They came together without problems so I expected the same for the DB4020–I knew for sure when I saw the board: all through-hole components (except for some capacitors which are factory soldered) and a lot of space on the board. The board has been silk-screened with clear indications on where all components have to come and the manual has very clear instructions where each component has to be soldered with referral to a quadrant. The manual provides a 252 quadrant page so it is a piece of cake to find where each piece goes.
What do you get?
Javier provides you with all components which need to be installed on the board and, of course, the kit board. The components come in small marked plastic bags and all is well-wrapped up in bubble wrap. The board is wrapped separately and that is put together with the component wrap which is then again wrapped up in bubble plastic. All goes into an envelope. Very well packed I must say.
Here’s a picture of the bags with components:
The silk-screened board:
I started with the resistors since that’s the easiest way. After that, I did the capacitors. I like to solder in all flat components first, so next were the diodes and IC sockets followed by the elco’s. The transistors were next together with all relays. As you solder in the transistors one also has to mount the cooling heatsinks, these cooling sinks are high and are ideal to protect the coils one has to make, they also protect the polystyrene caps (which I always find vulnerable) when the board is upside down.
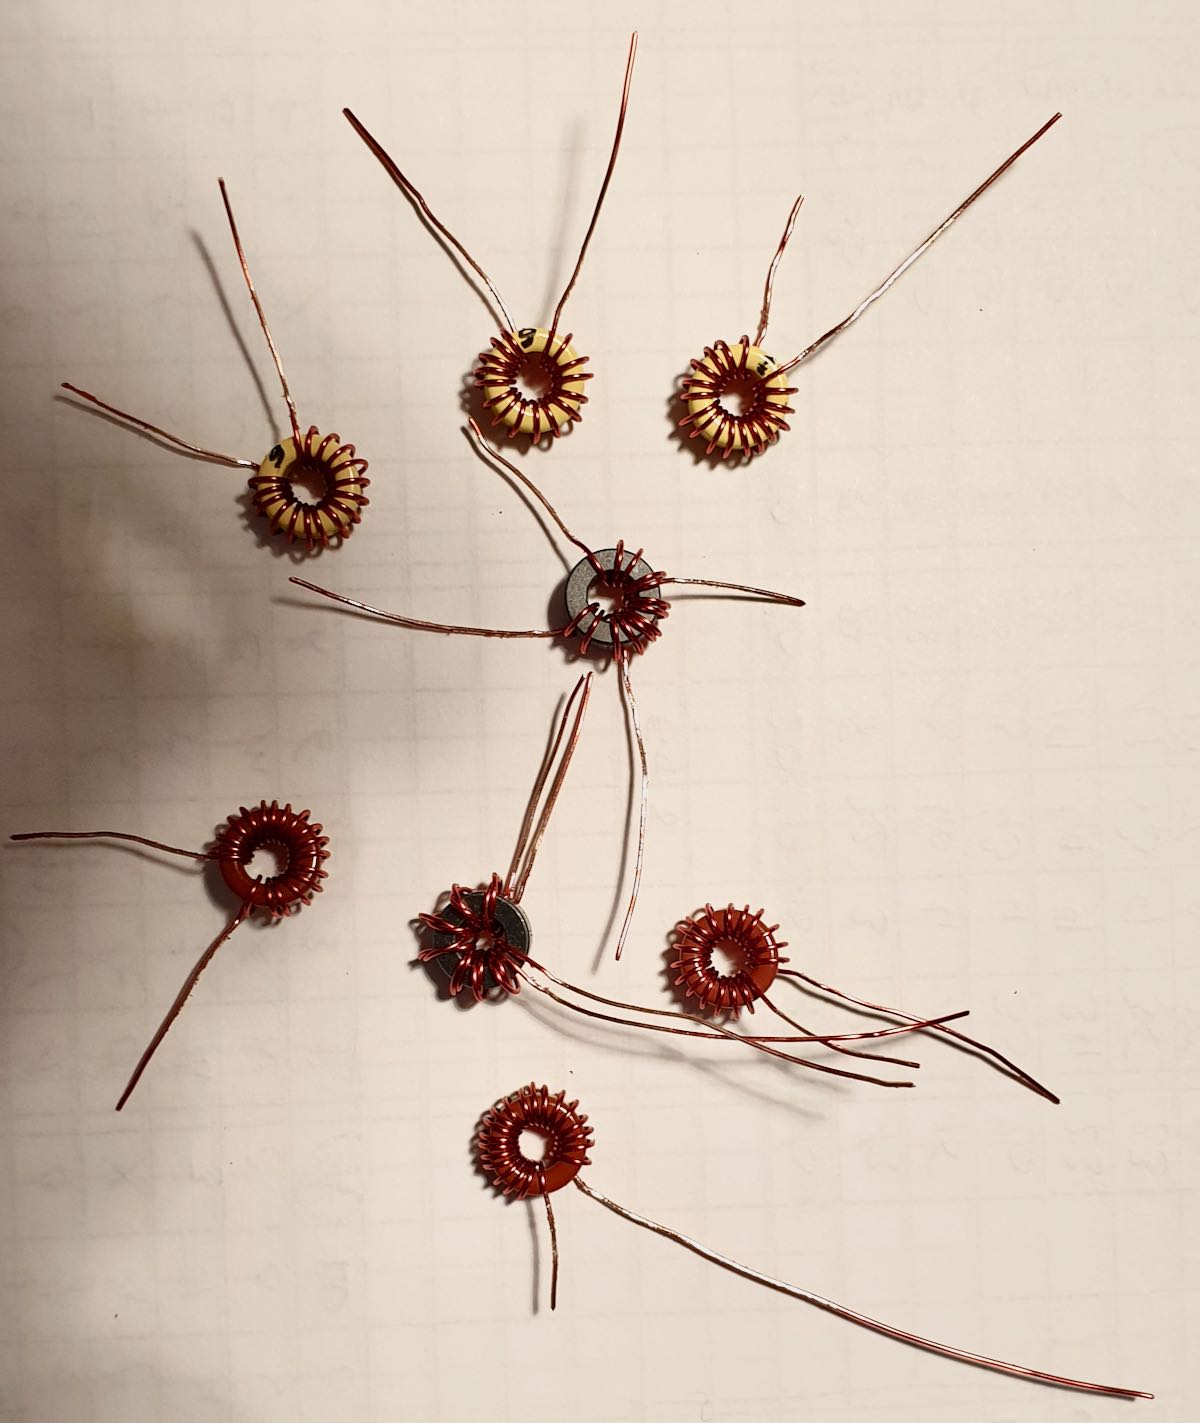
Many kit builders are afraid of winding the toroids in kits–don’t be! It is easy. Just take your time and follow the instructions given by Javier in the construction manual. In this kit the builder has to wind 8 toroids: 6 are a single wire which goes through the toroid body, 1 is a toroid with 2 different windings, and 1 has a twisted pair which goes through the final toroid. Be sure to measure the wire you need per toroid as instructed in the manual. Javier gives some spare, so you can be sure. You will also see that on next picture where the legs of the toroids have not been trimmed yet. Once done I still had some centimetres of wire leftover.
Picture of the toroids ready to be soldered in:
Finally all other parts and pin headers went in, jumpers were immediately put on where needed.
As I’m using a military-grade plastic box, I have to break-out some components like the display, tuning encoder, volume and rx control from the board. I also have put an on/off switch on the box and already have the CW KEY connector ready installed. I also installed a loudspeaker in the box. The SI5351 board and the Ardiuno Nano are the final components which go into the board after installing all wires.
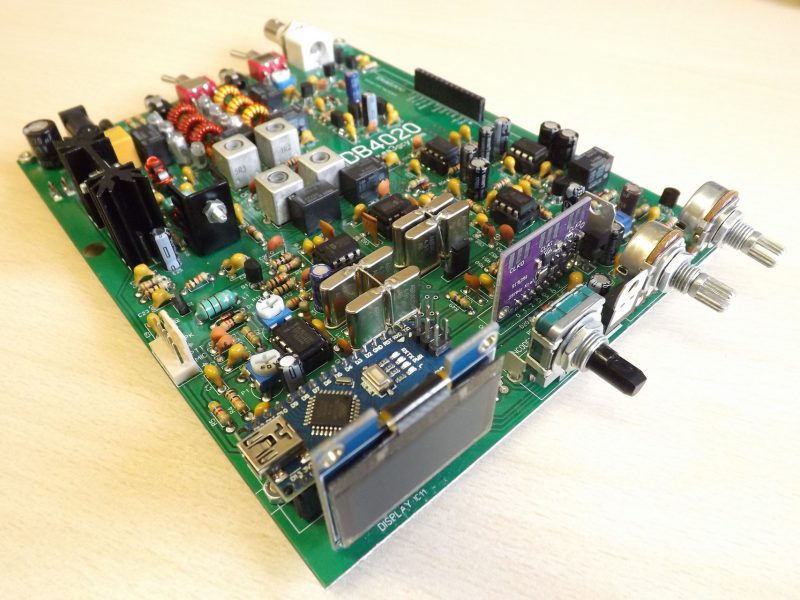
Picture of the board:
I intend to attach a CW paddle to the box made out of a relay. A HWEF tuner (from EA3GCY) which I was planning to incorporate in the box is I think a bit overkill. That HWEF tuner is already in a nice little box and would be a pity to dismantle, also I’m running out of space in the box… Maybe I can fit in a 9-1unun which would then give me good results on both bands…?
Maybe I will install a battery pack in the same box.
The box with board installed:
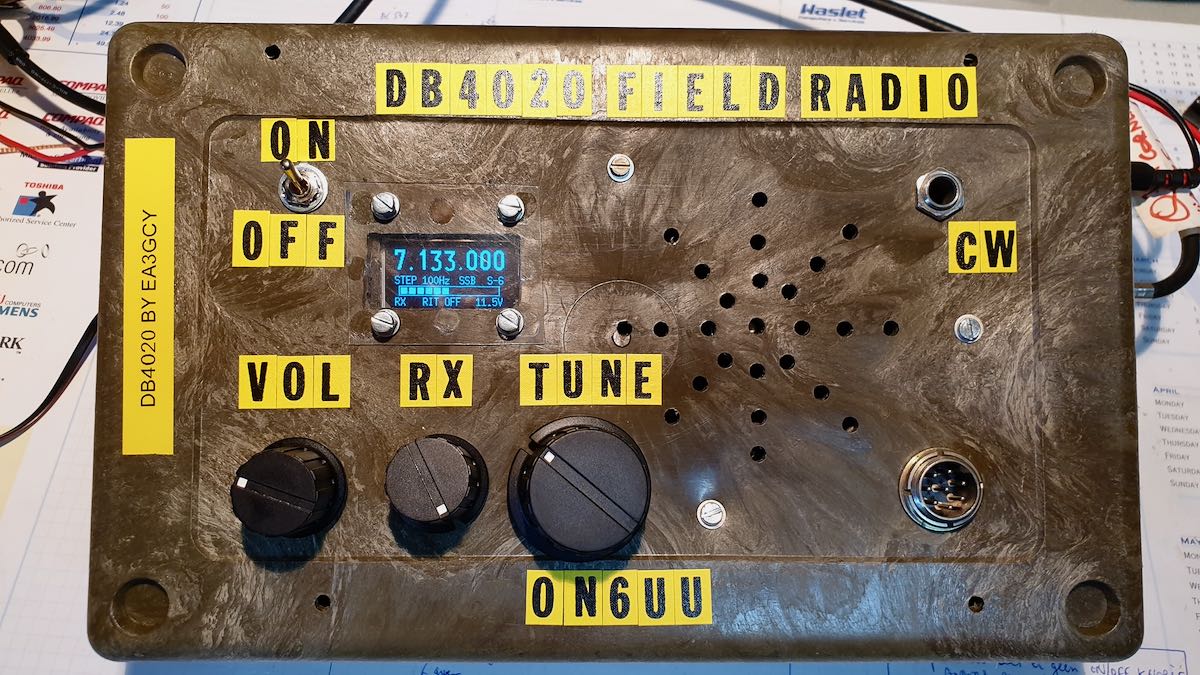
The box completed front side:
Mind you, it still needs some additional switches for the CW part of the transceiver.
73
Frank (ON6UU)
Video
Brilliant, Frank! I really appreciate the video as well–sounds like the kit produces smooth audio and should serve you well. No doubt, that military box enclosure will survive even the roughest field conditions!
Many thanks to SWLing Post contributor, Frank (ON6UU), who writes:
As so many, I enjoy reading your posts on the SWLing Post, very clear and understandable written with eye for details. I just did a “read-again” of the QCX+ article and thought that maybe you also would be interested in another European kit, namely the DB4020 by Javier Solans of QRP HAMRADIO KITS in Spain.
The DB4020 is a 2 band kit enabling you to do 40 and 20 meters, SSB and CW. The SSB part of the kit can be obtained for 150€ (169$), Print is a beautiful doubled sided silkscreen with enough space to mount all parts without problems. Some SMD parts are factory installed by Javier, all other parts are normal parts that can be soldered by anyone who knows how to hold a soldering iron. The CW part is an additional module which needs to be plugged into the main board. There will also be a CW filter available soon.
I’m building the kit at the moment and enjoy every minute of it. I’m not related or don’t have any benefit in sending you this mail, only want to draw some attention to a great kit and super friendly owner who goes the extra mile to have happy customers.
Have a great day
Thank you for the tip, Frank–and I’m glad you enjoy the SWLing Post! EA3GCY’s kit does look very nice indeed. We would love to see your photos once the kit is complete! It looks like a kit I’d certainly love building!
I’ve yet to build a QRP Labs kit, but I’ve only heard positive reviews from readers and friends. QRP Labs’ president, Hans Summers (G0UPL), is an amazing kit designer and, indeed, won the 2019 Homebrew Heroes Award.
Hans kindly took a break so that I could snap his photo at Hamvention 2019.
Last year, at the 2019 Hamvention, QRP Labs had a table across from ours and, based on the amount of people huddled around his table all day long, I’m certain he was one of the busiest vendors at Hamvention.
His new QCX+ transceiver is an upgraded/updated version of the original QCX transceiver which has sold nearly 10,000 units. In the following video, Hans describes in detail how the QCX+ is designed and the differences between it and its predecessor:
Since I’ve quite a few things on my Social DX bucket list–including the recent addition of QRP EME (I mean, what am I thinking?)–and since I don’t really need yet another CW QRP transceiver, I required a good excuse to buy and build this kit. So I turned to my editor at RadCom who very much wanted review. Fantastic excuse! Thank you!
The amazing thing about the QCX+ is you getting a full-featured single band QRP transceiver for $55 US plus a modest shipping fee. This means pretty much anyone can afford to buy and build one.
I just placed an order for the transceiver ($55) with a 40M band module, the optional custom aluminum enclosure ($25), and the optional GPS receiver ($23). If I had a 3D printer, I might have skipped the enclosure because I’m willing to bet that shortly after the transceiver’s release, someone will share an enclosure design one can print at home. Then again, since I know I’ll take this little rig to the field, an aluminum enclose will provide excellent protection.
I purchased the optional GPS receiver because I plan to eventually put this rig into use as a dedicated WSPR beacon. The GPS module will calibrate the frequency, time, and Maidenhead Locator grid square in WSPR mode. It can also be used to precisely calibrate the transceiver’s synthesizer reference oscillator.
Kit anticipation time!
According to the QRP Labs website, they plan to start shipping the QCX+ in mid-June. I opted for FedEx delivery, so hopefully it’ll arrive sometime around my birthday (Happy Birthday to me!).
More than anything, I simply enjoy building kits and really look forward to building the QCX+, then putting it on the air! I’ll post updates and a few photos here, but look for my full review likely this fall in the pages of RadCom.
Post readers: Please comment if you’ve built a QRP Labs kit or have any other kits in the pipeline this summer!
I had a number of important plans and goals yesterday which I conveniently set aside to build kits instead. Have you ever had one of those days?
Building kits is a little like therapy for me. I find it relaxing, fun, and it gives me an opportunity to tune out everything else in the world while that soldering iron is hot.
I’ve been on a search for two types of fused Anderson Powerpole distribution panels: a portable one for the field with at least 4 ports, and a large one for the shack with 12-16 ports and at least two USB 5VDC ports.
Sadly, there is no large one on the market that I would like right now. I checked every vendor at Hamvention and the Huntsville Hamfest this year and while there are large panels available, none of them have USB ports. That and the price for a 12-16 position DC distribution panel can easily exceed $120.
As for the small panels for field use, many of them are a bit too bulky and pricey. The inexpensive ones lack individually fused ports.
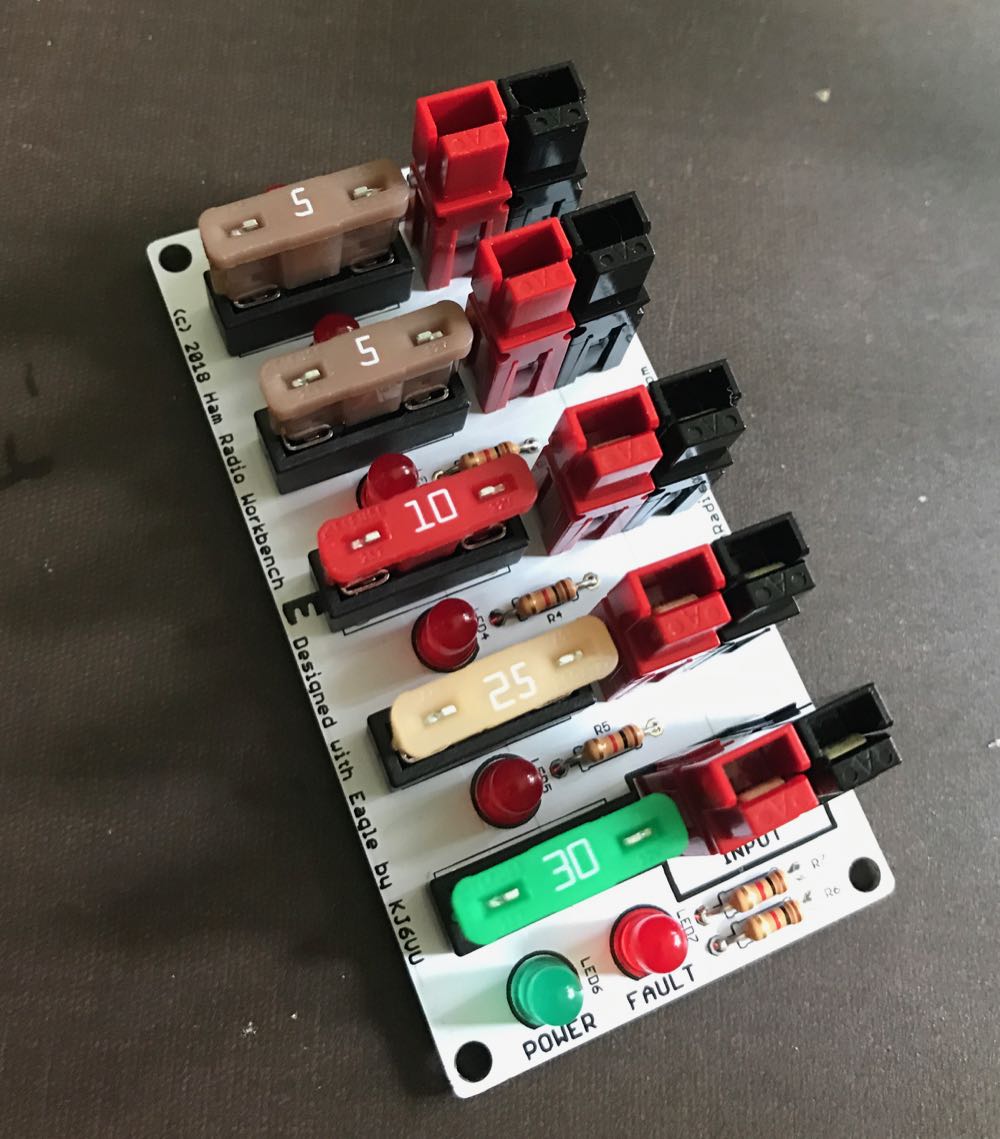
My buddy Dave (K4SV) knew I was on the hunt, so at Hamvention he directed me to the Ham Radio Workbench podcast table. There, I found the ideal portable solution in kit form. And the price? A whopping $25.
Take my money!
Yesterday, I built the kit in near record time. It went together so fast, I forgot to take progress photos.
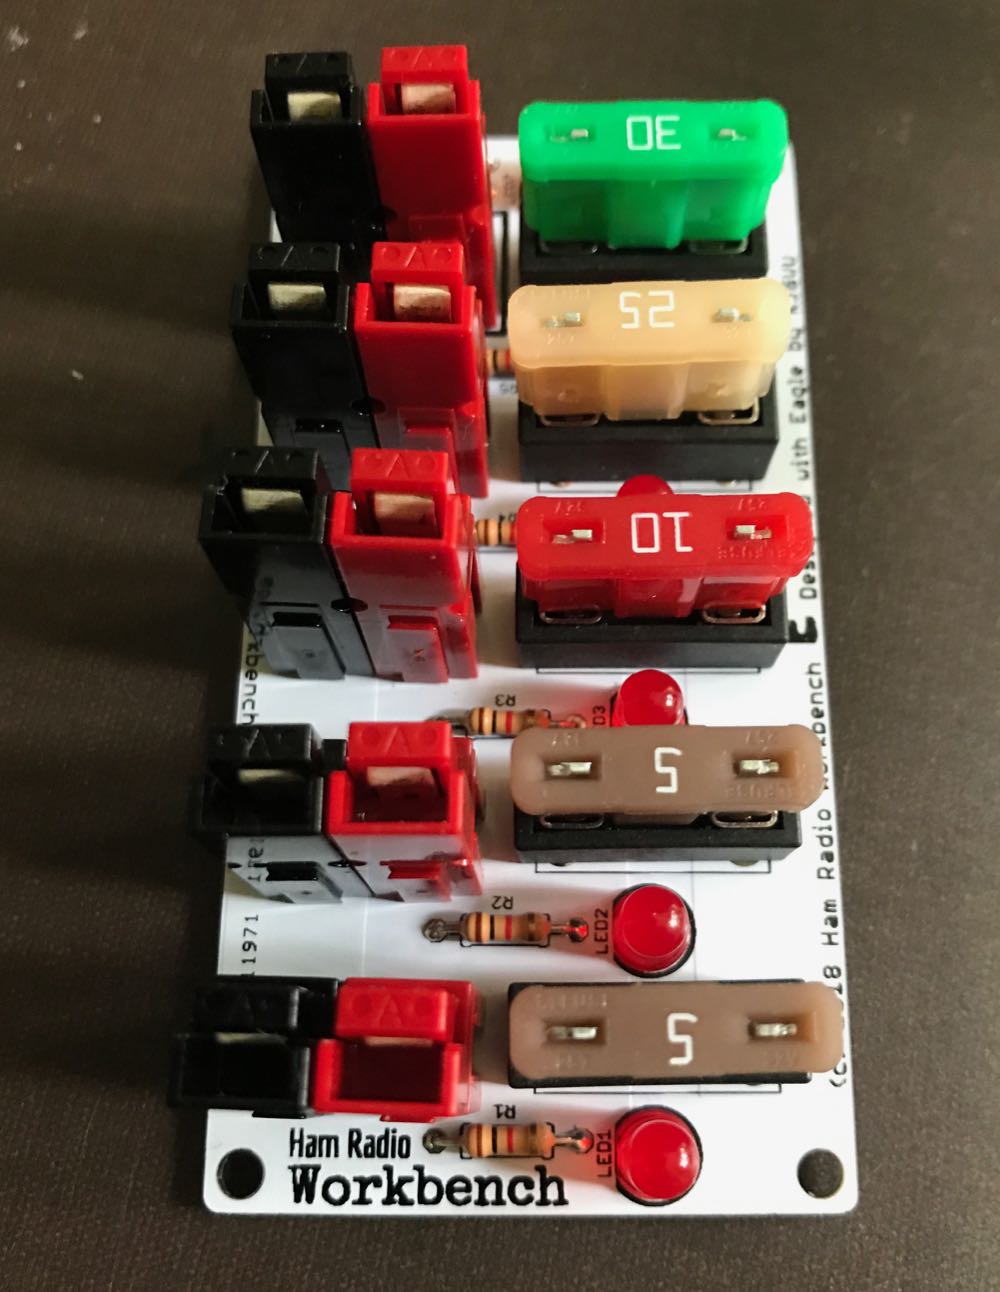
What I love about this DC distribution kit is it actually has more features than other products on the market:
There’s a green LED to indicate power has been applied to the panel and a red LED to indicate any faults
Each position is individually fused with standard blade fuses
Each position also has a red LED to indicate if the fuse has blown
I also love the size and configuration.
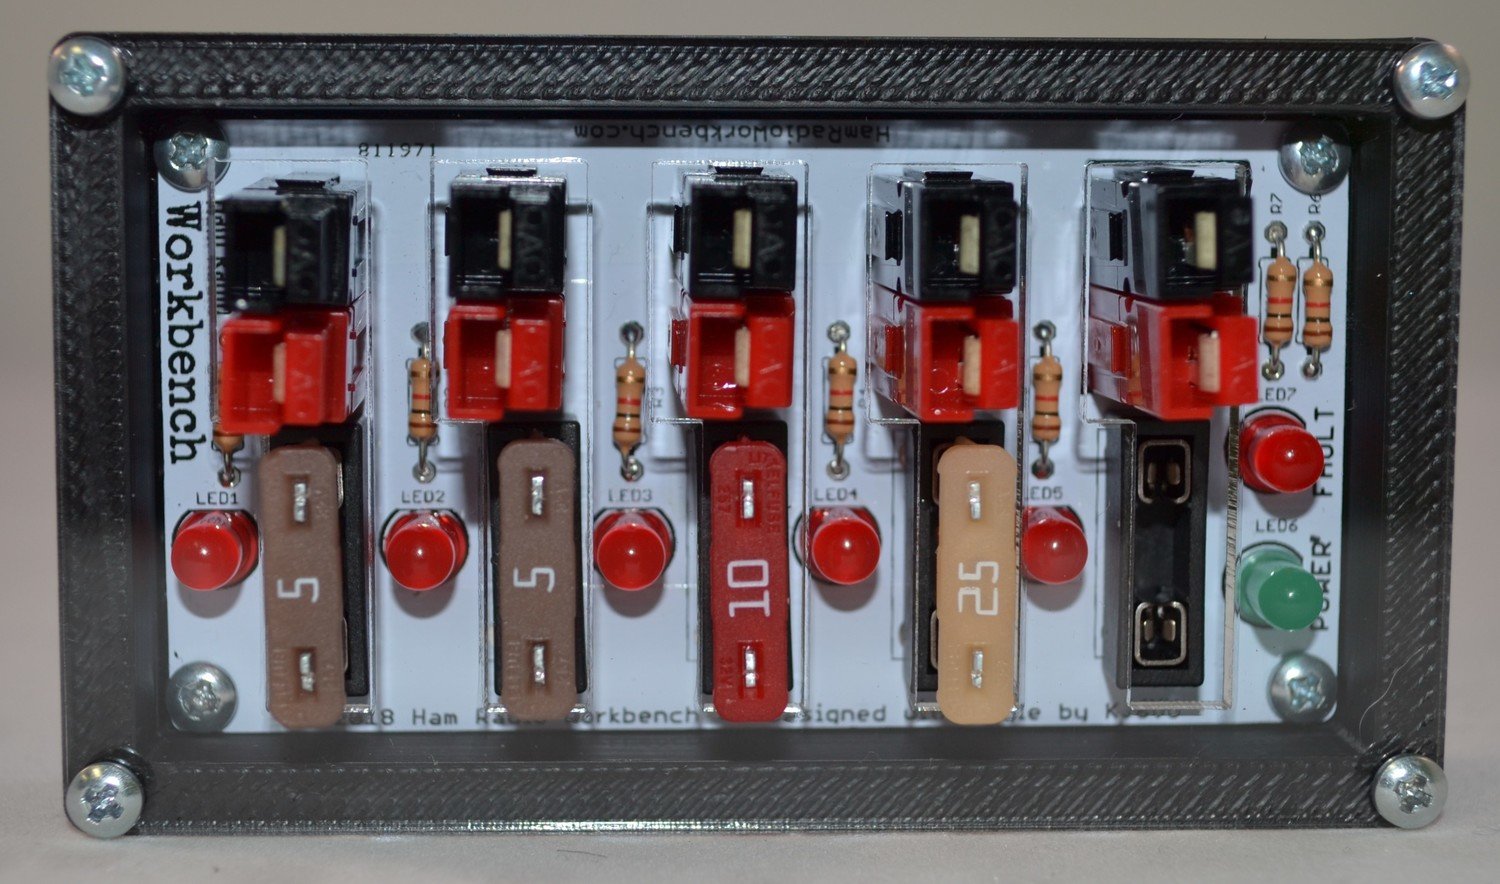
The kit does not come with an enclosure or base of any sort, so I had planned to simply attach it to a dielectric plate to prevent the bottom of the board from shorting on a conductive surface.
This enclosure protects the entire panel on all sides so I’ll be able to throw it in my backpack and not worry about the connectors snagging on other items. The price is a reasonable $12 shipped. Done!
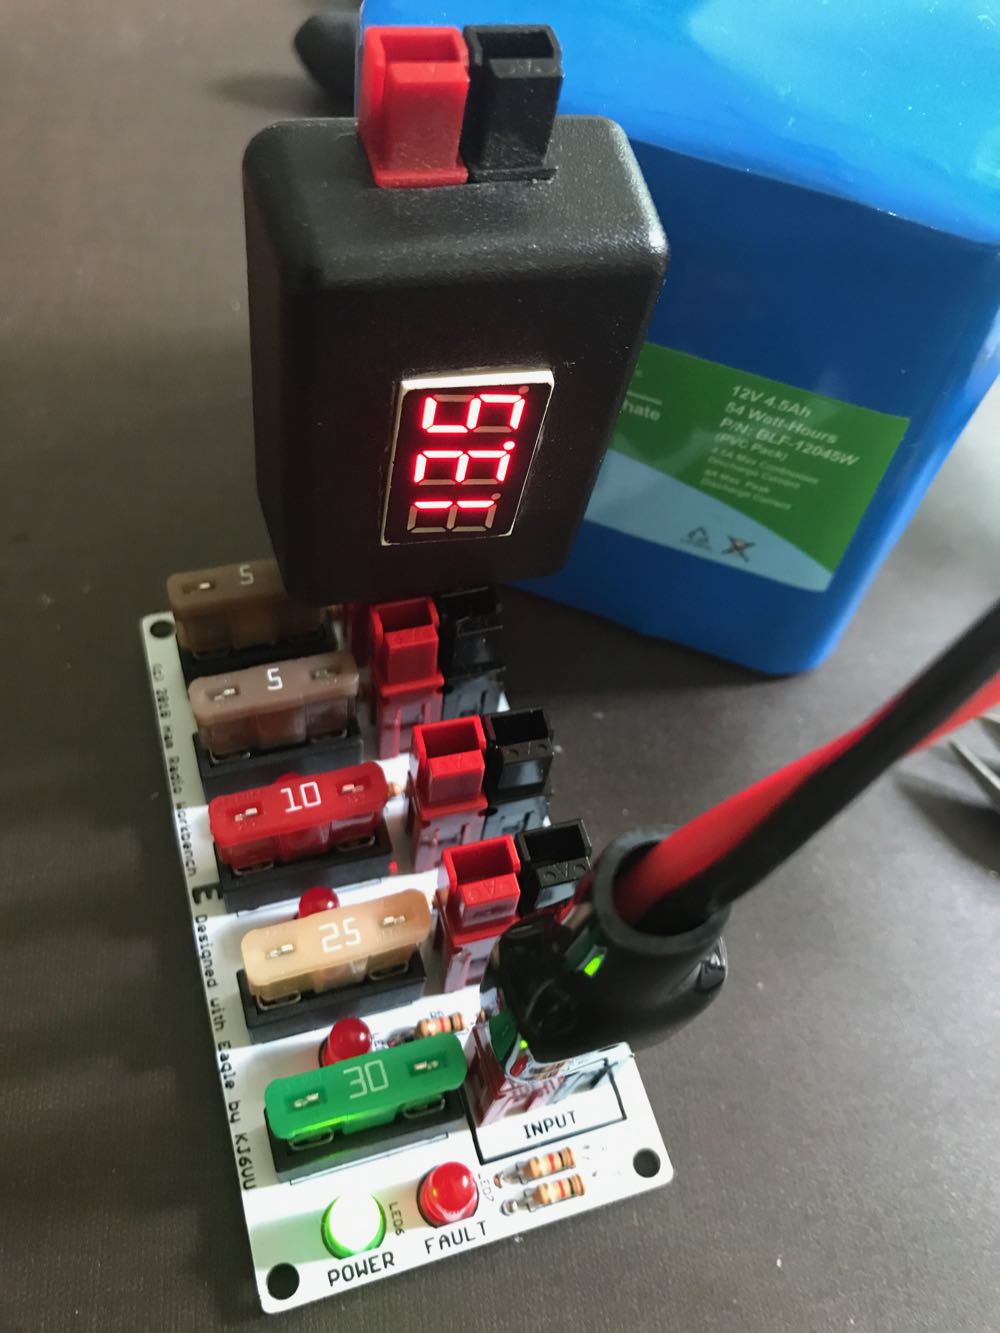
This little DC panel pairs well with the 4.5 aH Bioenno Lithium Iron Phosphate battery I purchased on sale at the Huntsville Hamfest. Together, they’ll power the portable SDR system I’m putting together. More on that in a future post! Stay tuned!
UPDATE: I understand Ham Radio Workbench may eventually print the circuit boards for this project. In the meantime, another affordable option I’ve used is this pre-built panel from Electro Sales on eBay: https://ebay.us/UyJPkh
Many thanks to SWLing Post contributor, Eric McFadden (WD8RIF), who shares the following announcement from Ken (WA4MNT) via the QRP-L forum:
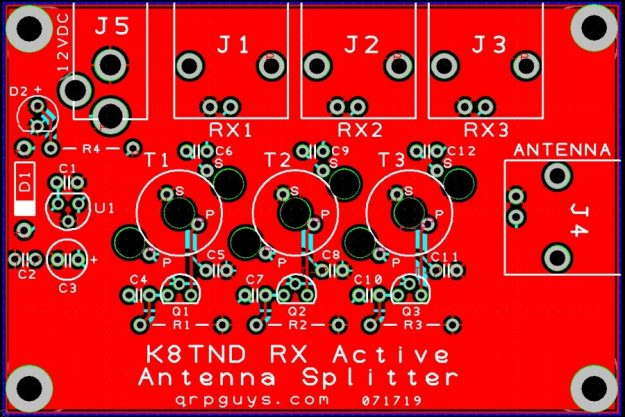
QRPGuys is open for orders after this year’s Summer shutdown. We have added a product that may be of special interest to SWL listeners and some hams. It is an active antenna splitter that will enable connection to three receivers from a single antenna.
Product Deescription:
The KN8TND Active RX Antenna Splitter will allow you to use one antenna with mulitple HF receivers simultaneously. Many hams and SWLers like to monitor several bands and/or frequencies, i.e. 14.300, international nautical emergency freq, 14.100, world HF beacons, etc, etc. Having two or three HF receiving antennas is a luxury some Hams and SWLers can’t afford. With the active receiver antenna splitter you can use one antenna and three receivers at the same time. Keep abreast of what’s going on on the bands, put some of those dust collecting receivers back in action. On a difficulty scale of 1 to 5, this kit is a 2. Build time is about 2 hours, depending on your experience, with the normal kit tools. Bear in mind, this is for receiving only. For HF transceivers you would need a T/R switch to your tuned transmitting antenna.
QRPGuys makes amazing QRP kits. Immediately after receiving Eric’s email, I purchased the active antenna splitter kit. Total cost with shipping was $25 US. A true bargain! Although I already have an ELAD Active antenna splitter, this one would be nice to take to the field as it’s much smaller and lighter weight.