Category Archives: Accessories

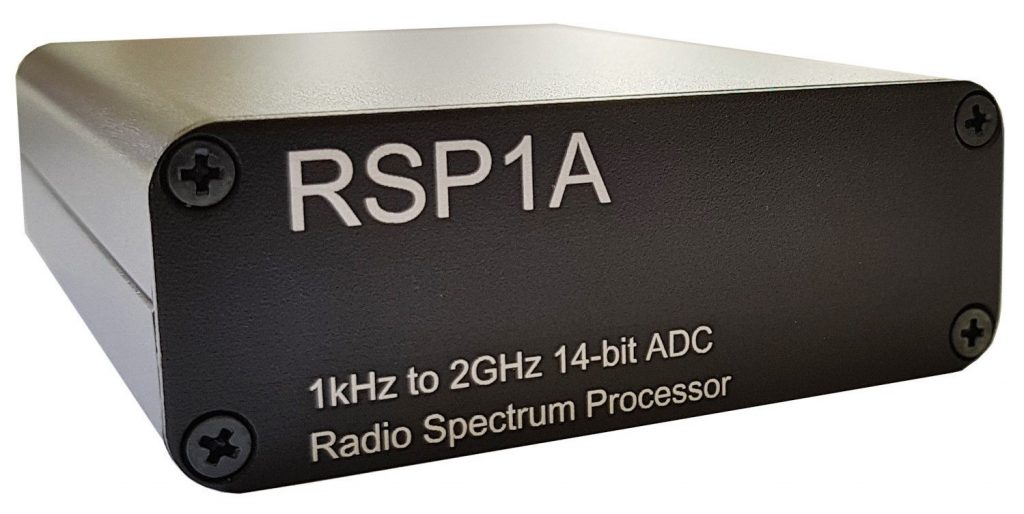
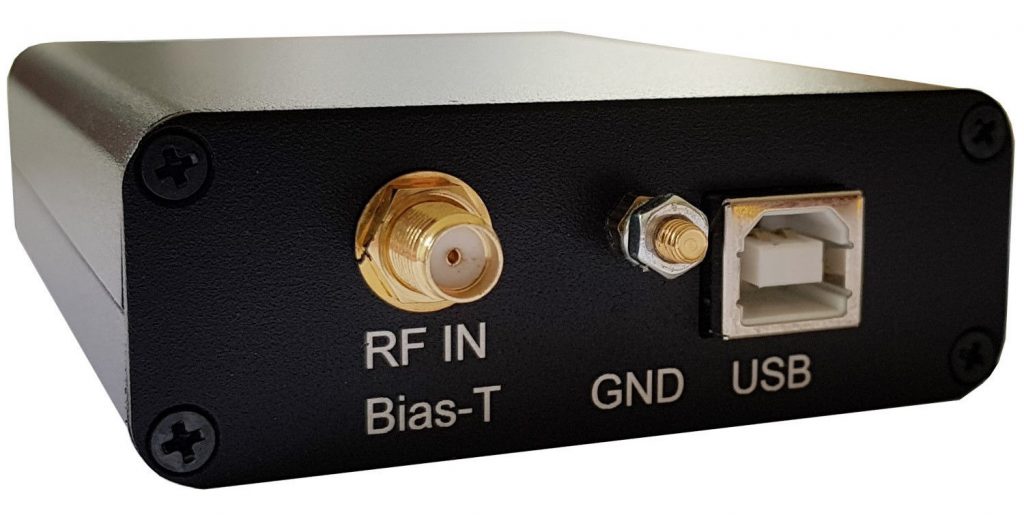
SDRplay RSP1A Aluminum Metal Case kit now available on eBay

Many thanks to SWLing Post contributor, Mike Ladd, who notes that the SDRplay RSP1A aluminum metal enclosure kit is now available on eBay.

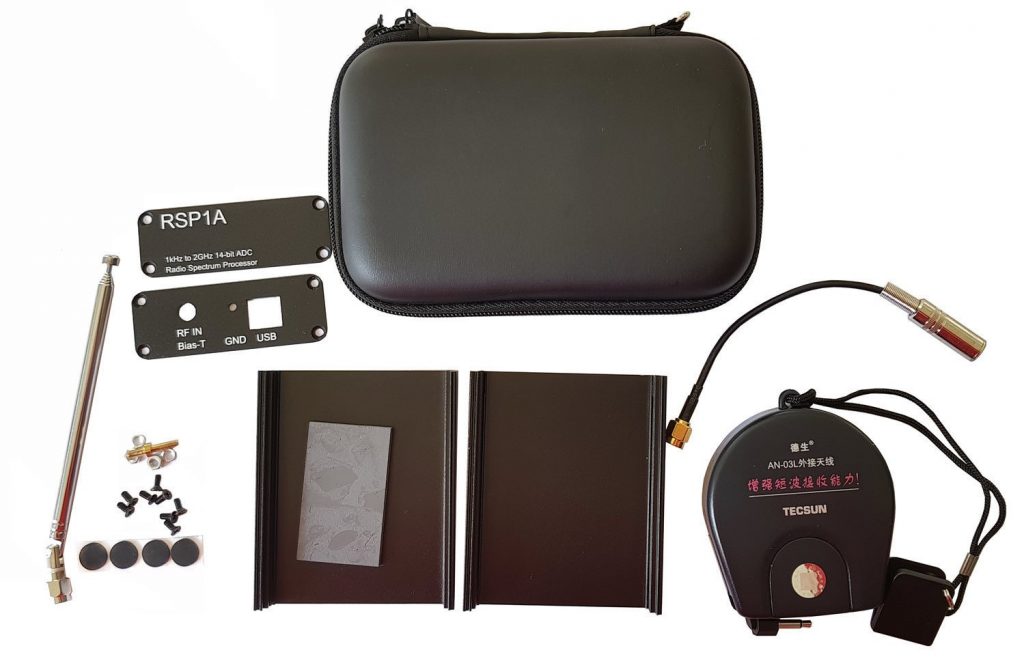
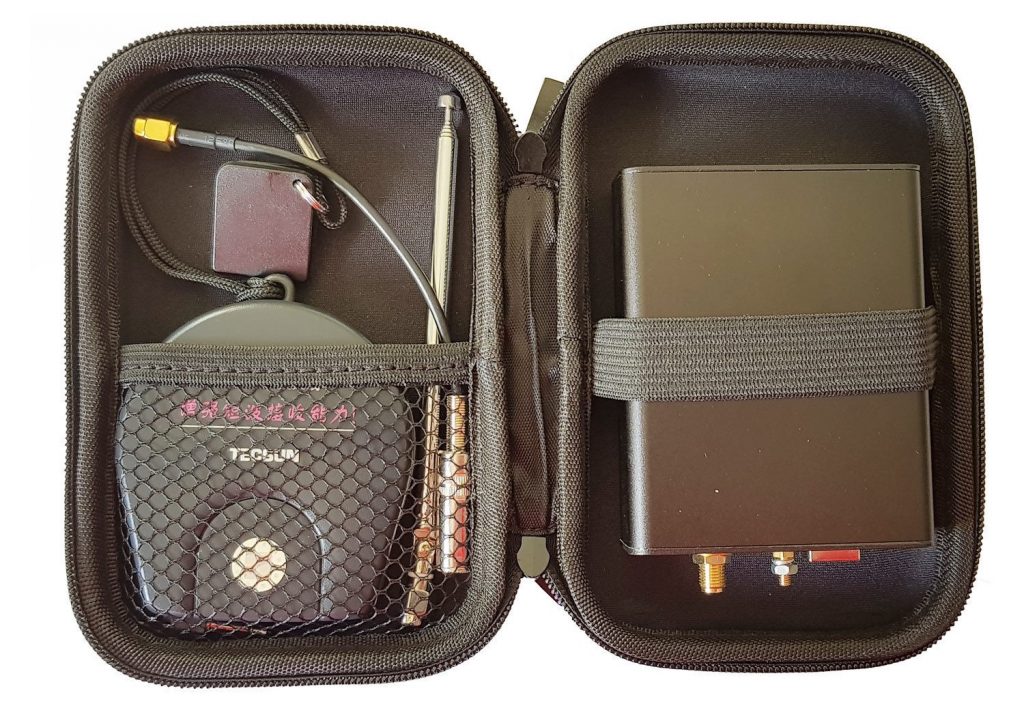
The price is $29.95 shipped and the kit includes:

  • 1x Black aluminum metal enclosure with two labelled side panels
  • 1x Black semi-hardshell carry case
  • 1x Thermal pad to keep the RSP1A cool and mechanically stable inside the enclosure
  • 1x Accessory set including enclosure screws, GND lug bolt set and 3M anti-slip rubber feet
  • 1x Tecsun AN03-L seven meter long wire antenna + 1x Matching SMA Adapter
  • 1x 11cm to 48cm portable SMA telescopic antenna

Click here to view on eBay.

Thanks for the tip, Mike. I’m definitely pulling the trigger. What a great upgrade and price!

Spread the radio love

Guest Post: Mark’s Micro Go-Box for the ICOM IC-7100

Many thanks to SWLing Post contributor, Mark Hirst, who shares the following guest post:


Micro Go-Box for the ICOM IC-7100

by Mark Hirst

You’ll be familiar I’m sure with the IC-7100 base unit and separate head unit design. It lends itself very nicely for vehicle installation.

Using it in any ‘portable’ situation however has always presented something of a challenge. A FT-857 or FT-891 can be carried as a single physical package with the head unit integrated into the body. The radios can sit and potentially operate on their tail in a backpack, with products like the Escort from Portable Zero making that process even easier.

I’ve had a few attempts at solving this portability conundrum, driven by a concern that there could be long term problems continually connecting and disconnecting the component parts for transport and operation, but knowing that a permanently assembled IC-7100 will always be an awkward dispersed structure.

My first solution was a Stanley 16 inch toolbox, which is fortuitously sized to accommodate the base unit and provides enough space to loop the original connecting cable and head unit. The box is not a bad fit, but certainly bulkier than necessary and leaves enough room for things to rattle around. When tilted vertically, the head unit can start moving.

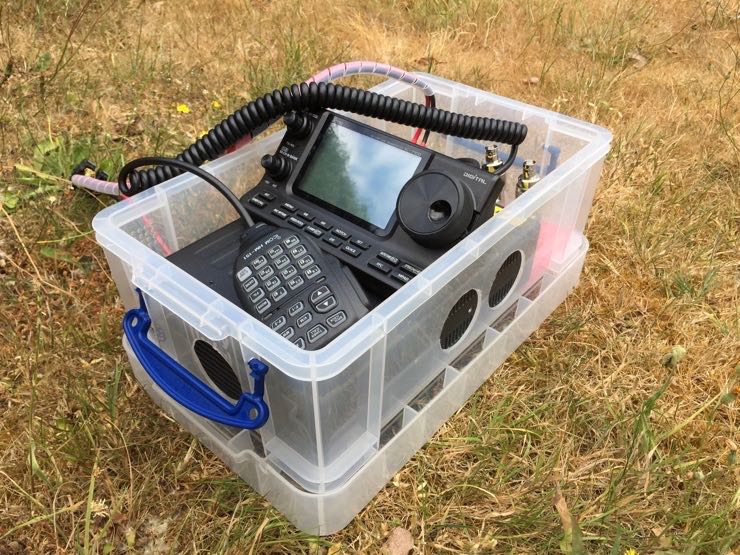
Fast forward to this week when I discovered that the IC-7100 base unit will also fit inside a 5 litre XL storage box made by Really Useful Boxes:

http://www.reallyusefulproducts.co.uk/usa/
http://www.reallyusefulproducts.co.uk/uk/

The XL version of the 5 litre box has a taller lid, and as you can see from the accompanying photos, accommodates the base unit with the head unit sitting on top of it in a ready to use configuration. The tolerances for height are also exact, the VFO knob very lightly touches the lid, so don’t put something heavy on the box:
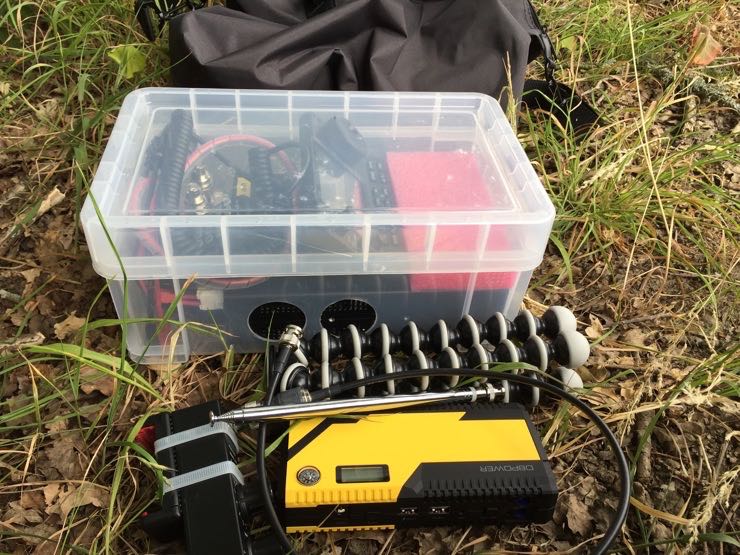
Once the lid has been removed, the radio can operate directly from the container:
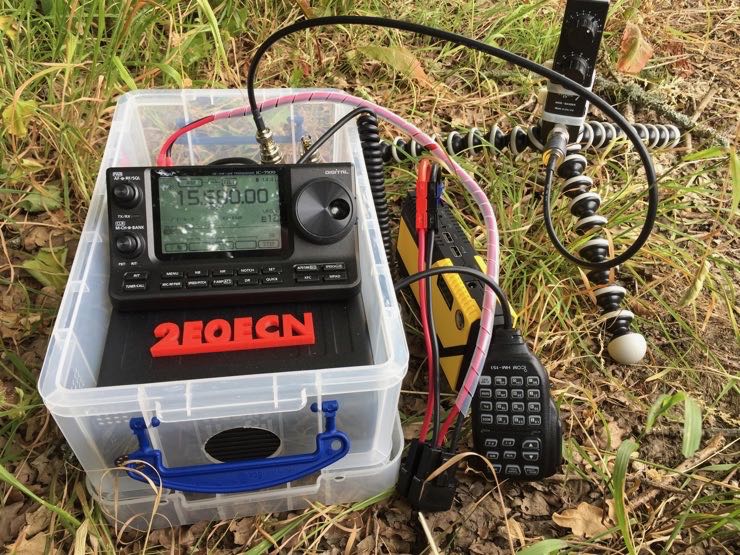
To make the whole thing fit, I used a 25cm CAT 6 cable in place of the original connection cable and a significantly shortened power lead. As luck would have it, I created the shortened power lead a while ago because I often put the battery right next to the radio.

You can see that I removed a section between the power plug and the fuses, and now use the removed length as an extension should the battery be further away. Although it wasn’t my intention at the time, the main part is about 2 feet long, the secondary about 8 inches.

For transport, the power cable is coiled behind the head unit, ensuring the fuse holders sit in the void immediately behind it, while the microphone cable is coiled on top leaving the microphone resting inside its own coil. You can see the arrangement below:

In the next photo, you can see how the cabling emerges from the back of the base unit:
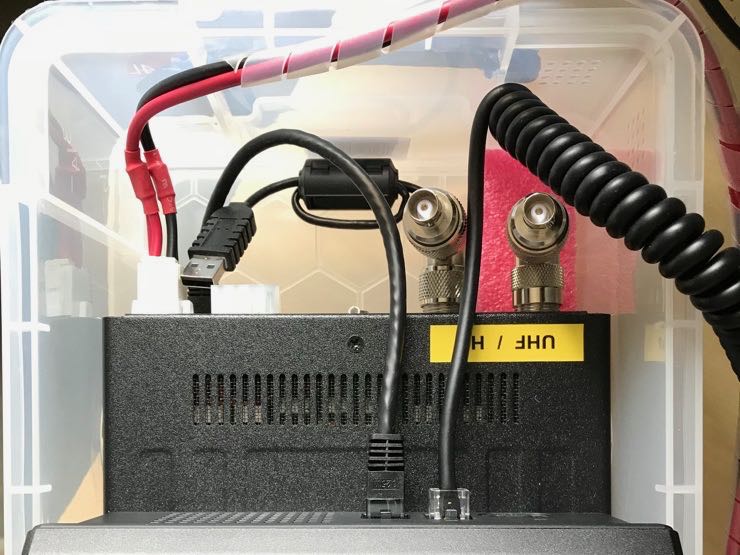
There’s just enough space for the power cable to leave the base and bend around without undue pressure, and likewise for the CAT 6 cable to curve round into the back of the head unit. Two angle connectors make the antenna ports accessible from above, while a short USB external drive cable provides access to the USB port for data modes and CAT control. A longer USB extension cable is attached to this short cable only when required, and the extension uses much more substantial ferrite chokes to mitigate noise from the computer.

To complete the transport package, I’ve cut out a kaizen style foam insert to make sure the base unit can’t move back into the cabling space, and another to make sure the head unit doesn’t slide towards the front.

The last problem of course is cooling. The fan is located in the front of the base unit, with slots along the sides and top to allow air flow. The box unfortunately is exactly the right size for the base, leaving no gaps for air to circulate. In the absence of a proper workshop or professional tools, I opted to use a hole cutter designed for putting pipes through wood panels. It turns out that plastic has a tendency to deform rather than cut under the blades due to friction heating. A sharp knife was essential in dealing with the effects of that deformation to produce the final smooth edges around the holes:

While I’m happy with the port exposing the front fan, the two holes on each side do not completely expose the side slots. Do I drill out the space between them knowing how tricky and flexible the plastic can be, and would a larger hole compromise the strength of the box? For now, I’m going to keep a careful eye for any temperature issues.

The current arrangement is to carry the box horizontally in a cheap travel bag:

Could the box be tilted vertically with the base unit nose down and carried in a back pack for longer excursions? Yes, but experience has told me that the lid latches on Really Useful Boxes have a tendency to pop open when you do that, so a luggage strap around the box may be required to prevent its very expensive cargo from spilling out. I’m also mindful that the box lid gently touches the VFO knob, so might put load on it in the vertical position.

The final result is something of a Swiss watch, and there isn’t much room for error. Things have to be arranged ‘just so’ to fit, but it does mean I can pack and pick the whole thing up in a handy container. The radio only needs a battery and antenna to be connected on site and then it’s ready to go.

There’s something oddly satisfying when unrelated objects come together like this. Who knew that this box was just the right size to fit the radio?

So, what do you think?


Thank you for sharing this project, Mark!

I love your Micro Go-Box: it’s practical, affordable and makes an otherwise awkward field radio easy to deploy and use. Looking at your photos, I realize that the IC-7100 does have one strong suit for field use. The IC-7100 front panel is tilted at a very comfortable 45 degree angle for use. 

Post Readers: What do you think?  Any other IC-7100 owners out there who take their rig to the field? Please comment!

Spread the radio love

Steve searches for a USB-powered battery charger for solar recharging

Many thanks to SWLing Post contributor, Steven Crawford, who writes with the following inquiry:

[I’m searching for] good quality USB powered battery chargers for AA and D size rechargeable batteries.

Wall outlet chargers are common but quality USB powered battery chargers appear much less common…less common than the packable solar panels with USB ports such as Anker’s, that could be used to power them. Ideally the charger should handle Nicad’s, NIMH and Ii-on but have standardized on AA, AA + D adapter sleeves, and D batteries for my storm supplies.

If I understand correctly, you’re searching for a good qualityUSB-powered battery charger that supports multiple battery chemistries (nickel-cadmium, NIMH and lithium ion) so you can recharge AA, AAA and D batteries with a portable solar panel.

I’m hoping SWLing Post readers can offer some suggestions.

I’ve also looked into this type of charger for both Ears To Our World and my own personal use when off-grid in the summer. I’ve never found one that truly supports all of the battery chemistries you mentioned. The one I’ve used (an EBL) works quite well, but only supports NiMH AA and AAA batteries. As you mentioned, you can use D cell sleeves with the AAs.

EBL makes a number of USB chargers that can be found by searching Amazon. This one–an EBL Quick Charger (affiliate link)–can recharge NiMH batteries within 40 minutes and I’ve personally used one. I’ve been pleased with EBL batteries as well.

I never use nickel cadmium rechargeable batteries at this point, so really don’t know what’s available on the market.

I have found that there are a number of USB-powered lithium battery chargers, but typically for specific lithium cell configurations like 18650, 16340, 14500, 26650, etc. Some of these inexpensive chargers have magnetic contacts that can fit almost any battery type and on Amazon and eBay they claim to recharge multiple battery chemistries, but frankly I’m quite skeptical. These $9 devices don’t seem to have a way of detecting battery chemistry, thus I’m not sure how they would adjust the charging cycle accordingly. Perhaps I’m incorrect in this assumption?

Other than using Powerfilm solar NiMH battery chargers (I can recommend these) which are incorporated in their folding panels, I’ve never charged batteries directly from a solar panel. Typically I have a 9ah or larger 12V battery floating between the PV panel and the charger.

I’ve found that using a 12VDC charger–like this–that’s pulling power from a 12V battery is simply a little more efficient, faster and reliable than charging directly from a small PV panel. Since I always have 12V batteries on hand when off grid, it’s a simple solution for for my system.

Post readers: do you have any USB-powered battery charging suggestions for Steven? Please comment!

Spread the radio love

Tom notes $14.99 closeout pricing on Sennheiser MM 50 iP ear buds

Many thanks to SWLing Post contributor, TomL, who writes:

Just a quick note to allow SWLing blog readers to check out a nice pair of lightweight ear buds to use for listening for only $14.99.

I found these on Amazon from a Marketplace seller getting rid of discontinued stock. They are headsets for iPhone but seem to work just fine in any radio I plugged them into. The voice quality is very slightly on the bright side, which seems to help with hearing voice, especially if you have chosen a narrower bandwidth. There is good bass response, perhaps too much for shortwave listening but one can easily just unseat each ear bud from your ear canal slightly until the excess bass is gone.

Most bad ratings are of people too impatient to notice that the right ear cable is longer than the left for a very good reason. The right side drapes around the back of your neck to help hold the ear buds in place and you plug it into your ear from behind. This is by design and it works well without having to clip it to anything like a moving shirt collar! Great idea, wish other manufacturers would do the same.

They are comfortable to wear for long times. Just used them over the long weekend for a couple hours at a time and never noticed them. They use Sennheiser’s rubbery and removable ear cups that come is three sizes. I left the Mediums on but the Small and Large are in the package if you want to experiment.

I have also used them to listen to radio reviews on YouTube and hear great depth and separation in the video depending on what kind of video recorder the reviewer used and can really hear what the radio sounds like. Very nice.

Finally, in a pinch, you can use these on your smartphone as a backup headset. The mic input hangs right below the left of your jaw.

Get them while they still have stock. There are white and black versions but no choice allowed. I ordered two (I keep misplacing my CX-475 Sennheiser ear buds!!!) and they are both the black version, which is fine by me. Enjoy!

Click here to view on Amazon.com (affiliate link).

Thank you TomL! I just purchased a pair. I use in-ear headphones every day. I use them to listen to the radio, to podcasts, and as hearing protection when I’m operating my lawn mower, chain saw and trimmer. (When using them with equipment, though, I tuck the cord underneath my shirt so no wires hang out to get snagged).

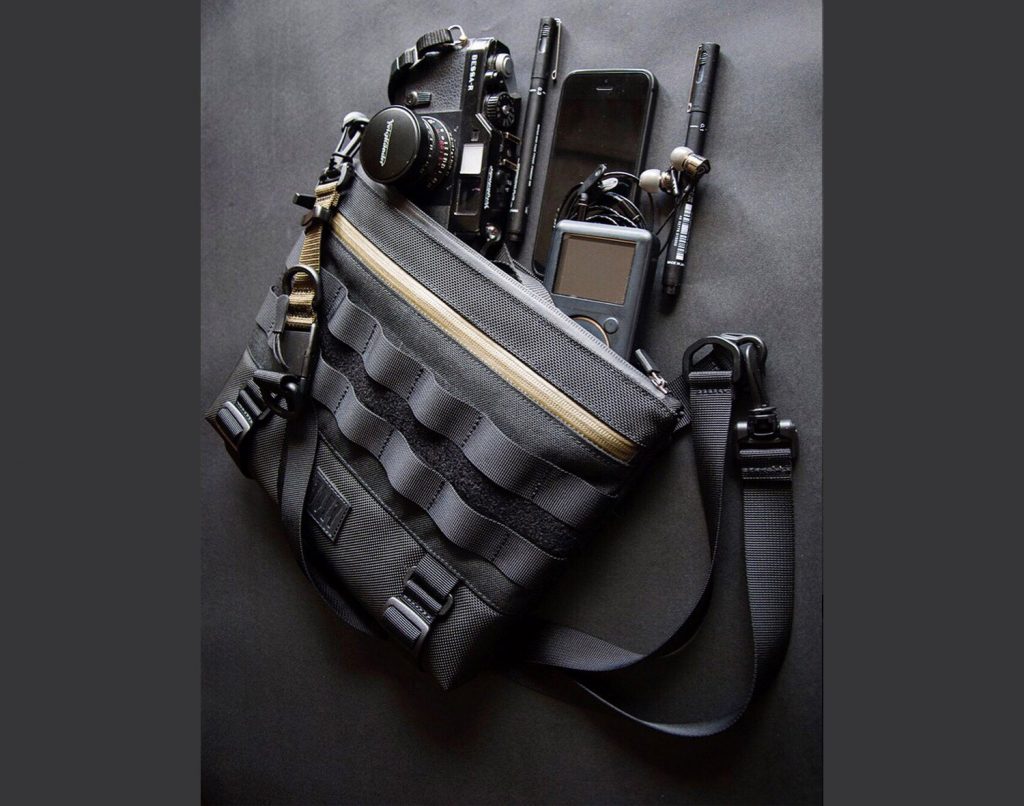
I keep a spare set of in-ear headphones in my EDC pouch.

I always have a pair in both my right pocket and in a pouch in my EDC bag.  The ones in my EDC bag are Panasonic Ergofits and aren’t quite as good at sound isolation, but have decent audio and are very comfortable to wear while sleeping.

I’m looking forward to checking out the Sennheisers!  Thanks for the tip!

Spread the radio love

Everyday Carry: My EDC packs and radio kit

SWLing Post contributor, Matt, writes:

Thomas: I know you’re a self-proclaimed pack geek and so am I! You published a photo of your EDC pouch in a post last year. Just a teaser really! What is that pouch and I assume you have a larger carry bag as well? Can you provide more details? I’m ever revising and honing my own EDC pack. Any details would be appreciated.

Thanks for your question Matt!  Besides radio, you’re bringing up on one of my favorite topics: packs! You may regret having asked me!

Yesterday evening, I snapped a few photos of my EDC (Everyday Carry) bag and the pouch you’re referring to. Your inquiry is prompting me to consider publishing a more detailed look at my EDC gear–especially since radio is such an important part of it.

I do carry a larger EDC bag at all times. Typically, this is the Tom Bihn Pilot:

For years, I carried a Timbuk2 messenger bag, but it didn’t have the type of organization I prefer in an EDC bag. My EDC bag must be rugged, water resistant and accommodate my 13″ MacBook Air while still having enough depth to comfortably fit the rest of my gear.

I’ve been using the Tom Bihn Pilot for almost a year and have been very pleased. The Pilot is an investment to be sure, but (like Red Oxx) Tom Bihn construction quality is superb and comes with a lifetime warranty.

It’s amazing how much gear will comfortably fit inside without making the bag bulge. The Pilot also has a dedicated water bottle pocket in the middle of the front panel. While I do carry water, it primarily houses my never-leave-home-without-it Zojirushi Stainless Steel Mug (affiliate link) which is filled with piping hot dark roasted coffee!

I also use the water bottle pocket to hold full-sized handled VHF/UHF radios. It accommodates either my Kenwood TH-F6, Yaesu FT2D, or Anytone AT-D868UV perfectly. Indeed, all of the front pockets will accommodate an HT since the zippers terminate at the top of the bag. Long antennas can easily poke out while the zipper still seals 99% of the opening.

The Pilot has one main compartment that houses my 13″ MacBook Air laptop.

The Pilot laptop compartment is spacious and has two built-in pockets opposite the laptop sleeve: one of these pockets (the one on the right in the photo above) holds my EDC pouch, the other holds first aid supplies, an Olight SR1 flashlight and Nitecore LA10 latern (affiliate link). My laptop is in a TSA-friendly Tom Bihn Cache.

While the Tom Bihn Pilot is the bag I use most days, also use a Red Oxx Micro Manager and–when I need 25 liters of capacity–the Tom Bihn Synapse 25.

I pack most of my EDC gear in pouches, so moving from one bag to another takes me all of one minute.

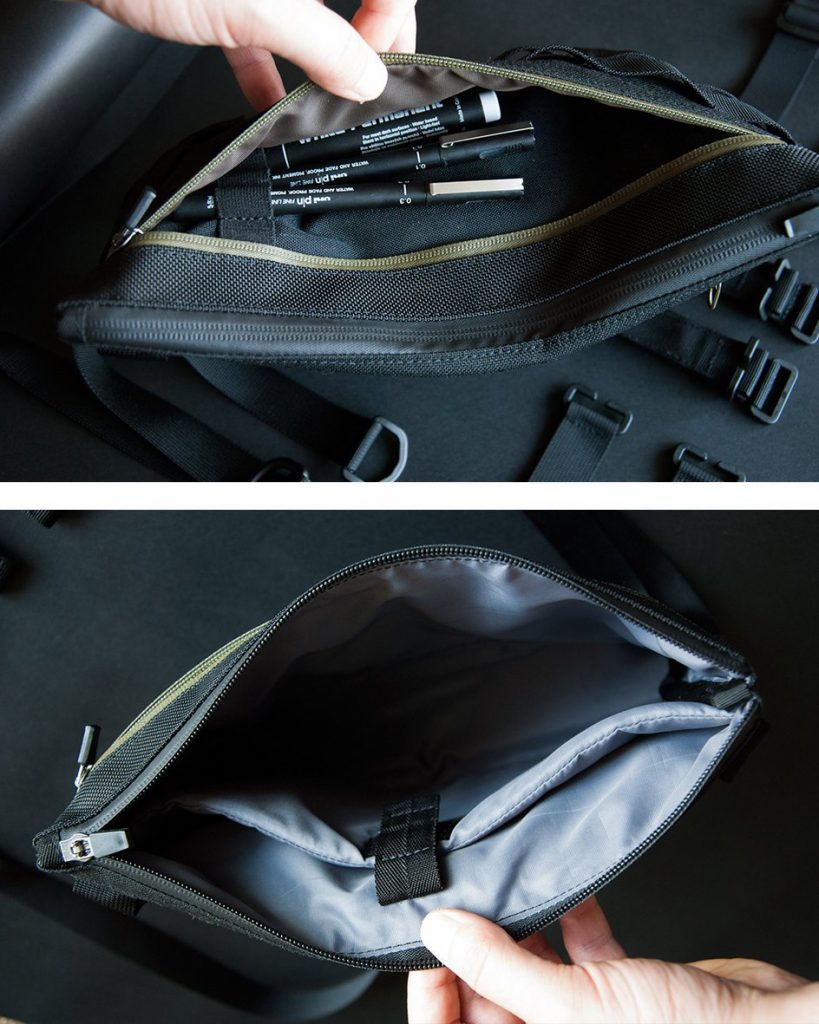
My EDC pouch is the Maxpedition Fatty Pocket Organizer (affiliate link). I love this pouch because it’s incredibly durable, affordable and opens like a clam shell to lay flat.

Everything has its place. Not only does it hold my Yaesu VX-3R handheld, but also a multi-function knife, a Leatherman Style PS tool, clippers, earphones, multi-bit screwdriver, USB stick, notepad, spare VX-3R battery, a mini first aid kit, titanium spork, and much more! Someday I’ll pull the whole thing apart and note each item.

Why do I choose the Yaesu VX-3R? First of all, it’s compact. This HT is so small it’ll tuck away anywhere. Not only is it dual band, but it’ll also receive the AM broadcast band (even has a little ferrite bar inside), the shortwave bands, and the FM broadcast band.

The mini rubber duck antenna will work in a pinch, but I also carry a flexible Diamond SRH77CA in the floor of the Tom Bihn Pilot’s main compartment.

When I attach the Diamond antenna, it significantly increases the VX-3R’s capabilities.

While the VX-3R does cover the HF bands, don’t expect amazing performance. Selectivity is poor, but sensitivity is adequate. For a shortwave antenna, I carry a short length of coax: one end is terminated with an SMA connector, the other has the center conductor exposed.

I also carry a short alligator clip cable which I clip to the exposed center conductor and then to a length of wire. The end result is a very cheap, flexible and effective portable HF antenna!

Someday, I’ll take everything out of my EDC pack, inventory the contents and publish a post about it. Somehow, that’ll please my inner pack geek! I’m overdue a review of the Tom Bihn PIlot and Synapse 25.

Post readers: Do you have an EDC pack built around a radio? Please comment and include links to your favorite gear!

Spread the radio love

Guest Post: Review of the TYT SF-401 Plus Frequency Counter/Tone Meter

Many thanks to SWLing Post contributor, Mario Filippi (N2HUN), for sharing the following guest post:


TYT Frequency Counter/Tone Meter Review

by Mario Filippi (N2HUN)
All photos courtesy of author

Most hobbyists own some type of transceiver whether it is a handheld, mobile, or base station. Some examples are amateur radio HF/VHF/UHF transceivers, Citizen’s Band radios, FRS (Family Radio Service) and GMRS (General Mobile Radio Service) handhelds.

A useful tool for the shack or the field is a frequency counter/tone meter since it can measure frequencies and analog/digital tones from transmitters/transceivers. At times ascertaining that a UUT (Unit Under Test) such as a 2 meter handheld is transmitting accurately may be indicated due to problems communicating with other stations. In addition, if the UUT transmits a sub-audible tone (either analog or digital) to access a repeater, a frequency counter/tone meter can detect the presence and verify accuracy of the CTCSS/digital tone.

Author’s TYT SF-401Plus, includes instructions, antenna, rechargeable battery and charger/cable. Covers 27 MHz – 3 GHz

Frequency/tone meters can be purchased for less than twenty US dollars but normally do not include a rechargeable battery and BNC connector for attaching an external antenna. Having had experience with these types, the time finally came for an upgrade.

After shopping around a decision was made to purchase the Tytera TYT SF-401 Plus. This model includes an instruction sheet, antenna, internal rechargeable battery, USB charger and cable. It represents a significant improvement over my previous, inexpensive meter, as the TYT has a BNC connector to attach a larger antenna and has four control buttons on the front panel. It also has, via a system menu, options to adjust the frequency/tone offset, dimmer levels, three or four decimal display and auto power off. All these valuable features warrant a higher cost, which was about $50, but well worth it. This price fits the budget of most hobbyists. However, higher end frequency/tone meters are available and cost several hundred dollars for those requiring that level of quality.

Out of the box the TYT SF-401 Plus, when checked against an IFR FM/AM-500A communications service monitor, was right on the money as far as accuracy. Note that the IFR-500A was calibrated against a high precision internal 10 MHz crystal in an “oven” and this is my gold standard reference for frequency accuracy in my shack.

TYT accuracy checked against an IFR FM/AM-500A communications service monitor transmitting a 146.52 MHz/131.8 Hz tone. Note frequency readout to four decimal places.

Now, it was time to check typical radios around the shack using the TYT. The first radio tested for frequency accuracy was a BTECH GMRS-V1 HT which I use to communicate with the home QTH while running errands around town. See photo for results. The BTECH and TYT agreed perfectly. Note that the TYT’s display includes a battery status indicator on top left and a timer use indicator, which resets every time the TYT is turned on. If you are going to measure digital signals (not included in this review) there is an option in the Setup Menu for that. With the BTECH handheld running 2 watts the TYT could detect its’ frequency at roughly four feet away.

Confirming BTECH transmit frequency against the TYT. Output is 2 watts. TYT multicolor display is super.

For VHF/UHF operating, especially when afield with other hams or groups such as CERT (Community Emergency Response Teams), problems can ensue if one does not have the correct frequency or tone programmed, so having the TYT in your shirt pocket to confirm these parameters when trouble occurs can be a quick way to get to the problem. See photo of an Icom IC-2300H 2 meter transceiver checked against the TYT for proper offset and tone. The Icom was putting out 65 watts and a repeater with an offset of -1.3 MHz and 88.5 Hz tone was checked.

TYT confirming unusual offset (-1.3 MHz) and tone for a repeater. Icom IC-2300H was at high (65W) setting and connected to an outdoor discone antenna.

According to the instructions included with the TYT SF-401 Plus, the operating range is from 27 MHz – 3000 MHz with a note stating “27 MHz – 100 MHz it can not be guaranteed and the corresponding normal emission appliance” which I interpret as accuracy is not guaranteed in this frequency range. Well, I checked the TYT against the IFR FM/AM-500A service monitor transmitting an AM signal on CB Channel 19, 27.185 MHz, and the TYT measured it exactly. One other important note is that according to the instructions, the tone decoder operates in the 136 MHz – 174 MHz and 400 MHz – 520 MHz frequency range. So that may limit its use in certain areas of the spectrum. One other item if interest is that the TYT has a 10 dB attenuator when dealing with high power signals.

All in all, I’m very happy with this purchase, and find the TYT SF-401 Plus useful for “first pass” troubleshooting and helpful when aligning older rigs which due to age are off frequency /tone. It definitely has a use in this shack.


Wow–what a bargain tool for the radio shack! Thank you for sharing your review, Mario.  Once again, however, you have tempted me with a purchase!  I remember when frequency counters would set you back a couple hundred bucks–it’s insane to think that you can grab one for $40-50 US shipped.

SF-401 Plus Retailers:

Note that the TYT SF 401 Plus is also marketed as the Surecom SF401 Plus:

Spread the radio love

The Professor reviews the RFA200 external ferrite antenna

Many thanks to SWLing Post contributor, The Professor, who shares the following review of the RFA200 external ferrite antenna:


The Tecsun R-9012 and RFA200 MW antenna (Photo credit: The Professor)

A Quick Review of the RFA200

The Professor

I’ve considered saying something here about RFA200, as I bought one of these not long after its existence was announced on this blog a few months ago, but I’ve been hesitating because I didn’t have much good to say about it. A couple of times I’ve placed it up snug up against the the top of the two Tecsun sets I have handy (the PL-310ET and the PL-880) and found that despite a lot of knob turning it had little or no effect on improving signal on medium wave stations. I was not impressed.

But I guess I’ve kind of changed my mind on that. And oh yeah, I bought another radio. It’s funny how you can talk yourself into things when you’re talking someone else into something. But after I had mentioned to a reader here the other day that the very inexpensive Tecsun R-9012 was a worthy analog DX portable, I decided to drop twenty and pick one up for myself. After all, it was about the same price as a fancy Brooklyn hamburger. It arrived a couple days ago.

So, I have been playing with it a bit over the last few days. It’s as good as the other ones I’ve had which are the same basic radio (I’d mentioned that the bandswitch slider broke in a couple of mine). It’s single conversion. The bandwidth is a little wide, but it’s a very sensitive and simple analog set.

Yesterday I was going through the AM band and remembered that ferrite from Greece, and I pulled it out recalling that in my experience some radios are more susceptible to reception improvements using passive loops than others. Maybe this ferrite bar might be similar. And sure enough, the antenna made a notable difference this time. By placing it up against the R-9012 and tuning the thing I could certainly increase signal a bit. And I could even see it in the slight brightening or steadiness of the tuning light.

So, not a total waste money after all. I would emphasize that the difference in reception doesn’t seem to be as dramatic or sustaining as you might hear with a tunable loop antenna next to your radio. But it’s not junk either. Then again, for fifty dollars shipped it is a little pricey. Twice as much as a Tecsun tunable loop antenna, and two and half times more expensive than the R-9012 itself.

I found the best way to use this antenna is to tune the radio separately first and when you find a weaker signal you want to improve physically go ahead and rotate the radio until the signal is strongest and THEN put the antenna along the top of the radio and adjust the tuning knob on the antenna. Focus in on strengthening the signal you actually hear, going back and forth until it gets strongest. If you seem to be pulling up other stations it’s because the antenna adjustment will bring in adjacent stronger stations if you move it too far either way.

I’m surely not able to pin down the science involved in exactly how these things work, but perhaps somebody can chime in on this. I’m wondering if analog radio tuning in particular is better suited to the use of these tunable passive antennas, as opposed to PLL and DSP radios?

If you buy one of these be prepared to wait. At least mine took weeks to get here from Greece. And don’t expect miracles. But it seems rather well constructed, and will probably work with some radios. The seller has a 100% rating on eBay and has all sorts of interesting antennas for sale. I’m glad to see people succeeding in that business.


Many thanks, Prof, for sharing your fine review of the RFA200! Thanks for also mentioning the Tecsun R9012–I purchased one a couple years ago with the intention of reviewing it, then gave it to teenager who expressed interest in shortwave. I don’t think I actually put it on the air myself. I do enjoy simple old school analog radio–especially when making band scans. 

Click here to view the RFA200 antenna on eBay.

Spread the radio love