Category Archives: Guest Posts

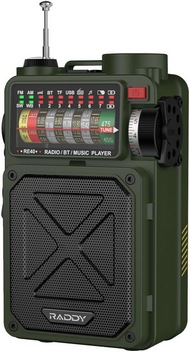
The RADDY RF760: Light, Portable, Powerful

(Guest Post)

 By Robert Gulley K4PKM

(Note: This review was requested by Radioddity, who provided the in-production radio to the reviewer, with no strings attached or pre-approval.)

I confess to have been a little bit skeptical when Thomas asked me to review this radio, not because of past experience with RADDY, but because tiny radios in general don’t usually impress me, and I have had plenty of them over the years and considered most of them a novelty. There are a few exceptions, of course, such as the C.Crane Skywave or the Tecsun PL-368, but for the most part there are simply too many limitations to tiny radios for my listening style (this one can literally fit in a shirt pocket!). Upon opening the box I was still skeptical, despite the rather impressive packaging and extras. But hey, a little skepticism is a good thing, right?!

The radio comes with some nice accessories!

Accessories

The radio comes with a thin carry case to protect it from scratches, a rechargeable lithium battery, strap, earbuds and a wire antenna to improve shortwave reception. There is also a Type “C” USB cable for charging the battery. Oh, and a spare set of earbud covers – a nice touch!

Ergonomics

Picking up the radio I noticed right away it has a solid, comfortable feel to the unit. I start with that because most tiny radios feel very flimsy, and usually have something of a rough or hard plastic feel to them. This radio has a glossy feel to it, meaning it is comfortable and actually nice looking. Looks aside, I must admit the ergonomics of the radio impress me. I like the feel of it in my hand, and the controls are laid out well for one-handed operation. Being left-handed, that is not always the case, but the controls seem well thought out for either right- or left-handed folks.

As you can see in the images there are two primary rows of buttons, as well as a tuning knob on the right side of the radio. There is also a belt clip on the back which is unobtrusive – I can’t speak to its longevity as I really never clip a radio to my belt, but for those who do, I suspect it will hold up well with a little care.

The telescopic antenna (fixed) is rather impressive as well, measuring ~18 inches in height when fully extended. As one might imagine, at this length the antenna is fairly fragile – I would not walk around with it fully extended while attached to my belt. For hand-holding it should be just fine, and standing upright on a table it does not tip over, but if out in an open-air environment with a strong breeze it will tip over, so a stand would be advisable.

The display is very readable, and the orange background light which pops on when making adjustments is quite nice. The light stays on for ~9 seconds after pushing any of the buttons. Another nice feature of the radio is a press of any button while the radio is off will turn on the display, indicating time, temperature, and battery strength. Yes, it has a built-in thermometer, and it seems quite accurate, at least on the unit I received.

On top there is an external antenna jack, headphone jack, and slot for the strap.

Operation

For such a small radio it is literally packed with features. I will not go over all of them in this review, but I will cover some of the highlights as well as make mention of most features at least in passing. I was not expecting so many features in this little radio, so I was pleasantly surprised by some of the more advanced options.

Naturally the radio has AM/FM capabilities, as well as weather, air, VHF above the air band, SW and CB (yes, CB!). There is also a customizable frequency range setting for monitoring a desired set of user-selected frequencies. There are presets available for various modes listed in the manual, including predefined amateur radio bands and shortwave stations (always subject to change, of course!).

There is an attenuate function available if needed, as well as numerous step modes for tuning various modes. One interesting feature of the radio is two separate tuning methods, one by up and down buttons, and the other by a tuning knob on the side. These can be set independently of each other in terms of the step-change on a given band. This is particularly useful when scanning a band with the buttons after a station is found, because sometimes being slightly off frequency can produce a better signal – the scroll wheel can be used to make as little as 1 Hz changes.

Finally, there is a very useful bandwidth feature which can change between 3, 2.5, 2, 1.8, 1, and 6 kHz. Tuning is quite functional both with the scroll wheel and the tuning buttons. Holding down the tuning buttons will start a scan of the current band, and a longer press will speed up the scan if no stations are found initially. Unlike some scanning radios, when a signal is found, scanning stops and does not resume. I like that feature better than the alternative method of some radios restarting a scan after 5 seconds or similar. I want time to figure out what I am hearing, and a short stop does not really allow for that most of the time.

This is a very compact and lightweight radio!

Reception

I have to say I am impressed with this little radio. I have listened to amateur frequencies, shortwave frequencies, AM/FM, weather and tried airband (nothing close to me except a minor airfield). I live in a very quiet location in terms of local man-made interference, and this provides a great opportunity to really test out a radio’s sensitivity. My conclusion may surprise you as it did me. This is one sensitive radio, given its small form factor and limited antenna movement. (I did not test the external antenna option. While it has one, I felt it only fair to make tests using the built-in antenna on all the radios I compared it with, thus eliminating extraneous or otherwise hard to compare situations.)

Side by side with one of my favorite portables, the Sangean ATS-909X2, this little guy was right in there with difficult to receive stations. While the Sangean has a much larger speaker and therefore fuller sound, in terms of actual reception, most stations came in about equally. I even used an old, but very reliable Select-A-Tenna to boost AM reception on both radios, assuming the Sangean has a much larger ferrite rod given its size, and yet both performed equally well next to the passive antenna. Impressive!

On various shortwave and amateur stations the RADDY RF760 held its own again, picking up almost station for station what the Sangean and the Sony 7600 GR (another favorite of mine) did, in a package less than 1/3 the size of the Sony, and about ¼ the size of the Sangean. Am I going to dump my Sony and/or my Sangean? Of course not – there are many reasons I prefer those radios for my daily use. But if I were wanting to go extremely lightweight/portable, the RADDY is a keeper with impressive performance and most features one could want in a portable radio, all while still fitting in your shirt pocket. I truly do not know how one could get much better performance or features in another radio this size. It makes one wonder where can they go from here?

FM reception is also quite good, pulling in weaker stations while still being quite listenable. I have heard a few stations on this radio which I have not caught before, and this with some atmospheric noise due to storms in the region. Likewise, listening to AM while there were storms in the general area, still allowed for reasonable reception. As we all know AM broadcasts are highly susceptible to atmospheric noise, especially lightning, but this radio recovered nicely after each static crash. Some radios seem to linger longer in recovery after such events, but this radio was quick to bring back in the signals.

Negatives

In short, there really are not any glaring negatives to this radio, so allow me to point out some little things which are, after all more about personal preference than any deficiency in the radio. Your mileage may vary, as they say.

  • An articulating antenna would be a nice touch, but that might require an increase in size, and likely would make the antenna more susceptible to damage. Many times, being able to bend an antenna this way or that can improve a signal.
  • Changing the frequency steps can be a little fiddly at times, but that’s probably me
  • When powering on, the short press acts like pressing any other button, meaning the light comes on, the time, temp, and battery power indicator displays. A longer press brings up the sleep timer. Two short presses turns on the radio, but not too short of presses. This takes a little getting used to, and I would prefer one longer press to turn on the radio, with the two short presses activating the sleep timer, but that, I know, is getting really nit-picky!

Conclusion

If you are in the market for a small, lightweight, but solid radio – this RF760 is definitely one you should consider. It is so light as to be almost weightless, compact but with easily reachable and useful controls, and has more modes and features than almost any similar radio I have run across. As an old-timer I have to shake my head in amazement at what can be packed into such a small radio these days! This certainly isn’t your grandpa’s transistor radio (and it’s even smaller!). Cheers!

Check out the Raddy RF760 at Radioddity.

Spread the radio love

Matt’s Rooftop Receiver Shootout: Round Two!

Many thanks to SWLing Post contributor, Matt Blaze, for the following guest post:


Matt’s Rooftop Receiver Shootout, Round Two.

by Matt Blaze

You may recall that back in April, I dragged eight of my favorite receivers up to the roof, hooked them up to a portable antenna, and compared their abilities to demodulate various signals at the same time. For the most part, the similarities between radios were more striking than their differences. I hinted that there’d be a second installment to come, including more receivers and more challenging signals, to further expose and highlight the practical real-world performance differences between the radios we use.

So, as promised, here we are with Round Two of my Rooftop Receiver Shootout.

This time around, I used approximately the same setup, but with a total of fifteen different radios. And once again, I took advantage of nice weather and brought a multitude of receivers, recording gear, cables, and an antenna up to my roof to listen to and record shortwave signals under the open sky.

Our fifteen receivers included everything from “dream radios” from the 1980’s to current-production desktop models to less expensive modern portables to high-performance bench-top lab measurement gear. I tried to curate samples of a wide range of radios you may be familiar with as well as some you probably aren’t.

The lineup consisted of:

  • Icom R-8600, a current production “DC to Daylight” (or up to 3 GHz, at least) general coverage communications receiver, with highly regarded shortwave performance.
  • AOR AR-ONE, another DC to 3 GHz general coverage radio, less well known due to the high price and limited US availability. Excellent performer, but a counterintuitive and awkward (menu-driven) user interface is less than ideal for shortwave, in my opinion.
  • Reuter RDR Pocket, a very cute, if virtually impossible to get in the US, small production, high performance SDR-based shortwave portable receiver. It’s got an excellent spectrum display and packs near desktop performance into a surprisingly small package.
  • AOR 7030Plus, an extremely well regarded mobile/desktop HF receiver from the late 90’s. Digital but retaining some important analog-era features like mechanical filters. Designed and (mostly) built in the UK, it’s got a quirky menu-driven user interface but is a lot of fun once you get used to it.
  • Drake R8B, the last of the much-beloved Drake receivers. Probably the chief competitor to the 7030+.
  • Drake R7A, an excellent analog communications receiver (but with a digital VFO) from the early 80’s. It still outperforms even many current radios.
  • Sony ICF-6800W, a top of the line “boom box”-style consumer receiver from the early 80’s. Great radio, but hard to use on SSB, as we saw in Round One.
  • Panasonic RF-4900, the main competition for the Sony. Boat-anchor form factor, but (improbably) can run on internal D-cell batteries. Generally impressive performer on AM, but, like the Sony 6800, difficult to tune on SSB.

You may remember the above radios from Round One back in April. The new radios this time were:

  • Tecsun 501x, a larger-format LW/MW/HF/FM portable released last year. As noted below, it’s a generally good performer, but regrettably susceptible to intermod when connected to a wideband external antenna (as we’ll see in Part One).
  • Tecsun PL-990x, a small-format portable (updating the PL880), with many of the same features as the 501x. Like the H501x, good performance as a stand-alone radio, but disappointing susceptibility to intermod when fed with an external antenna.
  • Sangean ATS-909x, a recent LW/MW/HF/FM portable with a good reputation as well as a few quirks, such as only relatively narrow IF bandwidth choices on HF. Excellent performance on an external antenna.
  • Sangean ATS-909×2, an updated, current production version of the ATS-909x that adds air band and a few performance improvements. Overall excellent, though I would prefer an addition wider IF bandwidth choice. My go-to travel receiver if I don’t want to take the Reuter Pocket.
  • Sony ICF-7600GR, a small-format digital LW/MW/SW/FM portable introduced in 2001 and the last of the Sony shortwave receivers. Showing its age, but still competitive in performance.
  • Belka DX, the smallest radio in our lineup, made in Belarus. You’ll either love or hate the minimalist interface (one knob and four buttons). If you’re going to secretly copy numbers stations in your covert spy lair, this is a good radio to use. Can be difficult to obtain right now due to sanctions.
  • Finally, a bit of a ringer: the Narda Signal Shark 3310, a high performance SDR-based 8.5 GHz RF spectrum and signal analyzer. As with most test equipment like this, demodulation (especially of HF modes) is a bit of an afterthought. But it has an excellent front end and dynamic range, intended for identifying, extracting, and analyzing weak signals even in the presence of strong interference. Not cheap, but it’s intended as measurement-grade lab equipment, not consumer gear. Demodulated audio is noticeably delayed (several hundred ms) compared with other receivers due to the multi-stage DSP signal path.


The antenna was my portable “signal sweeper” Wellbrook FLX-1530 on a rotatable tripod, using a power splitter and a pair of Stridsberg Engineering 8-port HF distribution amplifiers to feed the fifteen radios. So every radio was getting pretty close to exactly the same signal at its RF input. Continue reading

Spread the radio love

Guest Post: You might be a radio nerd if…

Many thanks to SWLing Post contributor, Jock Elliott, who shares the following guest post:


How can you tell if you are a radio nerd?

By Jock Elliott, KB2GOM

Jeff Foxworthy made a name for himself with his comedy routine, “You Might Be a Redneck.”

That phrase – you might be a redneck – is always followed by a qualifier, such as: “If you ever financed a tattoo.” My favorite: you might be a redneck if you ever mowed the lawn and found . . . a car.

Taking a cue from Foxworthy, I thought I might help the readers of the SWLing Post determine if they are radio nerds.

You might be a radio nerd, if . . .

  • You think DXing NOAA weather radio stations is kinda fun. (That would be me.)
  • You made special arrangements with the National Institute of Standards and Technology to visit WWV, the NIST time station in Colorado. (That would be our very own Thomas, Maximum Leader of SWLing.com. Check out this post.)
  • You traveled to Newfoundland, Canada, to lay out hundreds of feet of wire to listen to tiny maritime weather stations in Northern Europe. (That would be Don Moore, and if you have not read Don’s posts–this one or this one–you are in for a treat!)
  • You see a display of pool “floaty” noodles, and all you can think of is: “Construction materials for ferrite sleeve loop antennas.” (That would be Gary DeBock, with this post and numerous posts on SWLing.com.)
  • You think it is fun to get up in the middle of a 10 degree Alaskan night to DX an Australian station 8,000 miles away and then find yourself on an Australian newscast. (That would be Paul Walker.)
  • You are constantly thinking about how you might improve reception at your station. (That would be most of us, I think.)
  • You have accidentally said your Amateur Radio call sign at the end of a telephone conversation. (Me, again.)
  • You find yourself using ham lingo in ordinary conversation: “I’m going to QSY to the kitchen.”

So, are you a radio nerd? If so, present your evidence in the comments below.

Spread the radio love

Jock says, “It’s about time…and beacons!”

A WWV Time Code Generator

Many thanks to SWLing Post contributor, Jock Elliott, who shares the following guest post:


It’s about time . . . and beacons

By Jock Elliott, KB2GOM

Shortwave time stations can be incredibly useful for shortwave listeners, not just for checking the time, but also for finding out what’s going on with radio signal propagation. What makes these stations particularly valuable is that they are available all the time. I use them often when I am testing radio equipment or tweaks to my listening post.

Chief Engineer Matt Deutch at WWV/WWVB. (Photo: Thomas)

The National Institute of Standards and Technology (part of the U.S. Department of Commerce) maintains a couple of stations devoted to broadcasting time announcements, standard time intervals, standard frequencies, UT1 time corrections, a BCD time code, and geophysical alerts 24 hours a day, 7 days a week.

WWV in Fort Collins, Colorado, according to NIST:

“radiates 10 000 W on 5 MHz, 10 MHz, and 15 MHz; and 2500 W on 2.5 MHz and 20 MHz. Each frequency is broadcast from a separate transmitter. Although each frequency carries the same information, multiple frequencies are used because the quality of HF reception depends on many factors such as location, time of year, time of day, the frequency being used, and atmospheric and ionospheric propagation conditions. The variety of frequencies makes it likely that at least one frequency will be usable at all times.”

In addition, WWV broadcasts the same signal heard on the other WWV frequencies on 25 MHz on an experimental basis. The power is 2500 W and, as an experimental broadcast, is may be interrupted or suspended without notice.

WWVH crew from left to right: Dean Takamatsu, Dean Okayama, Director Copan, Adela Mae Ochinang and Chris Fujita. Credit: D. Okayama/NIST

WWVH, based in Kekaha, Hawaii, transmits 10000 W on 10 MHz and 15 MHz, and 5000 W on 2.5 MHz. A NIST notes that the 5 MHz broadcast, which normally radiates 10 000 W, is currently operating at 5000 W due to equipment failure.

Photo Thomas (K4SWL) took in 2014 of the sign above WWV’s primary 10 MHz transmitter.

Both stations have voice announcements. WWV uses a male voice; WWVH, a female voice. They are staggered in time so that they don’t talk over each other. While doing research for this blog, one afternoon on 5 MHz and 10 MHz, I could hear the female voice, followed by the male voice, so I was hearing both Hawaii and Colorado. On 15 MHz, I could hear only Hawaii. Both stations transmit in AM mode, although I sometimes use upper sideband to pick the signals out of the noise.

CHU’s QSL card used in the 1980s depicting Sir Sanford Fleming, father of uniform times zones.

In addition, there is a Canadian time station. CHU transmits 3000 W signals on 3.33 and 14.67 MHz, and a 5000 W signal on 7.85 MHz.

The frequencies were chosen to avoid interference from WWV and WWVH. The signal is AM mode, with the lower sideband suppressed.

The same information is carried on all three frequencies simultaneously including announcements every minute, alternating between English and French. The CHU transmitters are located near Barrhaven, Ontario.

According to a posting on Radio Reference, there is also a time beacon in Moscow, Russia that transmits on 9996 and 14996 kHz in CW mode. I have never heard that station.

If anyone knows of additional shortwave time stations, please post the information in the comments section below.

Beacons

Another “standard reference” that can be used to figure out what’s happening with shortwave propagation is the International Beacons Project, a worldwide network of radio propagation beacons. It consists of 18 Morse code (CW) beacons operating on five designated frequencies in the high frequency band. The project is coordinated by the Northern California DX Foundation (NCDXF) and the International Amateur Radio Union (IARU).

This page shows the locations of the beacons and gives samples of the signals that can be heard. Each beacon transmits once on each band once every three minutes, 24 hours a day. A transmission consists of the callsign of the beacon sent at 22 words per minute followed by four one-second dashes. The callsign and the first dash are sent at 100 watts. The remaining dashes are sent at 10 watts, 1 watt and 100 milliwatts. At the end of each 10 second transmission, the beacon steps to the next higher band and the next beacon in the sequence begins transmitting.

Clicking around the International Beacons Project website will reveal a wealth of information, including a Reverse Beacon Network — https://www.ncdxf.org/beacon/RBN.html — no kidding.

Finally, if you would like to disappear down the rabbit hole of chasing shortwave beacons, here is a list of 411 beacons around the world: http://www.dl8wx.de/BAKE_KW.HTM

The listing includes the frequency, the location, and the power of the transmitter (among other things). If any reader has experience with these beacons, please post in the comments section.

Spread the radio love

Giuseppe’s Ponza Island DXpedition with the Icom IC-705

Many thanks to SWLing Post contributor, Giuseppe Morlè (IZ0GZW), who shares the following guest post:


Report from Ponza Island: May 6-9, 2022

by Giuseppe Morlè (IZ0GZW)

Ciao Thomas and Friends at the SWLing Post!

This is the summary of 3 days of testing of my Icom IC-705 just purchased and immediately taken to Ponza Island, my hometown, for a full immersion DXpedition only listening to amateur radio bands especially on 20 m.

Day 1

I left Formia on the ship that went to Ponza and it was not a good start given the adverse sea weather conditions. After 3 hours of crossing in the rain and the strong sirocco wind, I arrived on the island at my father’s house.

In the early afternoon in the rain, I hoisted a 20 meter row on the “sloper” type roof not so high from the ground and connected directly to the Icom 705 without any counterweight given the place without electrical noise.

The position of my father’s house is open from West to North but totally covered to the South by a hill of 200 meters …

In this video you can see all of this:

During the first night, 20 meters was full of signals especially from the USA; it was, in fact, what I had hoped for given the position open to the West.

Really good overseas signals despite bad weather … below is a series of mixes of North American stations: Continue reading

Spread the radio love

Jock gets a good grounding!

Many thanks to SWLing Post contributor, Jock Elliott, who shares the following guest post:


Getting grounded – at last!

By Jock Elliott, KB2GOM

Readers’ comments are among the best things about writing for the SWLing.com blog. When a reader responds to a post and leaves a comment, it does three things. First, it lets the author know that someone actually read the post. Second, it provides valuable feedback – “I liked it.” “Did you know about this . . .?” “I had a similar experience.” – and so forth. Finally, it provides the author an opportunity to learn something, and that perhaps is the most fun.

A case in point: when I posted this, Andrew (grayhat) said:

“If you want to make an experiment, connect the end-fed to the Satellit high-Z wire input (clamp), then pick a (relatively short) run of insulated wire connect one end of the wire to the high-Z “ground” (clamp) and the other end of that wire to the “gnd” hole in the wall plug

The above being said, I prefer keeping antennas outside and taking care of the feedline, this helps reducing or eliminating noise from indoor appliances like switching PSUs and other things, anyway, if you want, try the above idea and let me know how it works for you”

To which, I responded:

“Thanks for the comments.

Thanks to a tree falling on the powerlines, I now know that the inherent electrical noise in my radio room is basically down to the level of atmospheric noise.

Neverthless, experimenting with a ground is definitely worth trying. A thin wire, sneaked out the window to a ground rod, might do the trick. I’ll report back after I try.”

Andrew (grayhat) came back to me and said:

“I was serious, try the “wall plug ground” I described, it won’t start any “magic smoke” or the like, otherwise, if you can lay out a wire with a length of 5m max, cut to be NON resonant, and connected to a good ground stake, go for it

Then, if you want to discuss this further, just ask Thomas for my e-mail, I agree to share it with you.”

Now, I really appreciated Andrew’s comments, but what I had not told him was that there is just one wall plug in my radio shack; it is really inaccessible, and I am not sure I can get a ground off it. Further, the rest of the power “system” in my shack is a rat’s nest of power bars and extensions, and I have zero confidence that any of them will provide a useful ground.

But – and this is a big but – I did take Andrew’s point: that connecting an actual ground to the ground clip on the back of the Satellit 800 might improve things. Continue reading

Spread the radio love

Guest Post: Review of the Electronic Specialty Products – Model DD-103 Universal Digital Dial

Many thanks to SWLing Post contributor, Bob Butterfield, who shares the following guest post:


Review of the Electronic Specialty Products – Model DD-103 Universal Digital Dial

by Bob Butterfield

I recently brought out of storage my Yaesu FRG-7 Communications Receiver to use “in the shack” once again.  I have always regarded the FRG-7 as a capable receiver but just did not have space as my radios co-exist with part of my daughter’s over-flowing stuffed animal collection–among other things.  After a couple of dozen members of the plush collection were relocated, I now had room for another receiver!  I checked the FRG-7 out carefully and found everything was functioning well, except for a modification I made decades ago which was the installation of a 100 kHz crystal calibrator kit inside the receiver.

I am the original owner of this FRG-7 which is an early production unit (the one without the small fine tuning knob).  I had always desired an external digital frequency display for this radio and thought now is the time.  I did some research, visited various radio forums, and decided on purchasing an Electronic Specialty Products (ESP), Model DD-103 Universal Digital Dial.  This unit is not cheap, US$140, plus $15 shipping, but seemed to fit my needs.  If technically inclined, one could possibly build an external display for themselves at lower cost.  What may be of interest to many concerning the DD-103 unit is that it comes pre-programmed for dozens of transceivers and receivers (to include the FRG-7).  Plus, if your radio is not pre-programmed it can be set up manually.

The DD-103 is an attractive compact external unit measuring 2”H x 6”W x 4”D with a very easy to read backlighted LCD (white on blue).  The unit comes with connecting cables, U.S.-type power supply, and instruction manual.  In my opinion, despite its size, this is one solid and well-built unit.  As per the ESP web site, new units are not stocked but are assembled upon order.  After ordering I immediately emailed ESP with my receiver make and model (I would recommend this for all buyers).  My unit arrived in a little over two weeks and I received a separate sheet accompanying the unit with specific instructions for my receiver.  Hook up was a breeze.  All that was needed was to set a few DIP switches, connect one lead to the indicated test point on the identified board, and the other lead to chassis ground (alligator clip leads are provided).  The connection to the display is made with the included RCA cable.  I made one simple installation modification, installing a RCA female/RCA female bulkhead connector on the rear panel of the FRG-7 to allow for quick disconnect.

The DD-103 display is programmed into 1 MHz increments.  To operate, you select the MHz range you want (for example 9 MHz) on the DD-103.  On the FRG-7, I then tune its pre-selector and the same desired MHz range, and finally tune in the frequency and watch the DD-103 display change accordingly.  The operational design of the DD-103 fits nicely with the Barlow-Wadley circuit design of the FRG-7.

A key feature of the DD-103 display is that it reads the entire frequency (e.g., 9.940.1 MHz) so you always know where you are with just one look.  In addition to AM mode the DD-103 can be further programmed for CW, LSB, and USB modes, as well as 10 Hz or 100 Hz resolution.  As stated in the unit’s manual, it can also be calibrated on each frequency range so as to correct IF amplifiers that are a little off or errors associated with aging receiver crystals, if applicable.

It is nice to have my FRG-7 up and running again and utilizing the new external numeric frequency readout.  Truthfully, I have been reminded just how good the FRG-7 is.  Though it does not have as many features, it holds its own when put up against my other classic receivers (JRC NRD-545, JRC NRD-535D, and ICOM R-75).

I must say I am quite happy with the Electronic Specialty Products DD-103.  The unit has good accuracy and stability as it utilizes a TCXO reference oscillator.  If I had to nit-pick about anything, I would likely point out that the on/off switch is on the back of the unit.  If your radio is in a confined space this possibly could cause operational issues for you.  Also realize that for the most part this unit is kind of a “one size fits all” package and it would not surprise me if certain receivers or transceivers might require lengthening of the connecting cable.  All in all this professional looking unit is a simple to use, simple to install, easy to read, designed well, and I think worth the cost.  For anyone else who is thinking about adding a digital frequency readout to a vintage radio, you may want to give this model due consideration.

Bob Butterfield

Photo of my FRG-7 with the DD-103 on top:

Web site for Electronic Specialty Products: http://www.electronicspecialtyproducts.com/dd103.html

Disclaimer: I have not been compensated in any manner in regards to this unsolicited review and purchased the DD-103 unit with my own funds.

Spread the radio love