Shortwave listening and everything radio including reviews, broadcasting, ham radio, field operation, DXing, maker kits, travel, emergency gear, events, and more
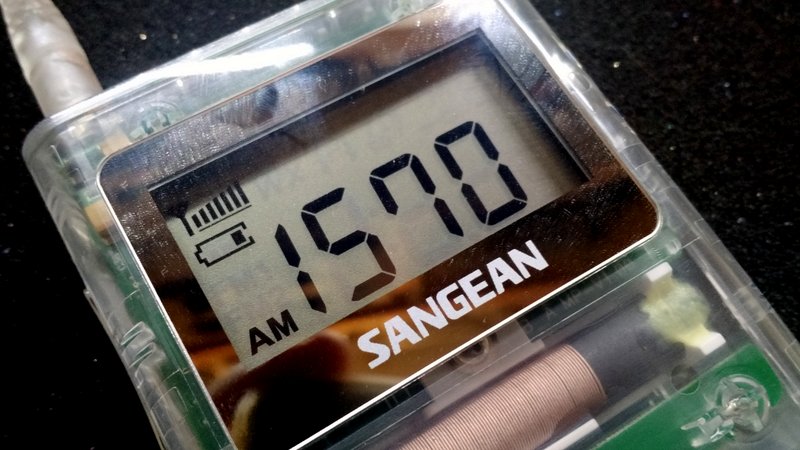
The Sangean DT-160CL still shows two of three segments on the battery indicator (see above).
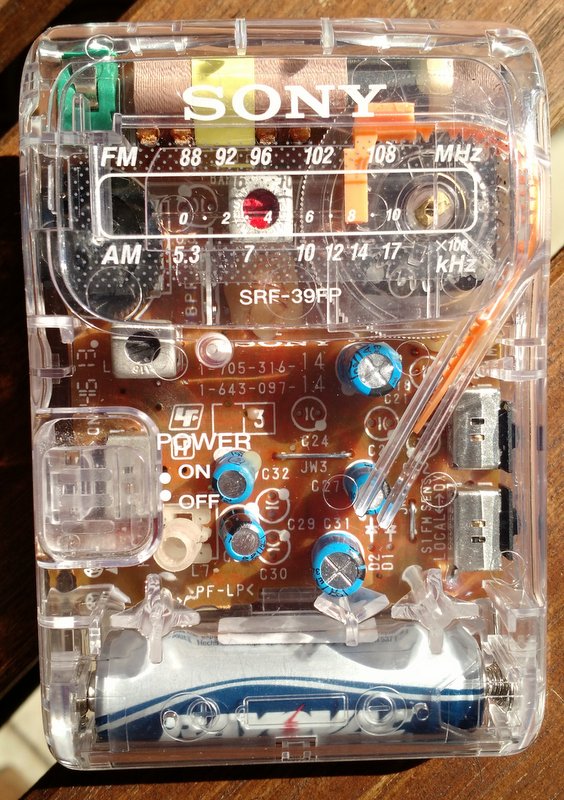
The Sony SRF-39FP seems to have no indication of quitting anytime soon–it’s still sensitive and audio sounds great.
I believe the Sony SRF-39FP is rated for 80 hours of playtime, and I’m sure if I had turned it on and off numerous times during the test, it might have had an impact on battery performance. It’s still going strong, though.
I am using advanced alkaline (CVS Brand) batteries in both radios. These should give each radio better battery life than standard alkaline or rechargeables.
Regardless which radio wins this test: both have already proved themselves “Holy Grail” battery misers!
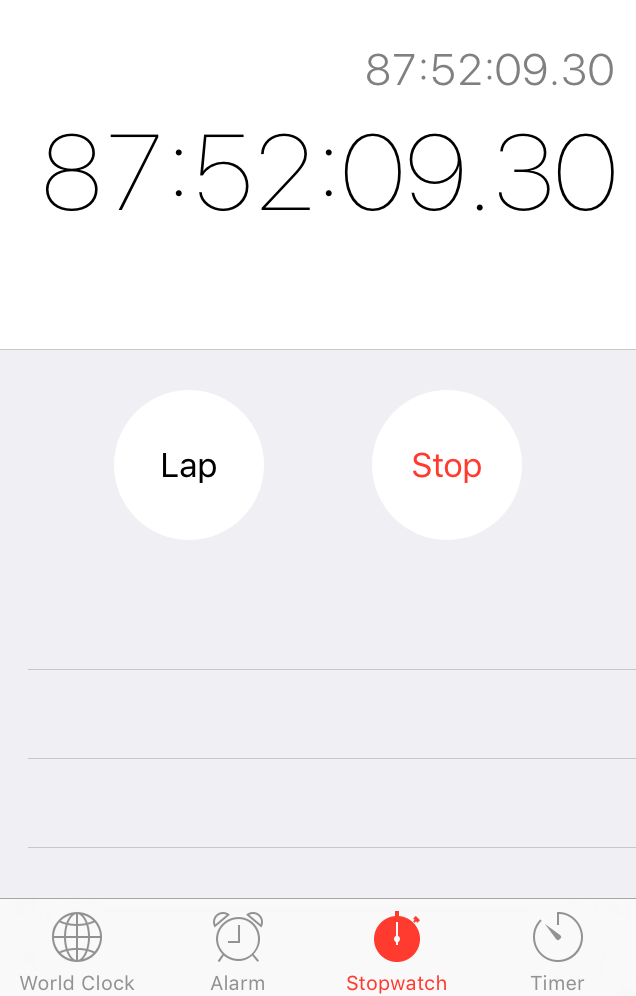
I’ll be monitoring the radios very closely today as we pass the 90 and 100 hour mark!
UPDATE: Shortly after making this post–at almost exactly 88 hours and 30 minutes into the test–the Sangean DT160CL’s battery indicator lost a battery indicator segment. It’s now only showing one of three battery segments. Could the end be near for our DT-160CL? Stay tuned!
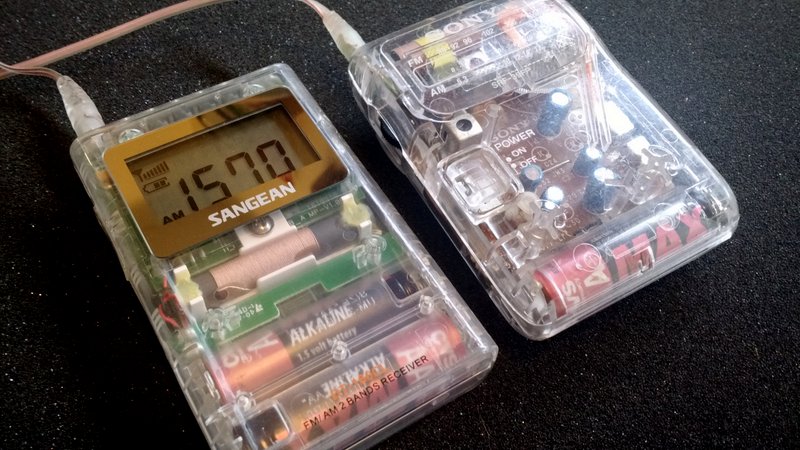
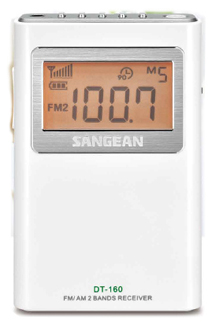
After publishing a post referencing the new Sangean DT-160 AM/FM radio, a number of readers noticed that Sangean has also produced a clear-cased version of the DT-160: model number DT-160CL.
This version, no doubt, was designed for sale in prison commissaries and is probably seen as a replacement for the venerable Sony SRF-39FP (which has been discontinued). The SRF-39FP is widely regarded as a superb mediumwave (AM) DXing ultralight.
In reference to the Sangean DT-160CL, SWLing Post contributor, Dan Hawkins recently commented:
Which begs the question: is this prison-quality radio really that good? I ask the question only because a good AM-FM prison radio must perform exceptionally well behind formidable prison walls. After all, nearly one percent of the US population is currently behind bars (down slightly from 2008) which is a substantial pocket radio market. Prison radios are typical sold in prison commissaries and prisons are big business nowadays. How does this radio compare to the famous Sony SRF-39FP? Inquiring minds want to know. Sangean is legendary for build quality. Does it beat the Sony?
After reading Dan’s comment, I couldn’t help but order the DT-160CL from Amazon.
The Sony SRF-39FP
I, too, am very curious how it will compare with the SRF-39FP in terms of battery longevity, audio fidelity, and overall performance.
I suspect the SRF-39FP will remain dominant on the AM broadcast band and possibly have better battery life (keep in mind, the SRF-39FP only uses one AA battery–the DT-160CL requires two).
As soon as I receive the DT-160CL (Amazon notes delivery will be Wednesday, August 3), I’ll pop fresh batteries in the DT-160CL and the Sony SRF-39FP, set them to the same volume level and frequency, then allow them to run continuously until the batteries are depleted. Of course, I’ll use the opportunity to compare performance on both AM and FM.
Many thanks to SWLing Post contributor, Ron, who shares his impressions of the new Sangean DT-160:
The DT-160 just came in and here are a few impressions:
1.) The heft and feel of this set is superb…it has that solid feel the earlier DT-200X doesn’t. It is markedly smaller,too and the buttons have a firm solid feel the earlier models lack (finally!).
2.) Jay’s review is spot-on as usual…but the AM section is not what you find in a Sony SRF-59 or SRF-37W digital. Expect to get locals and semi-locals fine but it’s not going to be a DX machine on AM as the Sony’s are.
This is doubtless due to the need for a smaller ferrite bar; a Q-Stick or loop will fix that.
3.) On the other hand as Jay said it leaves the Sonys in the dust on FM, which is superb.
4.) Audio is very good as is ease of operation.
5.) The closest comparison is probably the CC Pocket; they doubtless use the same/similar Silicon Labs IC.
But unlike the CC no birdies were heard on AM. [Update: Ron has since discovered a few birdies on AM, like the CC Pocket.]
Is it worthwhile?
Yes, if only for the promised 100 hour battery life. No other similar receiver will run nearly as long.
[Thomas,] you may wish to order two; one for Dad,and one for you.
I will definitely buy the DT-160 for my father. I wonder if it’s packaged in a way that I could take it out, play with it, then re-package it as a gift? 🙂 Would that be wrong? Of course not! 🙂
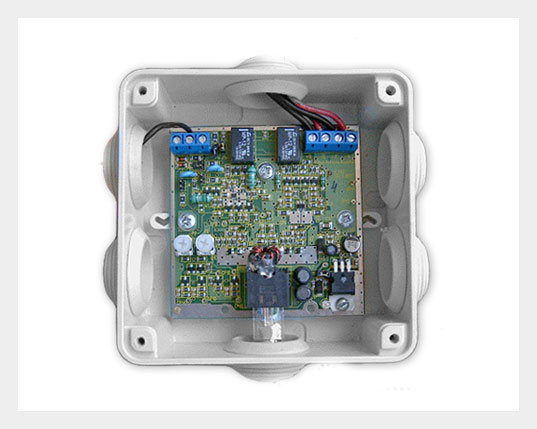
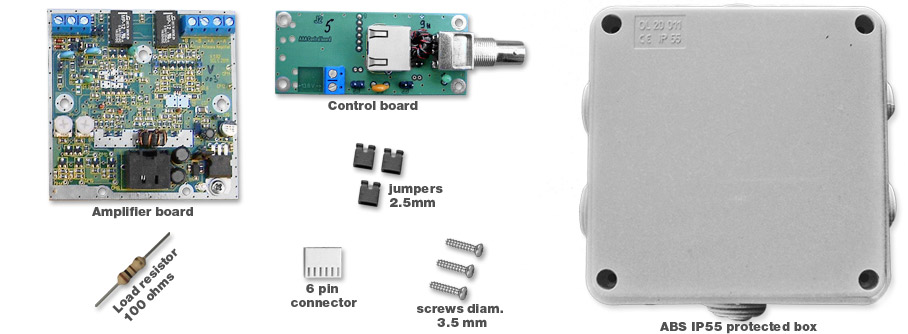
I recently stumbled upon the Active Antenna Amplifier (model AAA-1C) by LZ1AQ. At 87.00 EUR, it’s a pretty affordable and flexible solution for those who would like to design or use a loop antenna.
According to the website, it packs a lot of features:
4 remotely switched modes (Loop A, Loop B, crossed parallel loops A&B and dipole)
Each mode can be switched immediately
Good sensitivity and a flat frequency response
High dynamic range
Protected input from strong signals
High immunity to local noise with balanced amplifiers and balanced feed line
Balun transformer coupling for common mode noise reduction
Extensive documentation manuals with detailed description how to build your own small antennas
The amplifier is described as a kit because you must mount the board, wire up the antenna and set up remote switching yourself. It appears the SMT board comes pre-populated, though so I’m not sure if any actually soldering is required (perhaps someone can verify).
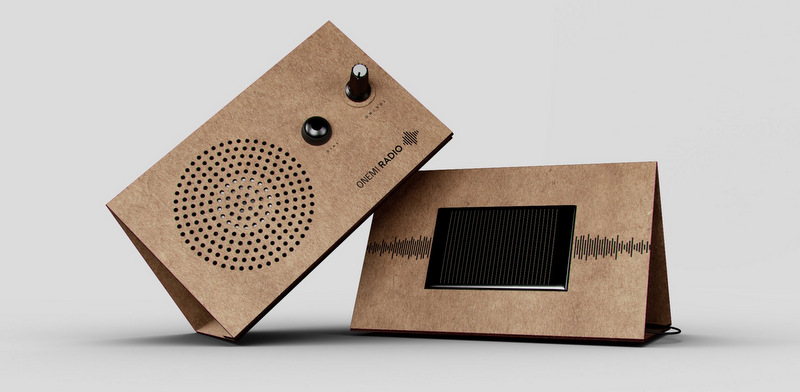
Chile is one of the most seismically-active countries in the world. The ONEMI (Oficina Nacional de Emergencia del Ministerio del Interior)–Chile’s emergency management office–recently added a a new tool to Earthquake kits Chilean families keep at hand.
It’s a foldable, flat-packed, solar-powered cardboard FM radio called the ONEMI Radio. It has a very simple design and interface: a volume control and tuning button that auto-tunes local FM stations.
It’s a cheap, portable and efficient solution that can enable Chilean emergency management to communicate advice during state of emergencies. Clever!
Last year, I was approached by die-hard shortwave radio listener Fred Studenberg, who had an idea that at first seemed outmoded, but soon had me intrigued: he wanted to design and build a car radio. Well, a car shortwave radio.
Studenberg described his ideal car receiver. It seems he’d abandoned the idea of making a radio along the lines of a Sony, for example, that takes the place of an existing car radio. Rather, Studenberg, with singular purpose, envisioned something quite unique: a little black box shortwave that could be easily installed in the back of a vehicle, transmitting audio from the shortwave receiver to the car’s system via an FM transmitter link. One would tune the car radio to an FM frequency––say, to 88.5––and listen to the shortwave receiver which would be located at a convenient location, near the mobile antenna, somewhere in the car (in the trunk, under a seat, etc.).
I was doubtful…and for good reason. To begin with, I’ve never used an effective audio FM transmitter link in a vehicle. They’re all rather mediocre, and usually inject noise––or, are simply too weak to be effective. Secondly, I imagined it would be frustrating to remotely operate a little black box stashed in the trunk of your car without some form of display feedback at hand, showing frequencies and so forth. Plus, I concluded, wouldn’t it be a pain to install? And how would you control such a shortwave receiver? To top it off, I just couldn’t imagine such a system coping with the RF-noisy environment of an car. The more I thought about it, the less feasible it seemed. I hated to disappoint Fred with my concerns.
And this video silenced my concerns: remarkably, it appeared Studenberg had managed to overcome each of my doubts. I was impressed, and interested.
All Studenberg wanted to know was, might any other SWLs benefit from such a device?
I thought of all the commuters and frequent travelers out there, with a penchant for shortwave and a shortage of time in which to enjoy it. Are you kidding? I thought. What SWLers wouldn’t give to turn a tedious traffic jam into a shortwave jam session?
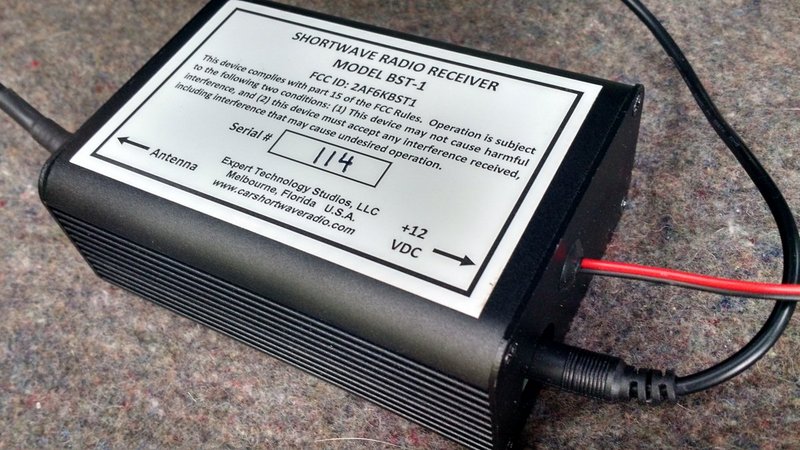
Fast-forward to this year, when Studenberg put his BST-1 on the open market. And in late February, he kindly sent me a loaner BST-1 to evaluate.
Installation
As many regular readers know, this has been a particularly busy winter and spring for me, so I had to delay installing the BST-1 in my car. I was sure it would require dedicated time and likely a bit of troubleshooting to get the shortwave working as intended.
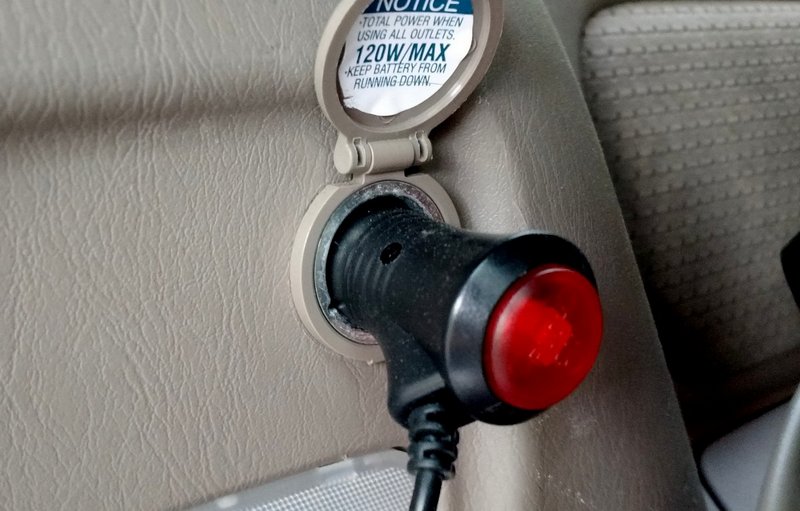
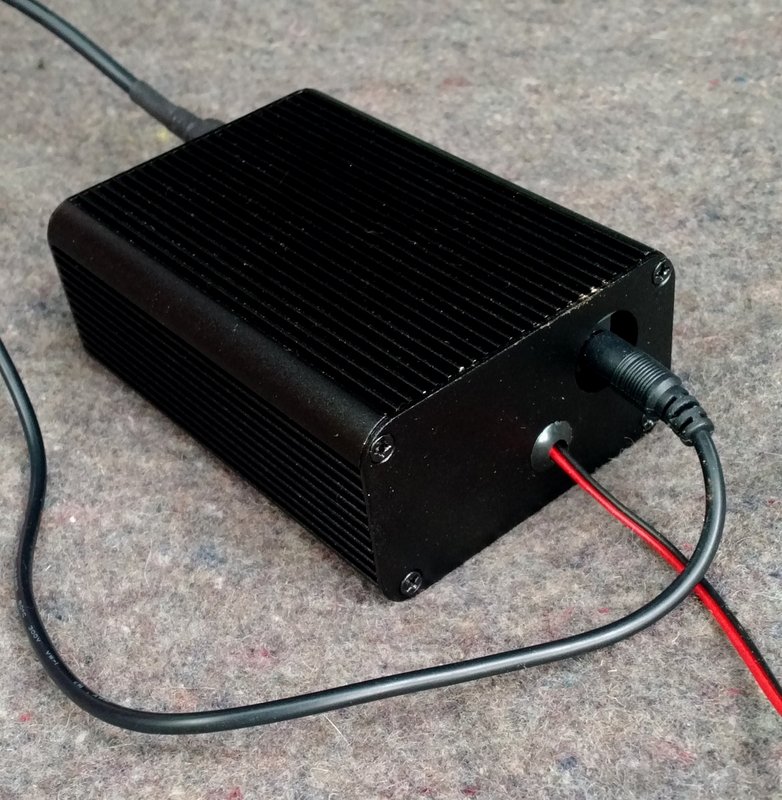
But recently I finally had a moment to install the BST-1. And I quickly I realized that, yet again, I had been fretting over nothing. My Toyota minivan was actually well-suited to installation of the BST-1, since it has a hinged hatchback door, a dedicated 12VDC plug in the rear, and even a small niche in which to tuck the BST-1.
The BST-1 is also supplied with a 12VDC cigarette lighter plug. If you have a minivan or SUV with an auxiliary DC port, powering the BST-1 will require no tools.
The radio’s proud papa also sent a Model CBST-1 mobile shortwave whip antenna with the BST-1. The antenna came with the steel whip and base, a trunk lip mount, and antenna feed line terminated with the appropriate connector. [Note: this whip is surprisingly short!]
The supplied shortwave radio steel antenna whip is short and effective. It should mount on most vehicles with little problem.
Admittedly, my minivan’s hinged door doesn’t work perfectly with lip-mounted brackets—but after some trial and error, I found just the place to mount it where the door wouldn’t damage the base of the antenna. The feed line was easily long enough to cover the span from the top of the door to the receiver.
As for the receiver, it really was a cinch to install: I simply connected the antenna feed line, plugged in the supplied 12 VDC power cord (note that, alternately, there are also twelve VDC pigtails that can also be used) and placed the BST-1 in the back pocket compartment of the minivan.
I’m sure some vehicles will lend themselves to an easy installation like mine, while some may actually be a bit more difficult. Regardless, I do think the installation process is very easy compared with, for example, installing a mobile ham radio transceiver.
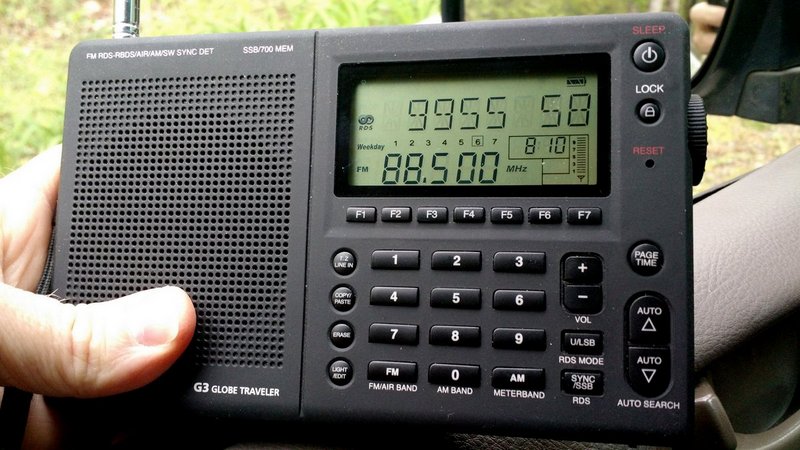
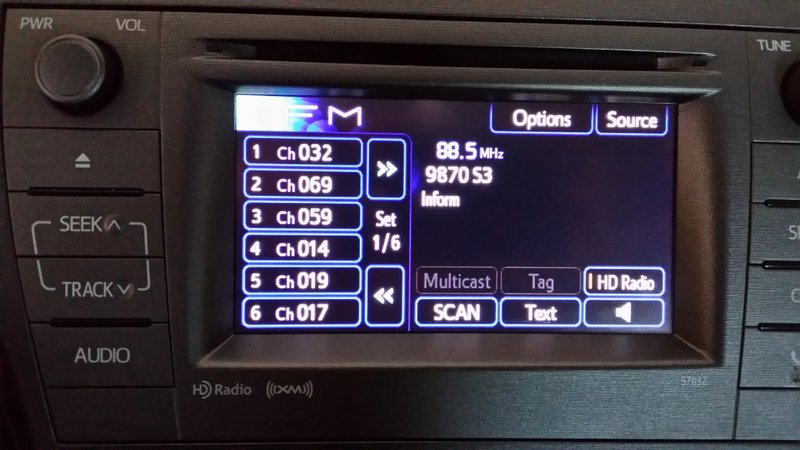
I turned on my car’s power, tuned the radio to the default FM frequency, and after a brief spot of tuning, recognized the unmistakable vociferations of Brother Stair—a sure sign that we’re (a) in North America, and (b) on the shortwaves!
Operating the BST-1
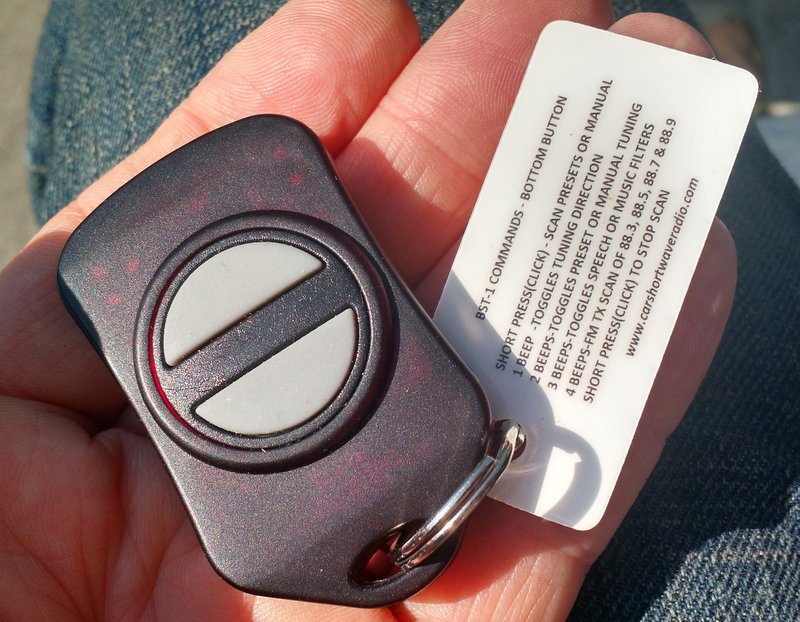
If, like me, you’re the type of person that likes to dive into a new product without referencing a manual, you may need to dial down your impulsivity a little to experiment with the BST-1. While the remote control—a two-button key fob—is extremely simple to use, it’s important to learn how it interacts with the BST-1 receiver.
Key fob
Studenberg’s tuning system is amazingly multifunctional, permitting the tuner to keep his/her hands on the wheel––and car on the road!––while simultaneously pursuing the SWL hobby.
Studenberg unlocked a total of twelve functions on a two-button key fob by employing a clever system of short or long presses.
The BST-1 key fob includes a handy quick reference tag
With a short press of the top or bottom button of the key fob—essentially a quick “click,” like you would use to unlock a car door, and which can readily be done while driving—you can single-step tune in 5 kHz steps, or cycle through preset memories.
Long presses, though, are where you unlock the bulk of the BST-1’s functionality. This was a little confusing to me at first, so I’ll explain how the long presses work:
After pressing and holding the top or bottom button, you’ll hear an audible feedback beep. As you hold the button down, you cycle through one, two, three, and four selections, each marked, again, by an audible beep, thus: beep, beep-beep, beep-beep-beep, and finally beep-beep-beep-beep. Each sequence has a slightly different tone to enable you to better distinguish them.
For example, if I want to toggle the AM filter between narrow (voice) or wide (music), I press and hold the bottom button until I hear one beep, then two beeps, then three beeps: as soon at the three-beep sequence is heard, I let go of the button, and the filter will toggle.
As another example, if I want to store a frequency in memory, I’d press and hold the top button until I heard a sequence of four beeps, then let go.
Short press (click) – Single step PRESET channels or tune in 5 KHz steps in TUNE mode
1 Beep Toggles sensitivity between HIGH and LOW sensitivity
2 Beeps Sends frequency in Morse code and toggles S-Meter update on/off and toggles squelch on/off
3 Beeps Quick to tune Preset Channel 50, WWV at 5 MHz.
4 Beeps If in TUNE mode, stores currently tuned frequency (Morse code “S”). If in PRESET mode, it will delete the channel. To prevent accidental deletions, this delete function must be executed twice. The first activation will display the message “R U SURE” and send the Morse code “?”. The second activation will delete the channel and then display the message “DELETED”.
Bottom Button
Short Press (click) – Starts scanning up or down in PRESET and TUNE mode
1 Beep Toggles tuning direction up or down
2 Beeps Toggles between PRESET or TUNE Mode
3 Beeps Toggles receiver bandwidth between SPEECH (3 KHz) and MUSIC (5 KHz)
4 Beeps Starts scanning of FM transmitter among 4 frequencies : 88.3, 88.5, 88.7, 88.9 MHz.
It took a couple of days to get used to the commands I used the most (tuning by steps, scanning, memory scans, and changing the filters/sensitivity) mainly because I was driving while using the BST-1.
Several models of shortwave portables, like my Grundig G3, have RDS which allows me to easily set BST-1 station memories. Note that RDS is a standard feature on most vehicles sold today–sadly, my 2008 model minivan lacks RDS.
While driving alone, obviously I couldn’t divert my attention from the road to read the included reference guide attached to the key fob, so I had to simply take a bit of time off the road to review the manual.
Performance
Studenberg’s tuning system is amazingly multifunctional, permitting the tuner to keep his/her hands on the wheel––and car on the road!––while simultaneously pursuing the SWL hobby. My very first day on the road with the BST-1, I was pretty impressed with its performance.
The BST-1 has the same form-factor of most SDRs: a black box. The small size and light weight make it ideal for stashing under a seat or in your vehicle’s trunk.
Of course, “mileage may vary” depending on your particular vehicle and receiver installation, but in my case the BST-1 proved to be a fairly quiet receiver on the road. I heard no significant RF noise due to the car’s ignition or engine, and the FM transmitter audio link worked very effectively. I live in a relatively rural area with only a few broadcasters in the BST-1’s 88.3 – 88.9 MHz transmitter range. There is, however, a fairly strong broadcaster on 88.9, but surprisingly the BST-1’s FM transmitter is strong enough that my car’s FM receiver blocks it. Not bad!
Additionally, the shortwave audio is unexpectedly good through my car’s audio system. The 5 kHz/3kHz bandwidth selections are appropriate for decent audio fidelity; indeed, the 5 kHz filter actually sounds more like a 7 kHz filter to my ears.
In terms of sensitivity, the BST-1 exceeds my expectations. The sensitivity is ample enough to receive almost every domestic shortwave broadcaster, strong international broadcasters, and time stations like WWV and CHU Canada. To be fair, I’m sure the sensitivity is being hampered somewhat by the fact the receiver must operate in a mobile environment with the accompanying local interference, but it’s still quite capable.
In the time I’ve been using the BST-1, I’ve logged the following stations here in eastern North America while mobile:
WRMI
Radio Australia
Radio Havana Cuba
HM01 (Numbers Station)
WWCR
WTWW
China Radio International
All India Radio
WBCQ
Of course, here in North America (during the daytime especially), you’ll hear a lot of the Overcomer Ministries via various private/religious broadcasters. Most of the time, these broadcasts are received as clearly as a local AM broadcaster.
In terms of selectivity, the BST-1 is effective. For about ninety percent of my listening, it rejects adjacent signal interference. In extreme cases—like that of Radio Australia (9,580 kHz), which experiences regular interference from China Radio International (9,570 kHz)—it struggles. But in truth, only the very best of my receivers—typically ones with selectable sync detection—can mitigate most of CRI’s spurious emissions. In other words, I’m pleased I’m able to listen to Radio Australia with the BST-1 despite the noise from CRI.
The BST-1 is unlike any other receiver I’ve reviewed here on the SWLing Post. So let’s get to the point: is it worth the purchase?
What the BST-1 isn’t
If you’re looking for a receiver to snag rare and weak DX while mobile, you will be disappointed. Expectations should be kept in line on this point. Especially while your car is running, the BST-1 simply doesn’t have the characteristics of a DX receiver (low noise floor combined with excellent sensitivity and a super stable AGC, for example).
And frankly, the process of band-scanning in 5 kHz steps seeking an elusive weak-signal station would not be fun.
What the BST-1 is
Simply put: the BST-1 is a lot of fun! Without breaking the bank, the BST-1 can bring many of your favorite broadcasters, and the SWL experience, to your vehicle. Once memories are loaded, it’s a simple process to scan them manually or automatically. And at night? You may very well snag serious DX here and there—especially if parked in an area far away from urban radio interference.
In short, the BST-1 is simple to use, unobtrusive, and, frankly, does what it’s designed to do: permit you to SWL in your car.
If your vehicle’s radio has RDS, you’ll have full access to the BST-1 display information.
Summary
Invariably, all radios have strengths and weaknesses; here’s a list of my notes from the moment I put the BST-1 on the air:
Pros:
Simple installation for a mobile radio
Ample sensitivity & selectivity
Little ignition/alternator noise in tested installation
Surprisingly good audio via FM transmitter link
Remote control/key fob (see cons)
Non-distracting while driving
Easily-to-learn common commands
Responsive beeps and “click” sounds to aid tuning
Two ways to connect to a DC source: 12V plug or traditional two-wire
Two AM bandwidths
Two sensitivity settings
Appropriate 5 kHz steps for broadcasting tuning
RDS tags work amazingly well (see con)
Cons:
Remote control/key fob (see pros)
Learning curve for infrequently used functions
Audio feedback only (no visual feedback) if your car’s radio doesn’t have RDS capability
Only two buttons control twelve functions
Limited tuning functionality (5 kHz steps up/down with band scan and memory scan)
No SSB
No sync detection
In conclusion, I’m so glad I finally installed the BST-1. If your vehicle has a RDS capabilities, the BST-1 will feel like a fully-integrated part of your mobile audio system. Even without RDS–like my situation–it still packs a lot of punch and is impressively engineered for distraction-free operation..
I must admit, it’s awfully magical to be driving down the highway here in the States, listening to, for example, Radio Australia, some 15,700 km away… So if you travel or commute regularly, and you love SWL, this little mobile shortwave receiver might be just made-to-order for you, too.
At $179.50 plus shipping, the BST-1 costs about the same as a decent portable shortwave receiver–a good value in my book!
SDRplay is pleased to announce the official release of SDRuno for the RSP. SDRuno is the new name for the RSP compatible version of Studio1, the rights to which we obtained and announced on 28th April. SDRuno contains native support for the SDRplay RSP and no extra plugins are required. Third party hardware can also be supported via the ExtIO interface, but with reduced functionality.
SDRuno provides a rugged and flexible, high performance SDR receiver capability and boasts some excellent features:
Multiple ‘Virtual Receivers’ which allow for simultaneous reception and demodulation of different types of signals within the same receiver bandwidth.
A selectivity filter with an ultimate rejection greater than 140 dB.
A unique distortion-free double stage AGC with fully adjustable parameters.
Multiple notch filters with BW adjustable down to 1 Hz, Notch Lock feature.
A unique synchronous AM mode with selectable/adjustable sidebands, dedicated PLL input filter, and selectable PLL time constants.
SNR (stereo noise reduction), featuring a proprietary noise reduction algorithm for stereo broadcast.
AFC for FM signals.
Calibration for receiver frequency errors.
Over time, we plan to add many more features to SDRuno to enhance the user’s experience of this very powerful piece of software. This software runs on Windows and we don’t yet know how easy it will be to migrate it to other platforms but this is something we will be investigating.
SDRuno will be made freely available to all current and future users of the RSP – to download a copy – simply go to http://www.sdrplay.com/windows.html
Our support for SDRuno in no way lessens our commitment to support HDSDR, SDR Console, Cubic SDR or ANY other software solution where the authors are willing to work with us. We fully recognise that many people have strong preferences for particular pieces of software and we do not want to do anything to undermine the options that people have to use their favoured software packages. Indeed, our view is quite the opposite. Our objective remains aim to have our hardware platforms support any and every SDR package out there. This of course may not be possible, but it is our philosophy and part of the ethos of our company.
About Studio 1:
Studio1 was developed in Italy by SDR Applications S.a.s. and has hundreds of happy customers around the world. Studio 1 is known for its user friendly stylish GUI, CPU efficiency and advanced DSP capabilities, including features not available on other SDR software packages.
SDRplay limited is a UK company and consists of a small group of engineers with strong connections to the UK Wireless semiconductor industry. SDRplay announced its first product, the RSP1 in August 2014