Shortwave listening and everything radio including reviews, broadcasting, ham radio, field operation, DXing, maker kits, travel, emergency gear, events, and more
The Yaesu FT-890: One of many general coverage HF transceivers spotted in the 2017 Hamvention flea market.
Many thanks to SWLing Post reader, Joe, who writes:
I’ve been practicing for my Technician ham radio license here in the US and am ready for the test. I’m already looking at HF transceivers even though I don’t have my General license yet.
Here’s what’s important to me:
I will still do a lot of SW DX
Something that has at least decent audio
Something that isn’t too too huge; though I’m a little flexible on size
I need something that has a receiver that handles weak DX well
I’d be comfortable spending $500 any day all day no problem. Anything higher than that and I’d really have to think it’s an investment in my radio future.
Thanks for your question, Joe, and allowing me to post it here for comment as this is one I’m frequently asked.
First of all, congratulations on studying for and taking your ham radio license exam! I’m a ham and absolutely love the radio privileges my license provides.
At the same time, I’m still more of an SWL than a ham–meaning, I spend way more time chasing SWL DX than doing on-air ham operations.
With that said, I always seek radios that will serve me well as both a ham and SWL, if possible.
My humble advice
If we stick with your $500 budget strictly, then we’re certainly looking at used transceivers. That’s okay–there are many good ones on the market!
I posted the following review of general coverage transceivers a few years ago. The info in it is still very much accurate in the used market. I would suggest you give it a good review as it goes into more detail about the ins and outs of your first transceiver and the importance of leaving budget to purchase a good power supply:
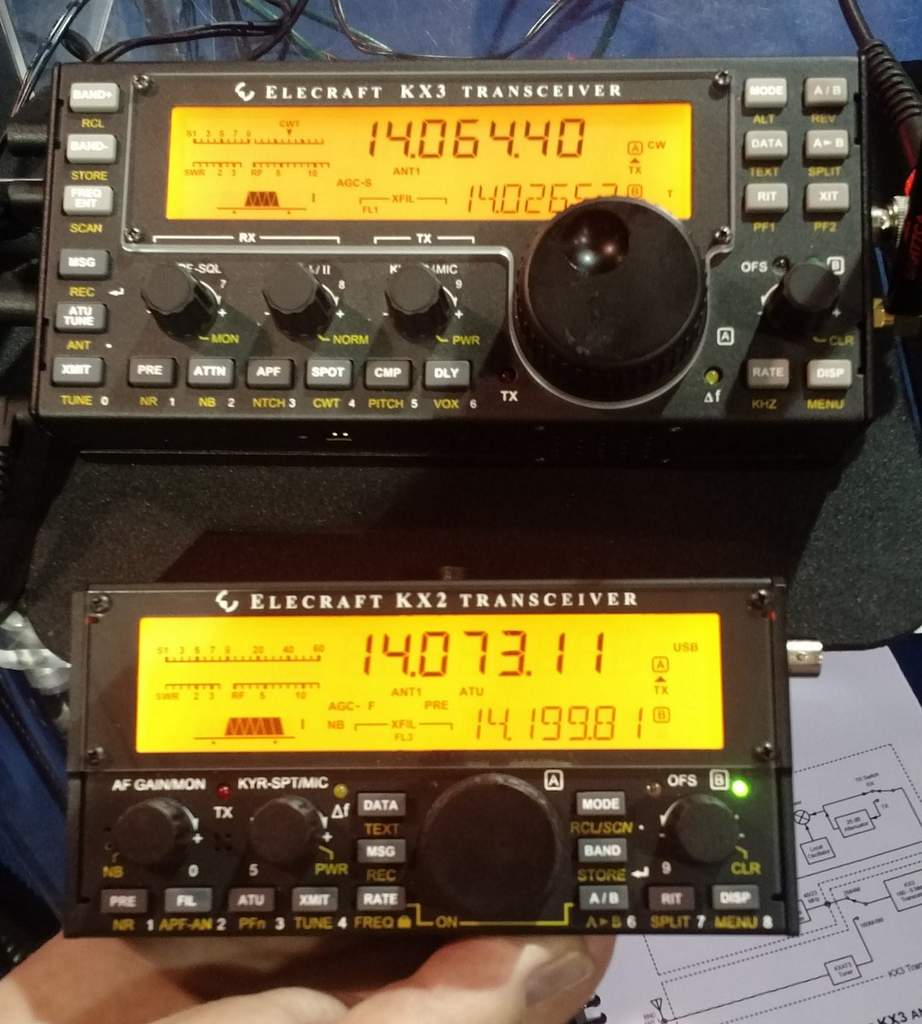
Comparing the size of the Elecraft KX3 (top) and KX2 (bottom) at Elecraft’s Dayton Hamvention booth.
You can find the KX3 used for $700-900 (depending on options). The bare-bones model of the KX2 can be purchased new from Elecraft for $749.
Of course, something to keep in mind about the Elecraft KX series transceiver is that output power is limited to 12-15 watts. Some of the general coverage transceivers mentioned in our review have a much higher 100 watt output power.
Additionally, the audio fidelity (via the internal speaker) is not as good as many other general coverage transceivers. Audio amplification is not as powerful, because both transceivers are designed to operate on a small battery pack (a major plus in my world because I love field-portable rigs).
Since I do 90% of my radio work with headphones, audio amplification is not a problem for me and I’m quite please with both KX line transceivers. Many KX series owners purchase external amplified speakers to improve audio.
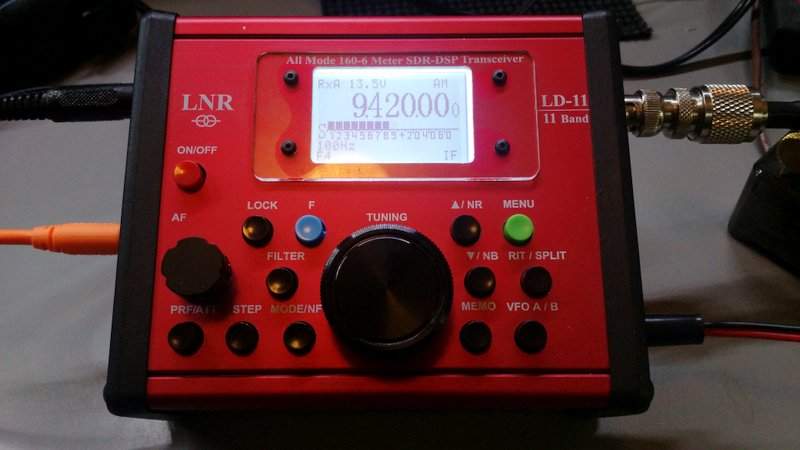
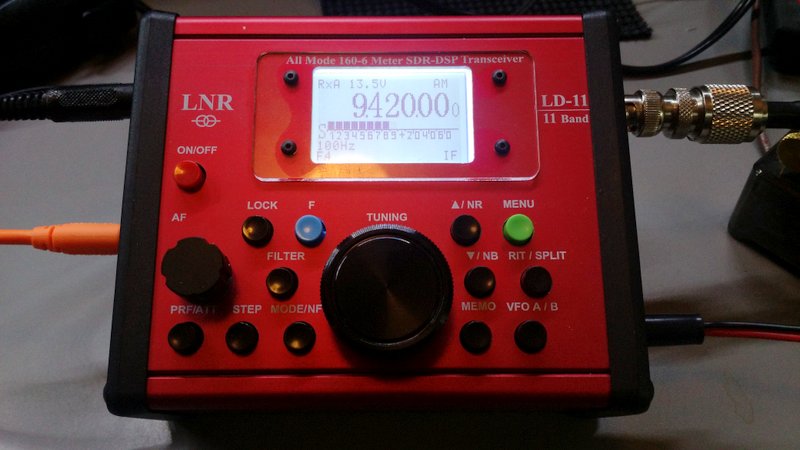
The LnR LD-11 tuned to the Voice of Greece.
While we’re looking at QRP transceivers, I would also recommend the LnR Precision LD-11. Its broadcast afidelity is even better (via headphones) than the KX2/KX3 since the AM filter can be widened to an impressive 9.6 kHz. It’s a top-notch transceiver and can be purchased new for $780 US. Click here to check out my full review of the LD-11.
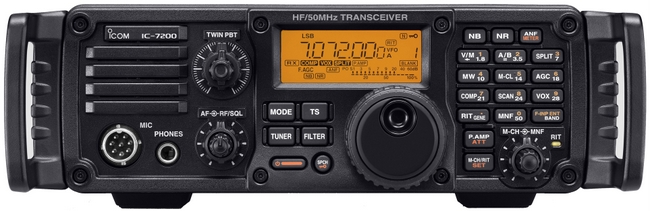
New, the IC-7200 is about $879 US, but they can be found used closer to the $650 – 750 mark. A very good value in my book. In fact, I’m very tempted to buy one as my 100 watt “shack and field” rig. It’s way more user-friendly on Field Day than my Elecraft K2/100 and, in many ways, a better option than purchasing an Elecraft amp for my KX3/KX2.
Any other good suggestions?
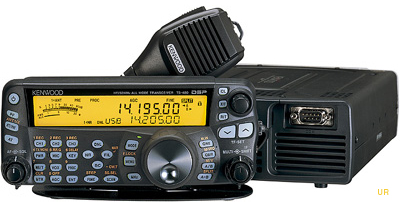
The Kenwood TS-480SAT is full-featured, small, and has a detachable face plate. A very good general coverage transceiver.
The following review first appeared in the November 2016 issue of The Spectrum Monitor magazine.
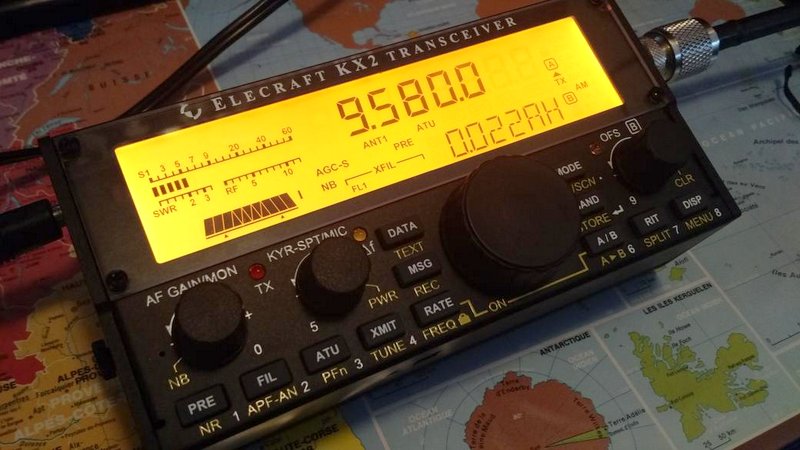
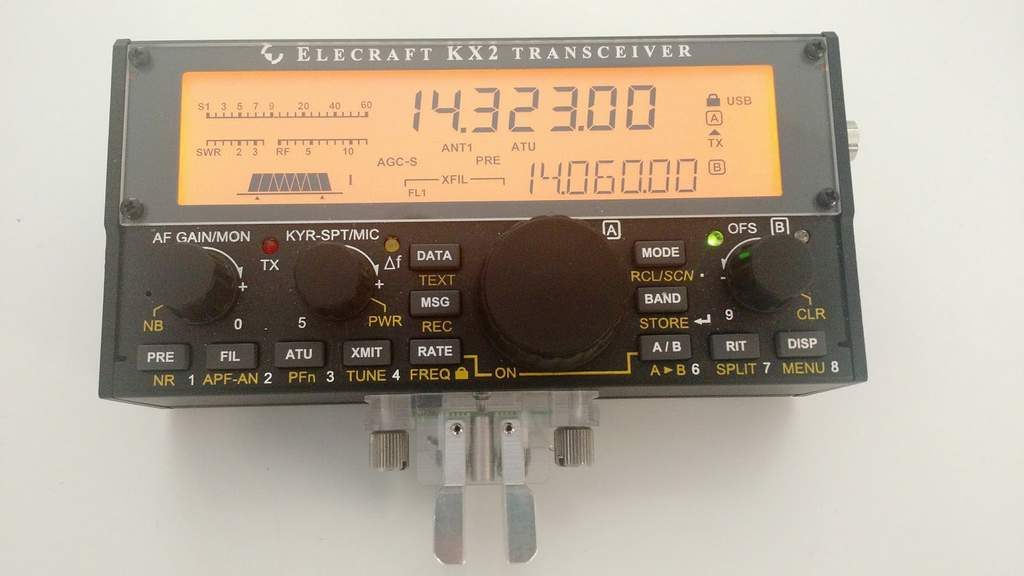
The Elecraft KX2 tuned to Radio Australia.
It’s not every day that I get exciting news about the production of a new radio.
It was two days before the 2016 Dayton Hamvention–the day before the Four Days in May QRP conference–as I was eating lunch en route to Ohio, that I received the news: Elecraft had just announced a new transceiver, the Elecraft KX2.
Elecraft being known for their exceptional products, I thought instantly, hmmmm, this could be interesting. I immediately dropped everything and contacted Elecraft, asking, “When can I see this new rig?”
Wayne Burdick (N6KR) of Elecraft kindly sent me a few specs, and the following day, I previewed the KX2.
What is the KX2?
In short: the KX2 is a feature-rich pocket QRP transceiver. For those who are familiar with the Elecraft product line, it’s like a KX3 (feature rich portable rig) in a KX1-sized (much smaller, handheld/pocket) package.
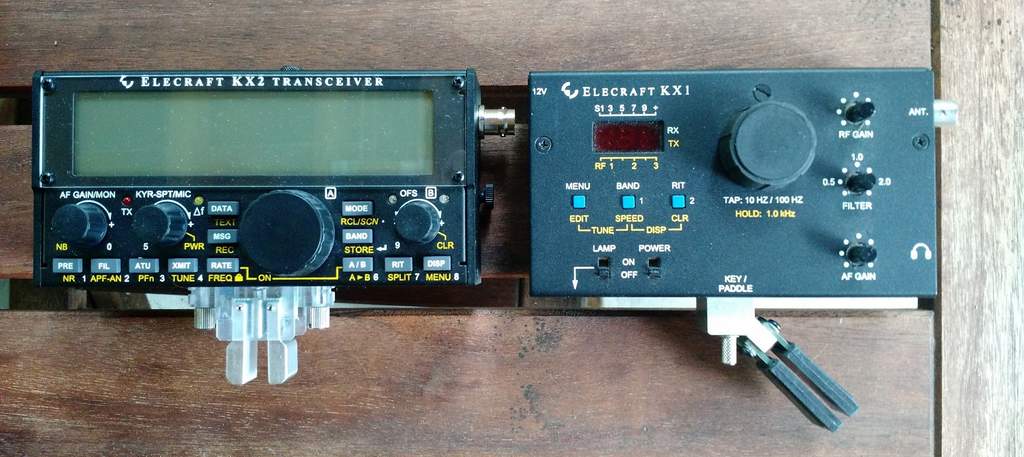
The Elecraft KX2 (left) and KX1 (right)
The day before the Dayton Hamvention, Elecraft allowed me to snap some photos, ask some questions, and generally give their new little rig a once-over. After holding their new offering in my hand–it’s slightly narrower, if a bit thicker, than a paperback book–was already tempted to plunk down $749 for the KX2 right then and there.
Comparing the size of the Elecraft KX3 (top) and KX2 (bottom) at Elecraft’s Dayton Hamvention booth.
So, what what stopped me? For one, I was less than two weeks away from taking a two month trip in Canada, and already had an (embarrassingly) large number of radios to take along. I also had a few other reviews in the works and needed to finish them prior to evaluating the KX2. And–let’s face it–that kind of cash is significant to a reviewer like me.
Yet there was another consideration–two, actually: I already own both the KX1 and KX3 transceivers, and like them very well. Come on, I chastised myself, as I continued to admire the latest Elecraft in its tiny package. Wouldn’t a KX2 be rather…redundant?
Nonetheless, in August I took the plunge and ordered a KX2. Perhaps it was a leap of faith…or a momentary lapse of judgement that led me down temptation lane. At any rate, I had been doing enough NPOTA activations that I fell for the idea that I could potentially have the advantages and performance of the KX3 in an even smaller, even more portable, package.
Would there be buyer’s remorse? The only way to tell, obviously, was to put the KX2 on the air.
Learning my way around the KX2
I imagine a lot of new KX2 owners will be Elecraft veterans like myself. Once you’ve used Elecraft equipment for a while, you begin to understand how the company designs their menu trees and functions. In other words, once you’ve experienced the Elecraft ecosystem, moving from one radio to another becomes easier.
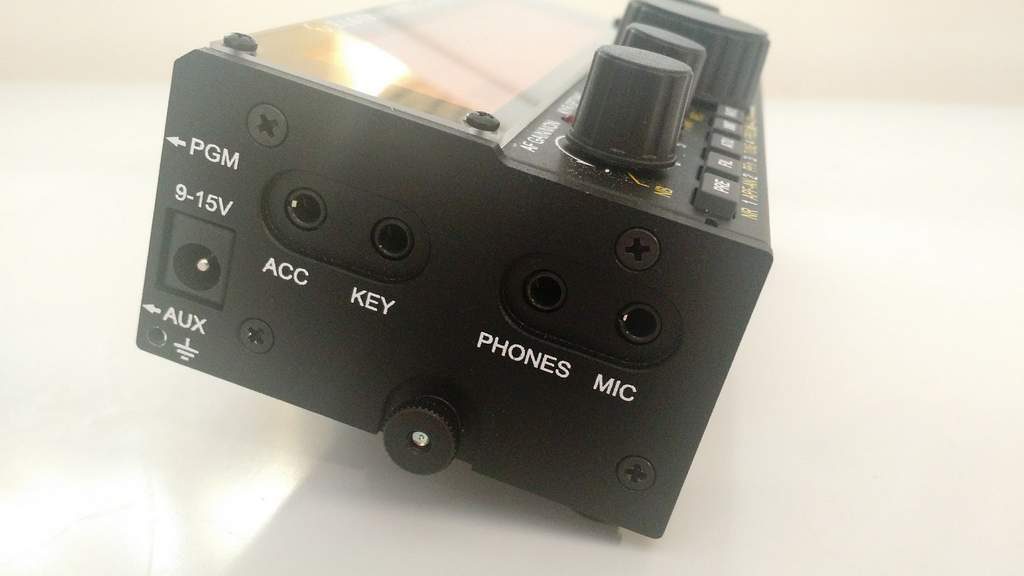
The KX2’s on-board microphone is located on the left side of the front panel and works very effectively especially in an HT configuration.
I approached the KX2 with confidence, having owned the similar KX3 for three years and the K2, K1 and KX1 for many years.
The left side of the KX2 is where all connections are located, save the antenna connector.
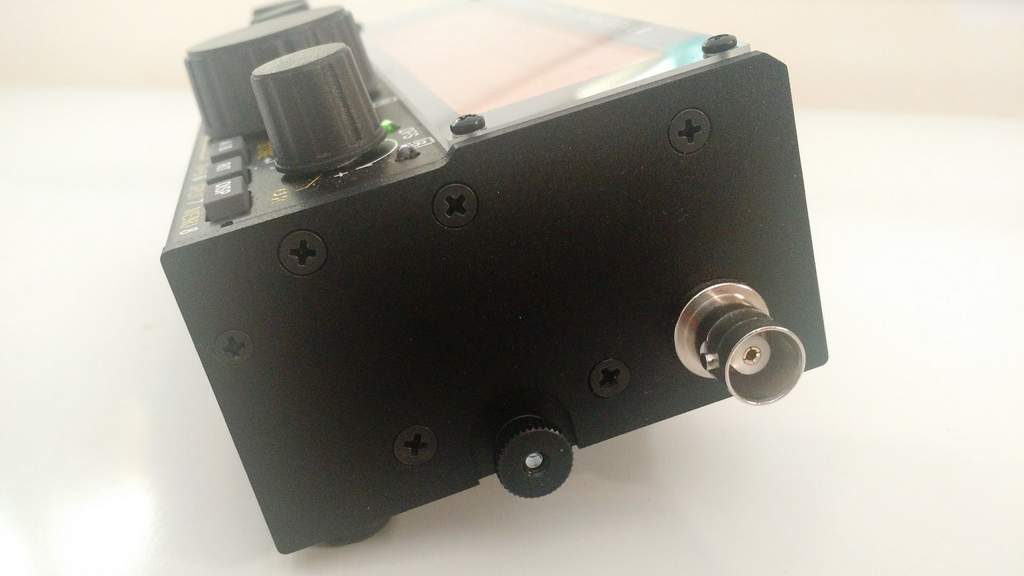
The BNC antenna jack is located on the right side of the KX2.
I plugged the KX2 into my power supply, main antenna, and powered it up by pressing the Rate and A/B buttons simultaneously (a clever keylock method). The KX2 defaulted to the 20-meter band. I started tuning around and quickly realized that the SSB mode was set to the lower instead of the upper sideband. No problem, I thought, and instinctively pressed and held the MODE button to switch from LSB to USB. This is where I found the first difference between KX2 and KX3 functions. Pressing and holding mode button on the KX3 toggles USB/LSB, but on the KX2 it enters the frequency memory store mode.
I tinkered with the KX2 MODE button to no avail, so reached for the KX2 owner’s manual, fortunately a well-written tome. Turns out, to switch between USB/LSB, you: enter the KX2 menu system, select the ALT MD entry, then switch the “alternate” to the “normal” SSB band mode, which moves it to USB on the 20-meter band.
A number of functions accessed on the front panel of the KX3 require using the menu system on the KX2. RF Gain is another example of this, as I discovered pretty quickly.
This got me thinking. I don’t envy the folks at Elecraft who have to sort out the ergonomics and functionality on a radio as small as the KX2. I decided I’d better check out the owner’s manual and familiarize myself with the functions I use the most in the field.
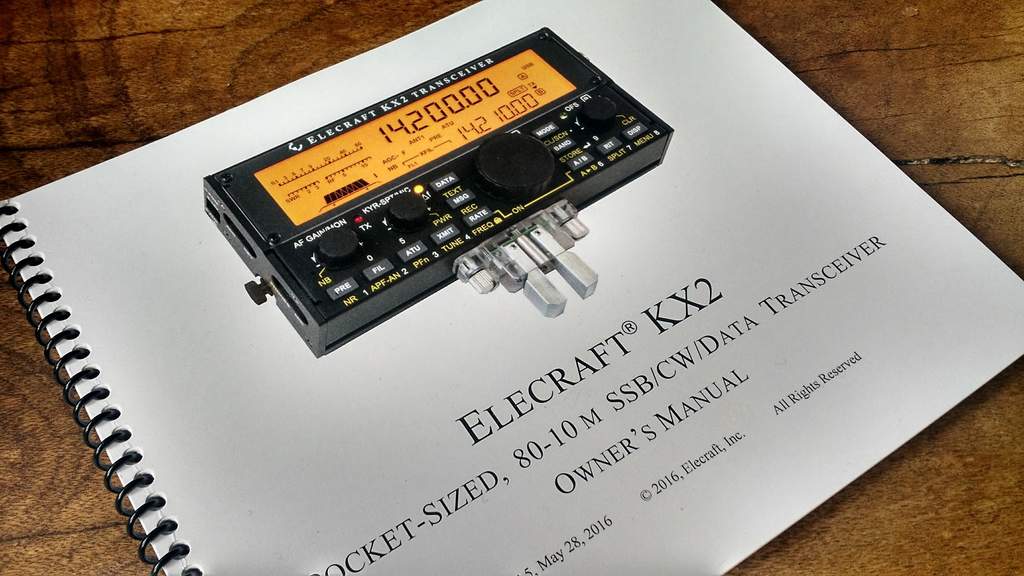
Elecraft manuals are superb; they’re spiral bound, easy to read and comprehensive.
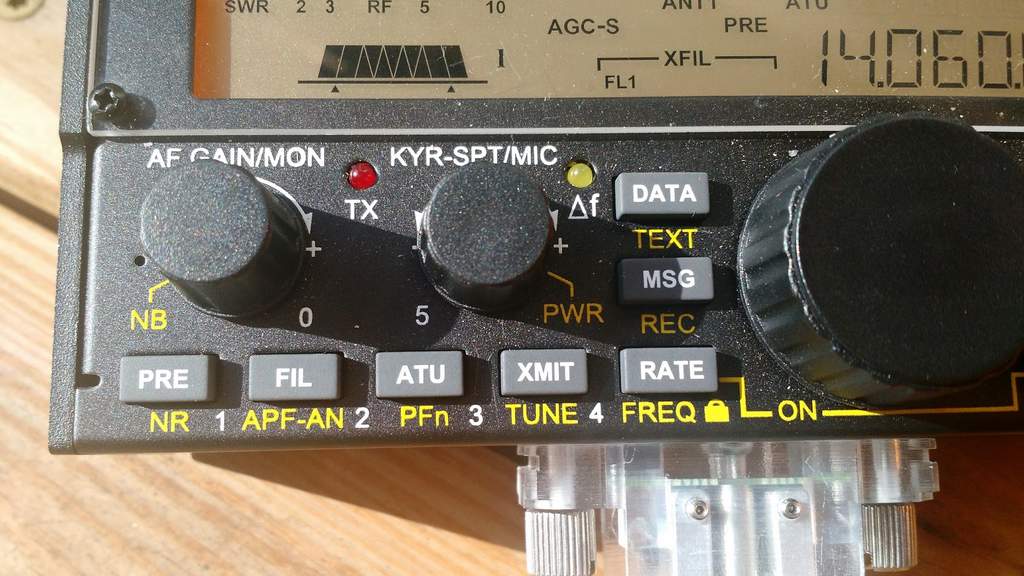
I must say, Elecraft has done an admirable job of keeping the most essential functions on the face of the radio and tucking the less-used functions into the background of their menu system [Not to suggest access is ever complicated, considering that you just 1) enter the menu, 2) select the function, and 3) change the parameter…that’s it.] No doubt, the reason for their success is the fact that their key designers, like co-founder, Wayne Burdick (N6KR), actually operate radio in the field–they get it.
Speaking of the field, that’s exactly where I wanted to take the KX2 to test, since that’s clearly where the rig’s designed for use. Note here that this is not a base rig: its size and features lends itself very well to a pack radio–one I wanted to keep packed and at-the-ready!
Packing up…
Prior to receiving the KX2, of course, I did some pack research (those of you who know me know that I’m a bit of a pack geek).
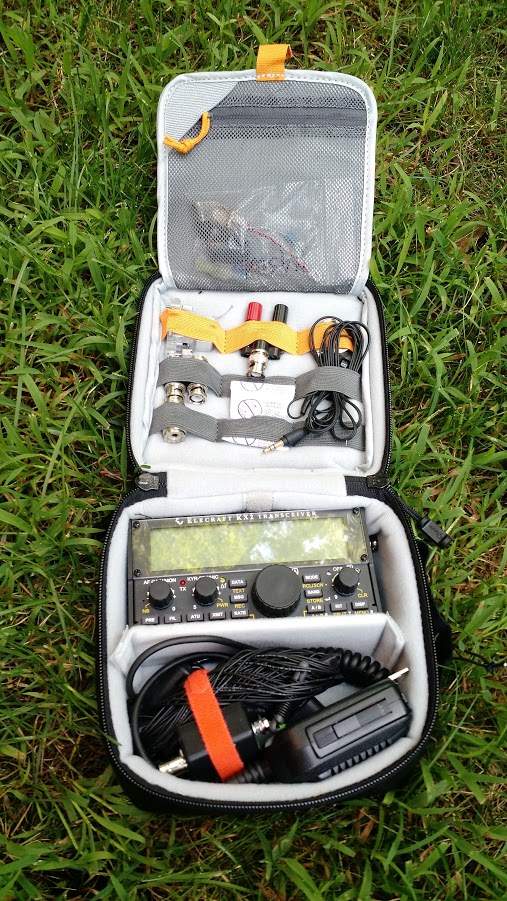
Elecraft was actually selling two models of a LowePro pack that fit the KX2 exactly: the ViewPoint CS 40 and ViewPoint CS 60. Though I searched far and wide, I couldn’t find a pack from some of my favorite manufacturers (such as Spec-Ops Brand, Red Oxx, and Tom Bihn) that has the right amount of padding, exact space and fit for the KX2, as did the CS 40 and CS60. So I purchased the larger CS 60–the larger of the two packs.
My Elecraft KX2 kit then consisted of the following:
The Elecraft KX2, with internal battery and ATU options
All of this–save fishing line, weight, six-foot coax cable and clipboard–were protected by the compact and perfectly portable LowePro ViewPoint CS 60 padded case, and fit it like a glove. I tucked the whole kit quite conveniently into my 20-year-old Dana Design lumbar pack.
The only way to know if the kit was complete, was to take it to the field. Nothing like trial by fire.
NPOTA: National Parks On The Air
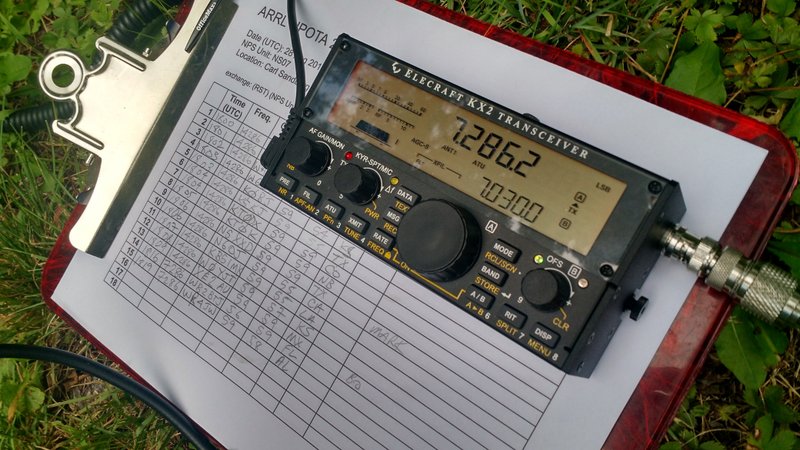
My first NPOTA activation with the KX2 field kit was at the Carl Sandburg Home in East Flat Rock, NC.
After hiking about twenty minutes to my trail location and setting up the station, which I found to be a fairly simple process, I realized that the KX2 is so compact that it easily fit on the clipboard I was using to hold my log sheets. Thus, the clipboard instantly became my laptop operating table.
As soon as I sat down in my folding chair, I turned on the KX2, set the frequency to 14,286 kHz, and pressed the ATU button, which gave me a 1:1 match (since the EFT is resonant).
Next, I recorded my CQ call into the KX2’s built-in voice keyer by:
pressing and holding the MSG button,
assigning the voice message to “memory allocation 1” by pressing the PRE (1) button,
pressing XMIT to start the recording,
reading off my CQ call, thus: “CQ, CQ, CQ, this is K4SWL calling CQ for National Parks on the Air…”, and
pressing XMIT again to stop the recording.
Then, I started calling CQ by simply pressing the MSG button and selecting my message stored in memory allocation 1 by pressing and holding the PRE (1) button.
By pressing and holding the PRE (1) button, I initiated a loop-playback of my CQ call where my KX2 would transmit my call from memory. Then I waited a few seconds to listen for any replies, and played it again. (In loop-playback mode, I’d learned that the KX2 will repeat my CQ call until I interrupt it by pressing a button or keying my mic.)
It’s a brilliant and easy function which saves my voice. By automatically calling CQ, it gives me an opportunity to answer questions from curious passersby who were naturally fascinated by a guy sitting on the side of a trail, talking into a little box connected to a tree-branch suspended wire.
In the end, I didn’t even need to use the voice keyer that much. I worked my minimum of ten stations within six minutes! Of course, I continued to call CQ until I worked everyone in the pile-up (including stations from California, Nebraska, Kansas, Texas, and Mexico–thanks, folks!).
Result? Wow. That first field experience at the Carl Sandburg home couldn’t have gone better. And the KX2 had quite a lot to do with that outcome–both in function and form-factor.
Since then, I have taken the KX2 on more than twenty NPOTA field activations, and my compact field kit is making impromptu activations a breeze. Indeed, by the time you read this review, I’m guessing I’ll have added a dozen more NPOTA activations with the KX2 field kit.
[Update: At time of posting this review, I have a total of 54 NPOTA activations–almost forty have been made with the KX2.]
Internal battery option
Activating PK01 (The Appalachian Trail) with the KX2
One of the things that make the KX2 so easy to set up is the fact it can run quite effectively on a high-capacity internal LiPo battery pack.
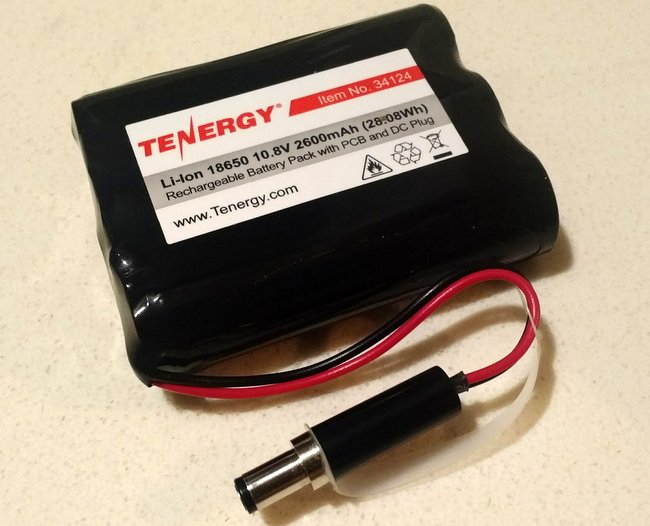
The KX2’s 10.8V 2600 mAh LiPo battery
On one particular set of activations, while returning from the W4DXCC conference in late September, I activated several sites, including a couple of “two-fer” sites, just during my drive home. I only used the KX2’s built-in battery to power the rig. I was on the air almost three full hours of fairly intense transmitter use (repeating my CQ call through the voice keyer). The KX2 was able to pump out a full 10 watts of power for a little over one hour, then as the voltage dropped, it reduced output to 5 watts.
I feel like this is impressive performance from such a small battery pack. It’s a little pricey (at $84.90 US for both the battery and external charger), but very much worth the cost if you’re splurging for a KX2, anyway.
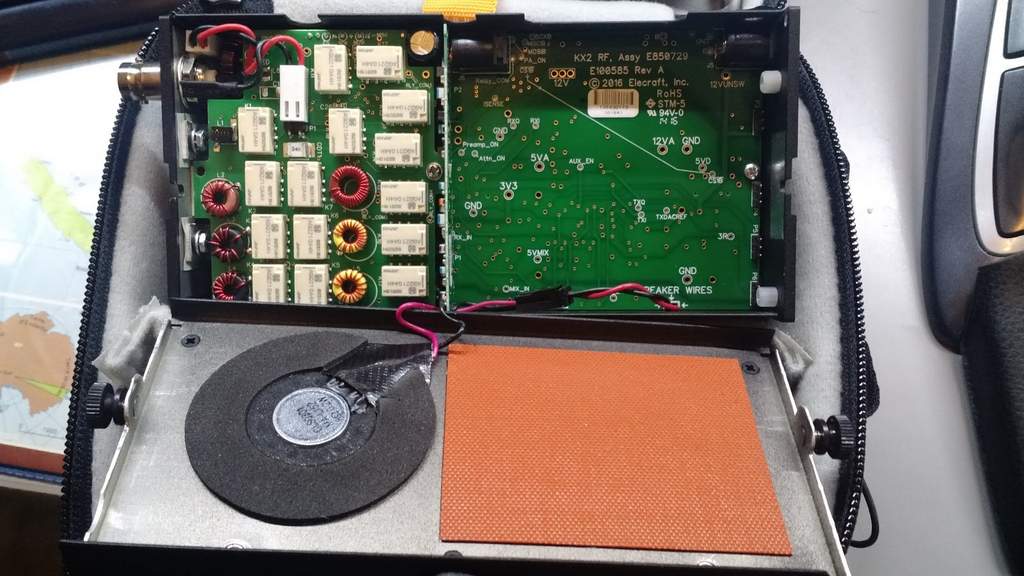
View of the Elecraft KX2 battery compartment. Note the speaker wires which attach the two halves of the chassis.
One complaint: I’m not crazy about the fact that the LiPo battery must be removed from the KX2 in order to be charged. To gain access to the battery, you loosen the two thumb nuts on either side of the KX2, then carefully open the back compartment. You must be careful because two speaker wires are attached to the back panel which holds the internal speaker; if you yank it open, you could disconnect the speaker.
I’ve read a report from an NPOTA activator who said that, in the process of multiple openings/closings of the back plate, the speaker wires have rubbed bare spots on the insulation. He used black electrical tape to fix the problem. So far, I haven’t noticed this, but I certainly see how it could happen with time.
Operating a NPOTA “two-fer” under the Blue Ridge Parkway and in the Great Smoky Mountains National Park.
In the end, I give Elecraft a little grace on this point. After all, this is the first transceiver they’ve ever produced that doesn’t have a kit form, plus they’re trying to satisfy the needs of battery and charging circuit while keeping costs down, as well as make everything fit in an almost paperback-sized enclosure. Frankly, this works fine. I don’t mind the extra care required because, in the end, having such a capable internal battery outweighs any inconvenience of charging at home.
Elecraft, if there’s a way to reinforce the speaker wires, that would likely help.
KXAT2 Internal ATU Option
I ordered the KXAT2 internal ATU option with my KX2. Having used the KX3 internal tuner for years, I guessed this might be an excellent ATU, as well.
And it is. In the field, I’ve used a variety of wire antennas, and the KX2’s internal ATU has matched them beautifully.
So, exactly how good is the KXAT2? The following story will give you an idea.
I brought my KX2 along to the W4DXCC conference in late September. The conference has a club station that consists of two Icom IC-7300s which are hooked up to a variety of antennas. During the conference, my buddy WD8RIF was activating a particularly rare NPOTA site. My only chance of working him was on 40 meters.
Conference attendees took turns operating the KX2.
Unfortunately, out of all of the self-supporting antennas erected on site, none were resonant below the 20 meter band. I had no means to properly hang my 10/20/40 meter EFT Trail-Friendly antenna at the hotel, so out of desperation, I tried to load a 20 meter hex beam on 40 meters at QRP power using the IC-7300 and its internal tuner. In short, the IC-7300’s ATU couldn’t find a match and refused to transmit.
But I had my KX2 in my field pack. I set up the KX2, connected it to the 20M hex beam, tuned it to 40 meters, and hit the ATU button. The KXAT2 promptly found a 1:1 match!
Using the Elecraft KX2 on 40 meters at the W4DXCC conference while attached to a 20 meter hex beam.
Granted, we were only operating 10 watts, but even the IC-7300’s internal ATU wouldn’t work at that same power level.
In short, if you plan to operate portable with the KX2, do yourself a favor and order the KXAT2 internal tuner, as well. Clearly, it’s ability to match is impressive.
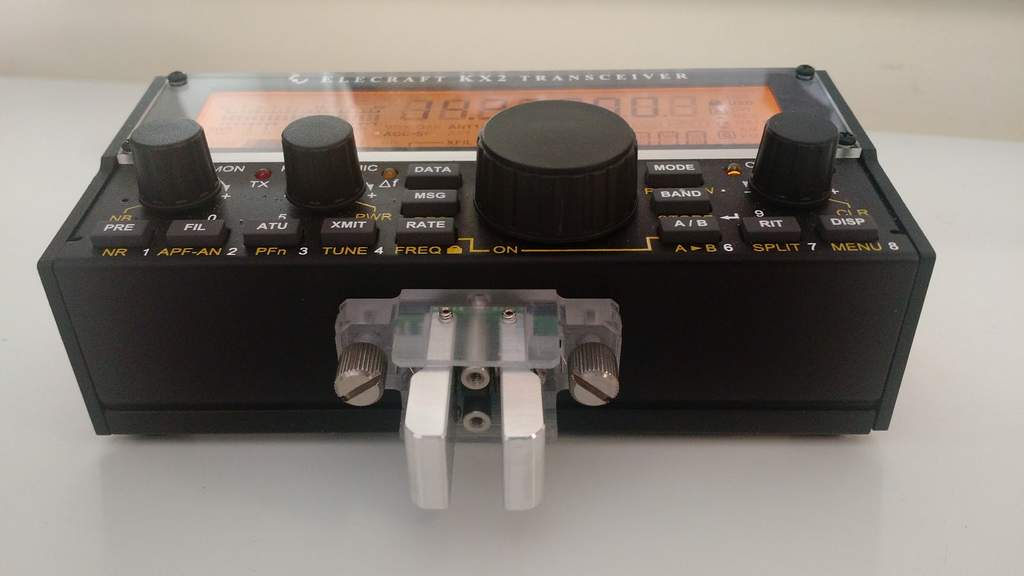
KXPD2 keyer paddle option
Elecraft also sells a small, attachable paddle that is custom-made for the KX2–it’s called the KXPD2 keyer paddle.
I had not planned on acquiring a KXPD2 as I’m not the biggest fan of paddles that are attached directly to radios. I did, however, think back to my KX1 and the many times I operated CW while holding that little rig in my hands. To be clear, though, the KX1 paddles are primitive in comparison to the KXPD2, which has adjustable contact spacing and even built-in allen wrench storage.
One night at my local radio club, I passed the KX2 around with the KXPD2 attached and received a number of positive comments about it. I find it a pleasure to use, too, and lightyears better than my KX1 paddle.
In the field, I personally find the two thumb screws which attach the KXPD2 a little small to turn fluidly. This is due, primarily, to the fact I have bigger fingers. Steve (WG0AT) experienced the same problem, and came up with a creative solution: silicone rubber tape. He simply wrapped the tape around the thumb screws, giving them a larger tactile surface area. I’ll try this with my KXPD2 paddle screws, as well.
The KXPD2 is a brilliant little key, I must admit. I say this even though I feel the $109.95 price is rather high. Still: it’s a quality little product and I’ve been very pleased with its smooth action and precision. And, oh, yeah–a bonus–it will fit my KX3 as well!
General coverage receiver
In August, Elecraft pushed out a Beta firmware release on the KX2 which included AM mode. Following this release, I received a number of inquiries from SWLing Post readers asking for a comparison and audio samples.
At the time, I had the excellent LnR Precision LD-11 transceiver in the shack, so I thought I’d do a quick audio comparison with the KX2 since both price points are similar and both are transceivers with AM mode.
I set the LD-11 to a bandwidth of 9.6 kHz, and the KX2 to 5 kHz: the widest AM filter settings of each. Keep in mind, of course, that this is was not an apples-to-apples comparison, but it did showcase each radio’s potential AM audio fidelity.
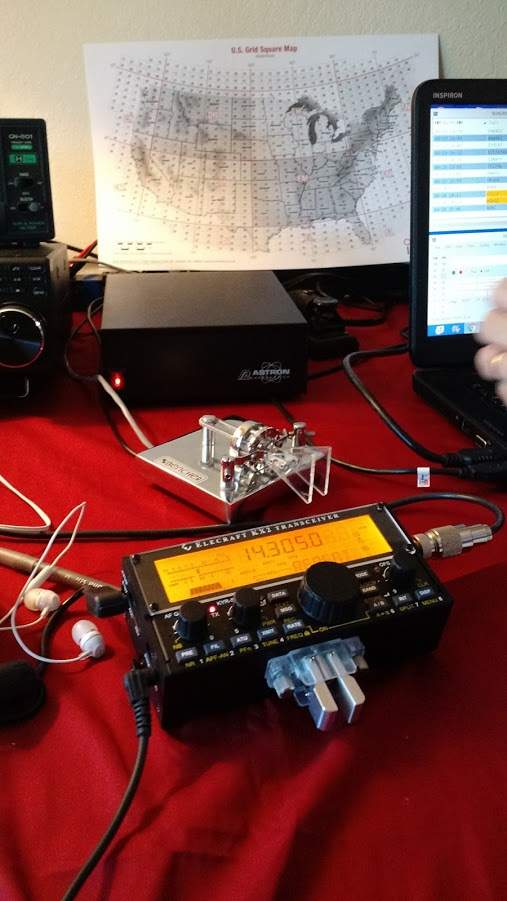
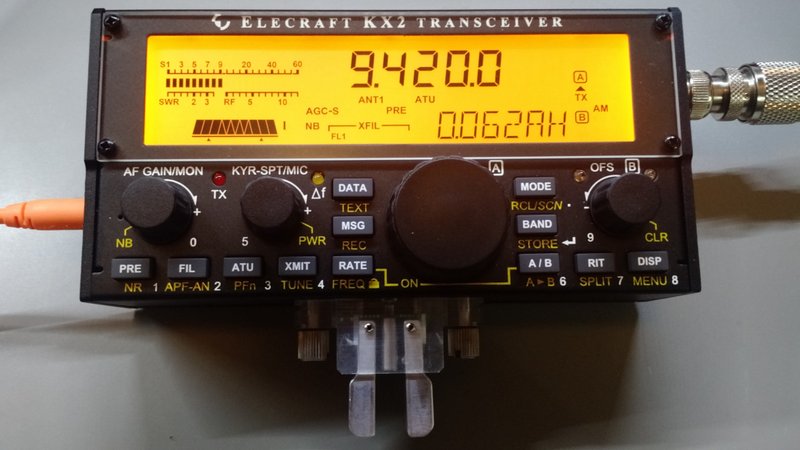
To make the playing field as even as possible for these two disparate units, I tuned both rigs to the Voice of Greece on 9420 kHz around 00:30 UTC. VOG’s signal was strong into North America.
I made the following recordings with my Zoom H2N digital recorder, feeding in-line audio patched from each radio’s headphone jack. I tried to balance the audio levels between the two rigs as closely as possible to one another.
The results from both radios are duly impressive. Since the LD-11’s bandwidth can be widened to 9.6 kHz, strong signals like this one sound pretty darn amazing. In truth, I actually prefer a filter width of about 8.2 kHz on strong signals, but VOG was wide enough to justify 9.6 kHz. I believe the LD-11 would rival many dedicated tabletop receivers.
The Elecraft KX2, in normal audio mode, sounds flatter and narrower than the LD-11 of course, but still remarkably pleasant–a surprise, considering its limitations.
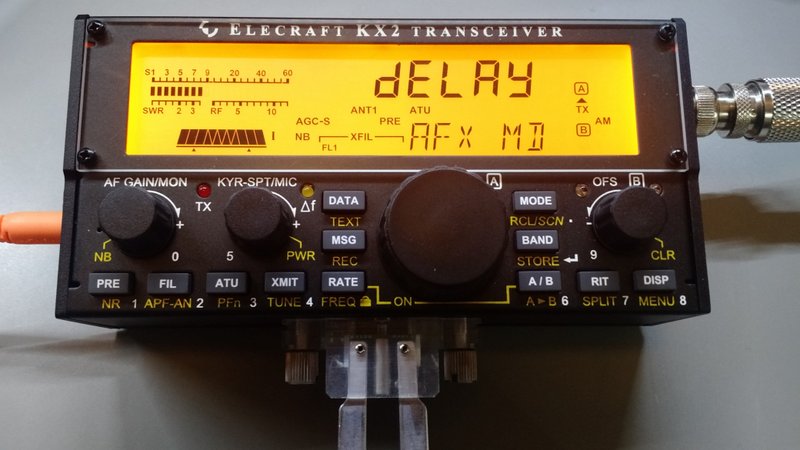
In the KX2’s “delay” DSP audio mode–available when headphones are used–the signal sounds much wider than 5 kHz, though the effect adds a little graininess to the audio. That’s okay, however; I appreciate having the “delay” audio option in my tool bag.
In the past several months, I’ve used the KX2 for shortwave broadcast listening, and each time I’ve been happy with it. It’s an exceptionally sensitive and selective receiver, with a stable AGC, thus would please the most dedicated DXer. Does it have the audio fidelity of the Drake R8B? No way. But its audio is very good, nonetheless, and it can dig weak DX out of the noise as well as any of my dedicated receivers.
After all, this is a ham radio transceiver, not a broadcast receiver, so I’m impressed that it can double as both.
Mediumwave reception?
While HF reception is very good, Elecraft is the first to tell you that KX2 mediumwave reception is strictly limited, and indeed rather poor:
“Sensitivity rolls off significantly below 3.0 MHz due to protective high-pass filtering. Preamp-on MDS is typically -105 dBm at 1.5 MHz, and -80 dBm at 1.0 MHz, sufficient for emergency AM broadcast signal copy.”
So, don’t plan on doing any mediumwave DXing with the KX2. It is sensitive enough, however, that I can receive strong local stations reasonably well.
Summary
Every radio has its pros and cons. When I begin a review of a radio, I take notes from the very beginning so that I don’t forget my initial impressions and observations. Here’s the KX2’s list, from the first moments I turned it on, to the present:
Pros:
Excellent sensitivity and selectivity
All modes: SSB, AM, CW, and Data (with built-in PSK/TTY decode/encode)
A convenient portable package for the field with needed options:
Built-in ATU option
Optional internal LiPo battery (see con)
With telescopic whip, the KX2 can be used as an HT via the internal microphone
Very quick deployment in the field
Built-in voice and CW keyer
Excellent general coverage receiver; AM mode effective for shortwave broadcast listening
Backlit display is easy to read in both shack and field
Numeric keypad for direct frequency entry
Considerate use of multi-function controls
Free and easy firmware updates via supplied software
Elecraft support and customer service
Cons:
Battery must be removed to charge; battery removal requires careful consideration of speaker wires (see pro)
Downward-facing speaker not ideal in the field unless back leg is used to raise off of surface
Price (shipped) exceeds $1,000 when loaded with ATU, battery, and external charger
Poor mediumwave/AM broadcast band reception (con) by design (pro)
Let’s be frank here: the cons I’ve listed above are rather nitpicky.
I suspect Elecraft will work on a better solution for the speaker wire (for those of us using the internal battery) or else KX2 users will come up with a creative modification.
In a perfect world, I also wish the KX2 were somewhat weather-proof or water-resistant. A couple of times, I’ve been operating in the field when rain caught me off guard. I feel like the KX2 is pretty vulnerable, so I either pack up the radio and stop operating, or I seek shelter if it’s available. It wouldn’t take a lot of moisture to penetrate the KX2 and there’s no way I’m letting rain ruin my rig. But I’m guessing weatherproofing would add significant cost.
So, did I experience any buyer’s remorse after purchasing the KX2?
Not in the least. Between us, kind reader: the KX2 has been a difficult rig with which to find fault. Price and inherent compromises for portability aside, there are really no serious negatives about this radio in my book. It suits my purposes very well.
Activating the Blue Ridge Parkway (PK01) with the Elecraft KX2 and “Silver Tip” 20 meter vertical. An effective combo!
Yet we reviewers cringe when our reviews appear this “glowing.”
I’m not a fanboy of any brand. I love to see companies introduce successful original products. I believe companies like Elecraft, CommRadio, LnR Precision, Elad, Icom, Yaesu, Kenwood, SDRplay, and the like are healthy for our hobby.
Competition and innovation are worthy friends.
Elecraft pushes our ham radio hobby forward, and it’s innovations like the KX2 that make our radio market and our hobby a dynamic and inventive space.
To be clear, I know the KX2 didn’t come out of nowhere. It’s the culmination of many iterations of Elecraft transceiver designs over the past eighteen years. Elecraft has taken feedback from customers, made notes, and improved their products with time, and it shows in this little rig.
The Elecraft KX2 is clearly a product of iterative agility. It will, no doubt, be a market success.
I remember when Elecraft co-founder Wayne showed me the KX1 many, many years ago at the Dayton Hamvention. He told me that the KX1 was a step toward the perfect portable radio he’d dreamed of as a kid. The KX2 is simply that–and a profound upgrade of the KX1. But more to the point, it might have been the portable of which I dreamed, too.
Anyone who knows me knows that since I was licensed nearly twenty years ago, I’ve been a fan of low-power (QRP) operations. There’s just something inexplicably fun in being able to talk to the other side of the world using very low wattage. In a sense, I’ve always felt that, in the world of ham radio, QRP is truly the province of the magician.
It’s for this reason that I’ve owned, operated, reviewed, and beta-tested a number of QRP transceivers over the years. What I look for in a QRP transceiver is quite different than what I’d look for in, say, a base station or mobile transceiver. The glory of QRP gear is that it’s more portable than its “full gallon” cousins in the transceiver world, allowing for radio communications on the go. QRP rigs tend to be more compact, lighter in weight, easier on batteries, less expensive, and provide built-in features to support field operation–even winter glove operation.
Of course, however, there’s typically compromise in smaller packages; neither would I expect a modest QRP transceiver to perform like a full-size base station. But I do expect it to perform well enough to satisfy my needs in the field or the shack.
Introducing the LD-11
LnR Precision, Inc., is a North Carolina-based company that specializes in antennas, straight-keys, and last but not least, QRP transceivers. The company has produced a number of innovative QRP transceivers over the years, and for many of these years, I’ve been admiring these from afar. But earlier this year when the company announced their latest QRP transceiver, the LD-11, I was especially intrigued.
What really caught my attention this time is that this little transceiver is based on the architecture of their popular LD-5–a five-band, stand-alone direct conversion transceiver. Yet the LD-11 is actually an upgrade on that model, in that it supports 160-10 meter operation with all modes (SSB, CW, CW-R, Digi, AM and FM). Curiosity got the best of me: I had to see this for myself. I contacted LnR Precision, who kindly loaned me a transceiver for review.
Overview
The left side sports the key and mic ports, headphone jack, a line in/out jack and a side tone adjustment.
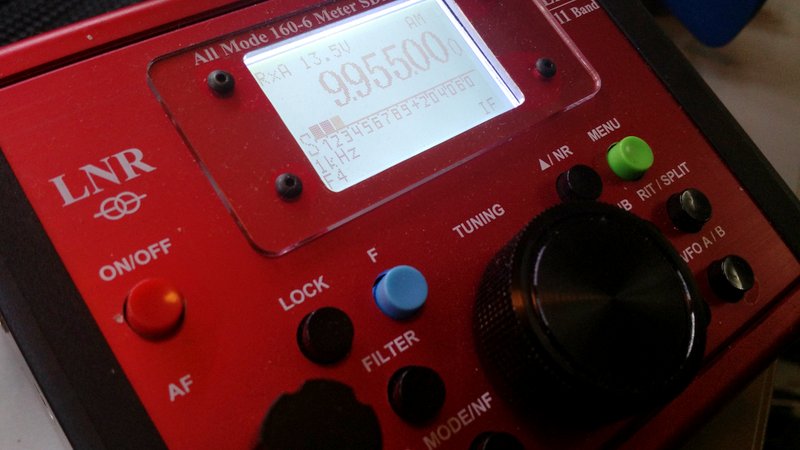
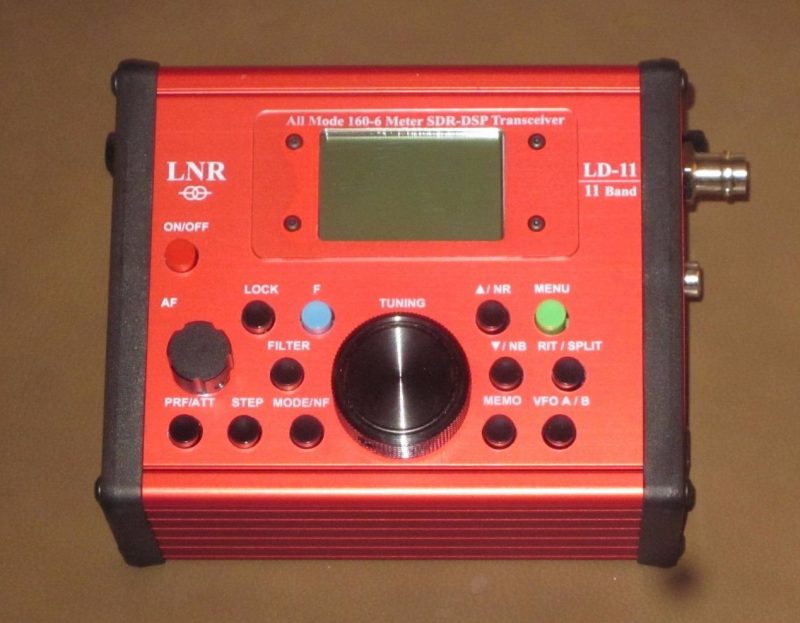
The first thing that catches your eye is the unusual color of the LD-11: it is red. Very red. Though opinions will surely vary, I rather dig the hot-rod red aluminum chassis of this little rig. The red faceplate makes the buttons quite visible as well as giving the radio a unique and vivid appearance.
The backlit LCD display, meanwhile, is crisp and easy to read. It’s large enough that all of the pertinent information (frequency, voltage, mode, filter selection, and tuning step) can be displayed at once. When in transmit, there’s a meter below the frequency that displays either a bar scale or numbers for SWR or Power; when in receive mode, it displays the “S” meter.
The LD-11’s buttons have a tactile, responsive, and smooth action. The tuning knob, while lacking a finger dimple, rotates easily with an appropriate amount of brake.
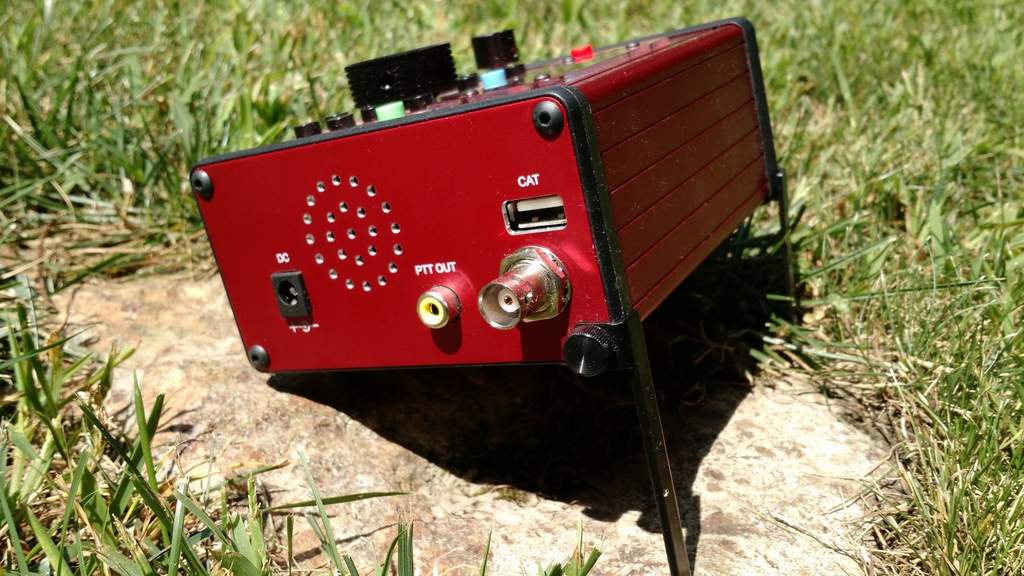
You’ll find the DC port, PTT out, CAT port and Antenna input on the right side of the LD-11.
LD-11 operation is really very simple. I was probably on the air for hours before I ever needed to reference the owner’s manual for functions. LnR has done a great job giving the LD-11 a logical menu layout and intuitive front panel functions.
The radio’s front panel allows you to do the following:
turn the radio on/off,
tune with the encoder,
adjust AF gain,
key lock the front panel,
toggle the panadapter display,
toggle pre-amp and attenuator,
change tuning steps,
change mode,
move between bands,
turn on noise blanker and noise reduction
operate RIT and set-up split,
toggle VFOs, and
enter menu functions.
The menu functions give you control of still more settings, such as AGC settings, CW configuration, mic/voice transmit configuration, notch filter settings, NB/NR settings, meter display, transmit power, backlight settings, squelch, digital gain, and AM/FM mode enable/disable, among others. So this little transceiver is feature-rich.
Moreover, most menu items can be changed while you’re transmitting. While on the air, for example, I regularly toggle the transmit meter display between power out and SWR while calling CQ. Very handy.
Again, operation is straightforward and simple, especially good because at time of publishing this review, the LD-11 owner’s manual is still quite basic (click here to download PDF version).
On the air
Unlike most of my review radios, which spend a great deal of time in the shack during the evaluation period, the LD-11 spent most of its time in the field–in several US states, as well as in a couple of Canadian provinces. I even used the LD-11 for two weeks in an off-grid cabin on Prince Edward Island, Canada.
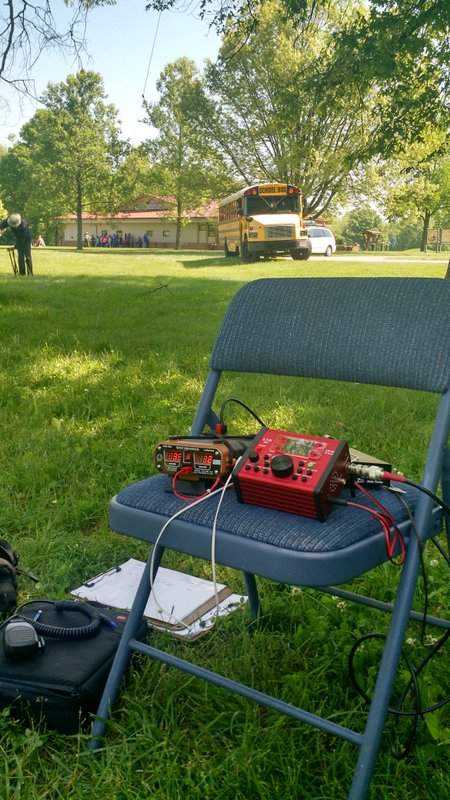
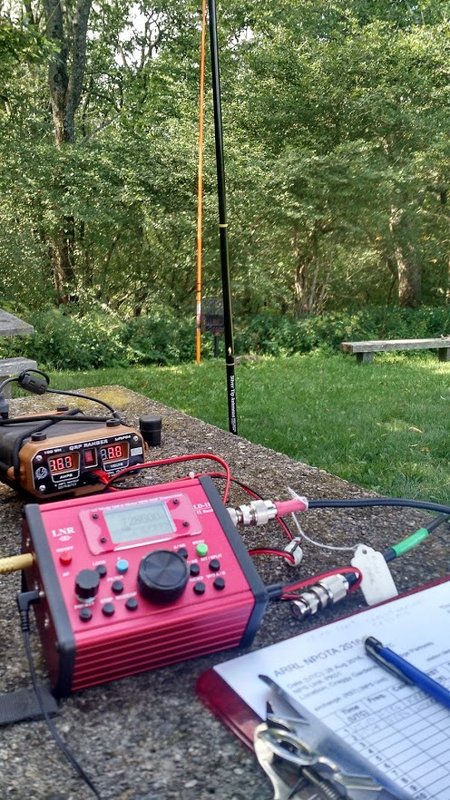
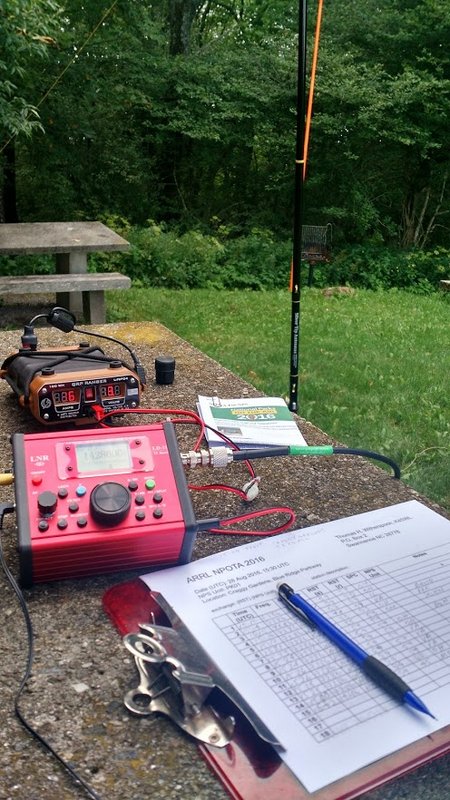
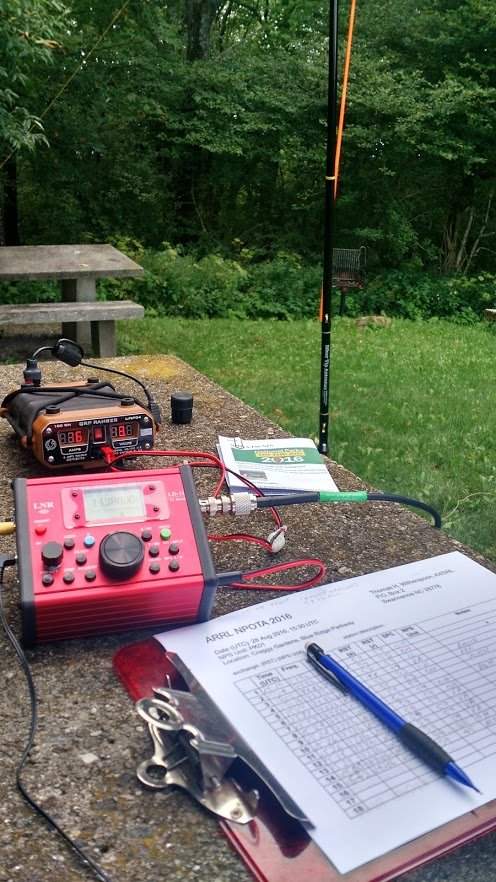
The LD-11, QRP Ranger, and Z-11 auto-tuner at the Hopewell Culture Park NPOTA activation.
We had a tight schedule for our NPOTA activations, so I couldn’t spend a great deal of time setting up my equipment. So on that day, I paired the LD-11 with Eric’s Z-11 auto tuner and a homebrew 40-meter doublet suspended from a tree. I powered the LD-11 with my Hardened Power Systems QRP Ranger battery pack.
And this combo worked brilliantly. At Hopewell, for example, I made twelve contacts, in short order, running SSB with just 8-10 watts output, and received positive audio reports.
Also that day, I discovered how exceptionally easy it is to operate the LD-11 in the field. When packing in, I appreciated how lightweight and compact it is, and that fire-engine red chassis meant there was no way I’d overlook it or forget it on the ground.
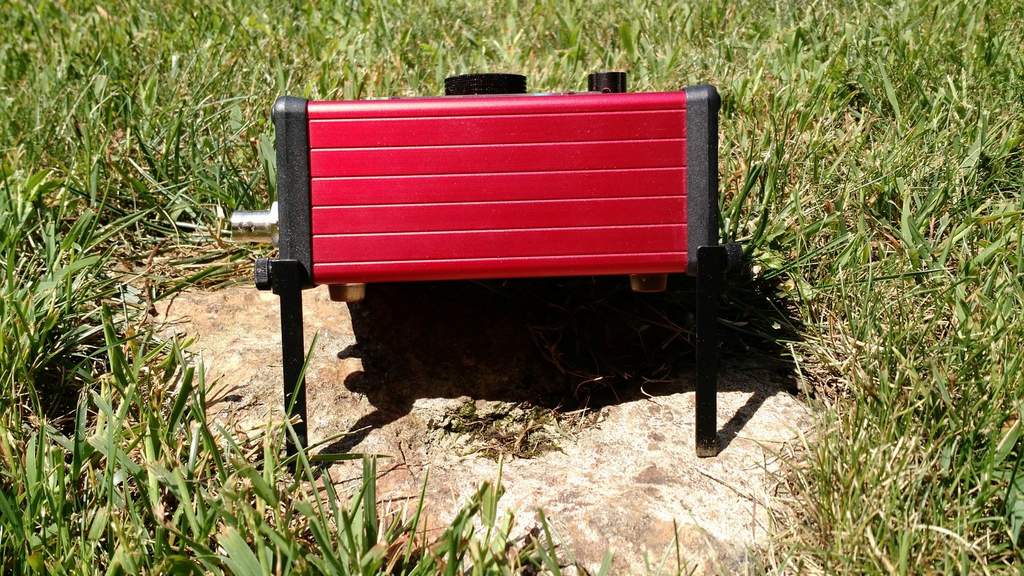
The LD-11 has two fold-down feet to support it on the shack table or in the field.
Two missing features, however, might make the LD-11 even more portable: these are an internal battery pack and an internal ATU. Unfortunately, there are no options for these at present (LnR, take note).
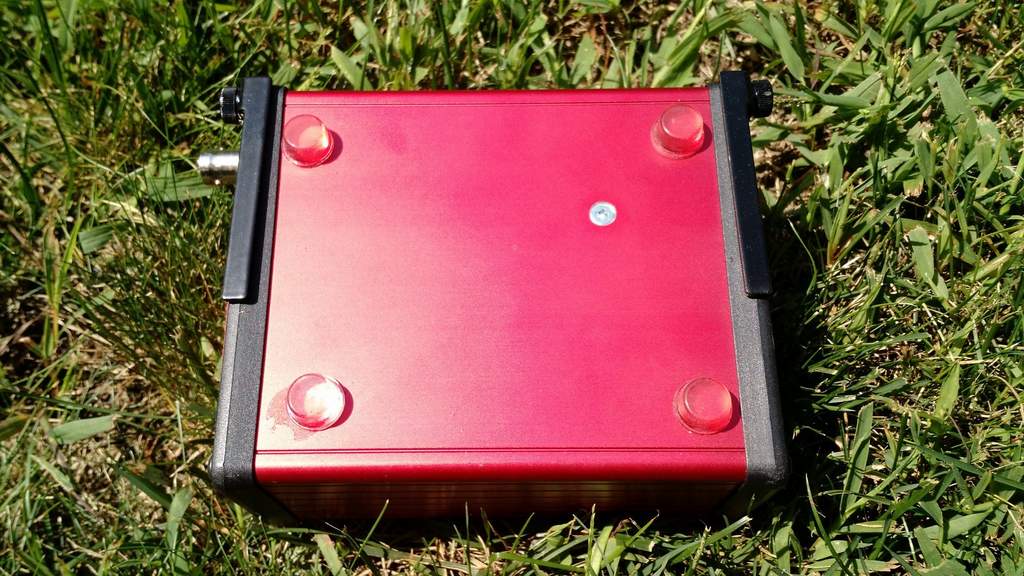
The LD-11 feet fold neatly under the chassis.
The external ATU, meanwhile, adds several extra items to manage: the ATU unit, the power cord, and an extra patch cable. Sure, if you’re operating all day from one location, none of that really matters. But when you’re doing quick deployments, every bit of kit that doesn’t require packing and unpacking also saves time and potential frustration. But I cheerfully used the above combo the rest of the day, logging even more contacts.
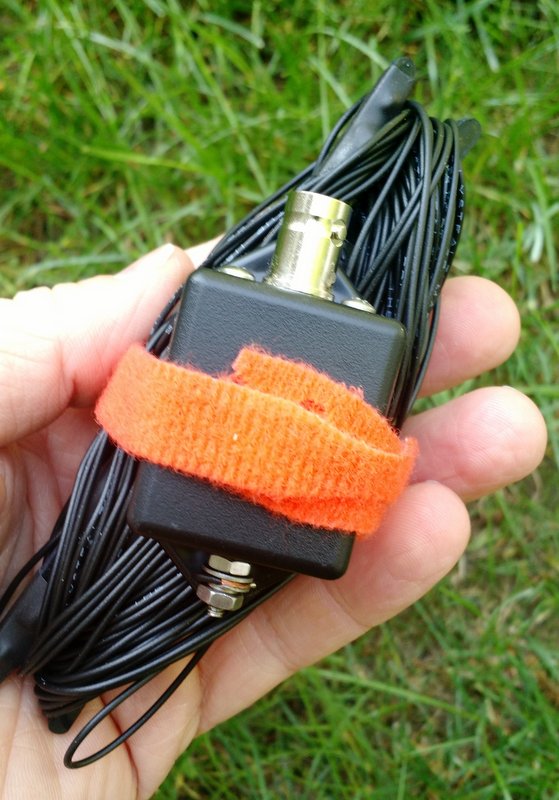
The EFT Trail-Friendly Antenna
At the Dayton Hamvention, I decided that one way to avoid taking an ATU to the field was to use a multi-band resonant portable antenna. I was quite busy at the Hamvention and didn’t want to spend time building one, so I decided to take the quick route and simply buy one. I visited a few vendors in Hara Arena and was impressed with the selection of field-portable antennas available. In the end, I was taken by the compact and easy-to-deploy design of LnR Precision’s EFT Trail-Friendly antenna,and purchased one on the spot. As many potential LD-11 owners might purchase the same antenna, I decided it might help to review it, too.
The EFT Trail-Friendly antenna is incredibly compact and quite easy to deploy.
I bought a version of the EFT antenna that is resonant on 40, 20, and 10 meters. I like that band combo for NPOTA and SOTA activations, because I like operating on both the 40 and 20 meter bands. What’s especially brilliant about the EFT end-fed design is that you only need to suspend one side of the antenna: simply launch a line over a tree branch, and hoist the business end of the antenna up, and, snap–you’re ready to go. When wound up for transport, it’s also lightweight and takes up very little space in a kit bag.
On the way home from the Hamvention, we activated the same four parks yet again. Eric and I tuned the EFT antenna before its initial use, and it was then ready to go.
Eliminating the need for an external tuner and adding the simple EFT antenna to the mix meant that I could set up and take down my entire station in a matter of minutes.
The only thing that took time at all was finding a tree branch to hoist the end of the antenna–usually not a problem, especially in our Eastern US parks. Moreover, the transceiver-plus-antenna team was quite effective: I easily logged all the contacts needed for all four sites in the one-hour time slots we allotted.
LD-11 Performance
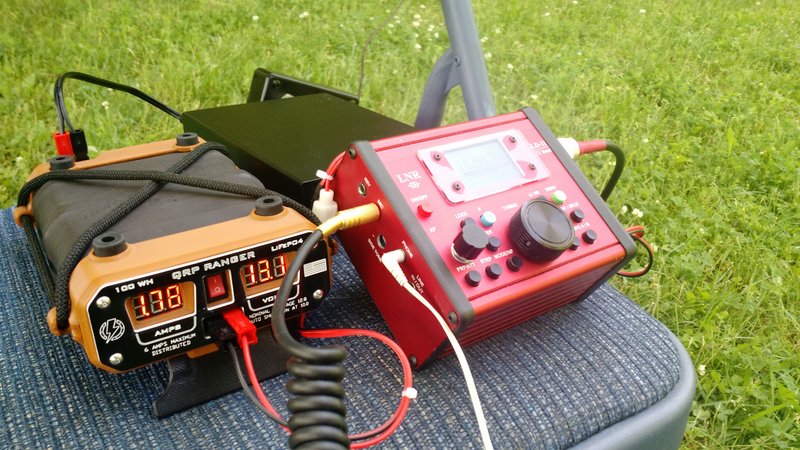
The QRP Ranger (left) and LNR Precision LD-11 transceiver (right)
In brief, I’ve been very pleased with the LD-11’s performance on the air.
The LD-11 receiver is both sensitive and selective. Though I didn’t have the chance to test it in the RF-dense environment of Field Day, it never overloaded in the areas where I’ve operated.
Through my headphones, the LD-11’s noise floor is impressively low and the receive audio is excellent. At first, I was a bit disappointed that the LD-11 doesn’t have an RF Gain control–something I frequently use to mitigate background noise–but fortunately the noise floor is low enough, and the DSP architecture seems adaptive enough, that I’ve never needed to reach for an RF gain control so far.
Nonetheless, LnR: I do hope you’ll consider making RF Gain a future firmware update!
Modes
The LD-11 is jam-packed with modes: USB, LSB, CW, CW-R, AM, and FM.
The LD-11 can also handle a host of digital modes, and there’s the choice of two models to connect to your PC: one LD-11 model with the Prolific USB Adapter Chipset ($739), and another model with the more-universal FTDI chipset ($789). It’s outside the scope of this review to test the LD-11 on digital modes, but note that I plan to do so in the coming months. The modes I’ve tested thus far are SSB, CW, and AM.
When I operated SSB, I found the default filters quite effective and the receive audio pleasant. On transmit, I received a number of positive reports on the LD-11’s audio. What’s more, through a menu option you can can adjust the transmit audio equalization (three defaults) to better match your voice.
On CW, the LD-11 was equally as pleasant. On-board filtering is quite effective and audio well-balanced.
On transmit, there is one negative worth noting for the CW operator: the LD-11 does not have full break-in QSK.
While this isn’t a problem for me, because I find hearing signals between the dits and dahs I send rather distracting, I know many CW ops that don’t like using a delay on transmit, preferring instead a full break-in. LnR notes that the LD-11’s “maximum switching delay is 12mS and digital delay is 47mS.” If you set the LD-11 for the quickest response time, you can hear between most characters, but the relay clicking can be distracting. For all of my CW operations, I set the response time to 500ms.
The first time the LD-11 was operated in CW it was with my buddy Mike Hansgen (K8RAT). Later, I asked this experienced operator how the LD-11 sounded on the other end? His reply:
“The LD-11 put out a sweet, musical note that was very pleasant and reminiscent of the note of a valve transmitter. The LD-11 sounded better than any silicon transceiver I had heard in a long time.”
Wow…high praise, indeed. For those who don’t know him, Hansgen has high standards, and doesn’t hand out such compliments readily.
AM mode (and general coverage)
Though the LD-11 isn’t advertised as having a general-coverage receiver, it will, in fact, tune the entire HF band.
You initiate this broad-spectrum tuning by entering the LD-11’s administration mode. In the admin panel, you’ll find functions that allow you to set the band edges on each amateur radio band. LnR describes this process in the LD-11 product manual, but suggests you contact them for support the first time you do so.
For a preliminary test of broadcast reception, I moved the lower band edge of the 30 meter ham radio band to 8.2 MHz.
After saving the settings and re-starting the LD-11 in normal operation mode, I could then tune the entire 31-meter broadcast band on the LD-11.
Hypothetically, you could either widen each amateur radio band to include adjacent broadcast bands, or you could simply set one of the ham bands to include the entire HF spectrum. To make it easier to navigate and tune through the bands, I prefer the former method.
Since the LD-11 has a proper AM mode, broadcasts sound great–especially via headphones! Better yet, the AM filter width can be widened to an impressive 9.6 kHz–! When listening to a blowtorch signal, audio fidelity is most impressive.
The LD-11 has four filter slots: F1, F2, F3, and F4. The F1-F3 slots can be set to a fixed user-defined widths (common widths are default).
The F4 position can be altered to any available filter width without having to enter the admin mode of the transceiver. Simply press the “F” (blue function button) and the FILTER button simultaneously, and use the encoder/tuning knob to specify the filter width in .1 kHz steps. Pressing the F and FILTER button, again simultaneously, will save your filter width for the F4 position.
I’ve been using the F4 filter position for widths between approximately 8.2 and 9.6 kHz in AM.
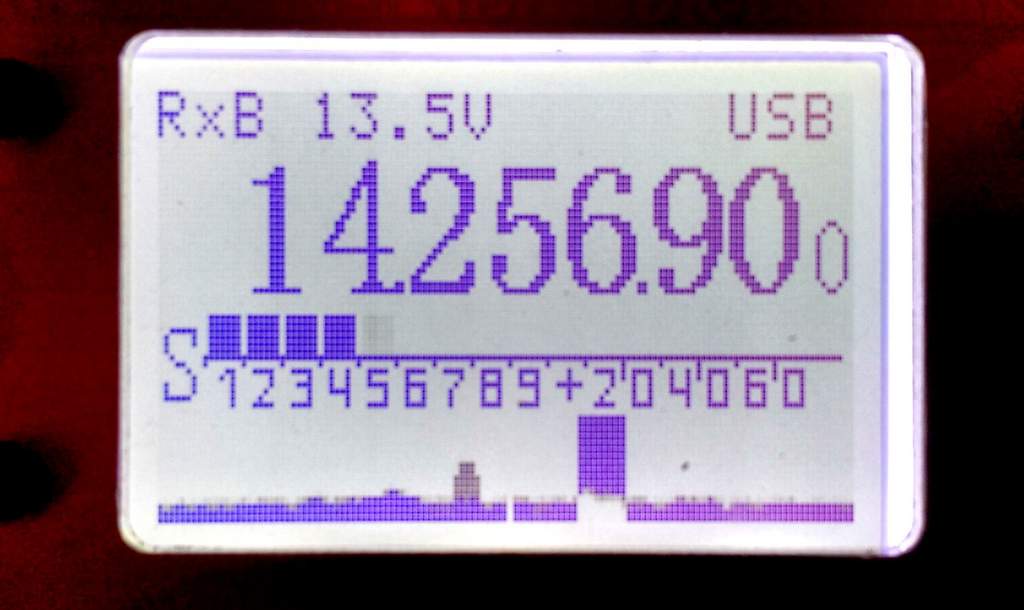
A panadapter
One final unique feature of the LD-11 is a built-in, simple panadapter. By pressing the F (function) and VFO buttons simultaneously, it will engage the panadapter which lines the bottom of the display.
The panadapter display is found at the bottom of the LD-11’s backlit display.
To be clear, the panadapter is very basic–it doesn’t include frequency markers, it’s monochrome, and it’s not very tall (height/depth helps to discern weak signals along the spectrum). In fact, when I first turned it on, I truly doubted its utility.
Yet after having used the LD-11 for several months, I can say that one of the first steps I now take when putting the rig on the air is to engage the panadapter. Though it’s quite simple, I find it a useful tool for chasing signals on bands, whether SSB, CW, or even AM broadcasters. It’s also very responsive and fluid, which helps make up for the fact that it’s solid in color and rather flat.
For example, the weekend before finishing this review, I activated PK01 (the Blue Ridge Parkway) for NPOTA. When I switched to 20 meters, the noise floor was so low that, when I first started calling CQ, I assumed that either the band was dead or the antenna wasn’t working. One look at the panadapter, however, showed me that there were some strong SSB signals on either side of my frequency. So I didn’t tune around, but simply continued to call CQ, which soon rewarded me with excellent catches (more on that below).
Summary
Invariably, all radios have strengths and weaknesses; here is a list of these from the moment I put the LD-11 on the air:
Pros:
Lightweight, compact size
Excellent ergonomics and simple menu-driven functions
Built-in, simple panadapter
Low current drain on receiver (….ma)
General coverage receiver
Low noise floor
Variable filter bandwidths
Rugged hand mic
Most menu items can be changed while operating PTT or CW
Headphone amplifier drives larger headsets
Internal speaker (see con)
Excellent CW transmit audio reports
Good LnR Precision customer service
Cons:
No internal ATU option
No internal battery option
No RF gain control (see noise floor pro)
CW operation is not full break-in QSK, some relay noise
No voice or CW memory keyers
Very basic owner’s manual
Occasional audio “pops” when tuning rapidly through a band
While the LD-11 lacks some of the portability of those rigs (specifically, options for an internal battery and ATU–again, please take note, LnR), its performance-for-price-point is right, in my opinion.
If you take the LD-11 to the field with a resonant antenna, as I have, all you need is a power source to be on the air in moments. If you pair the LD-11 with a simple ATU like the Emtech ZM-2 or the even smaller Elecraft T1, you’ll be able to tune wires to your heart’s content, and you won’t need extra power cables.
Oh, yes…there’s one more thing I must mention about the LD-11: this rig has, for lack of a better word, a “fun” factor. It reminds me of one of my favorite QRP radios from days gone by, the Index Labs QRP Plus. The QRP Plus had many performance shortcomings and wasn’t nearly as full-featured, as lightweight, or as small as the LD-11, but it was a fun radio due to its dead-simple controls, nice display, prominent tuning knob, and good ergonomics generally, making it a breeze to operate.
The LD-11 feels like what the QRP Plus should have been: a fun rig that delivers serious performance.
The LD-11 is also easy to use, and that certainly contributes to its sense of fun. Operation has clearly been well thought through by the LnR developers. Only a few days before capping off this review, I took the LD-11 to the field for its 6th National Parks On The Air activation. With eight watts in SSB and a 20 meter vertical, I worked Rhode Island, Texas, Montana, Manitoba, California, and Slovenia from a picnic table on the Blue Ridge Parkway. And it was great fun, underscoring the reason I get such a kick out of HF and QRP in the first place.
Of course, that’s the magic and the mystery of radio. But tools like the LD-11 make it all the more accessible. LnR Precision, I must say: pretty good trick. From your proverbial hat, you’ve produced the handiest little QRP rig I’ve seen in years.
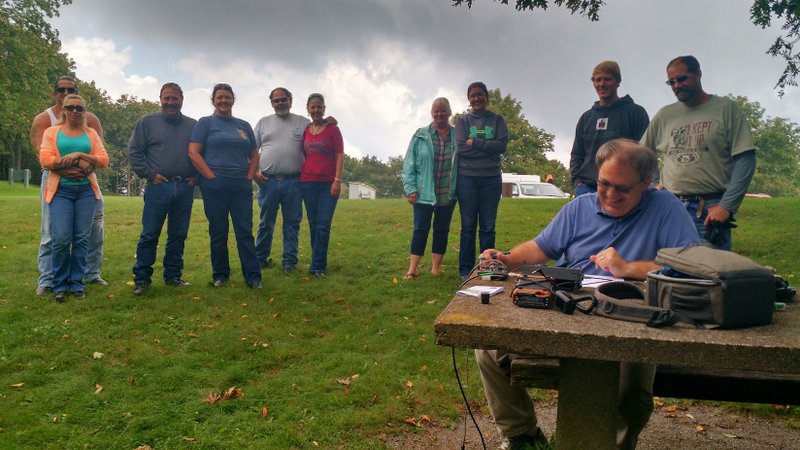
A crowd gathers as Vlado (N3CZ) works station after station in CW!
I’m not sure what I’m going to do after the National Parks On The Air event is over at the end of this year. I hope the ARRL organizes something equally as fun for 2017.
Truth is, I love playing radio outdoors and I love National Parks. The two are a perfect combo.
Vlado (N3CZ) on left, and me (K4SWL) on right.
My buddy, Vlado (N3CZ), and I decided to do an NPOTA activation on Sunday. The weather was fantastic–a little foggy with mild temperatures and the HF bands were open!
We arrived at our site–the Craggy Gardens Picnic Area (PK01)–at 14:30 UTC or so.
We brought the following antennas and supports:
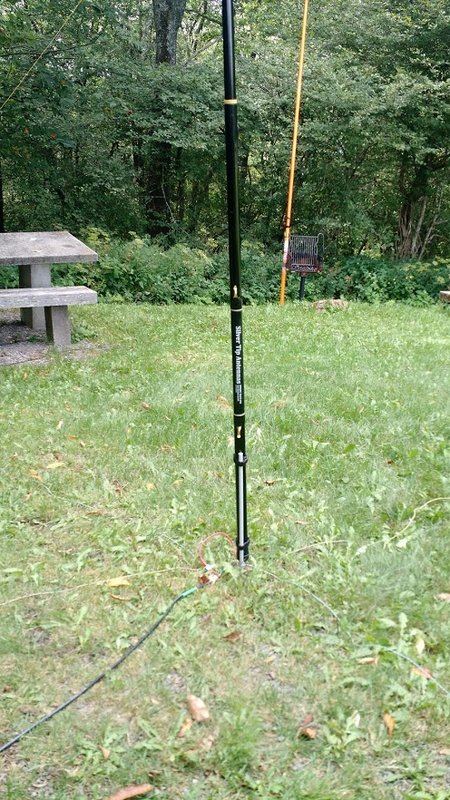
a self-contained 20 meter band telescopic fiberglass vertical (I recently purchased at the WCARS Hamfest for $40–!) and
a 31 foot fiberglass Jackite pole (the fluorescent orange on in the photos) which we used to suspend a homemade 40 meter doublet Vlado built the day before.
Setup was quick. We were both especially pleased the 20 meter vertical. It was so easy to install, even considering it was the first time either of us had used it.
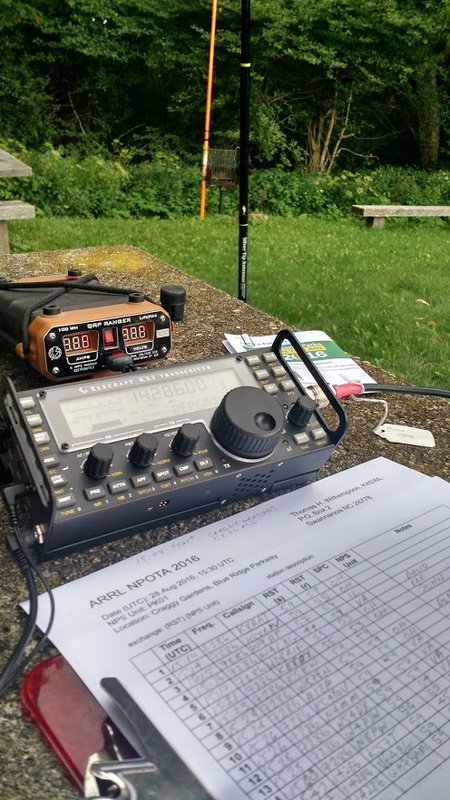
I powered the LD-11 and the KX3 with my QRP Ranger.
The 20 meter vertical antenna (in foreground).
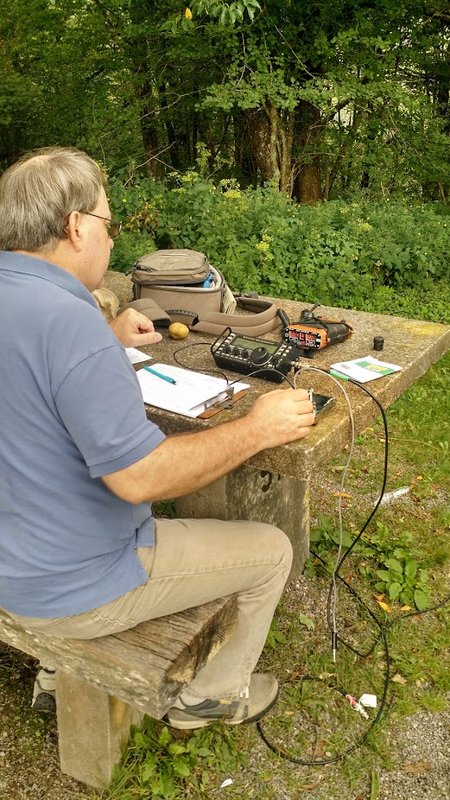
I operated SSB from a picnic table using the LnR Precision LD-11 transceiver, connected to the doublet on 40 meters, and the mono-band vertical on 20 meters.
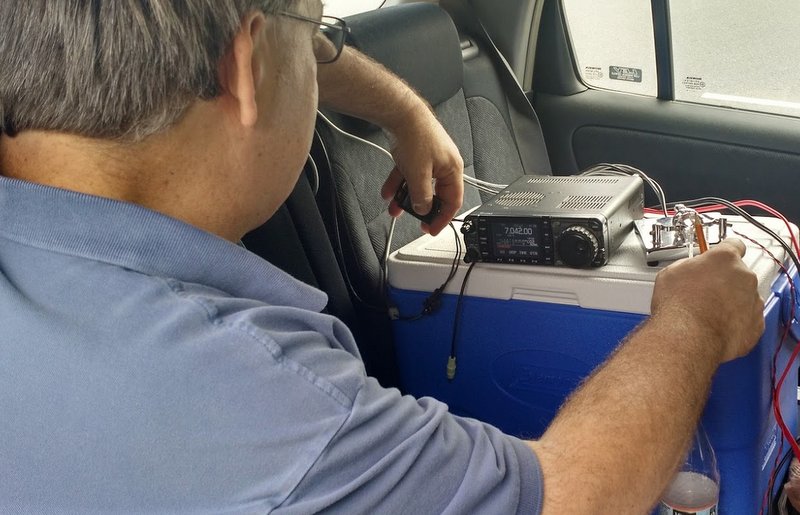
Vlado started by operating CW with his Icom IC-7000 which was installed in his car, but later moved to the picnic table and logged a number of contacts with the Elecraft KX3.
We easily logged the number of stations needed to activate the site.
The 40 meter band was hopping and a good path was open into Ohio, Virginia and other surrounding states. The 20 meter band was serving up some excellent QRP DX.
Vlado operating CW on the 40 meter band.
When I moved to the 20 meter band, the noise floor was so low on the LD-11, I thought perhaps the band was dead. Not so!
It’s hard to believe that with a mere eight watts in SSB I worked Rhode Island, Texas, Montana, Manitoba, Washington, California and Slovenia from a picnic table on the Blue Ridge Parkway.
Reports on the LD-11 audio were all very positive. I’ve used the LD-11 for eight NPOTA activations this year and can say with confidence that it’s a brilliant & fun little field radio. (FYI: I’ll be publishing a full review of the LD-11 in the October 2016 issue of The Spectrum Monitor magazine.)
Vlado and I are planning on several more activations together this year. Our next one will most likely be at the Carl Sandburg Home-. I can’t wait!
Any other post readers participating as an activator or chaser in the National Parks on the Air event?
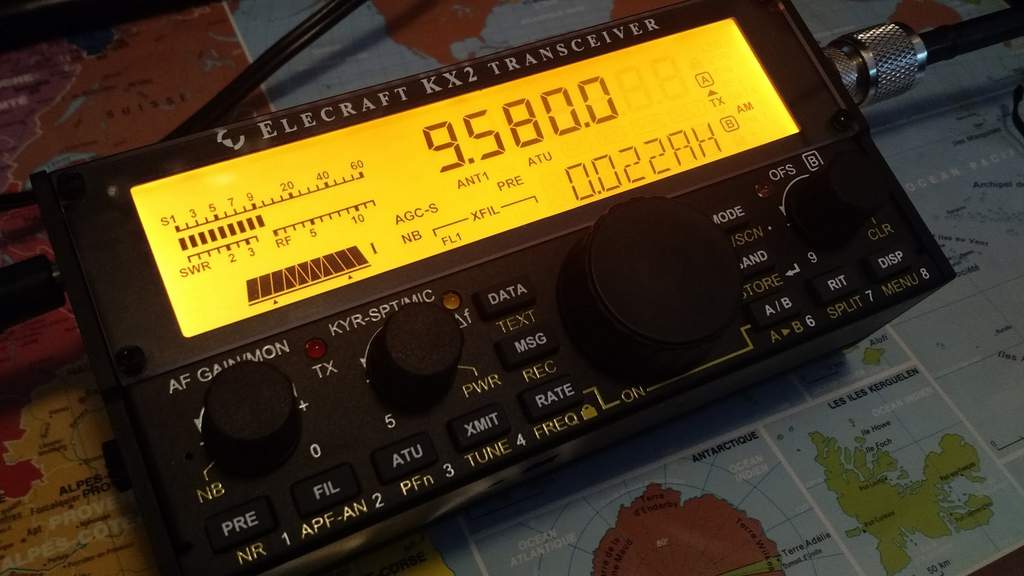
My new Elecraft KX2 tuned to Radio Australia this morning.
I’ve only had my Elecraft KX2 since Monday evening and have been so busy, I’ve only had an hour or so to tinker with this pocket transceiver. Monday evening, before putting it on the air, I updated the KX2 firmware to the latest Beta release which includes the new AM mode.
I’ve had so many questions from readers about the KX2’s AM audio already, I thought I’d do a quick comparison with the LNR Precision LD-11.
I set the LD-11 to a bandwidth of 9.6 kHz, and the KX2 to 5 kHz: their widest AM filter settings. Keep in mind, this is not an apples-to-apples comparison, but it does showcase each radio’s potential AM audio fidelity.
I tuned both rigs to the Voice of Greece last night on 9420 kHz around 00:30 UTC. VOG’s signal was strong into North America.
I made the following recordings with my Zoom H2N digital recorder, by feeding in-line audio patched from each radio’s headphone jack. I tried to balance the audio levels between the two rigs.
Note: Some Elecraft radios have an audio effects mode which includes a “delay” function. Elecraft describes it as “a quasi-stereo effect intended to provide depth and space to the received audio.” On an AM broadcast signal, it makes it sound wider and gives it almost a stereo depth.
I think the results from both radios are impressive. Since the LD-11’s bandwidth can be widened to 9.6 kHz, strong signals like this one sound pretty amazing. In truth, I actually prefer a filter width of about 8.2 kHz on strong signals, but VOG was wide enough to justify 9.6 kHz. I believe the LD-11 would rival many dedicated tabletop receivers.
The Elecraft KX2, in normal audio mode, sounds flatter and narrower than the LD-11 of course, but still very pleasant! In the KX2’s “delay” audio mode, the signal sounds much wider than 5 kHz, though the effect adds a little graininess to the audio. That’s okay, though–I love having the “delay” audio option in my tool bag.
Here’s what amazes me as an SWL and ham radio operator: both of these QRP transceivers offer excellent HF broadcast listening opportunities.
Please comment! Which audio sample do you prefer? Do you like the “delay” audio effect on the KX2? Keep in mind this is only one comparison and doesn’t address sensitivity or selectivity.
The QRP Ranger (left) and LNR Precision LD-11 transceiver (right)
After two months in Canada and one month spent catching up on work, I’m pleased to make some time this weekend to activate PK01 (the Blue Ridge Parkway) for the ARRL National Parks On The Air (NPOTA).
I’ll be joined by my good friend, Vlado (N3CZ) on August 28–we plan to set up at the Folk Art Center on the parkway around 11:00 EDT and be on the air by 11:30 EDT (15:30 UTC).
I must say, I’ve been using the LD-11 for the past couple of months and have been pleased–it’s a fun little radio with the added bonus of broadcast band reception (see my previous post). I’ve used it in no less than four NPOTA activations.
Mario and I do not know this eBay seller, but it appears the seller is in decent standing with eBay. In the past 12 months, the seller has had one negative review that appears to have been in error (the comment in questions was very positive, but marked as negative by a new eBay user). Do your research if you consider bidding.


 Anyone who knows me knows that since I was licensed nearly twenty years ago, I’ve been a fan of low-power (QRP) operations. There’s just something inexplicably fun in being able to talk to the other side of the world using very low wattage. In a sense, I’ve always felt that, in the world of ham radio, QRP is truly the province of the magician.