By Jock Elliott, KB2GOM
There was quite a bit of excitement in the ultralight radio community in 2024 when folks “discovered” the Qodosen DX-286 radio.
The very first version of this radio was the Qodosen SR-286. Its Big Trick was that it was based on the NXP TEF6686 DSP chip which is designed for car radio use and delivered impressive performance on AM (medium wave broadcast band), FM, and shortwave (it also receives LW; I have not tested that.). The SR-286 was later refined and became the DX-286, which late last year I bought. The two versions of the radio look virtually identical except for the model designation on the front panel.
The bottom line: I can, indeed, confirm the performance of the DX-286 is, as my Dad used to say, “hotter than a two-dollar pistol.”
While I don’t actually know much about the thermal properties of cheap handguns, I can say with authority that the DX-286 is very pleasing to own and operate.
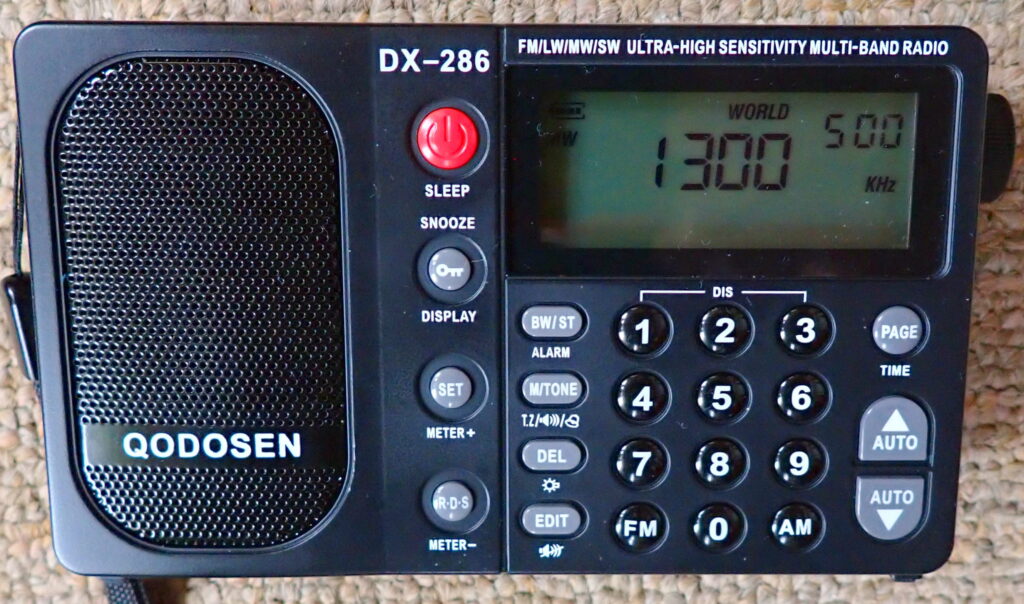
The DX-286 is a small radio, measuring 5.28″L x 1.18″W x 2.99″H. The fit and finish, for the most part, are excellent. The front is studded with 23 buttons, a speaker grill/opening, and a digital display. On the left side is a port for plugging in an external antenna. On the right side, you will find a tuning knob that can be pushed in to change the tuning step and auto tuning, a volume adjustment wheel, a charging port, and a port for plugging in headphones.. On the back is a hatch for accessing the rechargeable 18650 battery and a flimsy-looking flip-out foot for propping the DX-286 at an angle. On the top of the radio is a fold-out telescoping metal antenna that measure about 19 inches long when fully extended.

The DX-286 comes in a neat foam-cushioned plastic case that includes an extensive user manual, a drawstring bag for protecting the DX-286 when it is out of the case, a charging cable and an optional extra battery.
From the DX-286 manual, here are the frequency ranges that the DX-286 can receive and the tuning steps are available.
Frequency Range/Tuning Step
FM:
- 64-108MHz (suitable for Russia/Eastern Europe)
- 76-95MHz (suitable for Japan),
- 76-108MHz (suitable for School)
- 87-108MHz (suitable for Europe, Oceania, Africa, Asia)
- 87.5-108MHz (suitable for China, Americas)
(Tuning step is 250kHz/200kHz/100 kHz/50kHz/30kHz/10kHz)
SW: 1711-27000kHz (Tuning step is 1kHz/5kHz)
MW:
- 522-1620kHz (Tuning step is 1kHz/9kHz)
- 520-1710kHz (Tuning step is 1kHz/10kHz)
LW: 144-519kHz (Tuning step is 1kHz/3kHz)
Note: the DX-286 does not receive SSB signals, doesn’t do synchronous detection, or receive NOAA weather radio or the air band.
One of the things I have discovered messing with radios over the years is that ergonomics matter. The first definition of ergonomics from the American Heritage Dictionary is: The applied science of equipment design, as for the workplace, intended to maximize productivity by reducing operator fatigue and discomfort.
Let me give you an example of how ergonomics applies to radios. The XHDATA D-220 is a very simple radio. It receives FM/MW/SW bands and that’s it. As such, it has a very simple set of controls: a tuning knob, an ON/OFF/VOLUME knob, and a slide for selecting bands . . . and all that is needed.
By contrast, the Qodosen DX-286 is an extremely sophisticated receiver that offers a ton of interesting options: switching amplifiers and attenuators on and off, selecting internal and external antennas, choosing bandwidths, tuning steps and much more, each depending on what band you are trying receive.
In my view, in an ideal universe, a radio as sophisticated as the DX-286 would have a knob (or switch) for every job on its front panel, but that would make the front panel huge. However, in a small radio as sophisticated as the DX-286, many of the buttons serve more than one function, and those functions may change depending on band. As a result, you will be richly rewarded by studying the manual, which can be downloaded here [PDF], to take full advantage of the many functions of the DX-286.
But here’s the really good news: you don’t need encyclopedic knowledge of the user’s manual to use and enjoy the DX-286. I have been listening with it for three weeks and have consulted the manual exactly twice: once to find out how to switch to an external antenna while receiving MW (press and hold the RDS button) and once more to find out how to switch between medium wave and shortwave (quick-press the AM button until you get the selection you want; FM has its own button). In short, you can take a very un-sophisticated approach to the DX-286 and still have a bunch of fun with it.
The performance of the DX-286 is impressive.
I habitually listen with headphones (that helps to compensates for a hearing deficit that hearing aids can’t correct). Cruising the medium wave broadcast band, I’ve been able to hear very faint medium wave stations that I could not detect with other radios in its size class.
In addition, the DX-286 is the only ultralight that I own that allows me to connect an external antenna through a hardwire connection to boost medium wave reception. It’s easy: while in MW mode, plug the external antenna into the external antenna socket and then use the RDS button to switch from internal to external antenna. One of my joys has been to “sneak up” on very faint MW stations in the early morning using the DX-286’s internal MW antenna, then switch to the Terk AM Advantage loop antenna (connected through a hardwire) to attempt to boost the signal sufficiently to hear (or deduce) a station ID.

FM reception seems similarly robust . . . although I must admit that I am by no means an expert FM DXer. One evening, while poking around the FM band, a faint station popped up. Wiggling the telescoping antenna around, I found that if lowered the antenna to a horizontal orientation, I could receive an entirely different FM station. Cool! The DX-286 has RDS to help in IDing FM stations, but I wasn’t using it at the time.
SW performance, in my view, is also remarkable.
One mid-morning I used the AUTO seek buttons to search for SW stations using the whip antenna and found 20. Plugging in an external 45-foot wire loop antenna and using the seek function again, the DX-286 found 38 stations, some of which were at the extreme edge of detectability.
There are a couple of additional items that deserve mention. First, it seems there is something going on with the audio/signal processing within the DX-286 that renders the audio more pleasant to listen to on a “rough copy” MW/SW signal than some of my other radios. I might be deceiving myself, but I don’t think so.
Second, the DX-286 is quiet to operate. Pushing various buttons and turning the knob results in little noise, and this preserves domestic tranquility when I’m doing my horizontal DXing with the Better Half trying to drift off to sleep next to me.
Now, if this were a trip to Santa’s Lap, improvements to the DX-286 I would like to see would include SSB operation, NOAA weather radio, the air band, and operation off ordinary AA batteries . . . but lack of those aren’t deal breakers.
In the end, I can happily use and recommend the DX-286 just as it is.
Finally, a neat anecdote involving the DX-286. One of my pals bought one in the fall. He checked into the Radio Monitoring Net, which I run Tuesday nights on a local 2 meter repeater.
“I’ve got an election story to tell you, and it involves radio,” he said.
“Like you, I watched the election results on TV Tuesday night, but with the sound off. Instead, I was using the Qodosen DX-286 to listen to results on radio direct from Atlanta and Philadelphia (he lives in upstate New York). I got the results for Georgia and Pennsylvania two hours ahead of the national news!”
I told my wife about this, and she asked, “What radio was he using?”
I bet you can figure out the rest of the story.
Click here to check out the Qodosen DX-286 at Amazon.com
(Please note: this is an affiliate link that supports the SWLing Post at no cost to you.)