Shortwave listening and everything radio including reviews, broadcasting, ham radio, field operation, DXing, maker kits, travel, emergency gear, events, and more
Many thanks to SWLing Post contributor, Troy Riedel, who shares the following guest post:
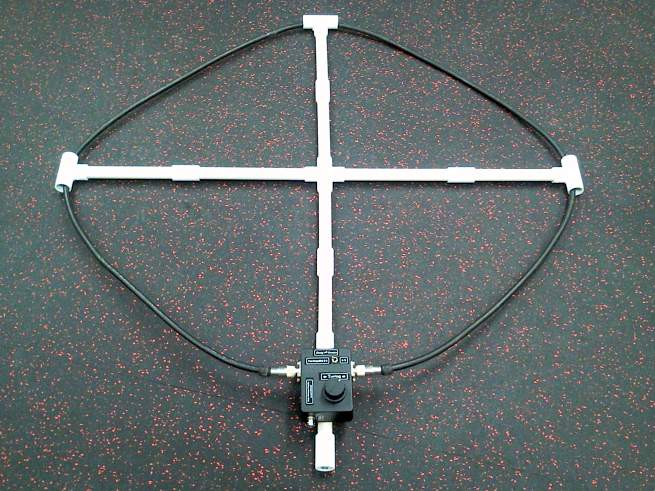
Review: DoxyTronics Portable HF Magnetic Loop 8020CA
-by Troy Riedel
Before I purchased the DoxyTronics 8020CA antenna, I emailed the owner/manufacturer and asked if he felt this antenna would be a good choice with the radios that I own. He promptly and courteously answered my question and I purchased the antenna on September 30th. I received the antenna approximately 6-days after I ordered it.
The DoxyTronics 8020CA magnetic loop antenna
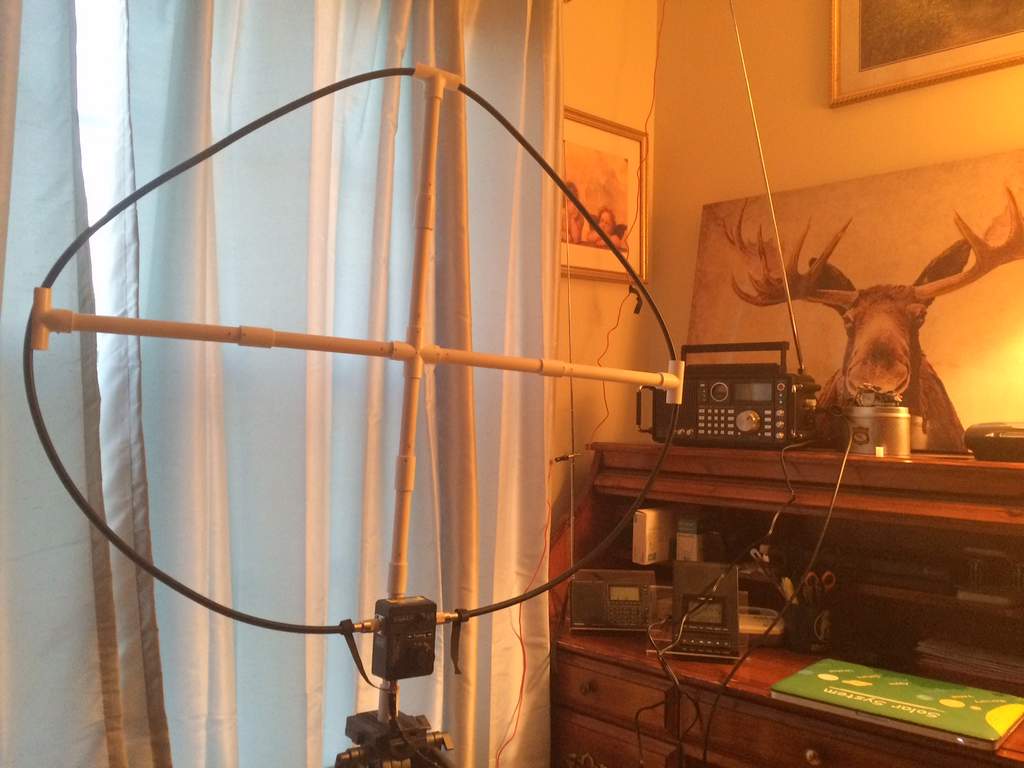
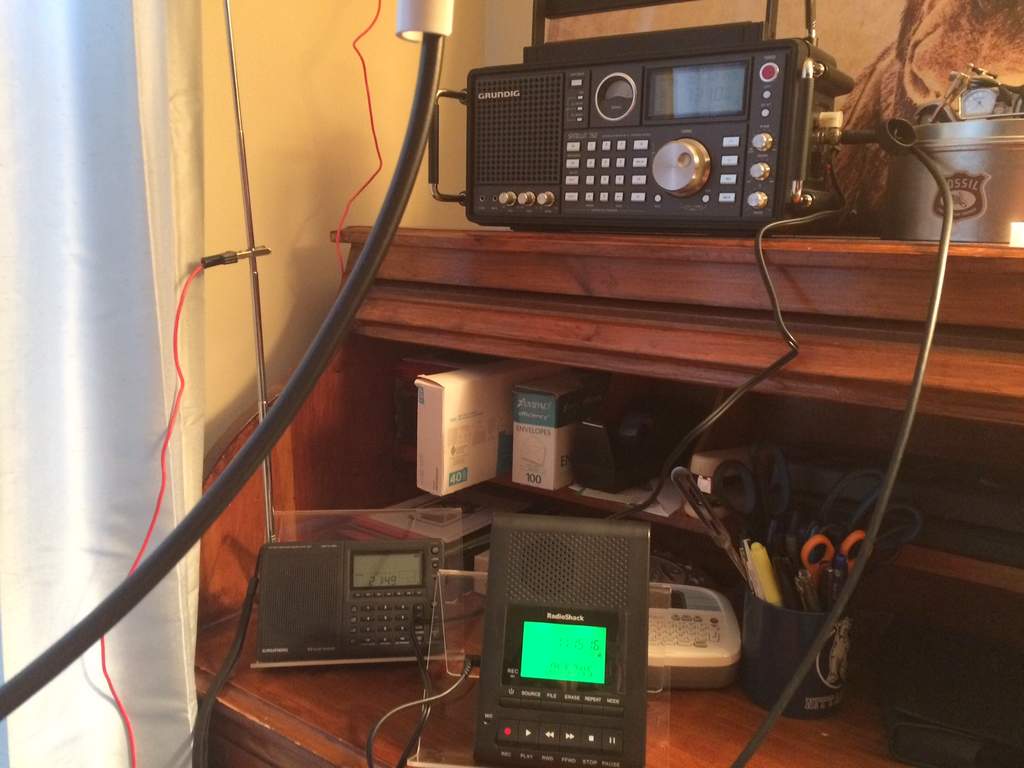
I have been evaluating the antenna for 5-6 weeks mostly on my Grundig Satellit 750 and my Grundig G3. I have used other portables but the two aforementioned Grundigs were the radios I used most.
The antenna control box has a ¼-20 hole on the bottom so it can be mounted to a video camera tripod. The assembled antenna weighs 3 lbs. I tried using a light duty DSLR tripod that I own, however that was nowhere near sturdy enough. I had to use a heavier duty tripod (Ravelli AVT) that I use for astronomical purposes. This Ravelli has a weight capacity of 16 lbs and it easily supported the antenna. I’m confident a much smaller and lighter duty tripod than the Ravelli could be used, I simply don’t own anything in-between as my astronomical binoculars and binocular telescopes weigh 5 – 14 lbs.
The 8020CA Antenna consists of a large tuning knob and control box. The control box has switch settings of 3-5 Mhz and 5-15 Mhz. In testing, I found that I could “tune” up to 17.840 MHz. No batteries are needed to operate.
The antenna worked equally well with all of the “portable” radios that I tested (I am a SWL’er, not a ham).
I can summarize the antenna’s performance as this: it is not a magic elixir that will allow you to capture signals too faint to recognize without the antenna attached, but it definitely enhances the signal and “stabilizes” it to the point where the level of the signal remains relatively constant (less peaks & troughs in signal strength).
Hopefully you can hear what I have summarized and concluded. I have included a two and one-half minute recording of the following:
Radio: Grundig Satellit 750 Recorder: RadioShack 140-214 Freq: 7.310 MHz BW: Wide Broadcaster: Radio Romania International Date of Recording: 15NOV2016 Time: 2309 – 2313 UTC
00:00 – 00:30: 8020CA Antenna Attached 00:30 – 01:00: Radio’s Whip Antenna 01:00 – 01:30: 8020CA Antenna Attached 01:30 – 02:00: Radio’s Whip Antenna 02:00 – 02:30: This last 30-second segment is with the 8020CA attached, however I am panning the Ravelli tripod 360-degrees in the horizontal. You will hopefully notice that there is a “sweet spot” where the signal and reception is the best of the entire 2:30 recording. I had set-up the antenna and I completed a quick, test recording of Radio Romania. But conditions changed slightly and the best signal during the recoding was approximately 50-60-degrees away from where the best reception was earlier. This is a positive for the antenna: you can pan the tripod head where the antenna sits to null and/or find the best signal.
Note: this is my first shortwave and radio-related review I have ever done. I have done many astronomical reviews – where I have much more experience – so please be kind towards this first attempt.
No worries, Troy! We’re kind and appreciative here–especially since guest posts are all about sharing our experiences and experimentation!
I must say, the DoxyTronics loop is doing a fine job mitigating the local QRM/interference that is easily heard when only the telescopic whip is being used. I’m also impressed that a passive loop this modest in size has so much gain without amplification.
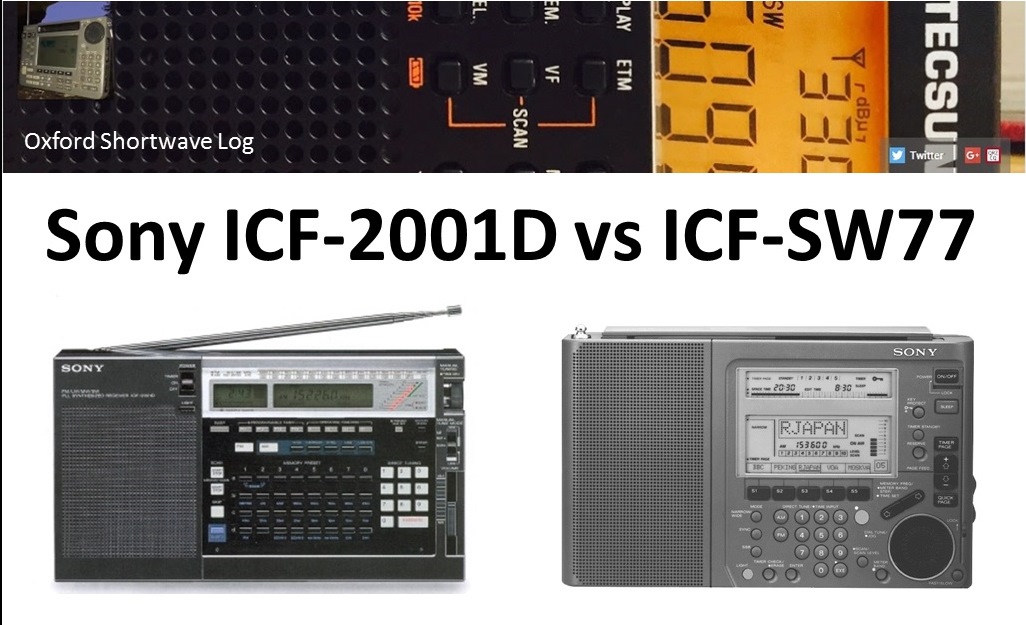
Hi there, subscribers to my YouTube channel Oxford Shortwave Log will be aware that I currently operate both of these wonderful vintage portables. I purchased the ICF-2001D only 18 months ago from eBay, based largely on its reputation as one of the best performing portables ever made. Previously I had been using my excellent ICF-SW55 as the mainstay receiver for my numerous DXpeditions, coupled with irregular appearances from my Sangean ATS-803A and the excellent value-for-money Tecsun PL-360. The ICF-2001D proved to be a revelation in terms of sensitivity, selectivity and contrary to popular belief, with careful planning (to avoid crowded bands), is able to cope pretty well with very large antennas. As regards audio bandwidth filtering, SSB and synchronous detection, in my experience, the ICF-2001D is as good as it gets in a portable – or a vintage portable at least. I have lost count of the number of personal-firsts I’ve achieved using this wonderful receiver and as someone who likes to push the envelope a little, I soon started to wonder whether it’s replacement, the ICF-SW77 might prove to be an even better performer. Subsequent online research confirmed there was no absolute consensus on this issue, with followers of these two great receivers firmly placed in both camps.
Sometime later, a good friend of mine, fellow radio hobbyist and subscriber to Oxford Shortwave Log very kindly offered to send me his cherished ICF-SW77 on long-term loan. Like me, he was intrigued to know how it compared to it’s venerable predecessor and thus the deal was done! Upon it’s arrival in July, I started planning a back-to-back series of comparison tests at the very quiet wood in Oxfordshire I used for my DX’peditions, using the same antenna for both recievers – the excellent Wellbrook ALA1530 active loop. In total, I made fourteen reception videos comparing the ICF-2001D and ICF-SW77 and posted them to Oxford Shortwave Log. Both receivers performed very well, delivering excellent reception on the Tropical Band and elsewhere on the shortwave spectrum from Bolivia, Brazil, Guatemala, amongst others. At the halfway stage, I generated a video to summarise the results to-date and this will follow in my next post to swling.com. In the meantime, I hope you enjoy the first half of the reception videos; which follow below:
Clint Gouveia is the author of this post and a regular contributor to the SWLing Post. Clint actively publishes videos of his shortwave radio excursions on his YouTube channel: Oxford Shortwave Log. Clint is based in Oxfordshire, England.
Okay, it’s not a great radio, but it was $11! I know, I know, it’s a terrible way to get started in SWL, but did I mention it was $11?
Anyway, I opened it up and found some differences between the photos you posted of the Basbon, as well as what appears to be an I²C bus in there; I’m not familiar with I²C busses, but I thought maybe some of your readers might find it interesting to see the guts of this radio and how it differs from the Basbon, or at least see the insides of yet another cheap radio.
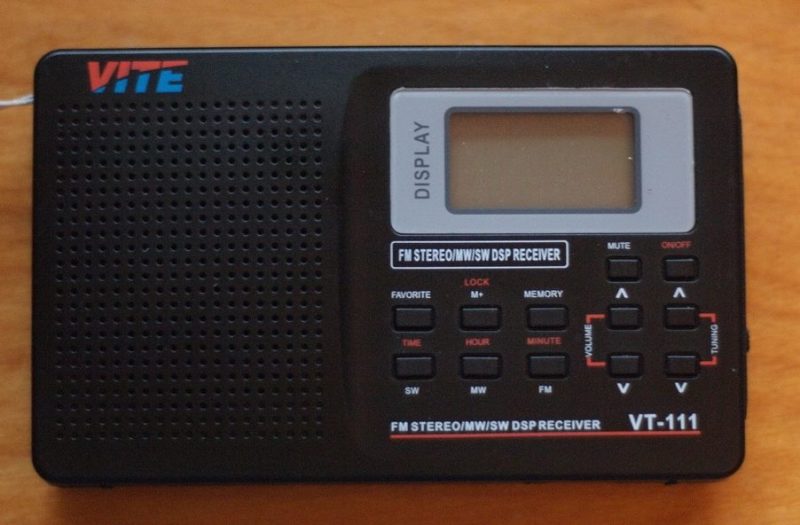
You’re reminding me that I have a VITE SRW-710S sitting on the shelf and must review it soon. One reader was curious if its on-board recording feature would be effective on shortwave. We’ll soon know!
Anyone who knows me knows that since I was licensed nearly twenty years ago, I’ve been a fan of low-power (QRP) operations. There’s just something inexplicably fun in being able to talk to the other side of the world using very low wattage. In a sense, I’ve always felt that, in the world of ham radio, QRP is truly the province of the magician.
It’s for this reason that I’ve owned, operated, reviewed, and beta-tested a number of QRP transceivers over the years. What I look for in a QRP transceiver is quite different than what I’d look for in, say, a base station or mobile transceiver. The glory of QRP gear is that it’s more portable than its “full gallon” cousins in the transceiver world, allowing for radio communications on the go. QRP rigs tend to be more compact, lighter in weight, easier on batteries, less expensive, and provide built-in features to support field operation–even winter glove operation.
Of course, however, there’s typically compromise in smaller packages; neither would I expect a modest QRP transceiver to perform like a full-size base station. But I do expect it to perform well enough to satisfy my needs in the field or the shack.
Introducing the LD-11
LnR Precision, Inc., is a North Carolina-based company that specializes in antennas, straight-keys, and last but not least, QRP transceivers. The company has produced a number of innovative QRP transceivers over the years, and for many of these years, I’ve been admiring these from afar. But earlier this year when the company announced their latest QRP transceiver, the LD-11, I was especially intrigued.
What really caught my attention this time is that this little transceiver is based on the architecture of their popular LD-5–a five-band, stand-alone direct conversion transceiver. Yet the LD-11 is actually an upgrade on that model, in that it supports 160-10 meter operation with all modes (SSB, CW, CW-R, Digi, AM and FM). Curiosity got the best of me: I had to see this for myself. I contacted LnR Precision, who kindly loaned me a transceiver for review.
Overview
The left side sports the key and mic ports, headphone jack, a line in/out jack and a side tone adjustment.
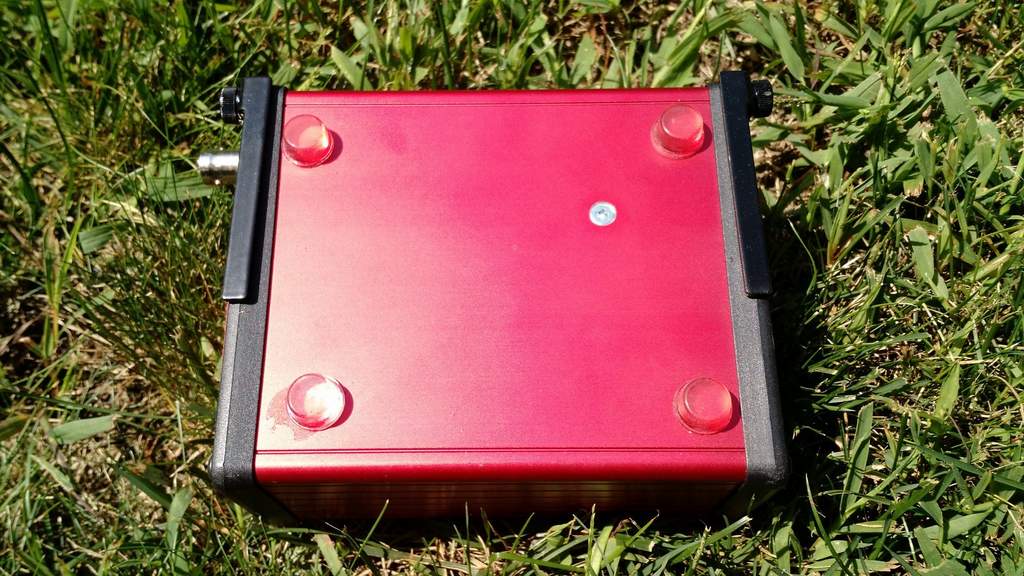
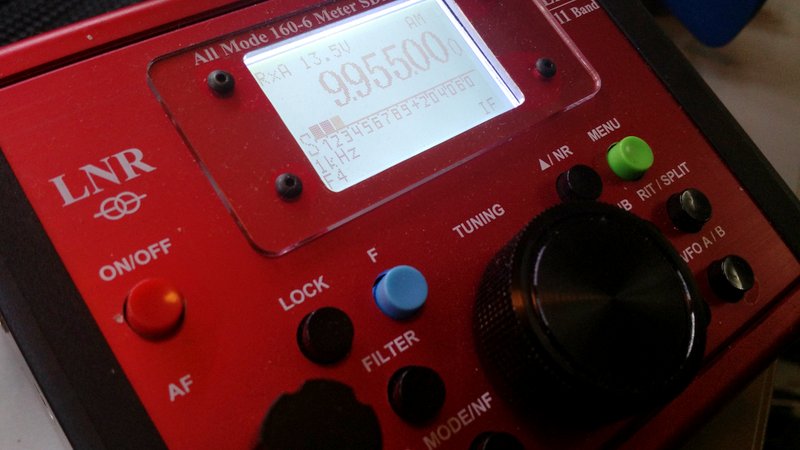
The first thing that catches your eye is the unusual color of the LD-11: it is red. Very red. Though opinions will surely vary, I rather dig the hot-rod red aluminum chassis of this little rig. The red faceplate makes the buttons quite visible as well as giving the radio a unique and vivid appearance.
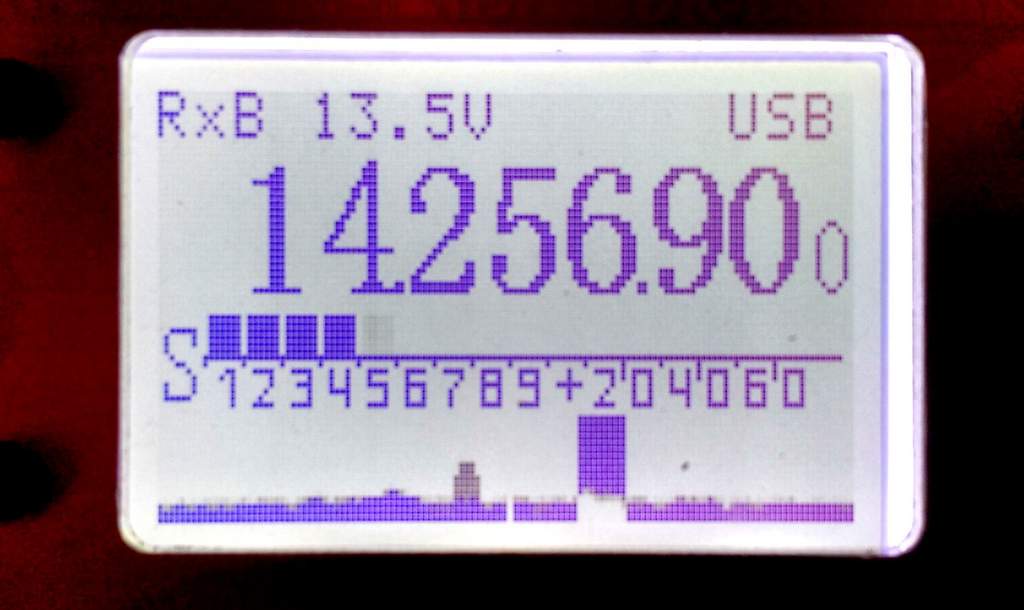
The backlit LCD display, meanwhile, is crisp and easy to read. It’s large enough that all of the pertinent information (frequency, voltage, mode, filter selection, and tuning step) can be displayed at once. When in transmit, there’s a meter below the frequency that displays either a bar scale or numbers for SWR or Power; when in receive mode, it displays the “S” meter.
The LD-11’s buttons have a tactile, responsive, and smooth action. The tuning knob, while lacking a finger dimple, rotates easily with an appropriate amount of brake.
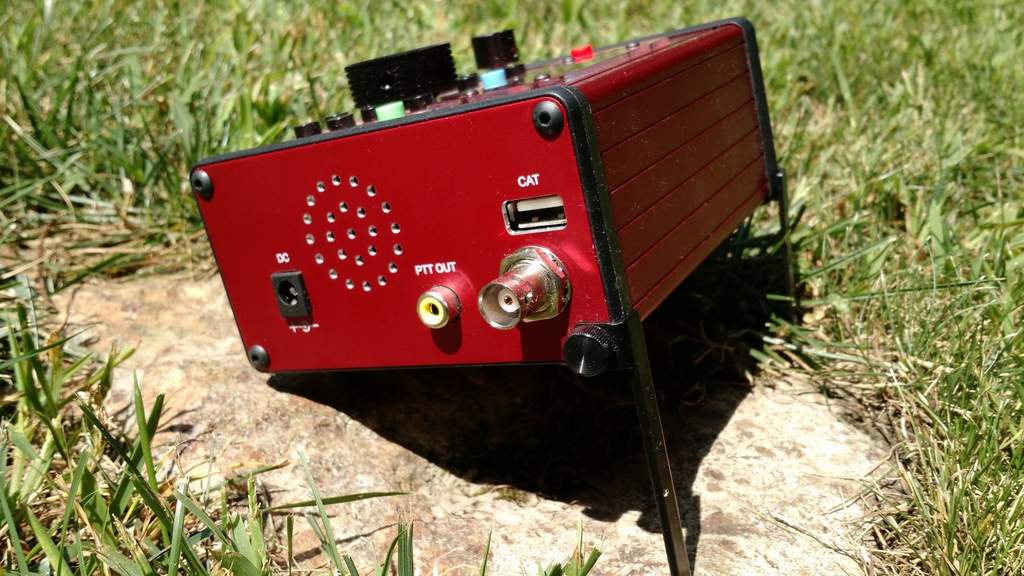
You’ll find the DC port, PTT out, CAT port and Antenna input on the right side of the LD-11.
LD-11 operation is really very simple. I was probably on the air for hours before I ever needed to reference the owner’s manual for functions. LnR has done a great job giving the LD-11 a logical menu layout and intuitive front panel functions.
The radio’s front panel allows you to do the following:
turn the radio on/off,
tune with the encoder,
adjust AF gain,
key lock the front panel,
toggle the panadapter display,
toggle pre-amp and attenuator,
change tuning steps,
change mode,
move between bands,
turn on noise blanker and noise reduction
operate RIT and set-up split,
toggle VFOs, and
enter menu functions.
The menu functions give you control of still more settings, such as AGC settings, CW configuration, mic/voice transmit configuration, notch filter settings, NB/NR settings, meter display, transmit power, backlight settings, squelch, digital gain, and AM/FM mode enable/disable, among others. So this little transceiver is feature-rich.
Moreover, most menu items can be changed while you’re transmitting. While on the air, for example, I regularly toggle the transmit meter display between power out and SWR while calling CQ. Very handy.
Again, operation is straightforward and simple, especially good because at time of publishing this review, the LD-11 owner’s manual is still quite basic (click here to download PDF version).
On the air
Unlike most of my review radios, which spend a great deal of time in the shack during the evaluation period, the LD-11 spent most of its time in the field–in several US states, as well as in a couple of Canadian provinces. I even used the LD-11 for two weeks in an off-grid cabin on Prince Edward Island, Canada.
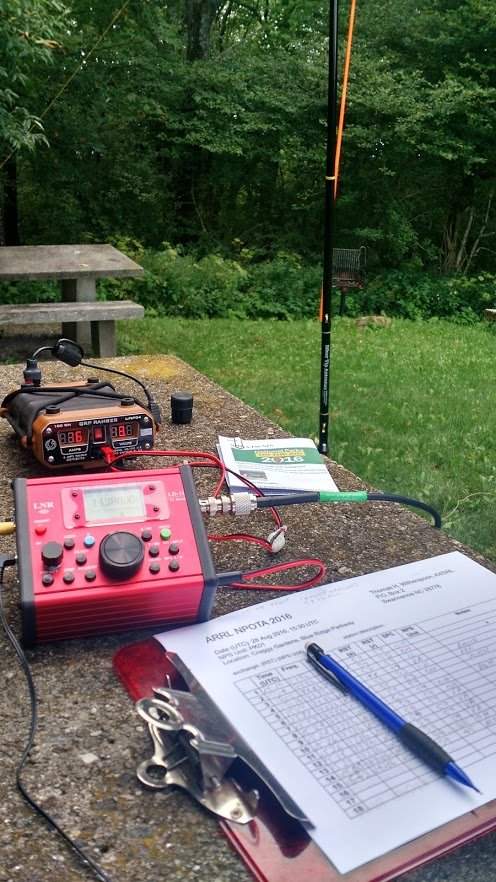
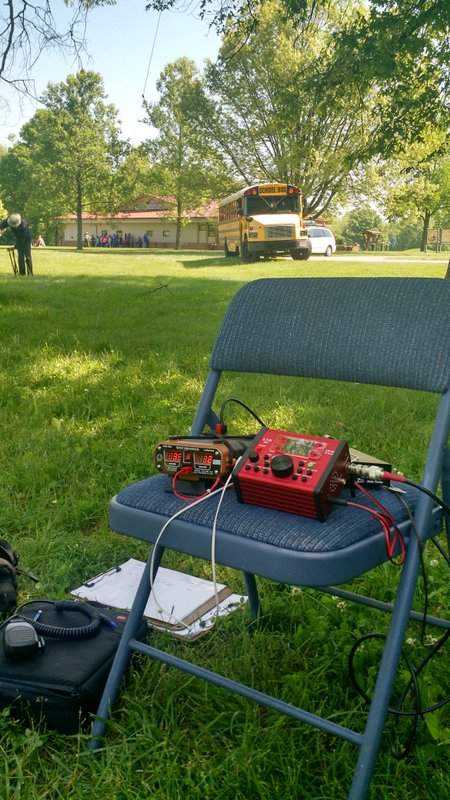
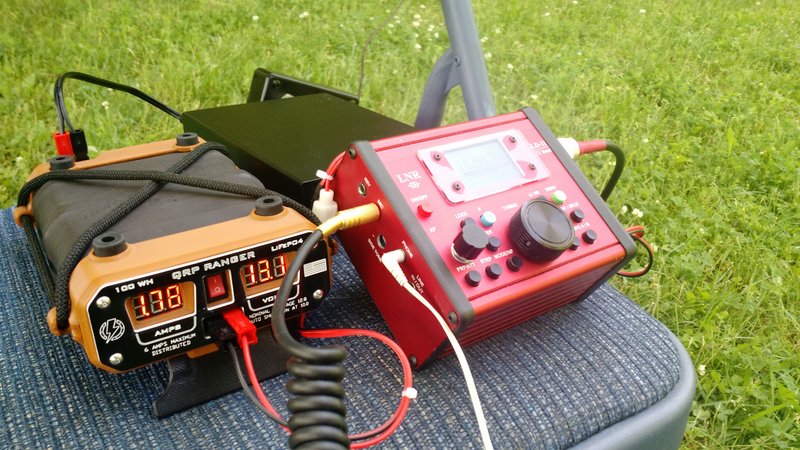
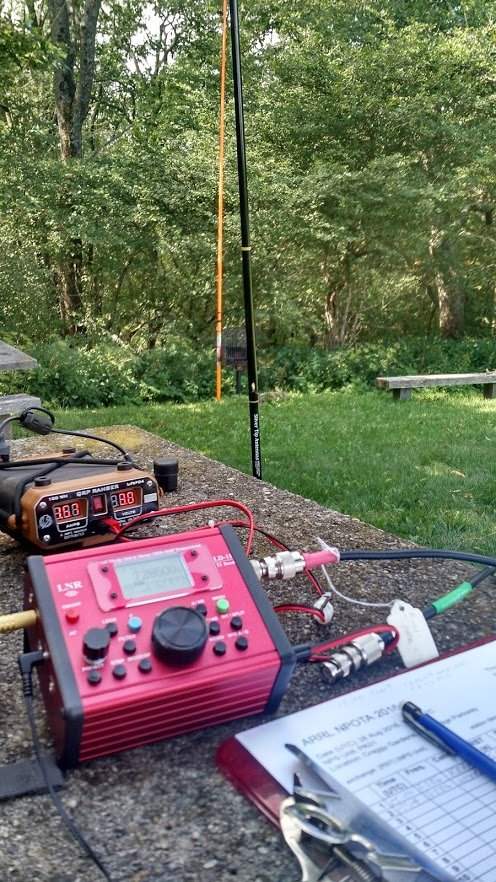
The LD-11, QRP Ranger, and Z-11 auto-tuner at the Hopewell Culture Park NPOTA activation.
We had a tight schedule for our NPOTA activations, so I couldn’t spend a great deal of time setting up my equipment. So on that day, I paired the LD-11 with Eric’s Z-11 auto tuner and a homebrew 40-meter doublet suspended from a tree. I powered the LD-11 with my Hardened Power Systems QRP Ranger battery pack.
And this combo worked brilliantly. At Hopewell, for example, I made twelve contacts, in short order, running SSB with just 8-10 watts output, and received positive audio reports.
Also that day, I discovered how exceptionally easy it is to operate the LD-11 in the field. When packing in, I appreciated how lightweight and compact it is, and that fire-engine red chassis meant there was no way I’d overlook it or forget it on the ground.
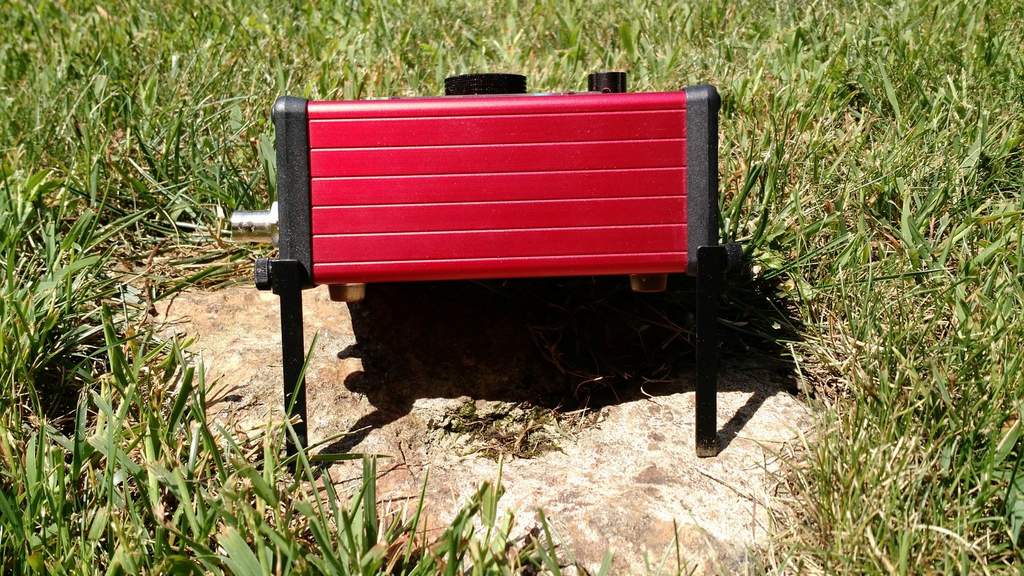
The LD-11 has two fold-down feet to support it on the shack table or in the field.
Two missing features, however, might make the LD-11 even more portable: these are an internal battery pack and an internal ATU. Unfortunately, there are no options for these at present (LnR, take note).
The LD-11 feet fold neatly under the chassis.
The external ATU, meanwhile, adds several extra items to manage: the ATU unit, the power cord, and an extra patch cable. Sure, if you’re operating all day from one location, none of that really matters. But when you’re doing quick deployments, every bit of kit that doesn’t require packing and unpacking also saves time and potential frustration. But I cheerfully used the above combo the rest of the day, logging even more contacts.
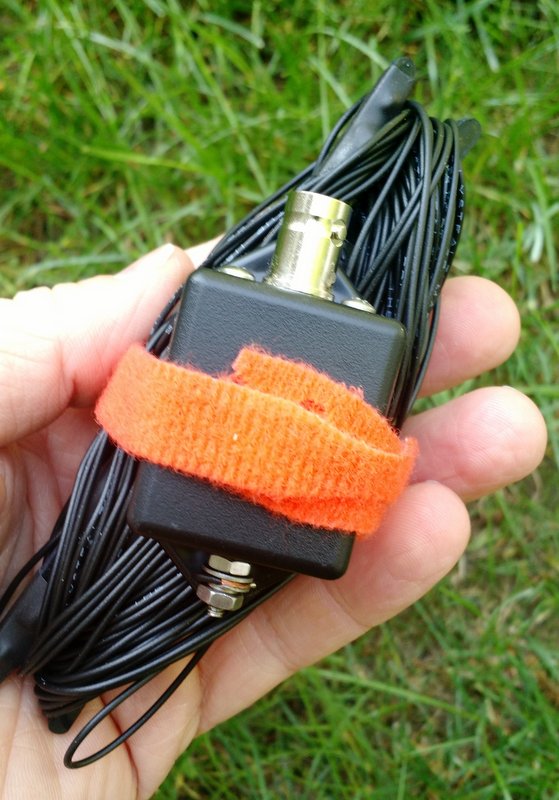
The EFT Trail-Friendly Antenna
At the Dayton Hamvention, I decided that one way to avoid taking an ATU to the field was to use a multi-band resonant portable antenna. I was quite busy at the Hamvention and didn’t want to spend time building one, so I decided to take the quick route and simply buy one. I visited a few vendors in Hara Arena and was impressed with the selection of field-portable antennas available. In the end, I was taken by the compact and easy-to-deploy design of LnR Precision’s EFT Trail-Friendly antenna,and purchased one on the spot. As many potential LD-11 owners might purchase the same antenna, I decided it might help to review it, too.
The EFT Trail-Friendly antenna is incredibly compact and quite easy to deploy.
I bought a version of the EFT antenna that is resonant on 40, 20, and 10 meters. I like that band combo for NPOTA and SOTA activations, because I like operating on both the 40 and 20 meter bands. What’s especially brilliant about the EFT end-fed design is that you only need to suspend one side of the antenna: simply launch a line over a tree branch, and hoist the business end of the antenna up, and, snap–you’re ready to go. When wound up for transport, it’s also lightweight and takes up very little space in a kit bag.
On the way home from the Hamvention, we activated the same four parks yet again. Eric and I tuned the EFT antenna before its initial use, and it was then ready to go.
Eliminating the need for an external tuner and adding the simple EFT antenna to the mix meant that I could set up and take down my entire station in a matter of minutes.
The only thing that took time at all was finding a tree branch to hoist the end of the antenna–usually not a problem, especially in our Eastern US parks. Moreover, the transceiver-plus-antenna team was quite effective: I easily logged all the contacts needed for all four sites in the one-hour time slots we allotted.
LD-11 Performance
The QRP Ranger (left) and LNR Precision LD-11 transceiver (right)
In brief, I’ve been very pleased with the LD-11’s performance on the air.
The LD-11 receiver is both sensitive and selective. Though I didn’t have the chance to test it in the RF-dense environment of Field Day, it never overloaded in the areas where I’ve operated.
Through my headphones, the LD-11’s noise floor is impressively low and the receive audio is excellent. At first, I was a bit disappointed that the LD-11 doesn’t have an RF Gain control–something I frequently use to mitigate background noise–but fortunately the noise floor is low enough, and the DSP architecture seems adaptive enough, that I’ve never needed to reach for an RF gain control so far.
Nonetheless, LnR: I do hope you’ll consider making RF Gain a future firmware update!
Modes
The LD-11 is jam-packed with modes: USB, LSB, CW, CW-R, AM, and FM.
The LD-11 can also handle a host of digital modes, and there’s the choice of two models to connect to your PC: one LD-11 model with the Prolific USB Adapter Chipset ($739), and another model with the more-universal FTDI chipset ($789). It’s outside the scope of this review to test the LD-11 on digital modes, but note that I plan to do so in the coming months. The modes I’ve tested thus far are SSB, CW, and AM.
When I operated SSB, I found the default filters quite effective and the receive audio pleasant. On transmit, I received a number of positive reports on the LD-11’s audio. What’s more, through a menu option you can can adjust the transmit audio equalization (three defaults) to better match your voice.
On CW, the LD-11 was equally as pleasant. On-board filtering is quite effective and audio well-balanced.
On transmit, there is one negative worth noting for the CW operator: the LD-11 does not have full break-in QSK.
While this isn’t a problem for me, because I find hearing signals between the dits and dahs I send rather distracting, I know many CW ops that don’t like using a delay on transmit, preferring instead a full break-in. LnR notes that the LD-11’s “maximum switching delay is 12mS and digital delay is 47mS.” If you set the LD-11 for the quickest response time, you can hear between most characters, but the relay clicking can be distracting. For all of my CW operations, I set the response time to 500ms.
The first time the LD-11 was operated in CW it was with my buddy Mike Hansgen (K8RAT). Later, I asked this experienced operator how the LD-11 sounded on the other end? His reply:
“The LD-11 put out a sweet, musical note that was very pleasant and reminiscent of the note of a valve transmitter. The LD-11 sounded better than any silicon transceiver I had heard in a long time.”
Wow…high praise, indeed. For those who don’t know him, Hansgen has high standards, and doesn’t hand out such compliments readily.
AM mode (and general coverage)
Though the LD-11 isn’t advertised as having a general-coverage receiver, it will, in fact, tune the entire HF band.
You initiate this broad-spectrum tuning by entering the LD-11’s administration mode. In the admin panel, you’ll find functions that allow you to set the band edges on each amateur radio band. LnR describes this process in the LD-11 product manual, but suggests you contact them for support the first time you do so.
For a preliminary test of broadcast reception, I moved the lower band edge of the 30 meter ham radio band to 8.2 MHz.
After saving the settings and re-starting the LD-11 in normal operation mode, I could then tune the entire 31-meter broadcast band on the LD-11.
Hypothetically, you could either widen each amateur radio band to include adjacent broadcast bands, or you could simply set one of the ham bands to include the entire HF spectrum. To make it easier to navigate and tune through the bands, I prefer the former method.
Since the LD-11 has a proper AM mode, broadcasts sound great–especially via headphones! Better yet, the AM filter width can be widened to an impressive 9.6 kHz–! When listening to a blowtorch signal, audio fidelity is most impressive.
The LD-11 has four filter slots: F1, F2, F3, and F4. The F1-F3 slots can be set to a fixed user-defined widths (common widths are default).
The F4 position can be altered to any available filter width without having to enter the admin mode of the transceiver. Simply press the “F” (blue function button) and the FILTER button simultaneously, and use the encoder/tuning knob to specify the filter width in .1 kHz steps. Pressing the F and FILTER button, again simultaneously, will save your filter width for the F4 position.
I’ve been using the F4 filter position for widths between approximately 8.2 and 9.6 kHz in AM.
A panadapter
One final unique feature of the LD-11 is a built-in, simple panadapter. By pressing the F (function) and VFO buttons simultaneously, it will engage the panadapter which lines the bottom of the display.
The panadapter display is found at the bottom of the LD-11’s backlit display.
To be clear, the panadapter is very basic–it doesn’t include frequency markers, it’s monochrome, and it’s not very tall (height/depth helps to discern weak signals along the spectrum). In fact, when I first turned it on, I truly doubted its utility.
Yet after having used the LD-11 for several months, I can say that one of the first steps I now take when putting the rig on the air is to engage the panadapter. Though it’s quite simple, I find it a useful tool for chasing signals on bands, whether SSB, CW, or even AM broadcasters. It’s also very responsive and fluid, which helps make up for the fact that it’s solid in color and rather flat.
For example, the weekend before finishing this review, I activated PK01 (the Blue Ridge Parkway) for NPOTA. When I switched to 20 meters, the noise floor was so low that, when I first started calling CQ, I assumed that either the band was dead or the antenna wasn’t working. One look at the panadapter, however, showed me that there were some strong SSB signals on either side of my frequency. So I didn’t tune around, but simply continued to call CQ, which soon rewarded me with excellent catches (more on that below).
Summary
Invariably, all radios have strengths and weaknesses; here is a list of these from the moment I put the LD-11 on the air:
Pros:
Lightweight, compact size
Excellent ergonomics and simple menu-driven functions
Built-in, simple panadapter
Low current drain on receiver (….ma)
General coverage receiver
Low noise floor
Variable filter bandwidths
Rugged hand mic
Most menu items can be changed while operating PTT or CW
Headphone amplifier drives larger headsets
Internal speaker (see con)
Excellent CW transmit audio reports
Good LnR Precision customer service
Cons:
No internal ATU option
No internal battery option
No RF gain control (see noise floor pro)
CW operation is not full break-in QSK, some relay noise
No voice or CW memory keyers
Very basic owner’s manual
Occasional audio “pops” when tuning rapidly through a band
While the LD-11 lacks some of the portability of those rigs (specifically, options for an internal battery and ATU–again, please take note, LnR), its performance-for-price-point is right, in my opinion.
If you take the LD-11 to the field with a resonant antenna, as I have, all you need is a power source to be on the air in moments. If you pair the LD-11 with a simple ATU like the Emtech ZM-2 or the even smaller Elecraft T1, you’ll be able to tune wires to your heart’s content, and you won’t need extra power cables.
Oh, yes…there’s one more thing I must mention about the LD-11: this rig has, for lack of a better word, a “fun” factor. It reminds me of one of my favorite QRP radios from days gone by, the Index Labs QRP Plus. The QRP Plus had many performance shortcomings and wasn’t nearly as full-featured, as lightweight, or as small as the LD-11, but it was a fun radio due to its dead-simple controls, nice display, prominent tuning knob, and good ergonomics generally, making it a breeze to operate.
The LD-11 feels like what the QRP Plus should have been: a fun rig that delivers serious performance.
The LD-11 is also easy to use, and that certainly contributes to its sense of fun. Operation has clearly been well thought through by the LnR developers. Only a few days before capping off this review, I took the LD-11 to the field for its 6th National Parks On The Air activation. With eight watts in SSB and a 20 meter vertical, I worked Rhode Island, Texas, Montana, Manitoba, California, and Slovenia from a picnic table on the Blue Ridge Parkway. And it was great fun, underscoring the reason I get such a kick out of HF and QRP in the first place.
Of course, that’s the magic and the mystery of radio. But tools like the LD-11 make it all the more accessible. LnR Precision, I must say: pretty good trick. From your proverbial hat, you’ve produced the handiest little QRP rig I’ve seen in years.
The following review originally appeared in the SEptember 2016 issue of The Spectrum Monitor magazine.
Over the past year, I’ve received a number of inquiries from readers who are considering purchasing a handheld wideband receiver. This is a market I’ve never truly explored because, to be honest, I’m partial to the HF part of the spectrum, and wideband receivers have always seemed more akin scanners than to shortwave receivers.
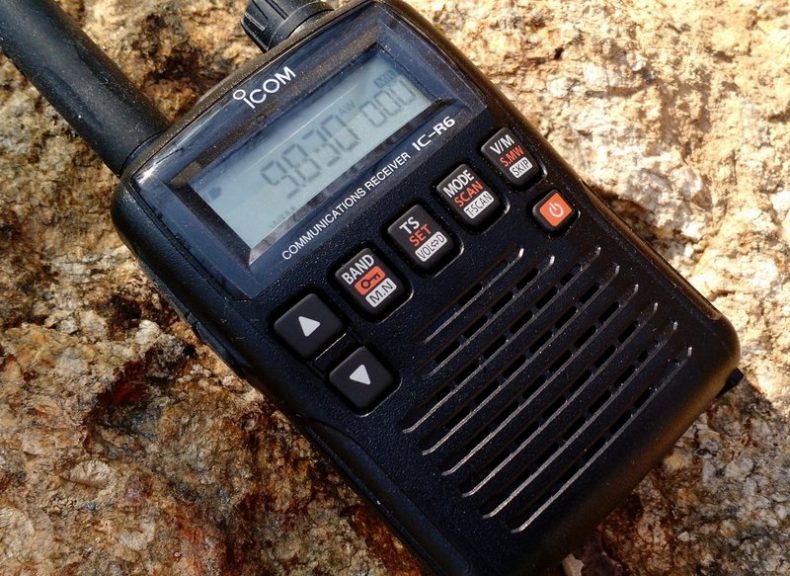
But lately, readers have specifically asked about the Icom IC-R6, a compact handheld receiver that covers from 100 kHz to 1309.995 MHz. What makes the IC-R6 appealing is that––at just $175 US––it is one of the least expensive wideband handhelds/scanners on the market that not only covers the shortwave bands, but also the AM broadcast, Longwave, FM broadcast, & NOAA weather frequencies.
Over the years I’ve read numerous reviews of the IC-R6 and other wideband receivers. Reviewers of this handheld receivers typically gloss over shortwave and mediumwave reception, and for good reason––it’s generally known that you just can’t have the best of both worlds in the sub-$300 price range. This makes sense, as there are invariably performance compromises when you pack wideband reception into such a tiny package: manufacturers usually put a performance emphasis on the VHF/UHF bands rather than on HF or mediumwave.
Still, I was curious enough about the IC-R6 to want to put it through its paces on shortwave and mediumwave, so I contacted Icom, who generously sent me an IC-R6 on extended loan for the purpose of this review
Usability/Ergonomics
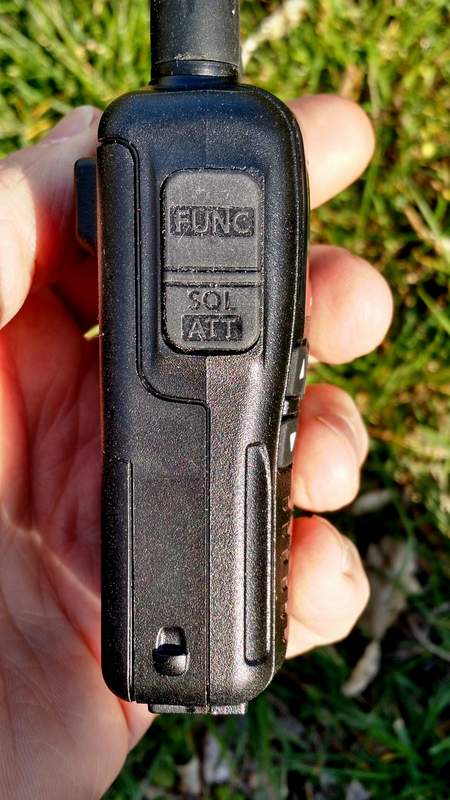
Here I need to throw out a disclaimer: I’m not a fan of handheld radio (Handy Talky) ergonomics.
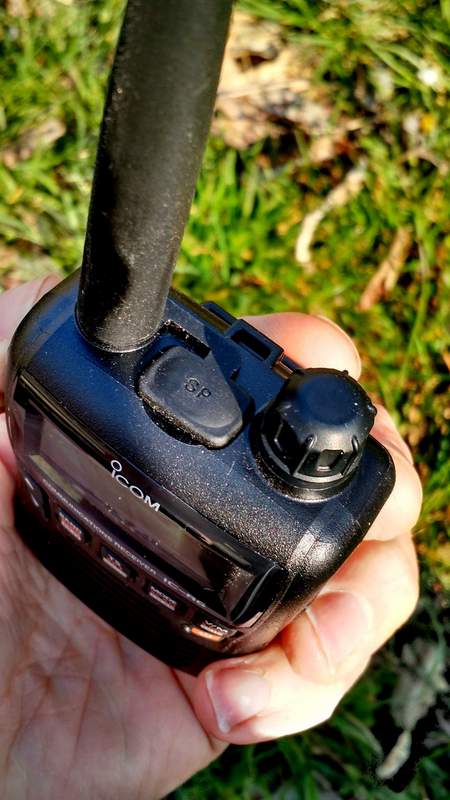
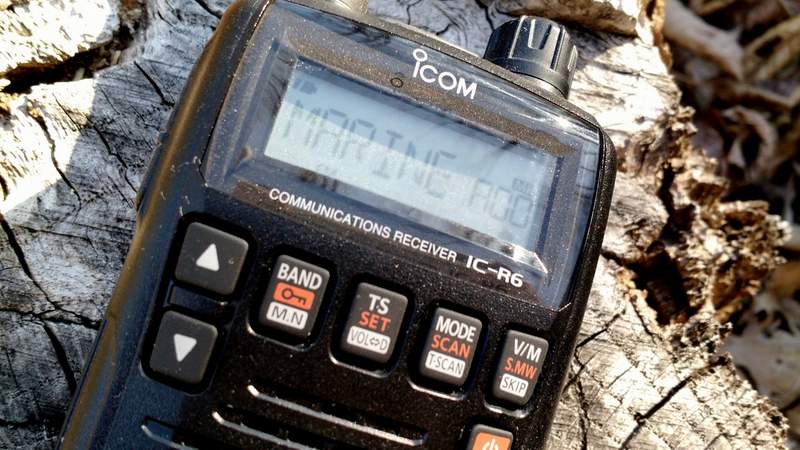
The IC-R6, like most other tiny handhelds, has a spartan array of buttons, all of which have multiple functions. Like its compact competitors, it also lacks a direct entry keypad-––after all, there’s simply no room for a keypad, and if there was one, it would obviously be too small to use.
That being said, however, I must say that Icom has done a surprisingly good job of making the IC-R6 usable in the field.
If, like me, you’re the type of person who typically ignores the owner’s manual when you first receive a new radio, the IC-R6 may prove frustrating. Fortunately, the Icom user manual is superb, and well worth the read. It’s very well written, and takes you through each function step by step. The 80-page manual is entirely in English (the US version, at least) and even has a cut-out pocket guide in the end. Brilliant!
Once I spent a few minutes reading through the IC-R6 manual’s outline of its basic functions, I found most operations are simple and relatively easy to remember.
What makes each operation handy is that the Function key––which helps toggle the four multi-function buttons––is located where the PTT (push to talk) button would be on an amateur handheld transceiver. It’s actually a great location for the button because it allows one hand to hold the radio and push the function button, permitting the other hand to push a front panel button. Though I initially felt I was keying up to “transmit” on an HT, it soon became apparent that this is a very logical key placement.
Tuning
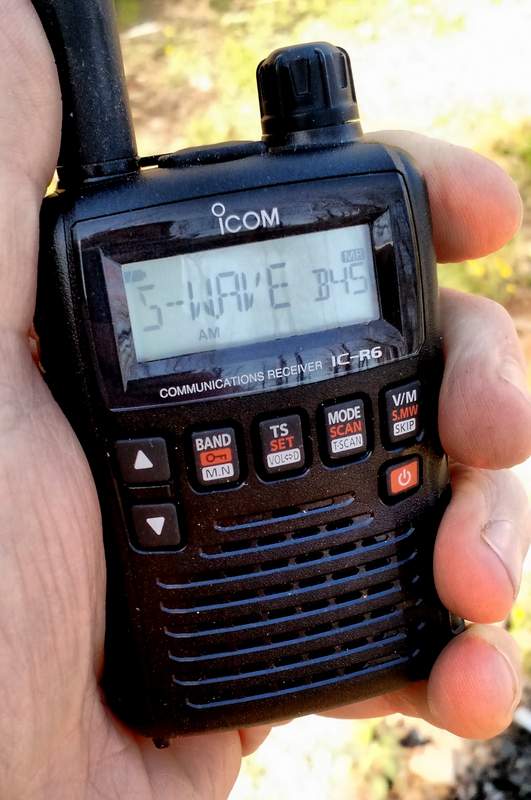
Tuning with the IC-R6 is relatively easy and straightforward.
Simply select a band with the BAND button. Next, adjust the volume with the UP/DOWN arrow buttons, and the squelch (if needed) by holding the squelch button and turning the tuning knob. Then you may use the tuning knob to tune up and down the band.
If you want to quickly skip to another part of the bands, hold down the function key while turning the tuning knob, and the R6 will tune in 1 MHz steps. I’ve found that this helps to move across the spectrum quite quickly and compensates for the lack of a direct entry keypad.
You can also easily change the tuning steps by pressing the TS button and using the tuning knob to cycle through selections (a total of fourteen possible step selections are available between 5 kHz and 100 kHz).
Over the course of a few months of using the IC-R6, I’ve learned a couple of methods to adapt to its lack of a direct-frequency entry keypad:
using the 1 MHz tuning steps, as mentioned above
loading the memory channels with band edges and your favorite frequencies (with 1300+ memory slots, there are many ways to manage your tuning)
Mediumwave/AM Broadcast Band Performance
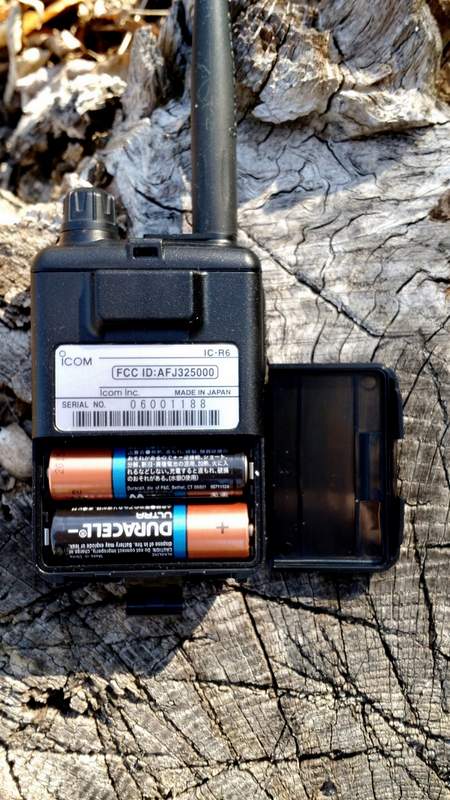
Surprisingly, the IC-R6 has a tiny internal ferrite bar antenna for mediumwave/AM broadcast band reception. This is a welcome feature because there’s no need to remove the supplied rubber-duck antenna to connect an external antenna for broadcast listening.
In terms of AM performance, I was happy with the IC-R6. I’m able to receive all of my local AM broadcasters with decent signal strength. I’m even able to reliably receive one 25-mile-distant daytime broadcaster; this truly surprised me, especially since the internal antenna must be minuscule.
Is the IC-R6 a good choice for a mediumwave DXer? Unfortunately, no. The AGC struggles with weak nighttime conditions, and frankly, with such a small ferrite bar antenna, nulling capabilities are minimal. If you’re a MW DXer, I would suggest carrying a small ultralight portable along with the IC-R6.
The IC-R6 also covers the longwave bands, but I would never use it even for casual longwave listening as the tuning steps are limited to 5 kHz increments.
Still: to have a respectable little AM receiver in a handheld scanner––? It’s great!
Shortwave Performance: Sensitivity
As I said, most reviewers gloss over shortwave reception on handhelds. I thought I’d put the IC-R6 through a more thorough test.
Note that, being fully aware of its limitations, I never used the stock rubber-duck antenna to test shortwave reception; instead, I used a long piece of thin co-ax attached to five- and ten-foot sections of wire. I tried longer and shorter pieces of wire, as well, but found that 5-10’ seemed to hit the sweet spot in terms of sensitivity.
To be honest, I had fairly low expectations of the IC-R6. I knew that the shortwave/HF bands are truly just an added feature on this rig, and realized that the R6 is more akin to a scanner rather than a shortwave radio. But in terms of sensitivity, I found I was rather impressed with the IC-R6.
The first morning I tested shortwave reception, propagation was, at best, mediocre. Yet I was able to copy WWV on 10 and 15 MHz without much trouble. I could receive all of the strong North American private broadcasters, like WTWW, WRMI and, of course, most frequencies occupied by Radio Havana Cuba and China Radio International––all of these are broadcasters that my shortwave portables can readily receive here in my region. Moreover, in the mornings, I’ve also been able to receive one of my staple shortwave broadcasters on the R6: Radio Australia. It’s nice to imagine that if I were camping, the little R6 could serve up my morning dose of news from Down Under.
All in all, I’m fairly pleased––and surprised!––by the IC-R6’s sensitivity.
Here’s an example of reception when tuned to WRMI, a strong station in my region. [Fun side note: I had no idea that, as I was recording, I would hear my buddies Mark Fahey and Jeff White on the air!]
Shortwave Performance: Selectivity
On the flip side, the IC-R6’s selectivity is unfortunately quite poor. I anticipated this.
Almost any of the strong signals I receive can be heard with equal fidelity when tuned off-frequency 5 kHz to either side of the carrier. You can pretty much forget discerning between two adjacent signals that are only spaced 5-10 kHz apart.
And yet while this would be a deal-breaker for me on a dedicated shortwave portable, this wouldn’t stop me from purchasing the IC-R6. Since we don’t have the crowded shortwave landscape we used to, selectivity is much less of an issue these days.
So, for some casual SWLing while say, backpacking? The IC-R6 does the trick!
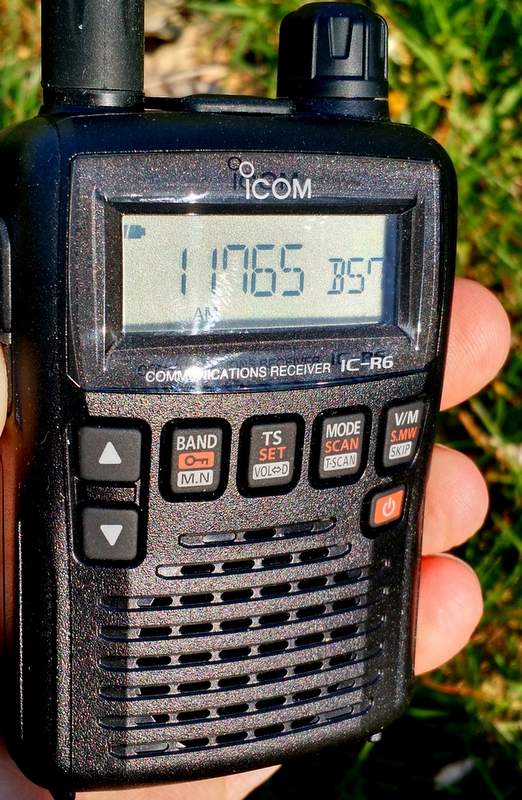
The IC-R6 runs efficiently on a set of two standard AA cells.
I should note here that I never connected the IC-R6 to any of my large outdoor antennas. First of all, I didn’t want to risk damaging the front end of the receiver (especially since this is a loaner), and secondly, I knew the IC-R6’s poor selectivity would only be exacerbated if gain were significantly increased. I also want to caution readers from doing this, as I suspect the IC-R6’s front end will seriously overload on a large antenna.
Auto-Memory Write Function
The IC-R6 has a very cool scanning function similar to the ETM auto-scan on Tecsun portables, known as the “auto-memory write function.” Here’s how it works:
Simply select the band you wish to scan.
Set squelch level.
Select the scanning range. There are several options here:
Full scan, which scans the entire frequency range of the IC-R6 (you’ll want to grab a cuppa coffee, as this will take a while)
Selected Band Scan, which only scans all of the frequencies with the band’s edges
Programmed Scan, which scans between two user-programmed frequencies
Finally, press the SCAN/MODE button to start the scan and the V/M button to engage the auto-memory write function..
The radio will then scan according to your selected scan mode, pausing for an interval of about five seconds on each signal it finds, and writing it to one of the auto-memory write channel groups (000-999) for your convenient access.
To recall the auto-memories once scanning ends, simply press the V/M button to enter the memory mode, select the band with the BAND button, then use the tuning knob to scan through the signal catches.
Once you’ve experimented with this process a couple of times, it becomes second nature, and is very handy.
One negative: since the IC-R6’s HF selectivity is lacking, you could possibly get double or triple auto-memory writes for really strong broadcasters.
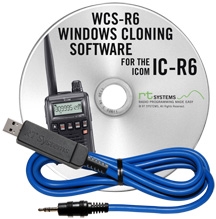
Programming software and cable
I’ll be frank here: if you plan to purchase an IC-R6 and load it with memory channels, you’ll be well-served to purchase programming software and a cable as well. Entering frequencies by hand is tedious, especially if you want alpha-numeric labels.
I’m very partial to the cables and software offered by RT Systems. Besides having the most user-friendly programming software I’ve personally used, RT Systems also offers consistency in terms of set-up and application user-interface across their whole product line. For example, I own a Yaesu VX-3R which I’ve programmed with the RT Systems software; when I want to import all of my VX-3R frequencies into the IC-R6, it’s a simple process with the aid of RT Systems software.
RT Systems supports almost all programmable amateur radio transceivers and receivers on the market, which means that it makes for a great cross-manufacturer link between all of your gear.
Summary
Invariably, all radios have strengths and weaknesses; here’s a list of my notes from the moment I put the Icom IC-R6 on the air:
Pros:
Very compact, handy size with respectable ergonomics
Scanning
Frequency/Memory scanning very fast
Quickly scans AM/SW/FM/VHF/UHF bands
Acceptable shortwave sensitivity for most regionally-strong broadcasters (see selectivity con)
Great Auto Squelch function that seems to be effective even on the HF bands
Attenuation setting which helps the front end from overloading
Wide array of scanning options
Long operating time with AA batteries
Cons:
User interface
Very difficult programming without external software/programming cable
No keypad for frequency direct entry
Audio, via built-in speaker, is tinny; headphones help, but audio output is mono
Almost non-existent shortwave selectivity (see sensitivity pro)
Tuning steps are limited to 5 kHz increments, which may be insufficient on SW/MW and LW
No SSB mode (though no other wideband receiver in the under-$300 price range offers SSB)
Conclusion
The Icom IC-R6 is one little powerhouse receiver with many, many listening possibilities. With this one radio, you can listen to everything from local VHF/UHF repeaters, to local law enforcement and emergency services, aviation frequencies, NOAA weather radio, the FM broadcast band, AM broadcast band––and, yes, even shortwave.
If you’re looking for an all-in-one receiver to take on hikes, to put in your 72-hour emergency (BOB) bag, to carry in your briefcase, or even to simply carry in your pocket, the IC-R6 is a great choice. Remember, if you do invest in one, you should also invest in programming cable and software to help you along.
This review focuses on broadcast listening with the IC-R6. While I didn’t cover traditional scanner functionality, I should note that the IC-R6 is not a trunking scanner. If you live in one of the many cities, counties or even even entire states/provinces in the U.S. and Canada that employ “trunking” radio systems for public safety communications, you’ll need a different receiver for this purpose.
Additionally, if you’re looking for a top-notch shortwave portable, you’ll want to buy a dedicated shortwave receiver, instead: they’re built with only HF reception in mind and will cost you much less, for better overall performance and more modes (SSB).
Of course, the IC-R6 is so modestly-sized that you could always carry it plus an inexpensive compact shortwave receiver (like the Tecsun PL-310ET, or the PL-380), and then…well, you’ll suddenly have the best of both worlds!
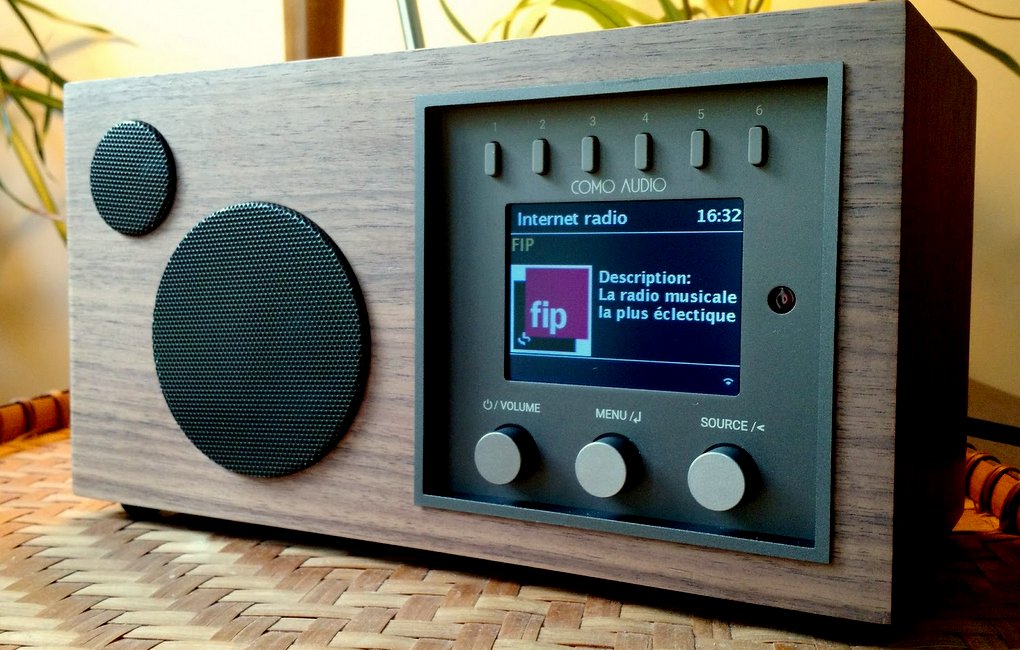
But exactly why did I buy this small, self-contained digital music device–? Having just completed an in-depth review of several WiFi radios, I certainly didn’t need another. But the good-looking Solo, with its clean design and walnut casing really caught my attention…I couldn’t resist checking it out. Plus, in backing the radio via Kickstarter, I was able to purchase it for $100 less than the predicted future retail of $299 US.
The Kickstarter campaign funding Como Audio was prompt in communicating updates with backers and providing even more product options during the wait for production and delivery. Although several other snazzy finishes for the Solo were brandished before me, I stuck firmly by the walnut veneer I’d originally chosen.
Fast forward to the present. I finally received my Como Audio Solo a few weeks ago, and have had time to play with it. While I haven’t had time to explore every nuance of this radio, of course, I have had an opportunity to form some opinions.
Design
I don’t often comment on the design of radios I review, but in this case it’s worth noting.
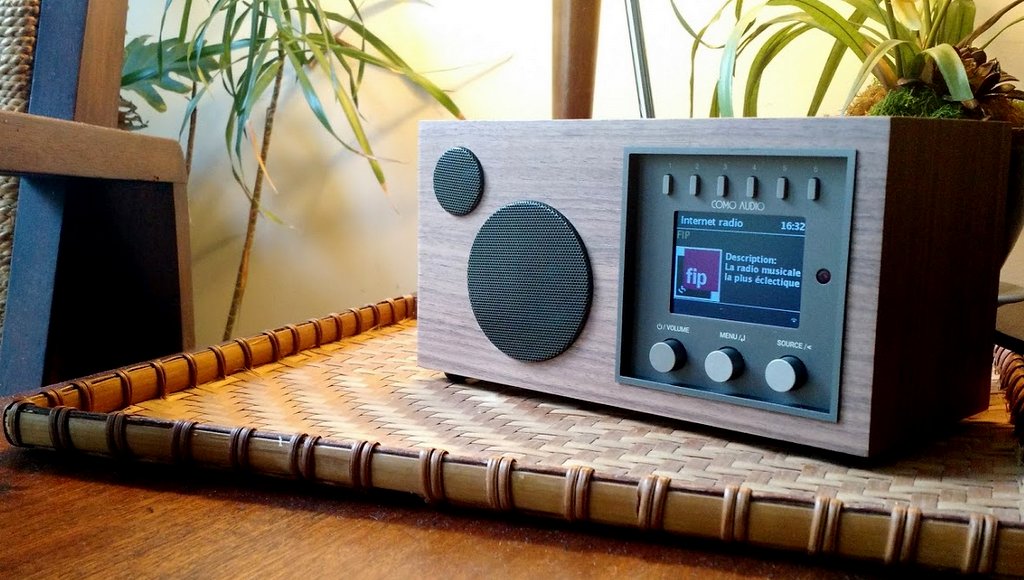
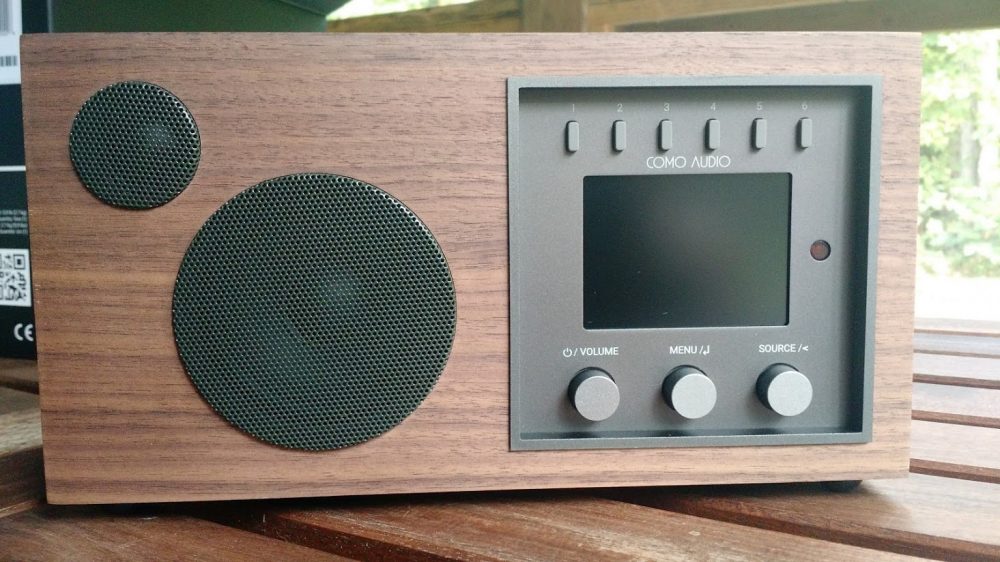
The Como Audio Solo, in wood, is elegant and simple. Love it:
The only element of the design I’m not typically keen on? I’m not the biggest fan of devices that sport colored backlit displays; to me they appear a bit flash and faddish, undermining a radio’s overall aesthetic.
But I must say, the Solo pulls it off. The color display in this case is somehow not too distracting–it’s soft yet crisp, and easy to read even at a distance.
In short, the Solo is a stunning piece of kit, especially with that warm walnut casing, and looks right at home in any setting–office, living area, kitchen, or at the bedside.
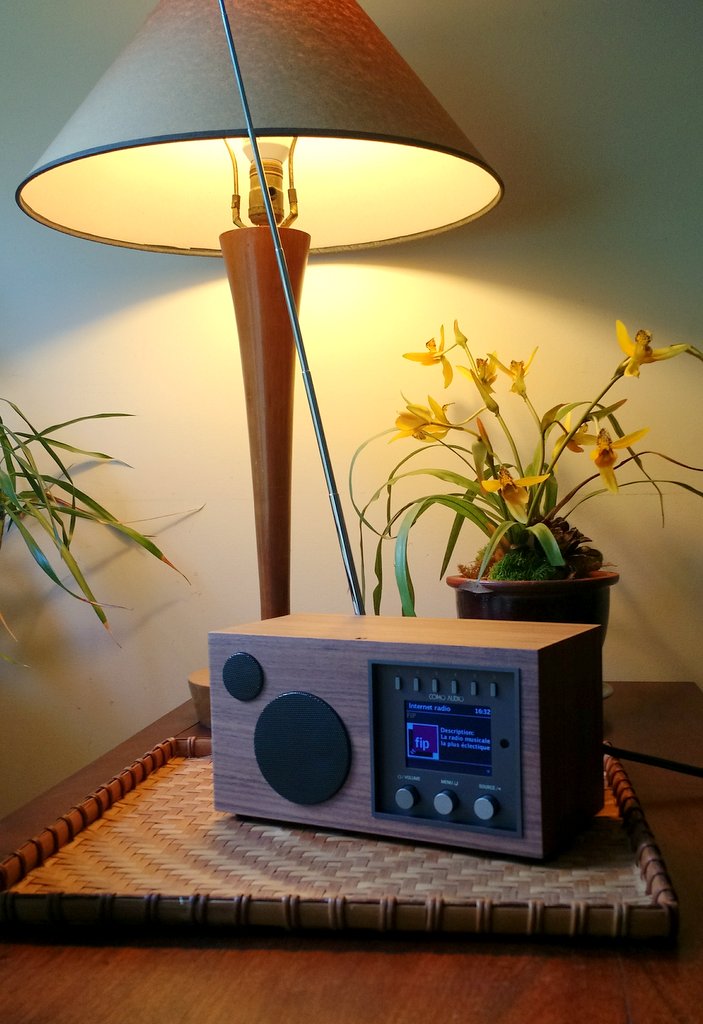
I’ve only one gripe with the Solo’s ergonomics: the front control knobs are a little too close to the bottom of the recessed controls area. When I try to turn a knob–for example, attempt to tune the FM band–I find my fingertips won’t fit between the knob and lower edge of the recessed panel, making the knobs a little hard to turn in one fluid motion. (Of course,this is also due to the fact that I have big fingers; my wife doesn’t seem to have this problem).
But this isn’t a dealbreaker as I’m finding I don’t often need to reach for the front controls, anyway. Why? Because the rig’s IR remote–or better yet, its smartphone app–control the radio effectively at any convenient distance from the radio. Sweet.
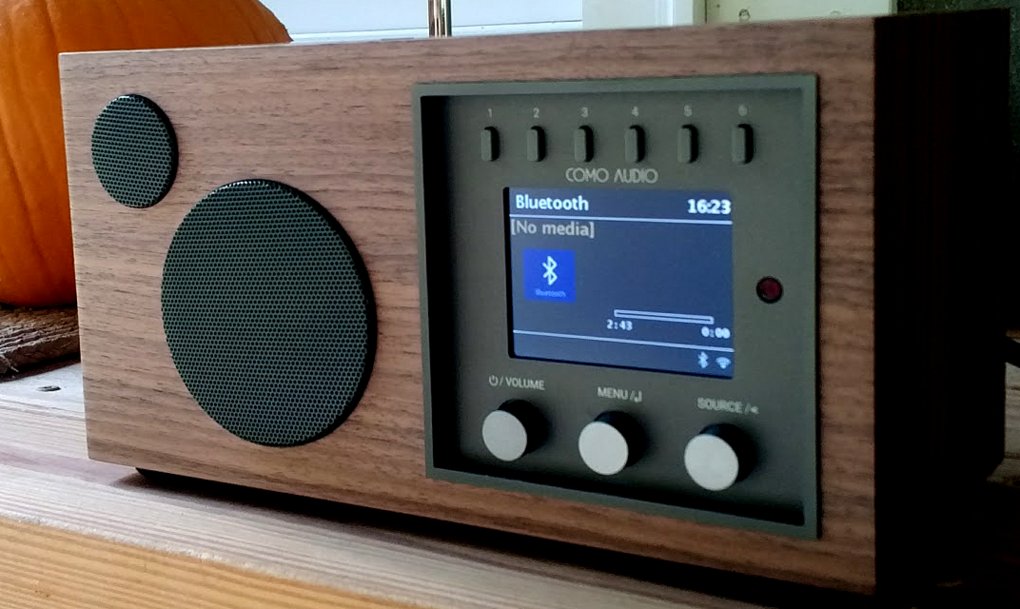
Audio
I’m a sucker for quality audio fidelity, and I must admit that this was one of the biggest deciding factors in purchasing the Solo: it touted extraordinary audio in a modest package, being designed around an acoustic chamber/chassis containing a 3″ woofer and 3/4″ dome tweeter fueled by a 2 X 30 watt RMS amplifier. I was very curious whether it could live up to its initial claim.
After turning on the Solo for the first time, I immediately wanted to hear audio, so I put it in Bluetooth mode and played a few songs, ranging from Jazz to Electronica.
In a nutshell: Wow.
The audio is strikingly reminiscent of my Tivoli Audio Model One…which is to say, it’s excellent. It packs more audio punch than any of the radios I reviewed in my WiFi radio comparison.
Out of the box, the audio is fairly well-balanced, too. But you can tweak the equalizer, and I did, drawing in a little more bass and treble. My wife (also a bit of an audiophile) was impressed. And yes, the sound is all the more remarkable considering the radio’s relatively small form-factor: little box, big voice.
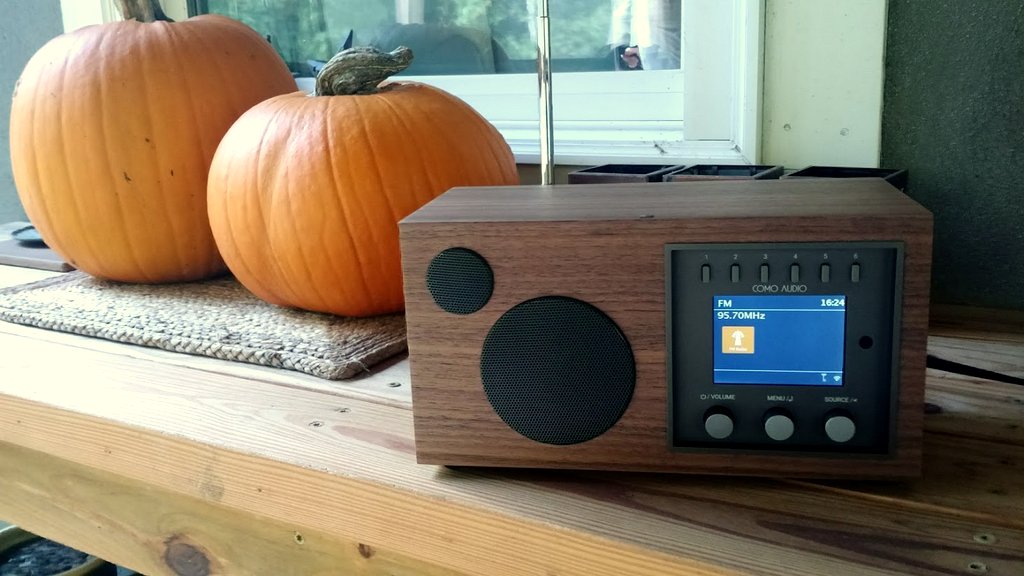
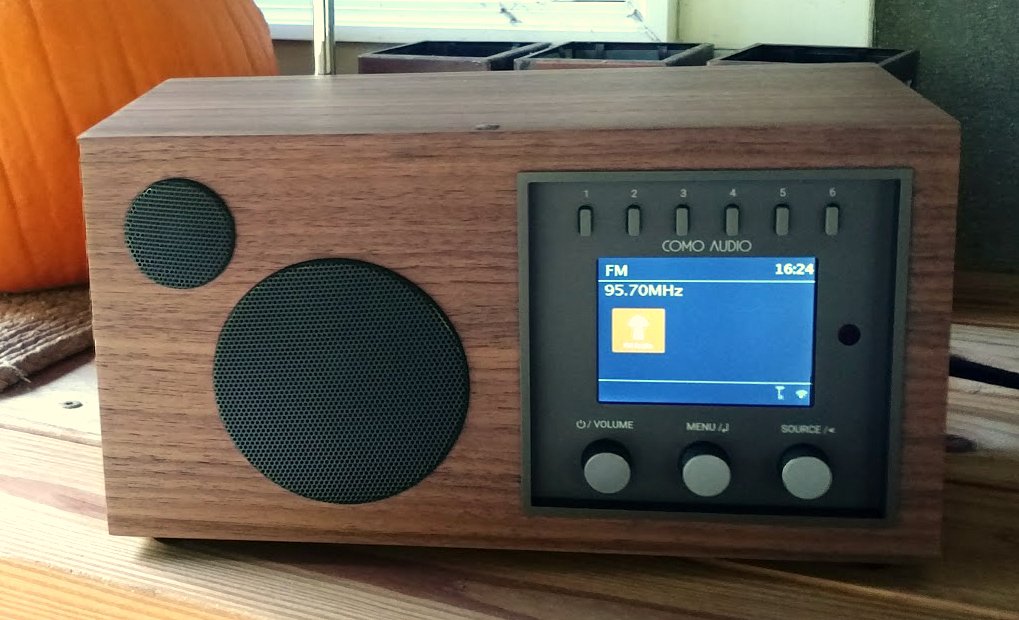
FM Reception
The Como Audio Solo is one of the few Wifi radios on the market that has a built-in analog FM and DAB receiver (save the $120 Sangean WFR-28, which has analog FM reviewed here).
Since I live in the US, I can’t comment on DAB reception. I have, however, had an opportunity to test the FM analog reception. Keep in mind, I live in a rural area and require a decent FM receiver with telescopic antenna fully extended just to listen to my favorite regional programming.
When I tune the Solo to my benchmark FM stations, it can receive them–but not as effectively as many of my other radios, including the WFR-28. Even when forced to use the Mono setting only, the stations it receives carry too much static for good listening. So obviously the Solo isn’t as sensitive as some of my other radios, at least in this setting. Indeed, few stations it receives in this area are able to lock in to the point that there’s no static in the received audio. For out-of-towners, this is a bit of a disappointment.
With this said, I imagine if you live in an urban area, the FM receiver should more than please you. I’ve no doubt it can faithfully reproduce beautiful audio from local FM outlets.
I should add that, while FM reception isn’t stellar for distant stations, the RDS information does convey even when the audio isn’t full fidelity.
WiFi radio
Of course, the main reason I purchased the Como Audio Solo was to use and review it as a WiFi radio…nothing at all to do with that sharp walnut chassis, or audio power.
As I outlined in my WiFi Radio primer, WiFi radios rely on station aggregators–extensive curated databases of radio stations–to surf and serve up the tens of thousands of streaming stations around the globe.
Based on feedback from Como Audio shortly after the Kickstarter launch, I was under the impression that the station aggregator of choice was vTuner. This concerned me, as vTuner’s reputation as an aggregator is somewhat maligned due to a series of documented faults and weaknesses. Fortunately, this turned out not to be the case: after the initial confusion, I soon discovered Como had adopted the more robust Frontier Silicon aggregator, instead–a better choice.
Since I’m a pretty big fan of Frontier Silicon and since I’ve already been using their service with my Sangean WFR-28, once I connected my radio to my user account, the WiFi portion of the radio felt identical to that of my WFR-28. Simply brilliant, as the Frontier Silicon radio portal gives the user flexibility to create station lists and folders with ease–all of which readily convey to the radio itself.
The Solo also features six dedicated memory buttons on the front panel for quick access to favorites.
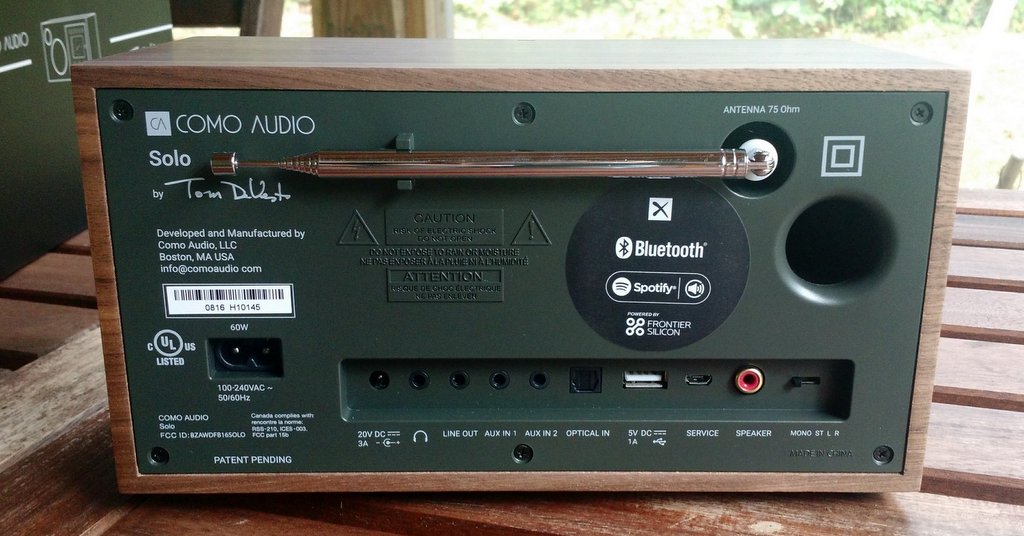
I love the Solo’s design–this certainly is a handsome product. Moreover, I love the audio, and am pleased that it delivers the fidelity promised by its Kickstarter campaign. The Solo and Duet are loaded with features, connections, Aux In and Aux Out audio and digital ports–more, in fact, than any similar device with which I’m familiar. I regret that the rig’s FM isn’t suited for country life, but the audio coupled with its stylish exterior do make up for this somewhat.
I do wish the Solo had an internal rechargeable battery option. Being able to move the receiver to different locations within a home or building could be a major plus for rural FM reception. As my friend John pointed out, however, the audio amplifier is robust enough, it might have been a challenge to implement an affordable-but-effective internal battery without compromising the audio amplifier’s needs.
In truth, I favor audio fidelity over portability for a tabletop radio.
In conclusion…do I have any backer’s remorse? Absolutely not–!
In short, the Como Audio Solo is a keeper. I’m still marvelling at this classy and dynamic radio that fills our home with rich beautiful audio. A few weeks in, the Solo has already become a permanent feature in our abode. It’s one of the few radios I have that meets my artist wife’s approval in terms of both design and audio.
Great job, Como Audio! If the Solo is any indication of radios to come, I’ll certainly be looking for your future innovations.
I have been procrastinating over investing in another portable shortwave radio to replace my ageing (but still going strong) Sangean ATS909. Also known in the U.S. as the rebadged Radio Shack DX–398, the Sangean has been a most reliable rig for in-the-field DXpeditions. My unit is one of the early first generation versions that I purchased on the second-hand market, so I’m guessing it has to be at least 16 years old now. It continues to provide a full rich tone quality on AM/FM and is very sensitive on shortwave providing you use an external antenna of 5 metres (16 feet) or more. The radio received some bad press because of its poor SW reception using just the telescopic rod antenna, which frankly was justified. The in-built whip is useless! But all of my work has been with an external antenna, and the results have been most successful over the years.
But the old ATS909 has lived a hard life, having been bounced around in the car on rough dirt tracks, dropped a few times, and thanks to a recent home renovation project it now has paint splattered all over it. On one occasion, I’d even left it outside on the ground after a spot of gardening, subjecting it to half an hour of heavy rain, before realising my forgetfulness. The radio was soaked but still going strong when I picked it up. However, the digital readout was all messed up. After 24 hours of drying, and it fired up beautifully again, and has been fine ever since! That’s some impressive build quality there! Thanks Sangean!
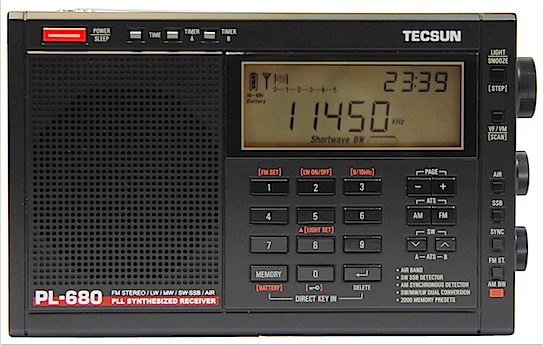
Anyway, a few months ago I decided to “pull the trigger” and purchased a new Tecsun PL-680 AM/FM/SSB/Air Band radio. This rig has been on the market since around February 2015. So far, it has performed very well for me.
Interestingly, on the built-in telescopic antenna reception is only marginally better than the Sangean, but the Tecsun is really quite sensitive with an external long wire antenna. In fact, I’ve had it hooked up to my three double bazooka (coax) dipoles for 80, 40 and 20 meters, and the performance has been excellent. The tone quality is not quite a good as the Sangean, lacking richness and depth on MW, FM and SW. But for DXing, the audio appears just right for digging out clear audio from the noisy shortwave bands.
Recently, I hooked up both portables for a side-by-side comparison using four different external antennas outside the shack with switches between the two radios. I was eager to check how they measured up in terms of sensitivity and selectivity. The results for the Tecsun were impressive, picking up all of the weaker signals that the Sangean could hear.
Indeed, on several shortwave broadcast bands, the Tecsun appeared to be just a touch more sensitive at digging out some of the weakest signals. The audio also appeared a little clearer for those weak signals, perhaps because it has a narrower audio response than the Sangean. And selectivity for the PL-680 was about the same as the ATS909, generally very good.
On the ham bands, however, the SSB audio quality of the ATS909 sounds more pleasant to my ears than the PL680. But the Sangean’s tuning process in SSB is somewhat more cumbersome than for the Tecsun.
The PL-680’s synchronous detector effectively reduces adjacent signal interference. It’s easy to use and is a strong feature in its favor. However, occasionally it can fail to lock on to a weaker signal or when the signal is subject to deep fading. One other characteristic of the Tecsun is that it has a rather overly generous S-meter, hitting S4 or 5 for all but the weakest signals. This is a meter not to be taken too seriously!

 Anyone who knows me knows that since I was licensed nearly twenty years ago, I’ve been a fan of low-power (QRP) operations. There’s just something inexplicably fun in being able to talk to the other side of the world using very low wattage. In a sense, I’ve always felt that, in the world of ham radio, QRP is truly the province of the magician.
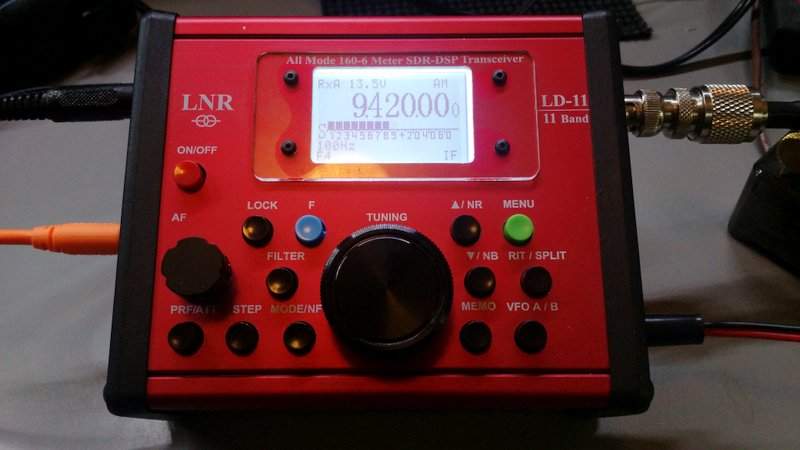

 I’m very partial to the cables and software