Tag Archives: Homebrew

Andy builds a genius companion control display for the Yaesu FT-817 transceiver

Many thanks to SWLing Post contributor, Andy Webster (G7UHN), who kindly shares the following guest post:


Yaesu FT-817 companion display

by Andy Webster (G7UHN)


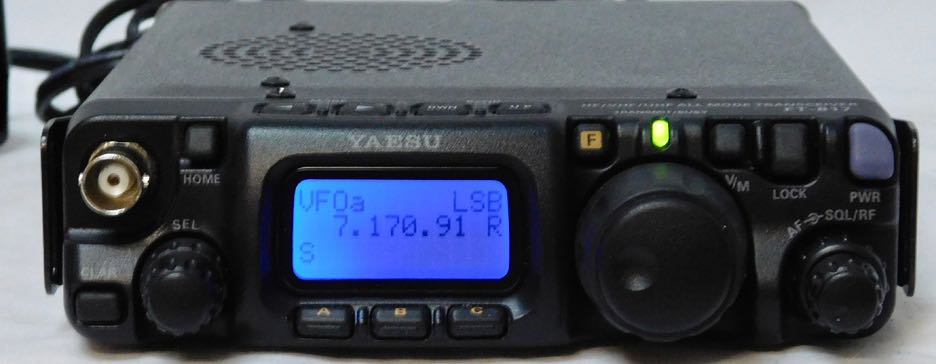
Like so many I love getting out portable with my FT-817 but I do seem to spend so much of my operating time fiddling through the soft-keys because my most used functions (CW narrow filter, power and keyer settings to tune an ATU, A/B, A=B, etc.) are spread across different “pages” of the A,B,C assignments. Compared to the sublime experience of using my Elecraft K2 the FT-817 can be a little frustrating!

Last month, inspiration struck and I thought I could cobble together a small microcontroller and a little OLED display with some buttons to provide some extra soft-keys for the radio using the CAT serial port. 
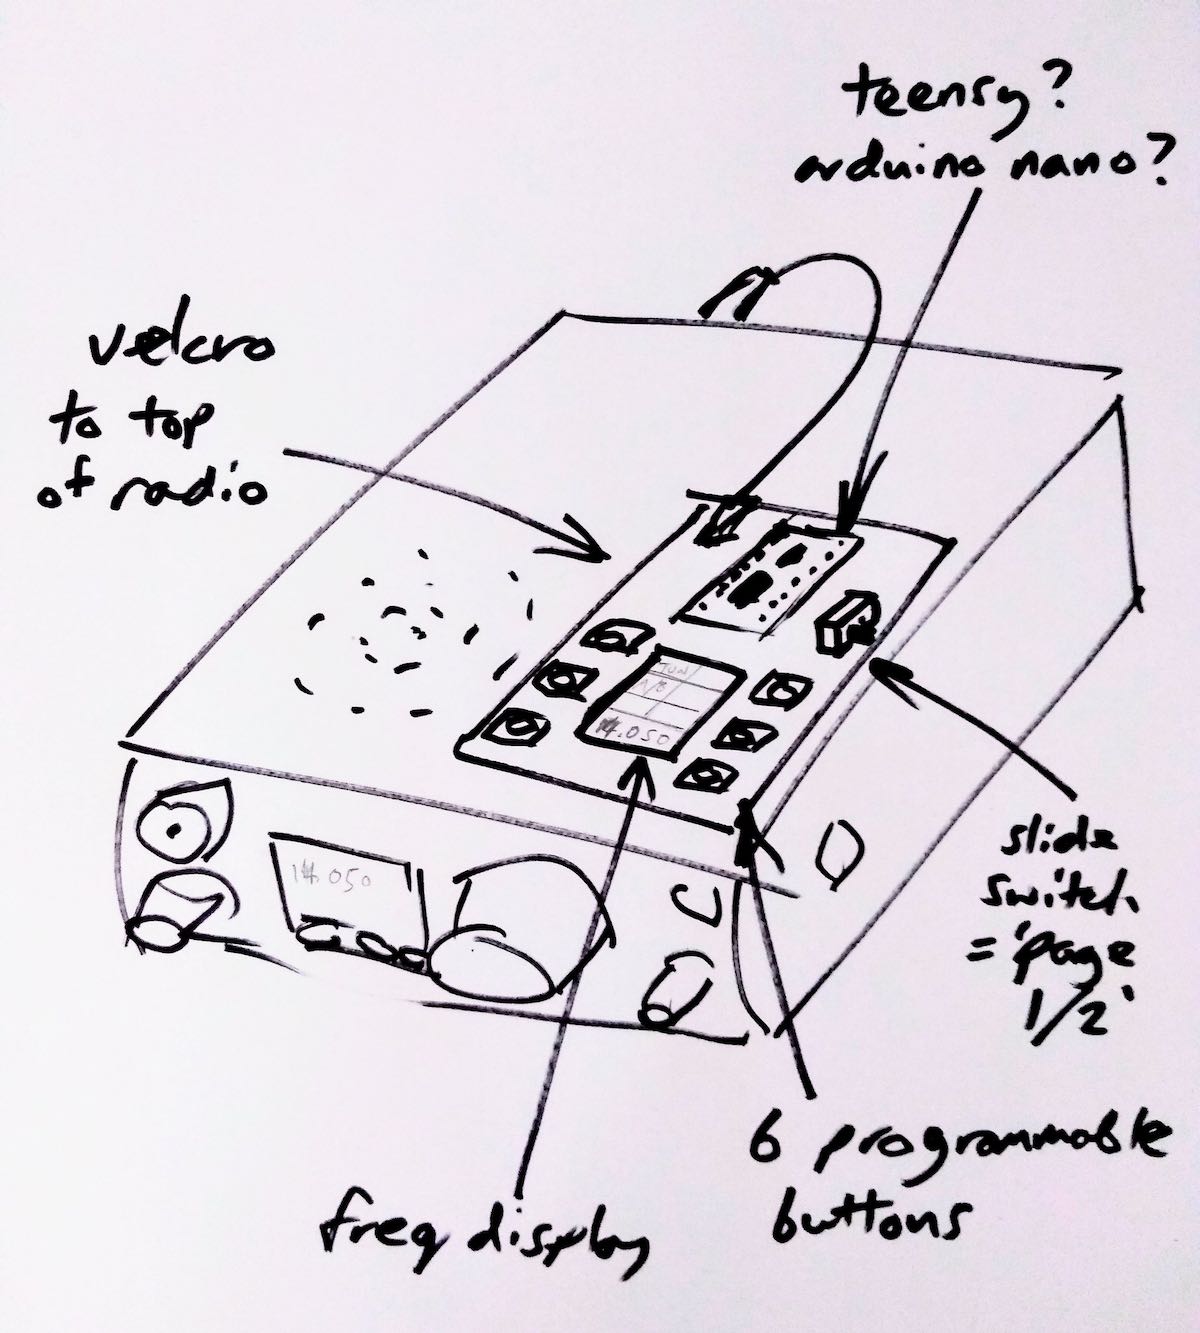
Nothing particularly original here (I’ve seen articles of people using PICs for this purpose) but it seemed like a nice sized project for me to play with and build some experience doing PCBs (I’ve only done this once before at home). A little bit of discussion with Michael G0POT (FT-817 and SOTA guru), some Google searching and we were looking over KA7OEI’s excellent reference page (http://www.ka7oei.com/ft817_meow.html) and thinking about our favourite FT-817 commands…


As it happened I was lucky to have the right bits (Arduino Nano, small OLED display, buttons, prototype board and an 8-pin mini DIN cable) lying around the house to see “first light” from my FT-817’s serial port that evening. The Arduino Nano is a good place to start because it works at 5V so can work directly with the FT-817 levels on the ACC port. What followed next was some late nights of hacking on Arduino code to send and receive the data for my favourite commands and more experimentation on prototype board.

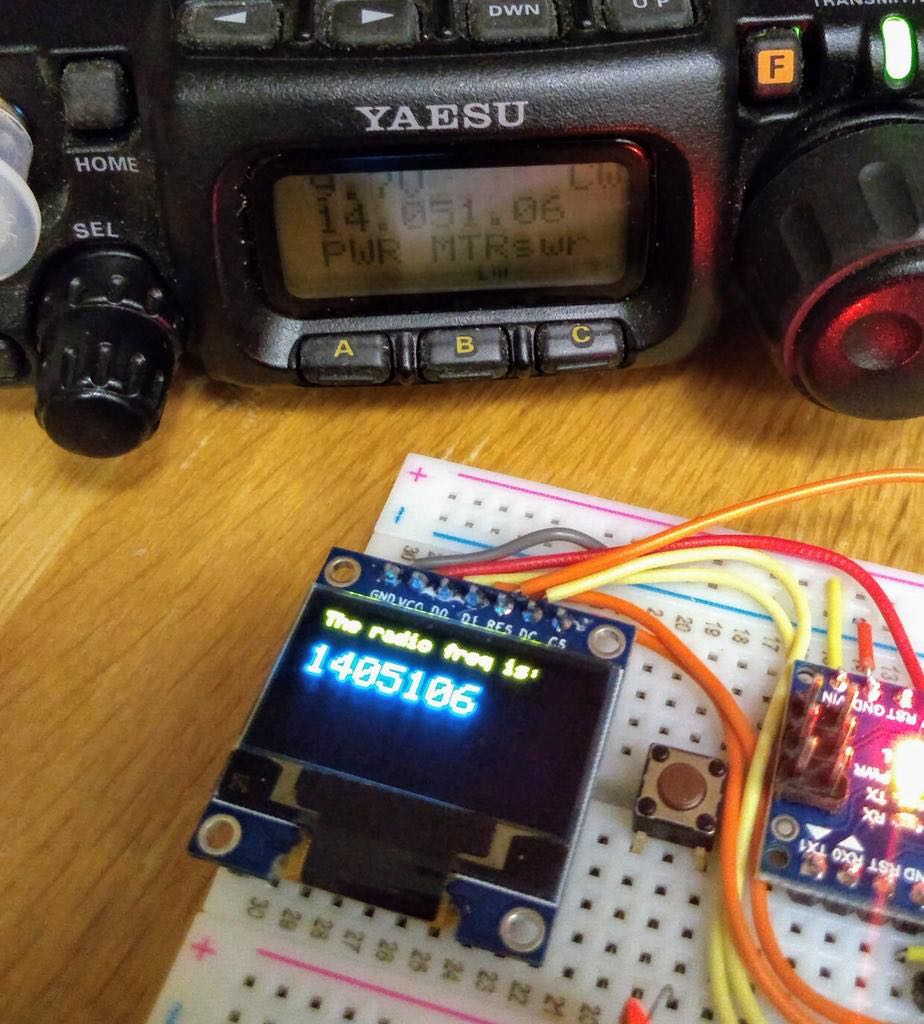
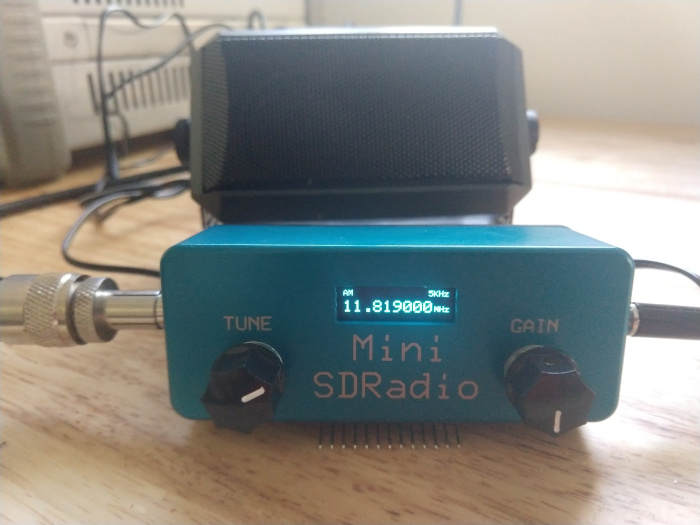
I tried a couple of cheap OLED displays and they look great indoors but weren’t quite up to the job in full sunlight which is fairly typical in my portable operations.

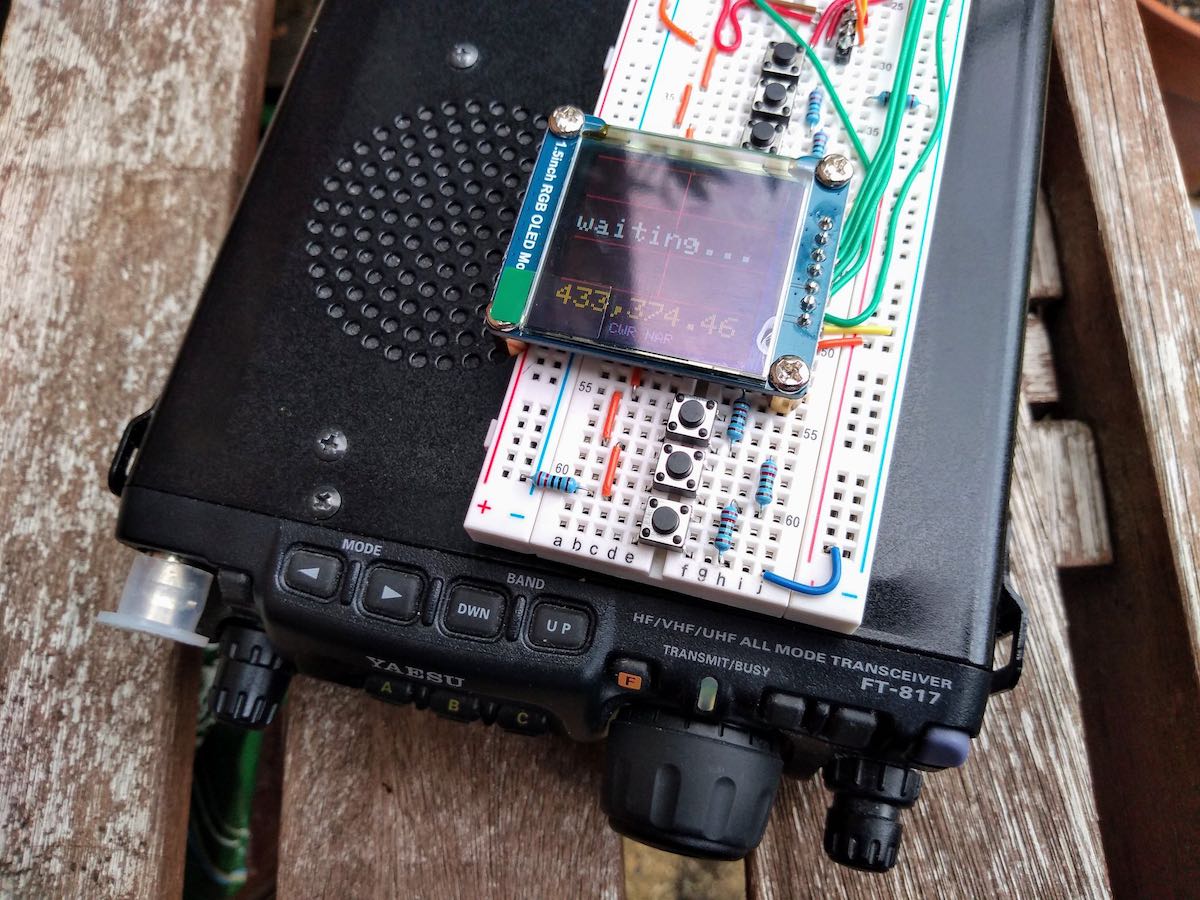
Daytime readability issues with an OLED display

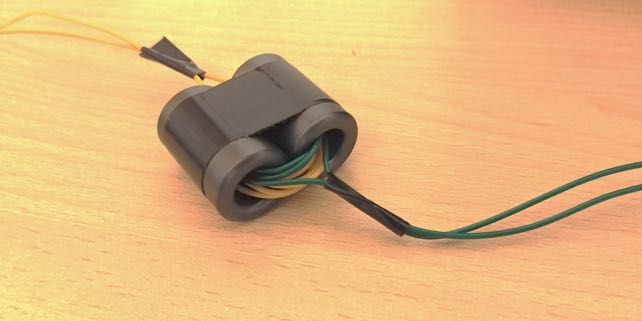
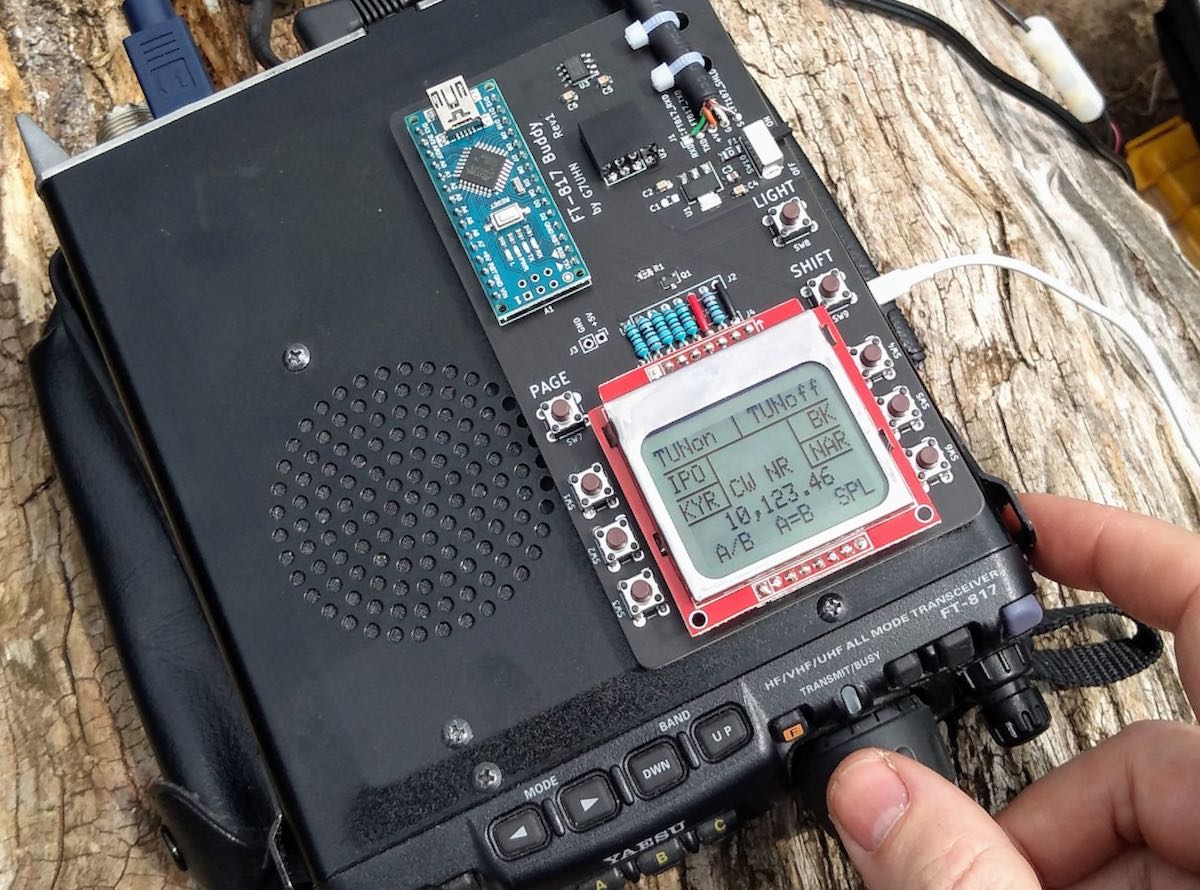
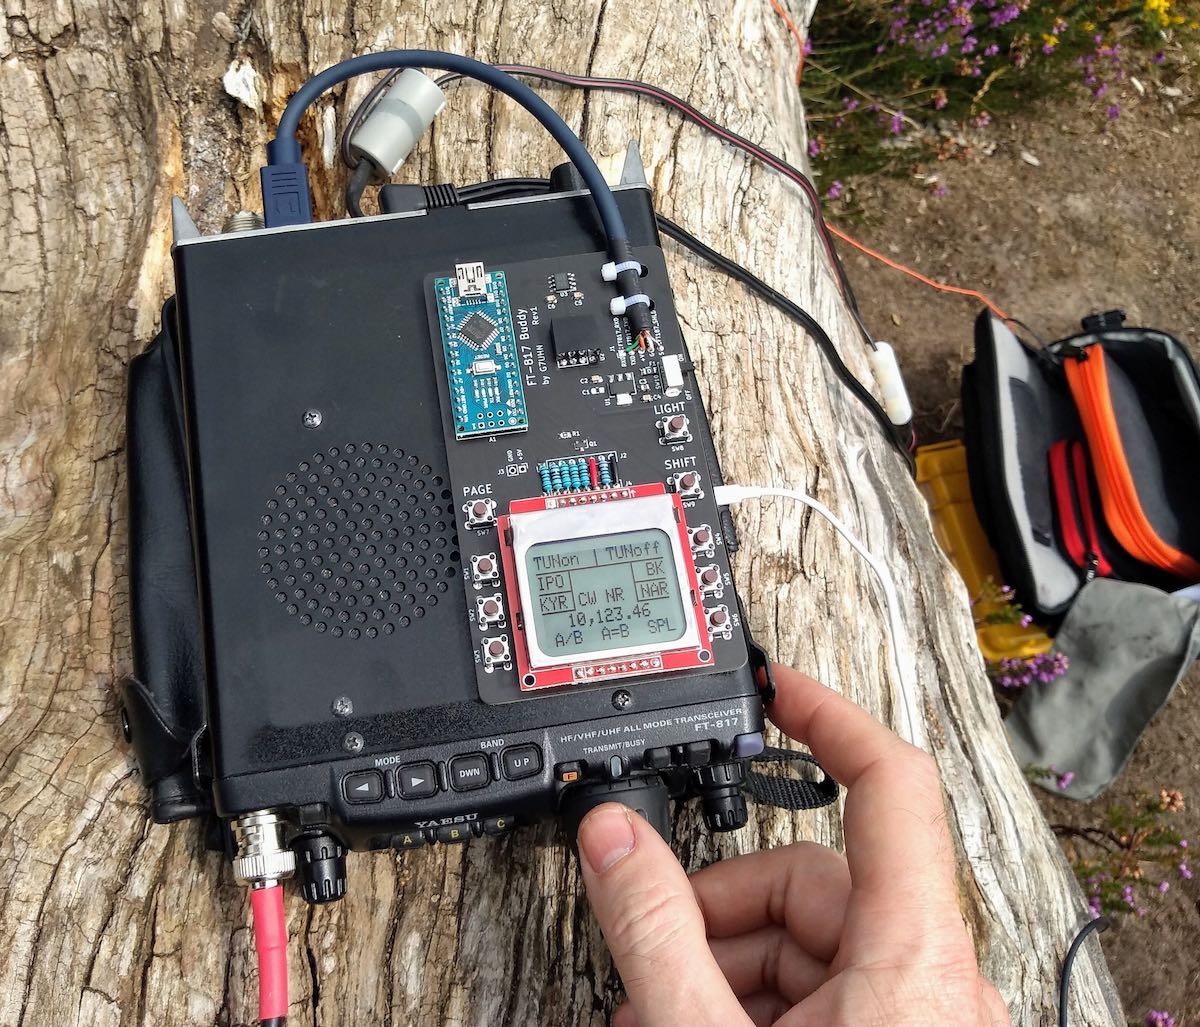
By this point I had also realised the utility of having an auxiliary display on top of the radio as a much easier thing to view than the 817’s own display on the front panel. I’d also experienced some interference from the unshielded prototype board coming through as clicking sounds on the radio’s receiver so it looked as though some isolation between radio and my circuit might be necessary. Guided by many Internet tutorials, I switched to using a Nokia 5110-style LCD for better daylight readability and lower power consumption. Adding an ADUM1201 digital isolator and a B0505S-1W isolated DC-DC converter to the prototype board (modules acquired very quickly from eBay suppliers) gave me some isolation and lowered the interference which I guessed would disappear when I made the design on PCB with good ground planes around the signal lines.

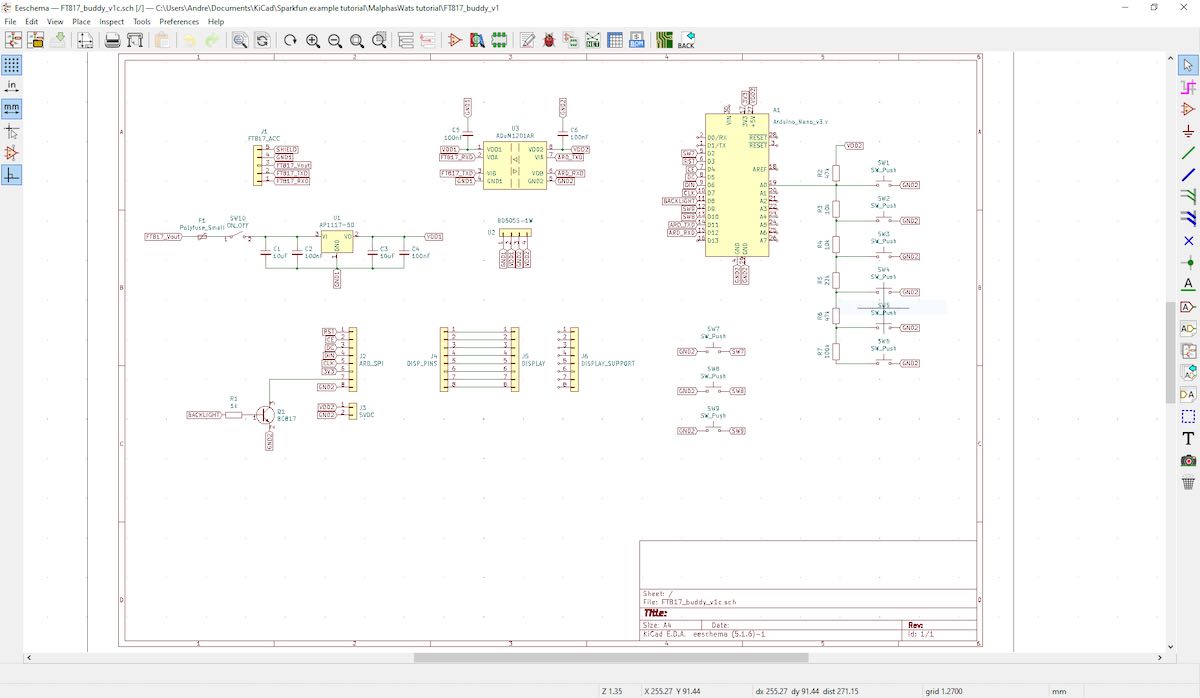
Screen capture showing the schematic (click to enlarge)

With a (mostly) working prototype it was time to hammer the Internet tutorials again, this time to learn how to use KiCad, a free open-source PCB design tool available on Linux, Windows and Mac. I’ve done one PCB for home projects before using Autodesk EAGLE and I found learning Eagle pretty hard going, it seems like it carries 20 years worth of baggage and dogma in the user interface. In fact I started using EAGLE on this project but spent 3 hours on the first evening just trying to change the labels on the ADUM1201 chip that I couldn’t find in an EAGLE library… so I gave up and thought I’d try KiCad which I’d seen some recent good reports on. I’m happy to say after finding an excellent tutorial on KiCad I had drawn the schematic and my PCB layout in about 15 hours working time spread over a few evenings.

I should add that the 15 hours of KiCad time did include several hours of agonising over the choice of slide switch so a PCB can be done much quicker than that once you’ve got your favourite parts sorted!

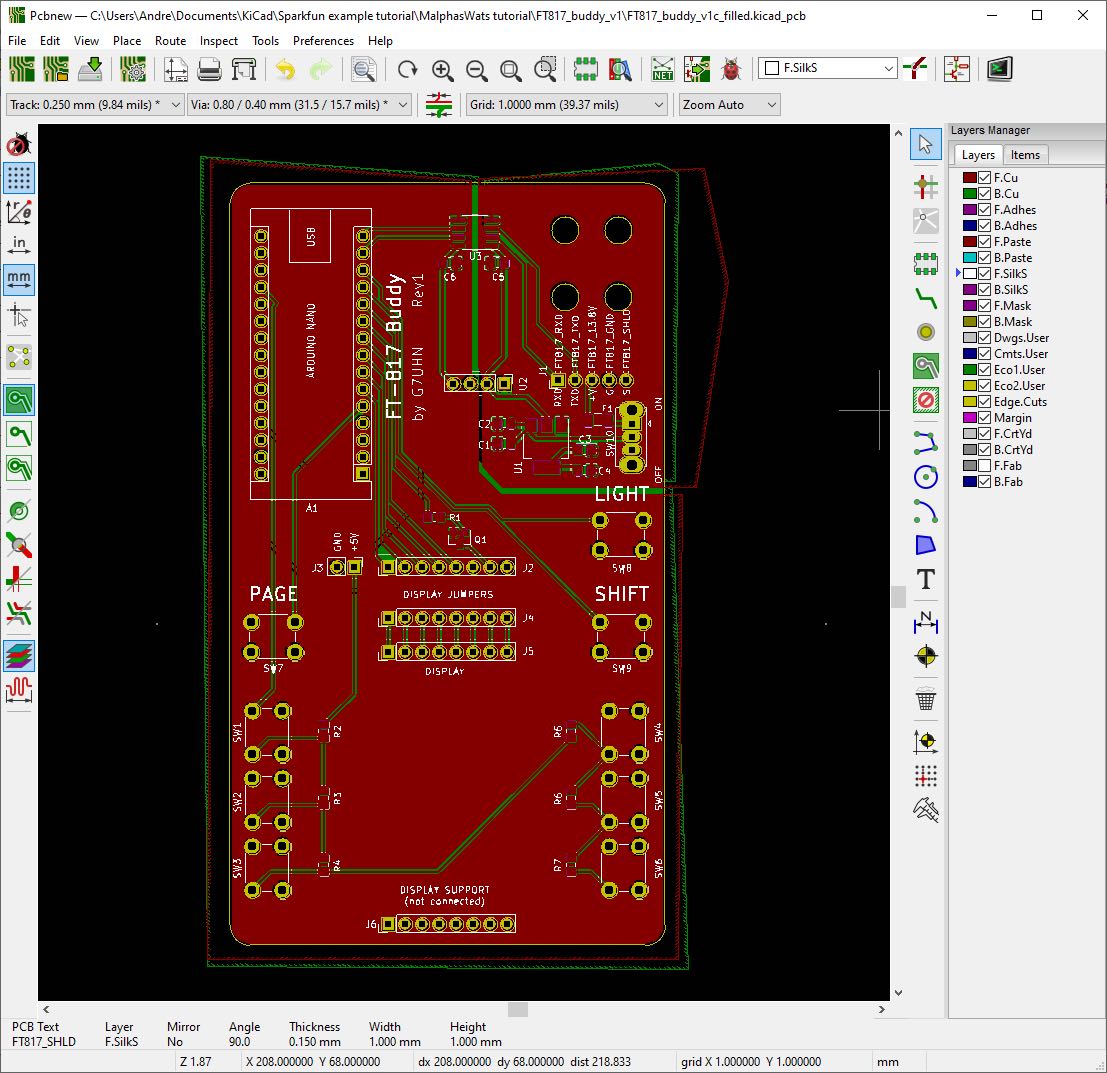
That’s pretty impressive for my first go with KiCad as a near-beginner to PCBs, I heartily recommend it, it was so much easier than EAGLE and quite an enjoyable tool. Right, PCB design done and uploaded to JLCPCB for manufacture. 5 PCBs with DHL shipping cost me less than £20 and arrived from China within 5 calendar days. Other PCB fabs are available… 🙂

Click to enlarge

So that brings us to today, pretty much. The PCB was assembled very quickly (!) and there is no sign of noise from the serial data lines creeping into the 817’s receiver now it’s on PCB. Some lessons have been learned through the construction (e.g. brown 6mm push buttons are less “clicky” than the black ones and that’s a good thing!) and I now have my companion FT-817 display/buttons in field trials. I’ve no plans to sell this, it’s a trivially simple design, but it does make a great home project to polish your skills in microcontrollers, PCBs and construction. I’ll post a write-up on my website in due course.

In use, the device works just as I’d hoped, I can do everything I want to on my FT-817 without having to fiddle through the awkward button presses. The frequency display is also in a much better position for me now (as most FT-817 owners will know as they jealously eye the KX2, KX3, etc…!) and I think I used it for the whole session when I took it to the field on Saturday. If only my CW had been so slick!

Next steps are to work on the Arduino code. My code is pretty rubbish (my coding style involves a lot of Stack Overflow and copy/paste!) and not safe for public consumption. There are also some health warnings to be noted in manipulating the FT-817’s EEPROM (required for some of the functions I wanted), explained on KA7OEI’s page but there have been a few volunteers on Twitter to help with the software which is great. Also I may do a “Rev 2” board with an Arduino Pro Mini to lower the drain on the FT-817 battery before sharing the PCB files. Other than that it’s now time to get back outdoors and enjoy the new improved interface to my smallest radio! 😀

73
Andy G7UHN


Andy, I absolutely love this project! A wonderful addition to the FT-817/818 and I’d hardly call it a “trivial” design–!

I purchased the original FT-817 shortly after it was introduced. At the time, I was living in the UK and travelled extensively throughout Europe. I loved the ability to simply throw this little rig into my carryon and play radio pretty much anywhere my work travels took me. In the end, I did less ham radio work with the FT-817 and more SWLing.

Still, I eventually sold my FT-817 for the very same reason that motivated you to build a companion display: the front panel is too small and my most used functions require too much menu digging. 

Your companion board is an elegant homebrew solution. I love the Nokia LCD screen–superb readability in the field. 

Thank you again and once you do a write-up on for your website, we’ll be sure to link to it on the SWLing Post!


Do you enjoy the SWLing Post?

Please consider supporting us via Patreon or our Coffee Fund!

Your support makes articles like this one possible. Thank you!

Spread the radio love

Bruce compares two homebrew NCPL antennas to the Airspy Youloop

The Airspy Youloop

Many thanks to SWLing Post contributor, Bruce (VE3EAR), who writes:

I decided that more testing of the Noise-Cancelling Passive Loop (YouLoop) antenna was needed, but I wanted to start with a clean page.

I built two identical loops using some 3/8 inch heliax scraps I had on hand. Both are one metre in diameter and employ the same feed arrangement, with a balun wound on a half inch square binocular core of type 75 mix. There are four turns on the antenna side and eight on the feed line side, of #24 gauge plastic insulated wire. The feed line shield connects to the antenna shields. The only difference between the two antennas is at the top of the loop, opposite to the feed point. One has a simple one inch gap in the shield, with the centre conductor passing across the gap, while the second one uses the crossover connection of the YouLoop design.

I’ve been running some A-B comparison listening sessions, both mid-day and in the evenings after local sunset. The testing is done outside, with the antennas hanging on a low limb of a maple tree in front of the house. The feed line is about twenty feet of coax which connects to my Realistic DX-440 receiver on the front porch. Testing is done listening to the AM broadcast band and the 160, 80, and 40 metre ham bands, with the loop aligned both E-W and N-S and about one loop diameter off the ground.

Both loops work well, but I do have to give the nod to the YouLoop (by Airspy), which produces a stronger signal of two S-units higher than the conventional loop. It also has deeper and sharper nulls, which can sometimes produce total nulling of the station!

73, Bruce, VE3EAR

Thank you so much, Bruce, for sharing your findings with us! I, too, have found that the Youloop generally outperforms my homebrew NCPL antenna. I believe one of the reasons for this as Youssef at Airspy once told me is because the Youloop has a lower loss transformer than anything that can be wound by humans (0.28 dB)–this improves gain.

Click here to read our review of the Youloop and click here for step-by-step instructions on building your own Noise-Cancelling Passive Loop antenna.

Spread the radio love

Christoph’s homebrew custom hotkey pad for SDR applications

Last week, I saw a fascinating post by Christoph Jahn on the SDRplay Facebook page.

Christoph created a custom hotkey pad for use with SDRuno.  The project is actually quite simple and his finished product looks amazing:

The steps involve downloading “LuaMacros” a freeware macros utility that allows you to map macros to an external USB device like a cheap numeric keypad. Christoph then designed the key templates and printed them on a strong adhesive vinyl foil.

I asked Christoph if I could post his project on the SWLing Post and he kindly sent me the followed PDF with step-by-step instructions.

Click here to download the instructions as a PDF (6.71MB).

Christoph also shared the macros file he used for his project (download .XML file 8.77 KB).

Thank you so much for sharing this, Christoph!  Your finished product is so professional, I would have thought it was produced by SDRplay!

This could be a useful tool for a radio friend who is visually-impaired and, of course, could be compatible with a wide range of SDR apps and rig control software that allow keyboard shortcuts.

Readers: Have you done a similar project? Please comment with your experience and any details–especially noting applications and programs you find are compatible with keyboard shortcut mapping. This could be very beneficial for radio enthusiasts with disabilities!

Spread the radio love

Patrizio’s simple homebrew NCPL antenna

Many thanks to SWLing Post contributor, Patrizio Cardelli, who writes:

I’m Patrizio (SWL I – 5184 /AN) from Riva del Garda, Italy.

A few days ago, I built a Noise-Cancelling Passive Loop (NCPL) antenna. I built the 1:1 balun with a couple of ferrite 175 – 285.

I got a good result on medium wave on my ICOM IC R 71 E with the antenna inside my house installed behind the desk just to avoid any problems with my wife.

On shortwave, the signal was low in comparison with the Bonito mini whip but in my QTH I have a lot of QRM and with this antenna I solved my problem.

Yesterday I tried the balun with my random wire (15,2 meter long) also with good results.

About my NCPL antenna: I made mine with RG-58 coaxial cable just to have easy portability in SOTA (please see photo) and also the feed line is made by the same coaxial cable. OK, you are right…it’s ugly:

Electrical connections are not soldered, still I don’t see any mechanical issues and this antenna since it is made for SWL / BCL purposes (meaning, RX only, no TX).

Concerning the binocular ferrite core, I didn’t have one, so I used two ferrite core type 175 – 285 (28,5 mm length, external diameter 17,5 mm and internal diameter 9,5 mm) normally used to reduce HF interference:

For the winding I used PVC insulated cable cat no: 7/0,2 type 2 (def61 – 12) conductor 7/0,2mm TSCu X 0,3mm R/T type single (4 turns primary and 4 turns secondary). It’s the same cable with which I built my random wire antenna (also portable for SOTA but now installed on my balcony until the COVID – 19 emergency is over).

The attached videos show the situation in comparison with my BONITO MINI WHIP active antenna (also installed inside my house). Recently I changed my QTH and unfortunately here I have a lot of interference both on MW and SW. The better results that you can hear are achieved with my NCPL antenna.

I have made this test with my ICOM IC R 71 E + BHI noise cancellation speaker…..you can assess yourself, the better results that you can hear are achieved with the NCPL antenna and in the case of Tecsun PL-660 without any noise cancelling filter (BHI speaker off).

Thanks for sharing this, Patrizio! As you say, the NCPL loop seems to do a fine job helping to eliminate local RFI/QRM. The Bonito Mini Whip is a fine antenna, but not optimal for environments with a lot of radio noise–that’s where the NCPL antenna really shines.

You also make a good point that if you’re simply experimenting and only using an antenna for receiving, you can be more relaxed about the build because you’re not sending RF through it. In the end, however, properly soldered and protected connections will last much longer and provide better, more reliable performance.

Thank you, again, for sharing your build, Patriio! Those reception results speak for themselves!

Spread the radio love

John adds a pre-amp and rotatable stand to his homebrew NCPL antenna

A couple weeks ago, we featured John Mills’ homebrew Noise-Cancelling Passive Loop (NCPL) antenna (see photo above) in a post with two other Post community designs.

John recently shared an update to his project:

As promised, some more pictures of my antenna mounted on a rotatable stand. I have used standard (in the UK) 20mm electrical plastic conduit and fittings to make the frame.

Fitted a small plastic box to house the balun and have put a BNC socket on the underside of it for connection the coax cable to my Rx.

I have also been experimenting with cheap low cost amplifiers (LNA) found on eBay (see picture) which do seem to improve the general strength of signals by 10-15db, but the baseline noise also rises.

I did manage to hear a QSO on 160M using one of these which was inaudible without the LNA but I cannot say for sure yet if they are worth the extra noise introduced.

Thank you for sharing your update, John! The plastic conduit support is simple and effective! Indeed, it looks very professional. What I love about your NCPL build (loop, stand, and LNA) is it that it’s all incredibly affordable as well.

Read more about John’s NCPL build in this post.

Post Readers: Has anyone else experimented with implementing a pre-amp in their NCPL antenna design? Please comment!


Do you enjoy the SWLing Post?

Please consider supporting us via Patreon or our Coffee Fund!

Your support makes articles like this one possible. Thank you!

Spread the radio love

A compact homebrew Si5351-based SDR

(Image source: Circuit Salad)

Many thanks to SWLing Post contributor, Paul Evans, who writes:

I see this receiver as a remarkable break through. Using audio processor to emulate modes from IQ is very, very clever. This is perhaps the article of the year!:

(Source: Circuit Salad)

[…]This is a revised version of my FV-1 based SDR. I replaced the CS2100 clk generator with the Si5351 clk generator. The Si5351 has some advantages over the CS2100, namely you can generate quadrature clks directly. This simplifies the hardware design and improves the quadrature accuracy. The sideband rejection in LSB/USB modes is impressive..somewhere around 60 db as best I can measure. The DSP processing is accomplished by the use of a FV-1 audio processor. The device makes the base band signal processing a snap. It requires some code to be loaded on a EEprom but the circuitry is simple and allows for up to 8 selectable programs. I created three: AM/USB/LSB . The FV-1 provides for three analog POT inputs to control any parameters you choose. Gain, variable filter bandwidth and depth, AGC are some examples of adjustable parameters if you desire. I kept it simple and created fixed band pass filters to taste. I did use one of the controls for AF gain. The design has no tuned circuits or band pass filters but they could easily be added.  It works just fine without them. Occasionally, I come across a ghost signal from harmonic mixing, when tuning, but not enough to matter. The design uses an OLED display and a rotary encoder for tuning. The frequency coverage is from 2.7 Mhz to 25Mhz. The bottom limit is created by the inability of the Si5351 to support quadrature below this frequency. Although I have improved my DSP programs for the FV-1 and have developed new display drivers and the new code for the Si5351, useful detail about using the Fv-1 can be found in my original design from a few years ago: https://circuitsalad.com/2015/06/19/comming-soon-stand-alone-software-defined-radio-baseband-demodulator-no-computer-required/

The design uses a LTC6252 low noise op amp as an RF input with gain. It provides a constant and reliable resistive Rf termination for the sampling detector.  This allows for random antennas to be used without adversely affecting the input termination to the detector. All the code to operate the main processor(display/clk generator/tuning, band select and receive mode) was written in MikroC which is a C compiler for PIC and AVR processors. The generation of quadrature signals out of the Si5351 is not difficult to implement once you know how but..figuring that out took me a couple weeks of experimentation! You can connect switches, the encoder, volume pot and display directly to the main board for operation but I created a secondary board to mount the display and encoders. Instead of an analog pot and selection momentary switches, I used another microcontroller and two encoders(with one built in momentary push switch each) to create all of the switching signals, gain control, etc. This allowed me to have just two controls for all features.  The controls include: tuning, audio gain, mode, and tuning step. Tuning resolution is from 1Hz to 100KHz . For fun, I made the output of the FV-1 differential into the audio amp. This is not necessary.

Here is a link to all the files used to build this radio in a zip file(updated 1/18/20):

https://www.adrive.com/public/Fq3pNr/Si5351%20SDR%20Data.zip[…]

Demo video

Click here to read the full article, download all design notes/files and watch videos at Circuit Salad.

Wow–that is fascinating! Thanks for sharing, Paul. I’m curious if any SWLing Post readers have experimented with the Si5351.

Interestingly, SWLing Post friend Dave Richards (AA7EE), also recently shared this video of an amazing Si5351-based VFO built by JF3HZB:

This must be one of the best analog emulations I’ve seen on a display. Marry the SDR receiver above to this VFO and you could have a top-shelf homebrewed receiver!

Spread the radio love

Video: Tube radio transmitter designs from the 1920s

Many thanks to SWLing Post contributor, Paul Evans (W4/VP9KF), who shares the following article from Hackaday:

The origin of the term “breadboard” comes from an amusing past when wooden bread boards were swiped from kitchens and used as a canvas for radio hobbyists to roll homemade capacitors, inductors, and switches. At a period when commercial electronic components were limited, anything within reach was fair game.

[Andy Flowers], call sign K0SM, recently recreated some early transmitters using the same resources and techniques from the 1920s for the Bruce Kelley 1929 QSO Party. The style of the transmitters are based on [Ralph Hartley]’s oscillator circuit built for Bell Telephone in 1915. Most of the components he uses are from the time period, and one of the tubes he uses is even one of four tubes from the first Transatlantic contact in 1923.[…]

Click here to continue reading at Hackaday.

https://youtu.be/Lli4DI2XFMQ

Spread the radio love