 Many thanks to SWLing Post contributor, Laurence Neils, who shares the following guest post:
A review of the Tecsun R-9012
by Laurence Neils
I have cheap radios. I can’t really justify buying more expensive ones given how much time (not all that much) I spend listening to the short wave broadcasters. The consequence of this is that, when I do listen to shortwave stations, I have the rather standard ultraportables to listen on.
My go-to radio is the Tivdio V-115, which has pulled out quite nice reception for me, and offers several functions I like a lot. However, it was missing one that interested me the most: analog or analog-like tuning. If I want to listen to something, I either have to know its frequency and try it, or I have to let the radio do an automatic scan. While it’s quite good at pulling out stations and letting me hear them, it can take a few minutes to do a full scan, and canceling it doesn’t result in the part scanned so far to be stored. Very few stations I am interested in hearing are convenient to jump into several minutes after they start (my interest is in spoken content rather than music, and neither news nor stories make a ton of sense if the introductory information was not heard).
From a recommendation here on the SWLing Post, I chose to purchase a Tecsun R-9012 radio to help me do a convenient scan, which is useful because it allows me to find stations without knowing their frequency, and leaves me to not remember all seventy frequencies a certain broadcaster is using this year.
Physical Description
When I bought my Tecsun R9012, it arrived quite quickly from Amazon. It included a short manual, whose contents could be loosely paraphrased as “insert batteries and turn on”. Other than that, the radio is all that’s there.
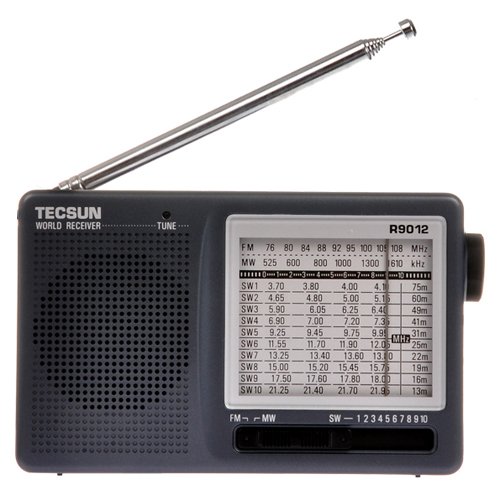
The R9012 is relatively small, but not as thin or compact as the Tivdio, which will be my main comparison unit for this review. It is your basic rectangle form factor, and about the size of the small tape recorders that were the last to be phased out for portable recorders. It would be easy enough to put this in a backpack, jacket pocket, or glove compartment, but you have no chance comfortably fitting it into a standard pocket. On the back, there is a flip-out kickstand that can hold the radio at about thirty degrees from horizontal and the battery compartment. This radio is powered from two AA batteries.

The right side of the R9012 contains the analog tuning knob, which I will discuss quite a bit later, and the power switch, which is not connected to anything else (not integrated into the volume knob or mode selector).

The left side gives you a 3.5mm audio out jack. This supports all the headphone types I’ve tried. One benefit of this radio is that headphones with integrated microphones, such as the ones that come with the iPhone as well as various sets that are intended for phone use, will work with it. Some other radios won’t work well with that type of headset. The Tivdio, for example, will play through the headphones but forgets to turn off the speaker if there is a microphone on them, making the headphones pretty much pointless.
Next to that jack is a power port, supposedly to recharge the batteries. A connector for this is not included, nor do they seem to sell one. I suppose the theory is that you might already have a suitable one in that box of old cables we all have, but I can’t see this as a particularly useful feature given the RFI you’ll get if you connect a radio directly to the mains to recharge. Above the ports is the volume knob, which is a very basic analog one, and then the wrist strap, which is integrated into the case. There doesn’t seem to be a way to remove or change it, should you desire that.
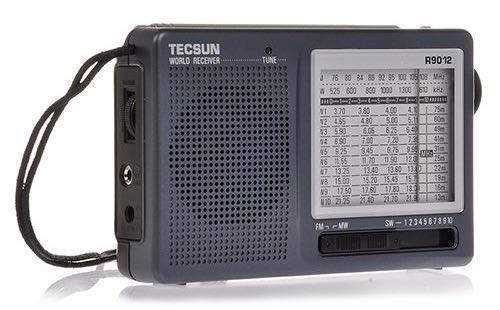
On the front of the radio, the speaker takes up the left half. This is fine for standard listening, but don’t expect wonders of audio fidelity. On the right half, there is the twelve-position mode switch (from left to right, FM, MW, SW from low to high frequency) and the tuning display.
FM performance
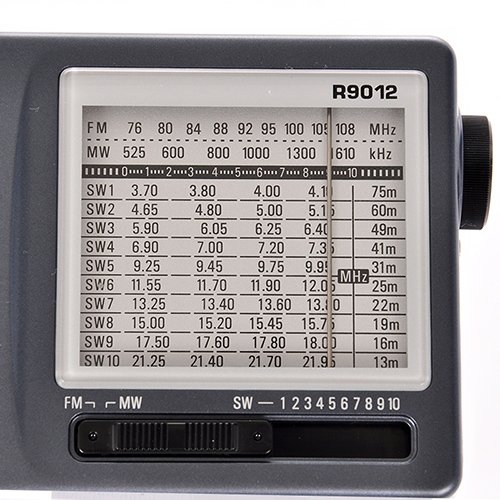
The Tecsun has a standard FM function, with stated coverage from 76 to 108 MHz. This is the leftmost position on the mode selector. The band is not divided into multiple switch positions, meaning that stations will be relatively packed into dialing space when compared to shortwave, which is spread across ten bands.
I didn’t buy this radio to use it for FM. I have very little interest tuning for FM stations. Some people may enjoy the experience of manual tuning for a station they can locate quickly, but I’m not one. I can easily type the frequency I want on my Tivdio, and I intend to keep doing that for FM. I mostly intended to test FM performance on the R9012 because I was curious to see whether there would be anything audible in the 76-87 MHz section. I know that our TV standards have switched off using analog audio, so I assumed there would be nothing, but I’d never formally put that to the test.
FM on the R9012 has problems. In fact, it has a lot of problems. Among other things, the FM process on this radio doesn’t seem to have a very good idea where things are. I’d be tuning through looking for some station and I’d find it…only to see that I was in a completely foreign part of the spectrum where that station had no business being. It seems that, unless you’re very focused in on a station, the R9012 is liable to pick up some other broadcast and layer them on top of each other. Never mind that the broadcasts have nothing to do with each other and aren’t anywhere near each other on the band. If you have a specific station you want, you can tune to it and have no problems. If you want to see what’s there, you’ll have a very fun time listening to stations that you might want to listen to, only to find that that was an image, you’ve lost it now, and you can’t find it again.
Sometimes, I managed to find a part of the spectrum that gave me three different images simultaneously. Ironically, the broadcast I intended to use as my landmark, the local classical music broadcast, which is located very close to the middle of the FM spectrum, was strong enough or at a coincidental frequency that I identified images of it at six different places on the scan, in addition to where it should be. So I got my answer about 76-87 MHZ. According to the R9012, there’s a lot of signal there. It’s just coincidence that it sounds exactly the same as standard FM broadcasts with extra static.
FM performance gets worse: this radio is extremely sensitive to location.
In order to get nice reception, you have to have the radio in a good position. This seems to be completely random. Standing up so the antenna lies flat on the top, but is not extended produces almost silence. Lying down so the antenna is touching the table (not a metal table) or chair (not a metal chair) causes most signals and images to come through quite clearly. Extending the antenna to medium length helps reception. Extending it all the way introduces a lot of interference. On FM, volume also changes a lot. We may reasonably expect for the signal to change if we connect something conductive to the antenna by, say, touching it with our conductive fingers. Maybe reception will get more static, or maybe it will in fact improve. What we don’t expect is for the broadcast to switch from comfortable volume to let’s see if we can get you some tinnitus volume. Unfortunately, that’s sometimes what happens on FM if you touch the R9012’s antenna. Or tilt it a bit in the wrong direction. This doesn’t seem to happen much if it is tuned onto a station, but if it is anywhere in the middle or if there’s some static, the volume change is very noticeable, in that it makes you want to get the radio off as soon as possible.
In summary, this radio just can’t really do FM. If your other radios are broken, you’ll be fine by using this, but don’t buy it if you intend to do FM things.
Mediumwave performance
The MW frequencies are mostly there, with stated specs including from 525 to 1610 kHz. While there are broadcasts between 1610 and 1710 KHZ, that’s not a ton of the spectrum. I don’t have much interest in MW. I tested the radio’s performance, and it seems fine. Strong stations come in loud and clear. Stations that have low broadcast powers are easy to tune in. I was able to get some skywave MW in here as well, but I really don’t have any interest in that. I was able to verify, however, that the terrible effects that plague FM performance don’t appear on MW. I got no images of distant stations, no rapid volume switches, and the position of the radio doesn’t seem to affect MW reception all that much. Perhaps this is due to the different antenna that most radios employ in tuning MW. However, the manual doesn’t say whether this radio has such an alternative antenna and I haven’t gone to the effort of disassembling it to find out.
Shortwave performance
Once again, the crazy stuff seen on the FM band doesn’t appear during shortwave listening. I was able to tune in quite a few stations, although this probably isn’t a DX-capable device unless you’re willing to go out into RFI-free areas. That sounds enjoyable, but it’s not really my thing. When I got signal, it came in quite clearly. I got very little interference from the device itself, although it does seem quite susceptible to RFI from power lines. Of course, so is everything else, but if you put its antenna closer to a line, you’d know it.
Frequency coverage
Shortwave is covered in ten bands that allow access to the more populated areas of the spectrum, but have many gaps. Certain descriptions claim that the radio has coverage from 3.90 to 21.85 MHz. This is so misleading I’d be willing to call it a lie. The actual ranges are as follows:
- SW1: 3.7 – 4.10Mhz
- SW2: 4.75 – 5.06Mhz
- SW3: 5.95 – 6.20Mhz
- SW4: 7.10 – 7.30Mhz
- SW5: 9.50 – 9.90Mhz
- SW6: 11.65 – 12.05Mhz
- SW7: 13.60 – 13.80Mhz
- SW8: 15.10 – 15.60Mhz
- SW9: 17.55 – 17.90Mhz
- SW10: 21.45 – 21.85Mhz
So what if most signals are in there somewhere? Those gaps are very large. For example, the only broadcast frequency for WWV that would be covered on this set is the 5MHZ one. 10, 15, and 20MHZ are all located in various gaps on the bands.
This turned out to be quite annoying. I know that these are standard areas of the spectrum, in which people place a preponderance of broadcasts, but the fact remains that a lot of broadcasts occur between the bands on this set. I checked the A18 shortwave schedule to identify how crazy I was. Of the 5530 broadcasts that were listed between the limits of 3.90 to 21.85 MHZ, 1870 of them or 33.8% of the total, are outside the range of this set.
It strikes me that the largest band on this radio covers only 500 kHz of space, whereas the smallest gap between bands covers 750 kHz. In many cases, bands cover only 100 kHz of bandwidth. While I guess it’s better that they’re there rather than their being completely absent, perhaps some effort could have been done to open that up a bit more. I quickly analyzed where missing signals were, and if Tecsun could extend the 5.95-6.20 MHz band down to 5.8 MHz, 7.10-7.30 up to 7.60 MHz, expand the 9.5-9.9 band, and give an extra 50 kHz to the 11.65-12.05 band, most of the missing spectrum, nearly a thousand broadcasts, would be brought back into coverage. This could be done and still keep the maximum band width at 500 kHz. Therefore, as they didn’t seem to feel this an important issue, it falls to me to consider it so.
Manual tuning
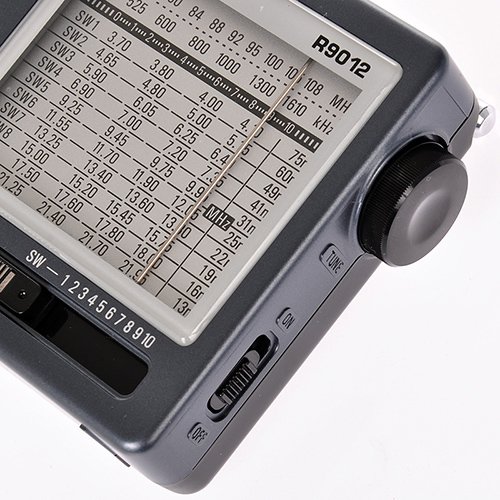
So I bought this to tune manually. It stands to reason that I should review how well it does that.
The analog dial is on the right, and protrudes outward. Once again, the knob does its job, but not all that well. It was very easy to use this to pan through the spectrum and pick up stations, but the wheel doesn’t make it all that easy to do so quickly. You have to turn it by grasping, as the wheel has a fair bit of resistance. I don’t doubt that this feature helps to keep from knocking it off frequency, but you have to use two fingers to rotate freely, and that slows the process down. Meanwhile, the wheel has a rather disconcerting way of stopping, where the wheel seems to have hit an obstruction. However, this essentially increases the resistance, rather than feeling like a barrier. It’s noticeable, but it feels like something’s blocking the turning mechanism, rather than that the mechanism has reached its limit. Actually, it is possible to keep turning the dial, which I assume will eventually damage something, but if you’re not used to how it feels, you may do so without realizing that you’re not actually going anywhere.
The wheel has quite a bit of travel. On my set, it will rotate about three full turns. I believe this is necessary because all of FM, including the standard and Japanese bands, is in one section. Therefore, the wheel needs to be able to turn a lot in order to separate those stations. However, this means that panning over a shortwave band that covers at most 500 kHz of spectrum includes a great deal of panning over static. This works to scan quickly, but there are undoubtedly even faster ways to do so.
Conclusions
It’s a radio. It will pick up stations and make noise. In that, it works. However, this isn’t exactly a great set. The $22 price tag may forgive some of its flaws but not all of them.
Radios like the Tivdio models cost similar amounts and cover the spectrum more fully with some extra features. When I purchased this model, I expected the lack of features to be made up by convenient scanning over shortwave, relatively good sound, and relative disposability. I got enough for me to keep the set, but nothing more.
Pros:
- Mediumwave is rather sensitive for those who enjoy listening to those signals.
- Radio has a kickstand and the antenna can be rotated freely.
- Radio supports headphones with inline microphone.
Cons:
- FM is plagued by images of other stations that should not be there. This is rather bad.
- FM is far too sensitive to antenna position.
- Shortwave coverage, while it includes most of the spectrum in use, has big gaps that are actually being used by a lot of broadcasters.
- Analog tuning works, but not really well. The knob can turn but does so with effort.
Would I recommend people to purchase this? Probably not.
Those who have higher-priced devices will get nothing from this. Those getting into the hobby aren’t going to get a ton of benefit from this, because tuning on shortwave requires enough familiarity with dial position that they may spend too long figuring it out. It would be useful on FM only if most other radios have been broken. It’s not even that good as an emergency set because of the FM sensitivity problem.
If all you want is analog tuning over the bands that are provided, the radio will do it for you. If you want more, buy something else.
Thanks for sharing your evaluation Laurence. Thanks for focusing on one of the points that is often overlooked with analog radios: the frequency coverage on various shortwave bands. The R-9012 does seem particularly segmented.
Tecsun R-9012 retailers:
Post readers: Do you own the R-9012? What are your thoughts? Please comment!
Do you like the SWLing Post? Consider supporting us via Patreon or our Coffee Fund! Thank you!

