Tag Archives: Inexpensive Shortwave

How to Build a Simple Linear-Loaded Dipole for Low-Noise Shortwave Radio Listening

Many thanks to SWLing Post contributor and RX antenna guru, Grayhat, for another excellent guest post focusing on compact, low-profile urban antennas:


A linear loaded dipole for the SWL

by Grayhat

What follows is the description of an antenna which may allow to obtain good performances even in limited space, the antenna which I’m about to describe is a “linearl loaded dipole”(LLD) which some call the “cobra” antenna due to the “snaking” of its wires
The arms of the antenna are built using 3-conductors wire (which may be flat or round) and the 3 conductors are connected this way:

That is, connected “in series”, this means that, the electrical length of the antenna will be three times its physical one; this does NOT mean that the antenna will perform like a single wire of the same (total) length, yet it allows to “virtually” make it longer, which in turn gives it good performance even with relatively short sizes. Plus, the distributed inductance/capacitance between the wires not only gives it a number of “sub” resonance points, but also helps keeping the noise down (in my experience below the noise you’d expect from a regular dipole).  At the same time it offers better performances than what one may expect from a “coil loaded” dipole. Plus, building it is easy and cheap and the antenna will fit into even (relatively) limited spaces (a balcony, a small yard and so on…).

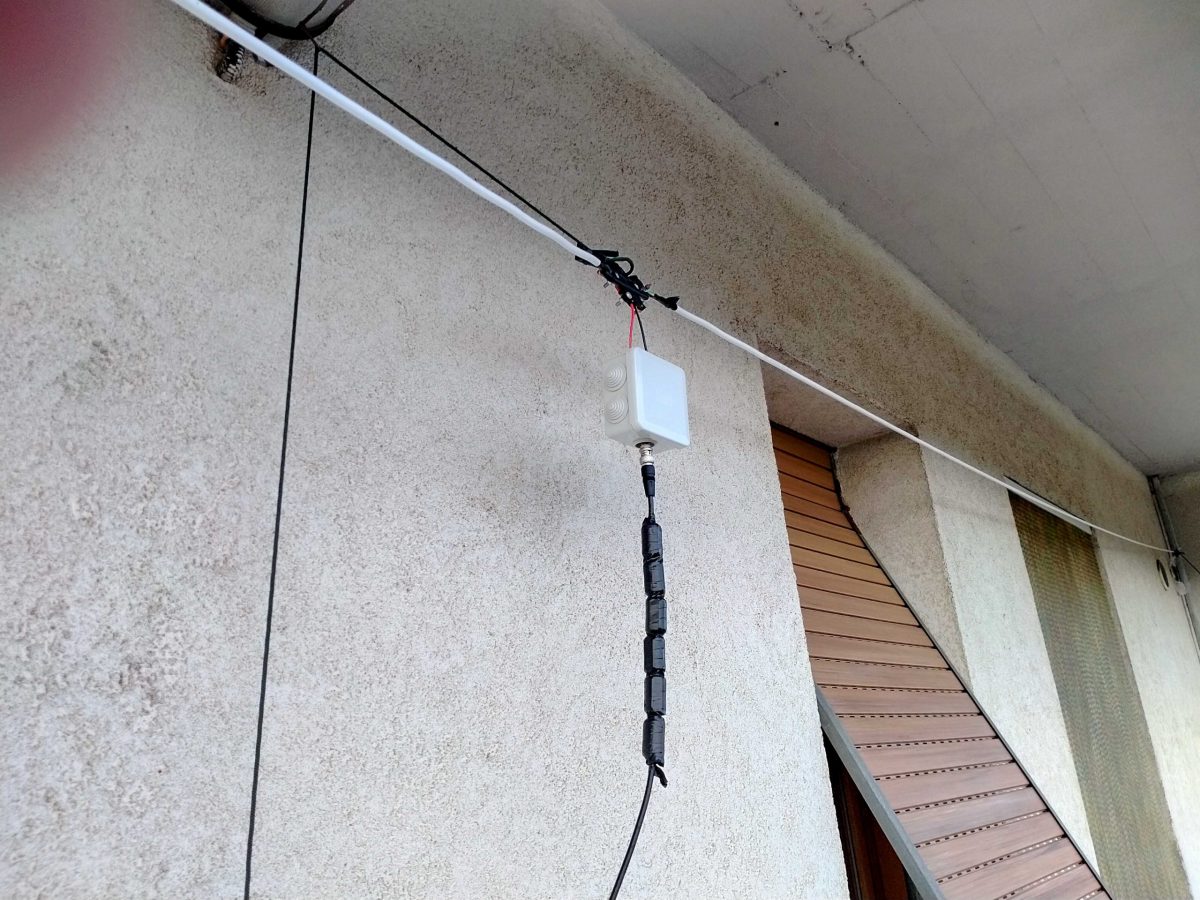
Interested–? If so, read on and let me start by showing my (short – 9mt total) LLD installed on a balcony:

Here it is in all its “glory”–well, not exactly–I fiddled with it lately since I’m considering some mods so the tape isn’t correctly stuck and it has been raised and lowered quite some times, but in any case that’s it.

Bill of Materials

Here’s what you’ll need to build it (the links are just indicative, you may pick different stuff or buy it locally or elsewhere).

  • Some length of 3-conductors electrical wire which will fit your available space (pick it a bit longer to stay on the safe side), it may be flat or round, in my case I used the round type since it was easily available and cheap: https://amzn.to/3g2eZX3
  • A NooElec V2 9:1 BalUn–or, if you prefer you may try winding your own and trying other ratios. I tested some homebuilt 1:1, 1:4 and 1:6 and found that the tiny and cheap NooElec was the best fitting one): https://amzn.to/3fNnvce
  • A small weatherproof box to host the BalUn: https://amzn.to/33vjZy3
  • A center support which may be bought or built. In the latter case, a piece of PCV pipe with some holes to hold the wires should suffice. In my case I picked this one (can’t find it on amazon.com outside of Italy): https://www.amazon.it/gp/product/B07NKCYT5Z
  • A pair of SMA to BNC adapters: https://amzn.to/37krHwj
  • A run of RG-58 coax with BNC connectors: https://amzn.to/2JckHcR

Plus some additional bits and pieces like some rope to hang the antenna, some nylon cable ties, a bit of insulated wire, duct tape and some tools. Notice that the above list can be shortened if you already have some of the needed stuff and this, in turn will lower (the already low) cost of the antenna.

Putting the pieces together

Ok, let’s move on to the build phase. The first thing to do will be measuring your available space to find out how much wire we’ll be able to put on the air; in doing so, consider that (as in my case), the antenna could be mounted in “inverted Vee” configuration which will allow to fit the antenna even in limited space.

In any case, after measuring the available space, let’s subtract at least 1m (50cm at each end) to avoid placing the antenna ends too near to the supports. Also, if in “inverted Vee” config, we’ll need to subtract another 50cm to keep the feedpoint (center/box) away from the central support.

Once we’ve measured, we may start by cutting two equal lengths of 3-conductor wire. Next, we’ll remove a bit of the external sleeve to expose the three conductors and then we’ll remove the insulator from the ends of the three exposed wire (and repeat this at the other end of the cable and for both arms).

The resulting ends of each arm should look somewhat like in the example image below

Now we’ll need to connect the wires in series. We’ll pick one of the cables which will be the two arms of our antenna and, assuming we have the same colors as in the above image, we’ll connect the green and white together at one end and the black and green together at the other end. Repeat the same operation for the second arm and the cables will be ready.

Now, to have a reference, let’s assume that the ends of each arm with the black “free” (not connected) wire will go to the center of our dipole.

Leave the two arms alone for a moment, and let’s install the balun inside the waterproof box. To do so, we’ll start by cutting a (small) hole through the single rubber cap found at one side of the box, then insert the cap reversed, so that it will protrude to the inside of the box and not to the outside. Slide the balun SMA connector through the hole so that it will protrude outside the box.

Now use a marker to mark the balun position and remove the balun from the box. Pick a piece of wood/plastic or other insulating material, cut it to size (refer to marking and to balun size) and drill four holes matching the one found on the balun board. Slide four screws through the holes and lock them with nuts, the screws should be long enough to extrude for some mm. Now insert the balun in the screws using the holes present on the balun board and lock it with nuts (be gentle to avoid damaging the balun). At this point, add some “superglue” to the bottom of the support we just built, slide the balun SMA connector through the rubber cap hole we already practiced, and glue the support to the bottom of the waterproof box.  Wait for the glue to dry.

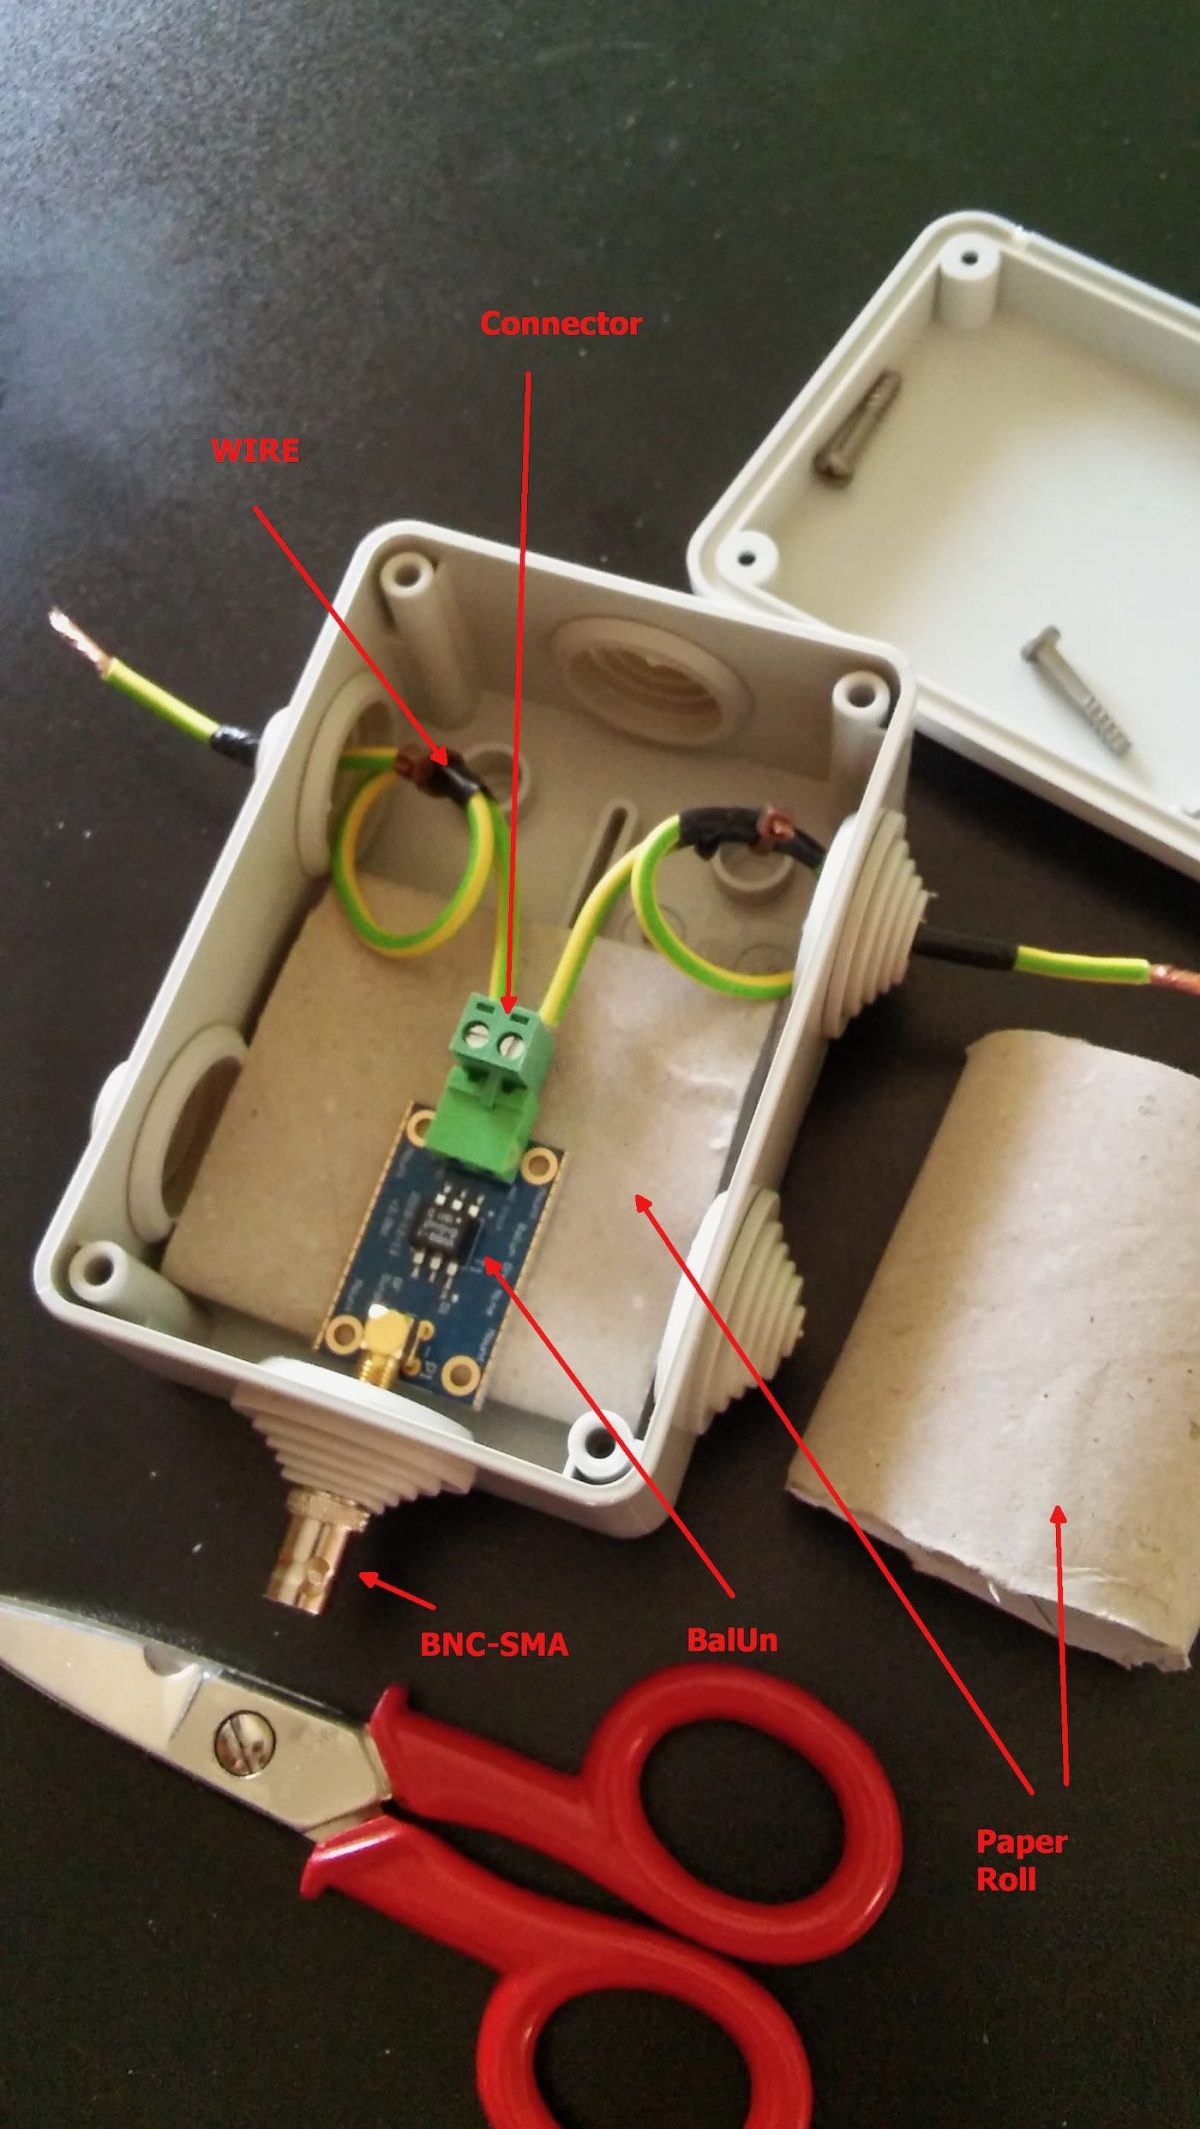
Just to give you a better idea, see the photo above. That’s a photo of the early assembly of my balun. Later on, I rebuilt it as described above (but took no pics!), the image should help you understanding how it’s seated inside the box–by the way in our case it will be locked by the screws to the plastic support we glued to the box.

While waiting for the glue to dry, we may work on the dipole centerpiece.

If you bought one like I did, connecting the arm “black” (see above) wires should be pretty straightforward. If instead you choose to use a PVC pipe you’ll have to drill some holes to pass and lock the wire so that the strain will be supported by the pipe and not by the wire going to the balun box. In either case, connect a pair of short runs of insulated wire to the end (black) wire coming from each end. Those wires should be long enough to reach the balun wire terminal block inside the box.

Assuming the glue dried, it’s time to complete the feedpoint connection.

Bring the two wires coming from the centerpoint inside the waterproof box. Pick one of the wire terminal blocks which came with the balun (the “L” shaped one should be a good choice) and connect the wires to it. Then, slide the block in place until it locks firmly. After doing so, close the box and screw the SMA-BNC adapter onto the SMA connector coming from the balun. Our centerpiece and arms will now be ready, and will be time to put our antenna up!

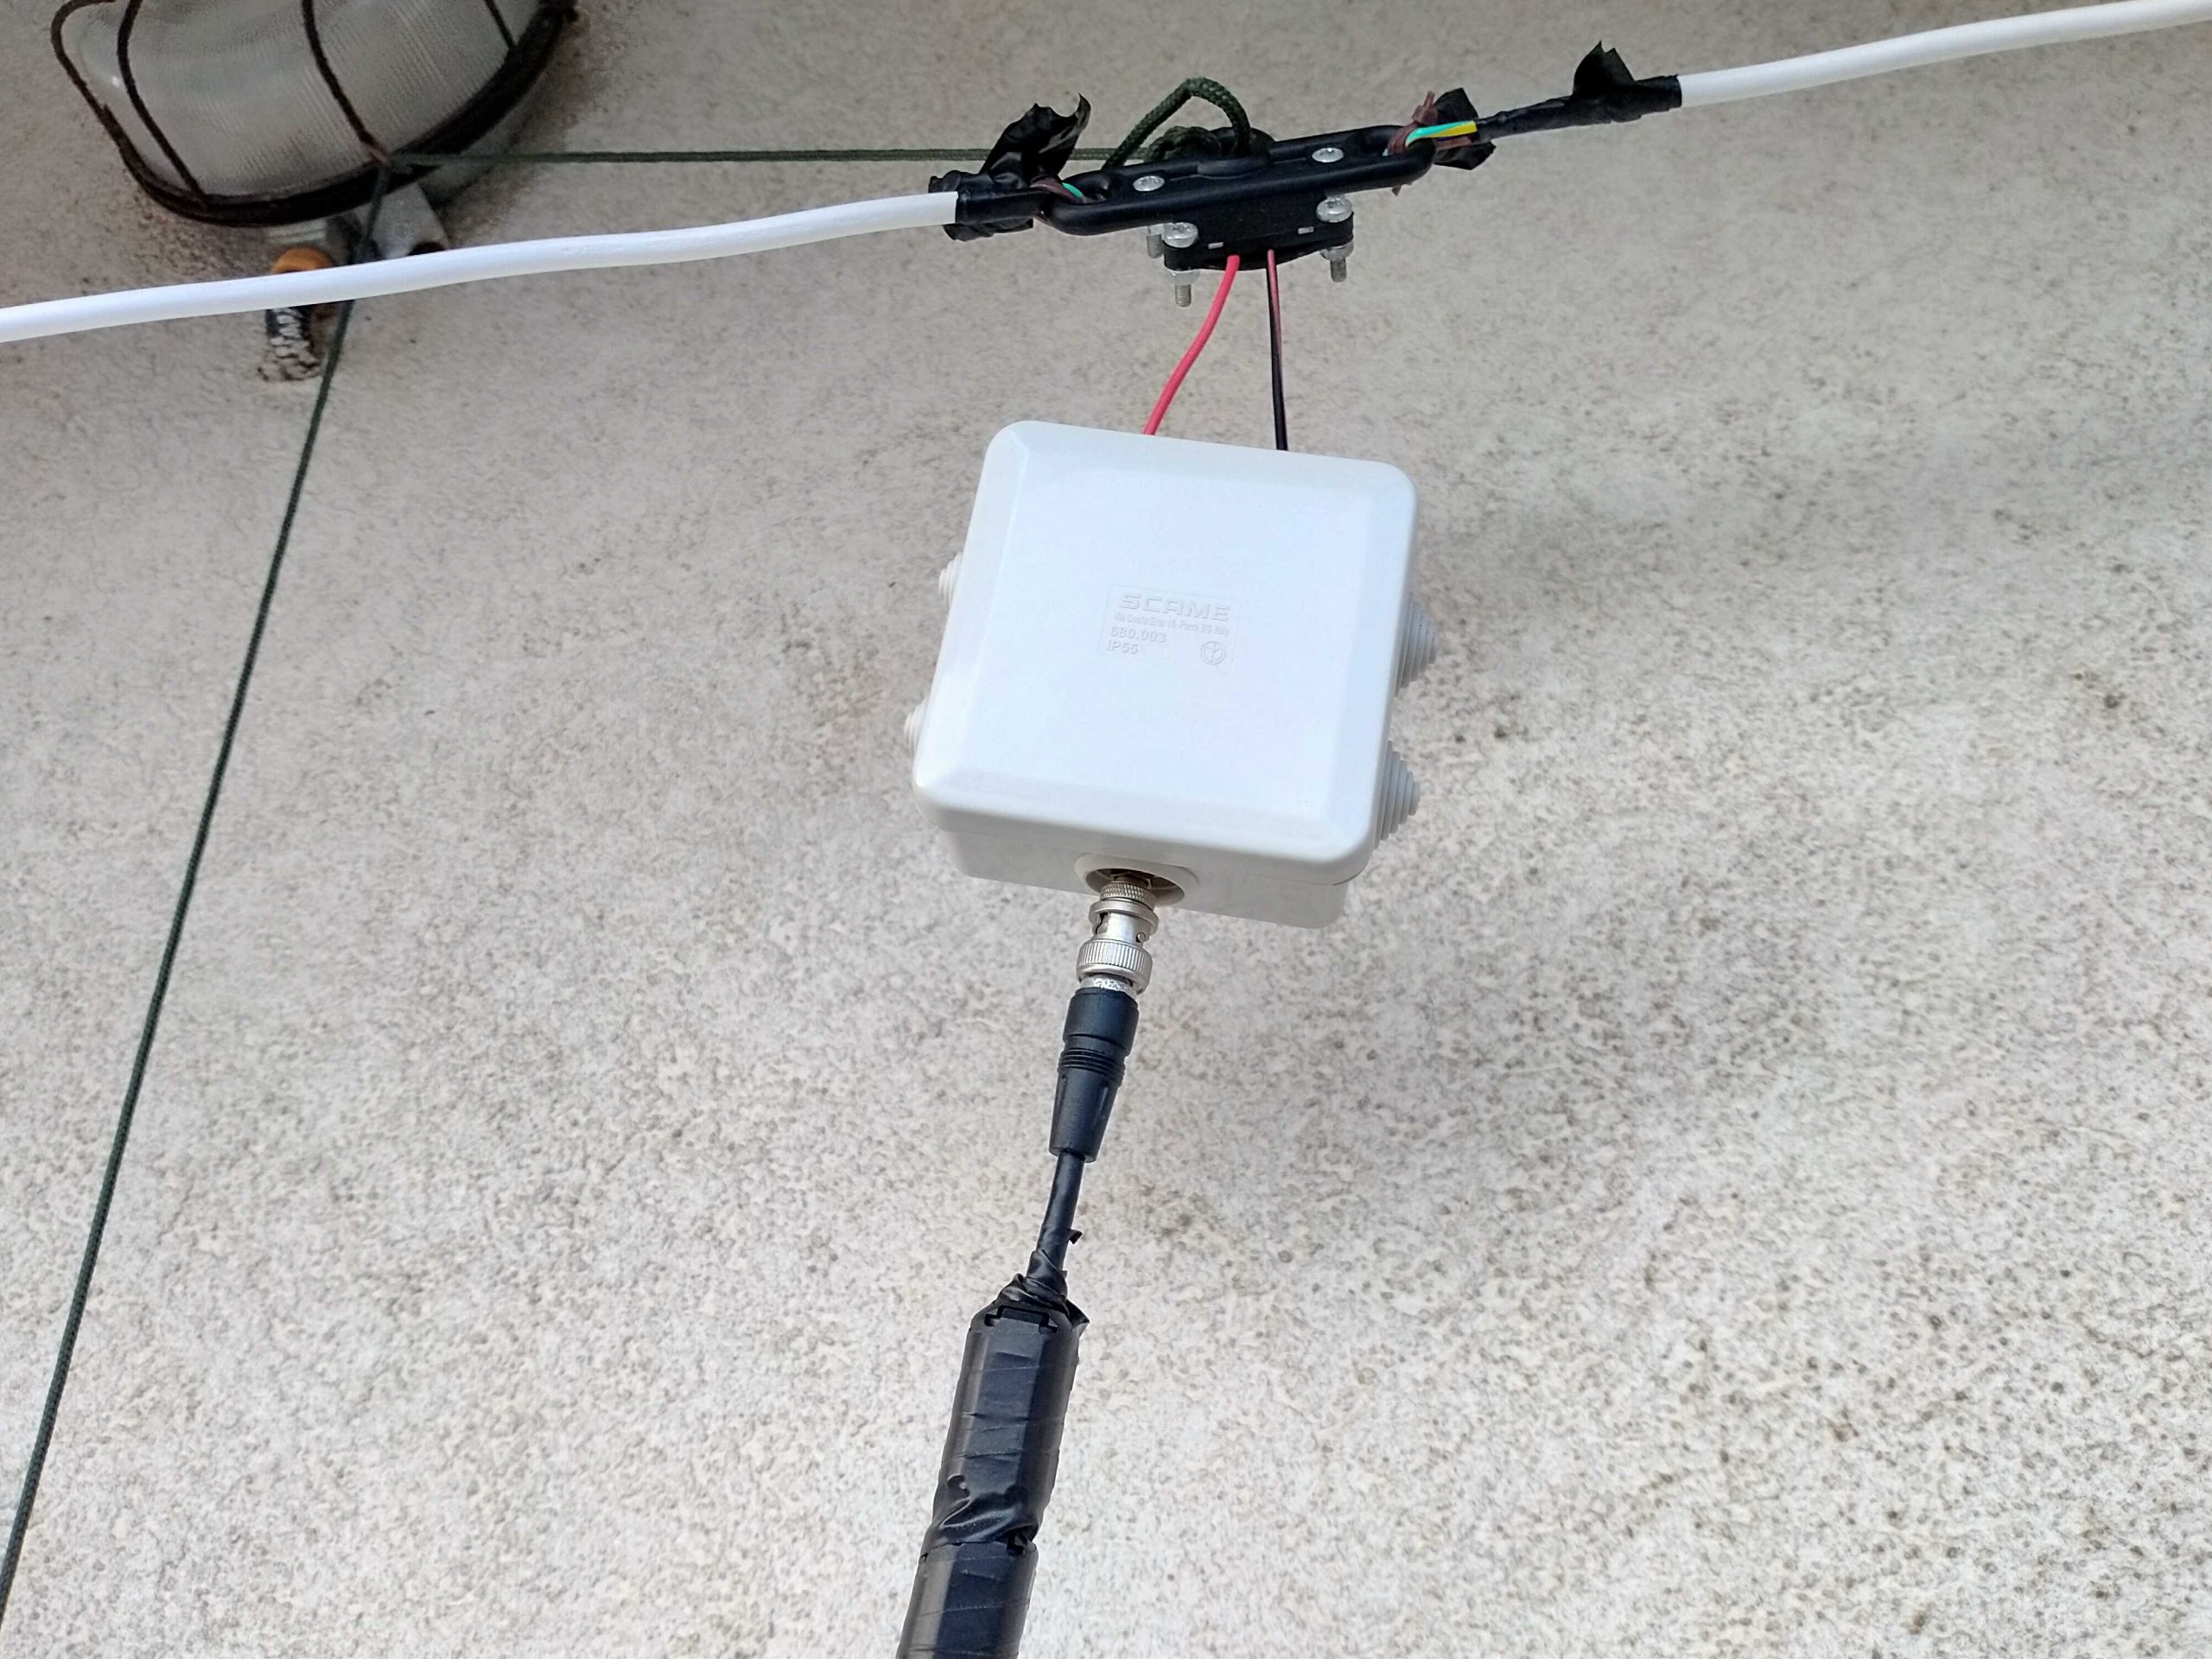
I’ll skip the instructions about holding the arm ends and the centerpiece up, since I believe it should be pretty straightforward. Just ensure to put the antenna as high as possible and, if you have room make the arms as long as possible. In my case, due to my (self-imposed) limitations, the antenna was installed on a balcony. The arms have a length of about 3.5m each and the feedpoint (in the image above) sits at about 9m off the ground.

The more acute readers probably noticed those “blobs” on the coax, they are snap-on ferrite chokes I added to the coax (there are more of them at the rx end) to help tame common mode noise. I omitted them from the “BoM” since they may be added later on.

Anyhow, now that you have your LLD up it will be time to give it a test! In my case, I decided to start by running an FT8 session to see what the antenna could pick up during 8 hours, and the result, on the 20 meters band, is shown on the following map (click to enlarge):

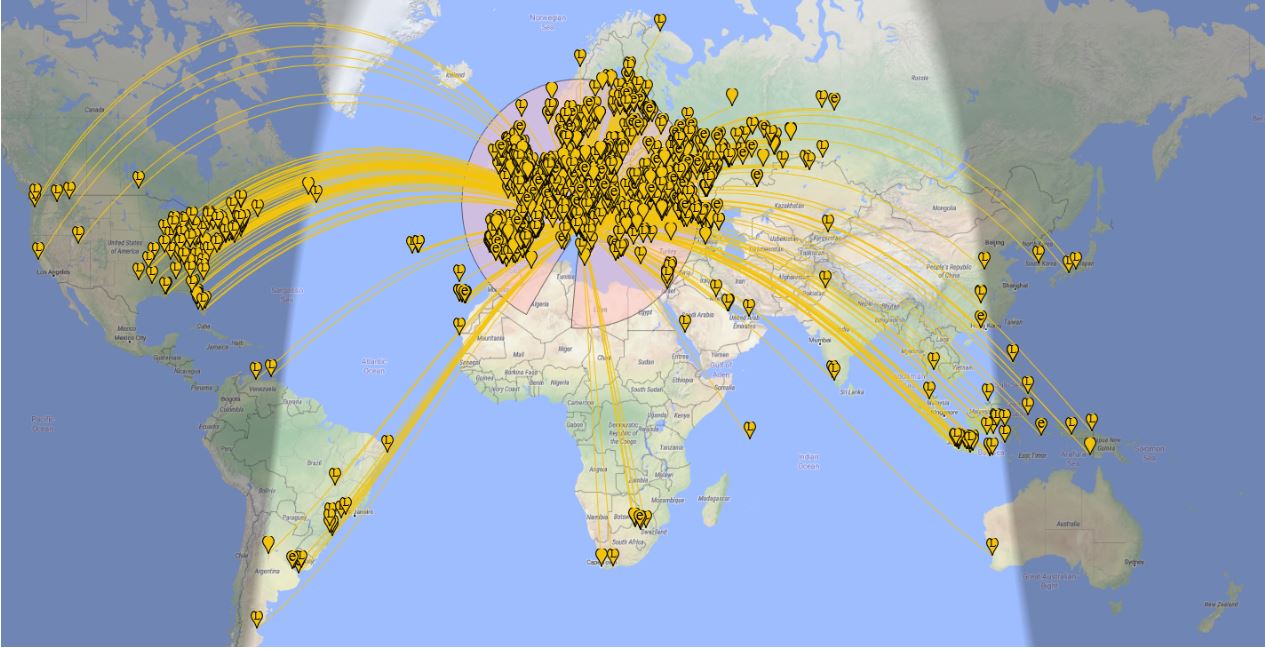
Later, that same antenna allowed me to pick up signals from the Neumayer station in Antarctica–not bad, I think!

Some final notes

While running my “balcony experiment”, I built and tested several antennas, including a vanilla “randomwire”, a dipole, and a T2FD.

Compared to those, the LLD offers much less noise and better reception on a wide frequency range. By the way, it won’t perform miracles, but it’s serving me well on the LW band, on most ham bands, and even up to the Aircraft bands–indeed, was able to pick up several conversations between aircraft and ground air traffic control.

All I can suggest is that given a linear-loaded dipole is so simple, quite cheap, and may fit many locations, why don’t you give it a spin–?  🙂

Spread the radio love

Frugal SWLing: Investing little, but getting a lot out of your radio

This article originally appeared in the April 2014 issue of The Spectrum Monitor Magazine.


RadioDialLet’s face it: SWLers and amateur radio operators are some of the most frugal hobbyists out there.  But the good news is that radio is a hobby that favors the frugal.  There are many practical and time-tested ways to make radio listening fun and effective–such as improving your shortwave radio reception–that are absolutely free, or that cost very little.

And how do I know this?  Among the frugal, I’m the most frugal SWLer I know! Yet there’s a method to my frugal madness:  because I simply can’t afford to waste hard-earned radio money on gadgets and accessories that are ineffective, I count my pennies in order to make quality purchases with longevity in mind.  Meanwhile, I track down ways to keep my hobby cost-effective.

I’ve gathered here some of my favorite frugal tips and quality purchase suggestions here. So, without further delay, let’s start SWLing–and saving money.

1. Check your shack/home for RFI. Cost: Free

Checking your shack for RFI is vitally important, a procedure every radio listener or operator should undertake.

The truth is, very few of us regularly experience ideal conditions for HF or AM radio listening. Devices like plasma TVs, laptop power supplies, and the ubiquitous AC adapter inject distracting noise into our otherwise peaceful environs, disrupting our hobby. This noise is known as RFI (Radio Frequency Interference).

These "Wall Wart" type adapters can create a lot of RFI

These “wall wart” type adapters can create a lot of RFI

A number of times, I’ve received a message from one of my readers on the SWLing Post claiming that their new shortwave radio can “only” hear strong, blowtorch stations. My simple advice? Put batteries in your radio, turn it on to an unoccupied frequency in your favorite shortwave meter band, go to your circuit breaker box, and turn off everything in your house. (Warning: Do warn your housemates beforehand, to avoid any loud protestation! And do reset your clocks and check your refrigerator/freezer after this test.)

Did the noise level on your radio decrease? If the decrease coincided with the power cut, then one or more electronic devices in your house are generating RFI. RFI often sounds like static–very loud static–and is often so wide in bandwidth that it can cover several megahertz. RFI can overwhelm your portable radio and basically “deafen” it to anything but the loudest stations that break through the elevated noise floor.

Next comes the process of elimination: systematically turn on circuit breakers until you hear the noise return. If you’re fortunate enough to have accurately-labeled circuit breakers, you will at least know what area in your house holds the infamous disruptive device. Here’s a short list of the usual RFI culprits:

  • the ubiquitous AC adapter (aka, “wall wart”)
  • laptop power supplies
  • flat screen TVs: especially Plasma TVs
  • heating devices like electric blankets
  • external hard drives
  • lamp dimmers
  • touch lamps

Good luck tracking it down!  Chasing RFI can be complex.  Check out this list of RFI resources on the ARRL website for methods and ideas to cope with RFI.

2. Take your radio outside. Cost: Free

ParkListeningIf you live in a condo, high-rise, or high-density neighborhood, my first suggestion may be of little use to you. In this case, your neighbor(s) may be causing RFI; turning off your own power may have little to no effect.  Fortunately, there’s an easy–albeit modestly inconvenient–way to deal with neighborhood RFI. Leave the neighborhood! No, not permanently; just for a fun afternoon outing (with radio, of course).

If you live in a city, grab your radio, and head for a park or other area with wide open space and no buildings. Listeners who live in urban areas frequently enjoy radio listening via headphones on a park bench; some even have a favorite bench for their fair-weather pastime.

The benefits in this case are two-fold: firstly, you’re removing yourself from the vicinity of RFI, but secondly–and the icing on the cake–is that you’re taking your radio, and its antenna, outside.  Antennas always function better outside. Walls and even windows attenuate HF signals.  Plus, outdoor settings nearly always equal fun.

Want some inspiration? Check out how this SWL plays radio in central London.

By the way, if you have no local parks to which you can escape, consider taking your radio in the car and driving to a national park. Better yet, combine camping and SWLing.  I like to do this, although I don’t have an RFI problem where I currently live.

3. Make a simple wire antenna. Cost: Free (or, at most, $10-15)

Most shortwave portables radios on the market today have a telescopic whip antenna that will suffice for casual listening. But often you can increase the antenna gain by simply adding more length in the form of a simple thin wire. Keep in mind that many radios actually ship with a clip-on antenna wire. Check your original box and make sure you haven’t overlooked it, as it’s fairly easy to do.

An alligator clip offers serious bang-for buck--especially if you already have the parts lying around

An alligator clip offers serious bang-for buck–especially if you already have the parts lying around

If you didn’t receive a factory-supplied clip-on antenna, no worries!  They’re a breeze to make and quite cheap: indeed, if you have a junk box of electronics parts like so many hobbyists I know, you may already have what you need. Simply obtain a 20 foot length of jacketed (insulated) wire–gauge is not important, just something thin enough that you can easily roll up to transport. Next, strip ¼ inch of insulation off the end of the wire. Solder and/or crimp an alligator clip to the end of the wire, making sure you have a solid, stable connection.

Now, stretch out this wire and attach it to your antenna.  You will most likely find that this improves antenna gain. The effectiveness of the wire varies with the receiver. When I’ve made clip antennas in the past, I’ve simply made them longer than I thought I might need, then later cut it off at the optimum length based upon signal strength.

Two caveats:

  1. If you live in an RFI-heavy environment, adding a wire antenna at home may only increase your noise level (after all, it will make the radio better at “hearing” the noise).
  2. Some receivers are susceptible to overloading and electrostatic discharge (the Tecsun PL-600, Grundig G5 and G3 come to mind). To be on the safe side, do not attach any wire to your portable that is in excess of twenty feet in length.  Twenty feet should be more than sufficient length to increase antenna gain without any negative repercussions.

4. Use batteries––preferably rechargeable ones. Cost: $5- $20

Not all rechargeable batteries are created equally. Lean toward name brand, higher quality cells. Dollar store batteries lack longevity.

Not all rechargeable batteries are created equally. Lean toward name brand, higher quality cells. Dollar store batteries lack longevity.

This is one suggestion that may require a modest investment, but will pay off in more ways than one. I honestly can’t think of the last time that I listened to a portable radio while it was plugged into mains/grid power via an AC adapter. Since at least 2007, I have been powering my portables exclusively with good-quality rechargeable batteries.

Why rechargeables–? First and foremost, with rare exception, shortwave radio manufactures give little thought to the AC adapters they include with a portable shortwave radio; they’re simply an accessory that is expected, so they deliver. Indeed, the AC adapter that came with my Tecsun PL-880 (Tecsun’s latest flagship portable) came with an AC adaptor that does a great job charging the internal batteries, but injects copious amounts of RFI in the process. Running the radio off of batteries solves the problem instantly.

Many radio manufacturers now include rechargeable batteries with the purchase of a radio. Some of these batteries are AA cells, others are slim packs resembling cell phone batteries. Consider purchasing an extra battery if you’re worried yours might die away while you’re listening to your favorite program; a quick switch, and you scarcely miss a beat. If your portable comes with rechargeable batteries, most likely the radio even has a built-in charge control circuit.

I should add that I’m a fan of the traditional AA battery, even though they’re bigger than other battery types. After all, they’re nearly always accessible.  If a radio takes AA batteries, I never use the radio’s built-in recharger, instead I prefer a MAHA brand battery charger, as they condition and give a longer life to the rechargeable cells.

Sure, buying rechargeable batteries and, potentially, a good battery charger require an initial outlay of money, but the rewards are a quieter receiver and a more earth-friendly approach than heavy-duty or alkaline batteries can deliver.

5. Listen with headphones or earphones.  Cost: $0 – $100

Sony MDREX10LP in-ear headphones are inexpensive and effective.

Sony MDREX10LP in-ear headphones are inexpensive and effective.

Why headphones? Ask any serious DXers (amateur radio or SWL) and they’ll tell you headphones are an indispensable tool. While armchair listening is great with your radio’s built-in speaker, headphones give you better sound isolation, and your radio’s audio is equally balanced. Digging a weak station out of the ether is easier with headphones.

Almost every portable you buy today will come with a complimentary set of earphones. Quality varies amongst these, but in my experience, the headphones included tend to be of the lowest quality; for shortwave listening, these may suffice.

Though AM and shortwave radio is not considered a “high-fidelity” medium, thus not requiring a wide frequency response, I still prefer listening with quality earphones/headphones. As long as your headphones have a decent frequency response–I usually aim for 8 – 22,000 Hz–you’ll be pleased.  And do make sure your headphones or earphones are comfortable to wear for extended periods of time.

Yamaha CM500's are a worthwhile investment if you're an amateur radio operator.

Yamaha CM500’s are a worthwhile investment if you’re an amateur radio operator.

One of my favorite pair of in-ear earphones for SWLing are the popular Sony MDREX10LP series. They’re comfortable, responsive, isolate noise, and are available from a number of retailers for about $10 USD per pair.

For over-ear headphones, I like the Panasonic RP-HTF600. They’re large, comfortable, and deliver amazing fidelity for about $30 USD.

If you also happen to be an amateur radio operator, the Yamaha CM500 headphones have a built-in boom mic that works amazingly well.  At $50 USD, they are a steal. When I received mine, I opened the package, plugged the headphone and mic jacks into my Elecraft KX3, and I was on the air with them in seconds.

6. Learn to use use Exalted Carrier Reception (ECR/ECSS). Cost: Free

ECSS-PL-660“Exalted Carrier Reception” (ECR) a.k.a. Exalted Carrier Single-Sideband (ECSS) is just a fancy way of saying that an AM broadcast carrier is tuned in while in single-sideband mode. This is most useful when you’re trying to listen to weak broadcasters.

This (ECR) is, in a sense, the frugal listener’s version of synchronous detection. Why does it work?  As my knowledgeable ham buddy Mike (K8RAT) explains: ”You’re removing any selective fading problems by filtering away one of the sidebands, and injecting a carrier of steady amplitude which eliminates the ‘tearing’ heard when a broadcast carrier is varying in amplitude.”  Got that?

Even if you don’t understand it exactly, here’s how to use ECR:  Simply find a strong AM station on your radio.  Next, turn on the BFO or SSB mode on your radio. As you adjust the tuning knob, you’ll hear an audible whine, the pitch of which will change with every increment of tuning. “Zero-beating” the carrier follows next–this is simply tuning in the signal until that whine is gone, and the AM station can be heard as clearly as if the radio were in AM mode.

The fidelity of ECR/ECSS is typically not as good as AM–mainly because SSB filters are usually narrower than AM filters–but it does lower the noise floor, increase the stability of the received signal, and make this signal “pop out” a bit more.

But don’t take my word for it–let your ears be your guide! In this recording, I tune in a low-power station on my receiver in standard AM mode, but at 15 seconds into the recording, I switch to the upper-sideband (SSB) mode, zero-beat the frequency, then open up the SSB filter a little wider.  Then, just before I end the recording, I switch to lower-sideband–something you can do if there is interference in the upper-sideband, for example:

It’s amazing how much background noise ECR removes.

If you’re lucky enough to have a tabletop radio, chances are it has an SSB mode (although there are some very rare exceptions). Less than a third of portables on the market, however, have SSB. Here is a list of the most popular portables with SSB that are, or have recently been, in production.

7. Use a web receiver.  Cost: Free

If you live in an area with frustrating RFI, but want to listen to the shortwave bands from home, try an online web-based receiver. Sure, it’s not quite like tuning a radio at your fingertips, but it’s the next best thing, and also a handy tool for checking propagation or verifying your own signal (if you’re an amateur radio operator).

My two favorites site are:

  • GlobalTunersGlobal Tuners which has a number of remotely-controlled radio receivers all over the world. You must register before you can participate, but registration is free. Global Tuners even has a free Android app that permits remote receiver control via your smart phone or tablet.
  • utlogo4bThe University of Twente Wide-band WebSDR is an amazing resource. Not only can you control this receiver, but so, too, can a few dozen other web guests––all at the same time! I’ve used U Twente’s receiver on a number of occasions to listen to European pirates. Cost? Again, it’s free.
  • The KiwiSDR network has become the largest network of web SDRs since we first published this post. You can literally travel the world via the KiwiSDR network! Click here to view KiwiSDR stations on a map, and here to view them in a searchable list.

8. Finally, practice listening. (Cost: Just some time)

SP600Dial3My final bit of “free” advice sounds a little philosophical, but rest assured, it isn’t.

I’ve always likened radio listening to another of my interests, astronomy–an entirely different hobby that, unless you’re a radio astronomer, relies on an entirely different sense.

Why the comparison?  I’ve known some talented astronomers that, with just a basic pair of binoculars, can see much more in the night sky than I ever could. Are their eyes better than mine? Not necessarily. Their eyes are just experienced in the field of stargazing; they know what to look for, and most importantly, what to appreciate. Their brains decipher the images of bright or faint stars, subtle variations in color or shape, and focus on what they consider important. In short, this is not an ability you can pick up overnight; it takes patience, experience–and true passion.

Radio listening is, in that sense, much the same. Though I’m by no means a good example, I do wish I could go back to the days of my youth with the ability to listen that I have developed over the decades. There must have been so many jewels of stations hidden in the ether that I completely skipped over…My ability to, for example, pick out the ID of a faint station, to tune accurately and quickly, and to cope with adjacent noise, have all been honed since then, a result of time spent just listening.

My good friend Vlado (N3CZ) is a case in point: he is one of the most capable ham radio DXers I know. His extraordinary ability to pull intelligible conversations and CW (Morse code) out of the static, even in crowded radio conditions, is simply astounding. Vlado’s main transceiver is nearly two decades old, and by no means a benchmark technically. If you ask Vlad if he uses filters and digital signal processing, he will wisely tell you, in his Macedonian accent: “Your best filter is between your ears.”

The same goes for SWLing. I have spent enough time listening to shortwave and weak DX that I can now pull conversations out of the noise that my (non-radio) friends can barely detect. I’m convinced this is healthy exercise for the old grey matter.

David Goren, good friend and the highly-creative radio producer behind Shortwaveology.net, describes how shortwave listening enhanced his career:

“When I first discovered shortwave, I’d strain my ears through the static and all the layers of jumbled up sounds trying to hear as far around the world as I could. Years of this kind of intensive listening tuned my ears in such a way that allows a laser-like focus on the sonic details when working in the production studio making radio stories.”

Indeed, I’ve heard and can certainly appreciate the results of his remarkable “laser-like” listening ability; check out Shortwaveology.net for your own experience of David’s talented ears. You’ll be glad you did.

No doubt you enjoy listening already; my contention is that it has more benefits for your brain than Sudoku puzzles, and iis even more fun. Plus, did I mention that it’s free? You don’t need to pay a subscription to listen to the radio. There’s no real trick to this: it just takes time…interest…and a pair of ears.

Happy listening!

Spread the radio love