Shortwave listening and everything radio including reviews, broadcasting, ham radio, field operation, DXing, maker kits, travel, emergency gear, events, and more
Many thanks to SWLing Post contributor, Josh (KI6NAZ), who shares a link to his YouTube channel where he takes us on a tour of the lab599 TX-500 Discovery:
Thanks for sharing this, Josh! The TX-500 is certainly a unicorn in the world of field-portable QRP radios since it’s designed to be weather-proof.
lab599 has confirmed that they will dispatch a TX-500 loaner unit for my upcoming review. I’m looking forward to see how it plays in the field and might compare with other QRP rigs in my arsenal!
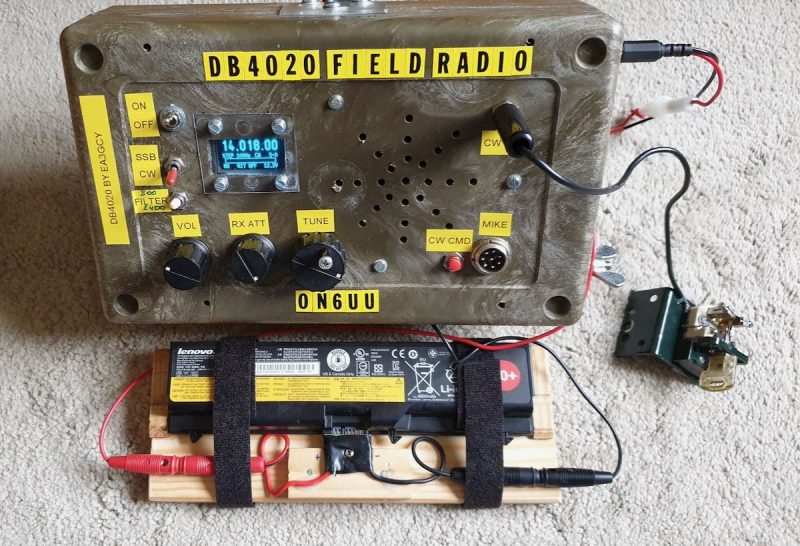
Many thanks to SWLing Post contributor, Frank (ON6UU), who shares the following guest post which expands upon his previous DB4020 article:
The EA3GCY DB4020 transceiver now has CW mode
by Frank Lagaet (ON6UU)
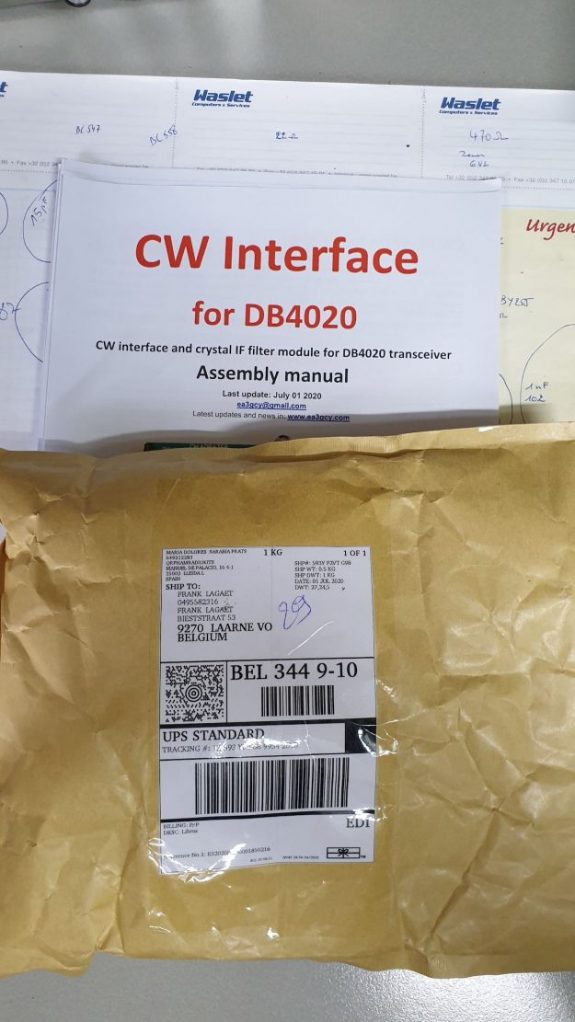
After telling you all about the DB4020 SSB build I’m here with the CW part of the kit, let’s say this is part 2. At a certain moment Javier let me know the CW interface kit was ready for shipment and some week later it was delivered to my QTH.
Again, a well packed kit arrived in a brown envelope, components and boards well packed in bubblewrap. I found even a board I did not expect which can hold a push button, a switch and the connector for your morse key. Javier thinks of everything it seems!
Unpacking the bubblewrap gave me this result, all components in 2 bags. In the bigger bag another 2 bags with 2 printboards, one for the CW interface, one for the CW filter. Great !! Checking the material bill resulted in all components there, another thumbs up.
I started, of course, immediately building it because I wanted CW in the transceiver as soon as possible. I don’t do much in SSB mode anymore and I already started missing CW on the DB4020, so I started my KX3 to listen to while I was populating the boards. I never thought CW was going to have this impact on me! …. ..
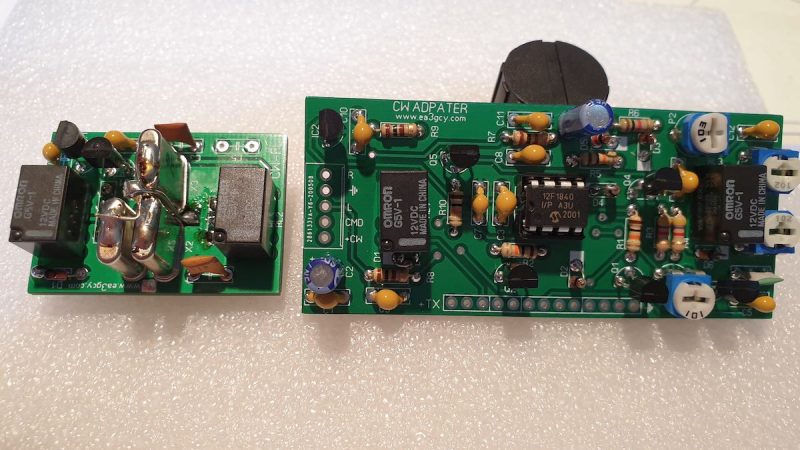
I started building the CW interface, again starting with all small items. I soon saw that the 2 relays which need to be soldered in were ideal to protect all components when the board is upside down, so I soldered them in very quickly. I then soldered in all other components ending with the elco’s.
Next phase was the CW filter. This board is small and came together in a blink of an eye, no problems there, the long legs of the 3 and 4 pin headers went in last.
The following day, I made all wire connections and soldered a 13pin connector, leaving one pin out since I want to have the option to choose the width of the CW signal I’m listening to. By cutting the FL CW + pin and adding an additional switch, I have now 500Hz or 2400Hz. Great option, for very little effort and simple. Another thumbs up here.
Now it was simply a matter of inserting the sub boards in the main board and all should be working. And it did! Hurray! The 500Hz filter works perfectly, filtering away all above or below stations nearby my operating frequency.
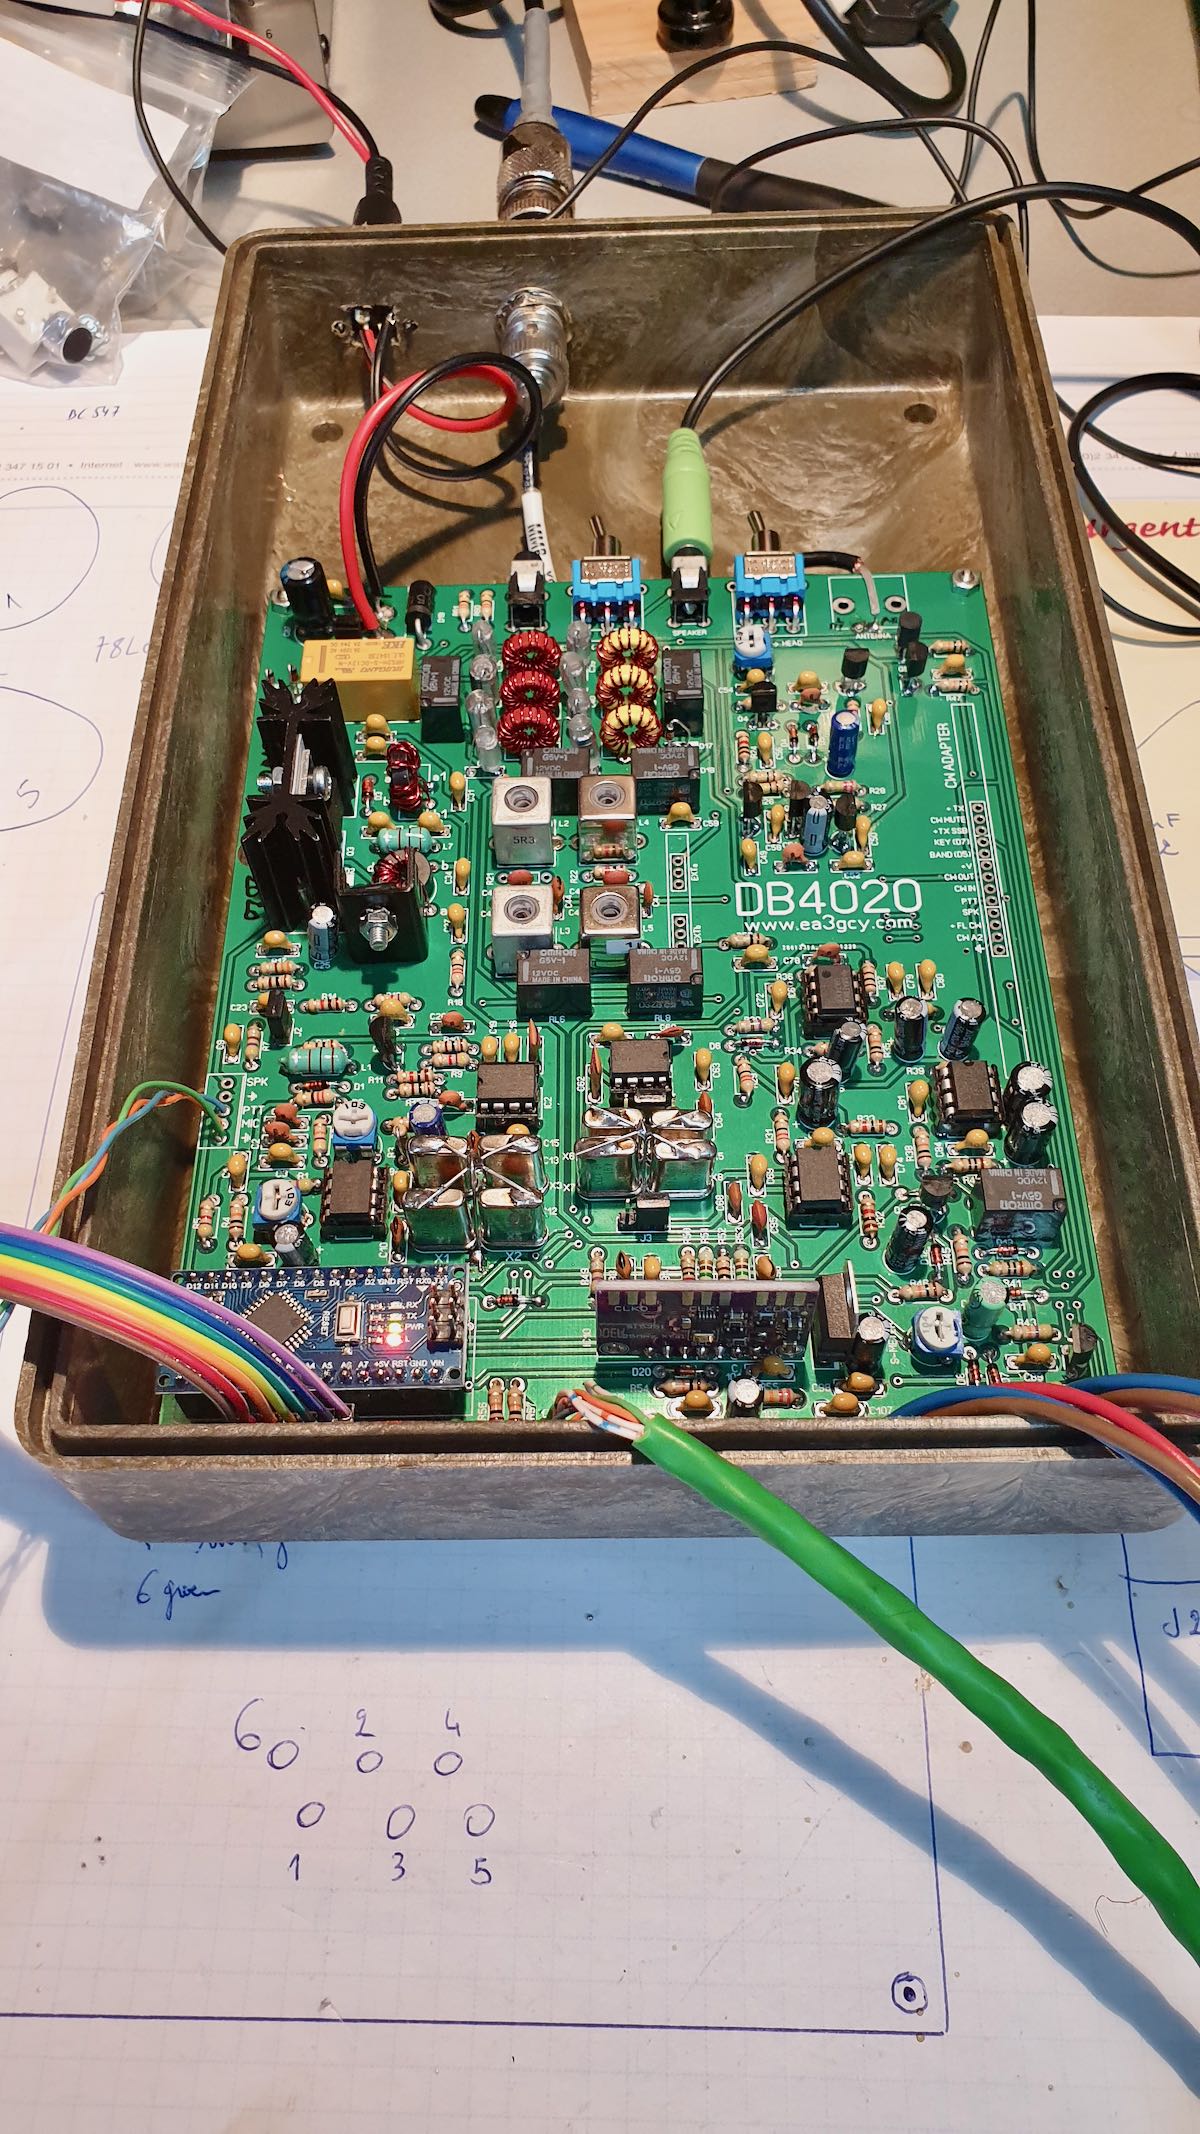
This is the result of the soldering work, 2 small boards which need to be inserted in the main board:
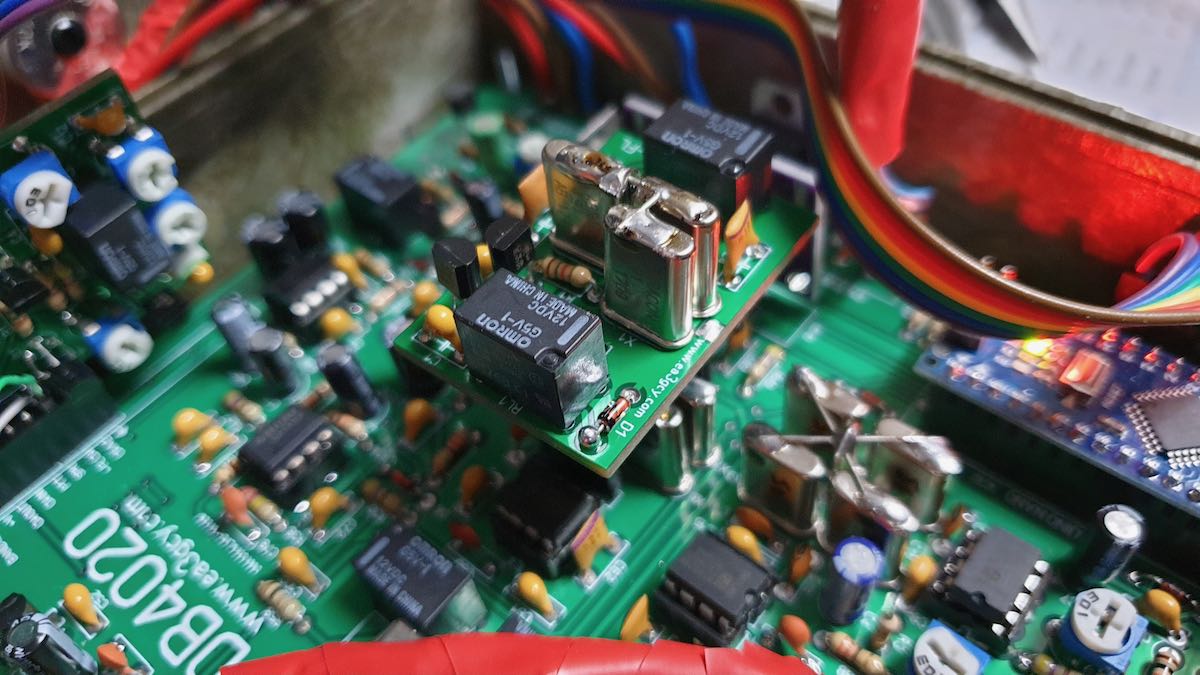
The CW interface still needs the 13pin header of which I cut one pin and mounted a switch to have the 2400Hz width.
The IC you see in the middle of the CW interface is the KB2 keyer which gives you several functions like 4 memories and beacon mode. The 4 potmeters are used to set the level on 40 and 20 meters, to set the delay between TX and RX switchover and to set side tone monitor level. The keyer also provides functions as keyer mode A or B, straight key function and can be set for speeds between 1 and 50WPM. WPM speed can be set in 2 different ways. Handy!
Here a picture of the CW filter inserted on the main DB4020 board.
The CW interface is inserted at the side of the main board, notice the 2 wires which go to the switch to allow switch-over between 500 and 2400Hz.
(Wiring still needs to be cleaned up in this picture.)
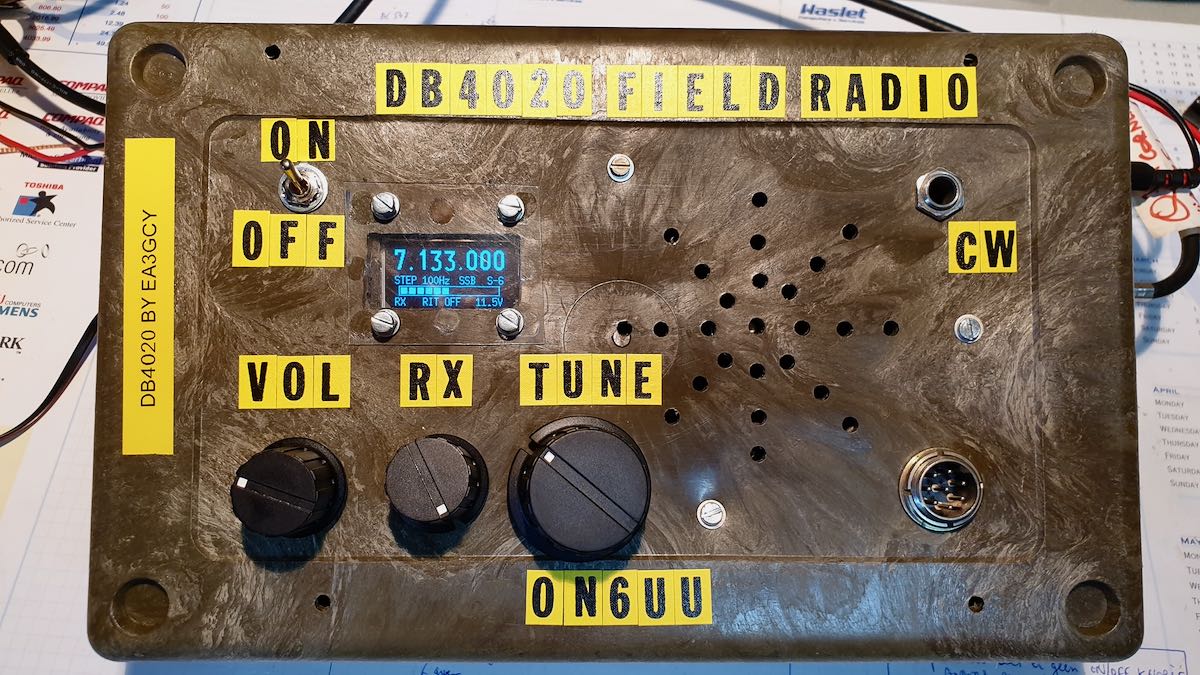
Finally, the result: a good working multimode QRP transceiver with 2 bands. It should be possible to make close to medium range with it as well as DX, even with QRP power.
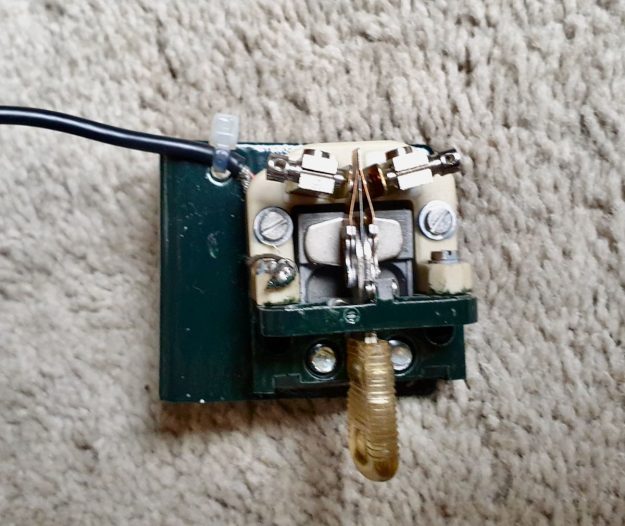
And while I was building I also made a new key for this radio, it is made out of a relay and cost nearly nothing, looks good doesn’t it ? hihi.
Homebrew key
The key, when in practiced hands (fingers hi), can do 50 WPM without a problem. My friend HA3HK does without blinking an eye at 40WPM with this kind of key and tells me that he can go faster if needed. Me? I’m going it a bit slower.
Battery pack
As this radio is only using little power (0.4A in RX, 1 to 2A in TX depending the power you set it) I thought, let’s make a battery pack for the radio.
The first plan was installing it in the box. I did not do that because the batterypack is also powerful enough to feed my KX2 and other QRP transceivers. Since I can use it with all of them, a loose battery works out better for me.
I started with an old laptop which had a broken screen and some other malfunctions, but still had a good battery, although I needed the battery connector of course. A piece of wood to mount the connector on was my next goal. And since I still have another laptop using the same batteries, I can charge the battery without problems. Simple, but good and it weighs much less than a gel cell battery.
The battery provides me with 12.5V and some 5Ah. Enough to last for hours on RX and for sure good enough to activate 2 SOTA sites in one day. It doesn’t look great but works great– that is what matters and to test it was more then good. Next will be getting the battery pack in a nice box. Better to re-use stuff than throwing it away I’m thinking.
I need to do something about the cover of the OLED display, there is still some work there to make it look nicer.
Some video can be seen on YouTube :
Finallym I’d like to thank you all for reading my articles about the DB4020. I had big fun soldering, tinkering with the box, making the key, and batteryholder/batterypack. My Hungarian friend HA3HK told me it looks a bit like a spy radio. …. ..
I also include one more time the link where you’ll find this kit :
Thank you so much, Frank. No doubt, you had a lot of fun putting this excellent little kit together.
Implementing a filter switch was a fantastic idea and, obviously, not terribly difficult to do.
Based on the videos, the DB4020 has a low noise floor and very good receiver characteristics. I’m impressed that the CW portion of the radios has so many features as well, such as a memory keyer and beacon mode.
I also love how you reused that 5Ah laptop battery! I think that could almost give you a full day of SOTA activations at those consumption levels!
Thanks again for sharing this with us, Frank! We look forward to your future articles!
Many thanks to SWLing Post contributor, Frank (ON6UU), who shares the following guest post:
Building EA3GCY’s DB4020 QRP Transceiver kit
by Frank Lagaet (ON6UU)
In May, I discovered via a newsletter that a new kit was available from Javier EA3GCY in Spain. I was immediately sold as this was a kit from my favourite kit producer and it has 2 bands–it will also be able to do CW and there also will be a CW filter.
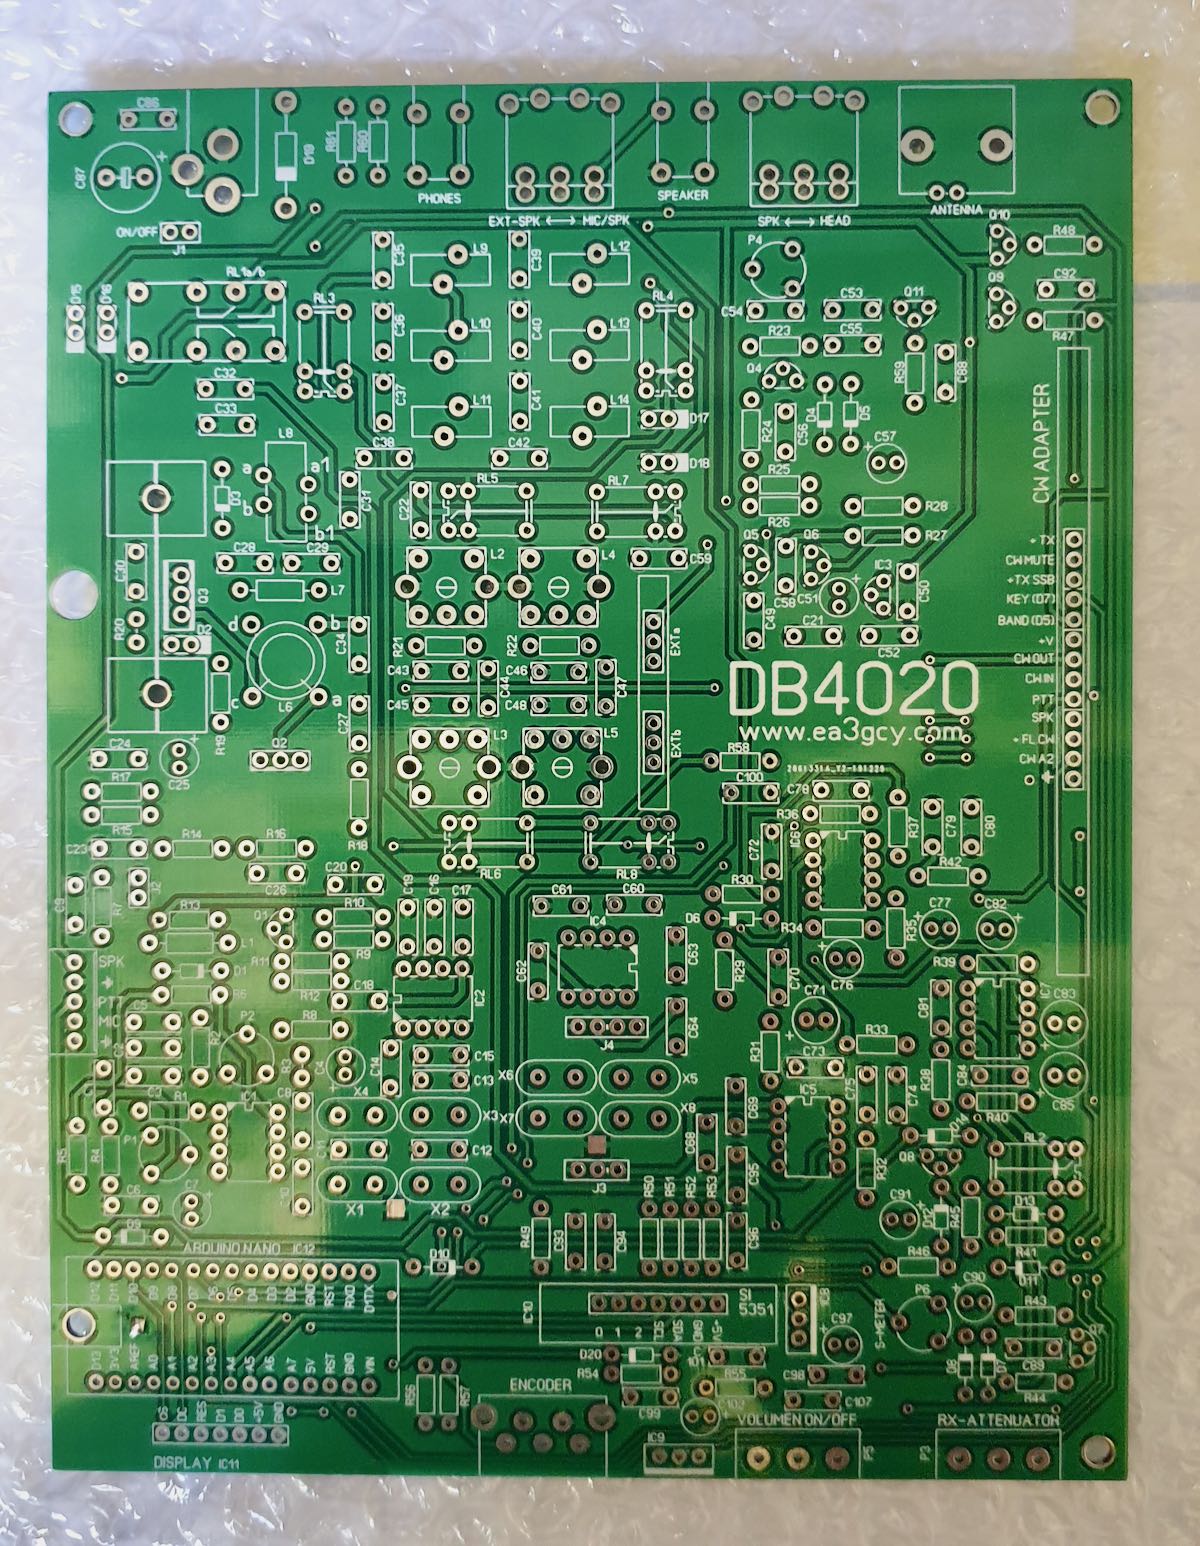
After building 2 MFT’s from Javier which work without problems, I needed to have the DB4020. The MFT’s are for 20 and 40 mtrs and do DSB (double side band). I did put them in a not-so-graceful box but they do what they are intended for which is QRP phone (SSB). They came together without problems so I expected the same for the DB4020–I knew for sure when I saw the board: all through-hole components (except for some capacitors which are factory soldered) and a lot of space on the board. The board has been silk-screened with clear indications on where all components have to come and the manual has very clear instructions where each component has to be soldered with referral to a quadrant. The manual provides a 252 quadrant page so it is a piece of cake to find where each piece goes.
What do you get?
Javier provides you with all components which need to be installed on the board and, of course, the kit board. The components come in small marked plastic bags and all is well-wrapped up in bubble wrap. The board is wrapped separately and that is put together with the component wrap which is then again wrapped up in bubble plastic. All goes into an envelope. Very well packed I must say.
Here’s a picture of the bags with components:
The silk-screened board:
I started with the resistors since that’s the easiest way. After that, I did the capacitors. I like to solder in all flat components first, so next were the diodes and IC sockets followed by the elco’s. The transistors were next together with all relays. As you solder in the transistors one also has to mount the cooling heatsinks, these cooling sinks are high and are ideal to protect the coils one has to make, they also protect the polystyrene caps (which I always find vulnerable) when the board is upside down.
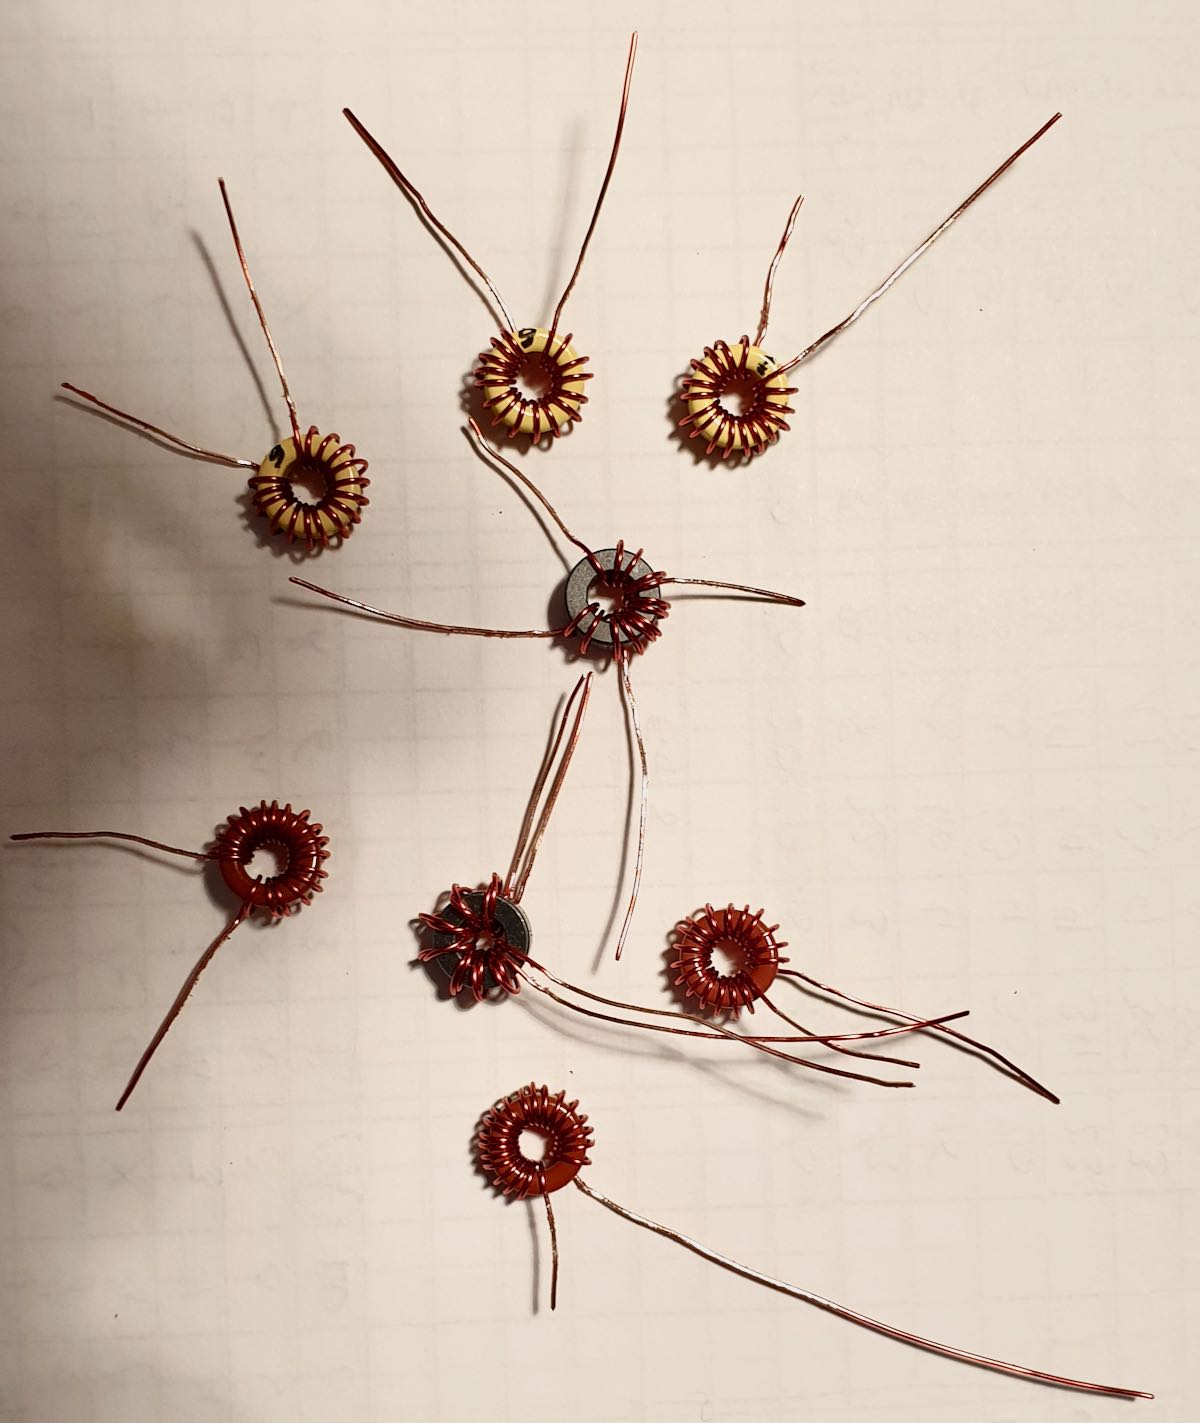
Many kit builders are afraid of winding the toroids in kits–don’t be! It is easy. Just take your time and follow the instructions given by Javier in the construction manual. In this kit the builder has to wind 8 toroids: 6 are a single wire which goes through the toroid body, 1 is a toroid with 2 different windings, and 1 has a twisted pair which goes through the final toroid. Be sure to measure the wire you need per toroid as instructed in the manual. Javier gives some spare, so you can be sure. You will also see that on next picture where the legs of the toroids have not been trimmed yet. Once done I still had some centimetres of wire leftover.
Picture of the toroids ready to be soldered in:
Finally all other parts and pin headers went in, jumpers were immediately put on where needed.
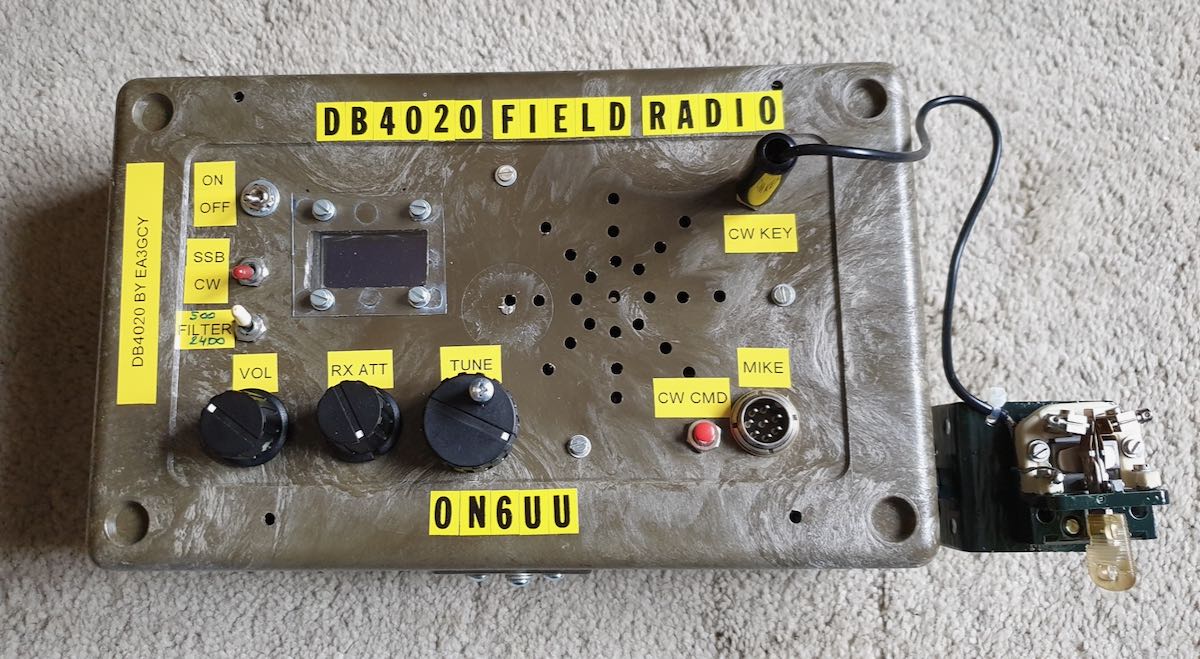
As I’m using a military-grade plastic box, I have to break-out some components like the display, tuning encoder, volume and rx control from the board. I also have put an on/off switch on the box and already have the CW KEY connector ready installed. I also installed a loudspeaker in the box. The SI5351 board and the Ardiuno Nano are the final components which go into the board after installing all wires.
Picture of the board:
I intend to attach a CW paddle to the box made out of a relay. A HWEF tuner (from EA3GCY) which I was planning to incorporate in the box is I think a bit overkill. That HWEF tuner is already in a nice little box and would be a pity to dismantle, also I’m running out of space in the box… Maybe I can fit in a 9-1unun which would then give me good results on both bands…?
Maybe I will install a battery pack in the same box.
The box with board installed:
The box completed front side:
Mind you, it still needs some additional switches for the CW part of the transceiver.
73
Frank (ON6UU)
Video
Brilliant, Frank! I really appreciate the video as well–sounds like the kit produces smooth audio and should serve you well. No doubt, that military box enclosure will survive even the roughest field conditions!
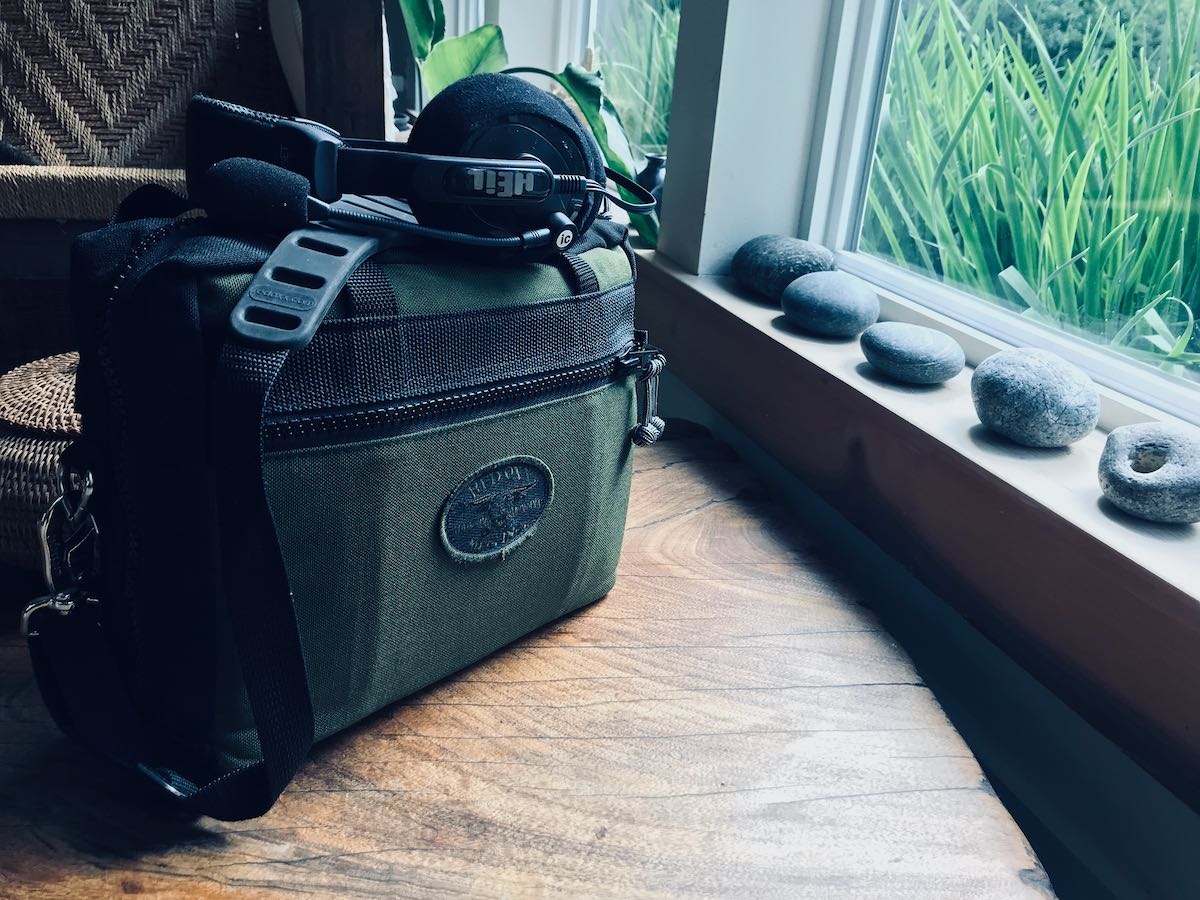
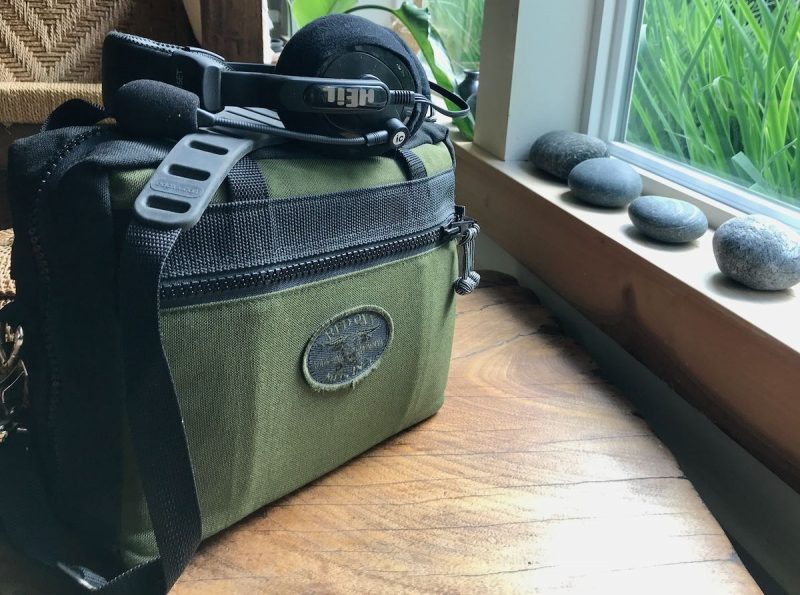
My Red Oxx Micro Manager packed with a full radio field kit
Yesterday, my family packed a picnic lunch and took a drive through Madison County, North Carolina. It was an impromptu trip. Weather was forecast to be pretty miserable that afternoon, but we took the risk because we all wanted to get out of the house for a bit.
Although that morning I had no intention of performing a Parks On The Air (POTA) activation, my family was supportive of fitting in a little radio-activity, so I jumped on the opportunity!
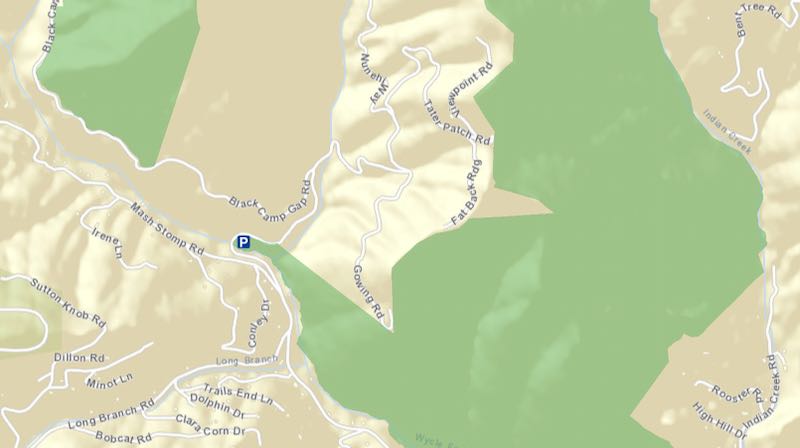
A quick glance at the POTA map and I determined that the Sandy Mush State Game Land (K-6949) was on our travel route. Better yet, the timing worked out to be ideal for a lunch picnic and before most of the rain would move into the area.
Ready for radio adventure
I had no time to prepare, but that didn’t matter because I always have a radio kit packed, fully-charged, and ready for the field.
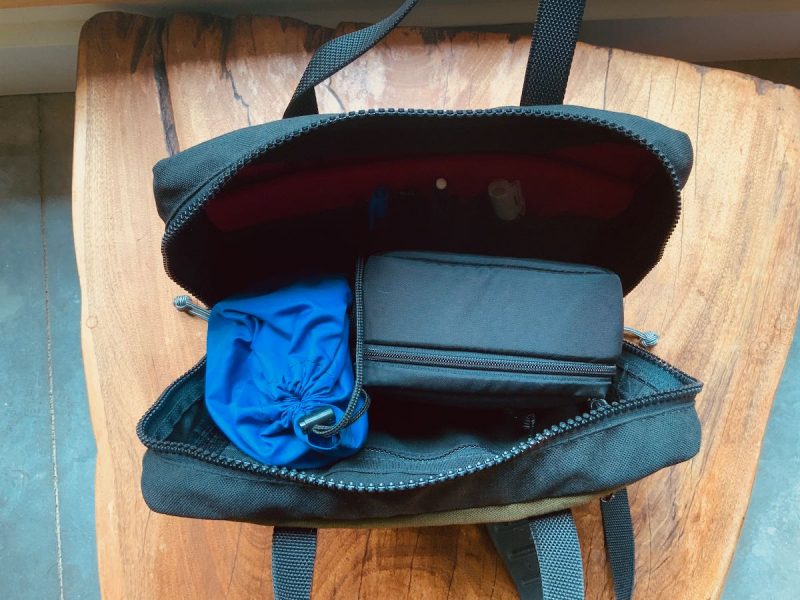
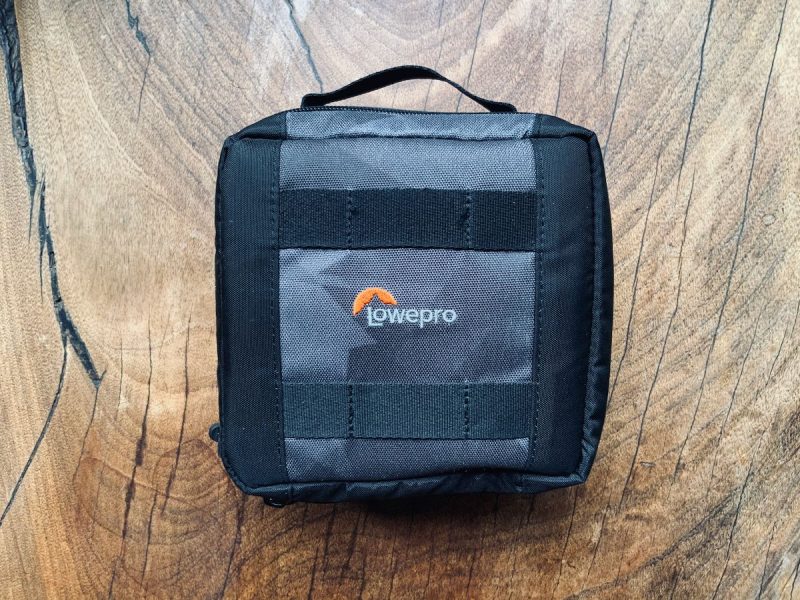
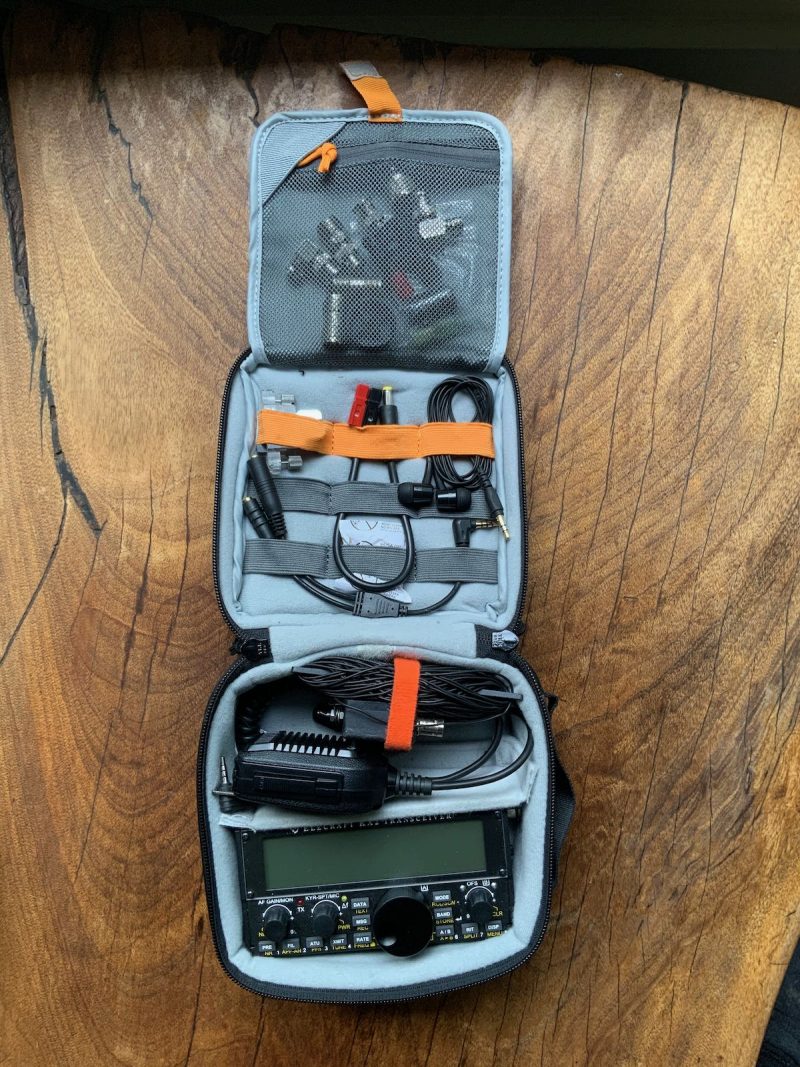
The Micro Manager pack easily accommodates the entire kit
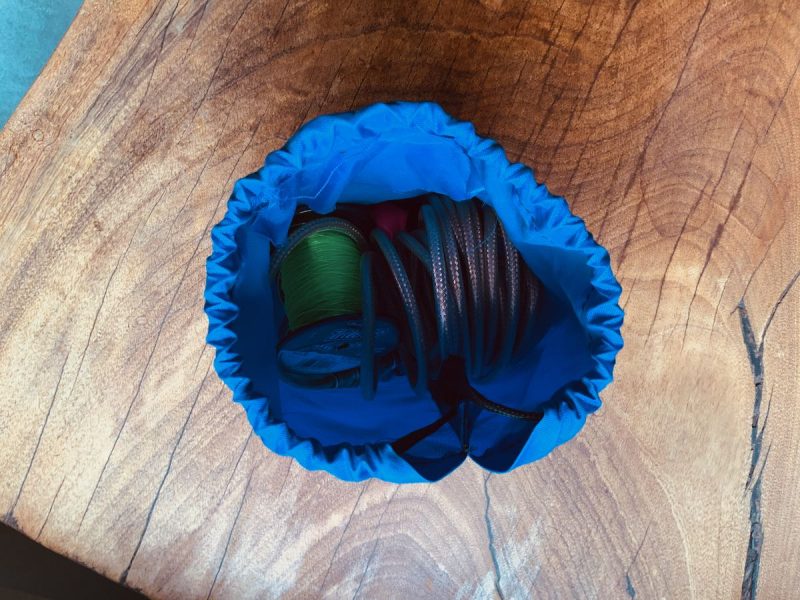
This 20 year old blue stuff sack is dedicated to antenna-hanging. It holds a reel of fishing line and a weight that I use to hang my end-fed antenna in a tree or on my Jackite telescoping fiberglass pole. The sack also accommodates a 10′ coax cable.
The Elecraft KX2 transceiver, EFT Trail-Friendly Antenna, hand mic, CW paddles, C.Crane earphones, and wide variety of connectors and cables all fit in this padded Lowe Pro pack:
The advantage to having a simple, organized radio kit at the ready is that everything inside has its own dedicated space, so there’s no digging or hunting for items when I’m ready to set up and get on the air.
This level of organization also makes it easy to visually inspect the kit–missing items stand out.
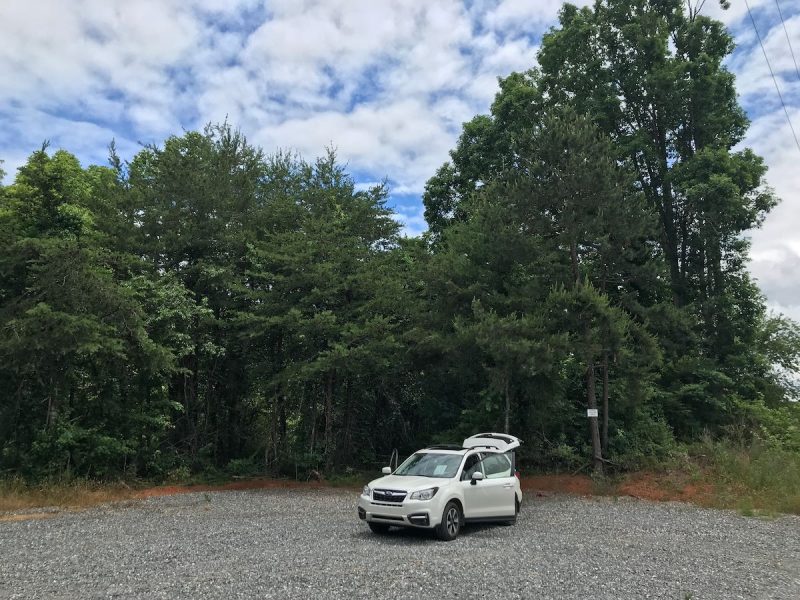
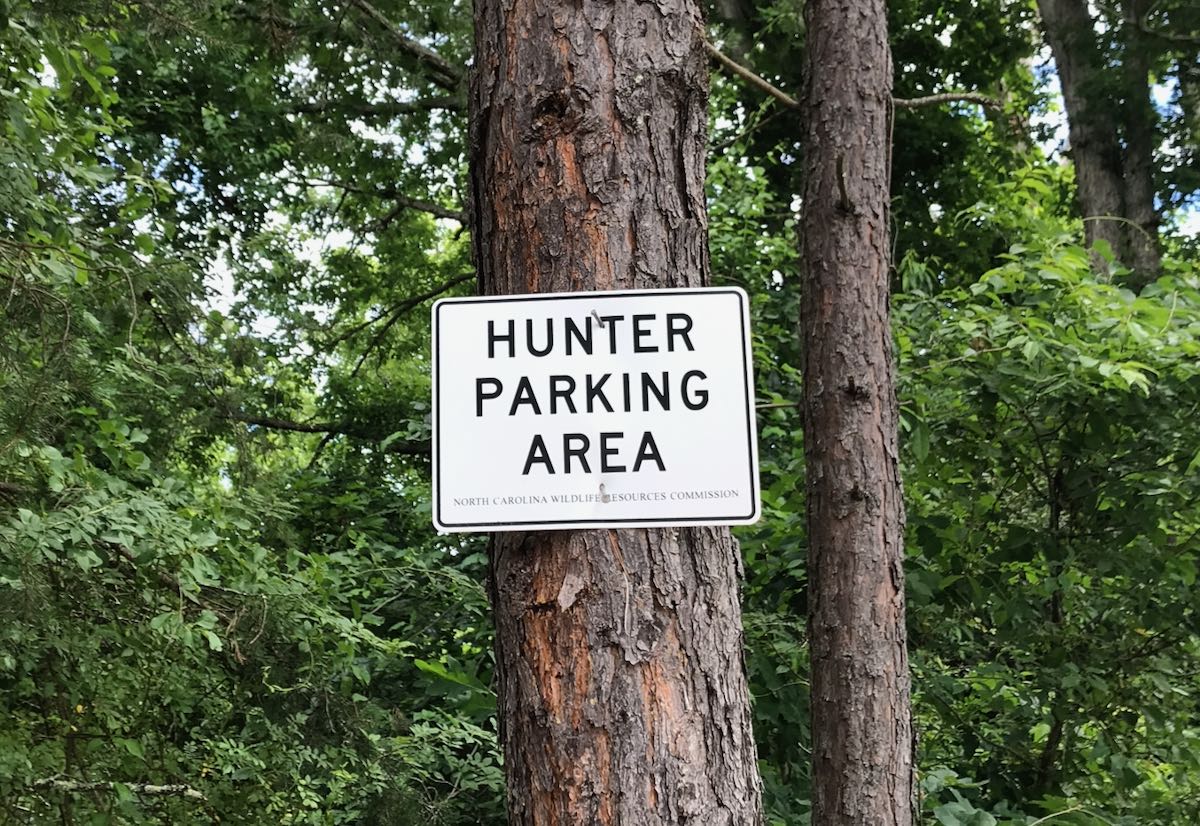
Yesterday I parked our car at one of the Sandy Mush Game Land parking areas, deployed my field antenna, and was on the air in a matter of seven minutes at the most.
Technically, this should read “Activator” parking area! (A questionable inside joke for POTA folks!)
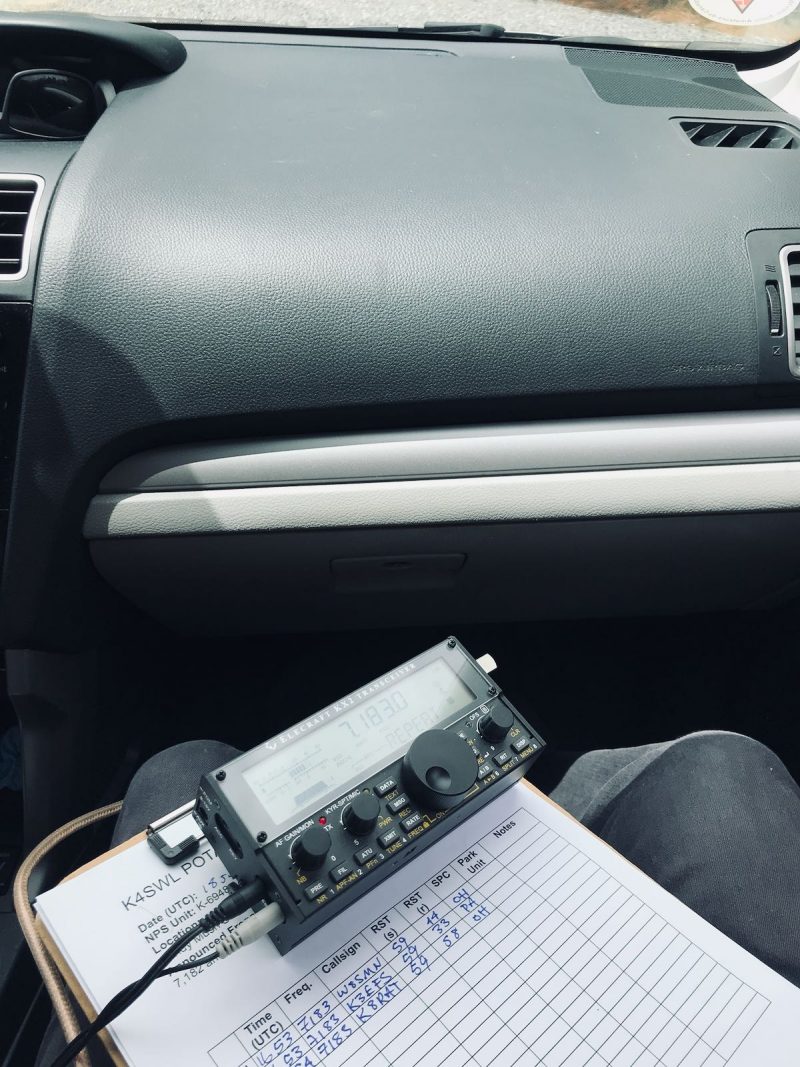
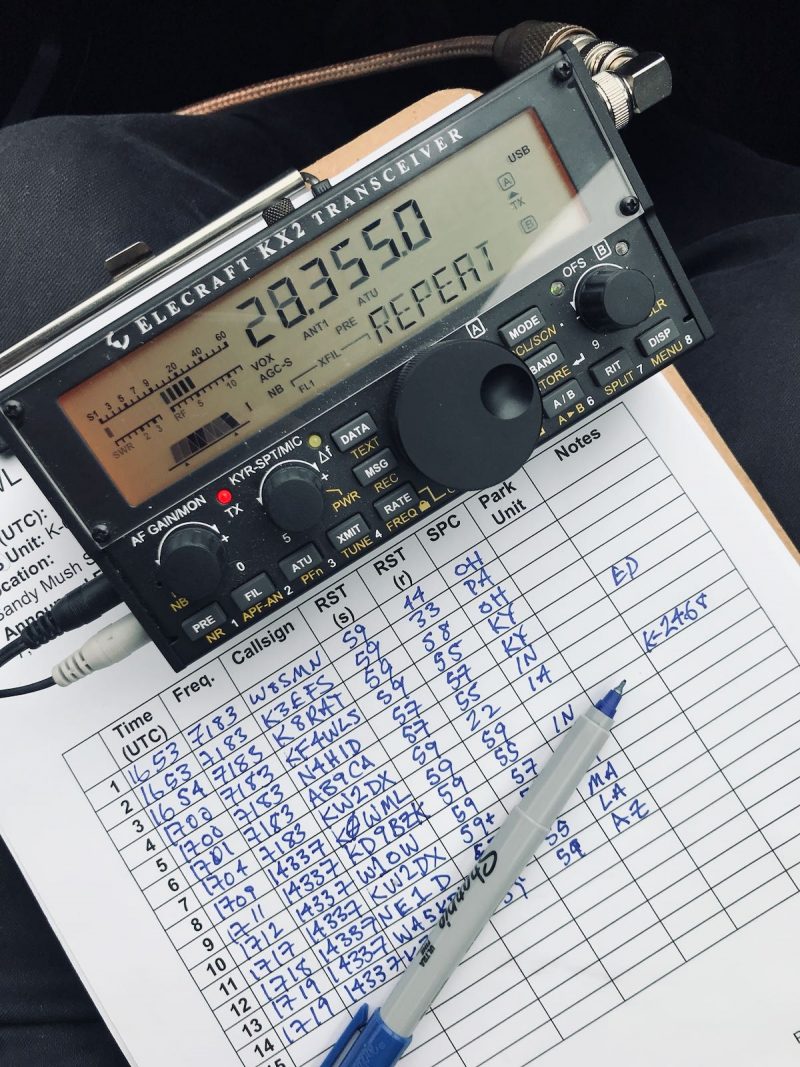
We planned for heavy rain showers, so I fed the antenna line through the back of my car so that I could operate from the passenger seat up front.
I also brought my Heil Proset – K2 Boom Headset which not only produces better transmitted audio than the KX2 hand mic, but it frees up my hands to log stations with ease. This is especially important when operating in the front seat of a car!
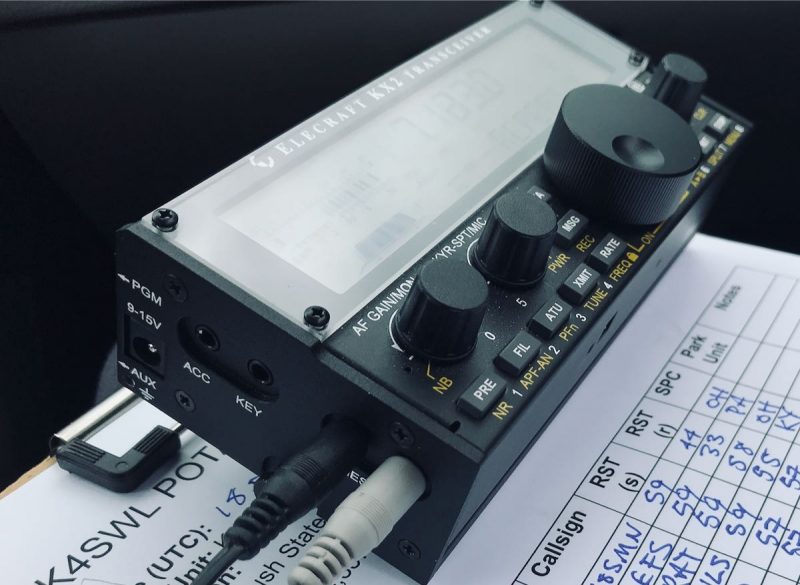
The great thing about the KX2 is that it’s so compact, it can sit on my clipboard as I operate the radio (although typically I have an elastic strap securing it better). Since all of the KX2 controls are top-mounted, it makes operation a breeze even in winter weather while wearing gloves.
Since I routinely use the KX2 for shortwave radio broadcast listening as well, I know I always have a radio “locked and loaded” and ready to hit the air. My 40/20/10 meter band end-fed antenna works well for the broadcast bands, as long as there is no strong local radio interference (RFI). When I’m faced with noisy conditions, I pack a mag loop antenna as well.
What’s in your radio go-kit?
Having a radio kit stocked and ready to go on a moment’s notice gives me a great sense of security, and not just for recreational ham and shortwave radio listening reasons.
Sometimes I travel in remote areas by car where I’m more than an hour away from the nearest town and where there is no mobile phone coverage.
If my car breaks down, I know I can always deploy my radio kit and get help from the ham radio community in a pinch. Herein lies the power of HF radio!
If you haven’t built a radio go-kit, I’d highly recommend doing so. Although I’m a bit of a pack geek, keep in mind that you don’t need to purchase special packs or bags for the job. Use what you already have first.
I’m plotting a detailed post about the anatomy of an HF radio field kit. In the meantime, I’m very curious how many of you in the SWLing Post community also have a radio kit at the ready–one based on a transceiver or receiver. Please comment!
Better yet, feel free to send me details and photos about your kit and I’ll share them here on the Post!
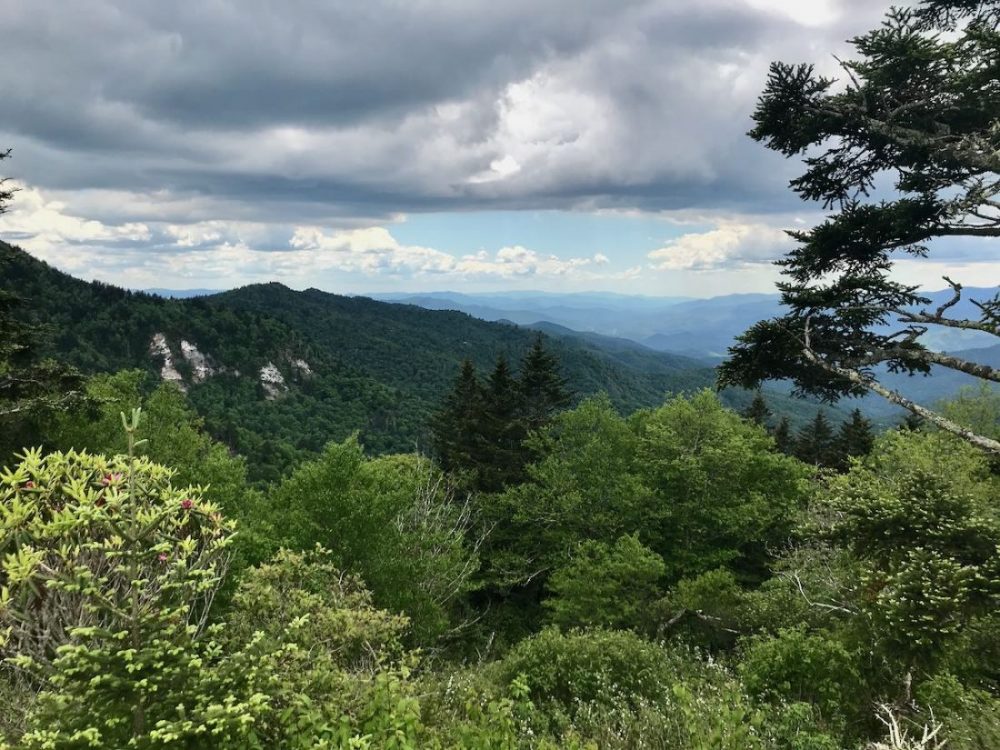
View from Waterrock Knob on the Blue Ridge Parkway (June 13, 2020).
You might have noticed from recent posts, I’ve been on a bit of a POTA (Parks On The Air) kick lately.
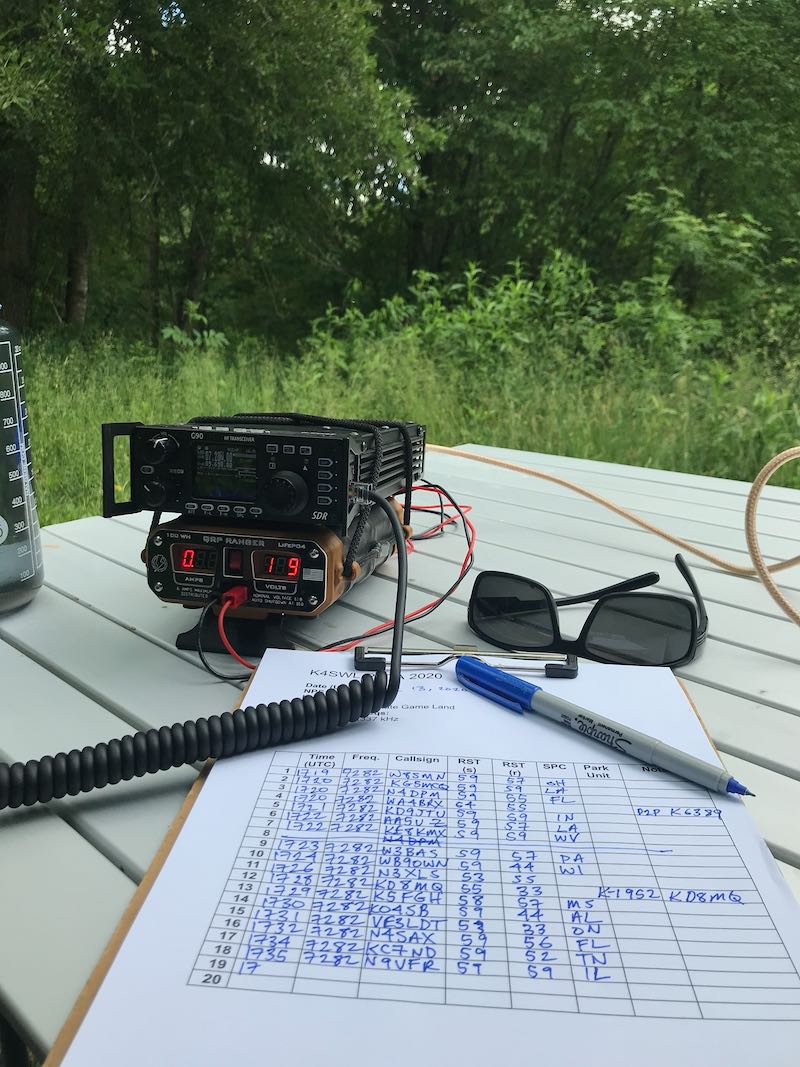
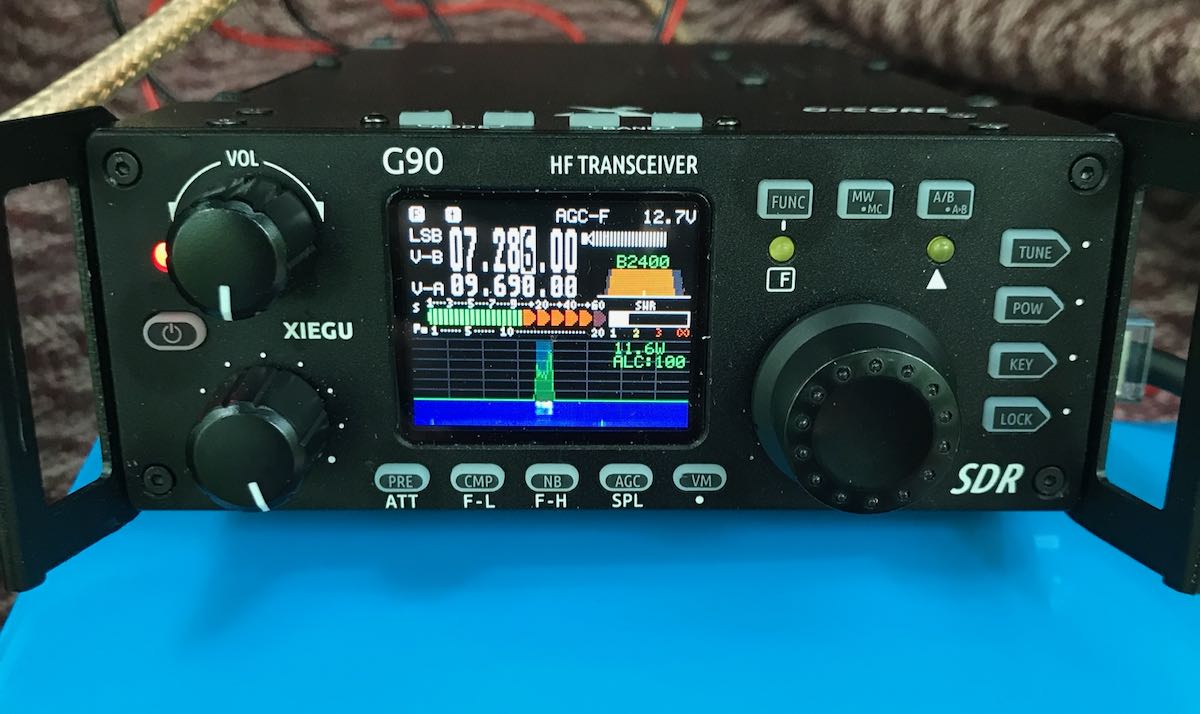
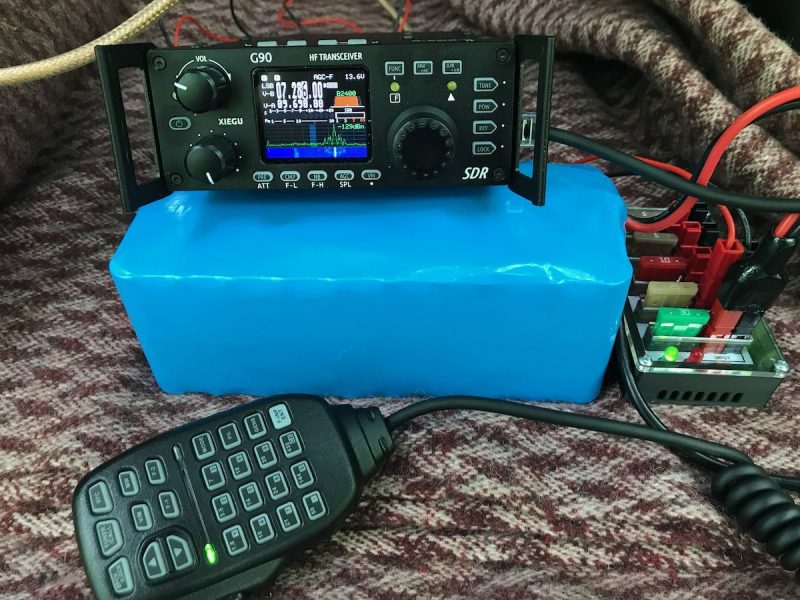
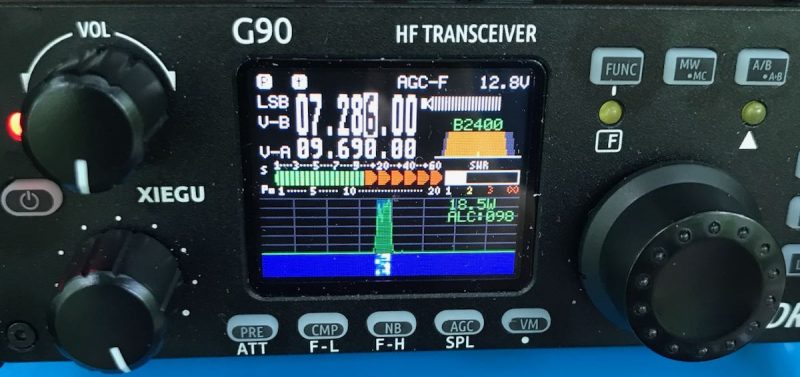
I’ve been enjoying taking the Xiegu G90 to the field and seeing just how well it performs under intensive use on battery power. So far, it has certainly proven itself to be a capable field rig.
Still, on two recent activations I also brought my trusty Elecraft KX2 along as well. Without a doubt, it’s still my number one field rig. It will be difficult for another field transceiver to displace it.
With that said, the G90 is less than half the price of the KX2 (when the KX2 is configured with the optional ATU). The G90 can also pump out a full 20 watts of power–nearly double that of the KX2. I also love the G90’s spectrum display which makes it so easy to find free frequencies and hunt other parks. Its internal antenna tuner–like the KX2’s–can match almost anything very quickly.
Here are a couple of quick reports from my recent activations:
William H Silver State Game Land (K-6967)
Saturday, my family had planned a trip to visit my father-in-law. My wife encouraged me to find a nearby park to activate as there are so many between our house and his. I made it slightly more challenging by deciding to find a park or POTA entity I’d never visited.
Turns out the William H Silver State Game Land was only a 30 minute detour. I had never visited it and, in fact, it was even an ATNO (All Time New One) for Parks On The Air, meaning no one had yet activated it.
I had initially planned 1.5 to 2 hours for the activation, but we were running behind Saturday morning so I had to cut my time at the park to a total of about one hour–which included set-up, operation, and take-down.
We arrived at the site and I immediately deployed my EFT Trail-Friendly end-fed antenna.
My 12 year old daughter (who is studying for her ham radio license and is a great at digging callsigns out of the noise) helped me log contacts. I stuck with very brief exchanges so that I could work as many stations as possible. When activating an ATNO, I always want to give as many POTA “hunters” as possible the best opportunity to put the site in their log books.
I started on the 40 meter band and worked 20 stations in 25 minutes with the Xiegu G90.
I then moved up to the 20 meter band and switched over to the Elecraft KX2.
Turns out, 20 meters was pretty unstable, so I worked very few stations. I did work a station in California with 10 watts and a wire, though, so I’ll still call that a success.
I plan to visit this same site again later this year–it’s very accessible.
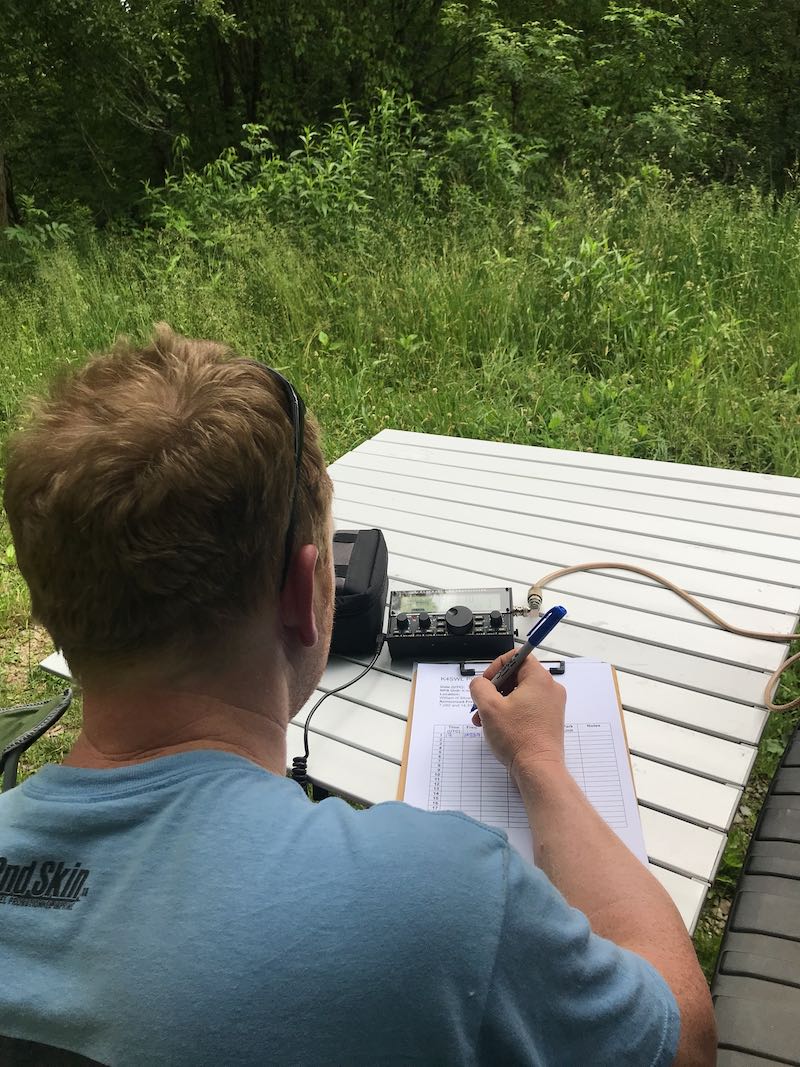
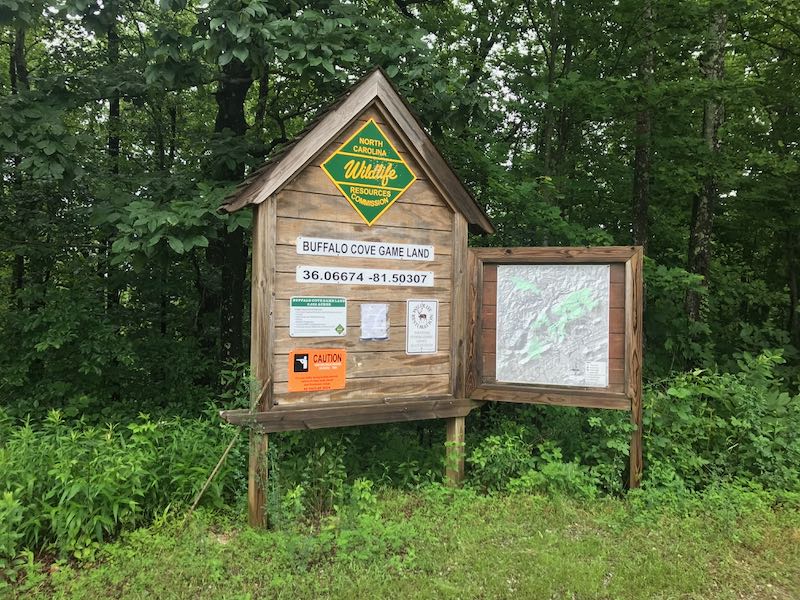
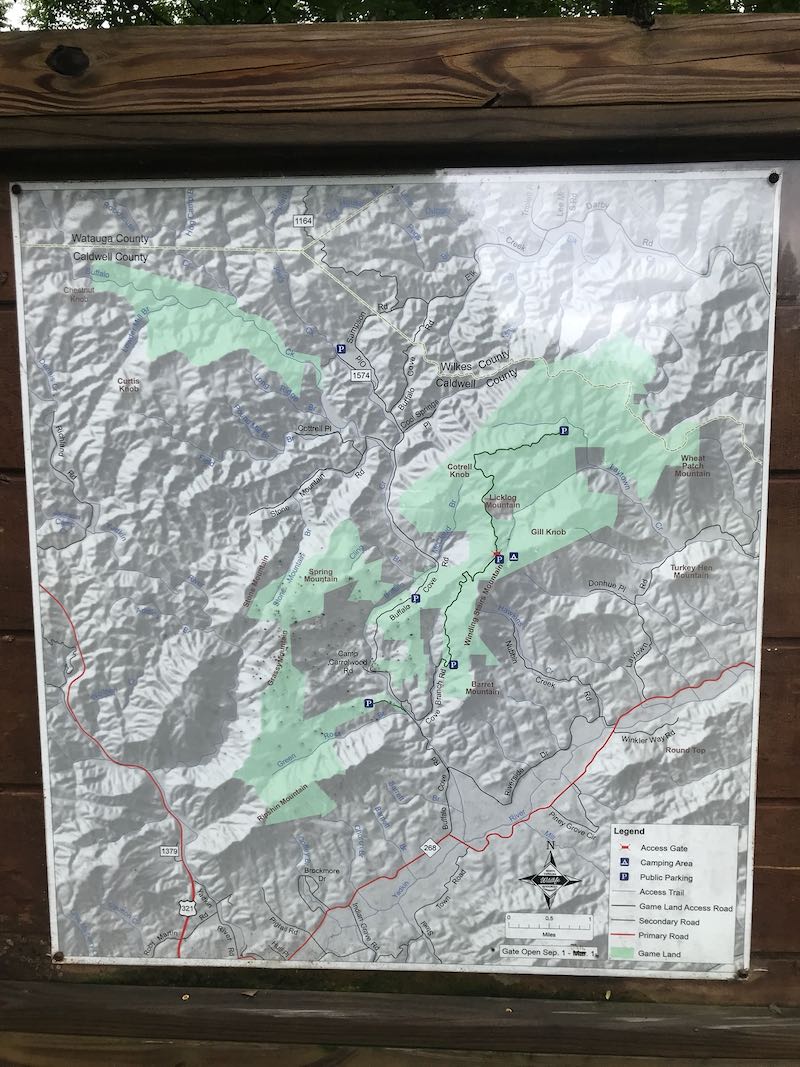
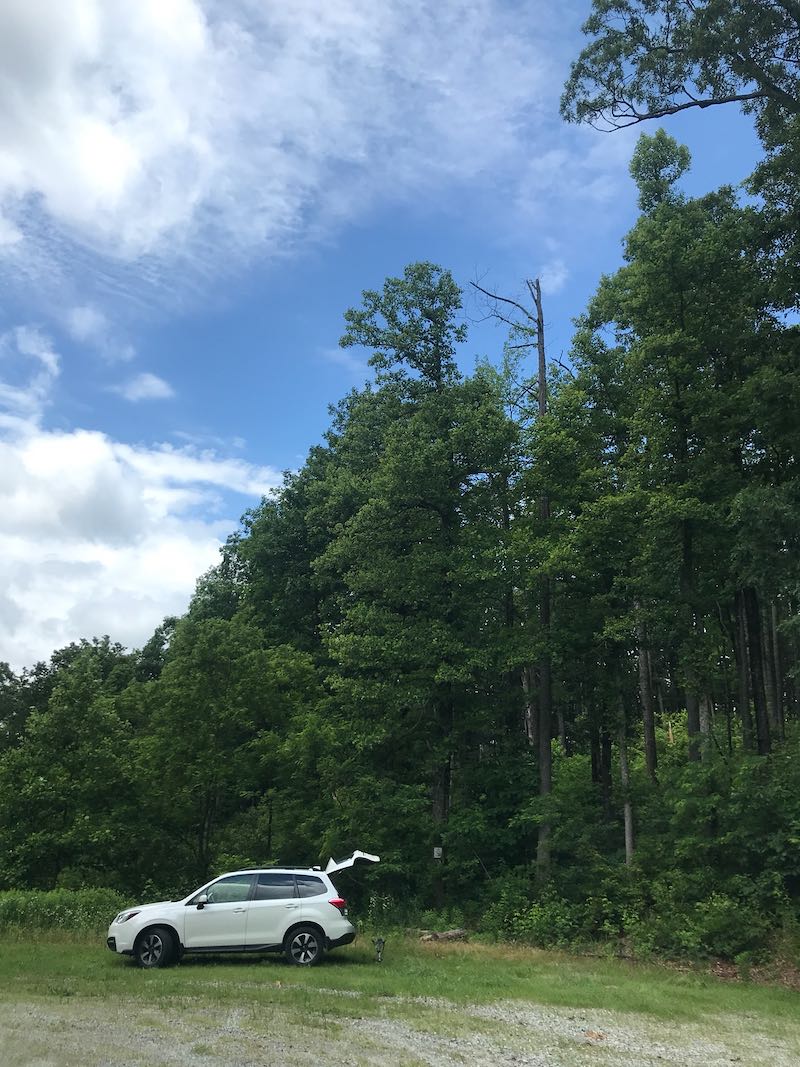
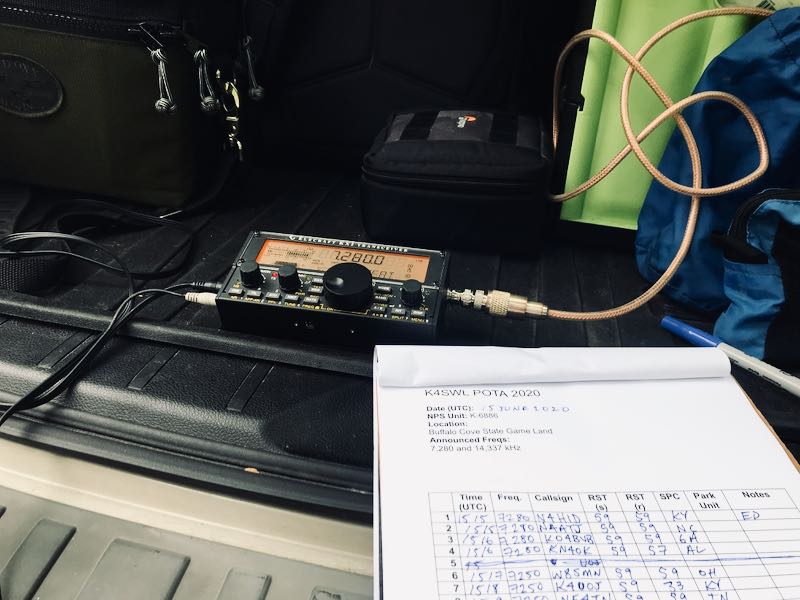
Buffalo Cove State Game Land (K-6886)
Monday morning, even though the weather outlook was dodgy, I scheduled another park activation which, like Saturday’s, was at a state game land which was another ATNO.
I like game lands. Unlike state parks, I don’t have to worry about crowds and I also usually get to take my Subaru or truck off-road. Access roads here in the mountains are typically steep, curvy, and washed-out in places. Finding the site can be very challenging, too. Still, I love adding a little off-road fun to a park activation!
The Buffalo Cove State Game Land is much larger than park K-6967 (above). I drove deep into the lands and found a large parking and camping area for hunters. I had the whole place to myself, so I found the best tree to support my end-fed antenna.
I operated the KX2 exclusively on this activation because I wanted to use its voice keyer and my Heil headset for hands-free VOX operation.
In the course of 90 minutes, I worked 51 stations from the trunk/boot of my car.
Many thanks to my good friend Mike (K8RAT) who made the whole process much smoother by spotting me on the POTA site.
Band conditions were actually pretty rough today, so I was very pleased with the results and intend to return here for a weekend activation later this year as well. This would actually be an ideal location for making low-noise portable SDR recordings while camping overnight.
This weekend, I decided I want to increase my portable field antenna arsenal. More about that in a future post!
Over the past few weeks, I have been building curated lists of ham radio transceivers. It all started when I needed to learn about multimode VHF/UHF transceivers for my EME project. As I got deeper into the process, I decided to make my master list of VHF/UHF multimode transceivers public. The goal with the list was to familiarize myself with the makes/model numbers and have an easy way to check out any used gear deals.
Next, I started a list of QRP general coverage transceivers–something I had been meaning to do for ages because I get so many inquiries about these from readers.
To be clear, by “general coverage” I mean radios that can receive HF and possibly MW broadcast bands in addition to ham radio bands. By “QRP” I mean radios that have output power of about 20 watts or less–some define the term QRP more strictly, but since our list has less to do with the transmitting function, I’m a little more flexible.
I like QRP general coverage transceivers because they’re often portable, have modest power requirements, and some offer superb sensitivity and selectivity for broadcast listening.
Please comment if you note a missing transceiver. I’m certain I’ve left some out. I’d appreciate model numbers and links if possible. If you’ve ever owned one, please consider sharing your thoughts on its performance from the point of view of an SWL as well.
I’ve already started working on a list including all general coverage transceivers. It’s massive so it could be a while before it’s published! I’ll certainly ask for your input then as well.
Yesterday, I was in my hometown helping my parents with a few projects. Around noon, I realized that I had a good four hour window of free time–a true rarity these days!
I had two fully-packed go bags in the car: one with my trusty Elecraft KX2, and one with my recently acquired Xiegu G90. On the heels of a successful POTA activation this weekend, I was itching to activate a new POTA site.
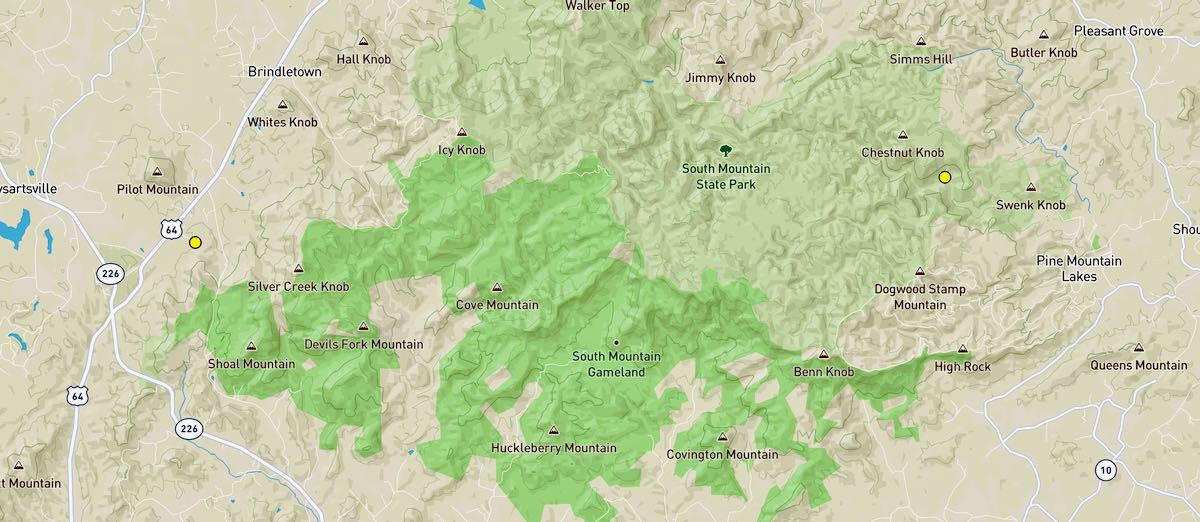
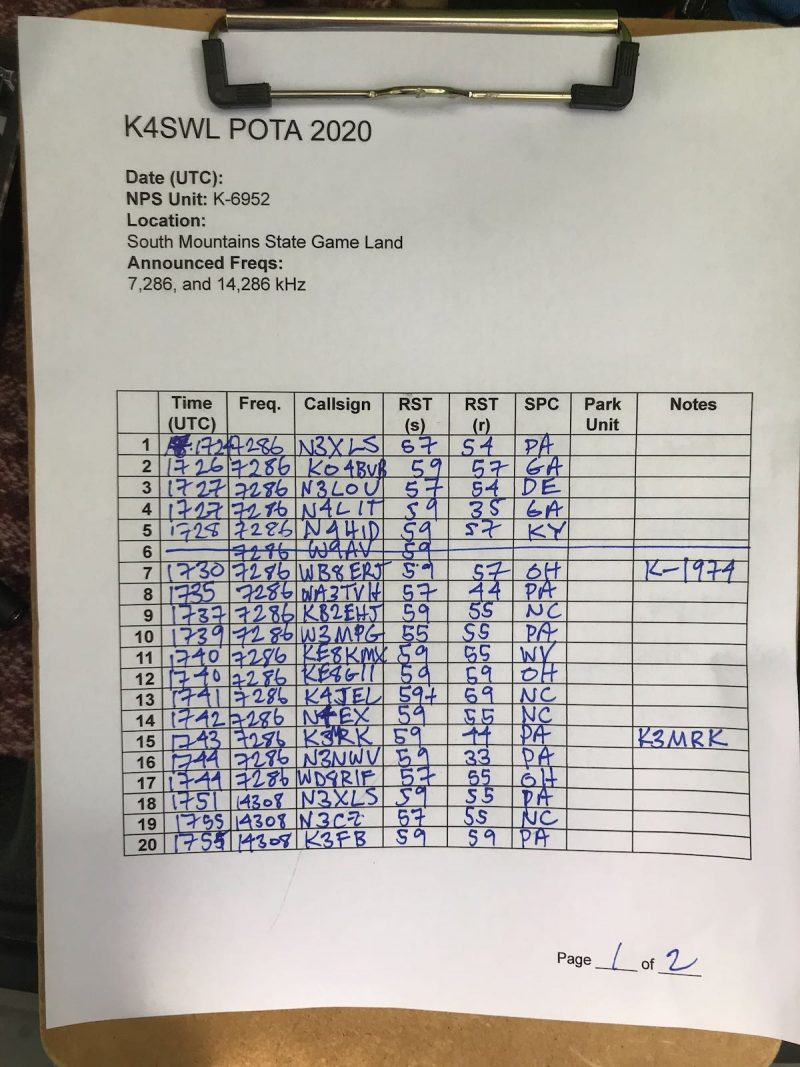
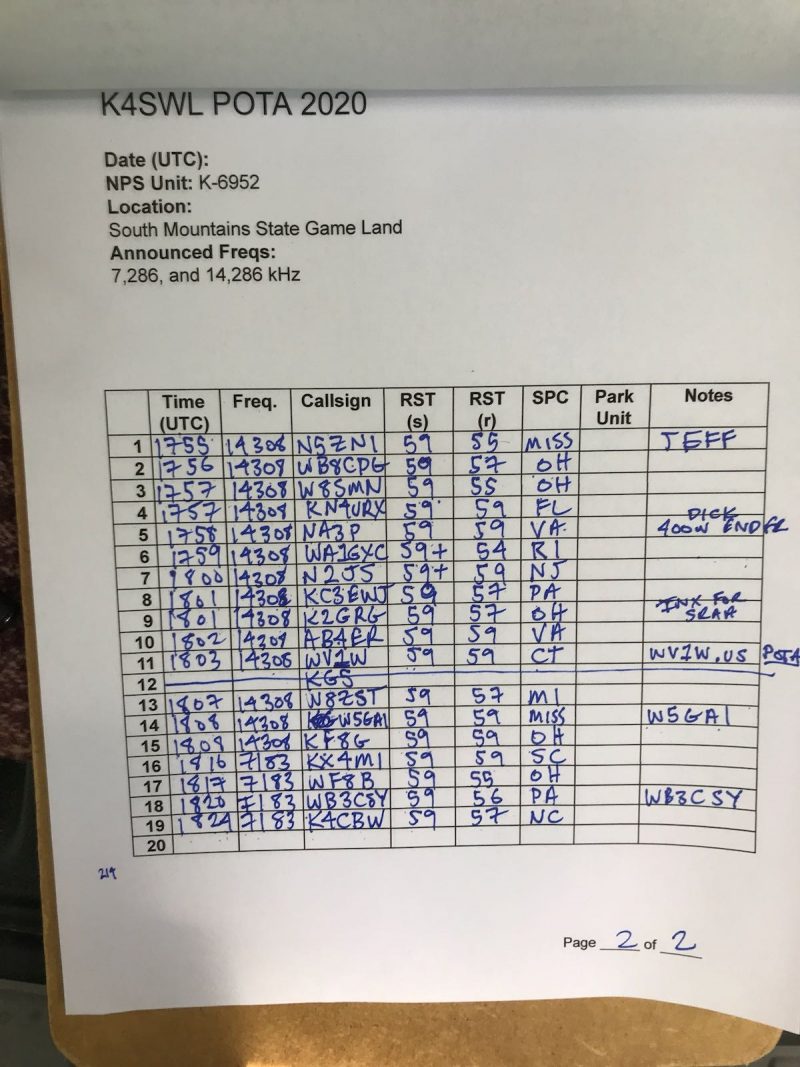
I did a quick check of the POTA site map and decided a trip to the South Mountains State Park (K-2753) was in order. The park was a nice 30 minute drive on back roads, so why not?
I posted a quick announcement on the POTA website, and jumped in the car.
When I arrived at the park, I noted an excellent, easily accessible picnic site with a nearby tree to hang my EFT Trail-Friendly antenna. Since I hadn’t been to this park in many years, I continued driving to check out other potential POTA sites.
In the main parking lot, I spotted a ham radio operator’s car with a prominent callsign on the back window and a POTA bumper sticker. I couldn’t see their operating site from the parking lot and since we’re all trying to social distance these days, I didn’t bother searching for them to introduce myself.
While it’s certainly allowed to have two activators running a park at the same time, I really didn’t want to impose and certainly didn’t want to cause any QRM by operating on the same meter band.
Contingency plan
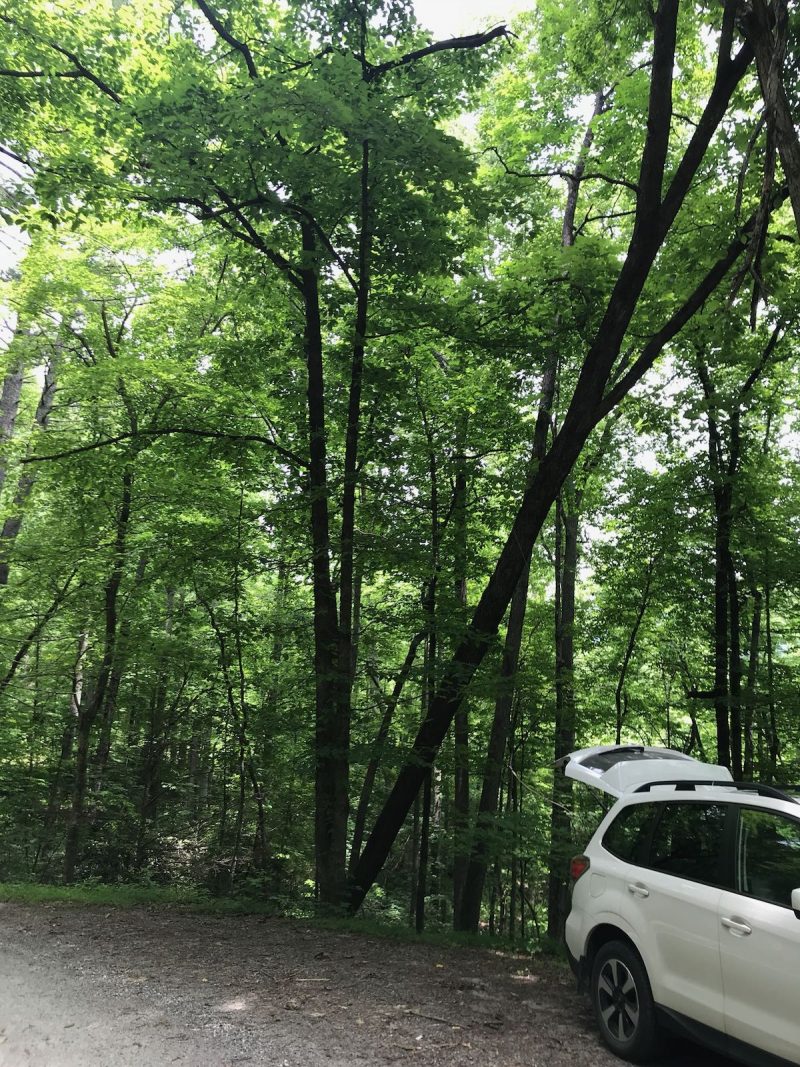
I had a “Plan B” in mind in case the park wasn’t accessible. On the west side of South Mountains State Park there was another POTA site: the South Mountains State Game Land (K-6952). I started driving in that direction, then used Google Maps to help me locate the entry road. Turns out, it was an additional 35 minutes of driving! Still, it was a beautiful day so no complaints from me.
The road was typical of game land roads: gravel and washed out in places. I had to ford one creek. My Subaru had no problem doing this, of course. (I actually love off-roading, so secretly I hoped the road would be more challenging!)
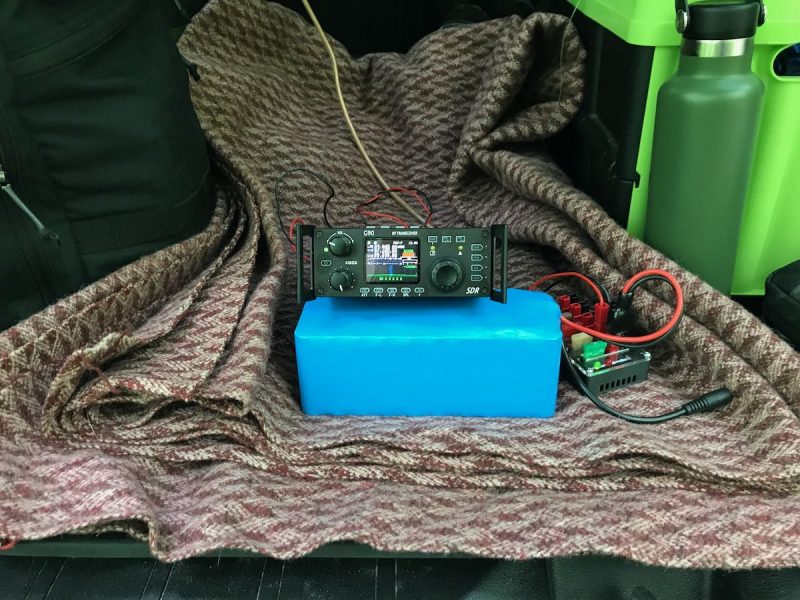
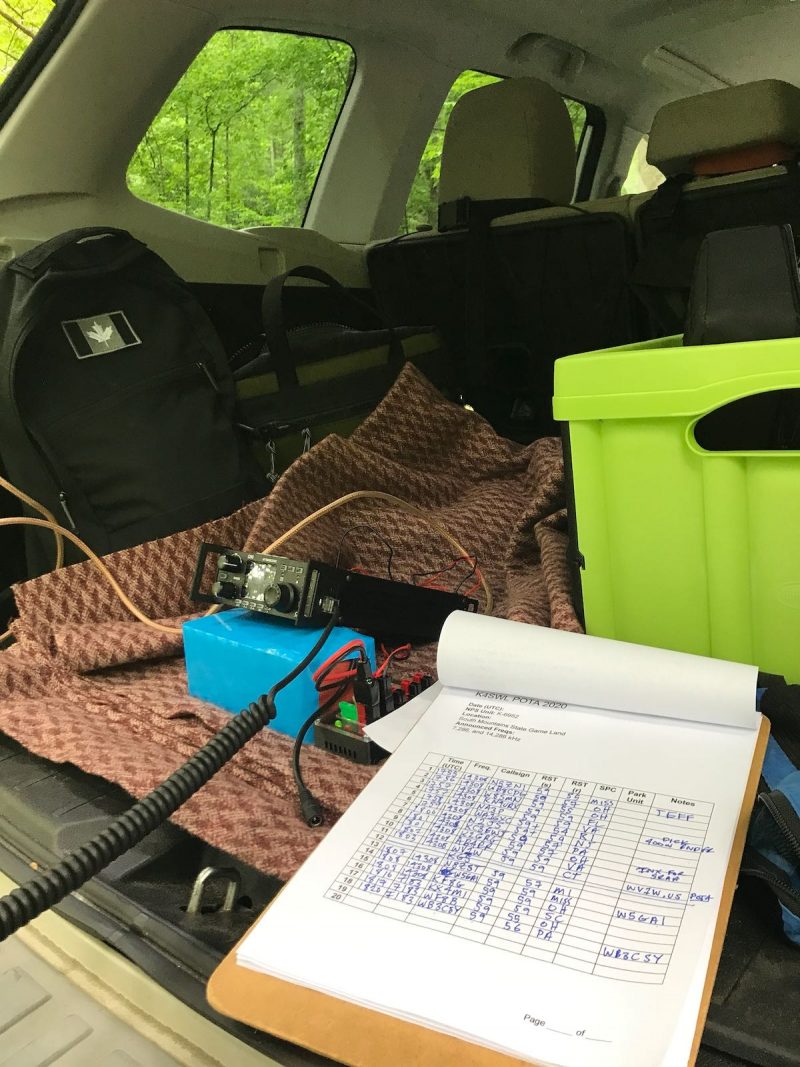
About four miles in, I found a pull-off that was big enough for my car and had an ideal tree to hang the antenna. I backed into the site, opened the hatch on the Subaru, and used the trunk/boot as my radio table.
Within ten minutes I had the G90 on the air.
I started calling CQ on the 40 meter band and thanks to buddies Mike (K8RAT) and Vlado (N3CZ) I was spotted on the POTA website.
Although there was a fair amount of QRN on 40 meters, now that the G90 has an RF Gain control (with latest firmware v 1.74), I could easily mitigate it.
I worked a number of stations on 40, then decided to move up to 20 meters.
I was very impressed with the response on 20 meters as well. Fading (QSB) was very deep, however, so I kept contacts brief. At times, stations would call me, I’d give them a 59 report, and when they’d reply I could barely hear them (and vise-versa). It took a little patience and good timing, but I believe I worked everyone who called me.
In the end, I had a total of 27 contact in the log with about one hour of operating. Here are my log sheets:
After transmitting steadily for an hour at a full 20 watts, the G90 body was pretty warm to the touch, but it had operated flawlessly.
A great field radio
The G90 is a gem of a transceiver and has some features that make it ideal for field use.
For one thing, I love being able to keep track of my battery voltage on the display:
Also, the G90 has excellent selectivity. On both 40 and 20 meters, at times I could see adjacent stations on the spectrum display that would have bled over and created QRM on less robust receivers.
I also like the ability to control all of the major transceiver functions without having to dive into an embedded menu. Adjusting the filter, RF gain, attenuator, and pre-amp, for example, is super easy.
I love the spectrum display, too. In the field, it’s nice to be able to find an open frequency by simply watching the display for a minute or so before calling QRL or CQ. It also allows me to see when folks are tuning up nearby to make contact with me.
Although I’ve been using a resonant antenna in the field, the G90 has a very capable built-in ATU. Back home, I’ve used it and have been very impressed with its ability to find good matches. Yesterday, for fun, I was even able to get it to tune up the EFT Trail Friendly antenna on 80 meters! I doubt it would be efficient, but the ATU did find a 2:1 match.
The only two features I feel like the G90 is missing are a notch filter (both manual and auto) and a voice keyer. I’m sure a notch filter could be added in a future firmware update (others have been asking for this as well), but I doubt a voice keyer could be added as easily. In truth, the voice keyer is a bit of a luxury, but it’s a feature I use without fail on my KX2 since park and summit activations often require constant CQ calls. Being able to record a CQ and have the radio automatically send it allows the op to drink water, eat lunch, and relax between contacts.
I had planned to sell the Xiegu G90 after my upcoming review in The Spectrum Monitor. I must admit: this transceiver is growing on me. It might be hard to let go of it.