Shortwave listening and everything radio including reviews, broadcasting, ham radio, field operation, DXing, maker kits, travel, emergency gear, events, and more
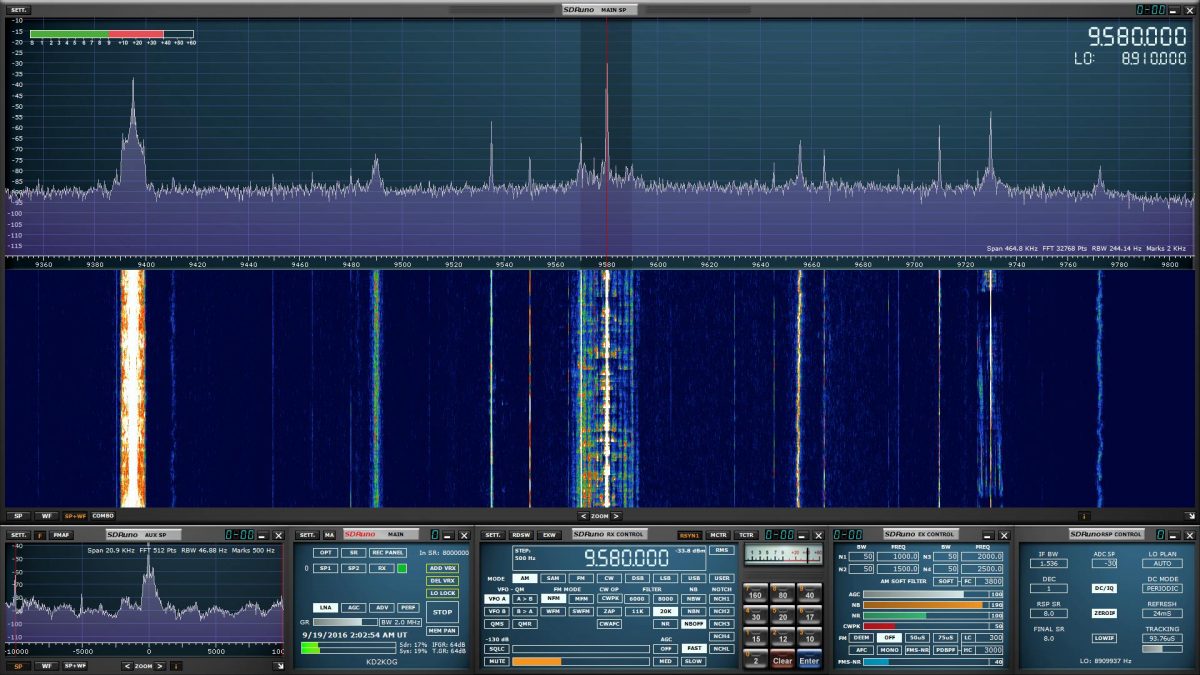
Today, we released version 1.1 of SDRuno, specifically for RSP. New features include a calibrated power measurement facility, an SNR meter and automatic S-meter calibration. There are many additional improvements and fixes. To find out more about all the additional features, documentation can be found on:
Paul Jones and Mike Ladd have worked tirelessly to get the new features documented in an updated version of the SDRuno Cookbook: http://www.nn4f.com/SDRuno-cookbook.pdf
Other SDRs can also use SDRuno with a new increased bandwidth limit of 2.5MHz.
Many thanks to Jon Hudson at SDRplay for sharing this info!
Many thanks to SWLing Post reader, Paul, who writes:
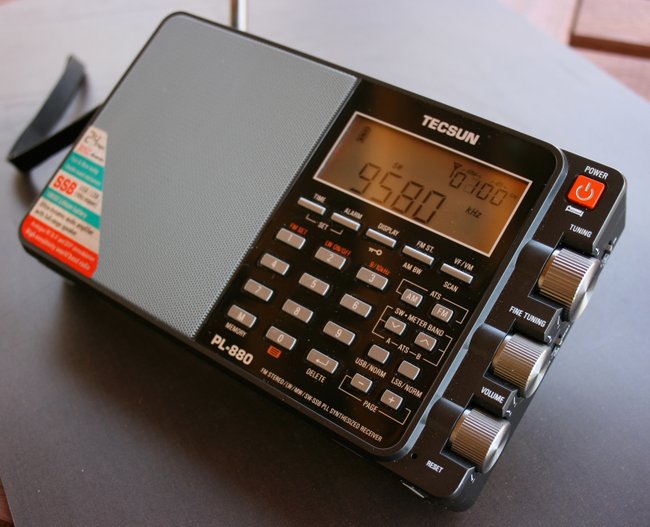
While putzing around with my new Tecsun PL-880 that I got while browsing at Universal Radio’s store in Columbus OH, I found what appears to be an adjustable noise reduction function.
Firmware level: 8820
Mfg date: probably August 2016 (201608 from the serial number inside the tilt stand)
Here are the steps to check it out;
When in a shortwave band, press “4” until either “ON” or “OFF” appears in the display.
If it displays “OFF”, press 4 briefly to clear, then long press again until “ON” appears.
Then, long press “9” until a two digit number appears.
Use either tuning knob to increase or decrease the number.
The number appears to correspond with the DbM threshold of the received signal.
Perhaps someone can play with the feature and elaborate on its function.
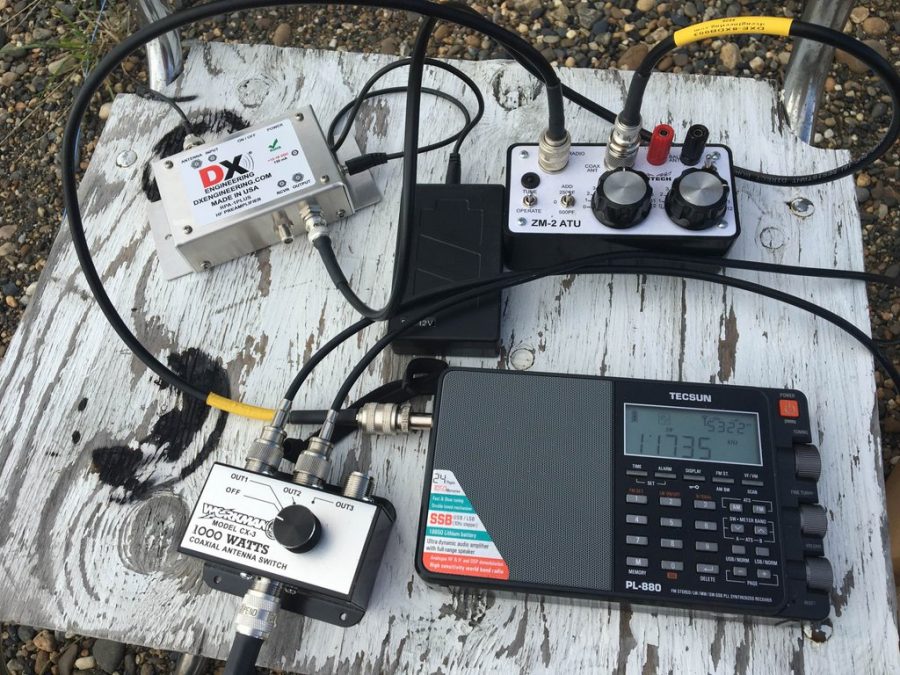
Not the strongest I ever hear them, but a good solid clean nearly noise and nearly fade free signal.
That’s an impressive signal, Paul, especially considering the fact that propagation conditions have been somewhat shaky as of late. Thanks for sharing!
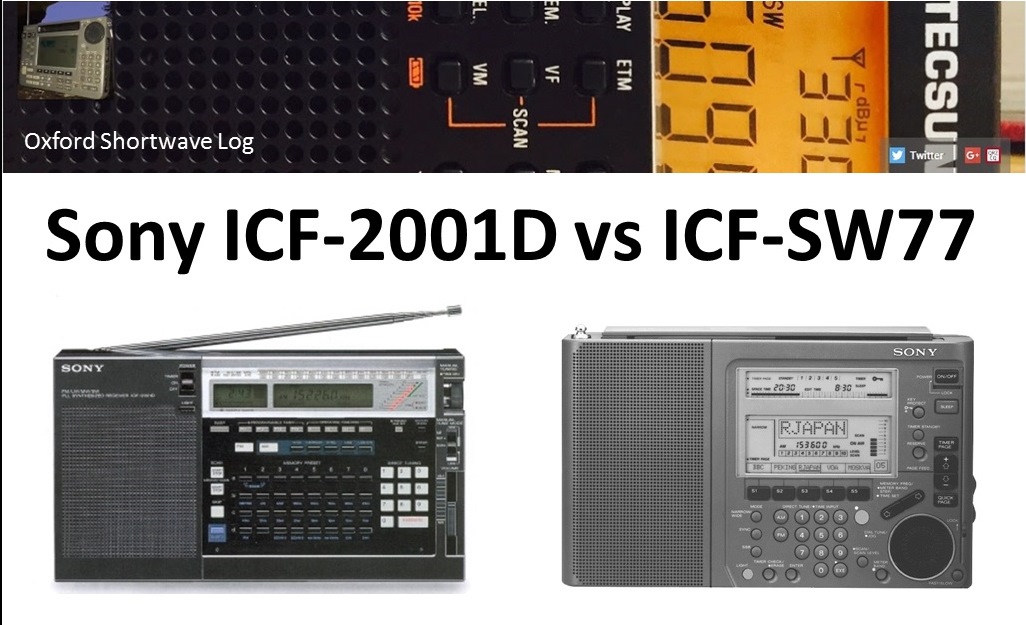
Hi there, subscribers to my YouTube channel Oxford Shortwave Log will be aware that I currently operate both of these wonderful vintage portables. I purchased the ICF-2001D only 18 months ago from eBay, based largely on its reputation as one of the best performing portables ever made. Previously I had been using my excellent ICF-SW55 as the mainstay receiver for my numerous DXpeditions, coupled with irregular appearances from my Sangean ATS-803A and the excellent value-for-money Tecsun PL-360. The ICF-2001D proved to be a revelation in terms of sensitivity, selectivity and contrary to popular belief, with careful planning (to avoid crowded bands), is able to cope pretty well with very large antennas. As regards audio bandwidth filtering, SSB and synchronous detection, in my experience, the ICF-2001D is as good as it gets in a portable – or a vintage portable at least. I have lost count of the number of personal-firsts I’ve achieved using this wonderful receiver and as someone who likes to push the envelope a little, I soon started to wonder whether it’s replacement, the ICF-SW77 might prove to be an even better performer. Subsequent online research confirmed there was no absolute consensus on this issue, with followers of these two great receivers firmly placed in both camps.
Sometime later, a good friend of mine, fellow radio hobbyist and subscriber to Oxford Shortwave Log very kindly offered to send me his cherished ICF-SW77 on long-term loan. Like me, he was intrigued to know how it compared to it’s venerable predecessor and thus the deal was done! Upon it’s arrival in July, I started planning a back-to-back series of comparison tests at the very quiet wood in Oxfordshire I used for my DX’peditions, using the same antenna for both recievers – the excellent Wellbrook ALA1530 active loop. In total, I made fourteen reception videos comparing the ICF-2001D and ICF-SW77 and posted them to Oxford Shortwave Log. Both receivers performed very well, delivering excellent reception on the Tropical Band and elsewhere on the shortwave spectrum from Bolivia, Brazil, Guatemala, amongst others. At the halfway stage, I generated a video to summarise the results to-date and this will follow in my next post to swling.com. In the meantime, I hope you enjoy the first half of the reception videos; which follow below:
Clint Gouveia is the author of this post and a regular contributor to the SWLing Post. Clint actively publishes videos of his shortwave radio excursions on his YouTube channel: Oxford Shortwave Log. Clint is based in Oxfordshire, England.
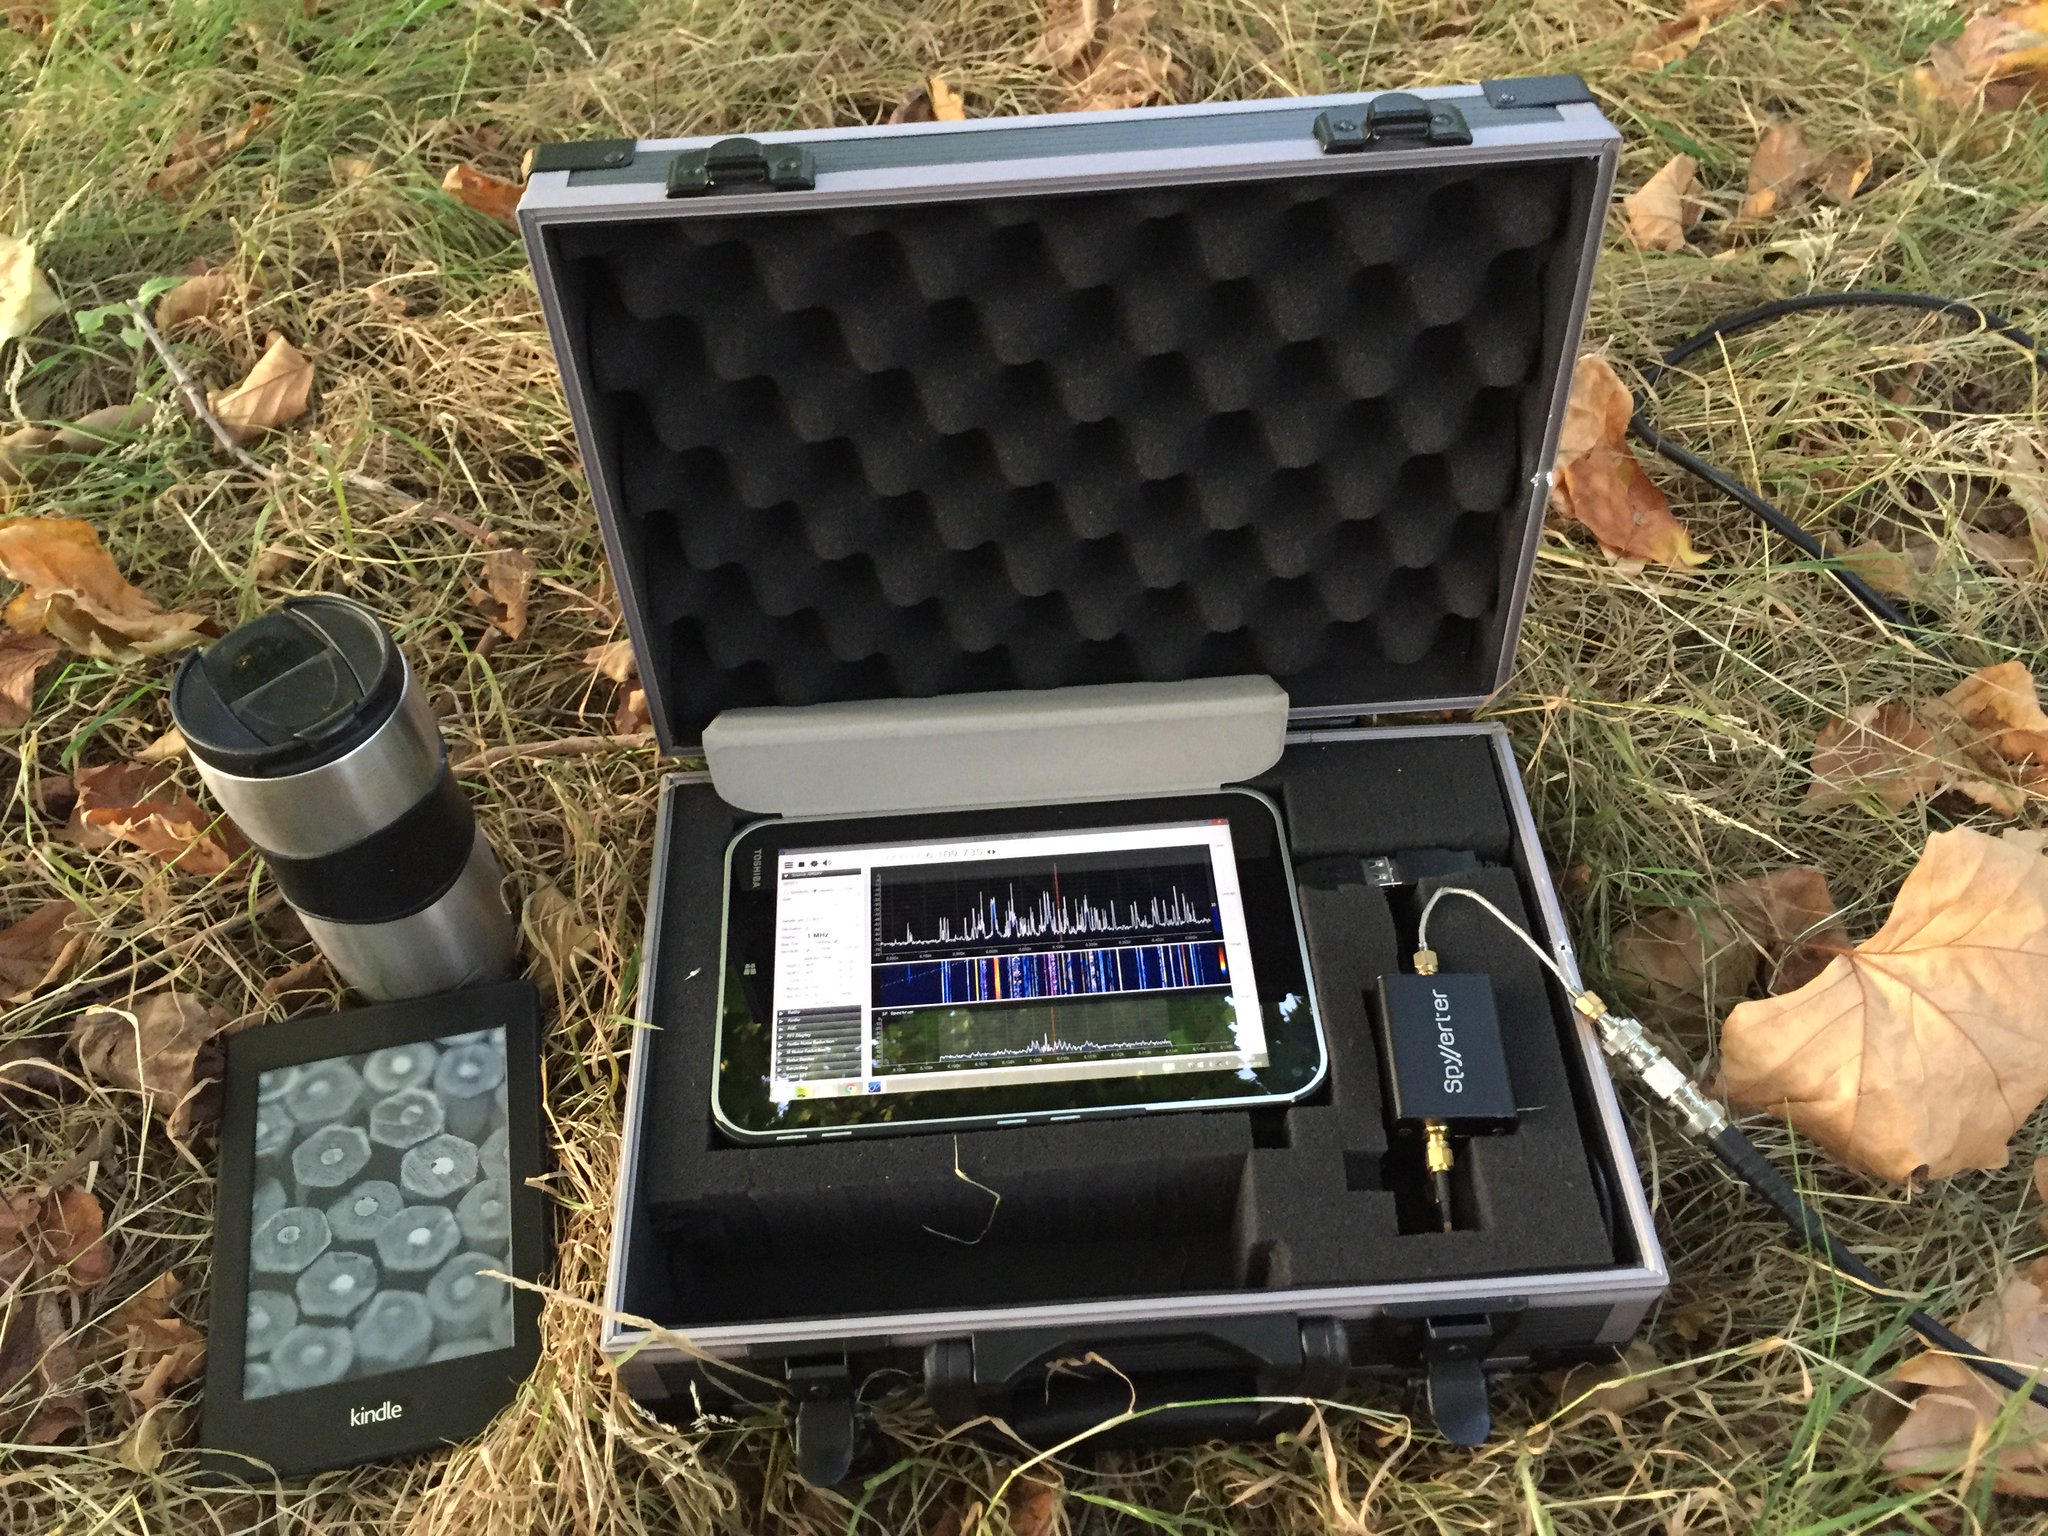
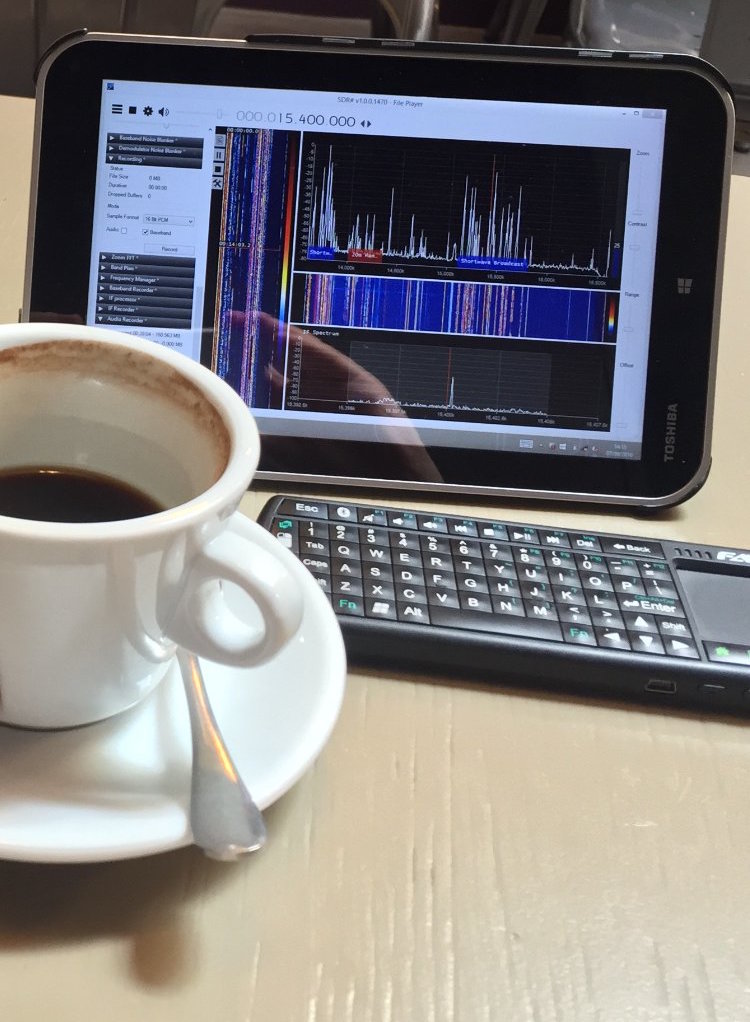
Capturing the shortwave spectrum out in the field.
Radio interference is a major problem in big cities when it comes to indoor shortwave reception. One effective solution I have found is to head for the local park and engage in scanning the bands there. However, since my time for making such outdoor trips is limited, I would always feel like I am missing out on a lot of radio action by monitoring a single frequency, which is all you can do with a standard shortwave radio. There are so many signals out there — which one should I go for? This inspired me to put together a lightweight, portable set-up that would let me capture large chunks of the shortwave radio spectrum out in the field, which I could later explore in detail. After two years of experimenting with various Software Defined Radio (SDR) technologies I am pleased to report that I finally have a solution that works well for this purpose.
A good SDR can give the user access to large portions of the radio spectrum via a graphical user interface. The user can then either process a specified part of it in realtime or record the chosen spectrum window in its entirety onto disk and analyse it later with the supplied software. Here is a short video showing the playback of one of such spectrum captures I made in a London park in September 2016. Note the final part where I zoom out to show the entire recorded frequency range (covering two broadcast bands with one ham band in the middle!):
When I got home from the park, I was able to replay that part of the spectrum capture many times over while scanning the frequency space, which is how I was able to identify a weak signal from a very distant ham radio operator that I might have otherwise missed.
Below is the list of the components I have used to put together my “portable spectrum capture lab”.
I bought this tablet in July 2014, based on the following criteria: the device had to have a reasonably powerful Intel processor, running the Windows 8 operating system. I believe that there are currently models on the market that are at least as powerful and are substantially cheaper (<$100).
Owing to its unique hardware design, the AirSpy SDR can monitor large parts of the radio spectrum (up to 10 MHz in bandwidth) while offering a high dynamic range and robustness to overloading, with almost no mixing/imaging products.
This additional device enables AirSpy to cover the shortwave bands (in fact, the entire frequency range between 0 khz and 30 MHz) and must be connected in-line between the AirSpy’s front end and the antenna feed line, as follows:
Connection cables
Below is a small collection of cable accessories to connect the antenna to AirSpy/SpyVerter:
I use a three-terminal matched balun connected two 6 metre copper wires via its antenna terminals as a dipole antenna, and connect it to the SDR via the feed line terminal with the 3m BNC cable listed above. The balun (Wellbrook UMB130) is engineered in a way that prevents the radio noise current from the tablet (usually a significant source of interference) flowing into the receiving part of the antenna.
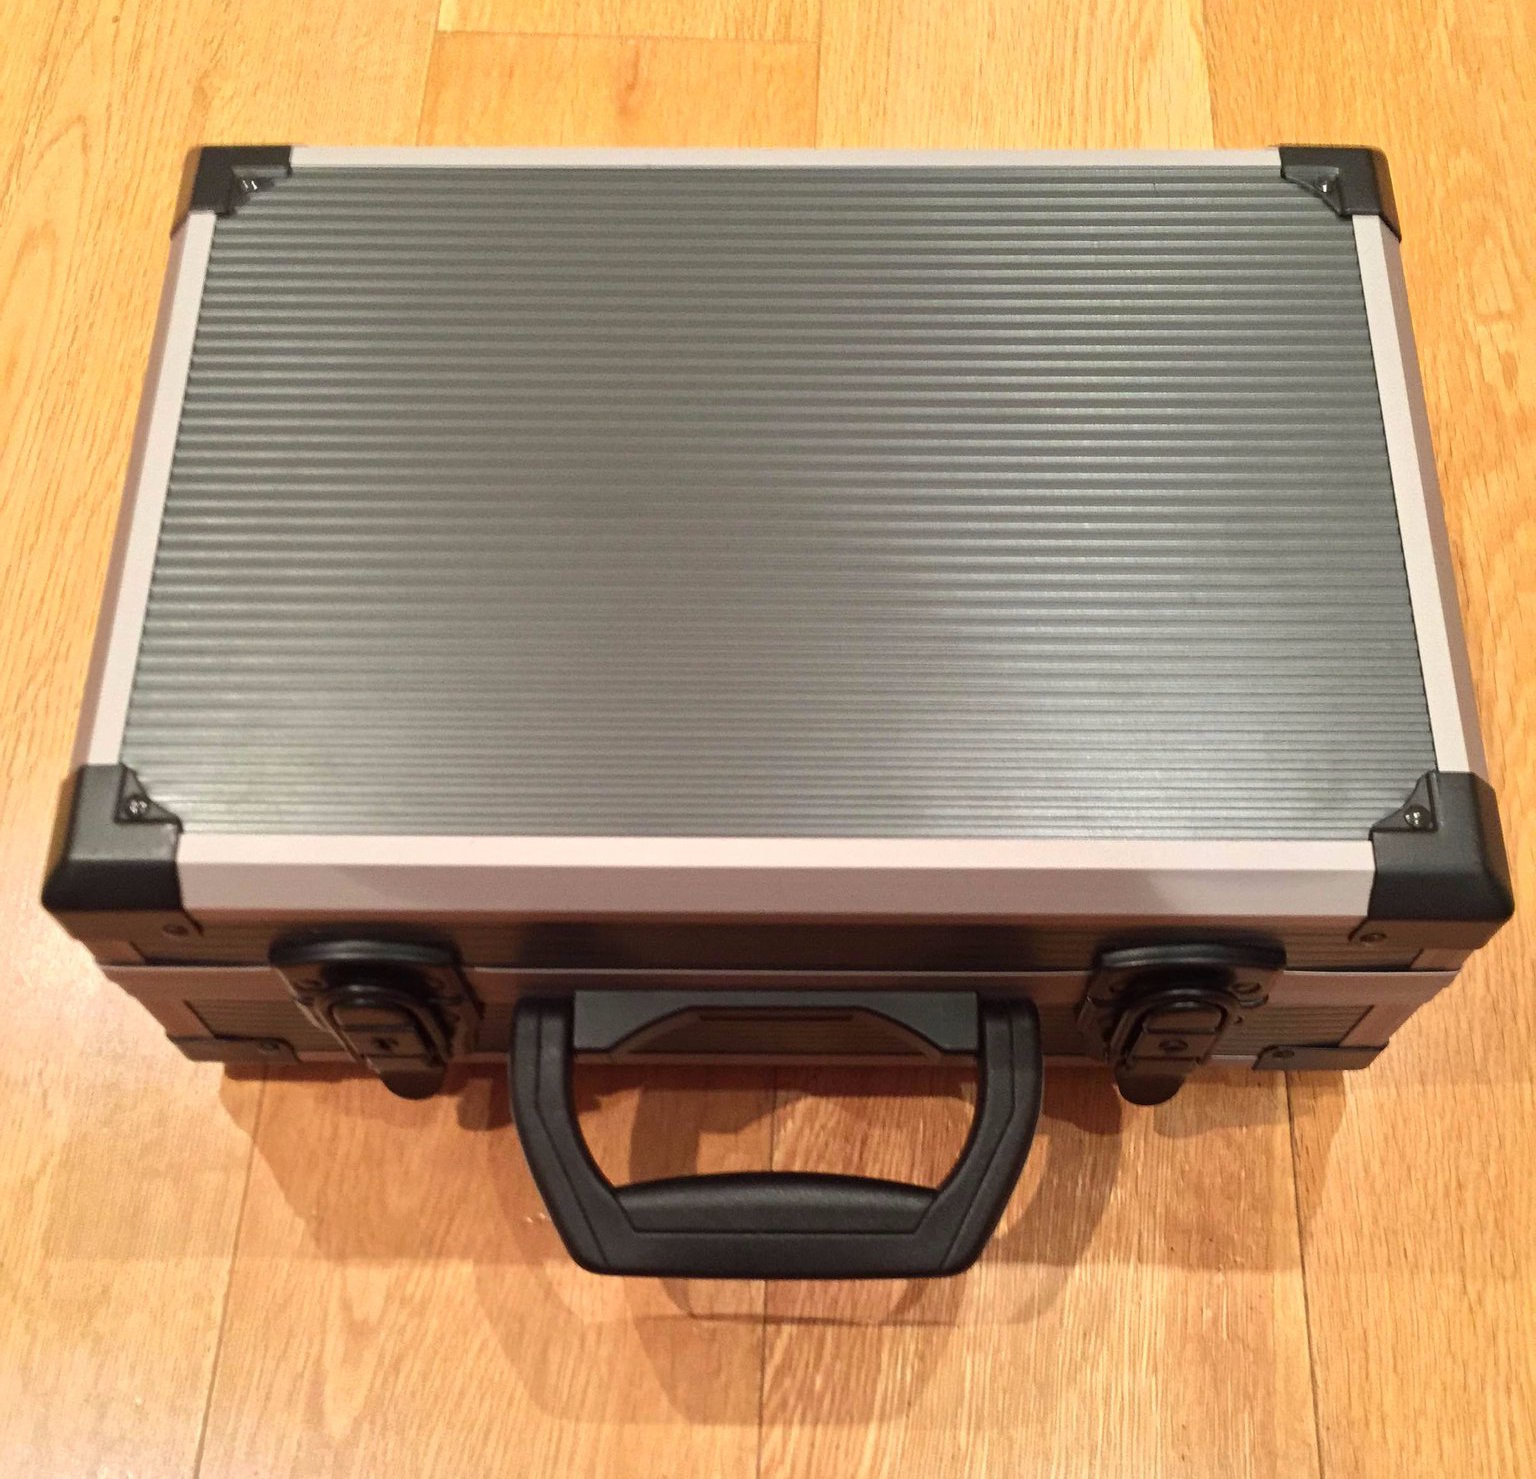
This foam-filled flight case comfortably houses all of the components. The parts 1 to 7 can remain assembled together, reducing the deployment time in the field.
I use this fast MicroSD card as the destination for my outdoor SDR recordings. The high transfer speed is critical – using slower MicroSD cards will result in large portions of the spectrum being dropped from the recordings. 64 Gigabytes can accommodate roughly one hour of spectrum data at 3 MHz bandwidth.
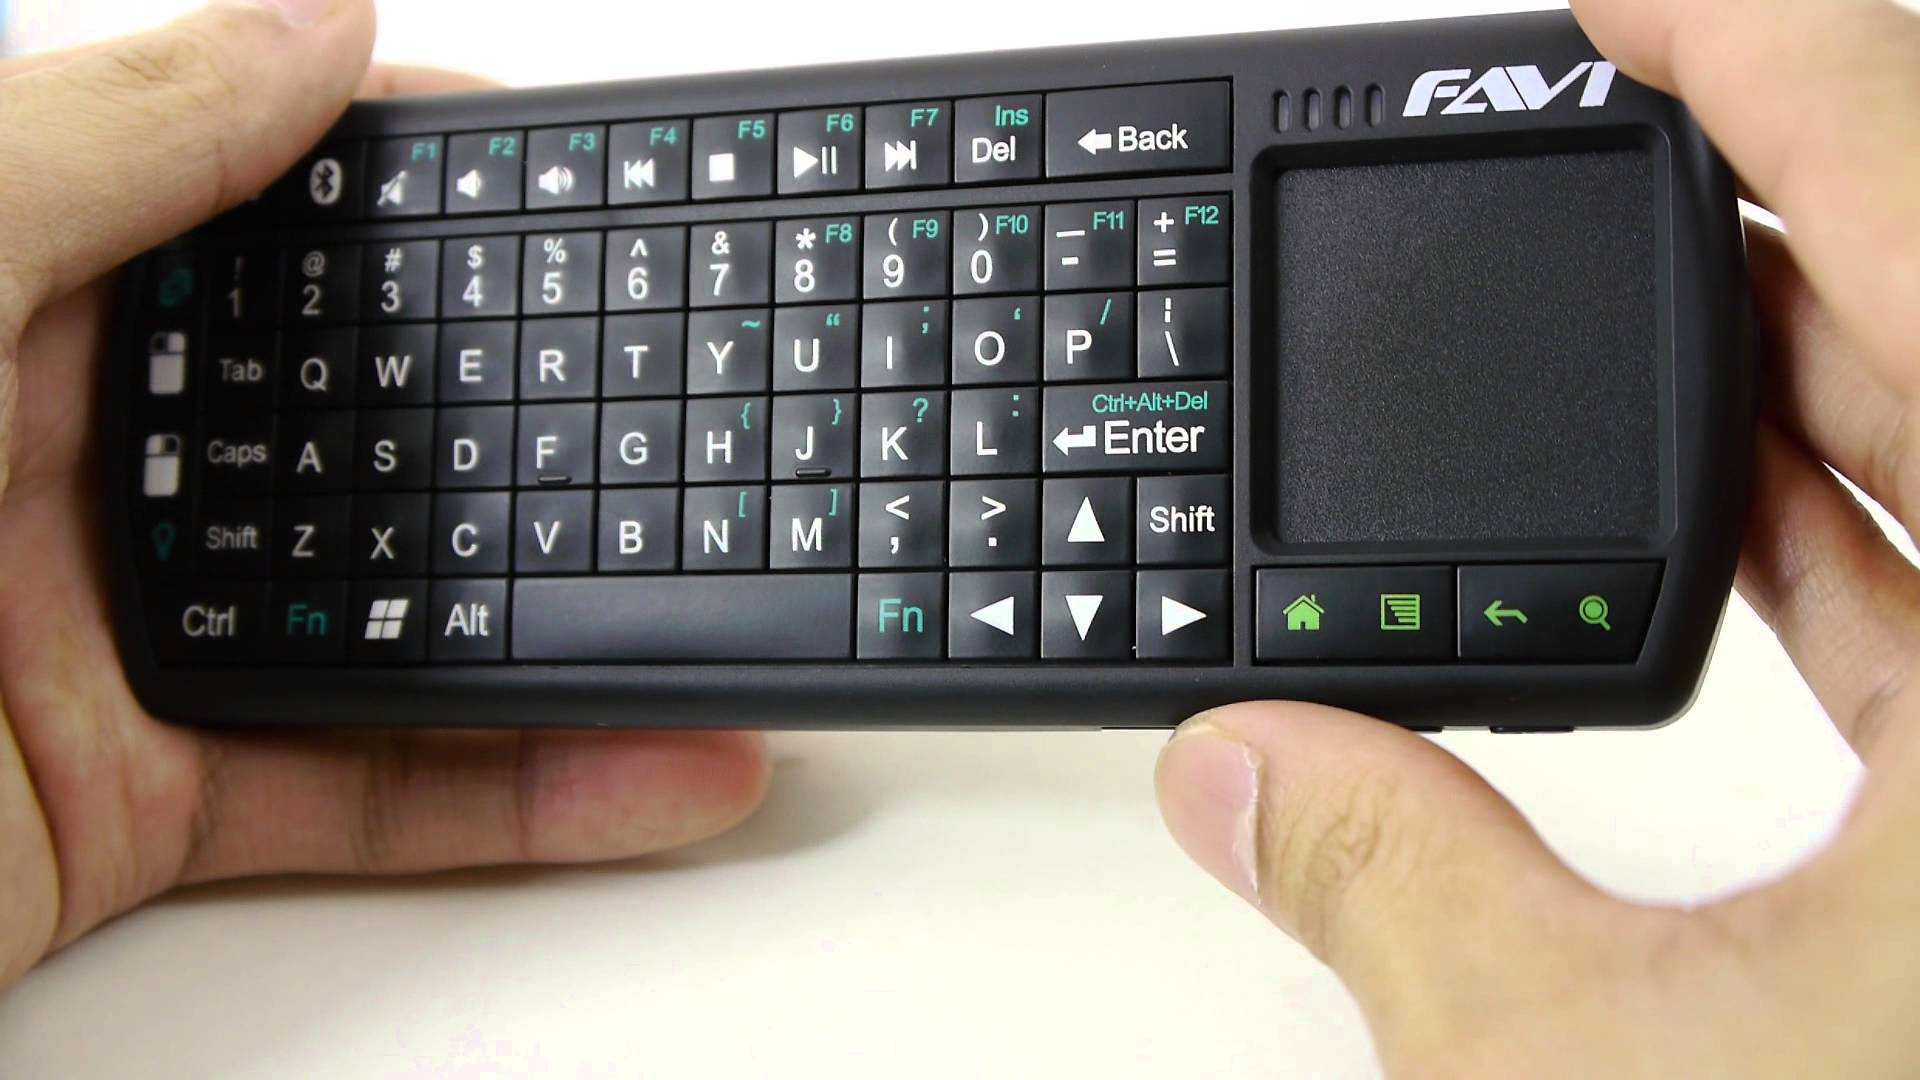
Windows tablets suffer from one major drawback: the touchscreen interface is usually inadequate for software that was designed for traditional computers with mice. A portable Bluetooth keyboard with a built-in trackpad solves this problem.
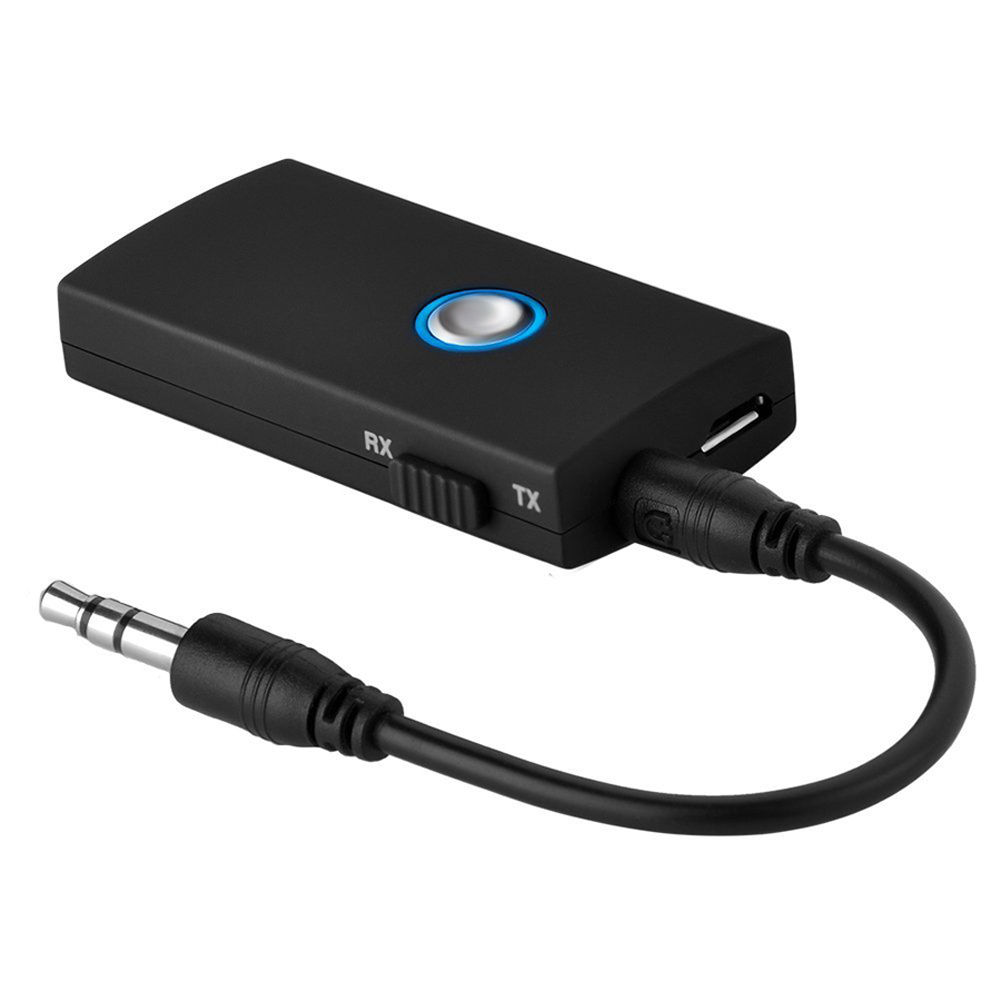
This small gadget turned out to be a very important part of the entire project. The Toshiba tablet has a rather unusual interference quirk that initially caused me hours of frustration. It turns out that significant amounts of radio noise are injected into the SDR when the tablet’s external speakers are active. One way to fix this is to plug a pair of headphones into the tablet’s line out jack, but this forces the listener to be glued to the device. The alternative is to pair the tablet with a Bluetooth audio receiving unit, such as the one listed above. It is worth noting that my other Windows tablet — a Dell Venue 8 — also suffers from this strange artefact.
Total cost: $610
Internal layout of the flight case
You’ll see that I have stacked the SpyVerter enclosure on top of the AirSpy one. As the latter can get very hot, it is essential to leave a sufficiently large gap in the foam for ventilation. It’s also worth leaving a small gap next to the tablet’s power button to prevent Windows from accidentally going into standby mode.
Software configuration
The best software to use with the AirSpy/SpyVerter combination is SDR#. It offers an impressive collection of features that many software packages and conventional radios don’t have, such as advanced noise reduction and synchronous detection with passband tuning. The following adjustments are required to make recording the spectrum a seamless experience:
Install the Baseband Recorder and File Player plugins
Baseband Recorder: this plugin enables efficient recording of very large spectrum (or “baseband”) files. Download and decompress the plugin zip file. Copy the .dll files into the directory with the SDRSharp.exe executable. Open the MagicLine.txt file and copy the first line of text into Plugins.xml file, just before the “</sharpPlugins>” line.
File Player: this plugin enables the playback of recordings made with the Baseband Recorder plugin. Download and decompress the plugin zip file. Copy the .dll files into the directory with the SDRSharp.exe executable. Open the MagicLine.txt file and copy the first line of text into FrontEnds.xml file, just before the “</frontendPlugins>” line.
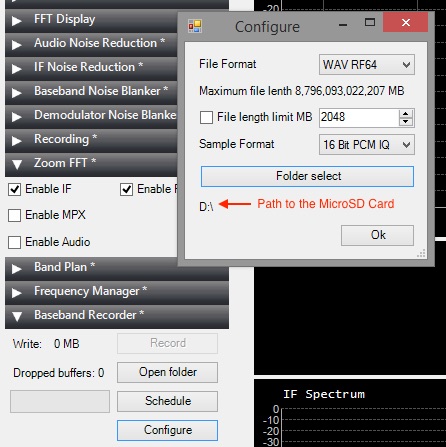
Configure Baseband Recorder
Open SDRSharp.exe and check that the program reports no errors when it loads.
Baseband Recorder configuration
In the plugin pane on the left, expand the Baseband Recorder tab and click “Configure”. Change the File Format to WAV RF64 and make sure that the File length limit check box is not ticked. Click “Folder select” and choose the MicroSD card as the destination directory for the recordings.
Adjust AirSpy settings
Disclaimer: in this section I describe how I capture the maximum spectrum bandwidth that my tablet’s CPU can handle. It involves operating SDR# in “debug mode” and exposes some internal functionality of AirSpy, which, if used incorrectly, can damage the radio. If you choose to copy my approach, please understand that you are doing so at your own risk and follow my instructions carefully to avoid voiding your AirSpy warranty.
Open SDRSharp.exe.Config file in Notepad. Look for “<add key=”airspy.debug” value=”0″ />” line and change it to value=”1″.
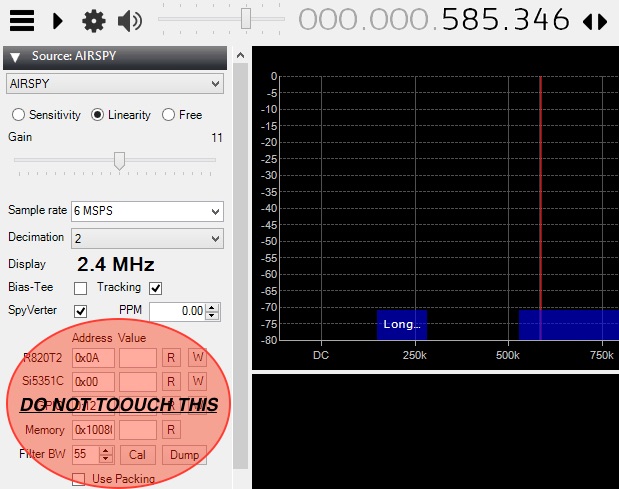
Once the AirSpy and SpyVerter have been connected to the tablet, open SDR# and select AIRSPY in the Source tab. You will see the following configuration dialog.
AirSpy configuration
In the “Sample rate” field, type in “6 MSPS”. For the “Decimation” option, choose “2”. This setting will result in spectrum captures of 3 MHz bandwidth (although only 2.4 MHz of it will be shown on the waterfall display). To capture smaller chunks of the spectrum, increase the decimation value. Make sure the SpyVerter check box is ticked. Do not touch any of the fields or buttons under the “Address Value” line.
Make a short test recording
Press the play button in the top left corner and set the desired frequency.
In the Source tab, select the “Linearity” option. Keep increasing the Gain value by one position at a time until you notice that the radio signals suddenly become “saturated” (the waterfall display becomes full of artefacts and the signal you are listening to gets swamped with noise). Take the Gain value back down by two positions. This will ensure high sensitivity while preventing AirSpy from overloading.
In the Baseband Recorder tab, press “Record”. While recording, do not change the radio frequency and do not move/drag the waterfall portion of the display. Stop the recording after a few minutes.
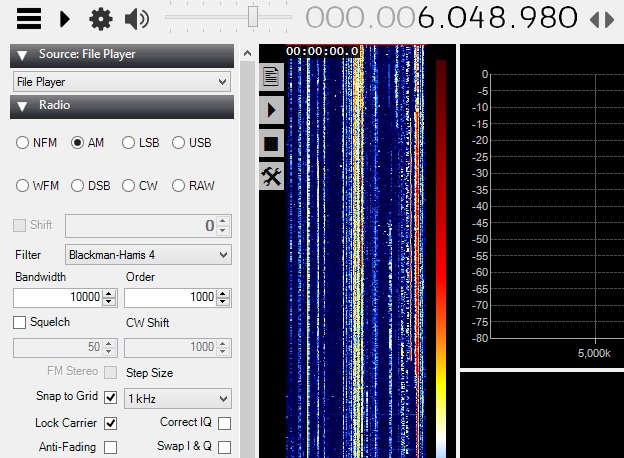
SDR# FilePlayer plugin
In the Source tab, change the input to “File Player” in the drop down menu. Click the Settings cogwheel button and select the spectrum recording file from the MicroSD card. A vertical band visualising the timeline of the spectrum capture will appear immediately to the right of the plugin pane. Click on the play button and select a radio signal to demodulate in the spectrum display. Listen to the audio carefully to make sure there are no dropouts or clicks: if so, your tablet and MicroSD card are capable of handing and storing the specified spectrum bandwidth.
Keep an eye on the gain
While making longer spectrum recordings, select a weak radio signal and keep monitoring its audio for signs of overloading. If the overloading does occur, reduce the Gain value further by one or two positions.
Some example spectrum captures
Shortwave for lunch. Playing back parts of the shortwave spectrum captured earlier in the park, inside a local cafe.
Below are some example videos in which I play back and explore the spectrum recordings I made during the trips to my local park.
Hoax radio transmission at Melbourne airport forces plane to abort landing
Police are investigating 15 incidents of illegal radio transmissions with aircraft at Melbourne and Avalon airports, including hoax calls that forced at least one aircraft to abort its landing.
In a statement issued on Monday night, the Australian federal police said there had been “unlawful interference with air traffic control broadcasts over several weeks”.
Audio obtained by the ABC revealed that, during one of the calls, the hoax caller pretended to be the pilot of a light aircraft as he spoke to an air traffic controller.
“I can see you there now. Roger your mayday. Could you please advise what your situation is,” the air traffic control operator asks.
“Engine failure,” the hoax caller replies. “Descending passing through 4,500.”
In another incident a Virgin Australia flight en route from the Gold Coast to Melbourne was forced to change course under the instruction of the hoax caller transmitting from an unknown location, the ABC reported.
Such behaviour could have disastrous consequences.
You’re right, Phil. It angers me to no end when people intentionally cause interference or disrupt operations at airports. So many lives depend on air traffic control and flight communications systems.
On November 15 (November 14 local date in the Americas), our special guest will be Cuban Jazz phenomenon Harold López-Nussa, who will share some of his wonderful new album El Viaje. We will also play some new Timba recordings and other excellent Cuban dance music.
Then, the next two weeks, by popular demand, we will rebroadcast our two recent episodes dedicated to JoJazz.
We will return with new episodes in December.
Two options for listening on shortwave:
WBCQ, 7490 KHz, Tuesdays 0100-0200 UTC (8pm-9pm EDT Mondays in the Americas)
Channel 292, 6070 KHz, Tuesdays 1900-2000 UTC (2000-2100 CET)
See our Facebook page for instructions for listening online if you are out of range or don’t have a shortwave radio.
Please support this website by adding us to your whitelist in your ad blocker. Ads are what helps us bring you premium content! Thank you!