Category Archives: How To

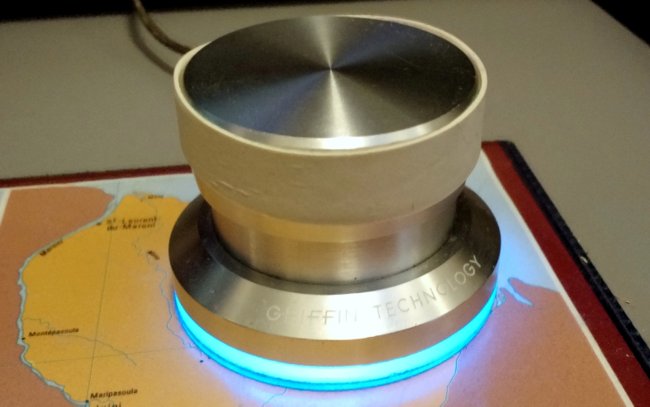
Hamfest find: Griffin Technology PowerMate Controller

GriffinPOwermateUSB

A few weeks ago, I attended the WCARS hamfest in near Waynesville, North Carolina. I walked out of that hamfest carrying way more goods than I had intended to purchase (more on that in a future post–!).

One of the best bargains I found was a Griffin Technology NA16029 PowerMate USB Multimedia Controller. The seller is a friend; he was trying (and succeeding) to push off a lot of his gear on me. We were actually in reverse price negotiations at one point–as he kept discounting prices, I was trying to raise them.

Knowing I’m an avid SDR guy, he insisted I give this Griffin Powermate controller a go.  I purchased it for $5 after I believe he had offered it for free (yes, the results of reverse negotiations).

I took the controller home assuming it would be cumbersome to interface with my SDRs–what a poor assumption I had made! It was a breeze: simply install the driver, and launch its associated application. The software makes it very easy to associate PowerMate controller actions with keystrokes and other PC functions.

PowerMate 8132015 54232 PM

There are a surprising amount of functions this simple knob performs:

  • Rotate clockwise and counter clockwise
  • Press down and rotate clockwise and counter clockwise
  • Press down once
  • Press down and hold

I set up the PowerMate to control my WinRadio Excalibur as follows:

  • Press and hold launches the WinRadio Excalibur application
  • Rotating the knob tunes up and down
  • Pressing down and rotating increases and decreases bandwidth
  • Pressing once toggles the volume mute

PowerMate-ExcaliburThe PowerMate is a brilliant piece of kit!

It has enhanced my user experience with the Excalibur. Soon, I’ll set it up to work with my Elad FDM-S2, and SDRplay RSP.

The PowerMate software allows you to set up multiple configurations, so it’s easy to call up a configuration based on the SDR being used (since mine have unique hotkeys).

The good news is a new PowerMate is only about $32 via Amazon.com.

I’m quite tempted, in fact, to buy a second unit to use with my laptop and to serve as a spare.

While looking up PowerMate pricing, I noticed more complex multimedia controllers on Amazon; I’m curious if any Post readers have experience with other models.

Seems to be a very affordable way to enhance your SDR user experience.

Click here to view the PowerMate on Amazon: http://amzn.to/1MmyxkC

Spread the radio love

A repair story: Vlado’s fix for the classic Sony ICF-SW100

Sony-ICF-SW100In June, I made a small leap of faith and purchased a (dead) Sony ICF-SW100 from Universal Radio (see the listing on right).

ICF-SW100-Used-NonWorkingYou see, for many years, I’ve dreamed about owning this wee little receiver, now a classic among tiny radios, but used ones are typically too expensive for my modest budget.

This time, seeing the ad at Universal, I spoke with Universal Radio directly to obtain more details about their defunct unit; while they simply didn’t know what was wrong with the Sony, they were able to very accurately describe its cosmetic and functional condition…I took a deep breath, and decided to take a chance on it anyhow.

In full disclosure, I have a secret weapon in my camp:  my talented friend, Vlado (N3CZ), who is not only the most adept electronics engineer/technician I’ve ever known, but one who truly welcomes a challenge.  The thought had occurred to me as I admired the wounded Sony, Wonder if Vlad would like to take this on–?

The answer, of course, was Yes!  So I dropped the DOA Sony off at Vlad’s home last week. He disassembled the radio, only to discover that my ICF-SW100 was a victim of the (dreaded) damaged ribbon cable.

A short history of the Sony ICF-SW100 and SW100S

These radios are indeed brilliant, incredible performers for their miniscule size.  Yet the first generation of ICF-SW100 radios–those produced before the fall of 1997–have a design weakness: the ribbon cables which connect the upper and lower portions of the radio’s clamshell design eventually fail. Multiple openings and closings bend and cut the cables, rendering the otherwise remarkable little radio useless.

SWLing Post contributor, Dan Robinson, recently shared his knowledge about the ICF-SW100 series. Dan notes:

SW-100 Seekers Beware

As shortwave veterans know, the classic SONY miniportables — SW-1, SW-100(S) and  SW-07, represented some amazing technological achievements. SONY managed to  shrink some fantastic technology into these receivers, including (with the last two in the line) — SYNC capability. The SW-07, which was the last of these receivers, still brings some high prices on Ebay.

But if you are searching for the ICF-SW-100S there are some things to consider and beware of. As everyone knows, the SW-100 suffered from the well-known ribbon-cable failure problem. SONY addressed this problem in later serial numbers, and changed the design of the radio case.

Modified SW-100s have a notch where the top cover meets the base.

There are some dishonest sellers out there who are trying to pass off older version SW-100s as modified ones. Usually, the tip-off is that the photograph in the Ebay auction will be dark or out of focus, so it’s hard to tell if the radio is the modified version or not.

It has become quite rare to find an original SONY modification kit, which includes a new top cabinet of the SW-100. And some sellers are trying to get as much as $300 for these, though they rarely sell at this level.

This repair kit was on eBay at time of posting.

ICF-SW100 modification kit found on eBay at time of posting.

It’s also becoming rare to see SW-100S radios new-in-box. I had two of these, sold one and kept the other.

If you’re after one of these marvel radios, do what everyone should do when considering items on Ebay — ask many questions about [the] cosmetic condition, accessories, serial numbers, etc.

Universal Radio, a trustworthy seller I know, had fully disclosed the model number and problems with this radio, so I knew exactly what I was buying. Dan has a very good point, though: unless you know the seller to be honest, do your research and ask questions!

The ailing ICF-SW100

Vlado discovers the faulty ribbon cable.

Vlado discovers the faulty ribbon cable (click to enlarge)

Back to my ailing unit:  Vlado delivered the news about the ribbon cable via text message, and though I was well aware that the chances were high that was the ribbon cable, I was a little bummed, to say the least, to get the formal diagnosis.

Why? As Dan mentions above, you’ll find that the SW-100S upgrade kit Sony produced in the 1990s is no longer available new; sellers typically list these kits at prices in excess of $300 US.  Out of my budget.

But Vlado, ever the intrepid engineer, had no idea I would be disappointed with this news; he was just giving me this FYI via text. Indeed, he seemed entirely unfazed, as in, hey, no serious internal damage here…

Another hour passed. Then came another message from Vlad; this one simply said: “Call me.”

Oh no, I thought. But I called, and Vlado answered cheerfully, “Hello? Tom, is that you? Sorry, I can’t hear you very well because your SW100 is playing too loudly. Hang on–let me turn the volume down!”

Vlad installs the replacement ribbon cable (click to enlarge)

Vlad installs the replacement ribbon cable (click to enlarge)

“What!?!” I responded, in utter disbelief.

Yes, he’d got it working!  It seems that Vlad had unearthed an old DVD player in his garage that he’d kept merely for parts. He opened it up, identified a ribbon cable with the right pitch, then cut and folded the cable to fit into the SW100.  Ingenious!

That’s Vlado for you!

And should I be interested in replacing this used cable with a new one–or in repairing other Sonys–Vlad directed me to eBay listings for new cables which only total about $20, shipped. Truthfully, I’m in no hurry, as this one is functioning perfectly and changing out the ribbon cable seems to have no effect on stored memories, etc. With a single affordable eBay purchase of multiple cable sets, it occurred to me that Vlad would have enough replacement cables to repair the SW100 many times over…

So I bought the cables.  (This one for the narrow cable and this one for the wider one.)

My “new” Sony ICF-SW100

Needless to say, I’m very pleased with my “new” (to me) SW100. It’s a little masterpiece of receiver engineering in such a tiny package.  And since the ICF-SW100 is unquestionably the smallest portable I own–and is one of the few I own with a proper line-out jack–it may very well become my go-to radio for one bag travel.

Listening to the 'SW100 before I pack it for my next trip.

It’s in the bag: listening to the ‘SW100 before I pack it for my next trip!

Stay tuned the review…

Vlado’s radio E.R.:  the doctor is in

Sony-ICF-SW100-Open2As I’ve said, Vlad is one of the most adept repair technicians I’ve ever known.  At my prompting, he’s kindly agreed to let me promote his services here on the SWLing Post. Vlad acknowledges that he “likes a challenge,” adding that he enjoys nothing more than making repairs even when”parts are scarce” and radio”surgery” is required.  Moreover, his bench fees will be quite reasonable, especially considering what you receive: new life for a failing radio. So, if you’ve got an ailing rig on your hands, and don’t mind waiting for Vlad to get to it, send it to his radio emergency room, where radios (like my Sony) have life breathed back into them once again.

Long live the Sony ICF-SW100!  And long live Dr. Vlado, who makes this possible with his creative (and nearly miraculous) repairs.

To contact Vlad, simply contact me with a description of your radio and its problem and I’ll put you in touch with Vlado.

Spread the radio love

Silicon Labs DSP chip homebrew receiver

DSP-HomebrewThe Silicon Labs Si4730 series DSP receiver chip powers many of the portable shortwave radios currently on the market.

Manufacturers are not the only ones implementing the chip in receiver design, however; radio enthusiasts are too.

I recently discovered this short video by a Japanese hobbyist who implemented the Si4734 in his receiver design:

While I don’t speak Japanese, the author also has a webpage of detailed design notes you might check out (click here to view). I used Google translate for a rough English translation of the page.

Have any readers made a homebrew receiver from a Silicon Labs DSP chip? If so, please comment!

Click here to download the Si4734 product information sheet.

Spread the radio love

A three transistor homebrew shortwave radio

(Photo source: netZener.net)

(Photo source: Instructables)

SWLing Post contributor, Richard Langley, writes:

Came across this site on building a 3-transistor shortwave radio similar to the kit offered by Radio Shack years ago:

http://www.netzener.net/index.php/8-project-articles/5-3-transistor-short-wave-radio

It was featured on the Instructables site:

http://www.instructables.com/id/Three-Transistor-Short-Wave-Radio/

Very cool!  Thanks for sharing this, Richard.

When I have a little time, I’ll go through my parts box and see how many of these components I already have. The author also supplies an excellent assembly manual for download and print. It would be fantastic if someone would kit up the parts list and offer it as a package. Regardless, this will make for a fun winter project!

Spread the radio love

Rob’s Yaesu FTDX3000 video series

FTDX3000My buddy, Rob Wagner, has started a series of videos featuring the Yaesu FTDX3000 transceiver. On his blog, the Mount Evelyn DX Report, Rob describes his first video:

Some shortwave listeners may not be familiar with using single sideband for receiving stations transmitting in the Amplitude Modulation (AM) mode. I have prepared a little video designed to demonstrate reception of SWBC signals in single sideband (SSB) mode. Under certain circumstances, this can be beneficial in providing better reception and more pleasurable listening in times of heavy interference (QRM).

[…]This video is the first in a short series featuring my new Yaesu FTDX3000 transceiver. You’ll get a good idea of what this rig can do by seeing it actually in operation on the shortwave bands. There are more videos to follow…..

ECSS is indeed a powerful and often overlooked tool for mitigating QRM and adjacent signal interference. Many thanks, Rob, for showing us how easy it is to use!

Though I’ve embedded Rob’s first video, above, I would encourage you to follow his excellent blog so you don’t miss future videos.

Spread the radio love

How to replace a noisy wall power supply

JamecoWallPowerSupplyRegarding noisy switching power supplies, SWLing Post reader, Dan Lewis, comments:

“Google the following: “Jameco linear wall transformer”, and you’ll find a suitable non-switching replacement.

Jameco still has a number of linear transformers in their catalog at reasonable prices. I haven’t bought anything from them in many years but when I dealt with them frequently a number of years back they were always reputable.”

Many thanks for your suggestion, Dan! Jameco is a reliable company and I’ve also been a long-time customer. If you know how to pick the proper power supply for your radio (or any other electronic device) click here to view a list of regulated linear supplies on Jameco’s website. [Also note this follow-up post.]Otherwise, keep reading…

How to find a replacement AC adapter/power supply

When you purchase a replacement power supply, you must make sure that several properties match that of the device it will power, else you could cause damage.

There are four properties you need to match: voltage, rated current, polarity and tip size.

Voltage

Most consumer electronics are powered by and rated for 4.5, 5, 9, 12, or 13.8 volts DC. Of course, there are exceptions. It is important that you match the required voltage exactly. Most radios and electronic devices display their required voltage and voltage tolerance on the unit itself, on the supplied switching power supply, and/or in the owner’s manual.

Rated Current

Like voltage, rated current is usually displayed somewhere on the device, existing power supply or in the owner’s manual. Current is usually indicated in amps (A) or milliamps (mA). Unlike voltage, rated current on your power supply does not have to match the device exactly. You simply need to make sure the power supply meets or exceeds your radio’s required current.

For example, if your radio requires 800 mA (or .8 A) and you find a power supply rated for 500 mA, you should not use it. If you find a power supply rated for 2 amps (or 2000 mA), it exceeds the 800 mA rating, so you’re good to go!

Unlike voltage, your electronic device or radio will only draw the amount of current it needs from the power supply.

Polarity

Click here to read more about tip polarity. (Source: WikiPedia)

Click here to read more about tip polarity. (Source: WikiPedia)

You’ll need to determine if your radio requires a plug with a positive or negative tip (a.k.a. center conductor).

Fortunately, manufacturers have long used standard symbols to make polarity obvious (see image).

You’ll typically find a polarity symbol printed on the back of your radio, near the plug-in point, in the owner’s manual or on the back of the existing wall adapter.

Note: Be very careful matching polarity! Some radios and electronic devices are not properly protected against reverse polarity; damaged can occur immediately after supplying voltage with incorrect polarity.

TJamecoWallPowerSupplyip/plug size

You need to make sure that the inner diameter and outer diameter of a replacement wall adapter will match that of your existing adapter.

This can be the most difficult property to match.

Occasionally, radio manufacturers will actually specify the tip size in their owner’s manual, spec sheets, or on the product page of their website. I’ve even had luck calling manufacturers and asking a technician for the plug size.

ACAdapterTip

Specification sheets will typically indicate plug dimensions with an illustration.

Otherwise, you can always measure the existing power supply tip (both inner and outer dimensions) using calipers.

Once you have those dimensions, finding the appropriate replacement power supply is quite easy. Indeed, companies like Jameco provide specification sheets (click here for an example) that indicate dimensions for each power supply they sell.

Once you’ve matched the voltage, rated current, polarity and tip size, you can purchase a regulated linear power supply with confidence!

Keep in mind: there are most likely other devices in your home with noisy switching power supplies that could be causing radio interference. Check out my noise trouble shooting section of this article to help identify local sources of radio noise.

Update: check out this follow-up post regarding Jameco power supplies–not all are truly linear regulated.

Spread the radio love

Jeffrey re-caps his Hallicrafters SX-110

The restored SX-110 sitting on the bookshelf in the shack. No one would mistake this for a new receiver, but it works just fine.

The restored SX-110 sitting on the bookshelf in the shack.

Many thanks to SWLing Post reader, Jeffrey Fritz, writes:

During the summer of 2012 you were nice enough to run an article in your blog about my reviving a 1961 Hallicrafters SX-110 General Coverage receiver. The radio has continued to perform reasonably well during the last few years. However, recently I acquired several pieces of professional test equipment. That encouraged me to delve even deeper into the restoration of my old receiver from my novice ham radio days.

Over the past week, I completely recapped the SX-110 (except, of course, for the mica and ceramic caps as they still good, and the electrolytic caps as they were replaced in 2012.)

The SX-110 isn’t a complex receiver, but there are quite a few caps, so I worked methodically and carefully. I started working from the audio amp stage and continued working back through the IF stages and the BFO to the RF stage. I recapped each stage replacing the old caps with new Orange Drop caps. Each stage was tested before I moved on to the next stage. Here’s a photo of the recapped chassis:

SX110-Underside

Here are the capacitors that were removed from the receiver. Most are the old Bumble Bee caps–called that because of the color stripes that mark their value:

SX110-NewCaps

Virtually every Bumble Bee cap tested leaky and out of tolerance.

Next, I tested every tube replacing the weak or bad ones with NOS (New Old Stock) tubes. Every pot and switch was cleaned with DeOxit and moving parts were lubricated where appropriate. Finally, I did a complete re-alignment following the instructions in the Service Manual.

As with all vintage tube gear, restorations require patience, care and a decent knowledge of electronics. It’s easy to make a fair radio–even a good radio–into a disaster if you are not careful. Also there is enough voltage and current inside of the chassis of a tube radio to toss you across the room. So care is always the order of the day as is a VARIAC to bring the radio up to AC line voltage slowly.

The receiver now sounds as good as ever–perhaps even better than ever. It has marvelous AM audio and can pick up ham and broadcast stations on all bands with nothing more than a wire in my basement. It even does a decent job on SSB–something that I don’t recall it ever bring adept at in the past.

That say that you can’t keep a good man down. Similarly an old radio, with some new parts and some TLC, can run virtually forever.

I agree with you: you can’t keep a good radio down! Repair work is certainly the commitment we make when we fall in love with these old rigs. It’s a good thing that almost all of the parts are still available and relatively affordable.

Thanks again, Jeffrey!

Spread the radio love