Shortwave listening and everything radio including reviews, broadcasting, ham radio, field operation, DXing, maker kits, travel, emergency gear, events, and more
We posted an update about the new Tecsun PL-330 in late April 2020. While we didn’t have a lot of details, it’s worth reading.
We still don’t have a lot of details (as of today, July 3, 2020) but readers have been contacting me and commenting recently with links to online retailers who are already selling the PL-330.
SWLing Post contributor, Babis, shared a link to retailer (Taoboa.com, see above), this website with more information, and a review on this page.
Before you buy
To be clear: I am not placing an order for the Tecun PL-330 yet.
Indeed, as I mentioned in a previous post, my trusted Tecsun contact informed me that all of the new portables–the PL-990, H-501, and PL-330–are first being released as a “domestic” or pilot version in China. The pilot version is not the final and fully-updated/upgraded international/export version.
I will make an announcement here on the SWLing Post when the international/export versions are available for purchase.
To be clear, I can’t comment on the performance of the domestic models, but I do understand that the export models will likely have better specifications and even updated front panels/functions.
I also understand that the PL-990 will likely be the first export model in terms of availability.
Stay tuned! I’ll post any/all updates here on the Post.
Many thanks to SWLing Post contributor, Dennis Dura, who shares a link to this radio project by Emanuele Pizzolorusso who wishes to combine a modern Internet radio with old-school city-labeled memory buttons. From Wallpaper.com:
CityRadio, designed by Emanuele Pizzolorusso for Italian design brand Palomar, allows you to access local radio around the world, with a simple – and satisfying – click of a physical button. It’s a contemporary re-imagination of radio’s early history, where city names where displayed to identify frequencies. As travel looks to remain restricted for the time being, get your multicultural fix through the airwaves.
Of course, you can go online and access local radio anywhere fairly easily, but for Pizzolorusso, there’s a certain romanticism to, and interconnection with, the act of listening physical object. ‘In my childhood home there was an old portable radio, one of those appliances that had the names of several European cities on the tuning dials – a feature from the time when one could still listen to stations from foreign countries,’ explains the Italian designer, who is based in Helskinki. ‘The list of those places, which to me as a child appeared so mysterious and exotic, stimulated my imagination and gave that ordinary forgotten object a deep sense of magic.’
Press magnetic keys to access 18 different cities around the world – from Barcelona to Beijing, Nairobi to New York.[…]
Many thanks to SWLing Post contributor, Frank (ON6UU), who shares the following guest post:
Building EA3GCY’s DB4020 QRP Transceiver kit
by Frank Lagaet (ON6UU)
In May, I discovered via a newsletter that a new kit was available from Javier EA3GCY in Spain. I was immediately sold as this was a kit from my favourite kit producer and it has 2 bands–it will also be able to do CW and there also will be a CW filter.
After building 2 MFT’s from Javier which work without problems, I needed to have the DB4020. The MFT’s are for 20 and 40 mtrs and do DSB (double side band). I did put them in a not-so-graceful box but they do what they are intended for which is QRP phone (SSB). They came together without problems so I expected the same for the DB4020–I knew for sure when I saw the board: all through-hole components (except for some capacitors which are factory soldered) and a lot of space on the board. The board has been silk-screened with clear indications on where all components have to come and the manual has very clear instructions where each component has to be soldered with referral to a quadrant. The manual provides a 252 quadrant page so it is a piece of cake to find where each piece goes.
What do you get?
Javier provides you with all components which need to be installed on the board and, of course, the kit board. The components come in small marked plastic bags and all is well-wrapped up in bubble wrap. The board is wrapped separately and that is put together with the component wrap which is then again wrapped up in bubble plastic. All goes into an envelope. Very well packed I must say.
Here’s a picture of the bags with components:
The silk-screened board:
I started with the resistors since that’s the easiest way. After that, I did the capacitors. I like to solder in all flat components first, so next were the diodes and IC sockets followed by the elco’s. The transistors were next together with all relays. As you solder in the transistors one also has to mount the cooling heatsinks, these cooling sinks are high and are ideal to protect the coils one has to make, they also protect the polystyrene caps (which I always find vulnerable) when the board is upside down.
Many kit builders are afraid of winding the toroids in kits–don’t be! It is easy. Just take your time and follow the instructions given by Javier in the construction manual. In this kit the builder has to wind 8 toroids: 6 are a single wire which goes through the toroid body, 1 is a toroid with 2 different windings, and 1 has a twisted pair which goes through the final toroid. Be sure to measure the wire you need per toroid as instructed in the manual. Javier gives some spare, so you can be sure. You will also see that on next picture where the legs of the toroids have not been trimmed yet. Once done I still had some centimetres of wire leftover.
Picture of the toroids ready to be soldered in:
Finally all other parts and pin headers went in, jumpers were immediately put on where needed.
As I’m using a military-grade plastic box, I have to break-out some components like the display, tuning encoder, volume and rx control from the board. I also have put an on/off switch on the box and already have the CW KEY connector ready installed. I also installed a loudspeaker in the box. The SI5351 board and the Ardiuno Nano are the final components which go into the board after installing all wires.
Picture of the board:
I intend to attach a CW paddle to the box made out of a relay. A HWEF tuner (from EA3GCY) which I was planning to incorporate in the box is I think a bit overkill. That HWEF tuner is already in a nice little box and would be a pity to dismantle, also I’m running out of space in the box… Maybe I can fit in a 9-1unun which would then give me good results on both bands…?
Maybe I will install a battery pack in the same box.
The box with board installed:
The box completed front side:
Mind you, it still needs some additional switches for the CW part of the transceiver.
73
Frank (ON6UU)
Video
Brilliant, Frank! I really appreciate the video as well–sounds like the kit produces smooth audio and should serve you well. No doubt, that military box enclosure will survive even the roughest field conditions!
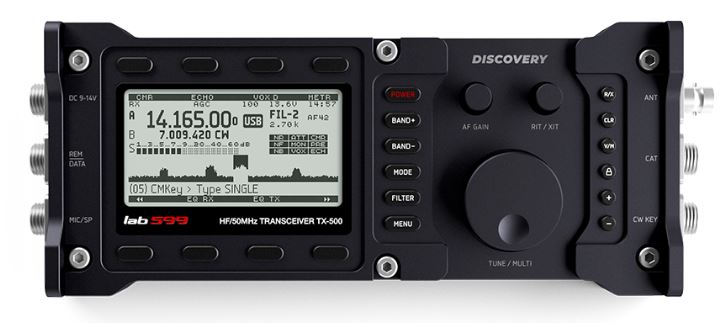
A number of SWLing Post readers have been contacting me this month regarding the lab599 TX-500 Discovery QRP general coverage transceiver. Since its announcement around this time last year, a number of radio enthusiasts have been seeking any updates or information regarding price and availability.
Spoiler alert: Sadly, I have no meaningful updates at present.
Here’s what I do know…
The product page for the TX-500 now has more photos and specifications. They also added a downloads page with the manual, software, and firmware. [Update: I removed links to these pages because some systems report that the site may have gotten a malware injection–common with WordPress sites.]
Many of you have asked if the TX-500 will be “vaporware.” Possibly, but I don’t believe so. I suspect lab599 is keeping everything under wraps until they have firm information regarding availability and pricing. I’m actually happy they haven’t asked for pre-orders with cash deposits because that always adds a layer of risk with products that are not yet in production. At this point, no consumers have an investment riding on this future rig.
Of course, I imagine the Covid-19 pandemic could also affect their supply chain.
The first video shows the TX-500 in the field and the operator (R9JC) making a contact in CW:
The second video shows the TX-500 display as the operator tunes through the CW portion of the 20 meter band with the 50 Hz filter engaged:
Following TX-500 updates closely…
I am following TX-500 updates very closely. Since I’m primarily a “field” ham radio operator, the idea of a weather-proof, rugged, QRP transceiver is very appealing. Seriously…just take my money!
Of course, being first and foremost a shortwave radio listener, I’m also very interested how the TX-500 might play on the broadcast bands in AM mode.
You can bet I will review the TX-500 as soon as it’s available.
I recently sent another inquiry to lab599. If I receive any meaningful information, I’ll share it here on the SWLing Post. Simply follow the tag: TX-500
When the Raspberry Pi 4 Model B was introduced last year, I immediately purchased two of the 4GB models for my daughters. A the time, 4GB was the maximum amount of RAM available.
Both of my daughters have been using their Pi 4’s with a Raspian distribution to learn Python, Linux Command Line and, of course, to cruise the web. They each had a Rasbperry Pi 3B prior to this and found that–especially if loading videos or media-rich web pages–it would often crash the browser. The Pi 4’s, however, have been much more stable.
The Raspberry Pi Foundation launched the 8GB version this morning. The price is $75 US for the board only.