Shortwave listening and everything radio including reviews, broadcasting, ham radio, field operation, DXing, maker kits, travel, emergency gear, events, and more
Many thanks to SWLing Post contributor, Golan Klinger, who leaves the following comment regarding the Digitech AR-1780:
I bought my AR1780 from Jaycar when they were first announced because I was too impatient to wait for the Skywave SSB.
It looked good on paper and I was really pleased when I finally tried it out. It turned out to be one of the best travel-sized radios I’ve ever owned.
Being a radio junkie, I did buy the CC Skywave SSB when it was finally released and an XHDATA D-808 when they first offered them at a huge discount. Both are capable radios, the latter being almost identical to the AR1780, but if I had to choose one, I’d take the Digitech. I just love it.
And that’s the thing isn’t it, Golan? Sometimes our favorite radios just “feel” good.
Like you, I’m a bit of a radio junkie and own all three of these radios. My preference is the CC Skywave SSB closely followed by the AR-1780. I also love the D-808, but although it’s superior to the other two radios in terms of audio and is slightly more sensitive than the AR-1780, I still tend to reach for the other two radios first.
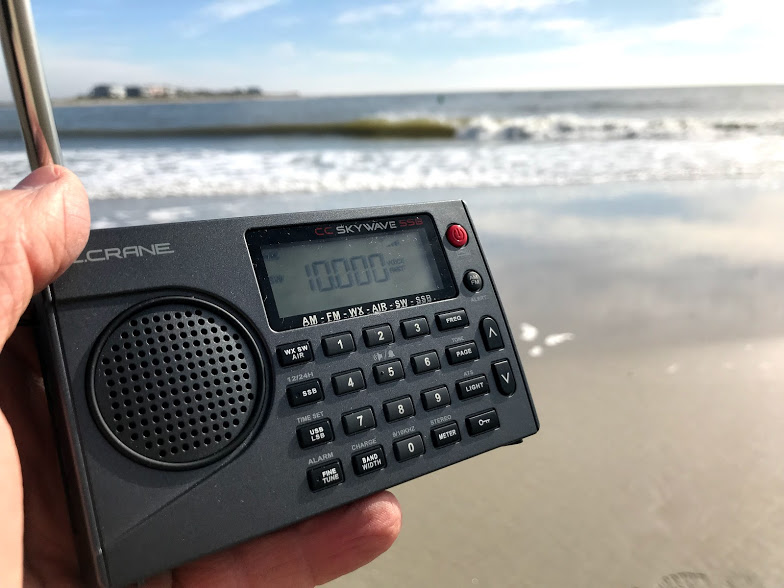
Nice weather and pics! Hmmm… it wasn’t so obvious to me before but it looks like the Skywave SSB is even smaller than the D-808. Now I’m jealous! ?
I find it pretty amazing is that just a few wavelengths away from the water, the signals seem to be tapering off a bit already, so standing IN the water and holding a portable is certainly getting the absolute best out of the radio. When I moved here (to the coast) I took a portable with a relatively stable station tuned in and drove to my beach listening post with it, then I headed back home right away. It seemed pretty obvious how the proximity to the water gradually improved the signals but of course that was a pretty unscientific test. I should repeat that with an SDR rigged up on the passenger seat and do that a few times in a row.
I’m off now to check how I can get a Skywave SSB to Europe.
It is quite amazing how large bodies of salt water enhance reception! 🙂 Although my home in the mountains has very little RFI, the ground conductivity is poor. Those who live on the coast get much better mileage from their antennas!
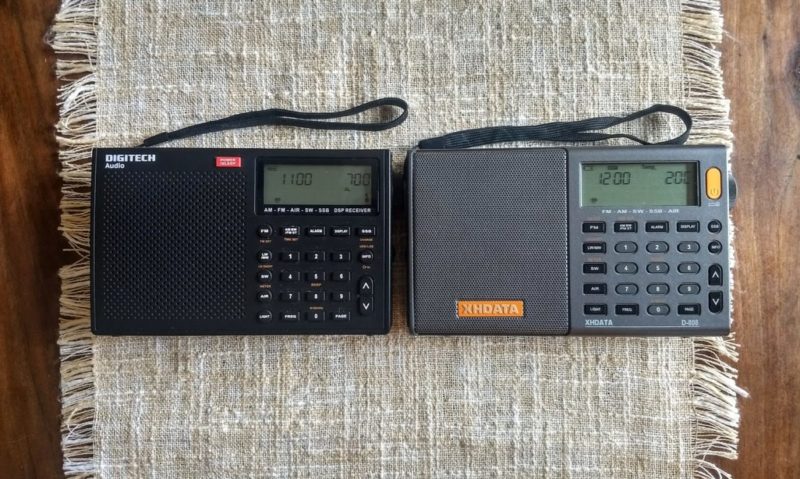
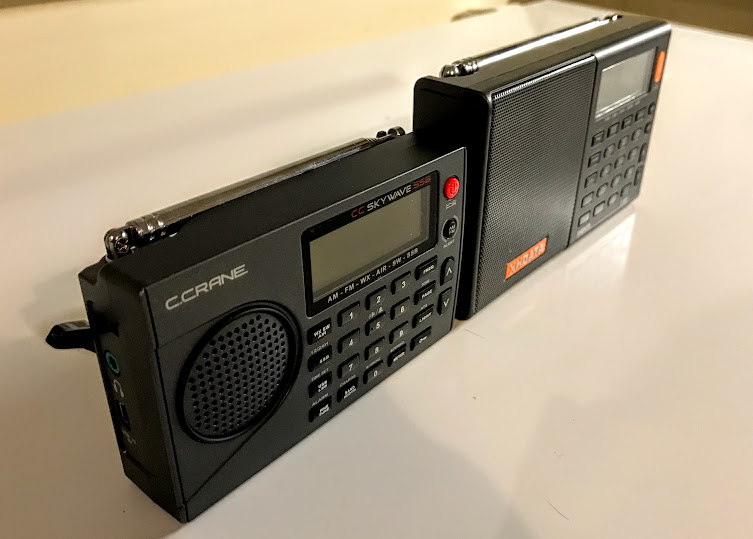
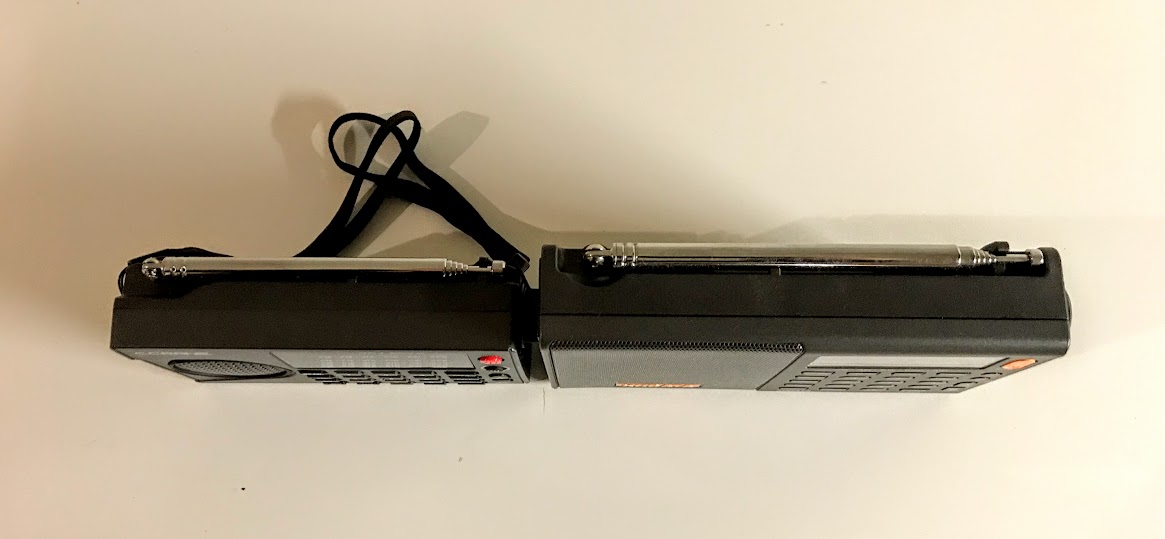
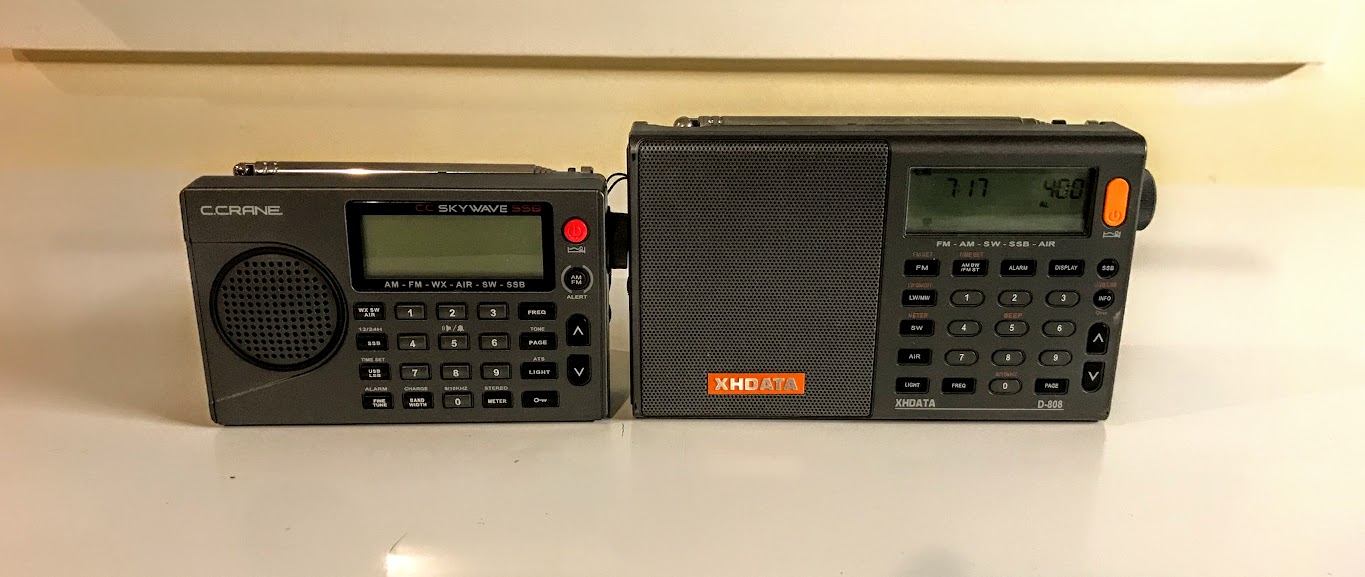
Regarding the size of the CC Skywave SSB and XHDATA D-808, based on my measuring tape, the D-808 is about 1.25″ wider, 0.5″ taller and perhaps 0.125″ deeper than the CC Skywave SSB. Here are a few photos:
Not a massive difference in size by any means, but the Skywave SSB is smaller in every dimension. Since I typically do one-bag travel, I always choose the smaller radio. Of course, the D-808 is more affordable than the Skywave SSB and is easier to purchase outside the US.
I don’t know of a C. Crane distributor in Europe. Perhaps Post readers might comment with suggestions?
Many thanks to SWLing Post contributor, Gary DeBock, for sharing the following guest post:
Supercharging the XHDATA D-808
Installation of High Performance AM and LW Loopsticks
By Gary DeBock, Puyallup, WA, USA, September 2018
Introduction
As a stock receiver the Chinese-made D-808 AM-LW-FM-SW-AIR portable is a very capable performer, with AM reception superior to that of any current Ultralight model, and impressive FM reception as well. The radio was certainly “inspired” (to use a generous term) by the C.Crane Skywave SSB model, which coincidentally was manufactured in the same part of China by C.Crane’s Redsun partner—with the first units going out the door a few months before the D-808 came into existence.
Because foreign intellectual property is routinely copied in China with no punishment from the government, XHDATA essentially had the chance to copy all the good points in the Skywave SSB design and improve upon its weak points as well. The only precaution that XHDATA took after this wholesale design appropriation was to forbid direct shipments of the D-808 from China to North America—presumably to avoid a copyright lawsuit by C.Crane. As such, the first D-808 models were sold to the rest of the world around January of 2018 at a price about half that of the Skywave SSB, while North American DXers were told that since the model couldn’t be shipped to the USA or Canada, they were out of luck.
Of course some D-808 models did make it into North America, where it was found to be a very capable portable with astonishing value for the price. Finally around March, an enterprising Chinese eBay seller came up with a plan to ship the model to North America through Israel, thereby skirting around XHDATA’s direct shipment prohibition. As of late August this eBay seller (harelan ecommerce) has already sold 62 of the D-808 models this way, even though he charges a premium for shipment to North America. Whether this single supply source will continue to serve North American customers is currently unknown, but out of the 7 models that I have purchased from him there hasn’t been a single D-808 model with any issues– despite the apparent lack of any manufacturer’s warranty offered on the radio.
Despite the D-808’s rather dubious design pedigree there is no doubt that the Chinese engineers (or reverse engineers?) did a superb job in creating an awesome radio for the money. Besides directly copying the Skywave’s SSB design and controls, XHDATA also made significant improvements, including a longer loopstick (providing clearly superior AM sensitivity), a much more powerful audio amplifier (correcting a serious shortcoming in the Skywave SSB) and a much lower price (about half that of the $169.99 Skywave SSB, for models shipped outside North America). Another great advantage for someone wishing to perform this loopstick upgrade are the perfectly located, highly accessible Litz wire connections on the RF circuit board—apparently used by the Chinese engineers to conveniently test out various loopsticks, and retained in the final product. The radio’s high quality construction and survivability in adverse conditions were proven repeatedly over the summer here, with the model surviving accidental exposure to a 104 degree (43 degrees C) car trunk temperature, exposure to moderate rain, repeated travel bumps, and use as the main receiver during a 9-day DXpedition to a plunging ocean side cliff in Oregon state. The 3.7v lithium-ion rechargeable battery provides superior run time for extended DXing sessions, and is included in the D-808 shipping package, along with a USB cord to charge the battery, a plug-in wire antenna (for FM,SW and AIR), a vinyl carrying case, and a pretty basic English instruction manual.
One thing you will NOT find supplied with the D-808 is a warranty card– either in the shipping box, or online. This is pretty standard practice in China, incidentally, where concepts like refunds and warranties aren’t generally part of customers’ expectations. This doesn’t necessarily mean that XHDATA won’t repair obvious problems in a new D-808, but it does mean that they aren’t assuming the obligation to do so. I have heard from one North American purchaser who received a new D-808 with a defective speaker, and he is still waiting for the model to be repaired (after paying the shipping charge to send it back to China). Each individual purchaser must decide whether or not this lack of any warranty is a deal breaker. But if you are looking for a final reason to perform this loopstick transplant, why not consider the fact that you will not be violating any manufacturer’s warranty by doing so??
Realistic Expectations
Although this 7.5” loopstick upgrade will certainly make your D-808 far more sensitive than the stock model on Medium Wave or Longwave, it is not designed to compete with large (2’ sided or larger) inductively coupled box loops, or any of the new FSL antennas. The sensitivity upgrade will boost the D-808’s MW band weak-signal performance up to the level of classic portables like the ICF-2010 and RF-2200; however, and since the D-808’s DSP-enhanced selectivity will generally exceed that offered by these classic portables, the overall DXing capability in the AM mode could be considered slightly greater. The D-808 does have SSB capability, although it lacks the SSB tuning convenience offered by the ICF-2010 and RF-2200. It also lacks the ICF-2010’s superb Synch detector, a big advantage in weak signal DXing. But in portability, versatility and DXing value for the price, the “Supercharged” D-808 is a real winner.
Project Overview
This construction article will provide the builder with step-by-step instructions to upgrade the XHDATA D-808’s loopstick to a much more sensitive, externally-mounted 7.5” Medium Wave or Longwave loopstick replacement. Both the Medium Wave and Longwave 7.5” loopstick designs have been thoroughly tested and proven effective in actual DXing by hobbyists other than the author, and as long as the instructions are followed carefully, this relatively inexpensive modification will provide a major improvement in the D-808’s weak-signal reception capability.
This modification project involves close-order soldering on the D-808’s circuit board, and should only be attempted by builders with reasonably good eyesight, good hand coordination and soldering experience. The project also calls for the use of a precut plastic loopstick frame to attach the antenna to the top of the D-808’s top back cabinet surface, and the construction of this precut plastic frame requires either the use of a 12” (or larger) power miter saw, or some rather lengthy cutting with a hacksaw. Use of a power miter saw SHOULD NOT be attempted by those without serious power tool experience! The author assumes that only qualified power tool operators will attempt to use a 12” miter saw to cut these frames quickly, and that other builders who wish to construct them will use a hacksaw. As such, only basic cutting instructions are provided for the 12” power miter saw users, while detailed instructions are provided for the hacksaw users. To assist builders who are not qualified to use power tools, the author has prepared a LIMITED number of these precut plastic loopstick frames on a power miter saw, which will be offered at cost to these builders on a first come, first served basis.
A final warning is in order concerning the step of gluing the precut plastic loopstick frame to the D-808’s top back cabinet surface. Although this step is not dangerous, it is pretty tricky. Since the superglue “grips” very rapidly, you will only get one chance to ensure that the frame is straight, and centered on the D-808’s top cabinet surface. Do yourself a favor, and make multiple “dry runs” to practice this important step before applying the glue! Failure to take this step seriously will probably result in a crooked loopstick frame—which will hold the antenna just fine for DXing purposes, but which will be an eternal reminder to the DXer (and everyone else) of the hazards of haste.
Construction Parts Required
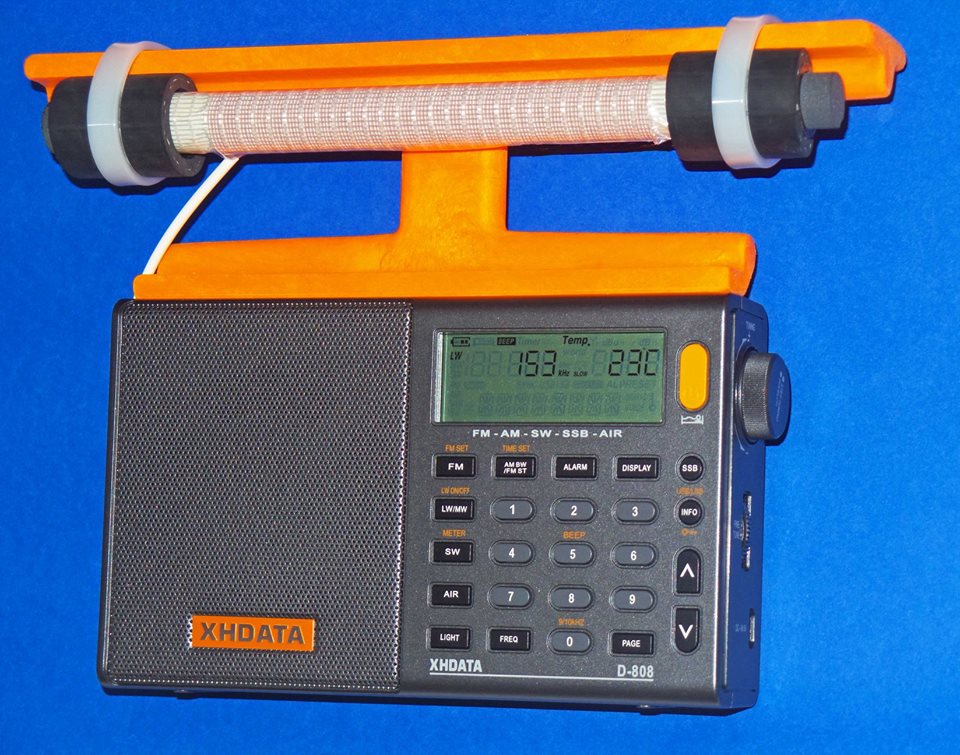
This 7.5” loopstick D-808 construction article will guide you through the assembly of either a 7.5” Medium Wave loopstick D-808 or a 7.5” Longwave loopstick D-808, so make sure that you order the parts necessary for construction of your chosen model. The picture above shows the parts that will be necessary for construction of either model, but the Litz wire and 7.5” ferrite rod components differ according to whether you are building the Medium Wave or Longwave model.
A) XHDATA D-808 Receiver, currently available to North American purchasers (for $112.87 + $10. Click here to search eBay.
B) Scotch brand “Extreme” strapping tape (any size roll)
Miscellaneous: One packet of Duro Super Glue (.07 ounce size), solder, 25w (low heat) soldering iron, hacksaw (or power miter saw), screwdriver set, sandpaper, needle nose pliers, diagonal cutters
D-808 Radio Preparation
Before starting the modification give the radio a thorough test on all bands, ensuring that all the stock model functions work properly, and that there are no issues with the display, speaker, headphone jack, battery or charging system. It’s also a good idea to run a daytime DX band scan on the AM or Longwave band (for whichever band you plan to construct an upgrade loopstick) and document the results—to use as a benchmark for the upgrade loopstick’s performance.
Step-By-Step Construction
Antenna Frame and 7.5 inch Loopstick Preparation
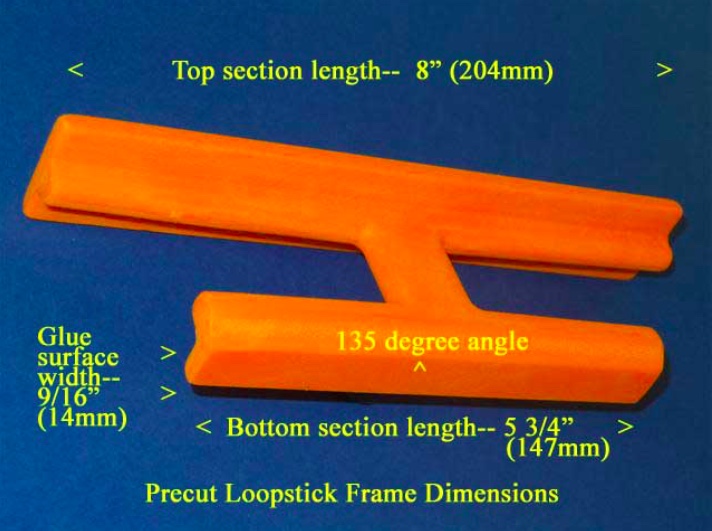
1) Refer to the photo below. Using the “Supercharging the Tecsun PL-380” article (posted at http://www.mediafire.com/file/du3sr5cd9thqvau/7.5inch-LS-PL380.doc/file or available directly from the author) carefully prepare the orange loopstick antenna frame according to construction steps 1-9, EXCEPT note that the lower (glue surface) edge of the antenna frame should be cut to a length of 5 3/4” (147mm), NOT 5” (127mm) as described in the PL-380 transplant article. Pay close attention to the safety precautions concerning power tool usage, and DO NOT attempt to use a power miter saw unless you have SERIOUS power tool experience!
2) If you are constructing an AM (Medium Wave) loopstick, follow construction steps 10-16 in the PL-380 transplant article to construct the antenna. If you are constructing a Longwave loopstick, follow construction steps 10a-16a in the PL-380 transplant article to construct the antenna. If you are constructing both loopsticks, MAKE SURE that the ferrite rod and Litz wire are only used in the antennas for which they were designed. Mixing up these items is very easy, and such a mistake will make both loopsticks perform like clunkers.
3) After construction of either the AM or Longwave loopstick, follow the instructions in steps 29 and 30 of the PL-380 transplant article to install a piece of 3 1/8” (79mm) shrink tubing, EXCEPT note that this length is slightly longer than the 3” (76mm) length called for in the PL-380 article.
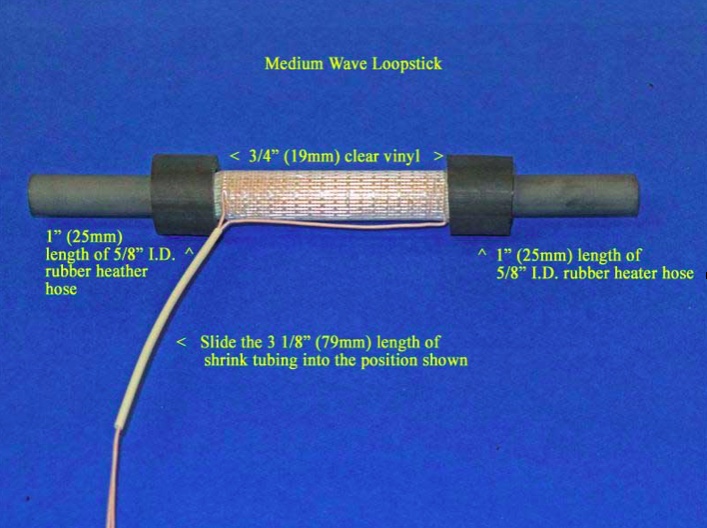
4) Refer to the photo below for the following three steps. [NOTE: Although this photo shows the AM (Medium Wave) loopstick, the procedures in this step are the same for the Longwave loopstick, although the position of the rubber hose lengths and clear vinyl inserts will be closer to the ends of the ferrite rod]. Carefully slide the length of 3 1/8” shrink tubing into the position shown, ensuring that there are no Litz wire kinks or bends inside the shrink tubing.
5) Take the two 3/4” (19mm) clear vinyl inserts and slide them onto the ferrite rod ends, twisting them up against the border of the Scotch “Extreme” tape ends to lock the tape in place under the vinyl inserts. Ensure that the clear vinyl inserts do not touch any Litz wire leads or coil turns.
6) Slide the 1” (25mm) lengths of rubber heater hose over the clear vinyl inserts until the appearance of the loopstick resembles the above photo. Ensure that the rubber hose sections also do not touch either the Litz wire leads or any coil turns. Finally, place the completed loopstick in a safe place until it is called for in Step .
Radio Disassembly
7) Refer to the photo above for this step. Remove the battery from the radio, and using a Jeweler’s Phillips screwdriver of the correct size, remove the six identical screws in the positions shown (NOTE: These screws have a tendency to stick inside their slots, even when the slots are turned upside down. If you cannot remove all six screws it’s not a major problem, but at least ensure that the screws are completely loose in their slots, and that you don’t lose any of them during the remaining steps). Grasp the tuning knob, and pull it out horizontally in a completely straight manner to remove it from the radio. Ensure that the battery, tuning knob and all removed screws are placed in a safe place until the radio is reassembled.
8) Carefully separate the front and back cabinet sections and place them down in the position shown in the photo below. Note that the front and back sections of the radio are connected by a ribbon wire plug-in system– ensure that this plug remains securely inside its slot at all times, and that no great stress is placed on the speaker wires.
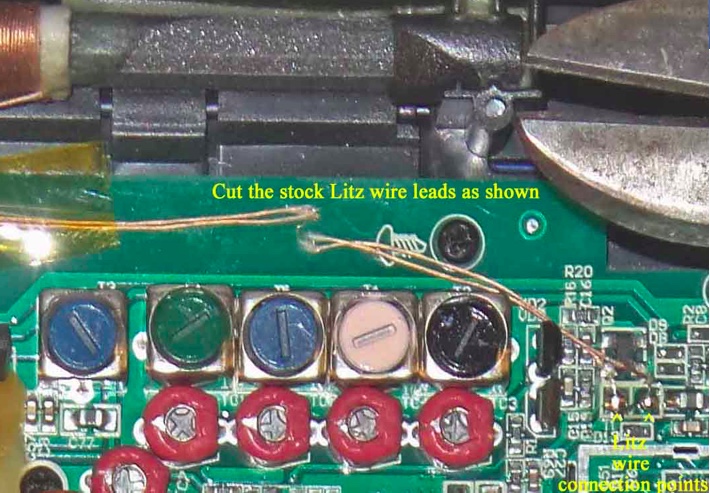
9) Refer to the close up photo below, and note the position of the two Litz wire soldering points on the circuit board (in the lower right corner of the photo). Using diagonal cutters, cut the two Litz wire leads at the position shown, UNLESS you wish to salvage this stock loopstick for other projects—in which case you should desolder the entire lengths of the Litz wire leads from the circuit board at the positions shown in the lower right corner (NOTE: The stock loopstick is of a fairly good design, and has an inductance that would be compatible with any DSP-chip Ultralight radio, providing an AM sensitivity boost in the process).
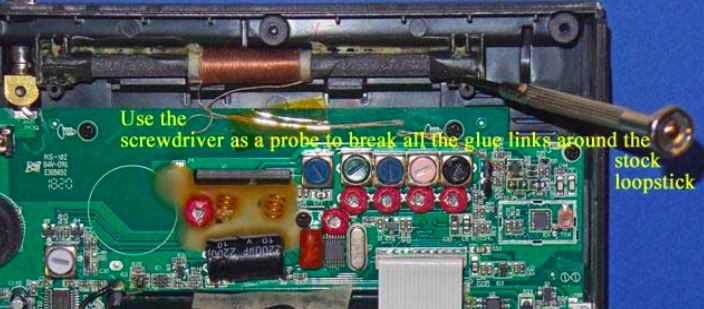
10) Refer to the photo below. Using a flat Jeweler’s screwdriver with a 1/16” blade, carefully probe around all four sides of the stock loopstick to break all of the glue bonds. Work slowly and carefully around the perimeter of the ferrite rod, including the plastic covers on each end. Once most of the glue bonds have been broken the ferrite rod will begin to shift around as you break up the few remaining bonds, but until this point work slowly and patiently to break up the glue.
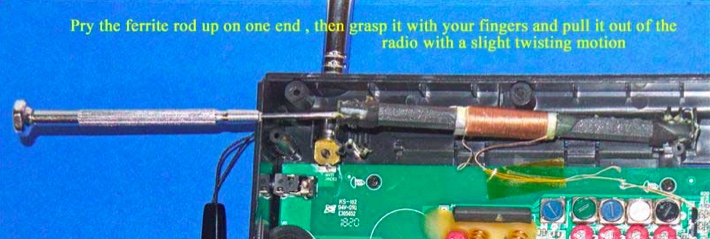
11) Refer to the photo below. Using the flat Jeweler’s screwdriver, once all of the glue bonds have been broken and the ferrite rod is loose in its slot, lift the ferrite rod out of its slot on one side by prying up under the plastic cover on the end of the ferrite rod. Ensure that the Litz wire leads have either been cut or desoldered from the circuit board, then grasp the ferrite rod with your fingers and pull it completely out of the slot with a slight twisting motion.
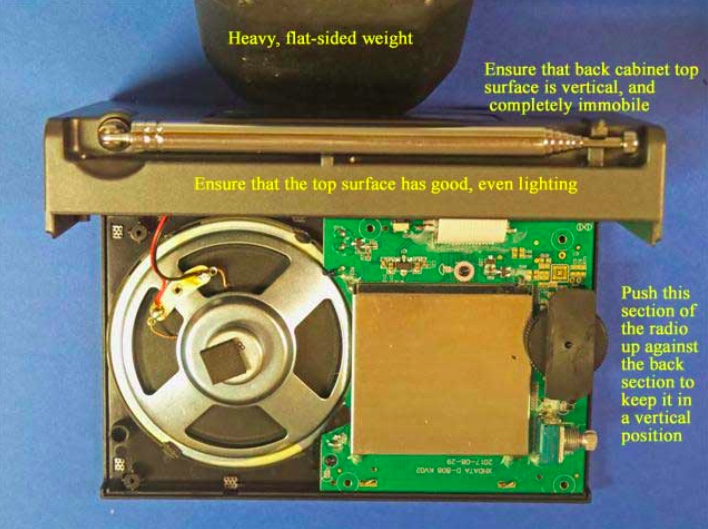
12) Remove the wrist strap, and refer to the photo below. Carefully pick up the two sides of the radio and place the back section in a vertical position as shown, with a heavy flat weight (barbell, or other heavy flat item) pressing up against the back cabinet section to keep it in a vertical position. Ensure that there is adequate, even lighting on the top cabinet section for the gluing process in the next step, and that the back cabinet surface will not shift around as you make the gluing “dry runs,” and perform the actual gluing of the loopstick frame to the top of the cabinet.
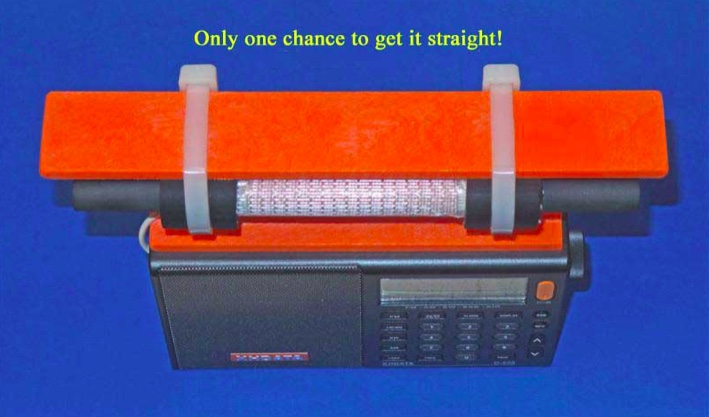
13) Take the previously prepared orange plastic loopstick frame, and ensure that its bottom glue surface is completely smooth and flat, with no uneven ridges on the edges of the glue surface (remove these with fine sandpaper, but ONLY on the ridges, and not on the rest of the flat glue surface). Using a damp paper towel, wipe the top cabinet glue surface and the loopstick frame glue surface to remove any dust or debris, then wipe them again with a dry, clean paper towel to ensure that they are both completely dry.
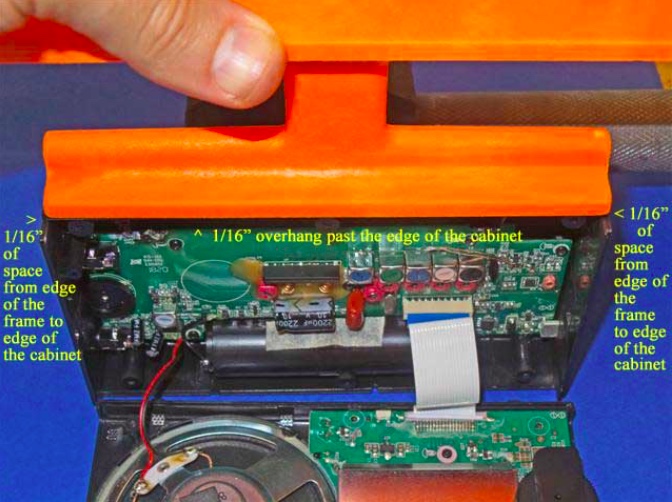
Take the loopstick frame and gently slide the frame over the top cabinet surface to ensure that both surfaces are smooth and flat. Refer to the photo at the top of the next page. Ensure that there is even, bright lighting on the top cabinet surface, and make several “dry runs” to place the loopstick frame in the exact center of the top cabinet surface (with 1/16”, or 1.5mm of space between the frame ends to the cabinet ends), and also 1/16” (1.5mm) of overhang above the front edge of the cabinet’s glue surface (NOTE: if you wish to simplify the process by lining up the front edge of the loopstick frame with the front edge of the cabinet’s glue surface it will still provide an acceptable result, but you will need to do some minor sanding of the whip antenna’s plastic slot post, as shown in the photo below. In either case, make repeated “dry runs” with the loopstick frame to practice placing it in the exact center of the top cabinet’s glue surface, since you will only get one chance to place it in the proper center position once the superglue is applied.
NOTE: The back of the loopstick frame has a beveled surface to permit full operation of the radio’s whip antenna after the frame is glued on the top of the cabinet surface. If the loopstick frame is glued with a 1/16” (1.5mm) overhang in front of the front edge of the cabinet surface then the whip antenna should have enough space for free operation. The alternative is to glue the two front edges lined up with each other to simplify the gluing process, in which case minor sanding may be required on the whip antenna slot post, as shown in the photo below.
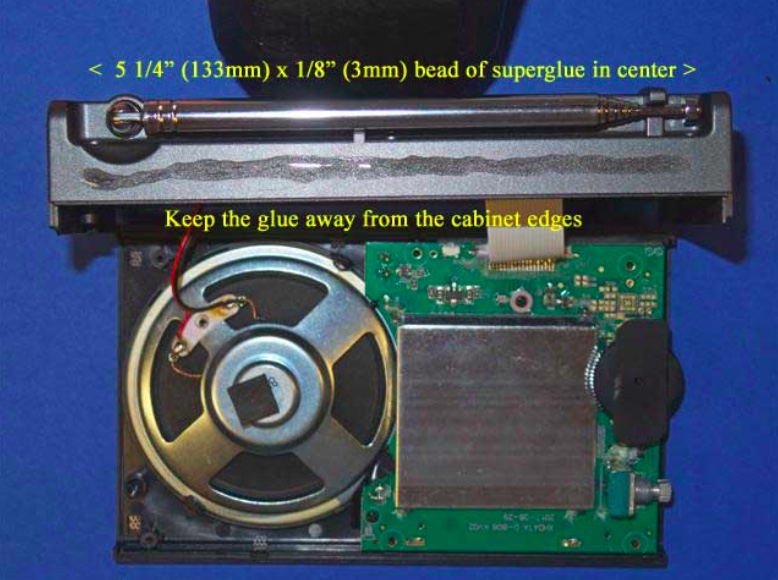
14) After making multiple “dry runs” and becoming familiar with accurate placement of the loopstick frame on top of the cabinet, refer to the photo at the top of the next page. After once again ensuring that the back cabinet section will not shift around during the gluing process, take the Duro superglue packet and apply a thin (1/8”, or 3mm) bead of glue along the center of the cabinet’s glue surface, extending it 5 1/4” (133mm)long, with equal spaces on both ends (as shown). While sighting the two sides place the loopstick frame carefully down in the correct center position as practiced previously, with the 1/16” overhang if desired. If satisfied with the position, press down on the frame to lock the two surfaces together securely. Usually the frame may be shifted around slightly within 1 or 2 seconds of placing it on the superglue, so use this brief time to promptly shift the frame to a straight position, if necessary. After a couple of seconds, though, you will need to be satisfied with whatever position the frame has ended up with (regardless, it will still hold the loopstick just fine, for DXing purposes).
15) After the loopstick frame is securely placed and locked on top of the D-808’s cabinet surface, place downward pressure on the loopstick frame along its length in order to ensure a tight glue bond throughout the entire top cabinet surface. Continue this process for about one minute, and sight both ends of the loopstick frame to ensure that they are both completely flat against the D-808 cabinet.
16) Inspect the front and back edges of the loopstick frame’s border with the D-808 cabinet for any glue seepage, and if any is found, remove it promptly with the 1/16” flat Jeweler’s screwdriver blade. Glue should not be allowed to run past the frame edges. This completes the process of gluing the frame to the D-808 cabinet.
7.5” Loopstick Installation
17) [NOTE: The installation procedures of the Medium Wave (AM) and Longwave loopsticks are identical, except that the plastic tie wraps and rubber hose sections are closer to the ends of the ferrite rod in the Longwave version. The following photos are for the Medium Wave (AM) version, but Longwave loopstick builders should follow the same steps, while referring to the Longwave model photo in the “Operation” section as a guide]
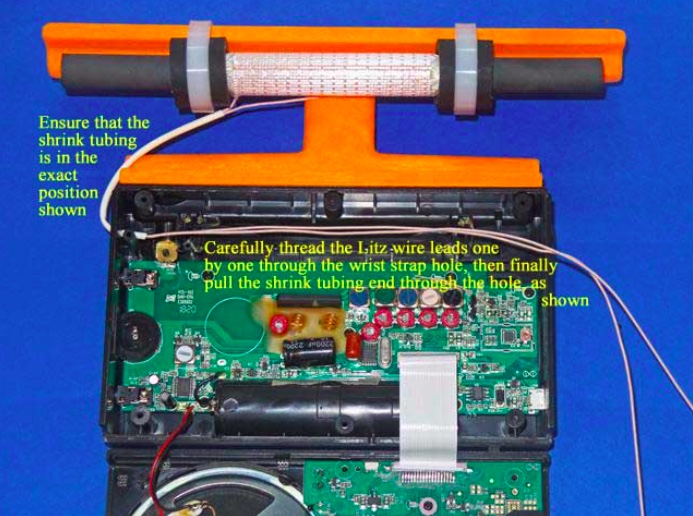
Refer to the photo below. Carefully take the previously prepared 7.5” loopstick and hold it in the position shown—in its slot, centered in the middle of the orange antenna frame, with the shrink tubing and Litz wire leads running down to the left. Take the two plastic tie wraps and install them in the position shown, centered over the rubber hose sections on the loopstick, while ensuring that no Litz wires or shrink tubing is bound under the plastic tie wraps.
18) Refer to the photo below. Lay the two cabinet sections down flat as shown, ensuring that the Litz wire shrink tubing is in the exact position shown (if it isn’t, carefully slide it along both Litz wires until it is in this exact position). Carefully thread one Litz wire end through the empty wrist strap hole, then thread the other Litz wire end through the hole, as shown. Finally pull on the two Litz wires together from the right while guiding the end of the shrink tubing into the empty wrist strap hole, and pull a short section of the shrink tubing through the hole (as shown) to protect the Litz wire insulation from friction damage.
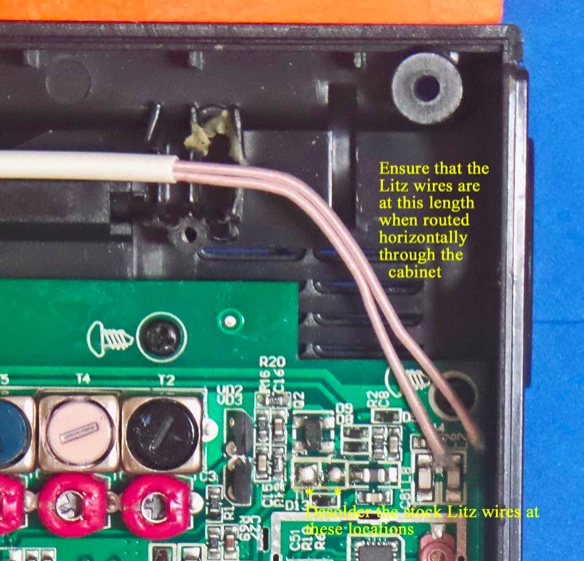
19) Refer to the photo below. Using the previous procedure to install shrink tubing (which is described in the PL-380 transplant article) install a 2.5” (63mm) length of shrink tubing over the two Litz wire ends, and shift the shrink tubing into the position shown in the photo. After this is done cut the two Litz wire leads to the lengths shown in the photo (NOTE: make sure that the ends of both Litz wires are cleanly cut, not frayed and at the minimum diameter before attempting to insert them into the shrink tubing. The process is much easier when the Litz wires pass smoothly through the shrink tubing).
20) Refer to the close up photo below. Using a low heat (25w) pencil-type soldering iron, remove the two stock Litz wire leads at the positions shown, taking care not to use excessive heat, or touch the adjacent components. Ensure that the new Litz wire leads are at the length shown when the leads are in a horizontal position throughout the cabinet, and cut them to this length if they are not.
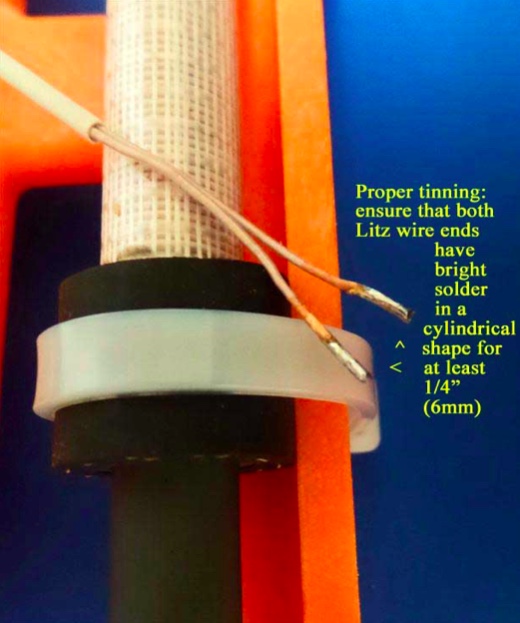
21) NOTE: When tinning the 250/46 Litz wire it is essential that all of the individual Litz wire strands be completely soldered together for a length of at least 1/4” (6mm), with bright, shiny solder around the circumference of the Litz wire ends for this minimum (1/4”) length. The Litz wire must be heated with a clean, hot soldering iron around its circumference in order to melt the solder properly for this step]
Refer to the photo above. Pull the Litz wires up out of the previous position, and place a clean rag underneath them (on top of the circuit board) to completely protect the circuit board from any solder which might accidentally drop down during the tinning process. Using your hot 25w soldering iron melt a generous amount of solder on its tip, and work the soldering iron tip slowly and patiently around the circumference of each Litz wire end until there is a bright, shiny solder length of at least 1/4” (6mm) in a cylindrical pattern at the end of each Litz wire. When doing this, take great care not to allow any solder to drip down onto the circuit board below (i.e., make sure that your rag completely covers the circuit board). The final appearance of your Litz wire lead ends should resemble those in the photo.
22) When your Litz wire lead ends resemble the photo above, cut the soldered portion down to a length of 3/16” (5mm) and observe the appearance of the end of the Litz wire. It should have a bright, solid circular shape, with no gaps or individual Litz wires showing. If not, reheat the end of the Litz wire while adding some solder, and repeat this step.
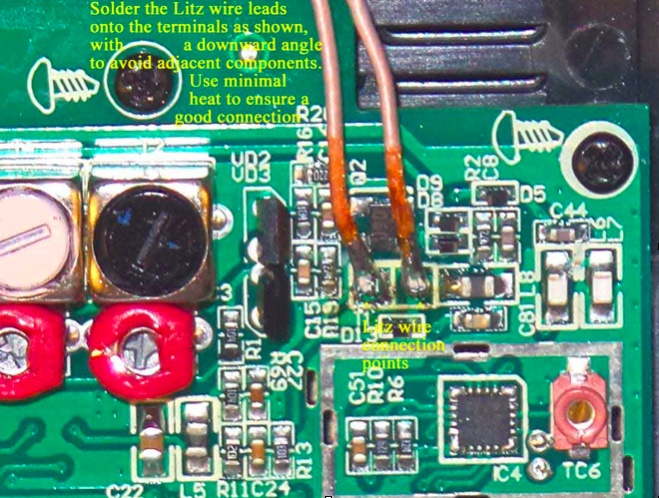
23) NOTE: The Litz wire connection points on the circuit board are surrounded by other important components. It is important to avoid solder drips on these components, or solder bridges to their leads. Solder the Litz wire leads down at an angle to avoid these surrounding components, and use the minimum amount of heat and solder to ensure good electrical connections)
Refer to the close up photo above. Following the precautions described, solder the two Litz wire leads down onto the circuit board at an angle, as shown in the photo. After soldering, make a close visual inspection to ensure that there are no solder bridges across the Litz wire connections, or nearby components. The remaining length of the Litz wire leads should be routed in a horizontal manner to the wrist strap hole.
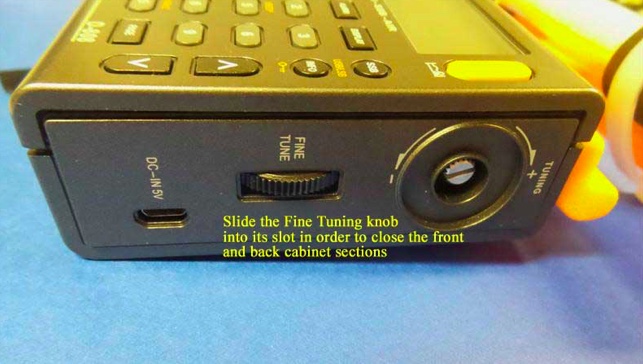
24) Carefully pick up the front and back cabinet sections, and hold the back cabinet section fairly close to the front section (as the radio would normally be oriented, when assembled). Refer to the photo below, and carefully insert the “Fine Tuning” control thumbwheel from the front cabinet section into its slot on the back cabinet section in a sideway movement. This will allow you to fully close the front and back cabinet sections in the next step.
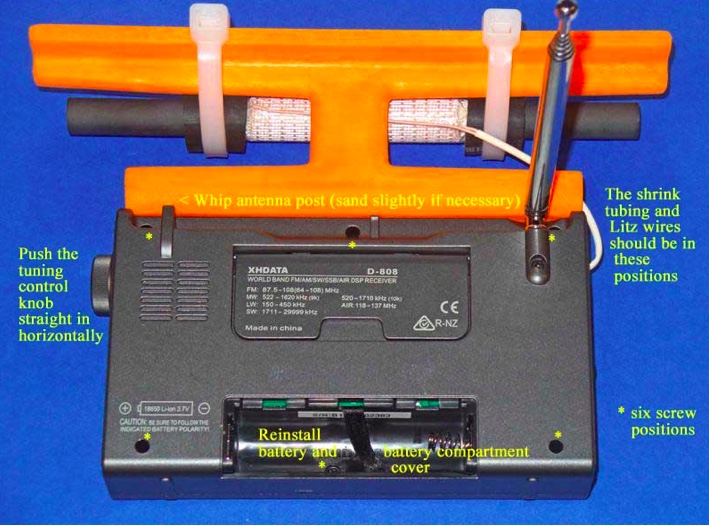
25) Refer to the photo below. Pick up the two cabinet halves and carefully snap them together (this action should not require any great force). Place the radio face down in the position shown (with a soft surface underneath, for protection), and using the Jewelers Phillips screwdriver of the correct size, carefully screw in the six screws that were loosened previously, starting with the screw near the whip antenna post (you should pick up the radio temporarily and hold the two cabinet sections together tightly at this corner, as you do this).
After all six screws have been retightened take the Tuning control knob and press it back onto its shaft in a straight horizontal motion. Finally, reinstall the battery and battery compartment cover to finish up the reassembly.
TESTING AND OPERATION– MEDIUM WAVE MODEL
This 7.5” transplant loopstick is designed to provide a major boost in sensitivity from 530-1700 kHz, and if the antenna is working properly both the weak signal reception and the radio’s nulling capability should be greatly enhanced. It is normal for the antenna to receive more background noise on the low band frequencies, although the sensitivity boost should be substantial across the band.
The construction design of the orange antenna frame allows full usage of the whip antenna for checking SW parallels of MW-DX stations, although if you chose to glue the antenna frame flush with the front of the back cabinet surface to simplify the gluing process, you may need to sand the whip antenna slot post slightly to allow free movement of the whip antenna (see step #13).
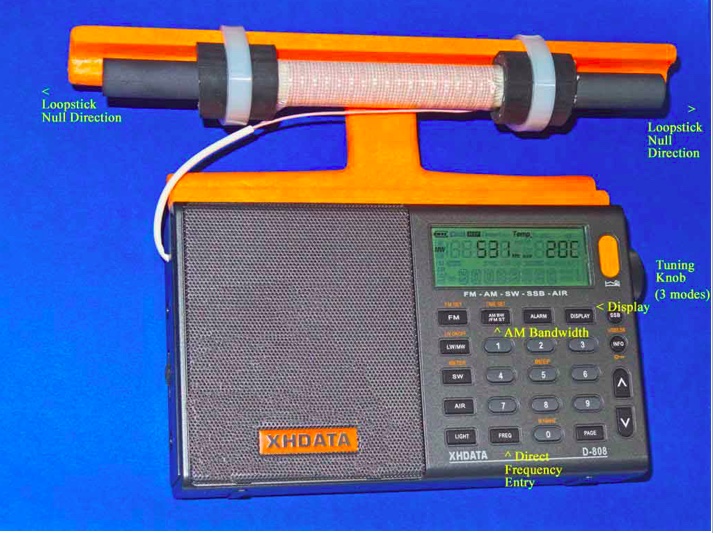
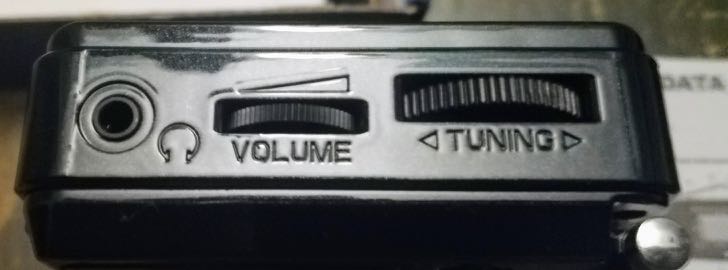
In the photo above, some of the important controls for Medium DXing are highlighted. The AM Bandwidth control allows you to choose multiple DSP filtering selections to enhance selectivity as desired, with the narrowest filtering (1 kHz) providing both the sharpest selectivity and the best weak-signal sensitivity. However this 1 kHz setting also has the poorest audio fidelity, with the higher audio frequencies typically cut off by the DSP filtering. As such, for regular DXing far away from strong local pests, the other AM Bandwidth settings may be more suitable. The Direct Frequency Entry key allows you to manual enter in any MW frequency, to which the radio will shift once the numbers are pressed on the keypad. The Tuning knob has three different modes, which can be toggled by pressing the knob horizontally. The first mode is tuning in either 9 kHz or 10 kHz steps (depending on which of these step you have selected), while the second mode is tuning in 1 kHz steps. The third mode is to lock the frequency in place. Pressing the knob again will return the tuning to 9 or 10 kHz steps.
The XHDATA D-808 has multiple display functions, which can be toggled by the indicated key. The first option is the temperature in either Centigrade or Fahrenheit (depending on your pre-set preference), while the second option is the alarm time. The third option is the current time (which you need to set according whether you prefer UTC or local time), while the fourth option is the received signal strength in both dBu and dB.
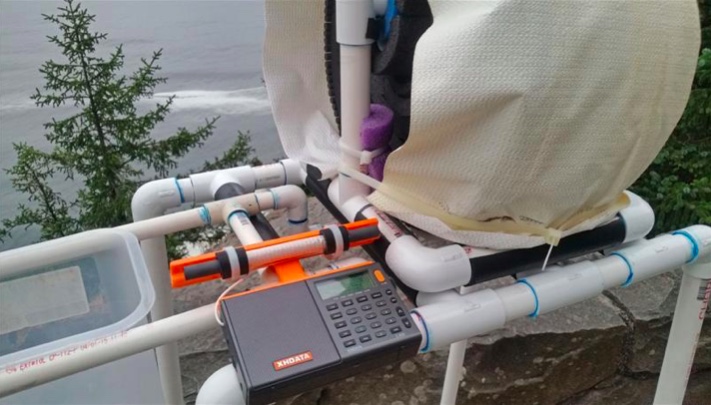
The supplied 3.7v lithium ion battery has superior run time, and may be easily charged using the supplied USB cable to either a computer or AC outlet (with the appropriate adapter). As reported in various posts throughout this year, the D-808 model has rugged construction with an excellent record of survival under tough conditions, including hot summer days, moderate rain exposure and extended usage as the main receiver during a 9-day ocean cliff DXpedition in Oregon—performing flawlessly at all times.
Conclusion
It is the author’s sincere hope that this “Supercharged” D-808 model will bring you a lot of DXing fun during travel, as well as at other times. When conditions are good you should never underestimate this enhanced model’s potential of receiving awesome DX beyond your expectations—as an example, here is the stand-alone performance of a 7.5” loopstick D-808 in receiving 1017-A3Z in Nuku’alofa, Tonga (10 kW at 5,632 miles/ 9,063 km) on the ocean cliff near Manzanita, Oregon at 1301 UTC on August 8th of this year:
Not only Tonga is received, but even the Australian horse racing station 1017-2KY in Sydney (5 kW at 7,630 miles/ 12,280 km) is received as a weak co-channel in the middle of the recording. My hope is that you all will be so lucky with your new Supercharged D-808!
73 and Good DX,
Gary DeBock (in Puyallup, WA, USA)
Absolutely amazing! Thank you for taking the time to put this procedure together and describing the process in such fine detail, Gary! Hats off to you!
Click here to read all of Gary DeBock’s posts on the SWLing Post.
Many thanks to SWLing Post contributor, 13dka, for the following guest post:
Tecsun S-8800 Review
by 13dka
Looking for a new toy again I recently revisited the Tecsun S-8800, which looked like it could replace both my battered old Grundig Satellit and my Tecsun PL-660. Being in production for a few years now, and with the “birdies” situation ironed out long ago, the S-8800 has gathered much acclaim by now but also a few somewhat contradicting reviews. For example, one review reports that the S-8800 can cope with larger antennas, another one states the exact opposite, one praises the MW performance, another one attests only average sensitivity, and only one mentioned an unpleasant detail I’m going to emphasize on in a bit.
All reviews touted the improved SW performance in AM and SSB though, and that was reason enough to make my own experiences. Testing it turned out to be a bit of an emotional rollercoaster though.
I hope I can share more than only redundant bits of information about the radio, and I’ll skip most of the general information you can read in most other reviews.
Off to the 13dka radio test site at the dike!
13dka’s SWL Happy Place
General
Like the technically somewhat similar Tecsun PL-880, the S-8800 is a triple conversion receiver and has 2 conventional IF stages, the third IF stage is using a Si4735 DSP chip again, providing the filters and all that jazz.
Tecsun seems to have thrown a lot more parts into it than in previous radios, plus a pretty big ferrite rod (covering 8-9/10th of the radio’s width) with individual LW and MW coils (most of the smaller receivers have only one coil), a 108mm telescopic whip and of course the “gun metal” knobs. Designing a radio with a rather simple front panel and making a remote control an integral part of the operation concept (like it is reality with TVs for a long time) is a charming oddball approach, in a way reviving an utmost luxurious feature of 1930s high-end radios. So let’s cut to the chase and talk performance:
Longwave and Mediumwave
On LW and MW, I first compared the S-8800 with my old Grundig Satellit 400 at home. The old clunker has similar dimensions, a big old speaker bass/treble controls and it was known to have an average sensitivity on the AMBC band in its time, when all the great, now vintage AM performers were still ubiquitous, so that’s rather a “Jay Allen average” than an “average of the mediocre AM radios of this millenium”. I think Jay Allen might rate it 3 stars.
Longwave
The first station I tuned in was the BBC LW transmitter network on 198kHz and it turned out a tad more noisy on the Satellit. Great! I could also pick up Medi1 and Kalundborg a smidge better than on the Grundig, and in the early evening, out at the beach I was picking up stations on all still populated channels on LW (minus 180kHz where it has one of the remaining birdies). The other new portables I currently own (PL-660, D-808) are far away (PL-660) and far, far, far away (D-808) from that kind of performance.
Mediumwave
Unfortunately that good impression vanishes gradually when leaving the long wave for the NDB band (still good) and finally medium wave. Before I left the house to test the radios on the electrically quiet beach again, I was checking out one of my favorite border case stations (low power station from The Netherlands on 1602kHz, whatever their name is this week) and that made very clear already that the S-8800 can’t hold a candle to the Satellit, at least not on the top end of the MW band. Despite all the noise indoors, on the Satellit I could easily recognize the song being played while the S-8800 didn’t pick up anything at all.
On the beach it turned out that – despite the ferrite rod being twice the size – I find it only marginally better than the PL-660, and not close enough to the little XHDATA D-808 (if you’ve read my D-808 review you already know that this little radio is almost on par with the Grundig on MW):
Of course I have read Thomas’ assessment of the AM performance so I was prepared to be underwhelmed. But at least you can connect some high gain MW antenna to make up for the missing sensitivity and be happy again, or can you?
A not so nice surprise
The unpleasant detail I mentioned before is: the Int/Ext Antenna switch does not turn off the internal ferrite bar antenna. Jay Allen mentioned it in his review, it was the only review with that detail and unfortunately I overlooked it. How does that matter?
The main issue is this: if you’re (like me) forced to use outdoor antennas to escape high indoor noise levels, the internal loopstick just won’t let you. The external antenna will just increase the SNR a bit when the station is strong enough anyway. Even in a low noise environment, the internal loopstick will needlessly add noise to the signal received from a high-performance active loop or FSL antenna.
That also explains a paragraph in Thomas’ S-8800 review:
“I also hooked up the S-8800 to my large horizontal loop antenna. This certainly did improve MW reception, but not as dramatically as I hoped. Additionally, it seemed to be very sensitive to RFI in my shack even when hooked up to the external antenna.”
There’s more external antenna idiosyncrasy: only the BNC jack is wired to the “Ext” position of the antenna switch, the “hot” (red) Hi-Z terminal is active when the switch is in the “Int”-position, it just seems to save you an alligator clip on the whip.
The dedicated “AM antenna” terminal was in part what sold the S-8800 to me. The label made me assume this would be specifically wired to the AM circuit but as it turns out it’s just a generic high impedance input and I really didn’t anticipate that the internal loopstick remains always active (or in case of the Hi-Z terminals, the retracted whip). Yes, technically you can connect an external antenna for MW, practically…YMMV.
To conclude this section, the final outcome of this antenna connector issue plus the not so brilliant MW sensitivity was that not even my active ML-200 loop (connected to the BNC-jack) could improve reception on 1602kHz enough to make the S-8800 get at least a bit into the ballpark of the Grundig with its loopstick antenna. The currently mounted small 80cm rigid loop on the ML-200 just couldn’t produce enough signal to lift the station over the noise that much.
Shortwave SSB
As the other reviews reported already, Tecsun has obviously worked on the AGC issues their former products had. I can confirm this so far, the AGC does not show the distorted onset of leveling anymore – unless the signal is very strong. But the leveling happens much faster than e.g. on the PL-880 so the remaining blasts of distortion are quite short:
A more relaxed AGC release time would save us most of those too. I noticed AGC pumping effects from strong signals in the spectrum neighborhood only with a big antenna connected. But unfortunately there is more…
Stuff you have to live with:
In his great review, Thomas mentioned the auto mute sometimes interfering with reception. I noticed this too (with all bandwidths on SSB) and I credited this to very low noise figures. When the bandwidth is narrow (=less noise) or if you have a very low noise floor anyway like when tuning through 25-30MHz, the receiver gets muted over the entire chunk of spectrum, just to intermittently and pretty suddenly pass the noise again. Sounds like a broken antenna cable and has some potential to confuse people:
Too bad that setting auto mute to ’00’ doesn’t actually turn it off in SSB mode so there’s likely no remedy for that.
On my example, there is absolutely no difference between the 3kHz and 4kHz SSB filters. A working 4kHz filter would have been a good choice for ECSS reception.
Another remaining quirk at least on my specimen of the S-8800 is a slight FM modulation of an oscillator in SSB, particularly with strong signals. You can hear it best if you create a heterodyne or listen to CW, the tone sounds a bit hoarse, so do voices and I’m not sure whether or not this could affect narrow-bandwidth digimiode decoding. The front panel (namely the bandwidth knob area) is quite susceptible for “hand capacity”, the frequency varies a bit when you move your hand in front of the S-8800. This is not uncommon with portables of course, but my D-808 for example has its “Theremin playing area” on the back of the radio.
In this clip you can hear both the “hoarse” modulation and my hand waving to you.
This leads me to calibration and frequency drift. The S-8800 can be calibrated on SSB (see the “Hidden features” section below), however this turned out to be a (too) fast moving target. I don’t know if it’s the VFO or the BFO but it is so temperature-dependent that 6°C temperature difference equates to a quite substantial (for SSB) drift of 150Hz. Whatever oscillator it is, it seems to lack any temperature compensation measures, with all the implications that may have on relaxed SSB listening, digimode decoding and ECSS reception when the temperature isn’t quite stable where you want to use it. After calibrating it, it’s often slightly off again within the same minute. My cheap little D-808 won’t drift even when I take it from an overheated apartment into a -5°C cold winter storm.
The good stuff
Now to the fun part! When I compared the SSB performance of the S-8800 with my PL-660 the first time, I found them very close for some reason. I could find only one weak station that came in noticeably better on the S-8800 and while I was happy that it wasn’t worse than the PL-660 I was also a bit disappointed.
Timeline: 0:00: PL-660, 0:10: S-8800 receiving the “Gander Radio” VOLMET.
Then I repeated the test a few days later, this time a bit more into the evening and the outcome was very, very different. The S-8800 won every single weak signal comparison with ease and sometimes in a way that made me think my PL-660 must be broken.
But then I could help the PL getting a lot closer by simply holding it in my hand, the difference was that I had placed the PL-660 differently so I could record both radios easier. The factor I forgot to put in the equation was that the S-8800 is absolutely not depending on anyone holding it to give it some counterpoise – that and the long whip is certainly a part of its advantage, and the receivers would be much closer when used with the same external antenna. With the radios just standing there tho (and that’s what most people will do with their radio instead of holding it in their hand), the difference is remarkable nonetheless and I also learned that you should always look and listen twice when testing radios!
When I repeated the test yet again but granted the PL-660/D-808 the litte bit of counterpoise they seem to need (I let them rest on the car door instead of holding them), the results were not that unequivocal anymore. However, the receivers were 50% on par, the S-8800 was clearly better the other 50% and overall the other two receivers could not score a single point for them. I think that shows that the S-8800 really is a hair or three better. Beyond the increased sensitivity and minus the frequency drift, SSB reception feels more mature, the the S-8800 behaves more like a regular communications receiver now and the big speaker is a big plus. Of course that means there should be also an improved reception of…
Shortwave Broadcasts
I know that the S-8800 has inherited the “Enjoy broadcasting” and “BCL RECEIVER” lettering from the cheap S350, but after stepping the PL-660 and the S-8800 through all shortwave broadcast bands, I felt that’s exactly hat it was made for, and it shows!
There is no doubt that a big speaker can create the illusion of better reception, but I think I don’t fall for that easily and rather listen to the background noise and how intelligible the “content” is. While the comparison with the PL-660 often ended up in a tie when I subtracted the impact of the speaker in my mind, there were indeed some stations where the S-8800 had remarkably less noise than the PL-660. But of course the big speaker is giving the S-8800 a permanent edge on all reception cases, and it’s a real joy to listen! Combined with lower noise and a generally more stable signal (through better AGC) this made quite a difference between the two.
Bottom line is that when listening to shortwave broadcasts, the S-8800 gives you the warm and lush sound of yesterday’s famous receivers while it technically delivers the best performance of all Tecsun portables so far. If you fancy music programs on shortwave and if you don’t mind the price for the luxury and performance, you’ll enjoy this radio a lot.
FM
Short story: my specimen of the S-8800 lacks the very good FM band sensitivity of the PL-660 or the XHDATA D-808. While the latter radios present my favorite marginal case station 100km away fairly with some noise at sea level, the S-8800 just doesn’t receive that station at all, no matter how I position the whip. It’s not exactly worlds between them but considering that (assumedly) most of the FM receiver is in the Si4735 chip that it shares with a couple of great FM performers from the same company, this is a bit surprising.
Signal handling capabilities
The S-8800 is said to have a pretty robust frontend, which I found true but I want to put that a bit into relation. My “lonely beach/dike listening post” sports 2 abandoned steel flag poles of 6 and 8m height. They can serve as support for wire antennas, or easily be used as an antenna themselves by inductively coupling them to the receiver – IOW by winding a wire 2-4 times around the pole (you could use the Eiffel tower as an antenna this way) and connecting the other end to the radio.
For some reason this contraption produces quite massive output voltages, but I could always use it for a quick and thorough (and due to the location QRM-free!) reception improvement with my PL-660 anyway. Why?
The PL-660/880 have a 3-position (DX, Normal, Local) switch. I think it turns off the input preamp in the “Normal” postion and adds a simple attenuator circuit in the “Local” setting. The latter is sufficient to tame the output of all sorts of antennas (including the flag pole) enough to make my PL-660 work just fine with that on all bands.
The S-8800’s sensitivity switch on the other hand has only 2 positions and telling from the results it really only turns off the preamp. Now it actually acts up much less on the flag pole than the PL-660 in its comparable “DX” and “Normal” positions, so obviously Tecsun has put some effort into making the frontend more robust indeed. But it seems they thought “that should do, let’s ditch the 3rd (attenuator) position and save 3 resistors” and that left me with many (but tolerable) images across the entire shortwave above 3 MHz, and a heavily image-infested 160m band. BTW, a few soft images from (I guess) 49/41m blowtorches could be heard around 29MHz with only the whip.
A word on the audio
I believe that the “legendary” status of the Grundig and Zenith lines of world band receivers is partly owed to their big sound. They had their music loving and program listening audience in mind, and Tecsun’s choice of casing, big speaker, the bass and treble controls are certainly taking the same line.
Compared to my Satellit 400 (80s model, but still has much of that “legendary” sound), the Tecsun sounds a bit more boomy in the lower mids while having a less super-deep bass response than the Grundig, which also sounds more neutral. Besides these very unimportant distinctions, the S-8800 does sound big and that also helps reception – lacking low mid/bass content can impair intelligibility as well, and it causes more fatique on long DXing sessions.
The bass/treble shelving EQ is certainly more sophisticated than the Grundig’s, it has quite sharp cutoffs at very sensibly chosen frequencies, so turning the knobs down will leave the main chunk of the mid range completely unaffected and just helps removing rumble or the 5kHz beat frequency from a band neighbor, or add some nice hifi-highs and beefy low end when you turn them all the way up. In other words you can continuously blend the speaker sound from perfect “voice communications” style to “dad’s big old radio”.
Hidden functions
Of course the S-8800 has some unofficial “power off” and “power on” extra functions assigned to the number keypad on the remote (they all work by pressing and holding a number key for up to 10 seconds). Some are identical to the PL-880, some are different:
0.) I found calibrating the S-8800 on SSB works with the same method used on the PL-880: Tune to a station with a known frequency, switch to USB or LSB and use the fine tuning knob to tune for best audio/music playback. An alternative way of doing this is downloading a free spectrum analyzer app for your smartphone (“SpecScope”), tuning the radio 1kHz off frequency so you get a nice heterodyne tone on USB or LSB, then using the fine tuning knob to tune the tone to hit exactly the 1kHz mark on the analyzer display. Your last 2 (Hz) frequency digits will now show an offset frequency.
1.) Then press and hold the ‘0’ button until a ’00’ appears in the top right corner of the display and the last 2 digits of the frequency readout start flashing. Release the button and quickly use the fine tuning knob to reset the last frequency digits to ’00’ (the number on the top right corner should be changing while doing that), then immediately hold the ‘0’ key again to confirm – tadaa, the offset should be gone while the last 2 frequency digits show ’00’ now. This all needs to happen pretty quickly and with the right timing, so it may take a few attempts to get it right.
2.) With the radio off, button ‘2’ turns the LW band on/off.
3.) Press and hold the ‘3’ button while the radio is off to toggle between permanent and “intelligent” display illumination.
4.) When the radio is turned on, this button enables access to the extra functions of the number 6 and number 9 keys. The display will read “On” when you perform this the first time, doing it again will turn it off again.
5.) Radio on, set to FM band: this toggles between 75 (US) and 50 (anywhere else) microseconds deemphasis on FM.
6.) Radio on: When enabled using the ‘4’-button as described before, holding the ‘6’ will toggle the (annoying) dynamic bandwidth feature off and on. You can set this independently for AM and SSB. Ideally to zero, because it automatically resets your bandwidth setting and since this is happening in steps, it sounds quite strange. The PL-660 uses a stepless dynamic envelope following low pass filter (which is I believe what they called “DNR).
7.) This is still a mystery to me. On the PL-880, this button apparently controls the line out level on FM. On the S-8800 it (ostensibly) seems to control the S-meter bias with numbers running from ’00’ to ‘+99’ and ‘-99′ for all bands. Positive values reduces the S-meter display which made me curious if it rather controls AGC level or gain at some stage, but it really seems to affect the S-meter display only.
8.) Radio off: Toggles the seconds display on the main clock (when the clock is displayed instead of frequency).
9.) Another important one: this controls the threshold of auto squelch/soft mute. If you want to turn that off, turn it down to ’00’ with the main tuning knob, then hit the ‘9’ key again. You need to do this for AM, FM and SSB separately.
Random stuff
The S-meter was indicating a permanent base level of 2 bars even at my remote beach listening post. But even though it can apparently be “calibrated”, a 5-bar indicator is quite a step backwards from the 99-step RSSI meter of the PL-880.
After an initial discharge and recharge cycle, the 2x2000mAh “18650” batteries gave me a continuous runtime of 21 hours. When you connect the charger and then turn on the radio, it stops charging unless – and this seems odd – you are in FM mode. A full charge while listening to FM radio took 4:41.
Verdict
I had a pretty hard time making my mind up about this radio. It has so elaborate details, so much design improvement and costly parts went into it but I feel like it doesn’t quite meet the expectations Tecsun created with this radio. Sadly, it has a few things that were started ambitious and ended underwhelming.
It got a huge 2-coil loopstick and somehow they managed to make it perform slightly worse than a 70€-radio with not even half of that loopstick size, they gave it 2 external antenna ports but they disappoint MW enthusiasts right again by keeping the loopstick always active, and how FM could turn out less sensitive than many radios with the same Silicon Labs chip (including their own models) is beyond me.
They improved the front end but then they dropped the attenuator, which costs the overall flexibility and better overloading-resilience their other radios have, they fixed the SSB issues of the predecessors and introduced a free-floating BFO with a mind of its own.
The price tag is making these downers certainly weigh heavier, and I think without them this radio may have turned out to be a real classic.
On the plus side I found a radio that really excels on shortwave. Shortwave program listeners can feast on a most sensitive, selective, luxurious and well-behaved portable with a big sound and I think there’s probably no current portable that could compete with that.
Ham radio aficionados get improved SSB reception and if there wouldn’t be this “cheap 70s receiver trademark” unstable oscillator, it would come close to communications receiver performance levels (minus the frontend needed for big antenna voltages).
That the price reaches into the ballpark of pre-loved high-end(-ish) JRC/Icom/Yaesu communication receivers or buys you a mint-condition ICF-2010/2001D may seem like a problem too. But then again, none of those radios is perfect either, and only the Sony is a portable.
Despite the quirks, the S-8800 is still a great, valuable radio that revives an out-of-fashion style of radios in a pretty unique and modern way.
What a brilliant, critical review of the Tecsun S-8800! Thank you so much for taking the time to properly test and compare the S-8800 with the venerable PL-660 and the XHDATA D-808 (readers, also check out his review of the D-808).
You’re right, too, in that I’ve noticed some contradictions in reviews–I do wonder if part of this might be variations between US and EU versions of the radio, or perhaps small quirks in production runs.
No doubt, however, that the Tecsun S-8800 is a champion of the shortwave broadcast bands and its audio fidelity is in a class of its own.
The XHDATA D-808 portable is an AM-LW-FM-SW-SSB-AIR band model which has already been the subject of many excellent reviews. Until recently the model was not marketed to North American purchasers, but recently a couple of Chinese sellers have started soliciting North American buyers via eBay listings.
My own interest in the model was in comparing its AM Band performance to that of the best performing Ultralight radios– specifically the CC Skywave and Skywave SSB models. Although the D-808 is slightly larger than the 20 cubic inch limit for Ultralight radios, its size and weight make it very convenient to take along as a “travel portable,” specifically as an SSB-enhanced model capable of checking transoceanic station carrier strength on exotic ocean beaches. The Skywave SSB model can also do that– but at a $169.99 list price, compared to the $112.86 (plus $10 shipping) cost of the D-808. In addition, none of the published D-808 reviews seemed to have any information about internal components like the loopstick, or Si4735 DSP chip.
My first test was to compare the stock Skywave SSB model with the D-808 in fringe AM station reception. The Skywave SSB model has a reputation of being one of the most sensitive Ultralight radios, but the D-808 clearly outperformed it on both low band fringe station (550-KARI) and high band fringe station (1700-City of Auburn TIS) reception. The D-808 couldn’t quite hang with a 7.5″ loopstick Skywave model, but that only made me curious about how the same modification could enhance the D-808. So… it was time to disassemble the D-808, and find out why its loopstick was such a superior performer.
The D-808’s 3 7/8″ (98mm) loopstick is shown adjacent to the 2 3/4″ (70mm) loopstick of the CC Skywave models. The D-808 is much easier to disassemble than the CC Skywave models, though, so enhanced loopstick transplants should prove to be quite popular in the D-808.
The D-808 loopstick is 3.7/8″ (98mm) long, while that of the CC Skywave SSB model is only 2 3/4″ (70mm) long. Other reviewers have noted the excellent performance of the D-808 on the AM band, and this is probably one of the main reasons. The SSB mode operates very similar to that of the Skywave SSB in providing a quick check of carrier strength on weak AM band targets– the LSB mode can be set to +55, and the radio tuned to different frequencies to check fringe station carrier strength. This can provide a real-time check of propagation changes during time-limited propagation openings for live ocean beach DXing with Ultralight radios or other portables (or with the D-808 itself, if desired).
The D-808’s Si4735 DSP chip was initially used in the Eton Traveler III Ultralight radio model, which was fully reviewed in the 2015 Ultralight Radio Shootout (where it won top honors for MW sensitivity). The D-808 augments that capability with a significantly longer loopstick, plus multiple DSP filtering selections. As such, the D-808 in stock form should be a very superb performer.
The Si4735 DSP chip has markings of “3560, DCUL, .738” and provides a wide range of AM bandwidth choices for the Medium Wave DXer (6K, 4K, 3K, 2.5K, 2K, 1.8K and 1K). These perform very well, and as with the other DSP-enhanced portables, the narrowest bandwidth (1K) provides the most sensitive AM band reception.
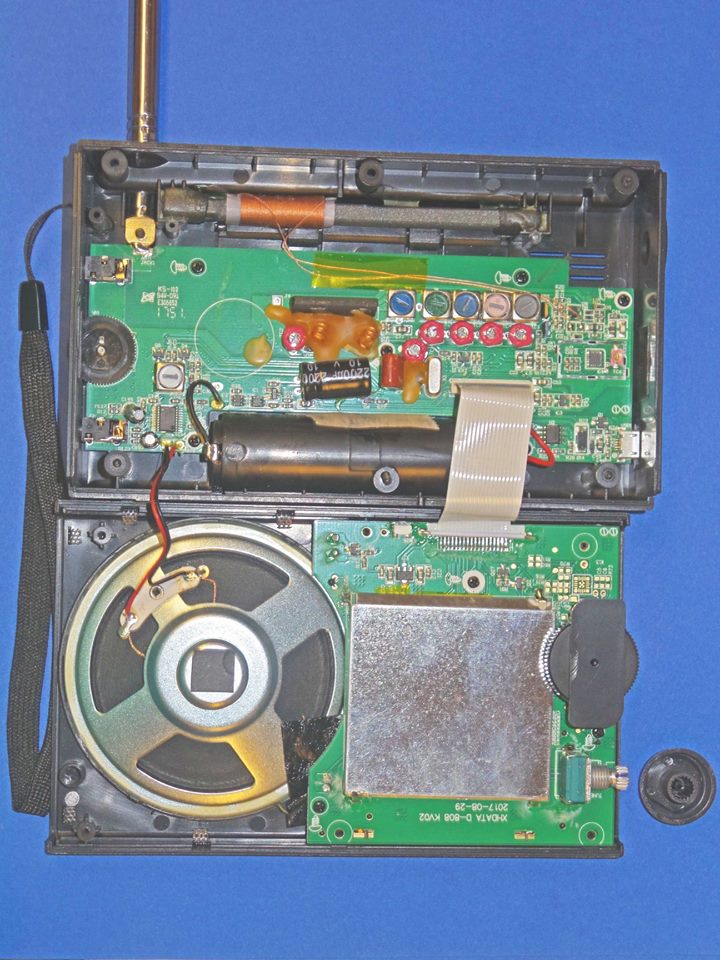
In construction very similar to that of the CC Skywave, the D-808 separates into two main circuit boards, connected together by a plug-in ribbon cable. One strange quirk is that the Si4735 DSP chip is located on the RF board (close to the center right edge). The Si4735 DSP chip is also used in the Eton Traveler III Ultralight radio, and although that model lacks the multiple DSP filter selections of the D-808, is has been the subject of highly successful 7.5″ loopstick transplant modifications– proving that such enhanced Medium Wave and Longwave loopsticks will perform very well in the new, Si4735 chip- powered D-808.
Disassembly of the D-808 model is fairly straightforward in comparison to the CC Skywave models, and the technician doesn’t need to memorize a detailed reassembly protocol in order to perform a routine loopstick transplant operation. Neither C.Crane nor XHDATA are likely to show any sympathy to someone botching up an antenna transplant, so you need to be confident that that your skills are superior to those of the company technicians before taking the plunge. In the CC Skywave and CC Skywave SSB models various parts fit together like a puzzle, but the D-808 isn’t like that. It should prove to be a fairly popular model for enhanced MW and LW loopsticks.
Those considering a purchase of the D-808 should be advised that its type 18650 Li-ion 3.7v battery is not commonly available at most stores, and that Postal regulations supposedly forbid shipping these batteries through the mail. One of the eBay sellers (harelan ecommerce) did manage to ship me two of the standard XHDATA type 18650 batteries through the mail (along with two new D-808 models) but if your seller won’t do this, you can still purchase the batteries on eBay. Some of the 18650 batteries sold on eBay have a flat positive terminal which won’t contact the D-808 cabinet’s positive battery connector terminal, but in such a case you can simply insert a #8 lockwasher in between the two, and the arrangement will be very secure. From that point on you can simply recharge the battery with a USB terminal connector.
Thank you for sharing this technical overview of the XHDATA D-808, Gary! I’m looking forward to the antenna mods you’ll no doubt make to this compact DX machine!
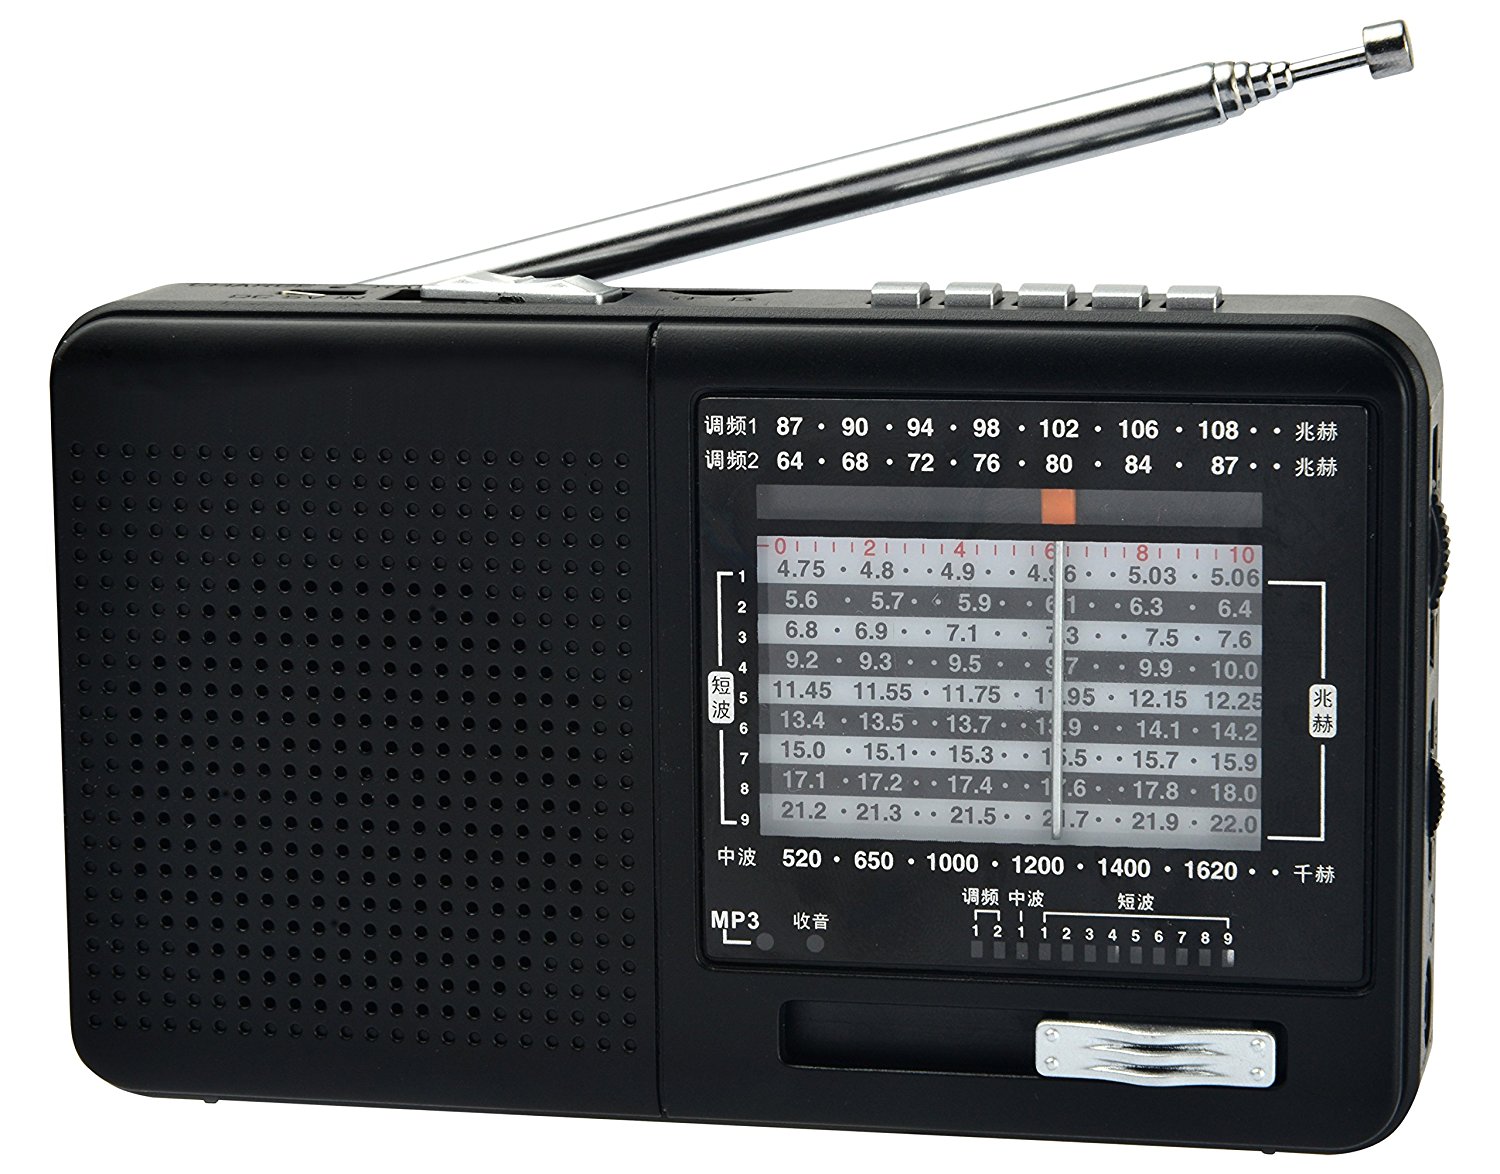
Many thanks to SWLing Post contributor, The Professor, who shares the following review of the XHDTA D-328:
First off, this is the best radio I’ve ever operated… that cost me less than ten dollars new. When I saw the promotion on the SWLing Post for free or half price radios, I had to bite, especially because the deal was that the first ten to respond would get a free XHDATA D-328. They told me I was the 15th caller, so I was allowed one for half price. And since they were going for just under fourteen bucks on Amazon, it felt like it was almost free.
Of course, I didn’t expect much. But as they wanted the people who received these free or very inexpensive little radios to leave reviews, I figured the Chinese manufacturers knew there were some good features radio folk might notice. And there are. And I’m not sure if I’ll post part of this brief review on Amazon, but I’ll do so here in this comment.
If you want a radio that will reliably pick up local AM and FM stations and play some MP3 files, this will work, and work pretty well. And it doesn’t sound bad at all for the size. I personally don’t have much love for these new analog-style tuning DSP radios, but I suppose people who aren’t as radio wise as readers of the SWL Listening Post won’t notice the less than poetic effects of moving between stations on these sets. Most probably tune in their desired stations and just listen to it, and this radio does this well enough.
I don’t really listen to FM much, but the XHDATA D-328 seems adequate enough. And with headphones on it sounds quite rich on FM. AM isn’t bad either, but it’s far from selective. I was able to dig out clear channel regional biggies like Zoomer Radio at 740kHz and WHAS at 840kHz in Louisville from here in Brooklyn at night, but in between often easy to find fifty-thousand watt stations like WBBM or CKLW weren’t there. The DSP tuning just defaulted to the next local station like WNYC or WABC when I turned the dial.
Shortwave was worse. Beyond the U.S. powerhouses like WWCR this radio doesn’t seem a very worthy shortwave set for those of us in North America. But I can imagine in that in third world countries where international and local broadcasters still target broadcasts that this radio might be an inexpensive way to access that programming.
I must admit that listening to MP3 music files was kind of pleasing. Again, the audio is really good for a radio at this price point. However you are listening blind, there’s no screen to tell you what you’re hearing, and no shuffle function to make a folder full of MP3s into unique sequences of songs each time. What you get are the songs in the alphabetical order of the file titles, although you do have the option to jump ahead 10 files before or after the one you are playing. So the best use of an MP3 player like this would be to listen to podcasts or whole radio programs with it. What I would do is copy the files onto the SD card and then perhaps number the filenames in the order I would like to hear the shows.
So, for the price there’s not a lot to complain about. People have already mentioned the off-center small kickstand, and that’s a little cheesy. But the tuning thumb wheel moves smoothly thru the imperfect DSP tuning function, and the volume thumb wheel is actually analog which make it much easier to get the exact volume you want out of this radio. But the sliding band selection switch under the tuning scale is a bit worrisome, as I’ve had a few cheap Chinese radios with a switch like this and just normal use eventually rendered them unable to switch bands adequately. This one feels a little bit more stable then they did, but time will tell.
All that said, there are radios that are not too much more expensive than this radio that offer much more in a number of ways. The small and inexpensive analog Tecsun radios from a few years ago are a case in point. Selling for twenty to thirty dollars, those multi-band radios are a little challenging to tune (a stiff thumb wheel on some), and the tuning scale may be a little off and they may drift a little, but the analog tuning is a much better experience. And you can DX with them. I remember listing to All India Radio with a decent signal one afternoon on my Tecsun R-9710.
There’s a lot of similar analog radios which I believe are probably just about the same radio – the Tecsun R-9012, the Tecsun R-911, the Tecsun R-909 and the Kaito WRX-911, among others. Once you get a look at these you’ll recognize other similar radios in this family. I’d say they’re the best really cheap receivers I know of. They generally run between twenty to just over thirty bucks. I believe these radios appeared on the scene in the early 2000s.
I have this fear that they’ll start turning these radios into DSP sets. That would be a real shame, but I’ve heard no mention of that. However I did notice that the marketers of the XHDATA D-328 didn’t even mention that it was based on a DSP chip. And Chinese manufacturers are notoriously not very open about how they are altering radios that they’re putting out, so be aware of that.
As far as MP3 playback, the one radio I would really recommend is the Meloson (or Tesslor) M8 (or the Meloson M7 or S8 if you can find one). It’s simply the best audio you’ll hear in a really small radio, AND you can shuffle the MP3 files in a folder with these. While it only give you the sequential number of the song in the display, it will generate a unique sequence of songs each time you shuffle. Fill a folder on a card full of songs and let it rip. It’s the perfect micro music player if you make a good folder of music. And the DSP radio in these is not bad either. It’s digital, not fake analog tuning, and most AM clear channel targets you can usually find at night in your region will show up on these. They used to go for less than thirty bucks, but right now I see they cost close to fifty dollars.
Two other radios I have that I can recommend for MP3 playback, are the Tecsun ICR-110 and the Tivdio V-115. Neither one offers playback shuffle, but they will play the files in alphanumeric order just fine. But they both have a cool feature in that you can press a button and record the broadcast you’re hearing as an MP3 file. And they both also sound great. The Tivdio has incredible sound for a tiny radio, but the ICR-110 is even more impressive. I believe it has the same speaker setup as the much more expensive Tecsun PL-880 and it also has similar warm and clear audio.
The reception with the V-115 is OK, nothing stellar, but the ICR-110 is kind of a monster on medium wave. I’ve been impressed. The ICR-110 is rather big compared to the other radios I’ve mentioned, closer to the PL-880 in size, but quite a bit lighter. The ICR-110 used to be cheaper, but can be found for around forty bucks. The Tivdio V-115 still goes for just under twenty if you look around. A bargain. Tecsun, Tivdio, Degen and other Chinese manufacturers have all sorts of inexpensive radios for sale out there, and others I haven’t used or mentioned might be quite good as well. If one appeals to you, do a little online research.
Of course, since I’m talking about small and inexpensive radios I should mention that the Tecsun digital DSP sets like the PL-310ET, the PL-360, PL-380, PL-390 and other variations are all amazing inexpensive radios that will run you around 35 to 50 bucks. The ultralight DX community loves these things, and for good reason. And there’s a version of the PL-390 that plays MP3 files from an SD card and another that offers bluetooth playback. No, none are perfect, but they’re solid sets, and all would have been dream radios thirty years ago.
So, that’s my evaluation of the XHDATA D-328, well worth fourteen dollars, but for a few dollars more you can get radios with similar features that do much more. It’s small, it doesn’t sound bad, and it’s fairly well-built. It will pick up all your favorite local stations and play all your MP3 podcasts effortlessly. Not bad. Like I said, it’s the best super cheap radio I’ve ever used.
Excellent review! I’m impressed that the D-328 has enough AM performance to grab some night time clear channel stations. It’s disappointing, however, that it lacks performance on the shortwave bands.
Thanks for posting your review–always great to hear from The Professor!
I live in the Philadelphia Suburbs, where there’s ample FM Stations, good AM Coverage, and also a lot of noise when it comes to Shortwave. I’m mostly an AM/FM listener, who occasionally likes to dabble in Shortwave. My idea of a good radio is something I can turn on, put up the antenna, and it just works.
Initial Impressions
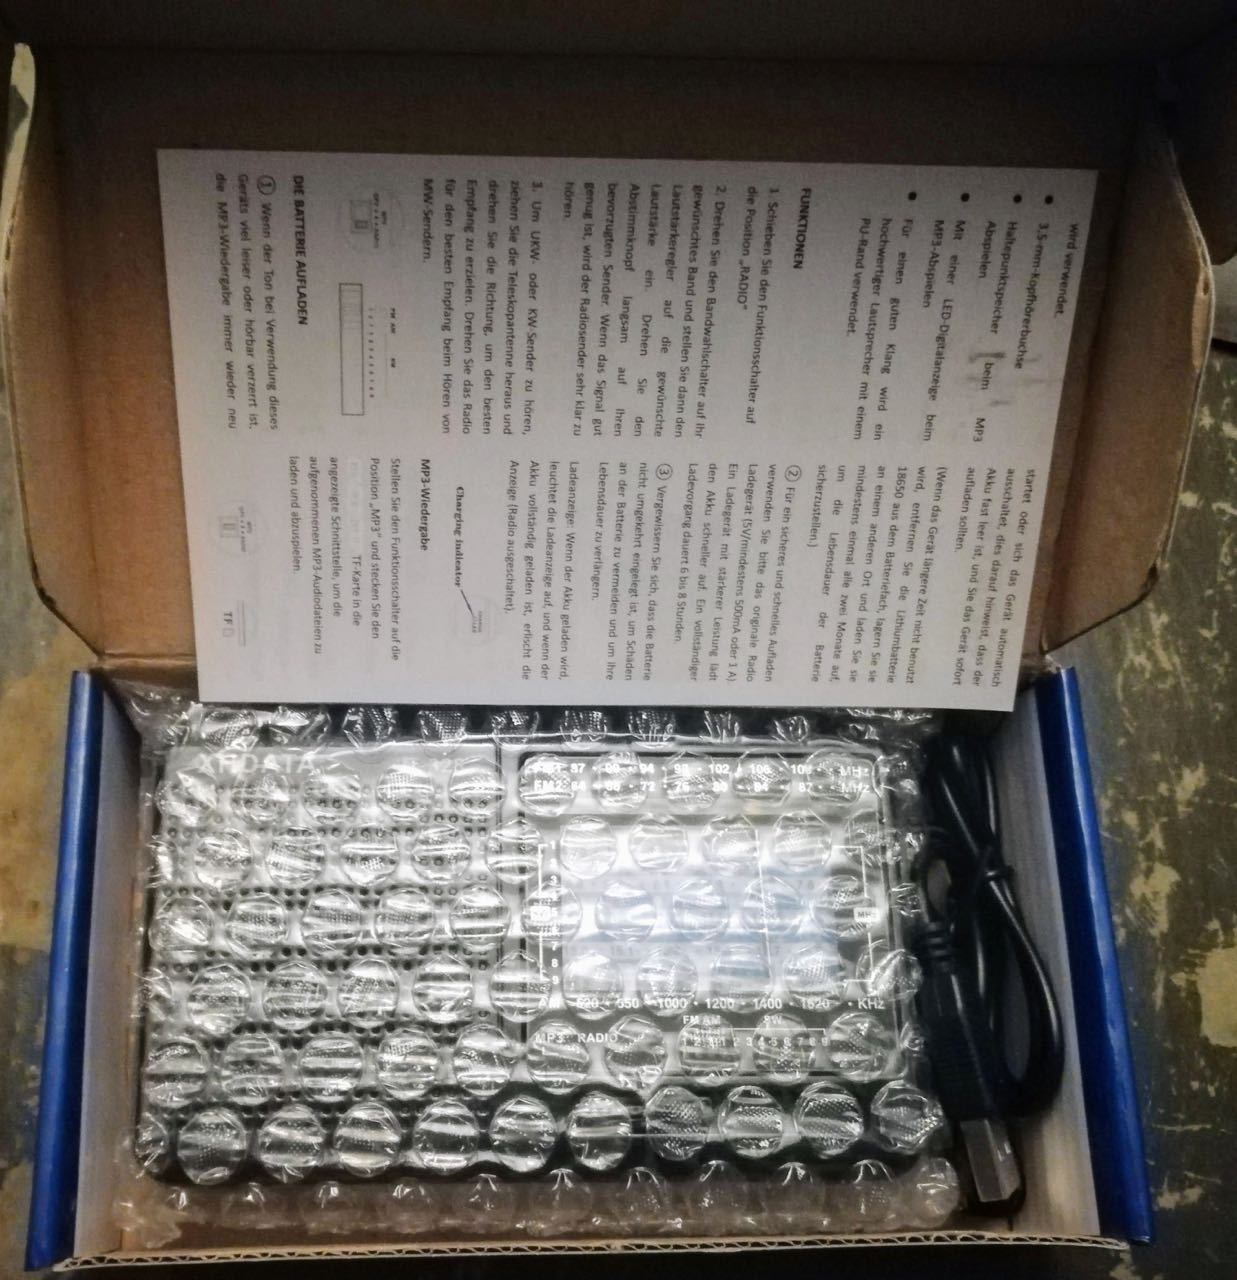
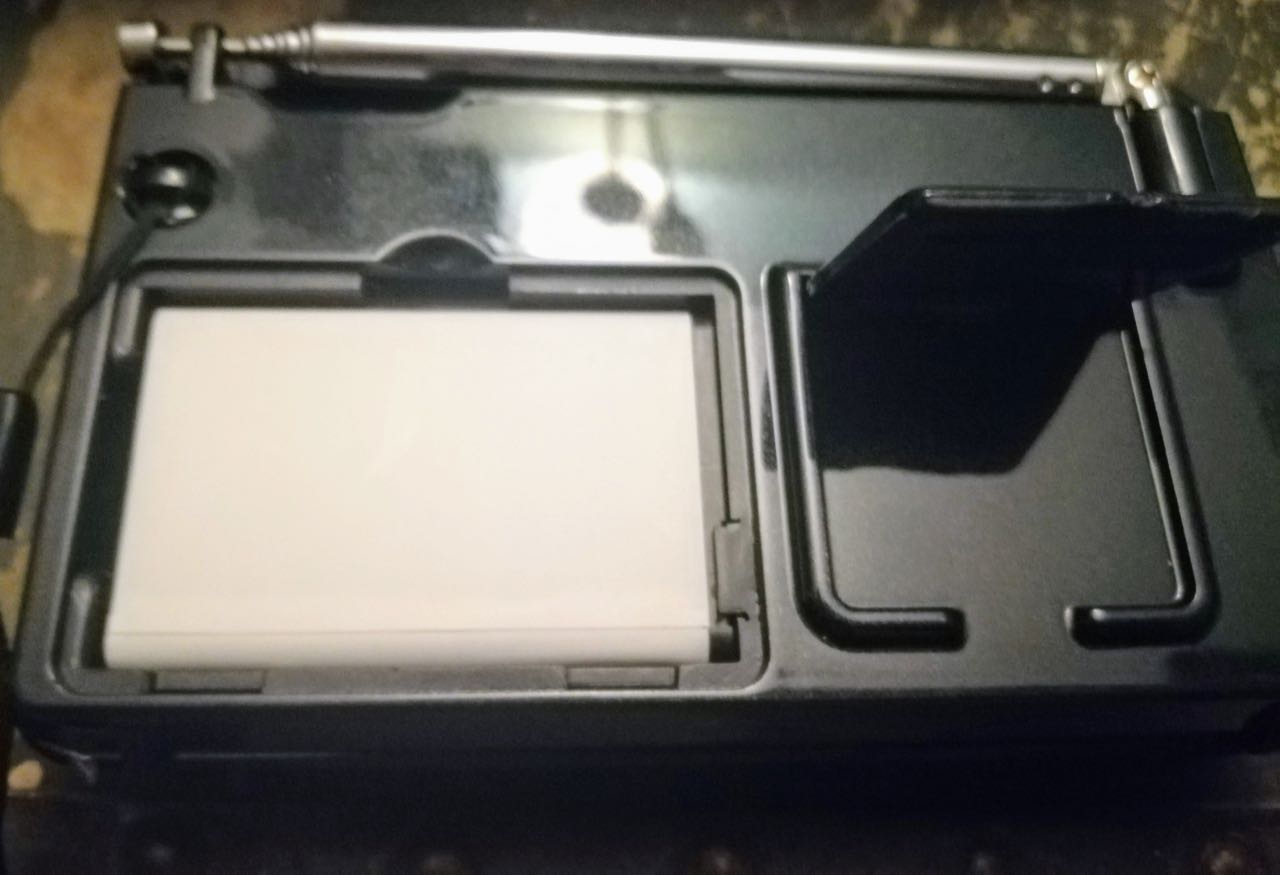
The Radio is boxed simply enough in a cardboard box, with a small amount of bubble wrap inside, manual, Mini-USB Cable. The Lithium-Ion Battery comes pre-installed.
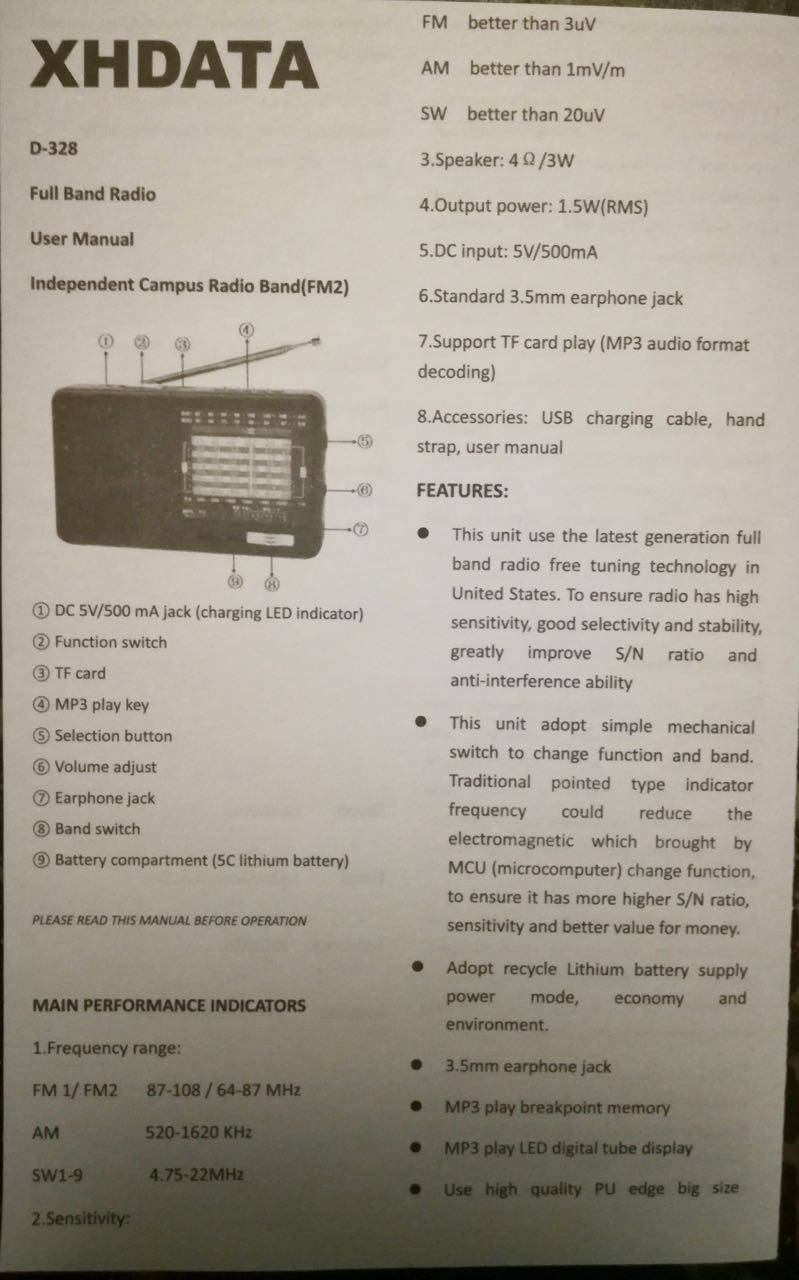
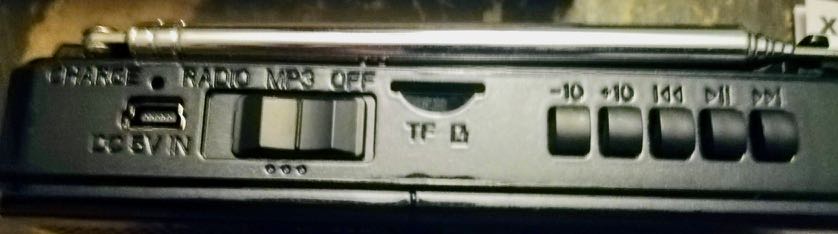
Operation of the radio is mostly straight-forward, and I doubt you’ll need the manual for anything. The manual itself contains your normal badly-translated English phrases and doesn’t make sense in a lot of places (did you know this radio uses high quality PU edge big size?)
Two curious notes about the manual:
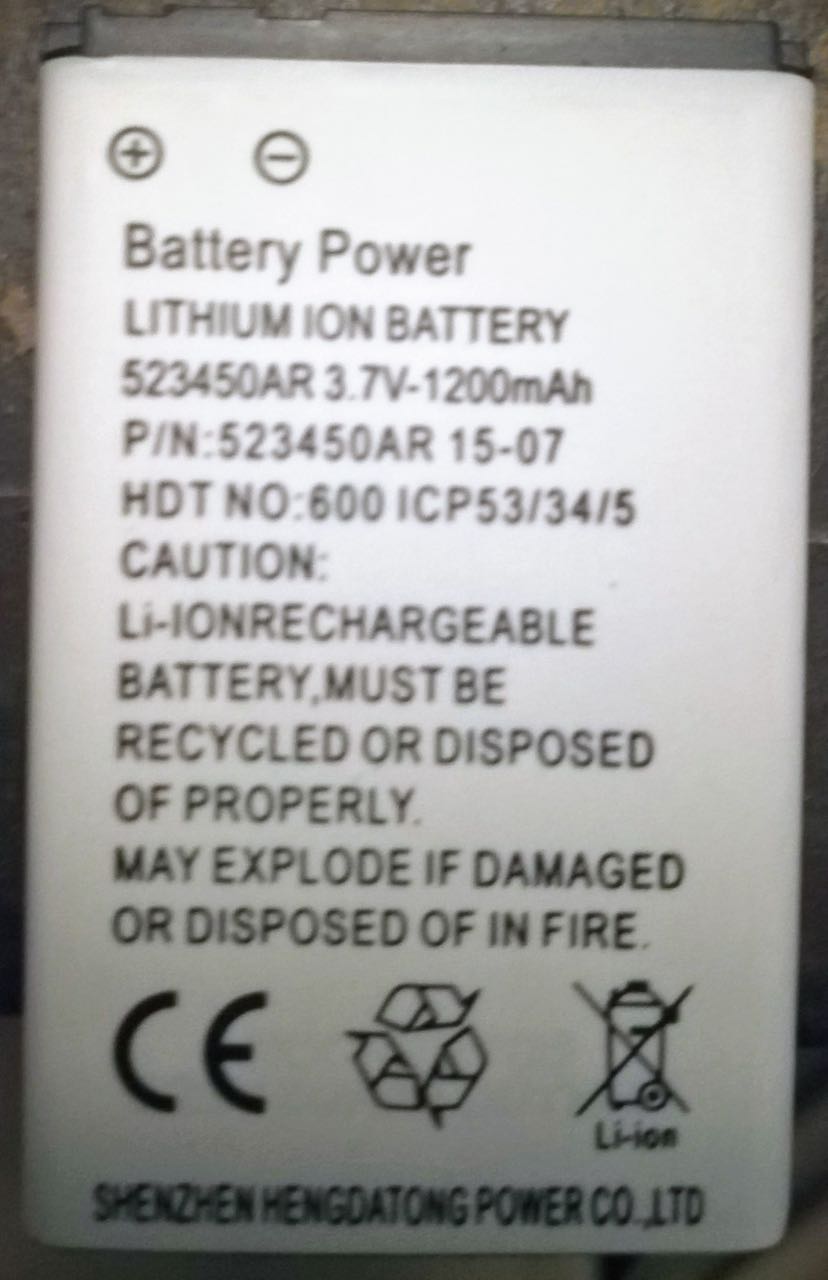
It mentions you should remove the “18650 Lithium Ion Battery”, but this radio doesn’t use an 18650 battery. Instead, this radio uses a “BL-5C” Battery, which based on my research looks like it was pretty common on Nokia phones around 2004.
Someone took white-out to the manual where it says “Set the function switch to the “MP3” position and insert the USB Stick or TF Card, with “USB stick” covered in white out.
The radio itself is made of a slippery, glossy plastic that doesn’t inspire confidence, but also seems to have enough structural stability it doesn’t worry me. I’d guess this radio could take a moderate drop and bounce and be OK, but it’d probably crack if dropped from above waist level.
I ran into a somewhat funny problem trying to insert the included wrist strap into the hole in the back of the radio. Unlike most radios with a wrist strap hole that’s closed off, the wrist strap instead continued down into the radio. That is, the wrist strap “loop” molded in the plastic is actually a hole into the radio. This doesn’t bode well for dirt or other junk getting pushed into the radio accidentally. I was able to eventually get the wrist strap on the loop, but it was far harder than it should have been.
Design
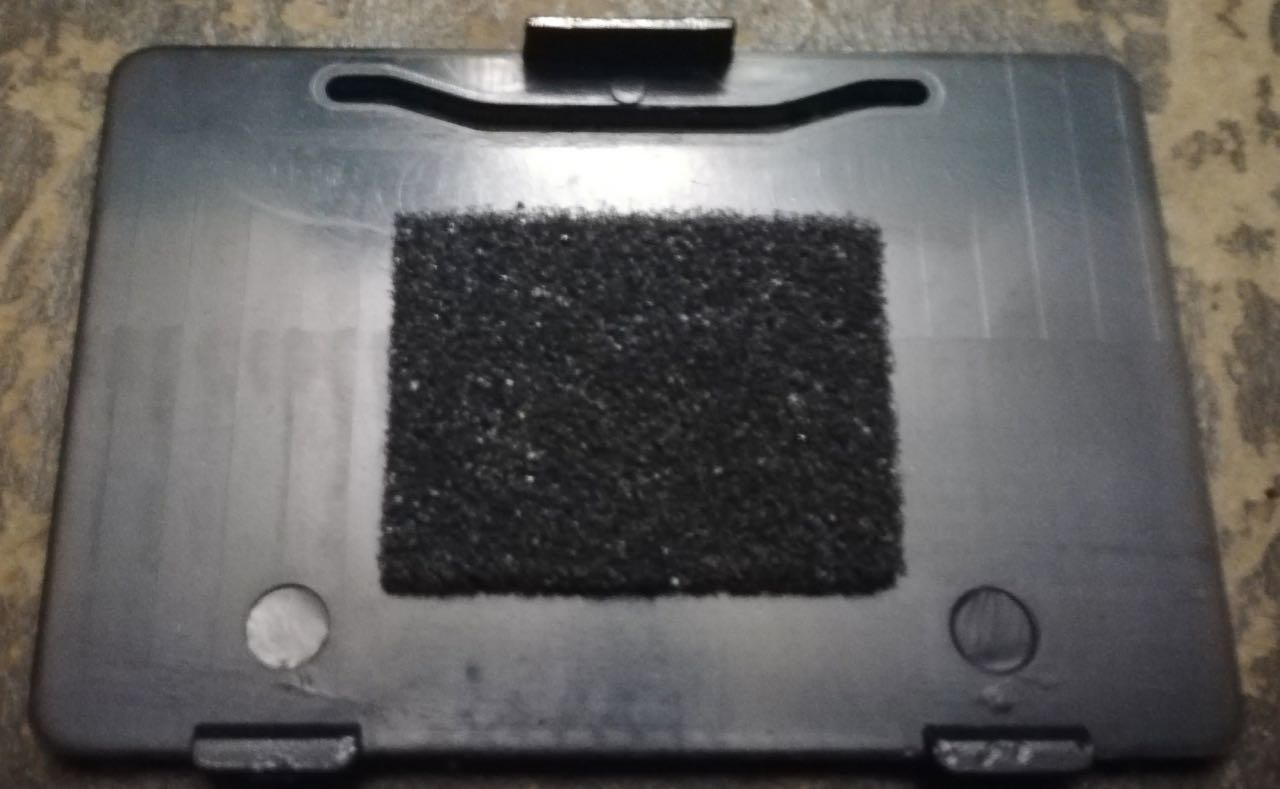
The Lithium Ion battery comes pre-installed in the radio, and the battery door it’s behind seems sturdy enough. Fortunately, there’s really no reason you should ever have to pull the battery out of this radio unless you need to replace it. Running the Battery model # across Google and other sites shows this should be a very cheap battery for you to replace at between $1 and $3.
Battery Door
Kickstand deployed with battery door open
Li-Ion “BL-5C” Battery
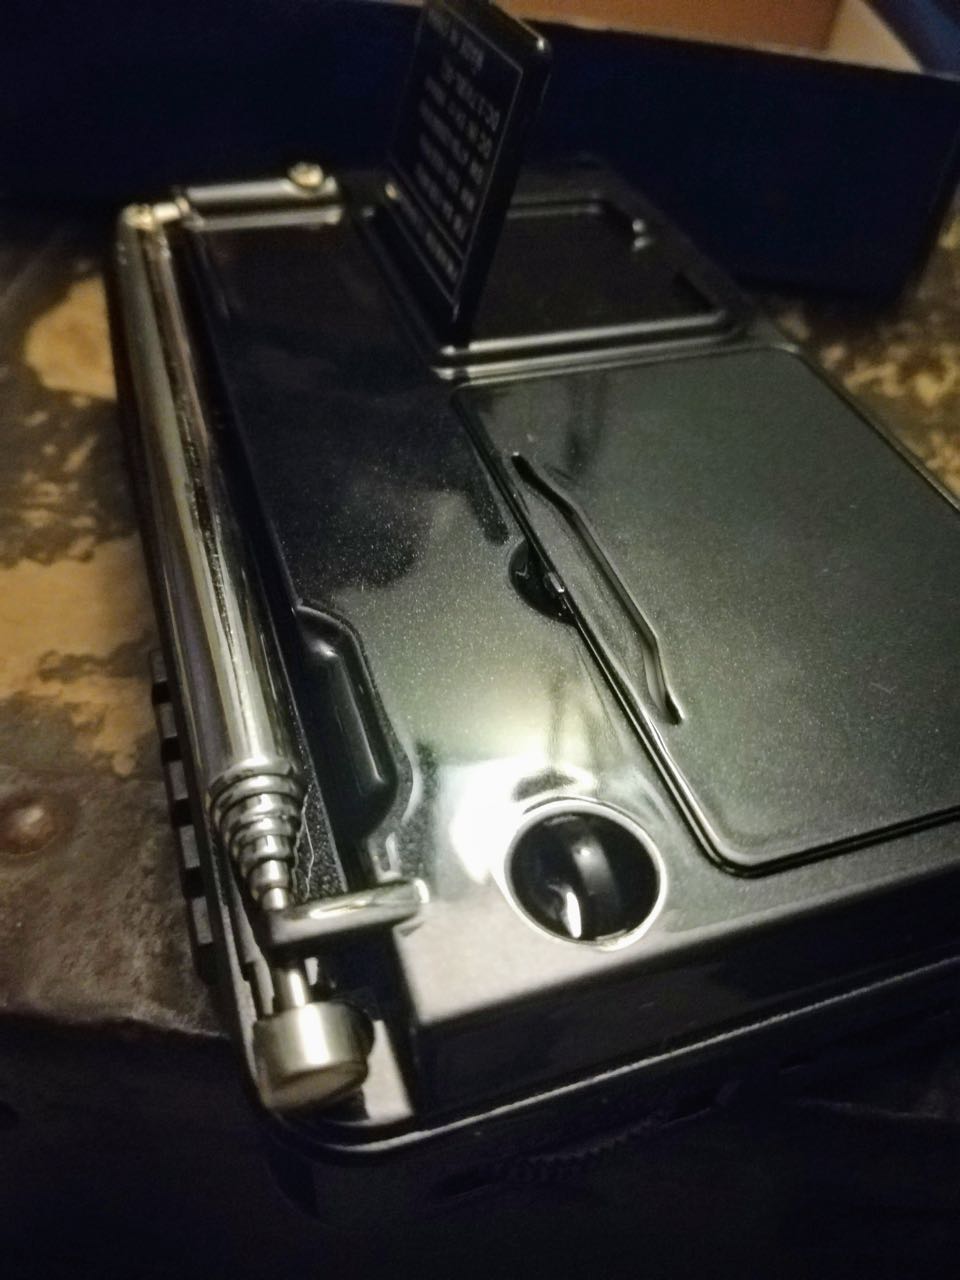
I very quickly noticed a big glaring design flaw on this radio with the poorly designed, super small kickstand located next to the battery compartment. This small, off to the left kickstand works fine if the radio is on a perfectly level surface like a nightstand, but causes the radio to tilt over if you try to place it on a soft surface like a bed or a pillow. I would have liked to see just one large combination battery door/kickstand if possible across the back of the entire radio.
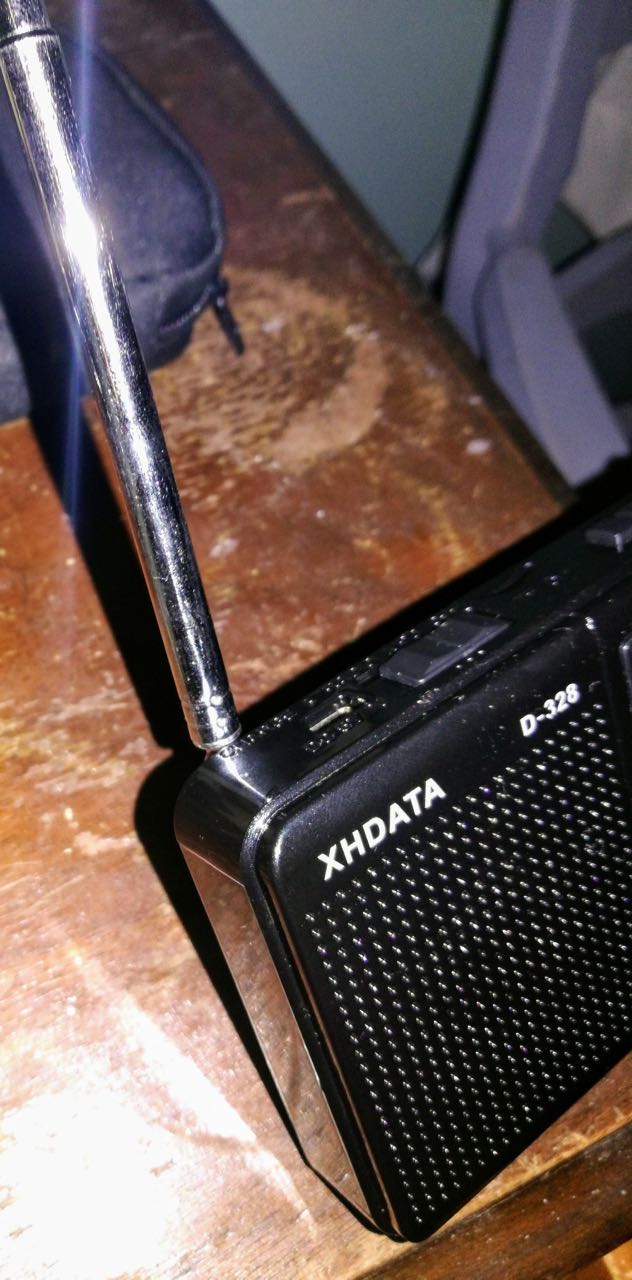
Design problem number two with the radio became very apparent when trying to extend the telescoping antenna. The antenna butts up against the plastic molding on the back of the radio, meaning you cannot prop the antenna up “Straight” when using the kickstand. This results in the antenna having to angle off at around 45 degrees, which is a bit annoying. My Tecsun PL-310ET doesn’t have this problem due to having a cut-out notch to allow the antenna to be in a more upright position.
“Upright” Antenna trouble
Tecsun PL-310ET for Comparison
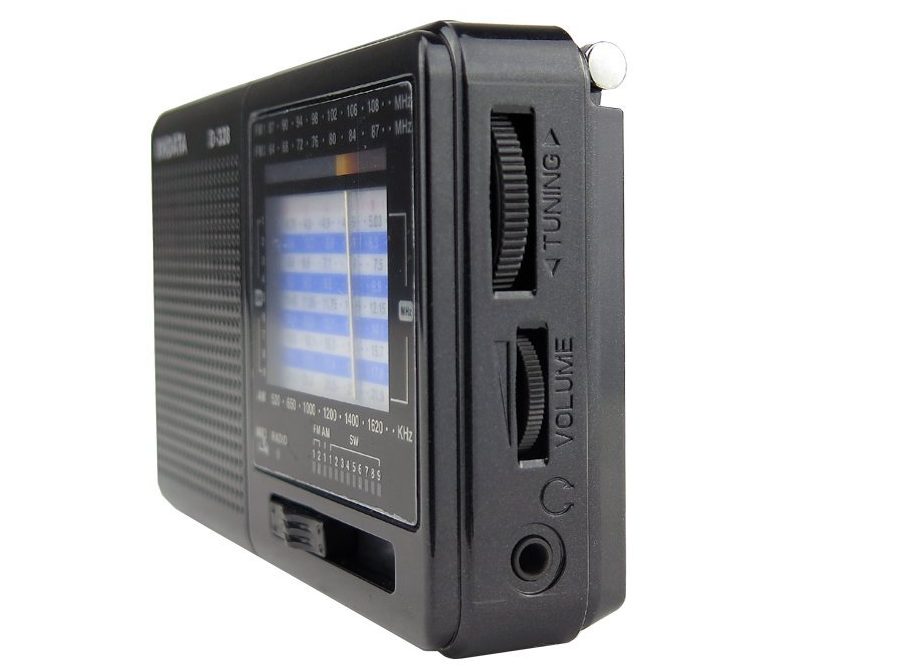
The tuning knob has a satisfying amount of resistance to it, and doesn’t spin too quickly or too slow. The volume knob, while smaller, spins freely and also feels solid.
The band selector selects between FM1-2, AM, and SW 1 through 9. The switch to move between these bands has a satisfying amount of click and feedback to it, and isn’t mushy and you likely won’t pick the wrong band. The small window displayed below each band number fills with a small, mechanical, plastic bar attached to the switch. The window and bar were slightly misaligned, making it difficult to tell at a glance which band I had selected.
The tuning bar itself moves smoothly across the band, but the metal extension piece running down the shortwave part of the spectrum tuning was not vertically straight and had a noticeable bend to the lower right.
Weight – this radio is INCREDIBLY light! The choice of a Li-Ion rechargeable battery pays off here, and when I weighed the radio it came in at exactly 160 Grams / 5.7 Ounces. The compact size of this radio and the weight would cause it to easily disappear into a coat pocket and I’d forget I was carrying it. This definitely qualifies as super-portable in my book.
The choice to use Mini-USB instead of Micro-USB on the charging is a questionable one. Micro-USB is the much more common connector you’ll recognize if you’ve bought a Smartphone in the last 3 years, or any other consumer device with a USB connector. Based on my short research, Micro-USB despite being smaller than Mini-USB, offers a number of benefits including increased cycle-count on the number of plugs/unplugs before the connector wears out. I don’t know why XHDATA went with Mini-USB on this, and I’d suggest they move to Micro-USB for future revisions. The Mini-USB, other than being slightly easier to plug in, seems to offer no benefit and is obsolete compared to Micro-USB.
Audio Quality
Wow! While I may have had some hesitations about the radio’s design, I was incredibly surprised by both the loudness and fidelity of the speaker on this radio. The volume was incredibly loud, and the audio did not distort even when I turned this to the highest setting. While a mono speaker, voices on AM were quite clear and nice to listen to, and music on FM Sounded way better than it deserved to sound coming out of a $14 radio.
Plugging in a pair of earbuds (not included) also produced crisp, loud audio, with no noticeable whine or hiss. Volume levels should be more than adequate. Audio came in through both Left and Right earbuds, but I was unable to tell if the output was actually Stereo when listening on FM. The word “stereo” is not mentioned anywhere in documentation, so I would not be surprised to learn this radio is mono-only.
Tuning
I don’t normally use analog radios, so tuning the D-328 was a bit of a challenge. The cramped display provided little feedback, and the crooked tuning bar didn’t help either. FM Stations seemed to be needed to be tuned “high” About 1MHz from where I thought they should be, and AM Stations about 50 KH above where I thought they should land. Tuning Shortwave seemed like a total crapshoot, being fairly imprecise.
I’m mostly an FM/AM Radio listener, and all the usual local suspects popped right in and tuned easily for me. Static between stations is kept very low, and when a station locks in on FM it pops in very clearly. Selectivity between close adjacent stations can be challenging due to the small tuning dial and skewed visual feedback, but I was able to tune in every FM Station I tried.
I am located in the Philadelphia Suburbs, so my usual station for tuning in a weak signal is WPRB 103.9 out of Princeton. I’m happy to report it came in just as clear as it did on my Tecsun PL-310ET, with no trouble finding it.
AM was more of a mixed bag with tuning. Stations I did not expect to come in clearly seemed to pop in with strong signal strength, while the “go-to” AM Test station of KYW 1060 proved surprisingly difficult to locate on the dial. Audio levels on AM were noticeably wider in variance of signal, with some stations proving almost too quiet to listen to.
I’m honestly not much of a Shortwave listener most of the time, so I’m sure some other reviewers will go into much more detail on the Shortwave performance of this radio then I will. My experience tuning around on Shortwave with the D-328 was similar to AM, in that I had a lot of unexpected surprises in strong signals between 6900KHz and 9300KHz. My shortwave listening usually takes place on digital tuning with the Tecsun PL-310ET, so it’s hard to compare analog listening for something I don’t do that often. Tuning was surprisingly easy on the shortwave bands, but seemed frustratingly random where stations would show up.
MP3
Let’s get this out of the way immediately – this radio does not record MP3 files. Instead, sliding the mode selector to “MP3” will let you play files off a “TransFlash” (MicroSD) Card.
I’ll be up front here – this radio is a functional, but not fun to use MP3 player. I tested the MP3 player by loading up a 2GB MicroSD Card I had laying around with some files in a structure similar to the following:
* Root
** File1
** File2
** Folder1
*** Subfolder 1
*** File 3
*** File 4
** Folder2
** File 5
** File 6
** File 7
The first thing you’ll notice when playing MP3s is the “MP3” Light that is Red. And blinks. And blinks. Yes, the red light blinks continuously while playing an MP3 file and you can’t turn it off. This right here would annoy me to no end if I wanted to use this feature
My second problem with using MP3 functionality is that playback without a screen is a throwback to the days of the iPod Shuffle. And if this radio had “shuffle mode”, I’d be OK with that, heck that would even be fun – but there’s no shuffle here, only sequential play.
This radio does seem to follow the expected order of my files in playing them sequentially 1 through 7 across subfolders, but the lack of visual feedback makes it very easy to forget where you’re at and what you’re playing. Pressing and holding the fast forward button does work to fast forward, and rewind through individual mp3 files.
If you want to load up a MicroSD card with some old time radio episodes and play them back – this might be great. But I’d probably ask you why you’d ever want to play MP3 files on this thing. I mean, the feature is there…. But why? There’s much better devices and experiences out there for MP3 Playback rather than loading files onto a MicroSD card to play on a device with no screen. I imagine this might have some utility usages for playing MP3’s when you don’t want to sacrifice more expensive hardware, but I personally can’t see myself getting much usage out of the feature.
Conclusion
At the end of the day I have to ask myself – who exactly is this radio for? The price point and feature set seems to pit this against the very low-end of the AM/FM/SW Market such as the Analog Tecsun R-9012 at $22, and Tivdio Digital tuning units around $18. The inclusion of Shortwave, Mp3 Playback, and USB rechargeable battery gives this a leg up over budget AM/FM units, as well as the competitors mentioned.
Is the DX/radio hobbyist the target market for this radio? I don’t think so. While cheap (and we Shortwave/HAMs are a cheap bunch!), this radio lacks the sophistication or features a DX’er would want.
Is this a good “throw-away” radio for when you don’t want to risk your “Good” Radio? Absolutely. I would not hesitate to toss this in a coat pocket, keep it out in the garage / workshop, or give it away to a friend. My personal use case for this radio will probably end up being I’ll take it to Baseball games to listen to the game on AM / FM while watching the game. If it breaks, I wouldn’t be too sad and would likely shell out another $14 without hesitation for a replacement.
Is this radio for kids? I don’t think so. Given the poor build quality of this, I can’t imagine this lasting very long in a youngsters hands and surviving more than a drop or two. Analog tuning is likely to prove incredibly frustrating to a youngster, and I can’t see anyone but the geekiest of little geeks making use of the MP3 player function.
Would I use this as an emergency radio, shoved in “go-bag” or kept around for winter storms / hurricanes? Probably not. The build quality and lack of standardized AA-Batteries would give me concerns over my ability to power it (though it did work great from a USB PowerBank when I tested) More concerning is I don’t know if I would trust this to still be working when I need it in a stressful situation.
So who is this for? This radio seems more destined / designed for the low-income international market. The price point on this radio is certainly attractive to North American buyers, but I just don’t think the average American radio buyer really wants or needs MP3 MicroSD Playback or Shortwave functionality.
For $14 XHDATA has made good, but not great, little radio. My future suggestions would be:
Ditch the MP3 functionality – it’s of marginal usefulness
Seal off the wrist-strap loop hole better
Fix the case design so the antenna can sit more “upright”, and swing more freely.
Re-design the kickstand to run the entire length of the radio, possibly doubling up as the battery door if somehow possible
Switch from Mini-USB, to Micro-USB connector
The BL-5C Battery is an …. Interesting choice. It sure seems to help with weight, but I think I’d rather see a single 18650 Cell as hinted by the manual or AA’s.
Many thanks, Aaron, for sharing your fine evaluation of the XHDATA D-328! I couldn’t agree with you more regarding your “future suggestions”–sounds like the MP3 functionality has marginal utility and the chassis design could use some tweaks. I’m very surprised a radio made in 2018 still uses a Mini-USB port. And that kickstand? I don’t think I’ve ever seen one more off-center!
But as you conclude, for $13.80 US (Amazon affiliate link), it is a very inexpensive unit. Not one for the radio enthusiast, but one that could please the casual radio listener. It sounds like the audio is surprisingly robust.