Shortwave listening and everything radio including reviews, broadcasting, ham radio, field operation, DXing, maker kits, travel, emergency gear, events, and more
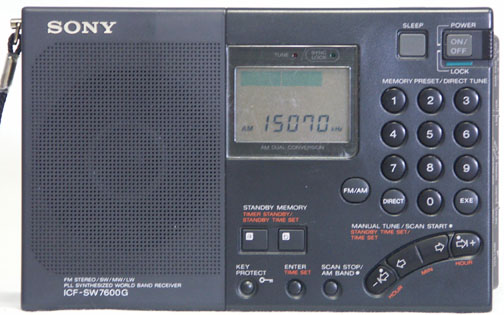
I’ve had my Sony ICF-SW7600G for almost twenty years. Early on, my very young son broke the receiver’s telescoping whip antenna and it was a simple and inexpensive matter to order a replacement whip assembly from Universal Radio, the Sony dealer from whom I had purchased the radio.
Recently, the receiver’s antenna failed at the pivot-point. First, the factory-supplied countersunk screw’s Phillips-head stripped out through repeated attempts to tighten the pivot over the years until finally I had to replace the screw. The best replacement screw I could find was a 2mm x 6 Allen-head screw from an R/C hobby shop that appeared to work fine until I managed to strip the antenna’s threads through over-tightening this screw. (Perhaps the Allen wrench simply provided too much torque for such a small screw.)
Clearly, it was time to actually buy a replacement antenna. This turned out to be easier said than done. Universal Radio is no longer a Sony distributor and has no access to parts for Sony products. A visit to the Sony website disclosed that service-parts are handled by two other companies, neither of which could provide the antenna—a surprising thing to discover since I think the antenna used in the ICF-SW7600G is the same part which is used in the current-model ICF-SW7600GR. A search on Amazon disclosed a seller offering the part for over $52, far more than I wanted to pay. Perhaps belatedly, I thought to check eBay where I found several listings, some offering the genuine Sony part shipped directly from Japan. I was intrigued, however, in the listing by stone_deng (link) who offered a non-OEM replacement antenna, shipped from Virginia, for $16.80 with free shipping. The description claimed the antenna was a perfect-fit replacement. Figuring the price would make this a good gamble, and because I wouldn’t have to wait weeks for delivery from Japan, I placed an order for one on a Monday evening and the postman delivered the antenna to my mailbox the following Friday. (I noticed as I was composing this post that stone_deng has raised the price for this antenna to $19.90 with free shipping.)
In comparing the replacement antenna with my original Sony part, the only difference I could see is that the metal tip of the replacement antenna is of a different style. Dimension-wise, the two antennas appeared to be identical.
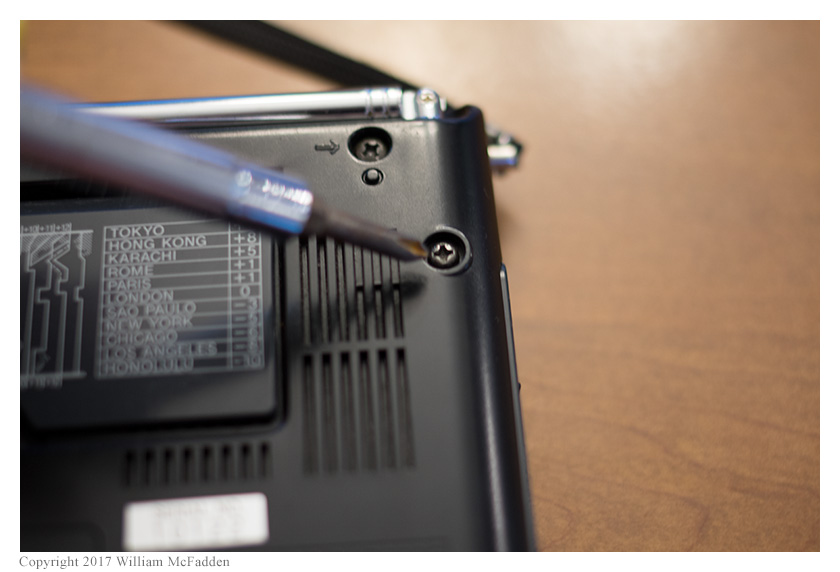
Installation of the new antenna was simple. A single screw secures the antenna to the radio.
Remove this screw and pull the antenna straight out of the receiver.
It should be possible to slip the new antenna into the hole, twisting it to properly line up the mounting-flange, and run the screw back into place. In my case, the new antenna insisted on snagging on something inside the radio and I ended up removing the rear-panel entirely to install the new antenna rather than try to force the antenna into place. Fortunately, the rear panel is easily removed.
Remove the battery-cover and the four AA cells. Remove the five black Phillips-head screws that are marked on the rear panel with arrows. The rear panel will then lift straight up. Insert the new antenna into its hole, lining up the mounting flange with the screw-hole, and insert and tighten the screw. Carefully place the rear panel into place, lining up the four screw holes, and insert and tighten the five screws. Re-insert the AA cells and replace the battery cover.
I’m hopeful that this non-OEM antenna will prove to be rugged but time will tell. If this antenna proves to be inferior than the original in some way, I will post a follow-up to this post.
Obligatory disclaimer: I don’t know stone_deng, and I don’t have any financial interest in his company or products.
Eric McFadden (WD8RIF) is the author of this post and a regular contributor to the SWLing Post. Click here to visit Eric’s website which features QRP operation. Eric is based in Athens, Ohio.
Many thanks to SWLing Post contributor, Jeremy Clark (VE3PKC), who writes:
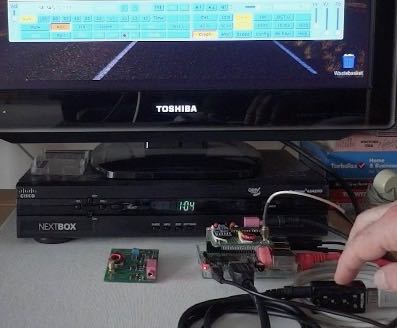
I have developed an SDR receiver that may be of interest to your readers. It can be used directly with the Raspberry Pi2B/3B. It comes in several versions DIP/SMD.
I have two eBooks which are basically design manuals for the DIP and SMD version of my SDR receiver. Each eBook has an Internet linked parts list, so that the reader can get their own parts to keep costs down. The DIP eBook is $7.90 CAD and the SMD book is $14.90 CAD.
Thank you, Jeremy–this looks like a fascinating construction project!
Readers: just to be clear, Jeremy is selling eBooks detailing construction–not kits. He did mention if you’re interested in obtaining the PCB, he can sell this as well.
Many thanks to SWLing Post contributor, Richard Schreiber (KE7KRF), who shares the following guest post:
Yet Another Internet Radio!
by Richard Schreiber (KE7KRF)
After deciding that an internet radio could be an important source of entertainment in our household, we formulated a few general guidelines:
We opted not to use an aggregator but would pick and choose stations we enjoyed and discover the URL’s ourselves. Also would be satisfied with a couple of dozen stations. Based on a recent decision to pare down the number of TV channels we were paying for, having access to hundreds of stations seemed impractical and unnecessary.
The price had to be affordable, thus eliminating many stand-alone, commercially available internet radios.
We already owned a quality portable speaker (Bose SoundLink Mini) so the internet radio didn’t need to duplicate that component.
Didn’t want to tie up nor be tethered to a laptop, tablet, or netbook. We predicted that would eventually lead to less and less use of the radio.
After some research, coupled with the fact I already had some experience with Raspberry Pi computers, that small device appeared to be our best choice. I had recently purchased the newer 2 B model, which has plenty of computing power, and had installed Ubuntu Linaro as the OS. (As an aside, this OS has not to my knowledge been upgraded for the latest Raspberry Pi 3). There are several other operating systems that will work just as well including the official Raspbian OS available through the Raspberry Pi Foundation.
I installed the MPD music player daemon and its client MPC, which is used to add to and delete station URL’s from the playlist, control volume, etc. An important find was the iPhone app called MPod which provides remote wireless access to the features of MPC. At the moment it is a free app for the iPhone (in my case the iPod Touch).
For portability, my Raspberry Pi is being used “headless”, meaning it is not connected to a monitor, keyboard or mouse. If maintenance is required you can use PuTTY, a SSH and telnet client, wirelessly from a Windows (or MAC?) PC, using a command-line interface. Mainly this is needed to shut down the Raspberry Pi properly before turning off the power, but it boots completely on its own when powered up. The MPod app will then load the playlist of stations and let you start playing the radio without direct access to the Raspberry Pi.
The sound output of my Raspberry Pi is connected to the auxiliary port of our Bose SoundLink Mini Bluetooth speaker. But instead of trying to implement Bluetooth on the Raspberry Pi, I took the easy way out and use a direct connection. The sound reproduction from this setup is very good, though audiophiles might be somewhat more critical.
The above represents a minimal investment if you already have a good speaker on hand. It does require some on-line research and learning at least enough to install the OS and software. The good news is that there are many websites and forums providing step-by-step instructions and helpful hobbyists willing to explain some of the more cryptic aspects. A few of the websites that I found to be helpful:
A couple of these also explain how to add a display to your Raspberry Pi internet radio.
Our Raspberry Pi radio is on each evening and has been trouble free. It is worth mentioning that this is a very portable setup, and can even be powered by a battery pack (the kind used for recharging tablets and cell phones) for a few hours. Of course you need to be near a wifi hotspot.
Thank you, Richard! What a great way to use the inexpensive Raspberry Pi. I have a spare Pi2 and an amplified speaker here at the house. Though I don’t need another WiFi radio, it would be fun putting this little system together.
Many thanks to SWLing Post contributor, Gary DeBock (N7EKX), who shares this video and notes the following on YouTube:
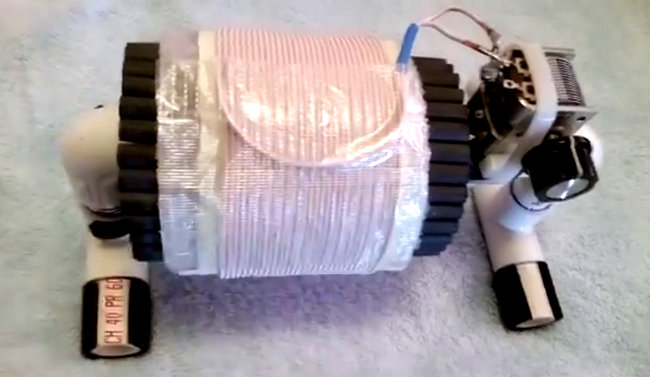
This is the new 3.5 inch (89mm) “Baby FSL” antenna, designed to provide a powerful DXing gain boost for Ultralight radios (or any other portables) despite its very small size. It has 32 Russian surplus 140mm x 8mm ferrite rods and 31 turns of 1162/46 Litz wire. In the demonstration video it provides a daytime DX gain boost for 750-KXTG (Tigard, Oregon, 50 kW at 160 miles) from inaudible up to about S7 on the Eton Traveler III Ultralight radio.
Gary is certainly a first-rate DXer and an ambassador of our radio hobby. Gary shows us here that, with a little ingenuity, we can take a $50 radio and turn it into something exceptional! Homebrewing at its best. Thank you, Gary!
Also, I had never considered that a high-gain FSL antenna would require very precise placement of the receiver for proper inductive coupling. It makes sense, though. This loop is tuned for razor-sharp precision!
Many thanks to SWLing Post contributor, Kris Partridge, who writes:
[R]esearch on DTH satellite TV service took me to a public website which is an archive going back to 1934. And boy, there is so much information there ..!
So what I pass to you for the Blog is this one as a start:
Knowing that many of your readers/contributors have made mention of using Beverage antennas I think this may make interesting reading. The report describes a method for accessing the performance of a Beverage, long wire, receiving antenna using off-air HF broadcast signals.
[…]It looks like the lower the better. And yes, there’s some heavy maths formula in there ..!
Wow–you’re right, Kris! This is very useful information. I’ll skip the maths bit and just follow the advice! Thank you for sharing.
Many thanks to SWLing Post contributor, TomL, for the following guest post:
“Car Shack” radio listening
by TomL
My car is an unusual place to listen to shortwave radio but has interesting possibilities. Due to the obscene noise at my home QTH, I decided that I must try something away from this unfortunate situation. So I took my homemade 14-inch loop antenna and outfitted the appropriate ancillary equipment with DC power packs. My trusty Sony ICF-2010 is the radio “vehicle” to “drive” this experiment (LOL). And, seriously, this is a way to show the public that it is not that hard to have a portable radio listening setup. Believe me, if I can do this, anyone can!
The basic ingredients are pictured here with some variations (see text):
Wellbrook amplifier powered by DC power pack of 10 eneloop AA batteries
KIWA Broadcast band (mediumwave) inline filter
Palstar preselector (active antenna) plugged into car cigarette lighter
Sony 2010 connected to a second DC power pack
Sony ICD PX333 digital recorder
Sennheiser earbuds
7 inch Samsung tablet and 4G MiFi device to do internet schedule lookups
Illustration SEQ “Illustration” 1: Car Shack in operation.
An important finding was that anything that has a cheap IC circuit to regulate and/or convert DC power can be extremely noisy! The pictured 16000 maH lithium brick would initially be quiet but after a while it would start spewing noise all over the bands. Power cycling it sometimes helped but I decided that it is too unpredictable. Also, converter cables that convert 5V to 12V for devices needing 12V also produce overwhelming amounts of noise. Even a small 5V USB converter plugged into the cigarette lighter makes a modest amount of ubiquitous noise. I am ditching the lithium power pack and converter cables and any cigarette lighter adapters!
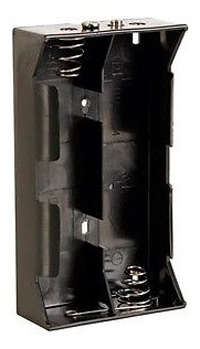
So, the main radio power pack will use the internal Sony battery comparment consisting of nine 2700 maH NiMH AA’s inside three D-cell battery holders that can each hold 3 AA batteries in parallel. This boosts the capacity to around 8100 maH for a modest cost (I already have NiMH chargers and the 4.5V requirement is not too high for the batteries in question). Pictured are examples of a single D-cell AA holder of which I bought 12 and the silver-top Powerex 2700 maH AA’s from fleaBay. The total voltage is slightly low (3.6V) but the Sony 2010 still works at a slightly lower performance (received signals are slightly weaker). I run the Sony on Local sensitivity and crank up the Palstar active antenna to compensate.
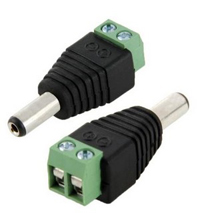
In a further quest for clean, portable DC power without noisy IC chips, I have been researching lithium batteries and it is quite a large amount of work to sift through all the variables. The Palstar active antenna and the Wellbrook amplifier both use external connections of 12V, 2.1mm (+ tip) plugs. NiMH is not going to cut it, too many needed and getting too heavy. Amongst the variables are things like:
Using a proper charger and not leaving it unattended or it could burn down your house
Chinese fakes being sold by the zillions that look exactly like the real thing
Initial cost being higher than current NiMH
Avoiding 1.5V step down batteries with noisy step down converter built-in
Learning the new terminology for sizes: AA = 14500 = 14mm diameter & 50mm length
Learning the differences between type of lithium: Lithium, Li-ion, LiFePo4, IMR, etc.
The difference between protected vs. non-protected batteries
How to avoid discharging the batteries too much which could render them completely useless (not just usage but also NON-usage as well)
How to physically handle Lithium batteries to avoid shock and temperature extremes
Learning how to compare maH’s of lithium to NiMH batteries
Finding out that most top rated 14500 Li-ion batteries are too long to fit into AA battery holders without risking damage to the protection PCB mounted at the bottom of the battery
and the list goes on and on…..
Here are some of the web pages I read to try to understand this technology:
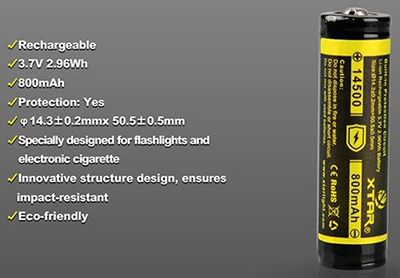
So, to cut to the chase, I have decided to order this one from XTARDirect because:
I can order from a USA distributor who orders from the factory in Shenzen China
The price is very reasonable for “protected” lithium ion batteries
They actually should fit into typical AA battery holders without damaging it
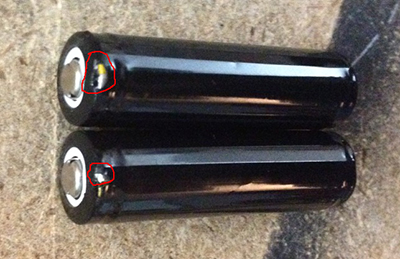
Illustration SEQ “Illustration” 2 XTAR 14500 800 maH Li-ion
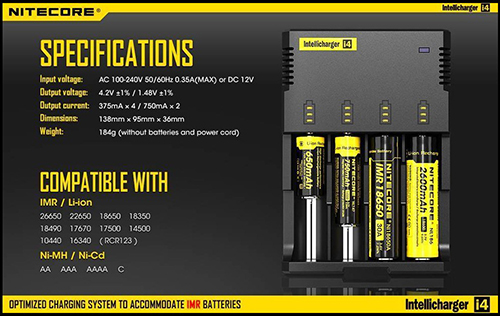
They are not the highest rated in terms of capacity, load drain, amp surge ability, etc., but they seem to have enough positive statements from users that indicate it gets the job done. Since I don’t have the lithiums yet, I am using some temporary 10-cell AA holders with good old Eneloops – good enough for now. And I am buying this discontinued charger at a discount to recharge lithiums:
Illustration SEQ “Illustration” 3: Nitecore i4 original version
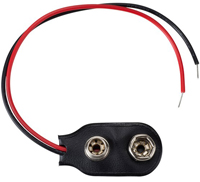
I will make two power packs made from these items pictured. The wire is fragile so I super glue the insulation directly to the DC power plug housing (avoiding getting any glue onto the bare wire inserted at the back). I will use three sets of lithiums (9 batteries) plus one set of Eneloop Pro’s (3 batteries) per power pack in the aforementioned parallel AA holders.
Illustration SEQ “Illustration” 6: 2.1mm x 5.5mm DC power plug.
Other items of note: The umbrella stand is optional since I found I like to move the antenna around and even tilt it to get slightly better directional signal. More importantly, I found that if I cut the Sony 2010 sensitivity from DX to Local, and then crank the Palstar preselector’s amplifier, I get a cleaner sound with less background noise. Also, the KIWA mediumwave filter is essential due to overloading.
One of my favorite stations is Radio Educacion (XEPPM) on 6185 kHz. A 1 kW station near the foot of Vulcan de Guadalupe in Mexico City, it is so weak that I almost never hear it and their wonderful selection of music representative of regional & cultural heritage. It is also 1675 miles distant according to Google Earth. Now, if I want to bother, I can go out and listen in my car at locations less noisy than home. So far, the safest places have been the parking deck at work (only two stories high) and the local grocery store parking lot. What I would really like is a very tall parking deck whose owners let me stay up on top long into the evening without harrassment (not sure I want to risk security personnel questioning me about the strange contraption and equipment – paranoia reigns these days)!
Sample of XEPPM, moderately good propagation from the work location:
Unexpected reception happens with this experiment. I mounted the antenna in the back, away from the engine and against the rear side window. Was traversing the local restaurant drive-through lane to get a hot dog, and turning the corner next to the long empty brick wall, the reception became dramatically stronger and clearer! Apparently, the brick wall blocked some interference as well as enhanced the signal coming from the Northeast. You can hear the effect starting at 25 seconds into the recording of RRI:
Also, not recorded from a previous evening at the grocery store location, 6135 kHz Radio Santa Cruz in central Bolivia, a 10 kW station playing Spanish rock music and a clear ID near the top of the hour.
More experiments to do, like
Mount the antenna as high I as dare with PVC pipe (too cold out now and I would rather not open any windows but I am itching to mount the umbrella stand and antenna on a 3 foot PVC pipe on the roof of the car, the increase in received signal strength is significant)
A bigger backpack to carry all this equipment away from the car
If Elon Musk has his way and builds the Gigafactory (and competitors follow suit), there could be many more experiments with lithium type batteries in the future
Perhaps get an SDR and cheap laptop computer to replace the Sony radio
PS: I found out that the three-AA battery holders do not make contact at the (+) tip of the XTAR lithium batteries I purchased. I just gently lifted up the contact inside the battery holder to allow it to reach the battery tip, that’s all that is needed. Whatever you do, do not put an extra piece of metal inside the battery holders! I accidentally damaged the outside skin of two of the batteries with a common piece of copper metal and the batteries immediately started to get HOT. I took them out as soon as I could and the batteries cooled down. So, don’t use any extra metal surface inside the battery holders; lithium batteries do not tolerate any kind of short circuit!
Cheers from Noizey Illinoiz,
TomL
Thank so much, Tom, for sharing your experiences and your ongoing experiments! Lately, I’ve been doing NPOTA activations with a portable loop antenna on top of my vehicle. I completely understand what you mean about getting strange looks from passers-by! We look forward to hearing about your future experiments fighting RFI.

 Remove this screw and pull the antenna straight out of the receiver.