Shortwave listening and everything radio including reviews, broadcasting, ham radio, field operation, DXing, maker kits, travel, emergency gear, events, and more
Thanks, Jim-I wish you success in this campaign (though it appears you’ve met your base goal and are now into stretch goals).
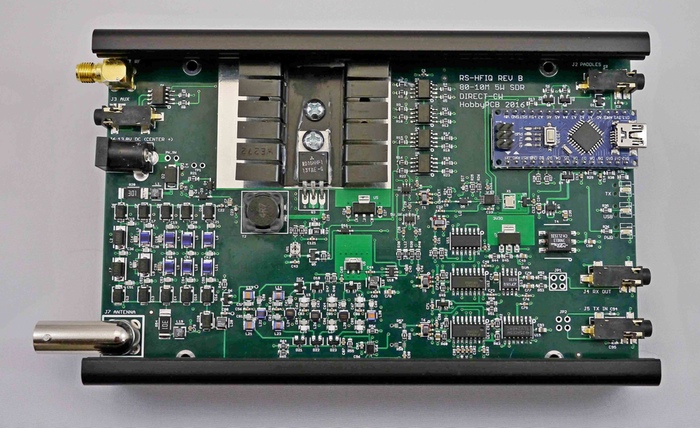
While there are a fair amount of SDRs in the $200-300 price range, there are few that are actually transceivers. I’m also impressed with the level of filtering on both the RX and TX stages and the fact that the baseband and digital section have separate and isolated grounds. The RS-HFIQ could potentially have a low noise floor and a decent front end.
If you back the RS-HFIQ, please consider sending us your review to publish here on the SWLing Post!
DXtreme Software™ has released a new version of its popular logging program for
Amateur Radio operators: DXtreme Station Log 12™.
New Features in DXtreme Station Log 12
Automatic LoTW Upload —Users can set Station Log 12 so it uploads each log entryto LoTW automatically when added, capturing and saving QSO Record Status from the LoTW server as part of the process. Modified log entries can be uploaded as well. If desired, users can disable automatic uploading and can upload log entries to LoTW semiautomatically and manually in batches whenever they want to.
LoTW Reporting —Users can perform searches and run reports filtered by LoTW QSO Record Status, which indicates whether log entries areOn, orNot On, theLoTW server following upload or QSL-updating. Users can also perform searches and run reports filtered by LoTW QSL Record Status, which indicates the date of each LoTW QSL record processed by DXtreme’s LoTW QSL Update Utility.
JT65A and JT9 Contact Pre-fill —Right-clicking the New button presents a shortcutmenu that lets users pre-fill the Station Log window with log information from a JT65A or JT9 contact completed on WSJT-X or JT65-HF-HB9HQX Edition.
Afreet Ham CAP Integration Expansion — Station Log 12 now integrates withoptional Afreet Ham CAP throughout the program. Users activate Ham CAP by requesting short- or long-path propagation predictions on spotted and logged stations and entities.
Quick Find —A box on the Station Log toolbar lets users type a call sign and press Enter to search quickly for a station in their log. If the call is in the log, a list of QSOswith it appears on a popup window. If desired, the list of log entries can be loaded into the Station Log window for viewing or editing, one log entry at a time.
Improv Imaging™ —Lets users associate adhoc images with their log entries. Thisfeature is like, but separate from, our popular QSL Imaging™ facility. Users can capture, scan, or paste any image and save it as a single-page .jpg, or single- ormulti-page .tif. Improv images popular with users include signals on a spectrum analyzer or waterfall, QSOs conducted on Amateur Television and data applications, and rigs and antennas used during contacts.
Other Imaging Enhancements —The QSL image previewer on the Station Log window is larger, as is the QSL Image Explorer, which also lets users call-up, in the Station Log window, the log entry associated with each QSL image, making theExplorer act like a Search window.Improv Imaging has its own, dedicated previewerand explorer.
UX Improvements —Users can apply foreground and background colors and fontattributes to grid headings and data rows throughout the program.
Standard Features in DXtreme Station Log 12
DXtreme Station Log 12 lets hams log their contacts and import ADIF files from otherprograms. It supports major call sign subscription services, and offers the following multimedia and advanced functions:
DX Spot Checker™ —Receives DX spots from Telnet-based servers, and determineswhether QSOs are needed for new or verified DXCC® entities, band-entities, mode-entities, or VUCC grids.
DX Atlas Integration —Performs DX Atlas azimuth plots from theuser’slocation tothat of a spotted or logged station. Also creates maps for a variety of reports.
Band Master Integration —Afreet Band Master can be invoked with needed bandand IOTA lists based on the user’s Station Log 12 database.
Rig Control —Tunes/retrieves frequencies and modes from supported rigs throughintegration with Afreet Omni-Rig.
QSL Processing —Creates QSL and address labels for physical QSLs, and supportsthe ARRL’s LoTW facility, including capturing LoTW QSL records as digital images.
Audio Facility —Records and plays QSOs.
Reports —Provides a wide range of performance and station reports to let users seehow well they’re doing. Reports can be filtered and sorted. Includes DXCC® and WAS Analytics™ tools for analyzing and enhancing DXCC and WAS standing.
Operating System and Requirements
DXtreme Station Log 12 runs in 32- and 64-bit versions of Microsoft® Windows® 10,Windows 8.1, Windows 8, Windows 7, Windows Vista®, and Windows XP.
Pricing and Support
DXtreme Station Log 12 retails for $89.95 USD worldwide for Internet distribution.Reduced pricing is available for upgrading users, and CD shipment is available at a nominal surcharge. All prices include product support by Internet e-mail.
About DXtreme Software
Based in Nashua, NH, DXtreme Software produces powerful and easy-to-use logging applications for all kinds of radio enthusiasts — from short-wave and medium-wave listeners and DXers to Amateur Radio operators. For more information about DXtremeStation Log 12, visitwww.dxtreme.comorcontact Bob Raymond, NE1I, at[email protected].
DXCC® is a registered trademark of the American Radio Relay League, Inc.
Microsoft®, Windows®, and Vista® are registered trademarks of Microsoft Corporation.
Band Master, DX Atlas, Ham CAP, and Omni-Rig are owned by Afreet Software, Inc. A purchased software license for Band Master and DX Atlas are required to use them.
JT65-HF HB9HQX Edition is owned by Beat Oehrli, HB9HQX. WSJT-X is owned by Joe Taylor, K1JT.
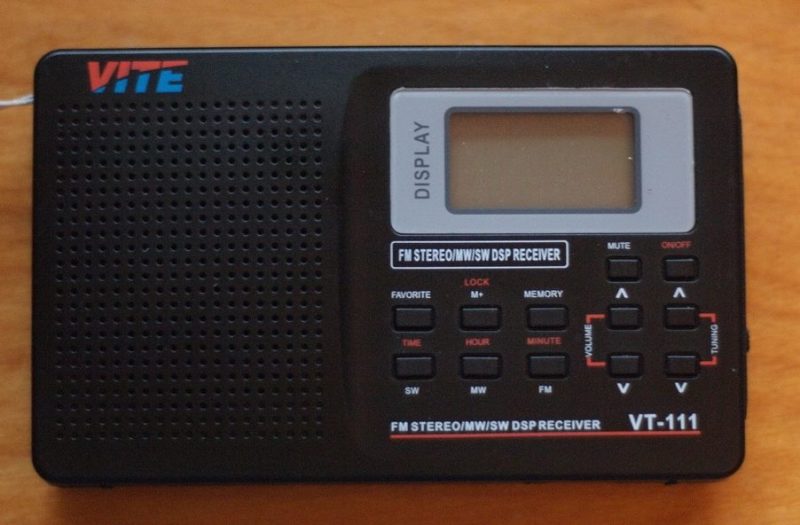
Okay, it’s not a great radio, but it was $11! I know, I know, it’s a terrible way to get started in SWL, but did I mention it was $11?
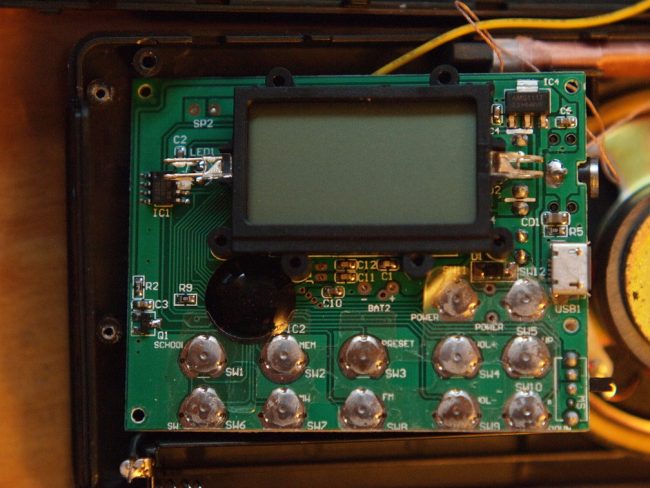
Anyway, I opened it up and found some differences between the photos you posted of the Basbon, as well as what appears to be an I²C bus in there; I’m not familiar with I²C busses, but I thought maybe some of your readers might find it interesting to see the guts of this radio and how it differs from the Basbon, or at least see the insides of yet another cheap radio.
You’re reminding me that I have a VITE SRW-710S sitting on the shelf and must review it soon. One reader was curious if its on-board recording feature would be effective on shortwave. We’ll soon know!
Anyone who knows me knows that since I was licensed nearly twenty years ago, I’ve been a fan of low-power (QRP) operations. There’s just something inexplicably fun in being able to talk to the other side of the world using very low wattage. In a sense, I’ve always felt that, in the world of ham radio, QRP is truly the province of the magician.
It’s for this reason that I’ve owned, operated, reviewed, and beta-tested a number of QRP transceivers over the years. What I look for in a QRP transceiver is quite different than what I’d look for in, say, a base station or mobile transceiver. The glory of QRP gear is that it’s more portable than its “full gallon” cousins in the transceiver world, allowing for radio communications on the go. QRP rigs tend to be more compact, lighter in weight, easier on batteries, less expensive, and provide built-in features to support field operation–even winter glove operation.
Of course, however, there’s typically compromise in smaller packages; neither would I expect a modest QRP transceiver to perform like a full-size base station. But I do expect it to perform well enough to satisfy my needs in the field or the shack.
Introducing the LD-11
LnR Precision, Inc., is a North Carolina-based company that specializes in antennas, straight-keys, and last but not least, QRP transceivers. The company has produced a number of innovative QRP transceivers over the years, and for many of these years, I’ve been admiring these from afar. But earlier this year when the company announced their latest QRP transceiver, the LD-11, I was especially intrigued.
What really caught my attention this time is that this little transceiver is based on the architecture of their popular LD-5–a five-band, stand-alone direct conversion transceiver. Yet the LD-11 is actually an upgrade on that model, in that it supports 160-10 meter operation with all modes (SSB, CW, CW-R, Digi, AM and FM). Curiosity got the best of me: I had to see this for myself. I contacted LnR Precision, who kindly loaned me a transceiver for review.
Overview
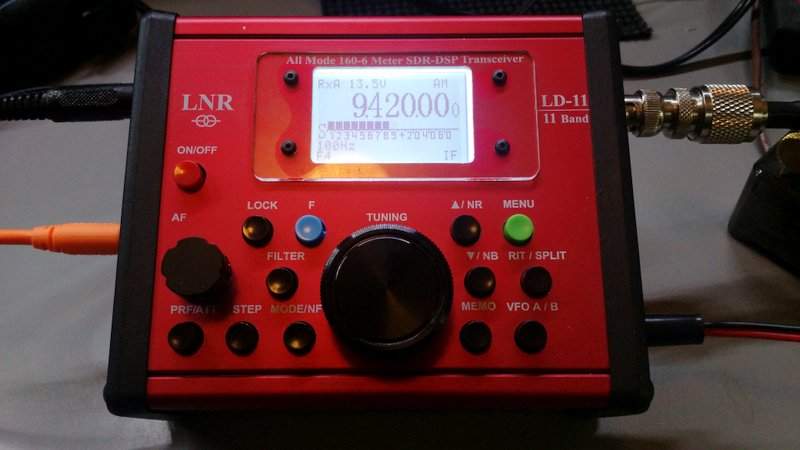
The left side sports the key and mic ports, headphone jack, a line in/out jack and a side tone adjustment.
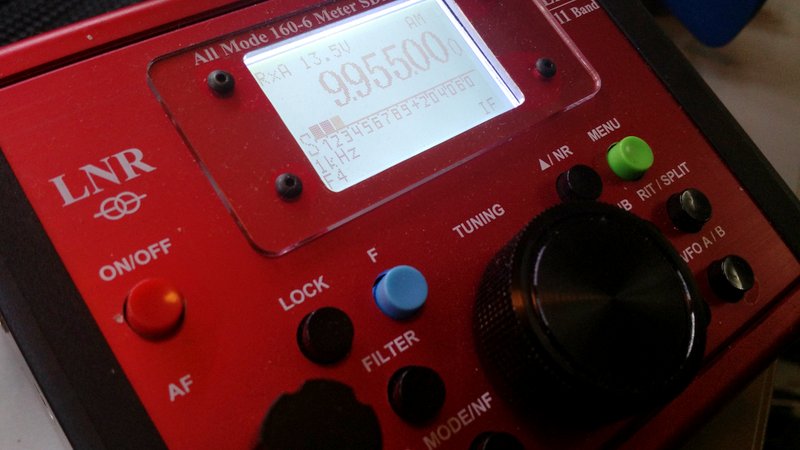
The first thing that catches your eye is the unusual color of the LD-11: it is red. Very red. Though opinions will surely vary, I rather dig the hot-rod red aluminum chassis of this little rig. The red faceplate makes the buttons quite visible as well as giving the radio a unique and vivid appearance.
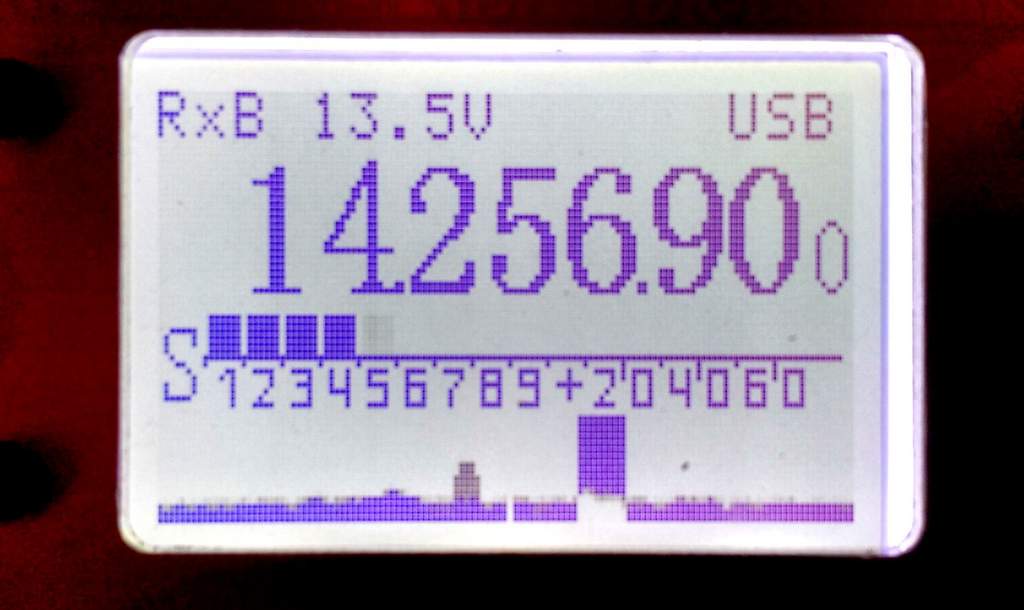
The backlit LCD display, meanwhile, is crisp and easy to read. It’s large enough that all of the pertinent information (frequency, voltage, mode, filter selection, and tuning step) can be displayed at once. When in transmit, there’s a meter below the frequency that displays either a bar scale or numbers for SWR or Power; when in receive mode, it displays the “S” meter.
The LD-11’s buttons have a tactile, responsive, and smooth action. The tuning knob, while lacking a finger dimple, rotates easily with an appropriate amount of brake.
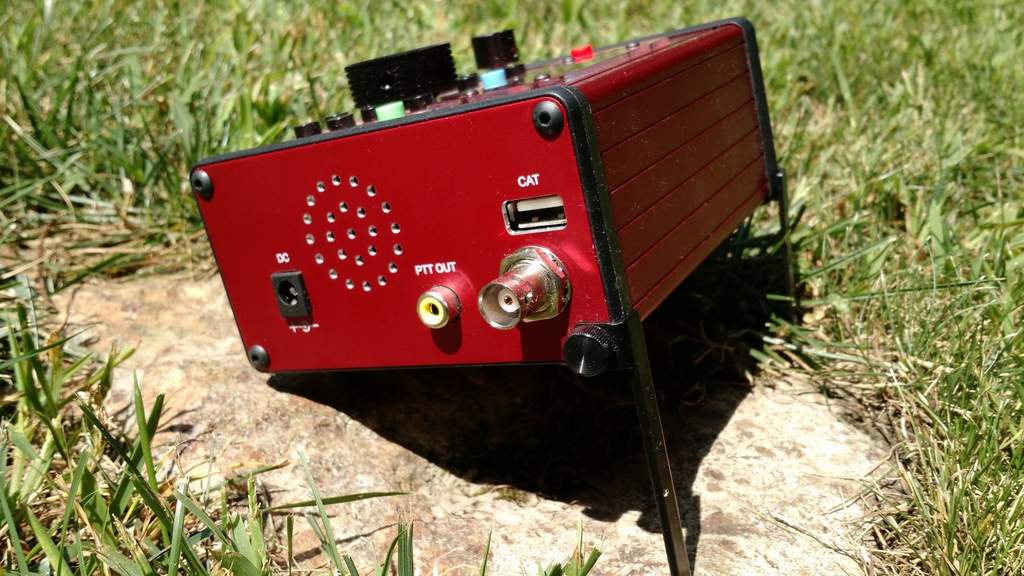
You’ll find the DC port, PTT out, CAT port and Antenna input on the right side of the LD-11.
LD-11 operation is really very simple. I was probably on the air for hours before I ever needed to reference the owner’s manual for functions. LnR has done a great job giving the LD-11 a logical menu layout and intuitive front panel functions.
The radio’s front panel allows you to do the following:
turn the radio on/off,
tune with the encoder,
adjust AF gain,
key lock the front panel,
toggle the panadapter display,
toggle pre-amp and attenuator,
change tuning steps,
change mode,
move between bands,
turn on noise blanker and noise reduction
operate RIT and set-up split,
toggle VFOs, and
enter menu functions.
The menu functions give you control of still more settings, such as AGC settings, CW configuration, mic/voice transmit configuration, notch filter settings, NB/NR settings, meter display, transmit power, backlight settings, squelch, digital gain, and AM/FM mode enable/disable, among others. So this little transceiver is feature-rich.
Moreover, most menu items can be changed while you’re transmitting. While on the air, for example, I regularly toggle the transmit meter display between power out and SWR while calling CQ. Very handy.
Again, operation is straightforward and simple, especially good because at time of publishing this review, the LD-11 owner’s manual is still quite basic (click here to download PDF version).
On the air
Unlike most of my review radios, which spend a great deal of time in the shack during the evaluation period, the LD-11 spent most of its time in the field–in several US states, as well as in a couple of Canadian provinces. I even used the LD-11 for two weeks in an off-grid cabin on Prince Edward Island, Canada.
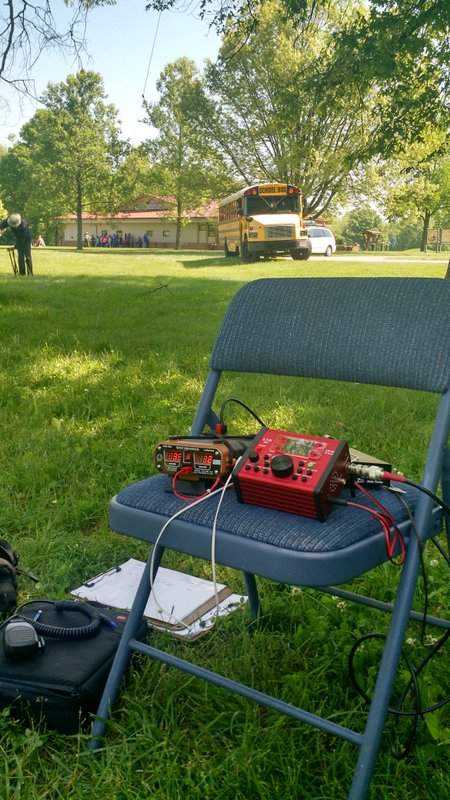
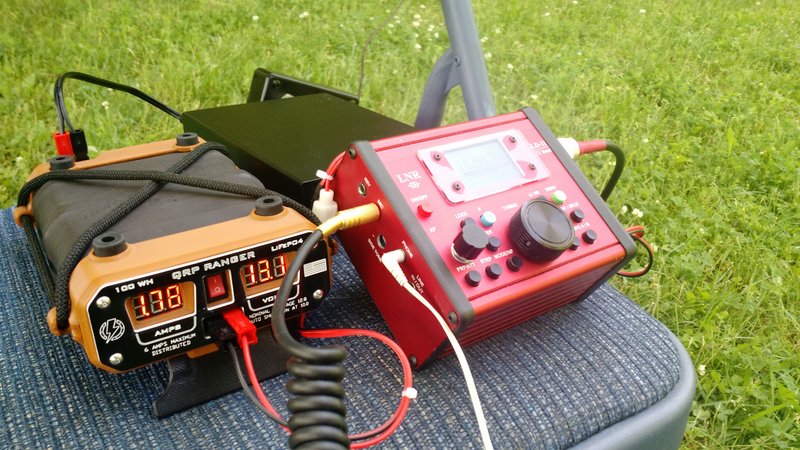
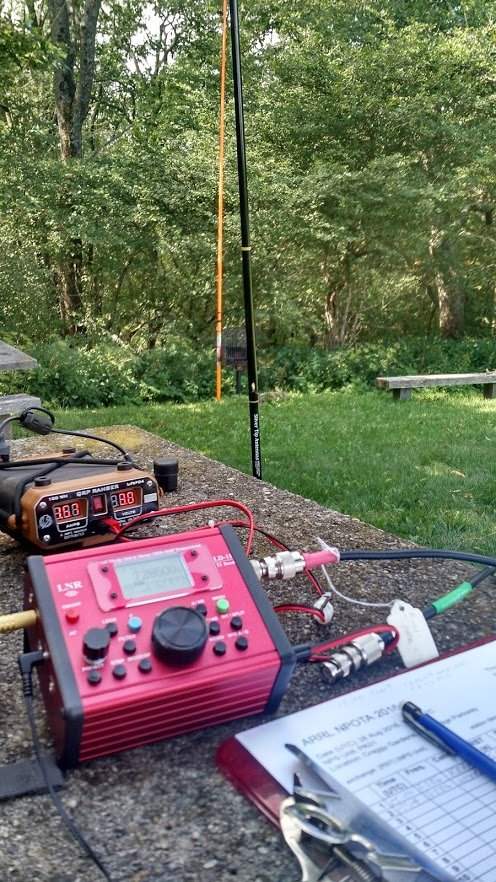
The LD-11, QRP Ranger, and Z-11 auto-tuner at the Hopewell Culture Park NPOTA activation.
We had a tight schedule for our NPOTA activations, so I couldn’t spend a great deal of time setting up my equipment. So on that day, I paired the LD-11 with Eric’s Z-11 auto tuner and a homebrew 40-meter doublet suspended from a tree. I powered the LD-11 with my Hardened Power Systems QRP Ranger battery pack.
And this combo worked brilliantly. At Hopewell, for example, I made twelve contacts, in short order, running SSB with just 8-10 watts output, and received positive audio reports.
Also that day, I discovered how exceptionally easy it is to operate the LD-11 in the field. When packing in, I appreciated how lightweight and compact it is, and that fire-engine red chassis meant there was no way I’d overlook it or forget it on the ground.
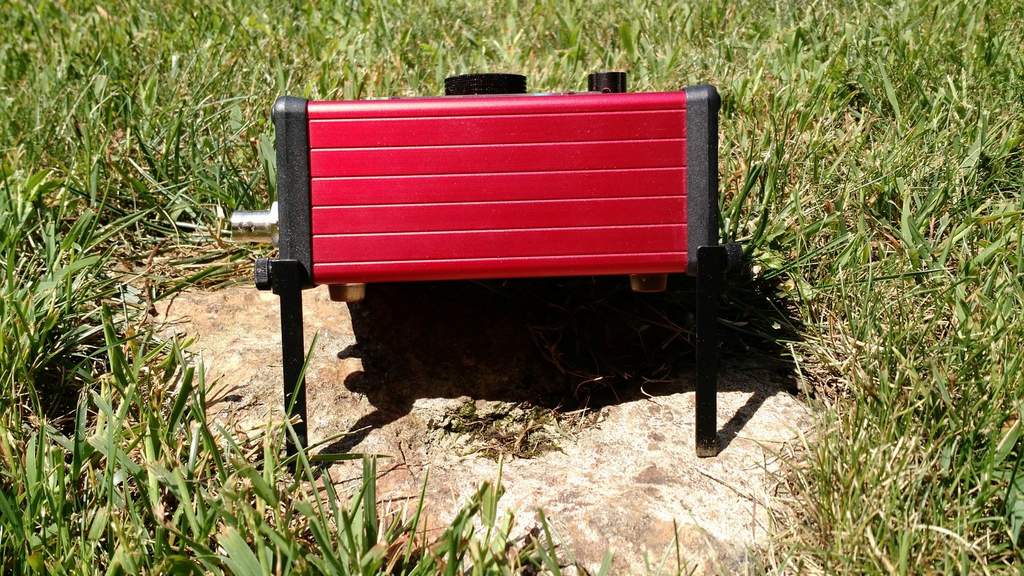
The LD-11 has two fold-down feet to support it on the shack table or in the field.
Two missing features, however, might make the LD-11 even more portable: these are an internal battery pack and an internal ATU. Unfortunately, there are no options for these at present (LnR, take note).
The LD-11 feet fold neatly under the chassis.
The external ATU, meanwhile, adds several extra items to manage: the ATU unit, the power cord, and an extra patch cable. Sure, if you’re operating all day from one location, none of that really matters. But when you’re doing quick deployments, every bit of kit that doesn’t require packing and unpacking also saves time and potential frustration. But I cheerfully used the above combo the rest of the day, logging even more contacts.
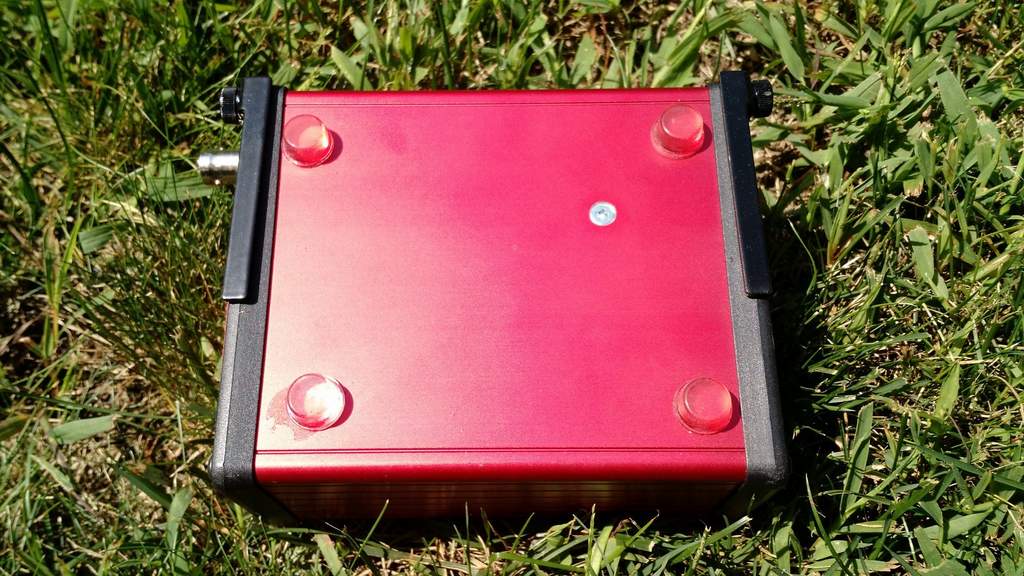
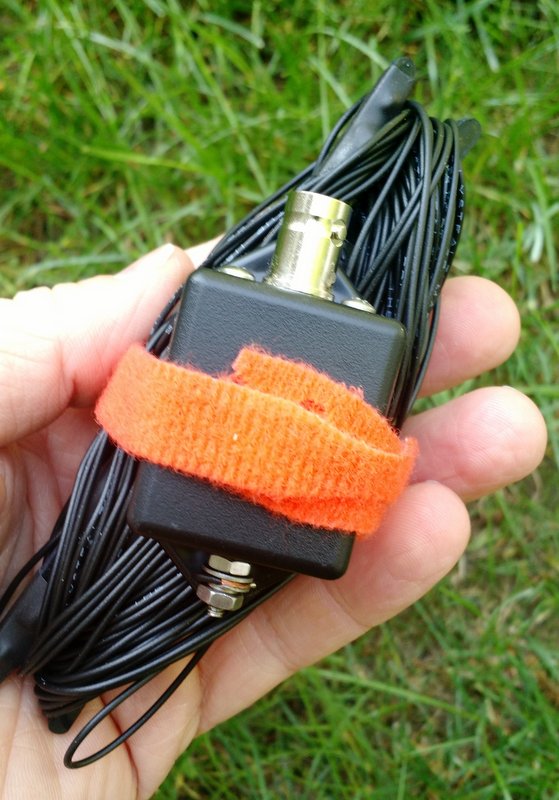
The EFT Trail-Friendly Antenna
At the Dayton Hamvention, I decided that one way to avoid taking an ATU to the field was to use a multi-band resonant portable antenna. I was quite busy at the Hamvention and didn’t want to spend time building one, so I decided to take the quick route and simply buy one. I visited a few vendors in Hara Arena and was impressed with the selection of field-portable antennas available. In the end, I was taken by the compact and easy-to-deploy design of LnR Precision’s EFT Trail-Friendly antenna,and purchased one on the spot. As many potential LD-11 owners might purchase the same antenna, I decided it might help to review it, too.
The EFT Trail-Friendly antenna is incredibly compact and quite easy to deploy.
I bought a version of the EFT antenna that is resonant on 40, 20, and 10 meters. I like that band combo for NPOTA and SOTA activations, because I like operating on both the 40 and 20 meter bands. What’s especially brilliant about the EFT end-fed design is that you only need to suspend one side of the antenna: simply launch a line over a tree branch, and hoist the business end of the antenna up, and, snap–you’re ready to go. When wound up for transport, it’s also lightweight and takes up very little space in a kit bag.
On the way home from the Hamvention, we activated the same four parks yet again. Eric and I tuned the EFT antenna before its initial use, and it was then ready to go.
Eliminating the need for an external tuner and adding the simple EFT antenna to the mix meant that I could set up and take down my entire station in a matter of minutes.
The only thing that took time at all was finding a tree branch to hoist the end of the antenna–usually not a problem, especially in our Eastern US parks. Moreover, the transceiver-plus-antenna team was quite effective: I easily logged all the contacts needed for all four sites in the one-hour time slots we allotted.
LD-11 Performance
The QRP Ranger (left) and LNR Precision LD-11 transceiver (right)
In brief, I’ve been very pleased with the LD-11’s performance on the air.
The LD-11 receiver is both sensitive and selective. Though I didn’t have the chance to test it in the RF-dense environment of Field Day, it never overloaded in the areas where I’ve operated.
Through my headphones, the LD-11’s noise floor is impressively low and the receive audio is excellent. At first, I was a bit disappointed that the LD-11 doesn’t have an RF Gain control–something I frequently use to mitigate background noise–but fortunately the noise floor is low enough, and the DSP architecture seems adaptive enough, that I’ve never needed to reach for an RF gain control so far.
Nonetheless, LnR: I do hope you’ll consider making RF Gain a future firmware update!
Modes
The LD-11 is jam-packed with modes: USB, LSB, CW, CW-R, AM, and FM.
The LD-11 can also handle a host of digital modes, and there’s the choice of two models to connect to your PC: one LD-11 model with the Prolific USB Adapter Chipset ($739), and another model with the more-universal FTDI chipset ($789). It’s outside the scope of this review to test the LD-11 on digital modes, but note that I plan to do so in the coming months. The modes I’ve tested thus far are SSB, CW, and AM.
When I operated SSB, I found the default filters quite effective and the receive audio pleasant. On transmit, I received a number of positive reports on the LD-11’s audio. What’s more, through a menu option you can can adjust the transmit audio equalization (three defaults) to better match your voice.
On CW, the LD-11 was equally as pleasant. On-board filtering is quite effective and audio well-balanced.
On transmit, there is one negative worth noting for the CW operator: the LD-11 does not have full break-in QSK.
While this isn’t a problem for me, because I find hearing signals between the dits and dahs I send rather distracting, I know many CW ops that don’t like using a delay on transmit, preferring instead a full break-in. LnR notes that the LD-11’s “maximum switching delay is 12mS and digital delay is 47mS.” If you set the LD-11 for the quickest response time, you can hear between most characters, but the relay clicking can be distracting. For all of my CW operations, I set the response time to 500ms.
The first time the LD-11 was operated in CW it was with my buddy Mike Hansgen (K8RAT). Later, I asked this experienced operator how the LD-11 sounded on the other end? His reply:
“The LD-11 put out a sweet, musical note that was very pleasant and reminiscent of the note of a valve transmitter. The LD-11 sounded better than any silicon transceiver I had heard in a long time.”
Wow…high praise, indeed. For those who don’t know him, Hansgen has high standards, and doesn’t hand out such compliments readily.
AM mode (and general coverage)
Though the LD-11 isn’t advertised as having a general-coverage receiver, it will, in fact, tune the entire HF band.
You initiate this broad-spectrum tuning by entering the LD-11’s administration mode. In the admin panel, you’ll find functions that allow you to set the band edges on each amateur radio band. LnR describes this process in the LD-11 product manual, but suggests you contact them for support the first time you do so.
For a preliminary test of broadcast reception, I moved the lower band edge of the 30 meter ham radio band to 8.2 MHz.
After saving the settings and re-starting the LD-11 in normal operation mode, I could then tune the entire 31-meter broadcast band on the LD-11.
Hypothetically, you could either widen each amateur radio band to include adjacent broadcast bands, or you could simply set one of the ham bands to include the entire HF spectrum. To make it easier to navigate and tune through the bands, I prefer the former method.
Since the LD-11 has a proper AM mode, broadcasts sound great–especially via headphones! Better yet, the AM filter width can be widened to an impressive 9.6 kHz–! When listening to a blowtorch signal, audio fidelity is most impressive.
The LD-11 has four filter slots: F1, F2, F3, and F4. The F1-F3 slots can be set to a fixed user-defined widths (common widths are default).
The F4 position can be altered to any available filter width without having to enter the admin mode of the transceiver. Simply press the “F” (blue function button) and the FILTER button simultaneously, and use the encoder/tuning knob to specify the filter width in .1 kHz steps. Pressing the F and FILTER button, again simultaneously, will save your filter width for the F4 position.
I’ve been using the F4 filter position for widths between approximately 8.2 and 9.6 kHz in AM.
A panadapter
One final unique feature of the LD-11 is a built-in, simple panadapter. By pressing the F (function) and VFO buttons simultaneously, it will engage the panadapter which lines the bottom of the display.
The panadapter display is found at the bottom of the LD-11’s backlit display.
To be clear, the panadapter is very basic–it doesn’t include frequency markers, it’s monochrome, and it’s not very tall (height/depth helps to discern weak signals along the spectrum). In fact, when I first turned it on, I truly doubted its utility.
Yet after having used the LD-11 for several months, I can say that one of the first steps I now take when putting the rig on the air is to engage the panadapter. Though it’s quite simple, I find it a useful tool for chasing signals on bands, whether SSB, CW, or even AM broadcasters. It’s also very responsive and fluid, which helps make up for the fact that it’s solid in color and rather flat.
For example, the weekend before finishing this review, I activated PK01 (the Blue Ridge Parkway) for NPOTA. When I switched to 20 meters, the noise floor was so low that, when I first started calling CQ, I assumed that either the band was dead or the antenna wasn’t working. One look at the panadapter, however, showed me that there were some strong SSB signals on either side of my frequency. So I didn’t tune around, but simply continued to call CQ, which soon rewarded me with excellent catches (more on that below).
Summary
Invariably, all radios have strengths and weaknesses; here is a list of these from the moment I put the LD-11 on the air:
Pros:
Lightweight, compact size
Excellent ergonomics and simple menu-driven functions
Built-in, simple panadapter
Low current drain on receiver (….ma)
General coverage receiver
Low noise floor
Variable filter bandwidths
Rugged hand mic
Most menu items can be changed while operating PTT or CW
Headphone amplifier drives larger headsets
Internal speaker (see con)
Excellent CW transmit audio reports
Good LnR Precision customer service
Cons:
No internal ATU option
No internal battery option
No RF gain control (see noise floor pro)
CW operation is not full break-in QSK, some relay noise
No voice or CW memory keyers
Very basic owner’s manual
Occasional audio “pops” when tuning rapidly through a band
While the LD-11 lacks some of the portability of those rigs (specifically, options for an internal battery and ATU–again, please take note, LnR), its performance-for-price-point is right, in my opinion.
If you take the LD-11 to the field with a resonant antenna, as I have, all you need is a power source to be on the air in moments. If you pair the LD-11 with a simple ATU like the Emtech ZM-2 or the even smaller Elecraft T1, you’ll be able to tune wires to your heart’s content, and you won’t need extra power cables.
Oh, yes…there’s one more thing I must mention about the LD-11: this rig has, for lack of a better word, a “fun” factor. It reminds me of one of my favorite QRP radios from days gone by, the Index Labs QRP Plus. The QRP Plus had many performance shortcomings and wasn’t nearly as full-featured, as lightweight, or as small as the LD-11, but it was a fun radio due to its dead-simple controls, nice display, prominent tuning knob, and good ergonomics generally, making it a breeze to operate.
The LD-11 feels like what the QRP Plus should have been: a fun rig that delivers serious performance.
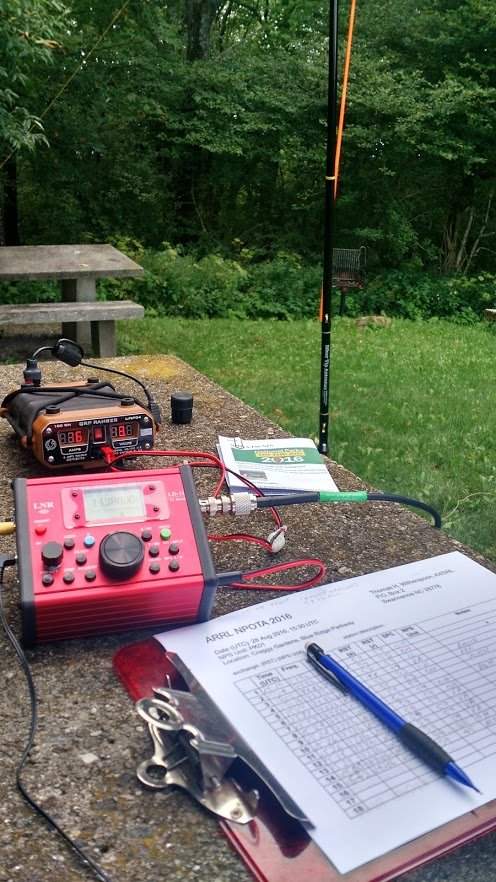
The LD-11 is also easy to use, and that certainly contributes to its sense of fun. Operation has clearly been well thought through by the LnR developers. Only a few days before capping off this review, I took the LD-11 to the field for its 6th National Parks On The Air activation. With eight watts in SSB and a 20 meter vertical, I worked Rhode Island, Texas, Montana, Manitoba, California, and Slovenia from a picnic table on the Blue Ridge Parkway. And it was great fun, underscoring the reason I get such a kick out of HF and QRP in the first place.
Of course, that’s the magic and the mystery of radio. But tools like the LD-11 make it all the more accessible. LnR Precision, I must say: pretty good trick. From your proverbial hat, you’ve produced the handiest little QRP rig I’ve seen in years.
Many thanks to SWLing Post contributor, Steve T, for sharing the following news from Business Insider:
KNL Networks, based in Oulu, Finland, has been in stealth mode during the past four years while developing a revolutionizing system that enables internet connection anywhere in the world – even in the middle of the Pacific Ocean – without using expensive satellite systems.
Today, KNL announced the completion of its series A funding round. The funding amounted to more than $10 million making it one of the biggest Nordic series A rounds. Creandum is the biggest investor.
[…]Facebook and Google have been exploring the possibility of bringing internet to remote locations by relaying data through a network of balloons. KNL’s technology, on the other hand, proposes the opposite: incredibly long range signals, by sending internet protocol over the radio.
KNL’s technology is already being used to provide robust internet connections to ships on the Atlantic and Pacific Oceans, but can be used anywhere on the globe for many different applications.
[…]KNL’s technology relies on shortwave radio transmissions, which can transmit data for thousands of kilometers, for a fraction of the cost of a satellite system. Accomplishing this has required the innovation of long-distance high frequency radio systems. In comparison with satellite internet, the radio technology offers the additional advantages of being easier to use, always on.
I’ve always had confidence that inherent HF bandwidth and data integrity issues could be addressed with time as our receivers, codecs and digital signal processing improve with each iteration.
As I wrote in, Does Shortwave Radio Have a Future?, I’ve always believed that the shortwave medium could be leveraged for international digital/data communications, and should be. In my article, I focused on Radio Canada International (RCI), which was then dismantling their shortwave transmitter site:
[B]roadcasters should not dismantle their transmission sites as Canada is currently doing. Not only is the current service originating from these sites a more reliable form of emergency communications than the Internet, should a national disaster befall us; not only do they continue to provide a broad-spectrum mode of diplomacy; but should future digital communication modes find a way to take advantage of the HF spectrum as is now under discussion, this would be most unfortunate.
Imagine a wi-fi signal with a footprint as large as several countries, digital devices with tiny fractal antennas that receive this signal containing rich media (e.g., audio and video)––these are not science fiction, but highly plausible uses of these transmission sites, even within the next decade…
We’ll be watching developments at KNL Networks and reporting updates here on the Post. Follow the tag: Shortwave Internet
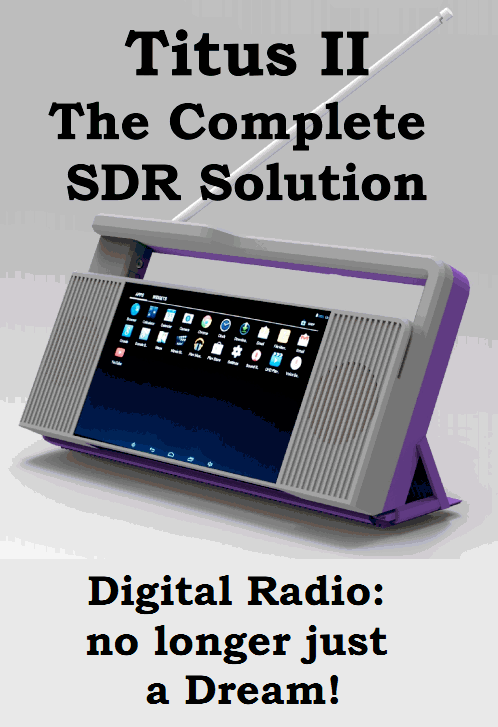
Those of you following the upcoming Titus II receiver will enjoy reading this interview with Mike of Pantronix. Here’s a short excerpt taken from DRMNA.info:
[DRMNA] Can you tell us a little about the process taken to develop the new receiver?
[Mike] We became aware of the need for a digital capable receiver by a visit from TWR representatives about three years ago. Having designed RF products and receivers in the past, it intrigued me that there were no low cost method to receive DRM. This began research into the problem. Initially we envisioned and designed what we call an ATU (Antenna Tuner Unit) that plugged into a ‘standard’ Android tablet. Unfortunately as time and testing proved, ready made tablets had varying problems from vendor to vendor, model to model. The decision was made about a year ago that we had to do our own Android ‘tablet’ and integrate the ATU into it. Hence the Titus II was developed.[…]


 Anyone who knows me knows that since I was licensed nearly twenty years ago, I’ve been a fan of low-power (QRP) operations. There’s just something inexplicably fun in being able to talk to the other side of the world using very low wattage. In a sense, I’ve always felt that, in the world of ham radio, QRP is truly the province of the magician.