Shortwave listening and everything radio including reviews, broadcasting, ham radio, field operation, DXing, maker kits, travel, emergency gear, events, and more
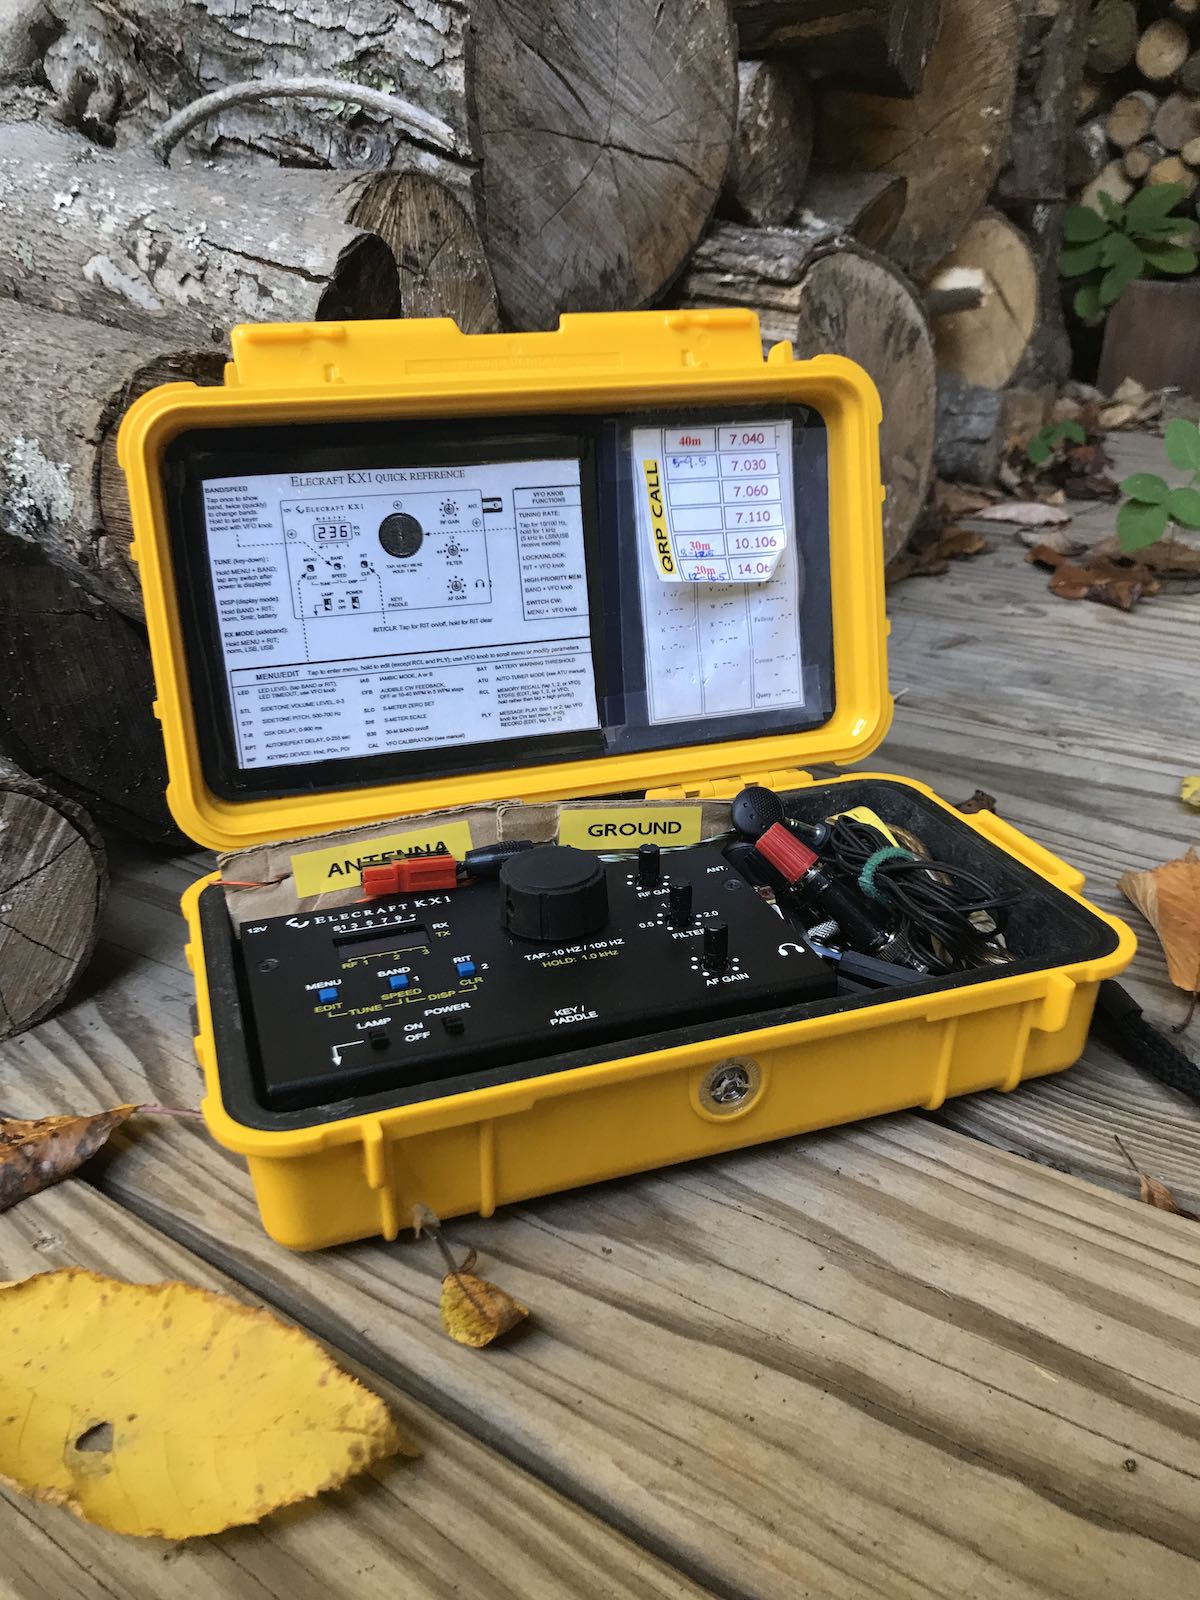
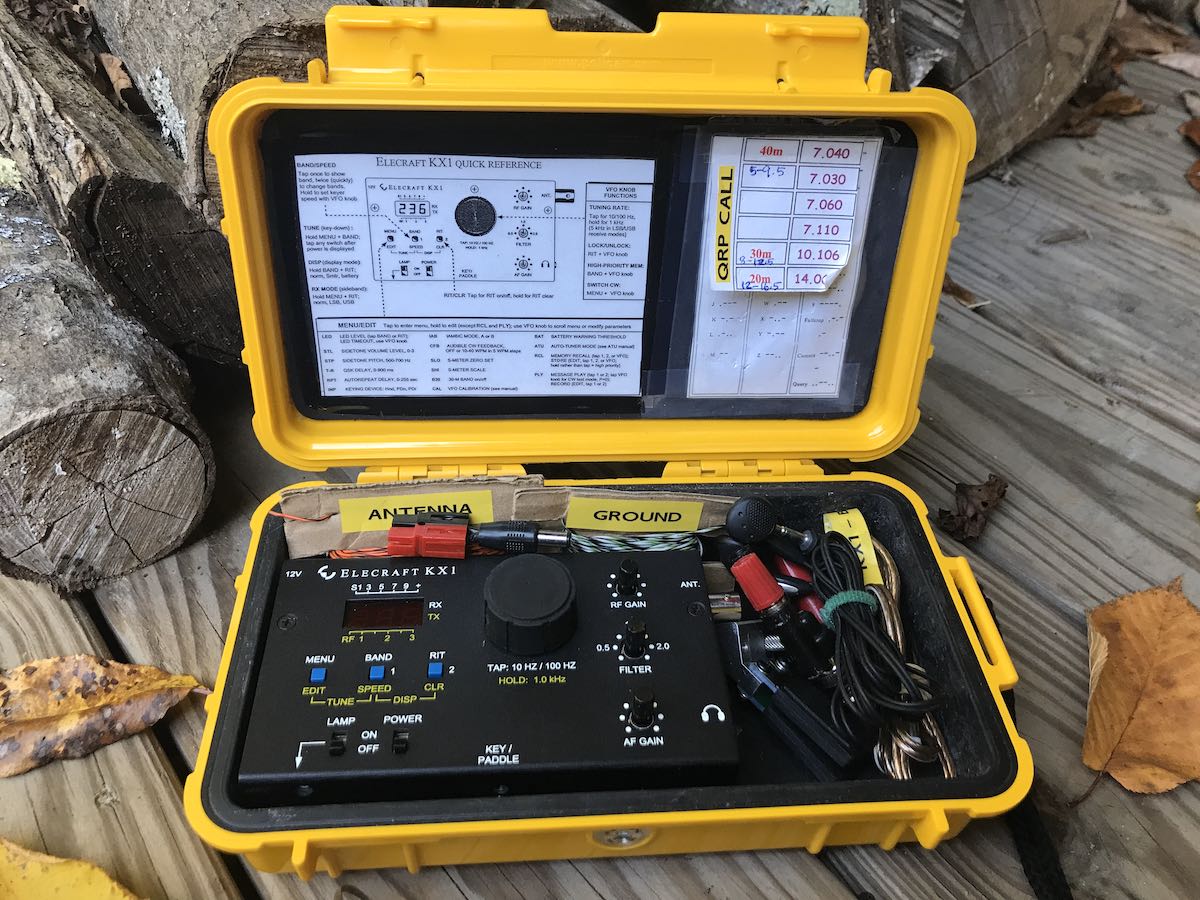
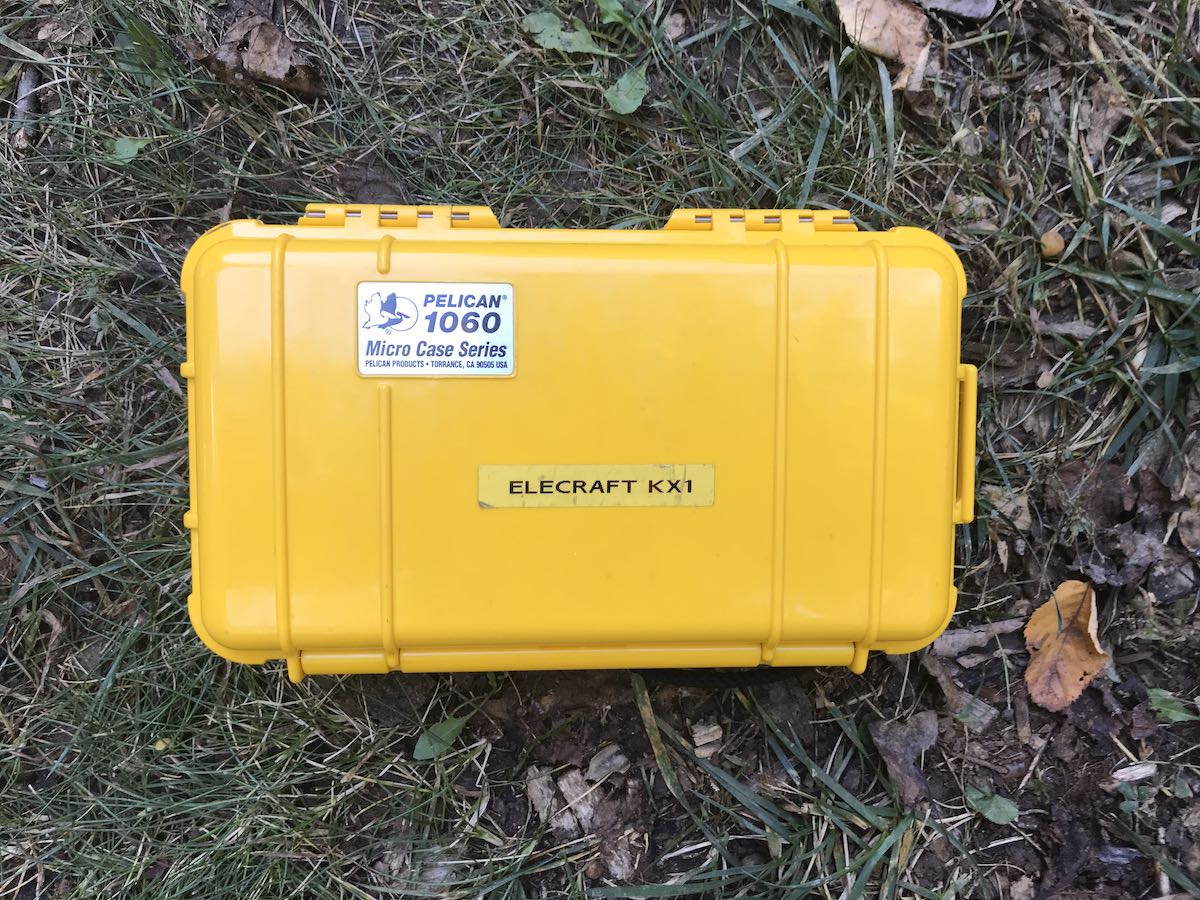
The seller, who lives about 2 hours from my QTH, described his KX1 as the full package: a complete 3 band (40/30/20M) KX1 with all of the items needed to get on the air (save batteries) in a Pelican 1060 Micro Case.
The KX1 I owned in the past was a four bander (80/40/30/20M) and I already double checked to make sure Elecraft still had a few of their 80/30 module kits available (they do!). I do operate 80M in the field on occasion, but I really wanted the 80/30 module to get full use of the expanded HF receiver range which allows me to zero-beat broadcast stations and do a little SWLing while in the field.
The seller shipped the radio that same afternoon and I purchased it for $300 (plus shipping) based purely on his good word.
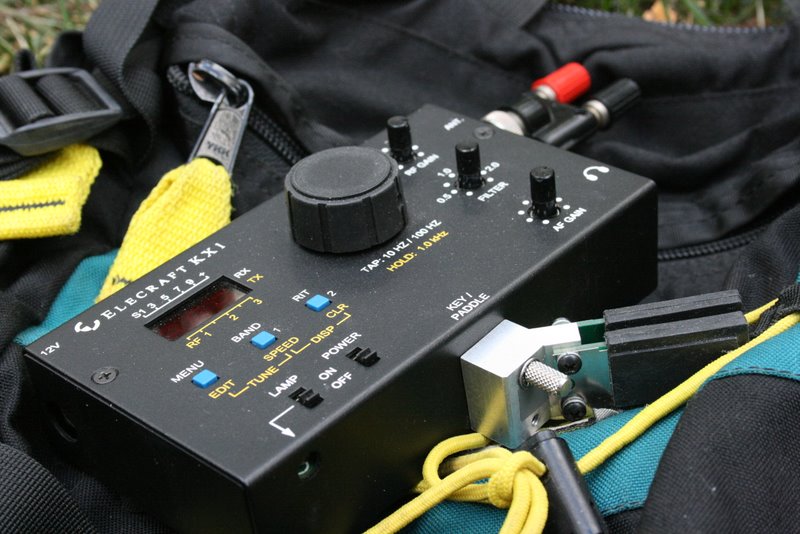
The KX1 package
I’ll admit, I was a bit nervous: I hadn’t asked all of the typical questions about dents/dings, if it smelled of cigarette smoke, and hadn’t even asked for photos. I just had a feeling it would all be good (but please, never follow my example here–I was drunk with excitement).
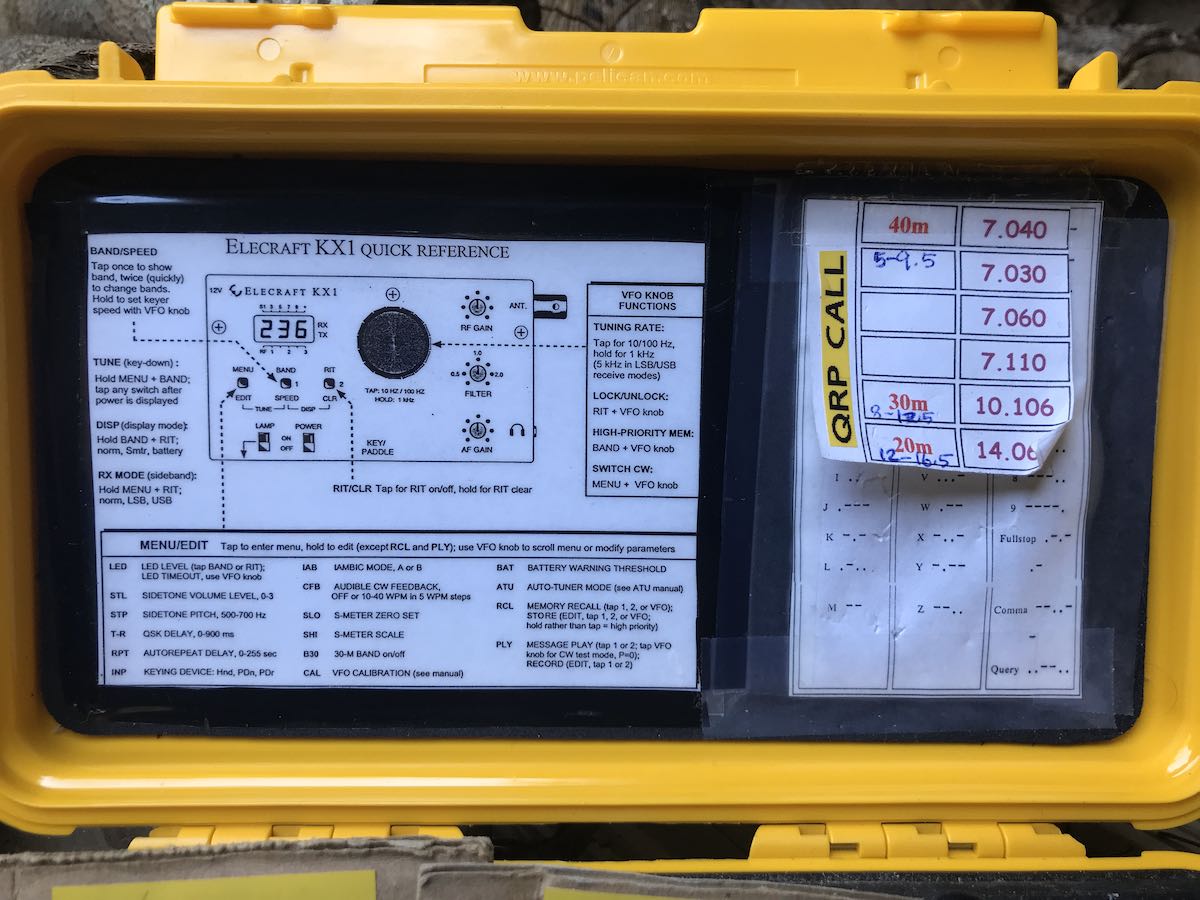
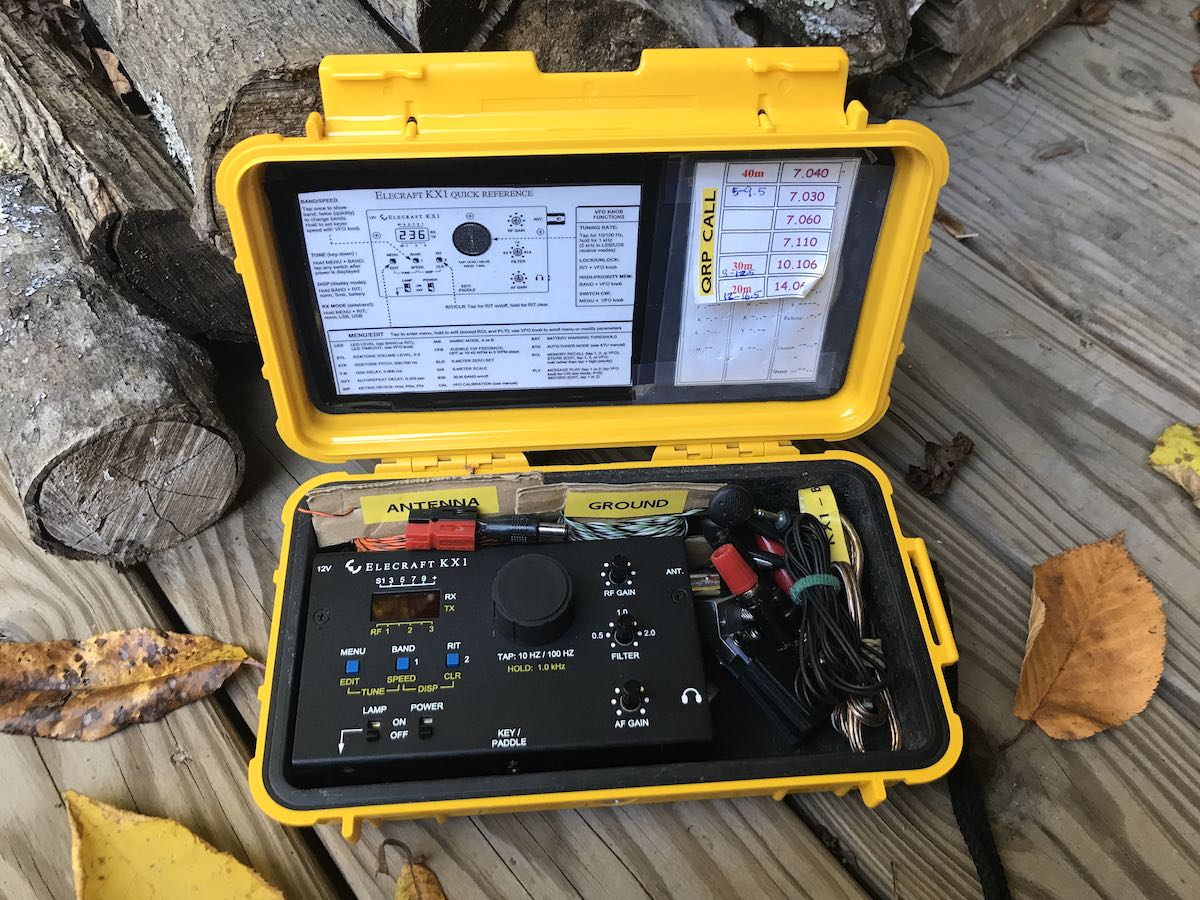
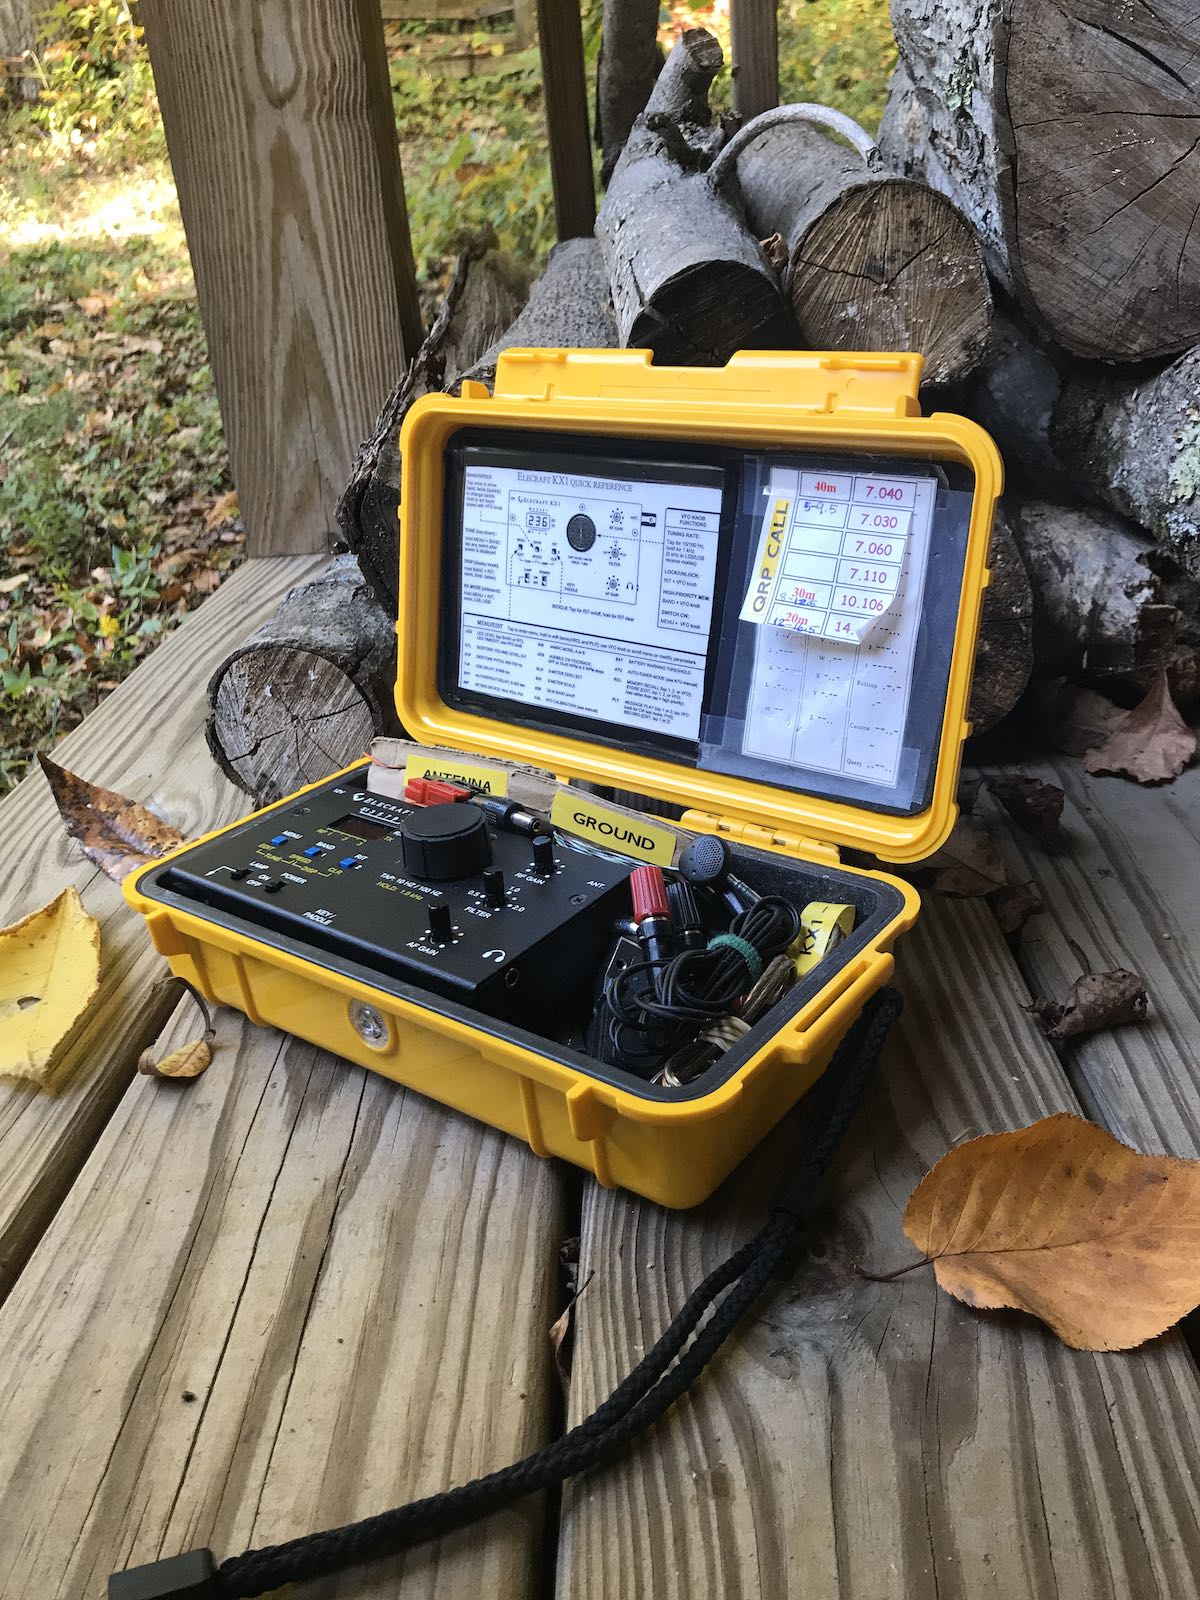
Here’s the photo I took after removing the Pelican case from the shipping box and opening it for the first time:
My jaw dropped.
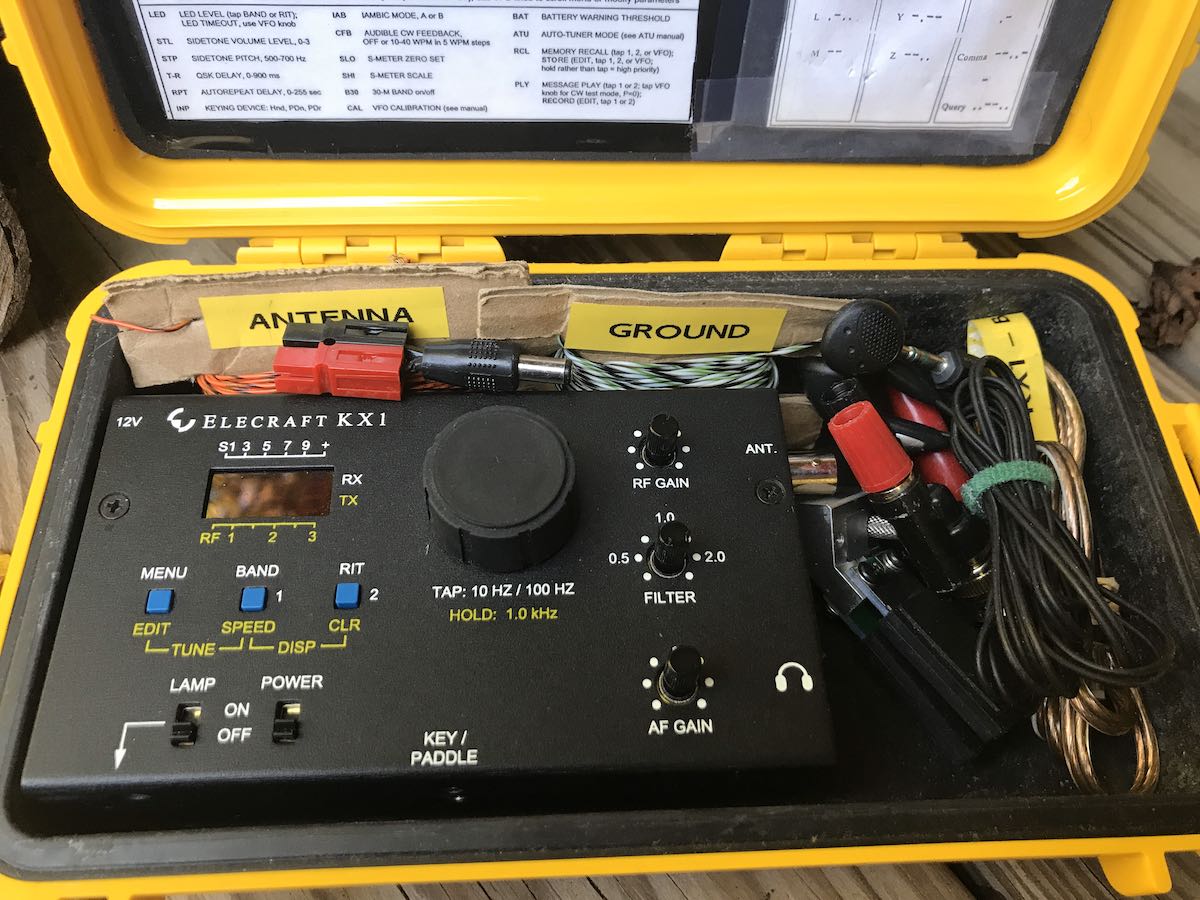
The seller was right: everything I needed (and more!) was in the Pelican case with the KX1. Not only that, everything was labeled. An indication that the previous owner took pride in this little radio.
I don’t think the seller actually put this kit together. He bought it this way two years ago and I don’t think he ever even put it on the air based on his note to me. He sold the KX1 because he wasn’t using it.
I don’t know who the original owner was, but they did a fabulous job not only putting this field kit together, but also soldering/building the KX1. I hope the original owner reads this article sometime and steps forward.
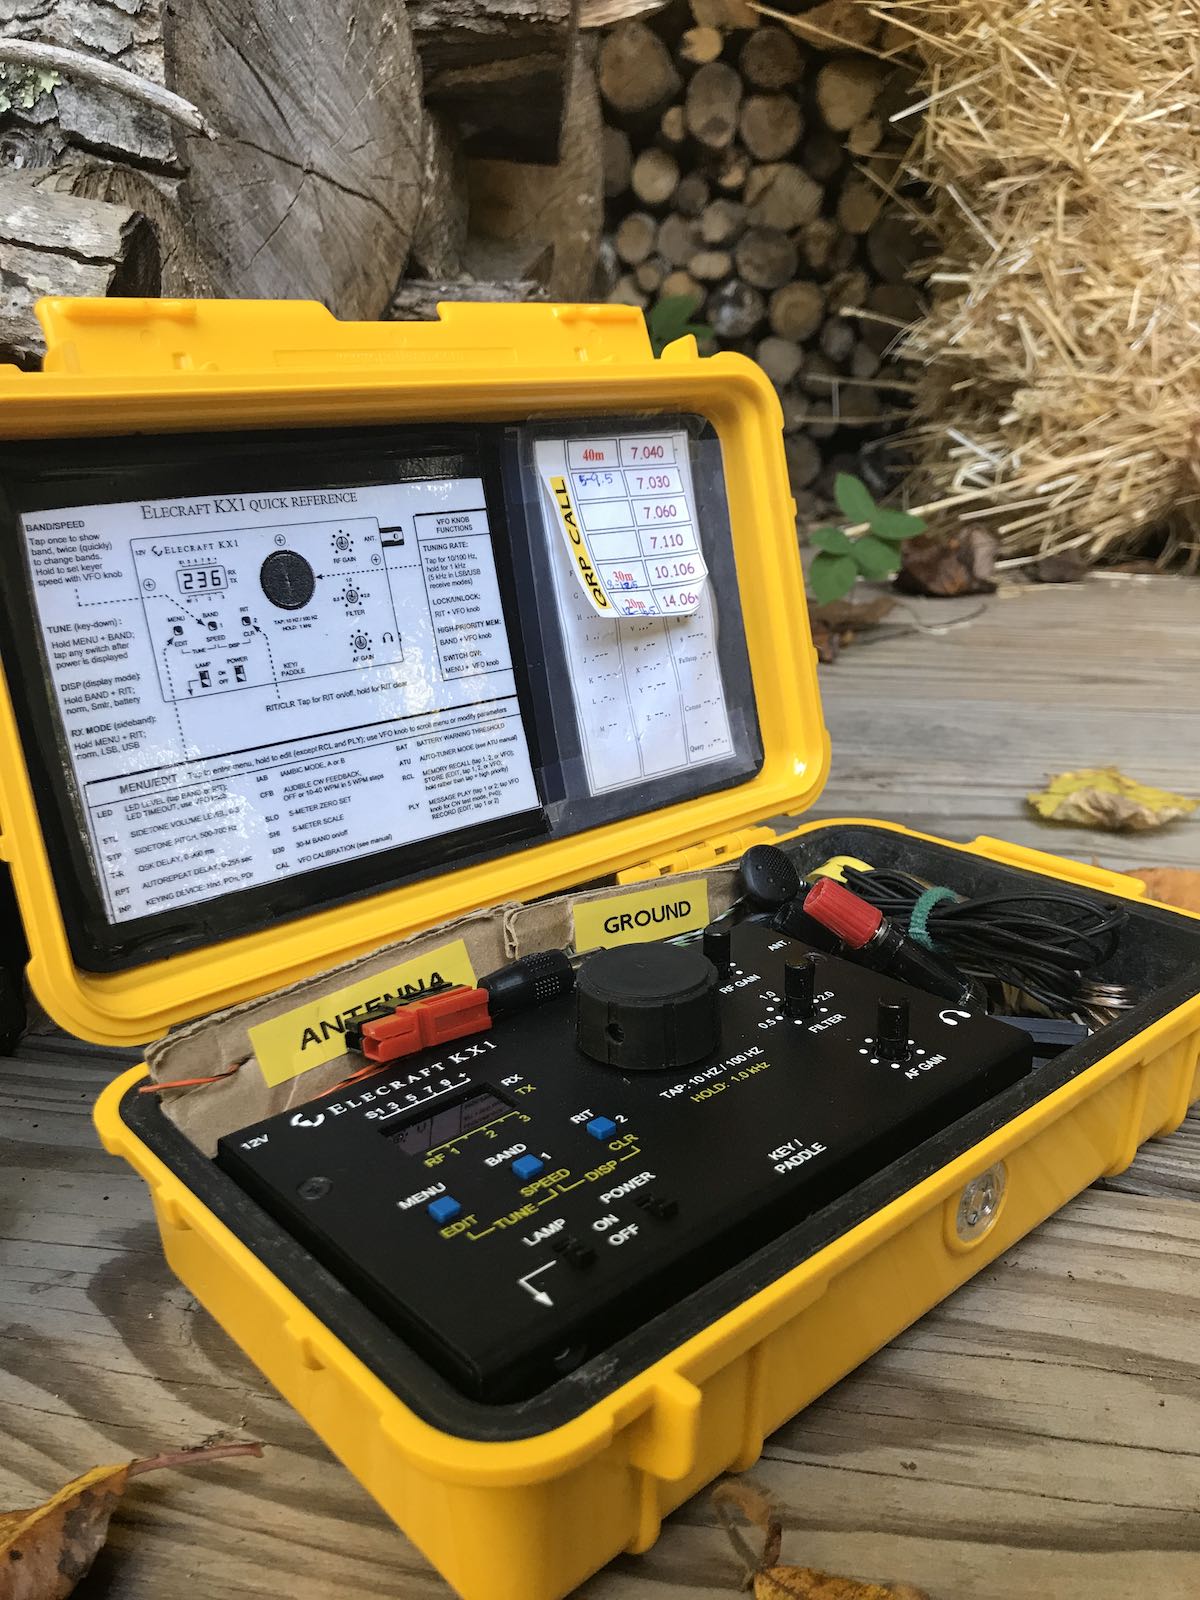
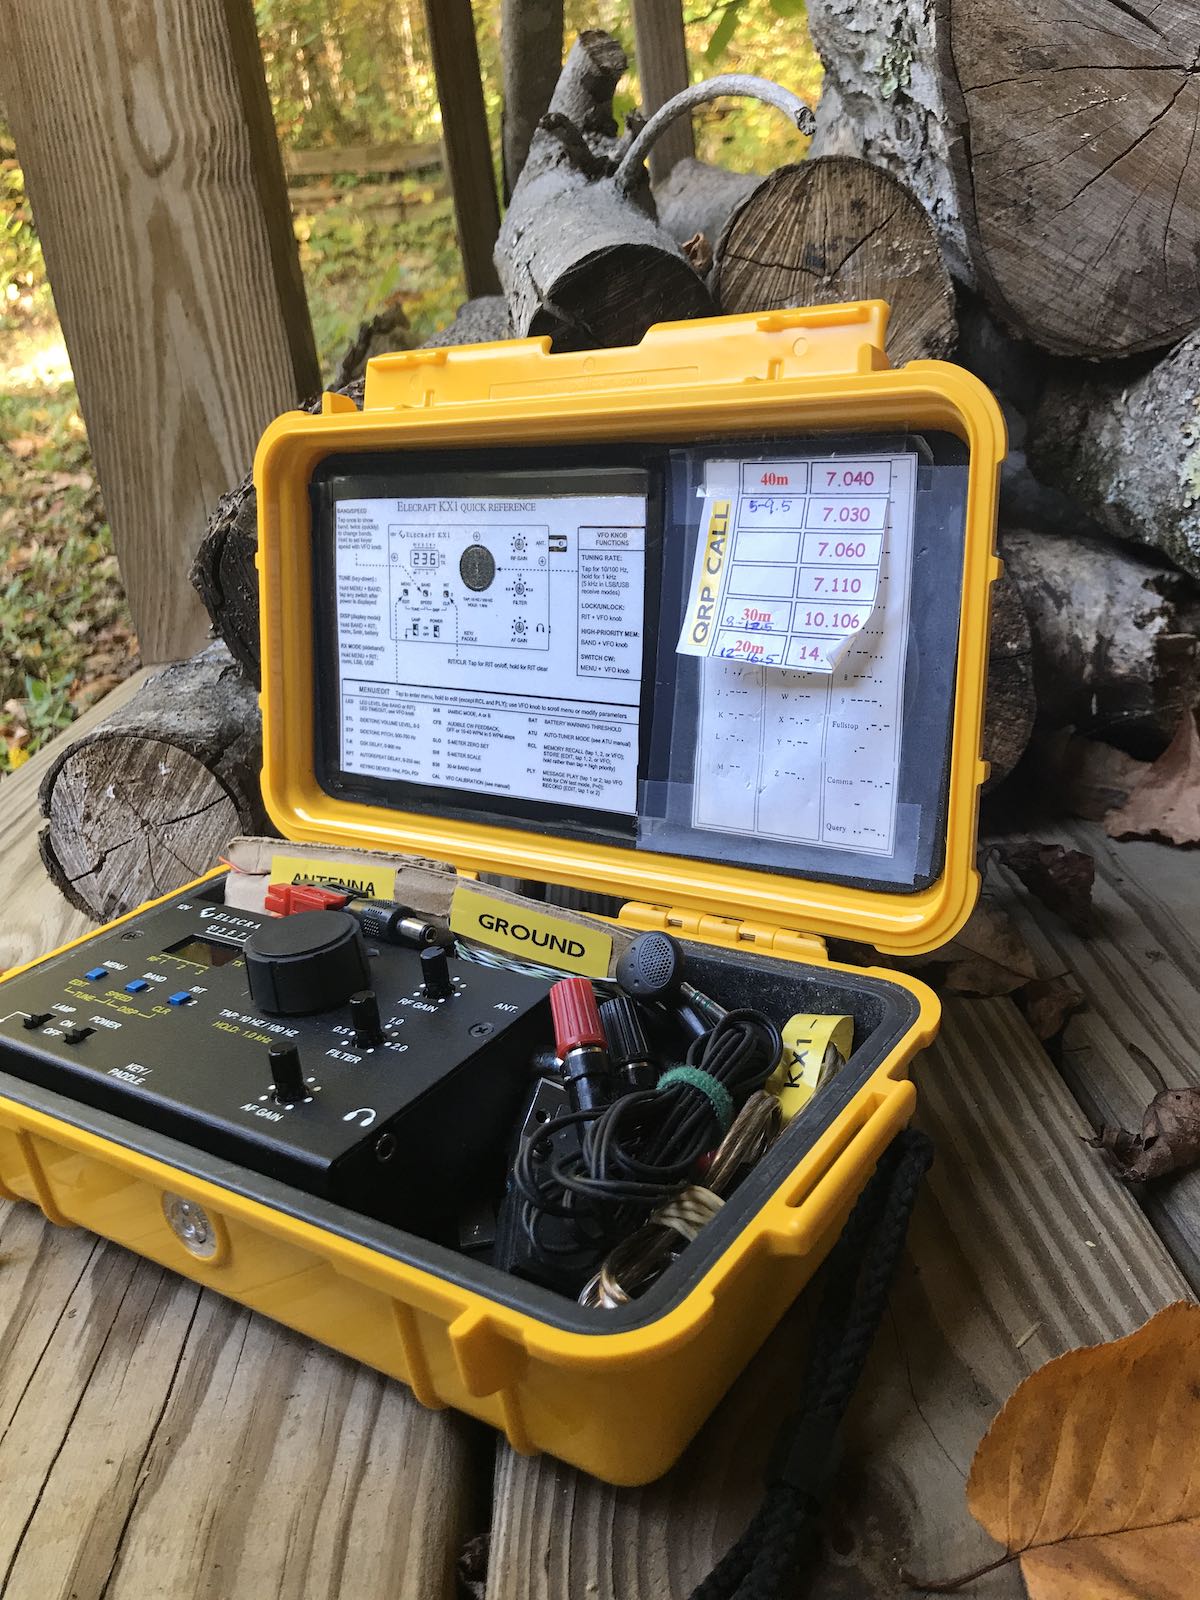
You might note in the photo that there’s even a quick reference sheet, Morse Code reference sheet and QRP calling frequencies list attached to the Pelican’s lid inside. How clever!
I plan to replace the Morse Code sheet with a list of POTA and SOTA park/summit references and re-print the QRP calling frequencies sheet. But other than that, I’m leaving it all as-is. This might be the only time I’ve ever purchased a “package” transceiver and not modified it in some significant way.
Speaking of modifying: that 80/30 meter module? Glad I didn’t purchase one.
After putting the KX1 on a dummy load, I checked each band for output power. Band changes are made on the KX1 by pressing the “Band” button which cycles through the bands one-way. It started on 40 meters, then on to 30 meters, and 20 meters. All tested fine. Then I pressed the band button to return to 40 meters and the KX1 dived down to the 80 meter band!
Turns out, this is a four band KX1! Woo hoo! That saved me from having to purchase the $90 30/80M kit (although admittedly, I was looking forward to building it).
Photos
The only issue with the KX1 was that its paddles would only send “dit dah” from either side. I was able to fix this, though, by disassembling the paddles and fixing a short.
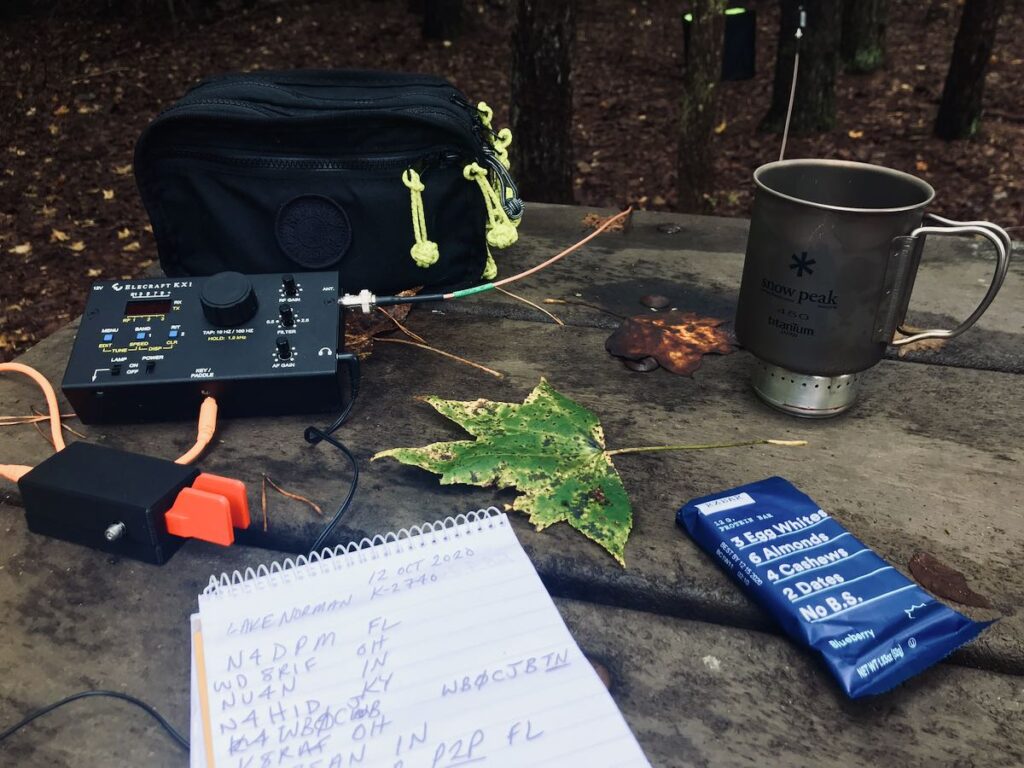
Although I’m currently in the process of testing the Icom IC-705, I’ve taken the KX1 along on a number of my park adventures and switched it out during band changes.
Indeed, my first two contacts were made using some nearly-depleted AA rechargeables on 30 meters: I worked a station in Iowa and one in Kansas with perhaps 1.5 watts of output power–not bad from North Carolina!
I’m super pleased to have the KX1 back in my field radio arsenal.
I name radios I plan to keep for the long-haul, so I dubbed this little KX1 “Ruby” after one of my favorite actresses, Barbara Stanwyck.
Look for Ruby and me on the air at a park or summit near you!
Many thanks to SWLing Post contributor, 13dka, who shares the following guest post:
Gone fishing…for DX: Reception enhancement at the seaside
by 13dka
In each of my few reviews I referred to “the dike” or “my happy place”, which is a tiny stretch of the 380 miles of dike protecting Germany’s North Sea coast. This is the place where I like to go for maximum listening pleasure and of course for testing radios. Everyone knows that close proximity to an ocean is good for radio reception…but why is that? Is there a way to quantify “good”?
Of course there is, this has been documented before, there is probably lots of literature about it and old papers like this one (click here to download PDF). A complete answer to the question has at least two parts:
1. Less QRM
It may be obvious, but civilization and therefore QRM sources at such a place extend to one hemisphere only, because the other one is covered with ocean for 100s, if not 1000s of miles. There are few places on the planet that offer such a lack of civilization in such a big area, while still being accessible, habitable and in range for pizza delivery. Unless you’re in the midst of a noisy tourist trap town, QRM will be low. Still, you may have to find a good spot away from all tourist attractions and industry for absolutely minimal QRM.
My dike listening post is far enough from the next small tourist trap town (in which I live) and also sufficiently far away from the few houses of the next tiny village and it’s located in an area that doesn’t have HV power lines (important for MW and LW reception!) or industrial areas, other small villages are miles away and miles apart, the next town is 20 km/12 miles away from there. In other words, man-made noise is just not an issue there.
That alone would be making shortwave reception as good as it gets and it gives me an opportunity to check out radios on my own terms: The only way to assess a radio’s properties and qualities without or beyond test equipment is under ideal conditions, particularly for everything that has to do with sensitivity. It’s already difficult without QRM (because natural noise (QRN) can easily be higher than the receiver’s sensitivity threshold too, depending on a number of factors), and even small amounts of QRM on top make that assessment increasingly impossible. This is particularly true for portables, which often can’t be fully isolated from local noise sources for a couple of reasons.
Yes, most modern radios are all very sensitive and equal to the degree that it doesn’t make a difference in 98% of all regular reception scenarios but my experience at the dike is that there are still differences, and the difference between my least sensitive and my most sensitive portable is not at all negligible, even more because they are not only receivers but the entire receiving system including the antenna. You won’t notice that difference in the middle of a city, but you may notice it in the woods.
When the radio gets boring, I can still have fun with the swing and the slide!
2. More signal
I always had a feeling that signals actually increase at the dike and that made me curious enough to actually test this by having a receiver tuned to some station in the car, then driving away from the dike and back. Until recently it didn’t come to me to document or even quantify this difference though. When I was once again googling for simple answers to the question what the reason might be, I stumbled upon this video: Callum (M0MCX) demonstrating the true reason for this in MMANA (an antenna modeling software) on his “DX Commander” channel:
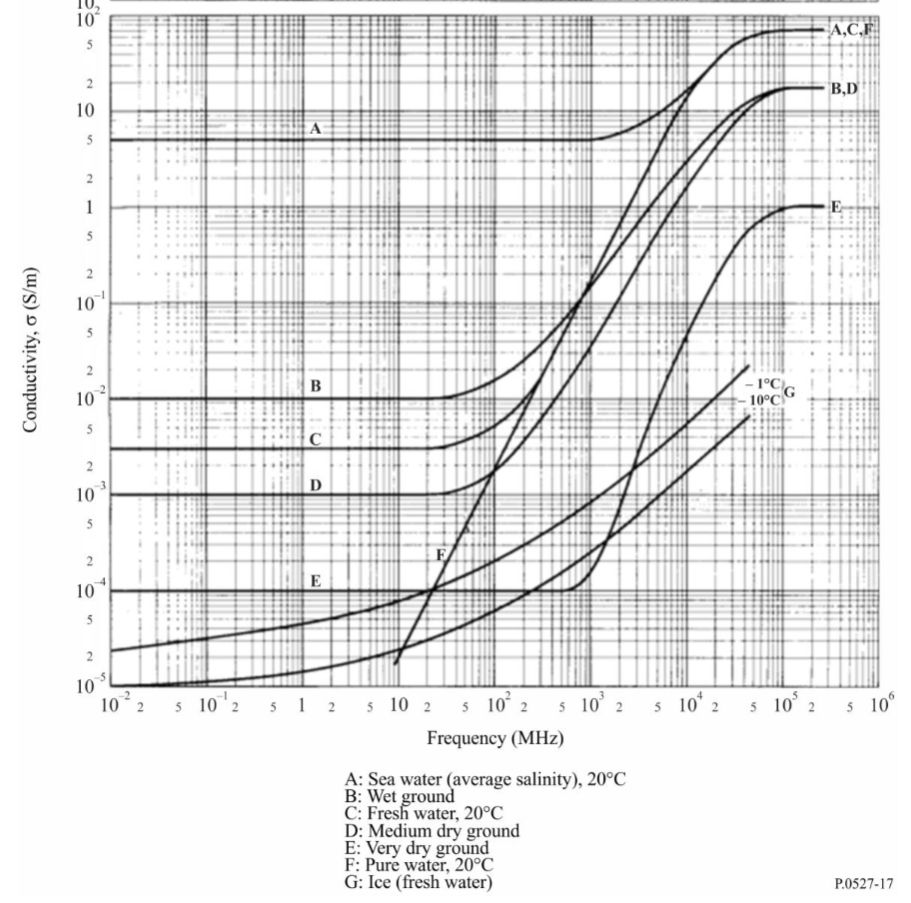
To summarize this, Callum explains how a pretty dramatic difference in ground conductivity near the sea (click here to download PDF) leads to an increase in antenna gain, or more precisely a decrease in ground return losses equaling more antenna gain. Of course I assumed that the salt water has something to do with but I had no idea how much: For example, average ground has a conductivity of 0.005 Siemens per meter, salt water is averaging at 5.0 S/m, that’s a factor of 1,000 (!) and that leads to roughly 10dB of gain. That’s right, whatever antenna you use at home in the backcountry would get a free 10dB gain increase by the sea, antennas with actual dBd or dBi gain have even more gain there.
That this has a nice impact on your transmitting signal should be obvious if you’re a ham, if not just imagine that you’d need a 10x more powerful amplifier or an array of wires or verticals or a full-size Yagi to get that kind of gain by directionality. But this is also great for reception: You may argue that 10dB is “only” little more than 1.5 S-units but 1.5 S-units at the bottom of the meter scale spans the entire range between “can’t hear a thing” and “fully copy”!
A practical test
It’s not that I don’t believe DX Commander’s assessment there but I just had to see it myself and find a way to share that with you. A difficulty was finding a station that has A) a stable signal but is B) not really local, C) on shortwave, D) always on air and E) propagation must be across water or at least along the coastline.
The army (or navy) to the rescue! After several days of observing STANAG stations for their variation in signal on different times of the day, I picked one on 4083 kHz (thanks to whoever pays taxes to keep that thing blasting the band day and night!). I don’t know where exactly (my KiwiSDR-assisted guess is the English channel region) that station is, but it’s always in the same narrow range of levels around S9 here at home, there’s usually the same little QSB on the signal, and the signals are the same day or night.
On top of that, I had a look at geological maps of my part of the country to find out how far I should drive into the backcountry to find conditions that are really different from the coast. Where I live, former sea ground and marsh land is forming a pretty wide strip of moist, fertile soil with above average conductivity, but approximately 20km/12mi to the east the ground changes to a composition typical for the terminal moraine inland formed in the ice age. So I picked a quiet place 25km east of my QTH to measure the level of that STANAG station and also to record the BBC on 198 kHz. Some source stated that the coastal enhancement effect can be observed within 10 lambda distance to the shoreline, that would be 730m for the 4 MHz STANAG station and 15km for the BBC, so 25km should suffice to rule out any residue enhancement from the seaside.
My car stereo has no S-meter (or a proper antenna, so reception is needlessly bad but this is good in this case) so all you get is the difference in audio. The car had the same orientation (nose pointing to the east) at both places. For the 4 MHz signal though (coincidence or not), the meter shows ~10dBm (or dBµV/EMF) more signal at the dike.
3. Effect on SNR
Remember, more signal alone does not equal better reception, what we’re looking for is a better signal-to-noise ratio (SNR). Now that we’ve established that the man-made noise should be as low as possible at “my” dike, the remaining question is: Does this signal enhancement have an effect on SNR as well? I mean, even if there is virtually no local QRM at my “happy place” – there is still natural noise (QRN) and wouldn’t that likely gain 10dB too?
Here are some hypotheses that may be subject of debate and some calculations way over my head (physics/math fans, please comment and help someone out who always got an F in math!). Sorry for all the gross oversimplifications:
Extremely lossy antennas
We know that pure reception antennas are often a bit different in that the general reciprocity rule has comparatively little meaning, many antennas designed for optimizing reception in specific situations would be terrible transmitting antennas. One quite extreme example, not meant to optimize anything but portability is the telescopic whip on shortwaves >10m. At the dike, those gain more signal too. When the QRN drops after sunset on higher frequencies, the extremely lossy whip might be an exception because the signal coming out of it is so small that it’s much closer to the receiver noise, so this friendly signal boost could lift very faint signals above the receiver noise more than the QRN, which in turn could mean a little increase in SNR, and as we know even a little increase in SNR can go a long way.
The BBC Radio 4 longwave recording is likely another example for this – the unusually weak signal is coming from a small and badly matched rubber antenna with abysmal performance on all frequency ranges including LW. The SNR is obviously increasing at the dike because the signal gets lifted more above the base noise of the receiving system, while the atmospheric noise component is likely still far below that threshold. Many deliberately lossy antenna design, such as flag/tennant, passive small aperture loops (like e.g. the YouLoop) or loop-on-ground antennas may benefit most from losses decreasing by 10dB.
Not so lossy antennas, polarization and elevation patterns
However, there is still more than a signal strength difference between “big” antennas and the whips at the dike: Not only at the sea, directionality will have an impact on QRN levels, a bidirectional antenna may already decrease QRN and hence increase SNR further, an unidirectional antenna even more, that’s one reason why proper Beverage antennas for example work wonders particularly on noisy low frequencies at night (but this is actually a bad example because Beverage antennas are said to work best on lossy ground).
Also, directional or not, the “ideal” ground will likely change the radiation pattern, namely the elevation angles, putting the “focus” of the antenna from near to far – or vice versa: As far as my research went, antennas with horizontal polarization are not ideal in this regard as they benefit much less from the “mirror effect” and a relatively low antenna height may be more disadvantageous for DX (but maybe good for NVIS/local ragchewing) than usual. Well, that explains why I never got particularly good results with horizontal dipoles at the dike!
Using a loop-on-ground antenna at a place without QRM may sound ridiculously out of place at first, but they are bidirectional and vertically polarized antennas, so the high ground conductivity theoretically flattens the take-off angle of the lobes, on top of that they are ~10dB less lossy at the dike, making even a LoG act more like something you’d string up as high as possible elsewhere. They are incredibly convenient, particularly on beaches where natural antenna supports may be non-existent and I found them working extremely well at the dike, now I think I know why. In particular the preamplified version I tried proved to be good enough to receive 4 continents on 20m and a 5th one on 40m – over the course of 4 hours on an evening when conditions were at best slightly above average. Though the really important point is that it increased the SNR further, despite the QRN still showing up on the little Belka’s meter when I connected the whip for comparison (alas not shown in the video).
The 5th continent is missing in this video because the signals from South Africa were not great anymore that late in the evening, but a recording exists.
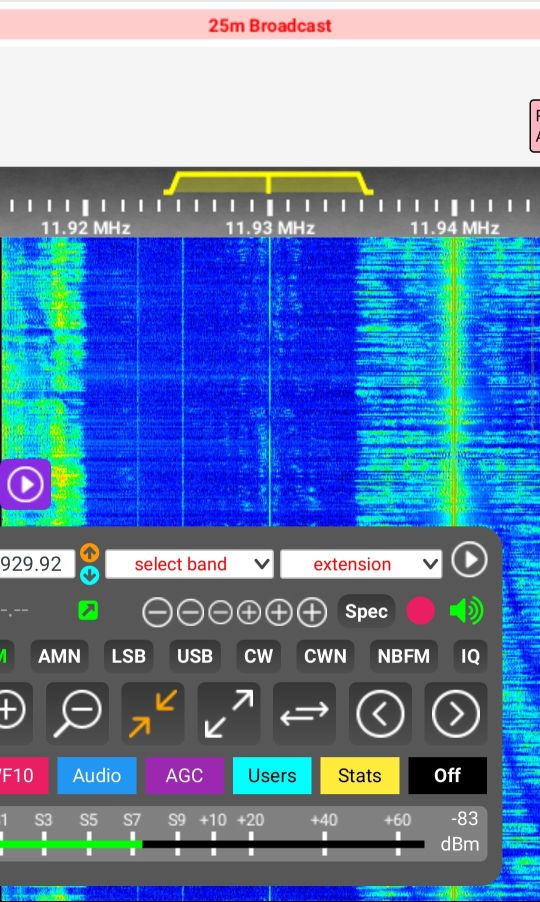
Here’s a video I shot last year, comparing the same LoG with the whip on my Tecsun S-8800 on 25m (Radio Marti 11930 kHz):
At the same time, I recorded the station with the next decent (but more inland) KiwiSDR in my area:
Of course, these directionality vs noise mechanisms are basically the same on any soil. But compensating ground losses and getting flat elevation patterns may require great efforts, like extensive radial systems, buried meshes etc. and it’s pretty hard to cover enough area around the antenna (minimum 1/2 wavelength, ideally more!) to get optimum results on disadvantaged soils, while still never reaching the beach conditions. You may have to invest a lot of labor and/or money to overcome such geological hardships, while the beach gives you all that for free.
But there may be yet another contributing factor: The gain pattern is likely not symmetrical – signals (and QRN) coming from the land side will likely not benefit the same way from the enhancement, which tapers off quickly (10 wavelengths) on the land side of the dike and regular “cross-country” conditions take place in that direction, while salt water stretching far beyond the horizon is enhancing reception to the other side.
So my preliminary answer to that question would be: “Yes, under circumstances the shoreline signal increase and ground properties can improve SNR further, that improvement can be harvested easily with vertically polarized antennas”.
Would it be worthwhile driving 1000 miles to the next ocean beach… for SWLing?
Maybe not every week–? Seriously, it depends.
Sure, an ocean shoreline will generally help turning up the very best your radios and antennas can deliver, I think the only way to top this would be adding a sensible amount of elevation, a.k.a. cliff coasts.
If you’re interested in extreme DX or just in the technical performance aspect, if you want to experience what your stuff is capable of or if you don’t want to put a lot of effort into setting up antennas, you should definitely find a quiet place at the ocean, particularly if your options to get maximum performance are rather limited (space constraints, QRM, HOA restrictions, you name it) at home.
If you’re a BCL/program listener and more interested in the “content” than the way it came to you, if you’re generally happy with reception of your favorite programs or if you simply have some very well working setup at home, there’s likely not much the beach could offer you in terms of radio. But the seaside has much more to offer than fatter shortwaves of course.
From left to right: Starry sky capture with cellphone cam, nocticlucent clouds behind the dike, car with hot coffee inside and a shortwave portable suction-cupped to the side window – nights at the dike are usually cold but sometimes just beautiful. (Click to enlarge.)
However, getting away from the QRM means everything for a better SNR and best reception. In other words, if the next ocean is really a hassle to reach, it may be a better idea to just find a very quiet place nearby and maybe putting up some more substantial antenna than driving 1000 miles. But if you happen to plan on some seaside vacation, make absolutely sure you bring two radios (because it may break your heart if your only radio fails)!
A little update (2023):
Like I said, the +10dB signal boost works both ways and here’s a nice example that I thought should be here. This is W4SWV, literally standing with both feet in the Atlantic ocean at the South Carolina coastline, carrying a 25W backpack radio with a whip and talking to F6ARC in France on 17m – received at my side of the pond using my simple vertical 33’/10m monopole antenna at the dike:
This was recorded on July 4th, 2021 and does not provide a reference to demonstrate how good or bad this is of course, all you have is my word that getting such a solid and loud signal from a 25W station on the US East Coast was just outstanding (compared to a fair number of coastal QRP stations I copied at the dike over the years, or the average 100W inland stations).
Meanwhile I found out that I’m luckily not the only (or the first) person who tried to make some practical experiments to reassess the theories in recent times: Greg Lane (N4KGL) made measurements by transmitting a WSPR signal simultaneously off 2 locations, one near the shoreline and one more inland. Measuring the signals created in distant WSPR receivers, he got similar results. He made a presentation about it in 2020:
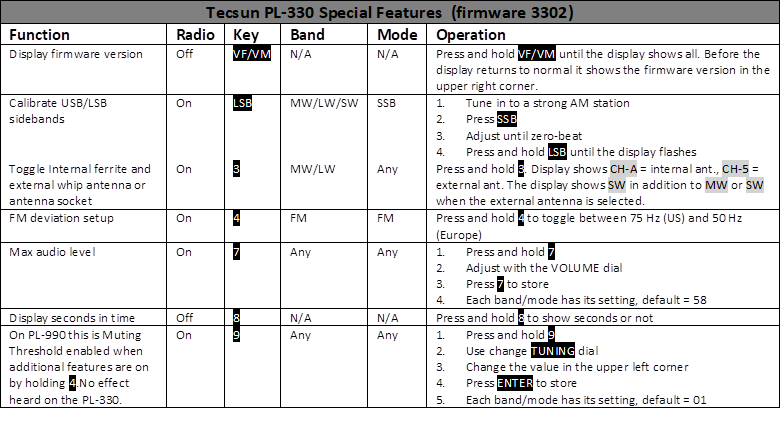
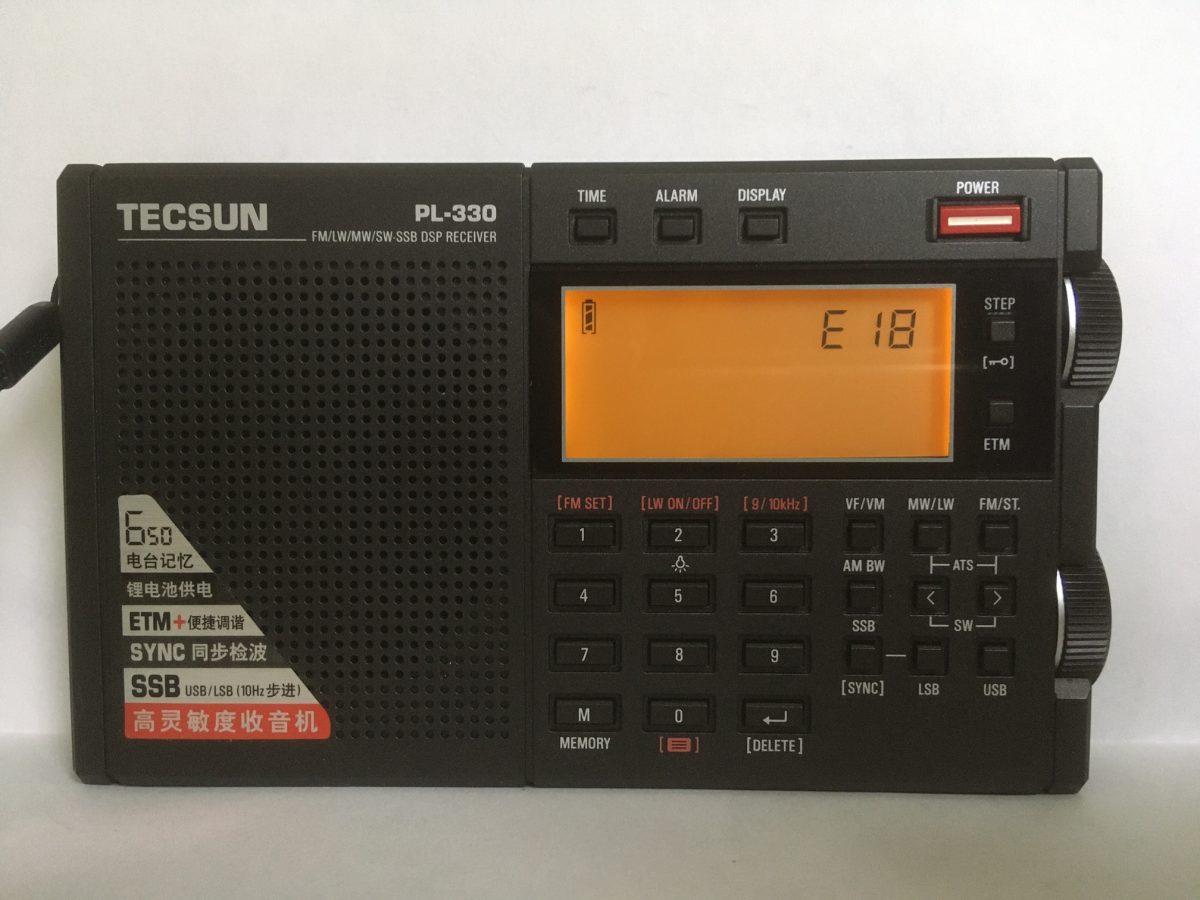
I discovered several features that are not displayed on the keyboard both on the Internet and by fiddling with the radio. Maybe these features are in the Chinese manual but I simply can’t read that language. What became clear is that the PL-330 resembles the PL-990x. But I couldn’t find if DNR and Muting Threshold are supported in the firmware I have (3302). Here is a table with the features and how to operate:
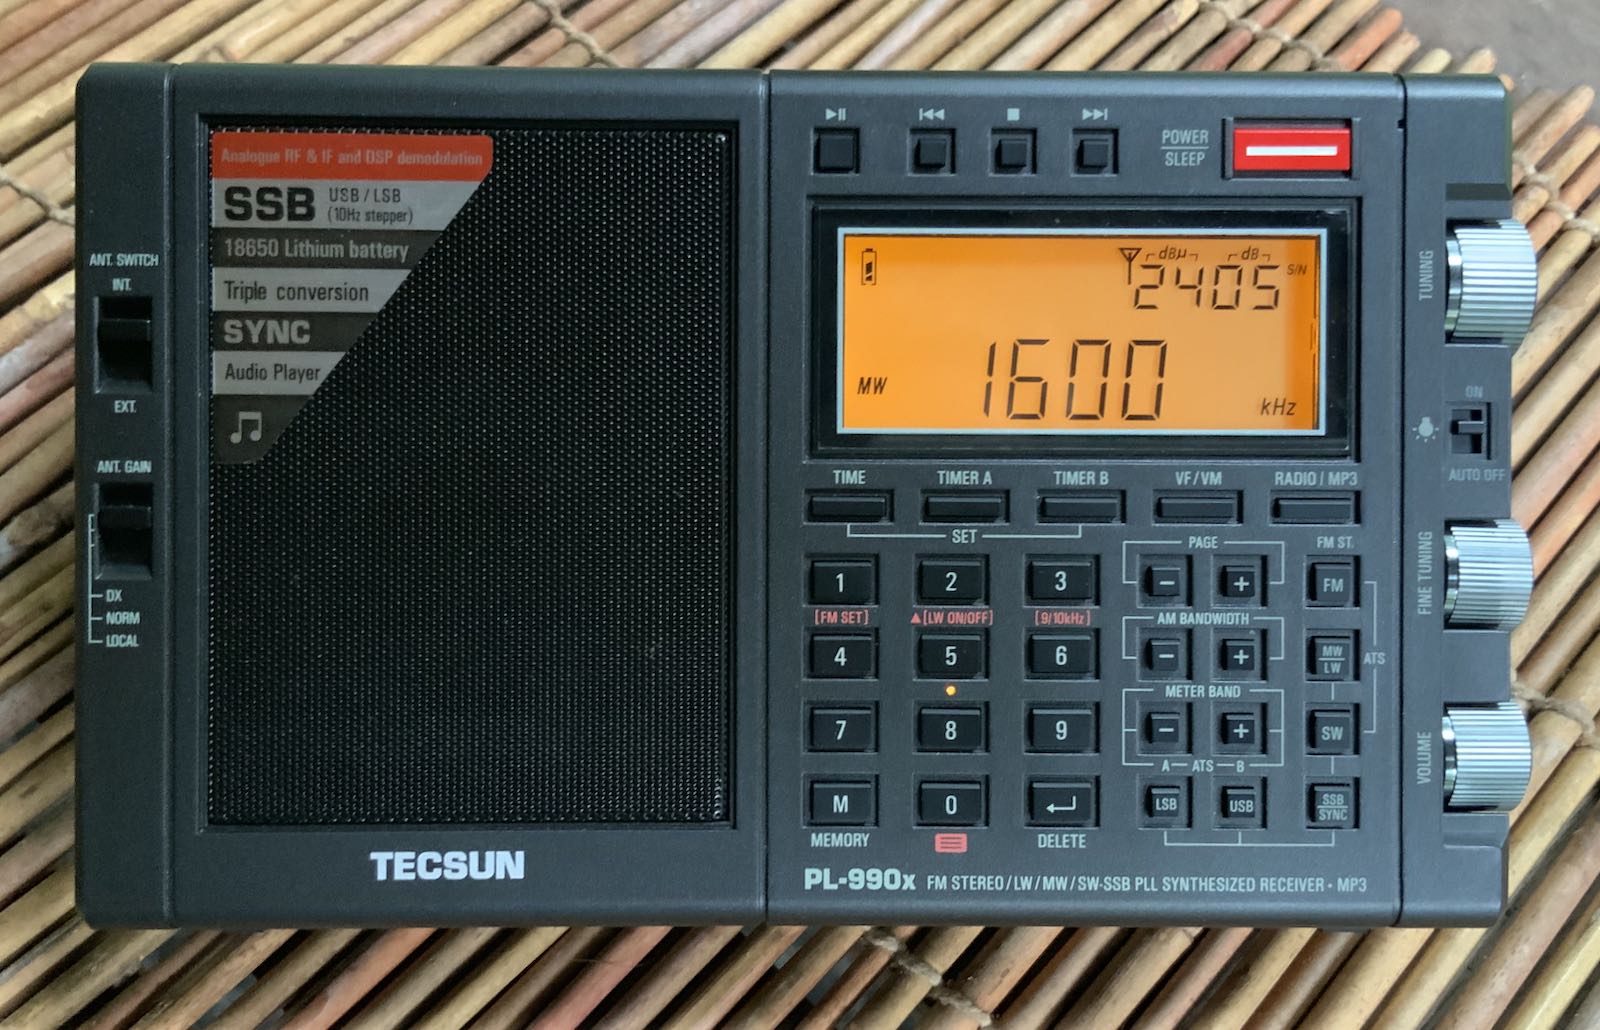
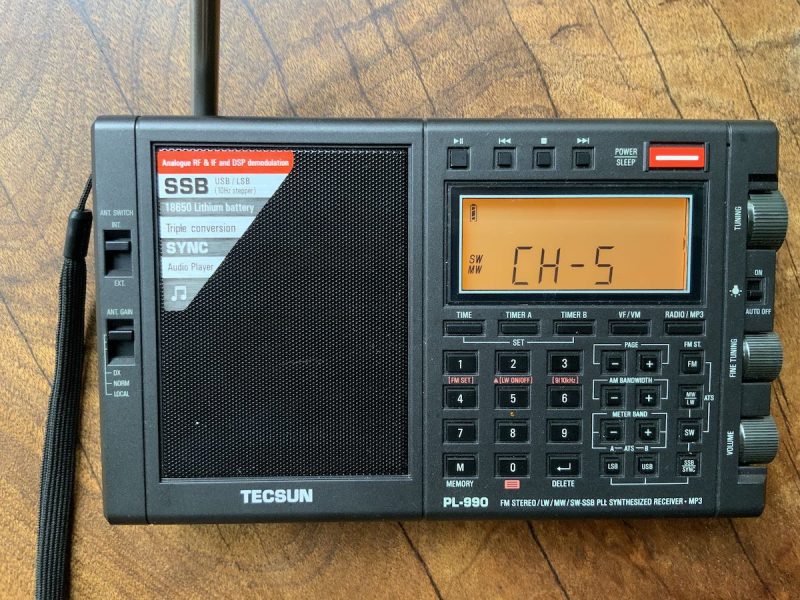
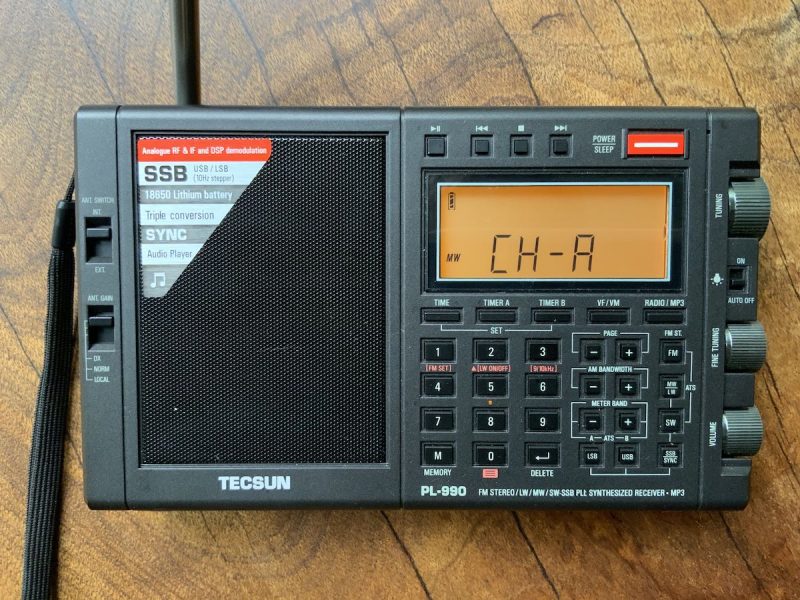
Many thanks to Anna at Anon-Co who recently shared an interesting “hidden feature” of the Tecsun PL-990 which allows the user to toggle between the internal ferrite antenna and telescoping whip antenna while on either the mediumwave or logwave bands.
Procedure:
1) Turn on the radio and then select either the MW or LW frequency band.
2) Press and hold the [ 3 ] key for about 2 seconds.
When the display shows “CH-5” (actually an “S” which stands for shortwave telescopic antenna) the radio is now set to MW/LW reception using the telescopic whip antenna.
The display will show MW (or LW) and SW on the left side of the screen.
3) Press and hold the [ 3 ] key for about 2 seconds.
When the display shows “CH-A” (“A” stands for “AM”) the radio is now set to MW/LW reception using the internal ferrite antenna once again.
The display will also show only MW (or LW) on the left side of the screen.
Pressing and holding the [ 3] key essentially toggles between these two antenna settings.
I’ve actually found that, indoors, using the whip antenna on mediumwave has been more effective at mitigating RFI with strong local stations. The ferrite bar antenna has more gain, of course, but for locals it’s not necessarily needed.
Many thanks to SWLing Post contributor, Jaap de Goede, for the following guest posts:
Operating the TECSUN PL-330 without an English manual
by Jaap de Goede
Introduction
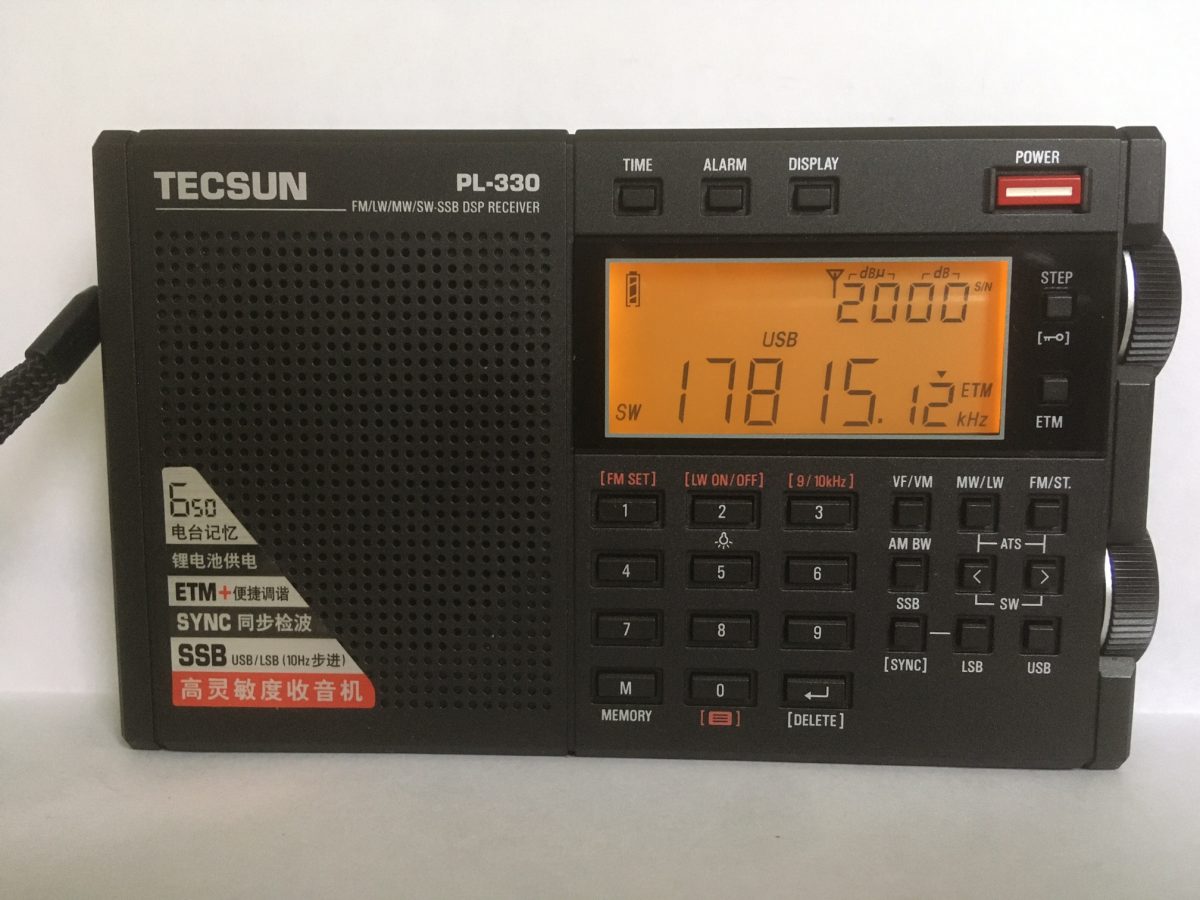
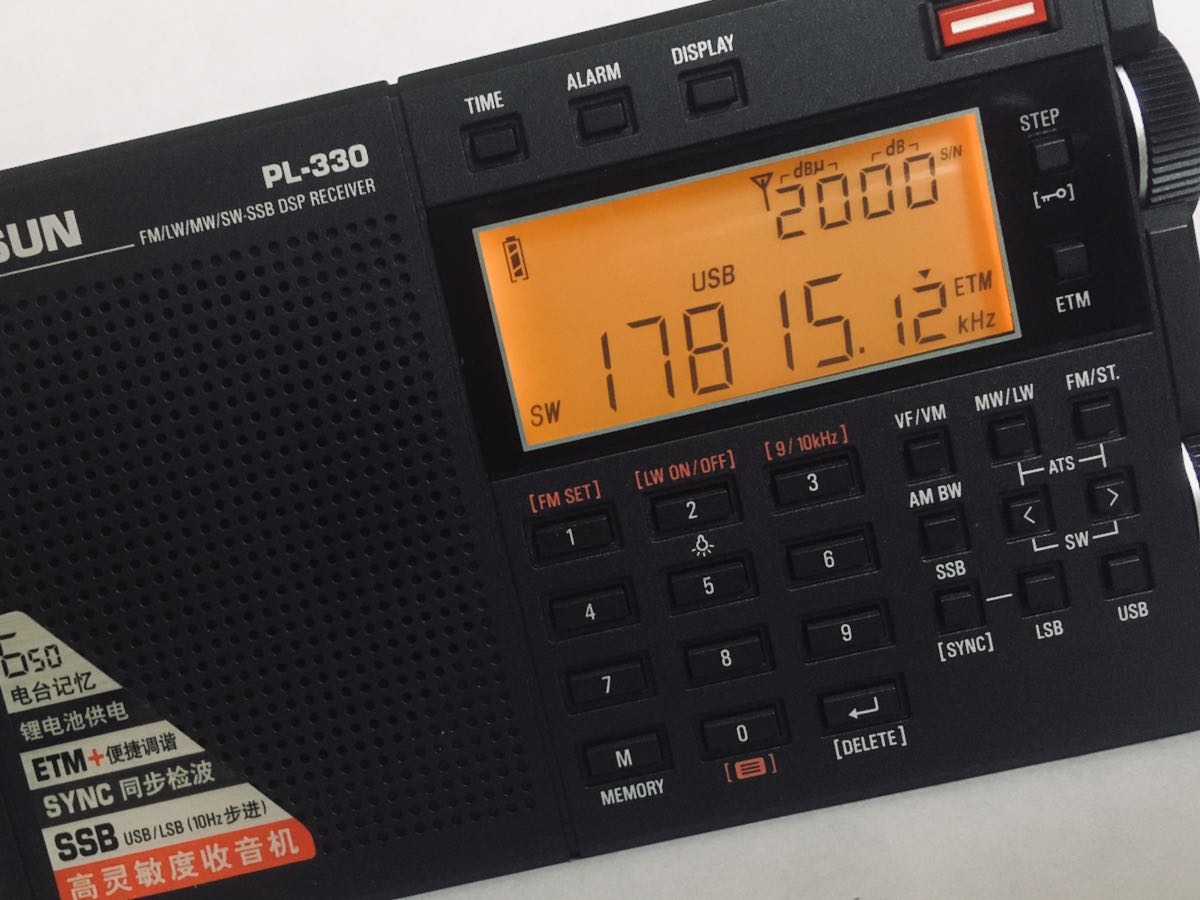
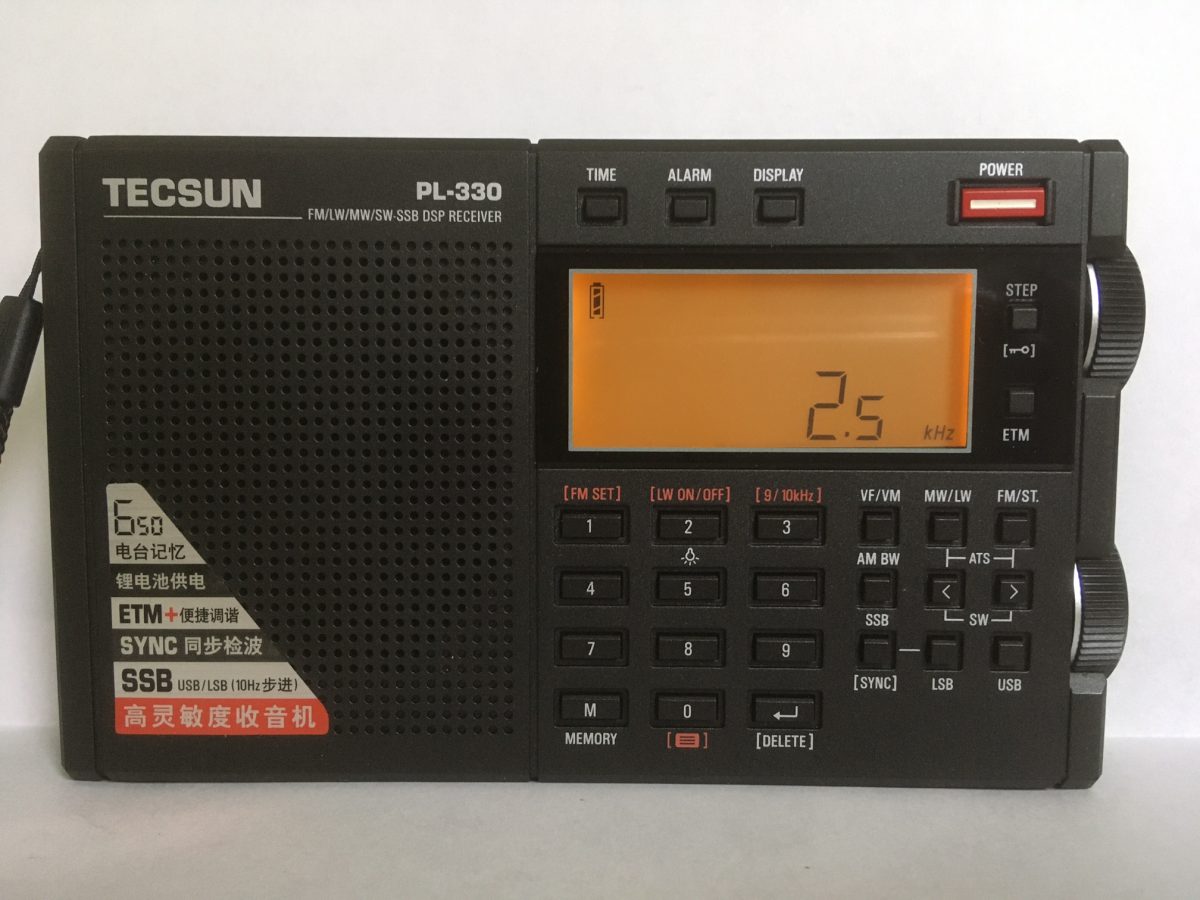
Inspired by my father, I like listening to radio transmissions for the last 60 years. That includes listening to shortwave transmissions. In my collection there are a number of radios including computer based SDR-receivers. The TECSUN PL-330 is a shortwave portable radio with SSB and digital readout.
I’d like to share my operating experience of the PL-330 and throughout I will now and then compare this radio to similar radios in my collection: Eton Satellit,XHDATA D-808 and CountyComm GP5-SSB (AKA Tecsun PL-365).
To be clear the PL-330 used here is a Chinese domestic version, probably manufactured in July 2020. An English manual was not available at the time of writing. In the meantime, the English manual of the Tecsun PL-990 helped to figure out a number of the features of the PL-330. Newer manufacturing batches might contain other firmware and that could change the way of operating.
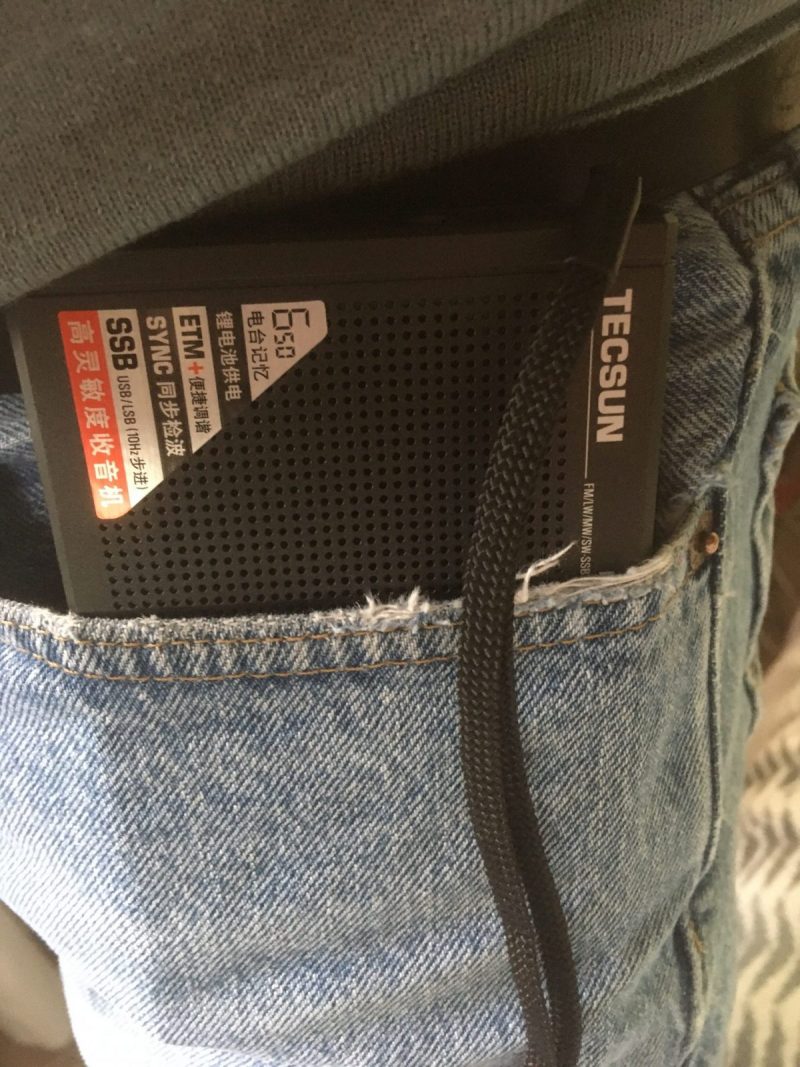
Size and sound
With a volume of about 18 cubic inches the PL-330 is less than 20 cubic inches. It easily fits the pocket of my jeans. 20 cubic inches (unofficially) classifies it as an Ultralight DX radio. The smallest radio of the four is the GP5-SSB with 14 cubic inches. The Satellit is the largest of the four and the size of these radios can be determined by the eye but by the ear as well.
The PL-330 has digital VOLUME control and the volume level is indicated on the display. In contradiction, the three other radios have analog volume control. All radios have a 3.5 mm socket for a stereo headset. A nice feature of the PL-330 is that the FM stereo decoder only works with a plugged-in headset. Else FM remains in mono. I think that’s a very clever feature because why would the stereo decoder degrade the mono-sound through the speaker in case of poor FM stereo reception?
Personal audio quality ranking from best to worst:
Satellit
PL-330 and D-808
GP5-SSB
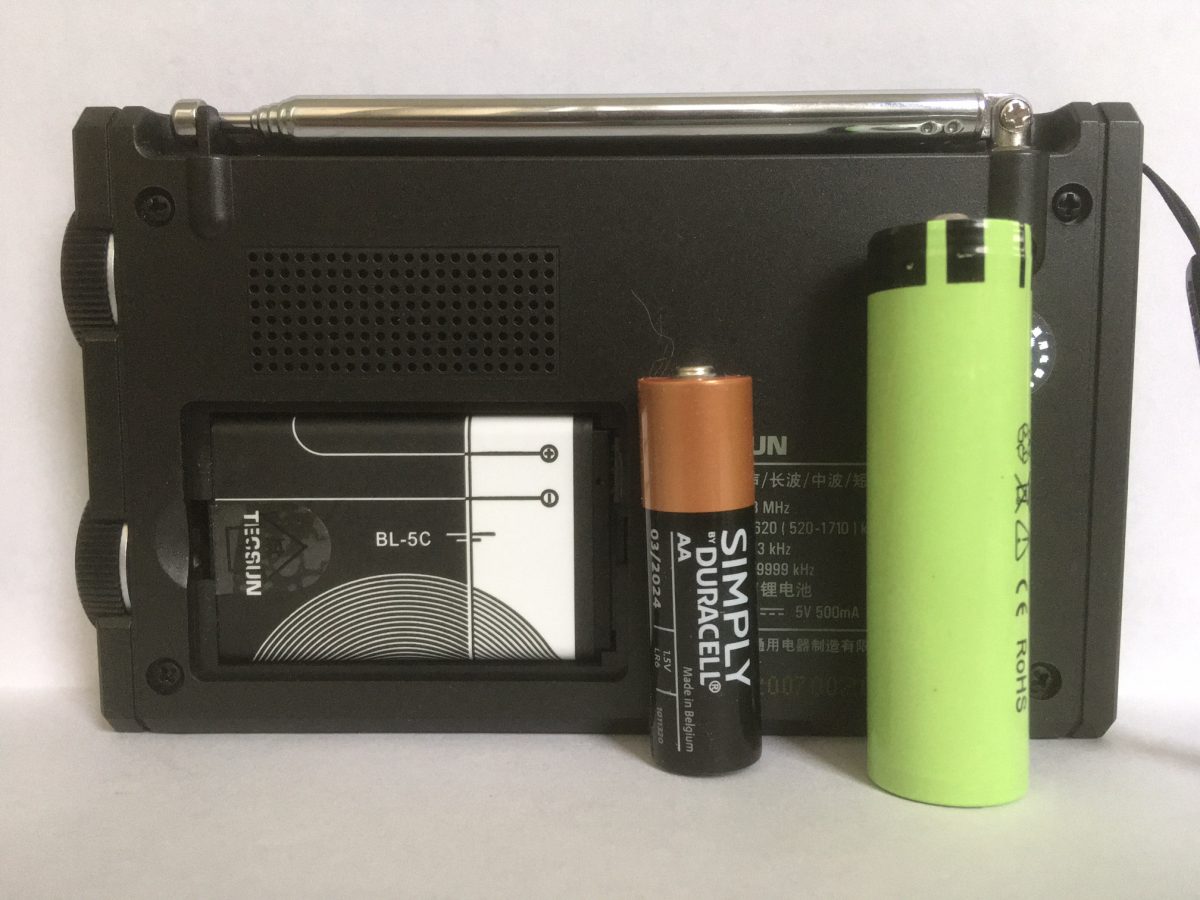
Power and Batteries
The PL-330 is supplied with a BL-5C battery of 1000 mAh. The battery can be charged in the radio through though a micro USB port. The display permanently shows battery status, regardless whether the radio is on or off. USB makes it very easy to charge from any external USB charger or an external USB battery. Here a quick comparison of the powering of the four radios:
Radio
Battery
Charging Port
Tecsun-PL-330
1 x BL-5C
Micro USB
CountyComm GP5
3 x AA NiMH
Mini USB
XHDATA D-808
1 x 18650
Micro USB
Eton Satellit
4 x AA NiMH
Bus
I don’t have runtime figures. I just charge when indicated on the radio’s display and carry a spare USB battery to charge the radio in case.
Antenna and Backlit
All four radios have an extensible whip antenna (what else would you expect). Also, all four radios have a 3.5 mm socket for an external antenna. The only radio with an antenna attenuator switch is the Satellit.
All four radios have backlit. But a feature that none of the other radios has is the ability with the PL-330 to toggle the backlit between “always on” or “automatic off”. Just hold and press the 5 button to toggle between the two modes. For comparison, the Satellit has the nicest illuminated display of all four, while the D-808 is way too bright.
Supported Radio Bands
The PL-330 supports the following radio bands:
Long Wave (153-513 kHz)
Medium Wave (520-1710 kHz or 522-1620 kHz)
Short Wave (1711-29999 kHz)
FM broadcast (64-108 MHz)
Radio Band and Demodulation Selection
To enable or disable the LW-band you must long press the 2 button when the radio is powered off. When the radio is powered on and LW has been enabled you can select between LW and MW by short press of the MW/LW button.
The American or Rest of World MW-band plan can be toggled by long press the 3 button when powered off. When the radio is powered on you can select between MW by short press of the MW/LW button.
To select the regional FM-band plan you should long press the 0 button when the radio is powered off. When the radio is powered on the FM-band can be selected by short press FM/ST. button.
When the radio is powered on the SW-band can be selected by short press < or > button.
In LW, MW and SW bands de-modulation can be AM, SSB and AM synchronous (SYNC). A short press of the SSB button toggles between AM and SSB. A long press of the SSB button toggles between AM/SSB and AM synchronous mode.
A nice feature within the SW band is that you can quickly skip to pre-determined broadcast or HAM bands. In AM and SSB mode you can skip to the desired band by pressing < or > button. The following bands can be selected and indicated in the display:
There is one (digital) TUNING dial for all tuning operation in any radio band. It only tunes up and down the bands and has no other function. (That makes tuning with the PL-330 so easy compared to the other three radios with multifunction dials.) Depending on the selected band and de-modulation the tuning steps can be altered by the STEP button.
In the LW and MW bands for AM demodulation the step size can be toggled between 1 kHz and 10/9 kHz by short press of the STEP button.
In SW for AM demodulation the step size can be toggled between 1 kHz and 5 kHz by short press of the STEP button.
In the SW band for SSB and synchronous mode the step size can be toggled between 10 Hz, 1 kHz and 5 kHz by short press of the STEP button. My other three portable radios, but only plus or minus 1 kHz of the actual frequency in steps of 10Hz. The PL-330 has continuous fine tuning in SSB; you can tune the entire SW band up and down in steps of 10 Hz. However, I noticed that the step size can change from 10 Hz to 50 Hz in case you turn the TUNING dial fast.
In the FM band the step size can be toggled between 100 kHz and 10 kHz by short press of the STEP button.
Bandwidth Settings
For AM and SSB you can change the bandwidth by pressing the AM BW button, turn the VOLUME dial to the desired bandwidth and press the AM BW button again.
I decided to purchase the PL-330 because of my good and bad experience with the GP5-SSB (PL-365). The PL-365 is super portable and I think ETM is great for occasional shortwave listening. However, without direct frequency entry the GP5-SSAB is a nightmare to operate just now and then. Now the PL-330 has an enhanced version of ETM: ETM+. No other radio has such a feature and I think ETM+ is fantastic.
ETM + provides 24 ETM banks that are chosen automatically based on the hour. Every hour you can press and hold the ETM button to initiate a (new or renewed) shortwave scan. It will display “E” plus the hour in 24 hours format like E00 to E23 depending on the time. When you quick press the ETM button it recalls the memory bank according to the time. As an example, when you quick press the ETM button at 15:24h it will recall bank E15. Then you can select the memory locations stored in the bank by turning the TUNING dial.
To toggle between ETM and Tuning mode press the ETM button.
In addition to ETM memories, the PL-330 has a lot of memories but lacks alpha tags. I really have difficulties remembering what I put in those memories. I hardly use them. The only one of the four that has alpha tags is the Eton Satellit, that makes things a lot easier.
Memories can be automatically populated in a bank separate from the ETM banks by using the Automatic Tuning and Storage (ATS) function. All four radios have ATS and I think it’s only convenient for FM. It works like:
Press FM/ST. to select FM Band
Press and hold FM/ST. to start ATS
Use the TUNING dial to select from the stored FM stations
To toggle between Memory and Frequency tuning mode simply press the VM/VF button.
Bugs or Features
With the DISPLAY button you can change the upper right part of the display between:
Signal strength
Clock
Preset (only in VM Mode)
Alarm time
The display always returns to signal strength after a few seconds. Except if time is chosen with a long press of the DISPLAY button. Nevertheless, the display returns to signal strength after applying any operation, including volume change. I’m not sure if this is a feature or a bug.
When using a headphone and changing volume, sometimes the sound is cut off. By changing the volume again, it comes back. Seems like a bug, not a feature.
I tried AM synchronous mode. It works like on the Satellit: poor. I would recommend to make this mode hidden or make it work well.
Universal Serial Bus
When connecting the radio with an USB cable to a PC, its operating system does not show any connection information. If the radio would have USB logic apart from charging, connection information would have showed up. I assume there is no way to update firmware via USB.
Hidden Features
Without an English manual, and maybe even with a Chinese manual I couldn’t understand all functions.
When the radio is powered off:
Press and hold VF/VM shows all items of the display.
Press and hold 8 toggles display clock in “HH:MM” and “HH:MM: SS”
Press and hold 3 in MW/LW band toggles between internal ferrite and external whip antenna
Press and hold Enter shows “dEL ALL”, probably delete all (except what is all)?
Press and hold M shows numbers, no idea.
Press and hold 0 shows “PO []”, no idea.
There seems to be a combination to show the firmware version.
Missing Features
RDS display would be welcome. Even though the PL-330 shares the radio chip with the D-808 and the Satellit, the PL-330 does not display FM Radio Data System (RDS) on its display. Backlit buttons would be a welcome for operation in the dark. (Although you’ll quickly get used to the button layout.)
Features I didn’t miss
None of the four radios has DAB+ or HD radio. For DAB+ reception I use a Sony XDR-S41D and I can’t receive HD radio in Europe. DAB+ and HD radio could make the radio way more expensive and I prefer good SW performance anyway.
The possibility to upgrade firmware would be convenient. But I understand constraints of costs and the liability of bricking the radio.
The Satellit and D-808 support the Air band (108-135 MHz). That is ok for occasional listening to one single channel, but forget about channel scanning. I have my Bearcat UBC XLT125 VHF/UHF scanner for that purpose.
Conclusion
Like I started, I’m an occasional shortwave listener. I couldn’t really tell the difference in radio performance between the four radios. Of course, the best radio is the one you have with you. And because of its size, easy operation with a single tuning dial and features like ETM+, the PL-330 is probably the best portable shortwave receiver at the moment (for me ?). Thanks to Tecsun!
Jaap de Goede
October 2020
Many thanks, Jaap, for taking the time and care to put together this excellent overview of the Tecsun PL-330! This will serve nicely as an operation manual. Your father would be proud of you! 🙂
Readers: Please note that you can also download Jaap’s PL-330 guide as a printable PDF document by clicking here. The PDF has even better formatting as Jaap has used operation manual styled fonts to indicate button labels and functions.
A number of SWLing Post readers have been asking about SSB audio characteristics on the new Tecsun PL-990.
Earlier this week, I took a moment while visiting family to make a few quick comparison videos with the PL-880 outdoors and away from RFI.
As I mention in the videos, there are a lot of cicadas singing in the background and you can also hear a bit of road noise–not ideal for audio, but I had to take advantage of a break in the weather!
You should also note that this isn’t a sensitivity comparison. The radios were pretty close together–if measuring sensitivity, I would have spaced them much further apart. Rather, I hope these videos give you an idea of the audio characteristics in SSB (both CW narrow and voice) and one comparison in AM. If you’re curious about sensitivity and how the PL-990x compares, check out Dan Robinsons initial evaluation.
CW Audio: .5 kHz filter on the 80 meter band
CW Audio: .5 kHz filter on the 30 meter band
SSB audio: 75 meter band
AM Audio: 5 kHz filter WWV 10 MHz
My thoughts
While these videos are far from ideal, they should give you a real-word impression of audio characteristics.
Personally, I think the PL-990x is a much better performer in single sideband. The noise floor is lower, but I think that may have more to do with better filter implementation. I’ve always felt that the PL-880 audio sounds “wider” than the selected filter in the more narrow SSB selections.
In addition, the PL-990x exhibits better SSB stability that’s especially noticeable in CW. The PL-880, at times, almost sounds garbled in comparison.
I also mentioned in the last video that the audio sounds better on the PL-880. I should have qualified that statement a bit better.
In general, yes, the PL-880 audio sounds better because its built-in speaker has slightly better audio fidelity that’s most noticeable when listening to music on the FM band, or a strong local AM station. On shortwave, I feel like I actually prefer the PL-990 audio for all but the strongest stations although I do wish the PL-990 filter could be widened to 9 kHz like the PL-880.
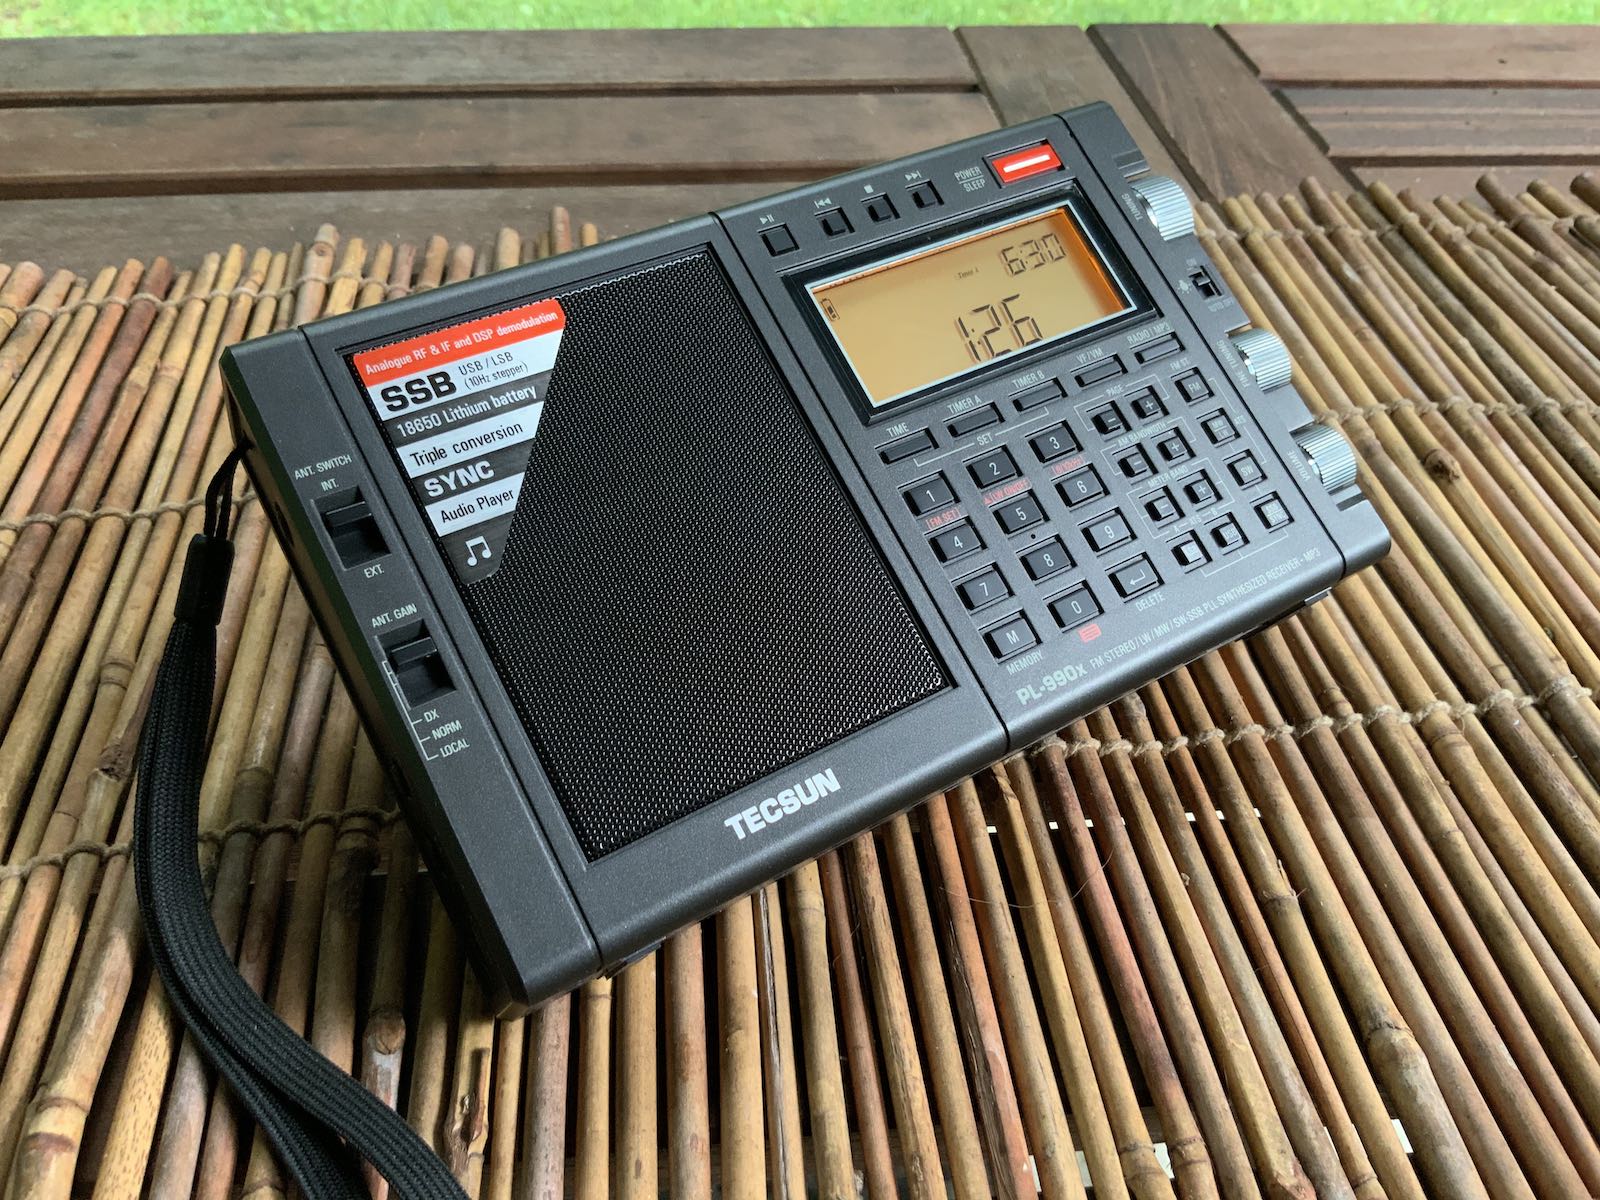
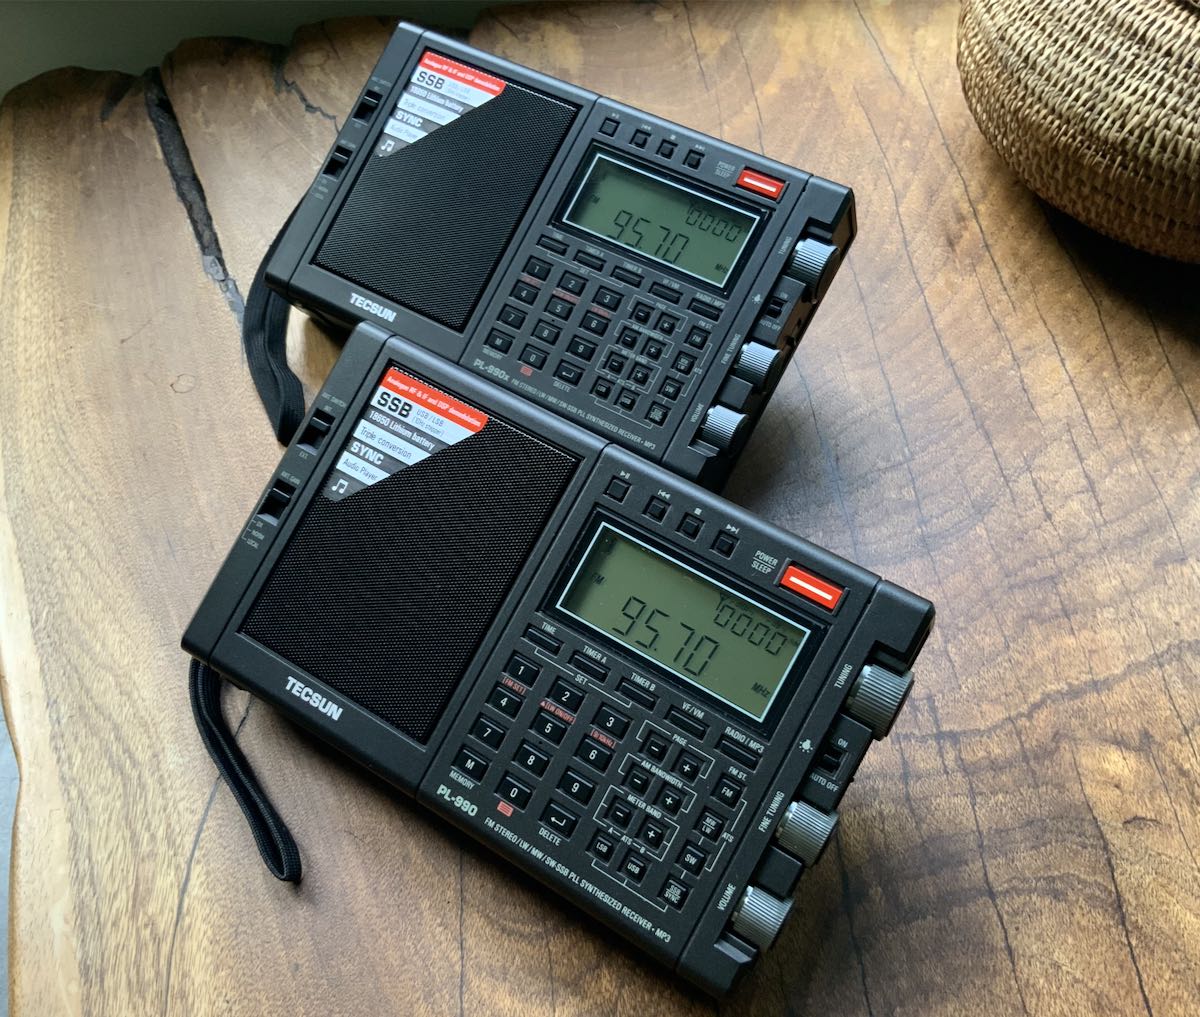
PL-990x (pre-production) vs. PL-990 (production model)
Tecsun Radios Australia reached out and kindly sent me one of their PL-990 production model radios to compare with the PL-990x pre-production model from Anon-Co we’ve been testing up to this point. This has been incredibly helpful as I put together my PL-990 review for the 2021 World Radio TV Handbook.
As I’ve mentioned in previous posts, I feel it can be problematic using a pre-production model radio for review only because there can be differences in quality control when a small number of pre-production units are manufactured compared with a proper first production run (remember this case?).
I’ve only had the production model PL-990 for a few days and most of that time we’ve been dealing with the remnants of hurricane Sally moving through our area dumping torrential rains.
Last night, however, a massive tree fell across our road knocking out power for the better part of 5 hours. This gave me a perfect excuse to start my comparison indoors while rain continued outside.
Based on my comparisons last night, it appears performance is nearly identical between the production and pre-production models. I’ve still more testing to do, but my initial impressions are most positive. Very happy quality appears to be consistent.
Many thanks to SWLing Post contributor, Mark Hirst, who writes:
Another radio turned up in the BBC series, ‘Death in Paradise’.
Set on a picturesque Caribbean island with an infeasibly high murder rate, we see the police interviewing a witness as he listens to the local radio station.
Can SWLing Post readers identify the radio I wonder?
Please comment if you can ID this radio! Not an easy task this time as there’s no close-up shot to pull details from the front panel. Good luck!