Shortwave listening and everything radio including reviews, broadcasting, ham radio, field operation, DXing, maker kits, travel, emergency gear, events, and more
Hello readers! I am happy to announce that there will be a special broadcast of VORW Radio International this Saturday August 22nd with 300 kW of power for listeners in Europe and Asia!
The show will be broadcast live from Moosbrunn, Austria on 6070 kHz and will feature a fun hour of good music and commentary. I hope to take listener music requests as well!
Here is the broadcast schedule:
(LIVE) Saturday August 22nd at 1700 UTC (1 PM Eastern / 7 PM CEST) – 6070 kHz – Moosbrunn 300 kW – Europe & Asia
A QSL will be given to any and all listeners who submit reception reports. Feedback is most welcome at [email protected]
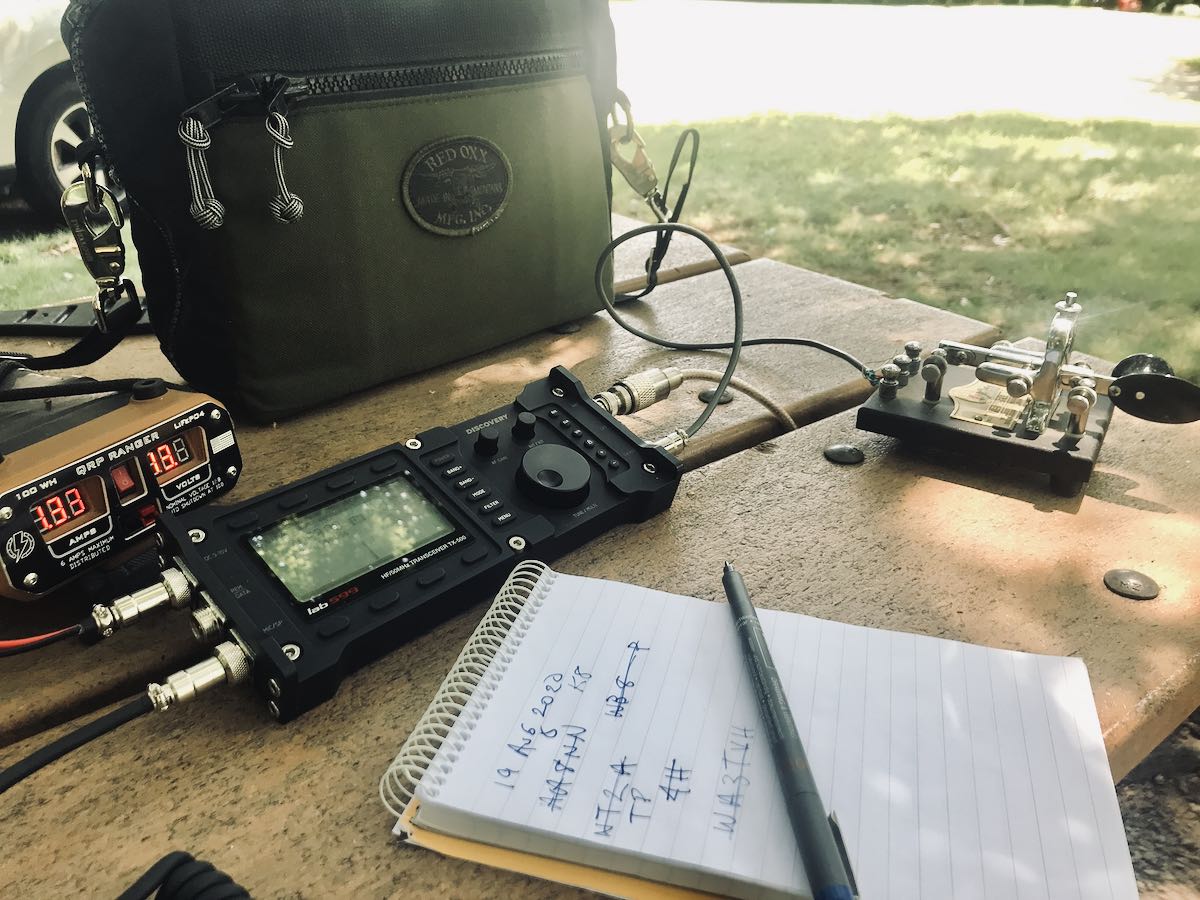
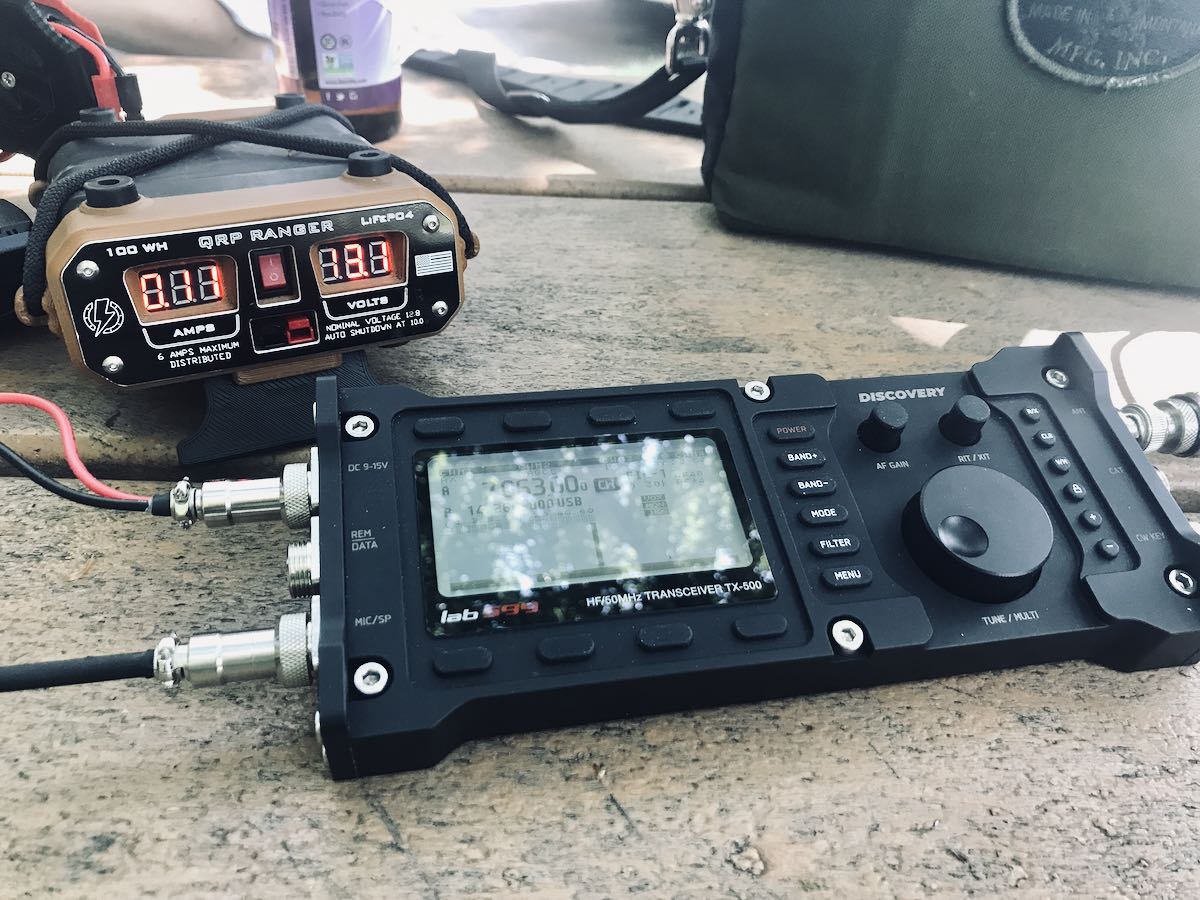
Yesterday, I took delivery of a lab599 TX-500 Discovery QRP transceiver. Many thanks to Josh at Ham Radio Crash Course for shipping it here and Ham Radio Outlet for trusting me with this fine machine for the next couple of weeks.
I’ve been looking forward to this day for months–indeed, nearly a year.
A few initial impressions…
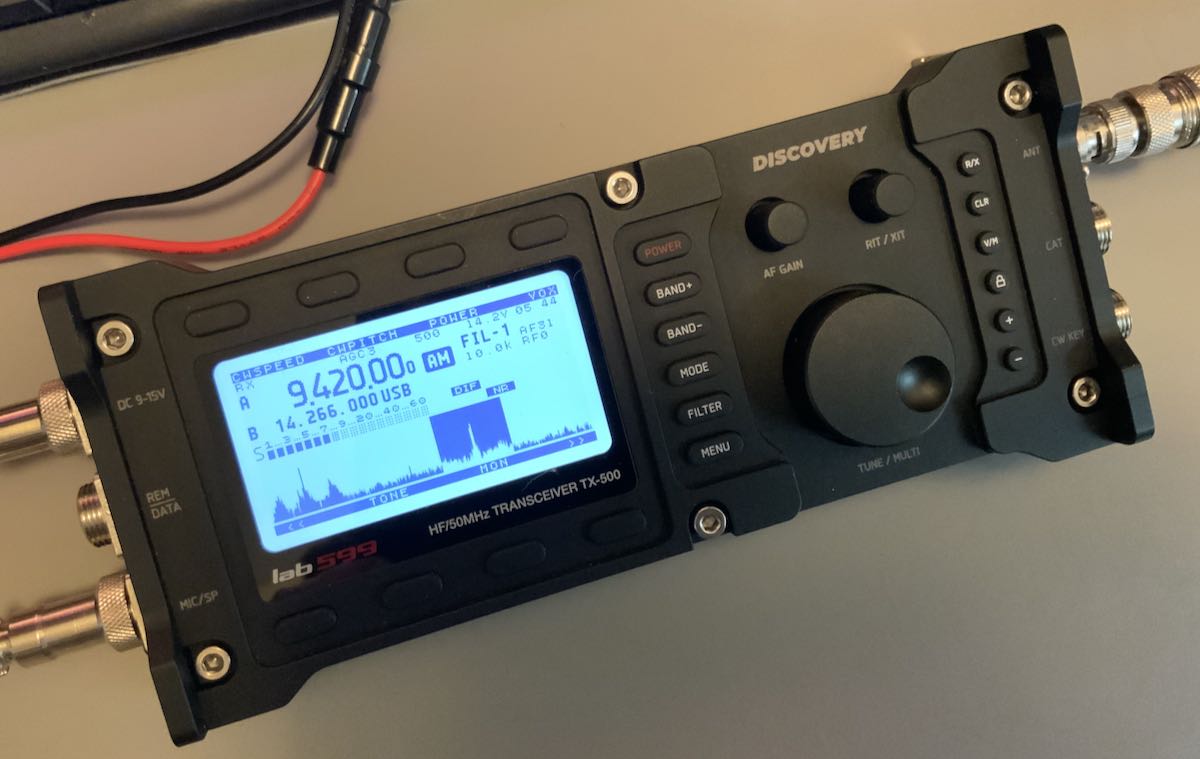
I won’t lie: the TX-500 is a gorgeous little transceiver and it’s solid.
The form factor is even a little smaller and lighter weight than I had imagined. I thought the multi-pin connectors on the side panels were the same size as, say, an XLR connector. Turns out, they’re much smaller and quite easy to use.
To put the TX-500 on the air, you’ll need to connect a minimum of three things: the power cable (terminated with Anderson Power Poles on the battery side), an antenna (BNC), and the speaker microphone. The TX-500 has no built-in speaker.
That’s all you’ll need if operating SSB. If operating CW, of course you’ll need to connect your key, but you’ll still need the speaker/mic connected for audio. That does make for quite a few things connected to the radio all at once.
The backlit display is high-contrast and easy to read indoors and in full sunlight. (And yes, that’s the Voice of Greece!)
In the spirit of full disclosure, I am not a fan of speaker microphone combos, but I’ll readily admit that the one with the TX-500 is about as good as they come. It feels durable and produces serious volume. The audio fidelity is obviously built around voice and CW, so it’s not ideal for HF broadcast listening, although it does have an external mono speaker port on the side of the mic.
If I owned this TX-500, I would order another speaker/mic 6 pin connector and build a headphone cable for broadcast listening and CW use. An easy fix.
For SSB though? The provided speaker/mic works. Indeed, it works quite well in the field because it’s so easy to hear.
There’s so much more to this radio, but I’ll save that for future posts and my full review. Let’s talk code…
Attaching a key
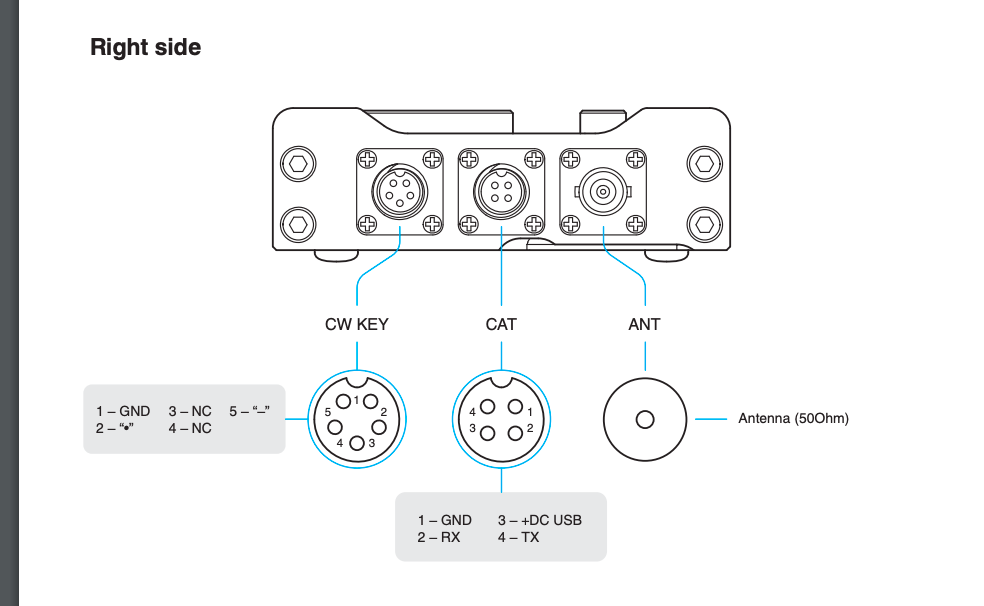
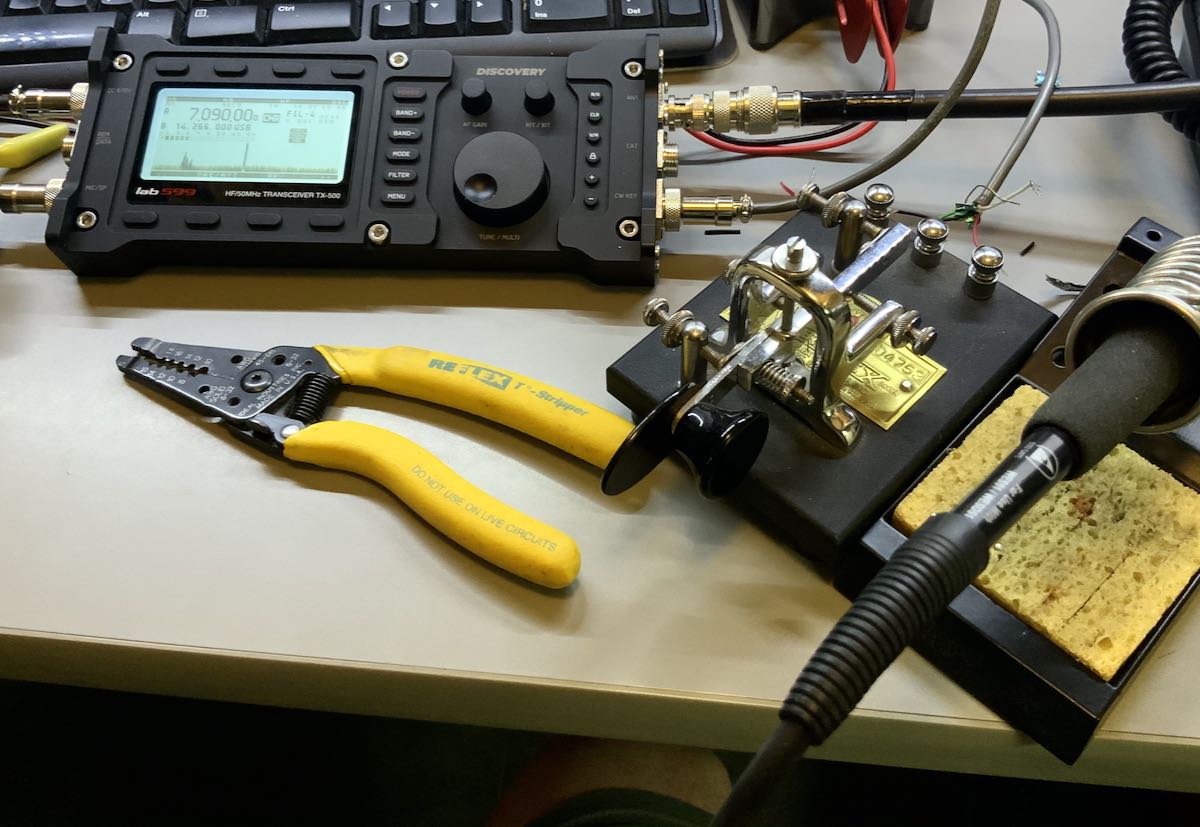
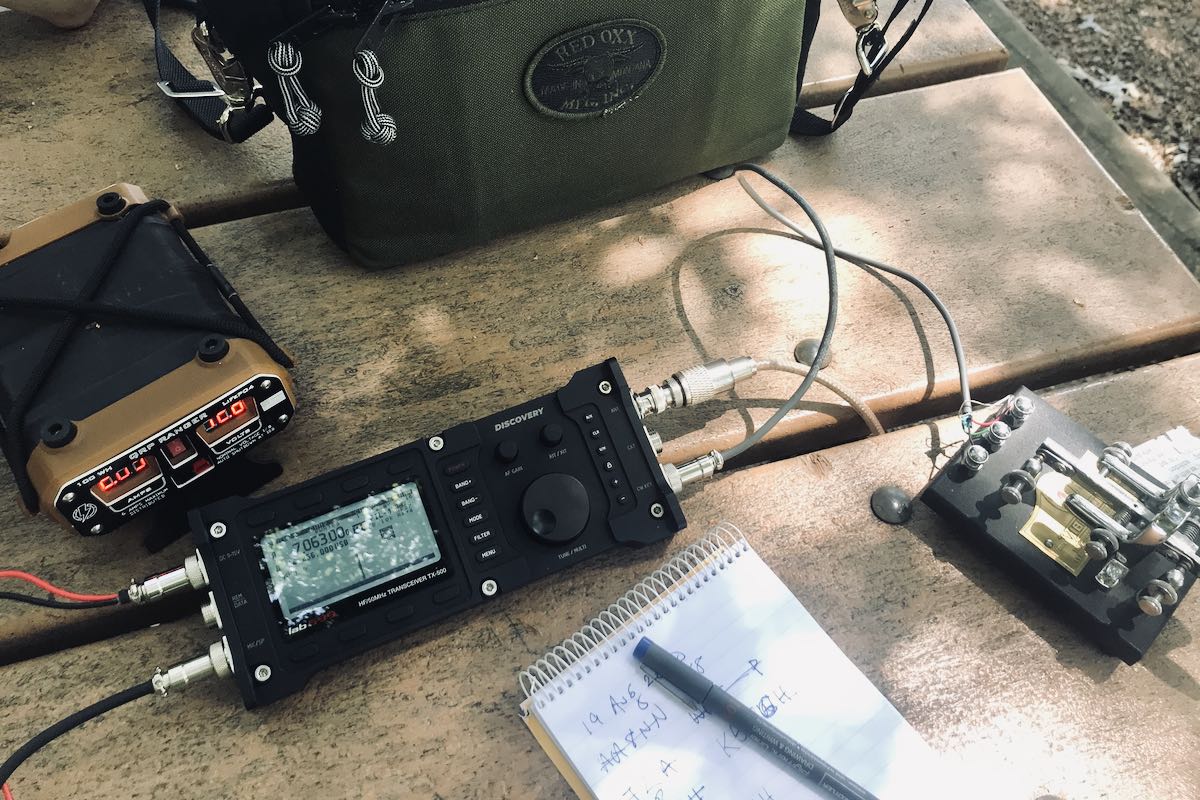
This morning, the first thing I did was fire up my soldering iron and make a CW paddle cable. (I hope HRO doesn’t mind–I didn’t exactly think to ask. Come to think of it, let’s just keep this between us, ok?). I soldered three wires to the supplied 5 pin connector (pins 1, 2, and 5).
To keep things simple, I hooked the TX-500 up to my Vibroplex single lever paddle which sports three terminals, making it easy to connect to the CW cable pigtail. Plus, heck, any excuse to play with the Vibroplex, right!?
CW
I was so eager to see how the TX-500 would perform on CW, that immediately after hooking up the key the first time, I checked POTA spots and worked two stations (WR8F in Ohio and NG5E in Texas) in rapid succession. Here’s a video of the exchange with NG5E:
Note that I used my iPad to make this video and, for some reason, the mic accentuated the clicking/clacking of my Vibroplex key. It’s not normally that pronounced. 🙂
CW memory keying
One of my complaints about the TX-500 when I read the final feature list a couple weeks ago was that it lacked CW memory keying. To me, this was a major negative because many POTA and SOTA activators rely on CW keyer memories to help with their logging workflow in the field. I certainly do.
lab599 must have been listening because I found out last week that they implemented CW memory keying in the most recent beta firmware update. Woo hoo!
I was sent the firmware file and this morning had no issues installing it in the TX-500 with the firmware application/tool.
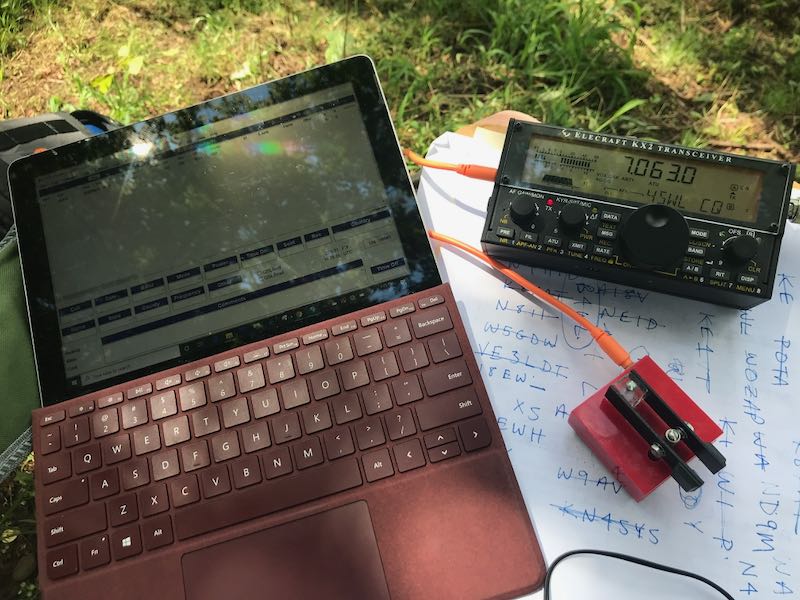
After I sorted out how to record and play back the CW memories using the top row of function buttons, I was ready to hit the field!
I packed the TX-500, and headed to the Blue Ridge Parkway for a POTA activation!
CW POTA activation
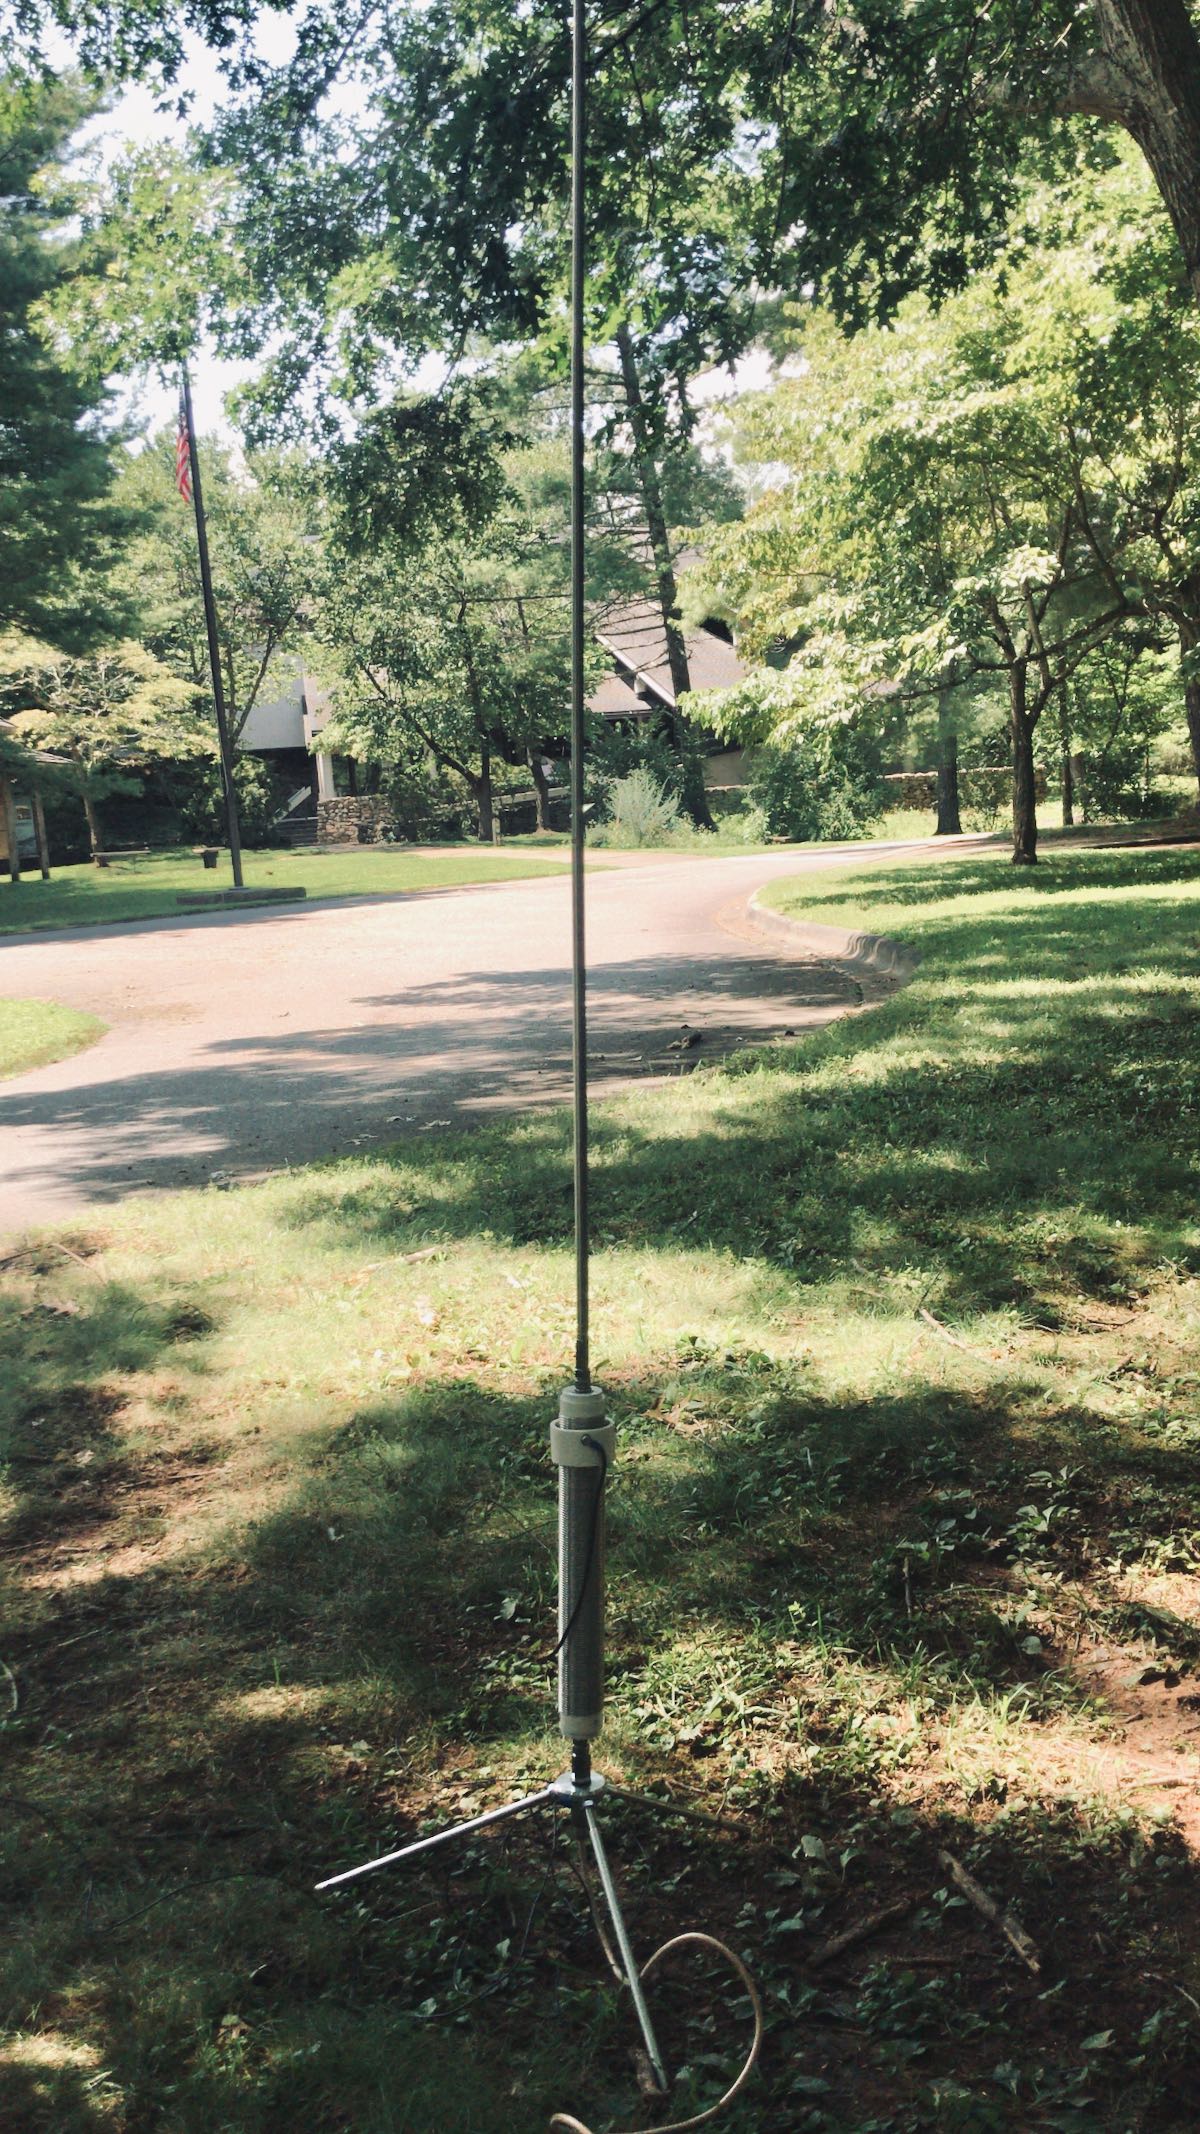
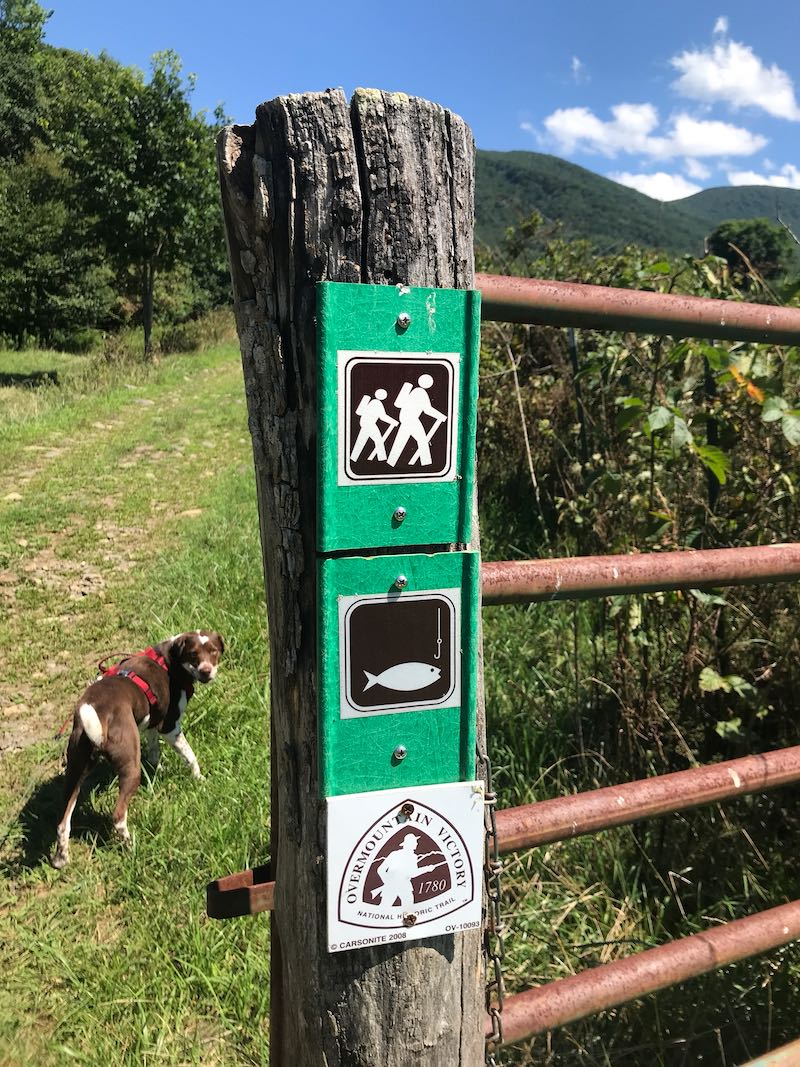
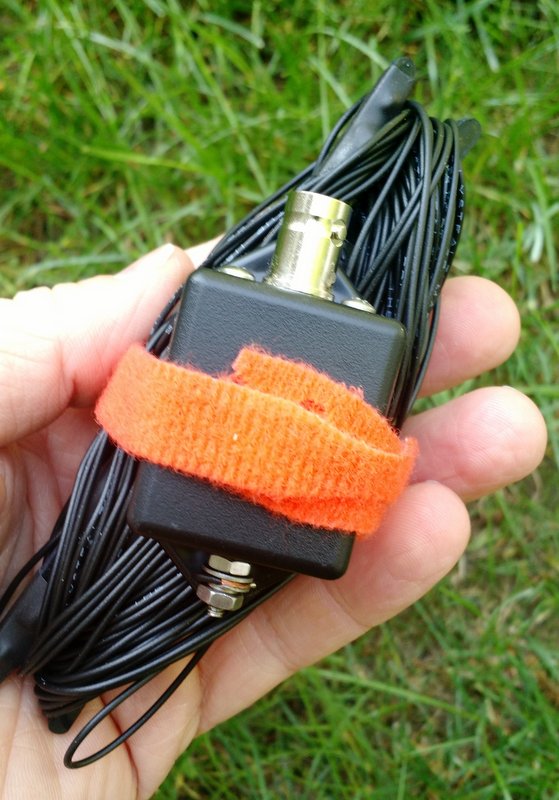
I only had a brief period of time to fit in an activation today, so I kept it simple by going to the Folk Art Center which has a number of picnic tables. A park ranger once asked that I not hang an antenna in a tree at this particular site, so I used my Wolf River Coils TIA portable vertical antenna.
The Wolf River Coils TIA
Truth is, I feel like I always get more mileage out of a wire antenna than a vertical when running QRP, but I worked with what I had.
I started calling CQ on 7063 kHz and within 10 minutes worked five stations.
The CW memory keyer worked well. There is currently a two second delay before the TX-500 begins transmitting, but I’m guessing that can be fixed in a future firmware update.
Here’s a short video of the TX-500 memory keyer in action:
The TX-500 uses a relay to switch between transmit and receive, so you can hear clicking in the background. I had the recovery time set to the shortest interval which resulted in the maximum amount of clicking. Good news is the TX-500 body is so solid, the clicking is quite soft and muted–about the softest clicking I’ve ever heard in a transceiver. You could, of course, minimize relay clicks by setting the T/R delay to a higher number.
I’m very impressed with the TX-500’s low noise floor and filtering. Signals just seem to pop out of this thing.
I played radio for a while longer but was eventually chased off by a thunderstorm.
I must admit: for the first time, I wasn’t terribly worried if it started raining and the radio got a bit wet. The TX-500 is weather-resistant so can certainly cope with a sprinkle.
More to come!
I’ve set a personal goal to take the TX-500 to the field seven days in a row. I’m not entirely sure that’s realistic as I see the amount of thunderstorm activity in the forecast. Still, one must have goals, right? Plus, any excuse to hit the field and play radio!
Please comment if you have questions about the TX-500. I’ll do my best to answer as many as I can!
The most common complaint I hear from new SWLing Post readers is that they can’t hear stations from home on their receivers and transceivers. Nine times out of ten, it’s because their home environment is inundated with man-made electrical noises often referred to as QRM or RFI (radio frequency interference).
RFI can be debilitating. It doesn’t matter if you have a $20 portable radio or a $10,000 benchmark transceiver, noise will undermine both.
What can you do about it?
Since we like to play radio at home, we must find ways to mitigate it. A popular option is employing a good magnetic loop receive antenna (check out this article). Some readers find noise-cancelling DSP products (like those of bhi) helpful when paired with an appropriate antenna.
But the easiest way to deal with noise is to leave it behind.
Take your radio to a spot where man-made noises aren’t an issue.
Field radio
If you’ve been reading the SWLing Post for long, you’ll know how big of a fan I am of taking radios to the field–both transceivers and receivers. Not only do I love the great outdoors, but it’s the most effective way to leave RFI in the dust.
My family had a great time at the site–we enjoyed a picnic and I played radio–but Hazel (our trusty canine companion) decided to roll in a cow patty during our hike. Hazel thought it smelled wonderful. Her family? Much less so. And all five of us were staring at a two hour car ride together.
Fortunately, my wife had a bottle of bio-degradable soap we use while camping, so I washed Hazel in Hampton Creek. (Turns out, Hazel didn’t mind that nearly as much as getting washed at home in the tub.)
The EFT Trail-Friendly antenna is incredibly compact and quite easy to deploy.
The EFT is my favorite field antenna for POTA activations. It works so well and is resonant on 40, 20 and 10 meters. With an ATU, I can also tune any bands in between. I’ve deployed this antenna at least 130 times in the field and it was still holding up.
I was bummed. Hampton Creek is nearly a four hour round-trip from my home. Was it worth the trip to rescue my antenna?
Fast-forward to Sunday: my amazing wife actually suggested we go back to Hampton Creek Cove on Sunday and also check out nearby Roan Mountain State Park. Would my antenna still be in the tree? Hopefully.
Whew! Still hanging out!
Fortunately, my antenna was still hanging there in the tree as I left it the week before. I was a little concerned the BNC end of the antenna may have gotten wet, but it was okay.
Mercy, mercy, so little noise…
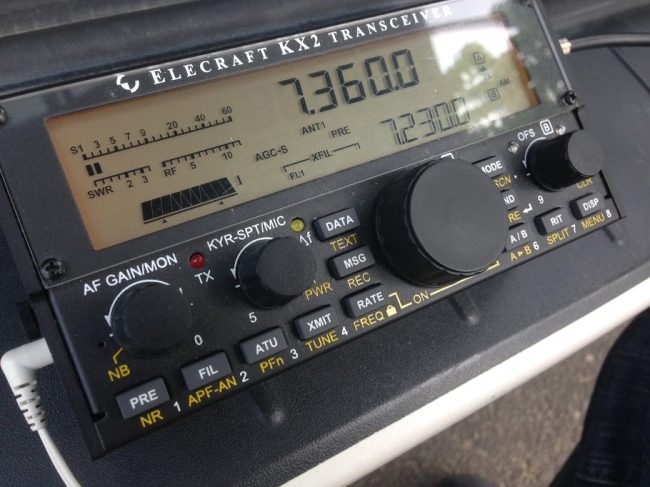
I turned on my Elecraft KX2 and plugged in the antenna. Oddly, there was very little increase in the noise level after plugging in the antenna. That worried me–perhaps the antenna got wet after all? I visually inspected the antenna, then pressed the “tune” button on the KX2 and got a 1.4:1 SWR reading. Then I tuned around the 40 meter band and heard numerous loud stations.
What was so surprising was how quiet the band was that day (this time of year the 40M band is plagued with static crashes from thunderstorms).
Also, there were no man-made electrical noises to be heard. This allowed my receiver to actually do its job. It was such a pleasure to operate Sunday–no listening fatigue at all. Later on, we set up at Roan Mountain State Park and did an activation there as well. Again, without any semblance of RFI.
When I’m in the field with conditions like this, I always tune around and listen to HF broadcast stations for a bit as well. It’s amazing how well weak signals pop out when the noise floor is so incredibly low.
It takes ten or so minutes to set up my POTA station in the field, but if you have a portable shortwave radio, it takes no time at all. None. Just extend the telescoping antenna and turn on the radio.
Or in the case of the Panny RF-2200 use its steerable ferrite bar antenna!
If you’re battling radio interference at home, I would encourage you to survey your local area and find a noise-free spot to play radio. It could be a park, or it could be a parking lot. It could even be a corner of your property. Simply take a portable radio outside and roam around until you find a peaceful spot with low-noise conditions. It’s the most cost-effective way to fight RFI!
Post readers: Do you have a favorite field radio spot? Do you have a favorite field radio? Please comment!
Indy 500 Week Offers the Chance for a Commemorative W9IMS Certificate and/or QSL Card
By Brian D. Smith, W9IND
Your chance to obtain the 2020 W9IMS Checkered Flag Award – or at least a QSL card commemorating this year’s Indianapolis 500 – unfolds in the coming week. And both amateur radio operators and SWLs are welcome to try.
This year’s certificate is easier than ever to earn. Normally the Indianapolis Motor Speedway’s three major races take place on three different weekends, but this year, because of Covid-19 concerns, two races were consolidated into one weekend – and in turn, two W9IMS special events merged into one.
For anyone who bagged that two-in-one event, you can seal the deal on the certificate by catching the station again between now and Sunday, Aug. 23. The Indy 500 operation will conclude at midnight local time (0400 UTC) Monday, Aug. 24. (Note: Indianapolis is on EDT or New York time.)
Even if you succeed in snaring W9IMS only once, you can still claim the corresponding QSL card. All certificate and QSL designs are brand-new each year.
How to find W9IMS? The station’s two transmitters will operate on three bands – 20, 40 and 80 meters – and may appear at any time of day or night until the final signoff at 0400 UTC Monday.
However, the best bet is to catch the station during prime time – 2200 through 0200 UTC on weeknights (6 to 10 p.m. Indy time). W9IMS operators will frequently activate 20 meters on weekdays between 8 a.m. and 2 p.m. (1200-1800 UTC); and will cover all three bands at various times throughout the weekend starting at 10 a.m. (1400 UTC) daily.
If you still haven’t caught W9IMS by 11 p.m. Sunday in Indianapolis (0300 UTC Monday), operators commonly conduct their own “happy hour” – working stations in rapid contesting style – during that final hour of the special event. But W9IMS has also been known to pull the plug a little early on Sunday evening if no stations are calling.
Here are tips for locating the station:
Go to the W9IMS web page (www.w9ims.org), find the “2020 Operating Schedule” heading, and click on the link to “Indianapolis 500.” Although some W9IMS operators make unscheduled appearances, you’ll have better odds looking for the station during the hours and bands reserved with a name and a callsign.
Even so, never assume that W9IMS is off the air. Check DX Summit (www.dxsummit.fi) for spots that identify the station’s current frequency (or frequencies), if any. Type “W9IMS” in the search box and you can customize it to show reports for only that station.
Preferred frequencies for W9IMS are 3.840, 7.245 and 14.245 MHz, so the station can usually be found there or within 10 kHz.
For further details, consult the W9IMS web page. Feel free to submit your requests for the 2020 QSL cards plus certificate in the same envelope, and if you don’t have your own QSL card, a printout of your W9IMS contacts or reception reports will suffice.
Remember to include $5 for the certificate plus two cards; or an SASE for one or both of the cards alone — the house rule is “No SASE, no W9IMS card, no exception!”
Many thanks to SWLing Post contributor, Andy Webster (G7UHN), who kindly shares the following guest post:
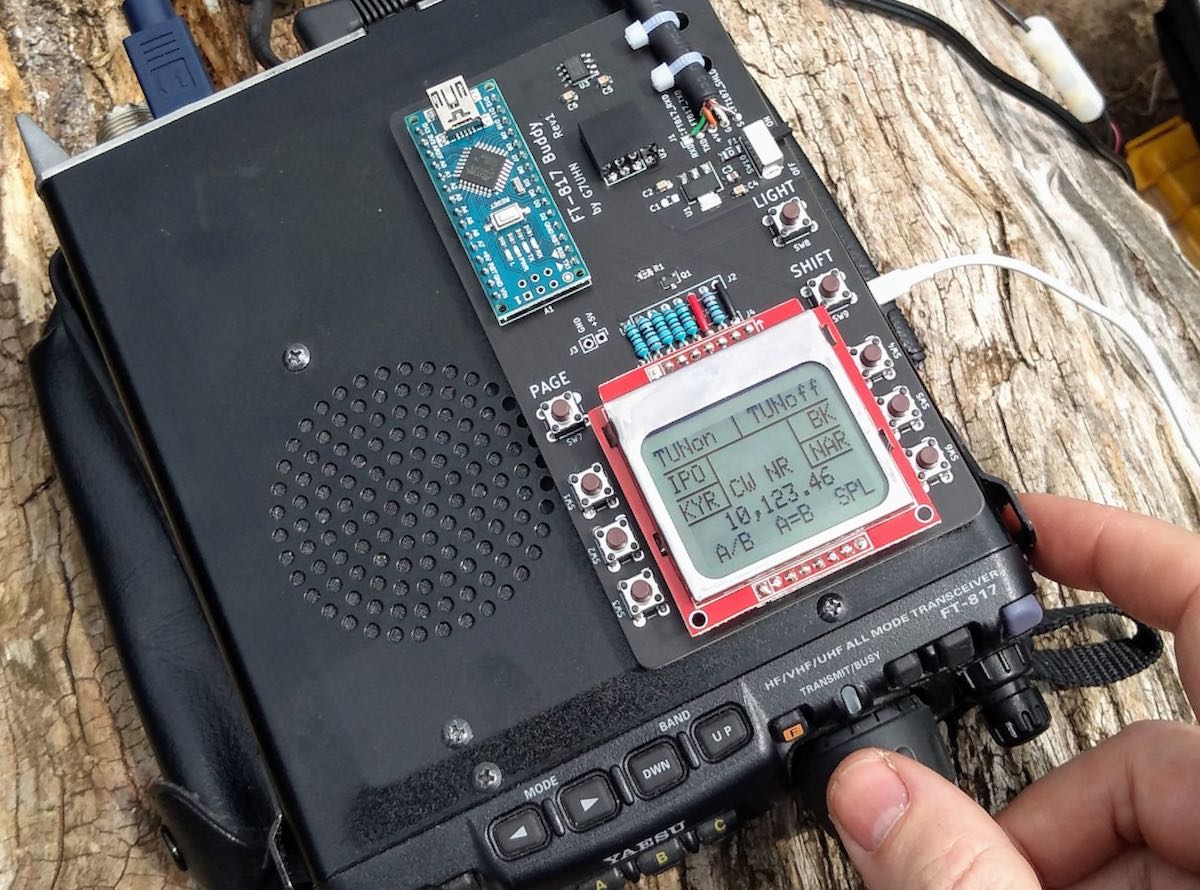
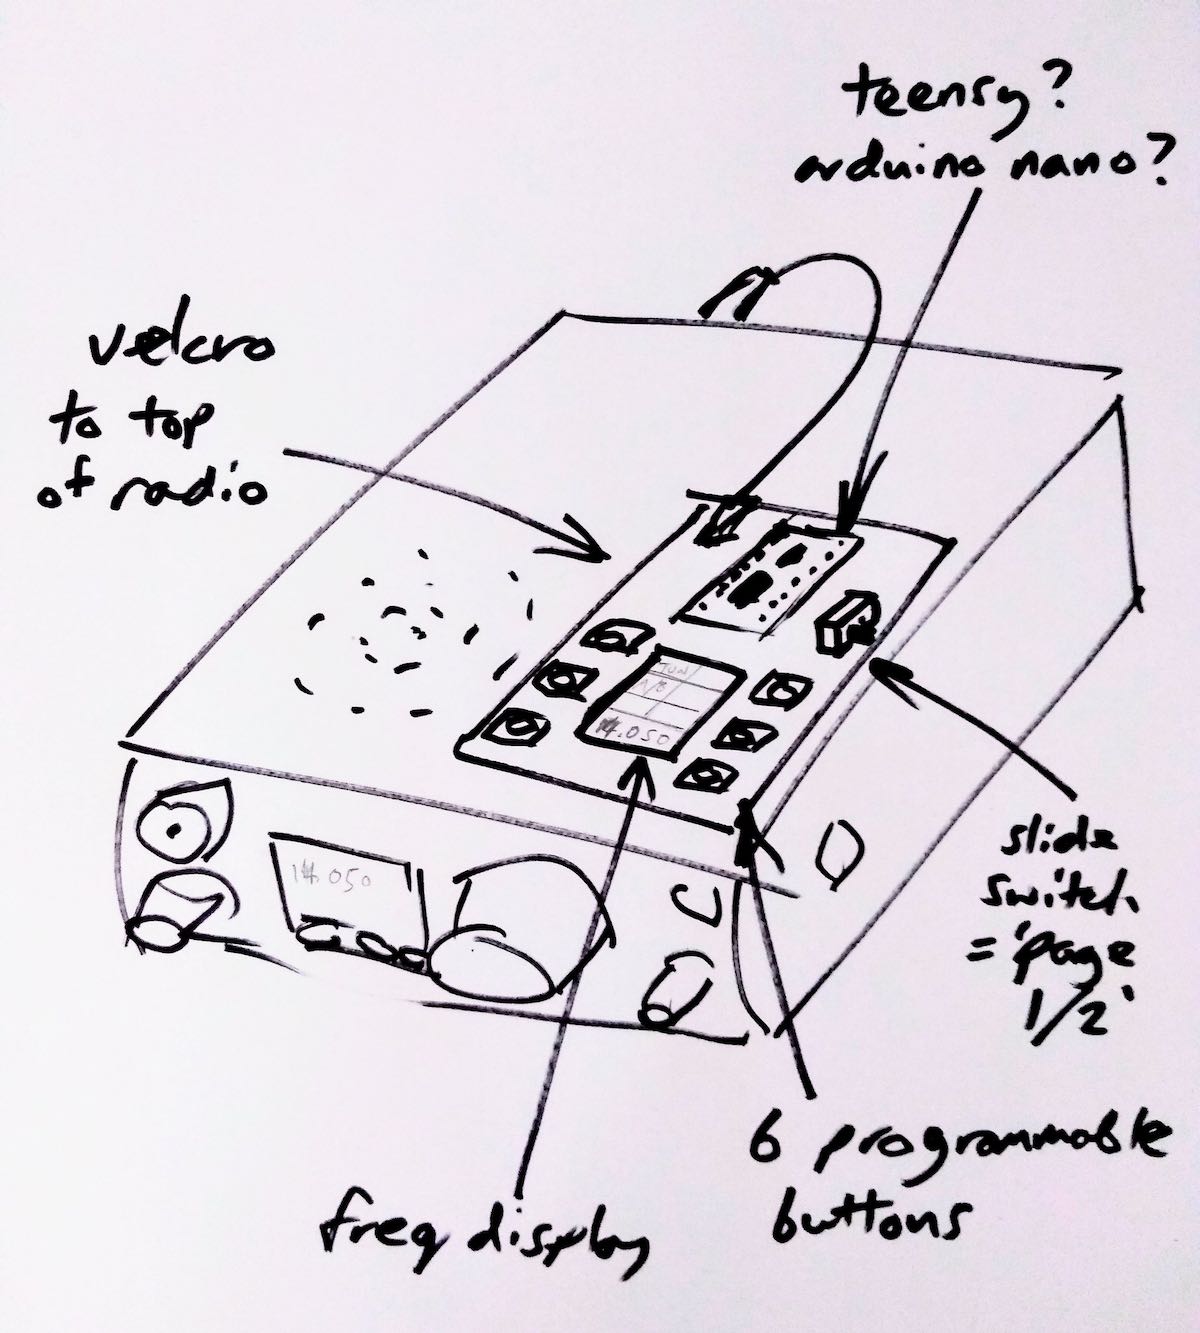
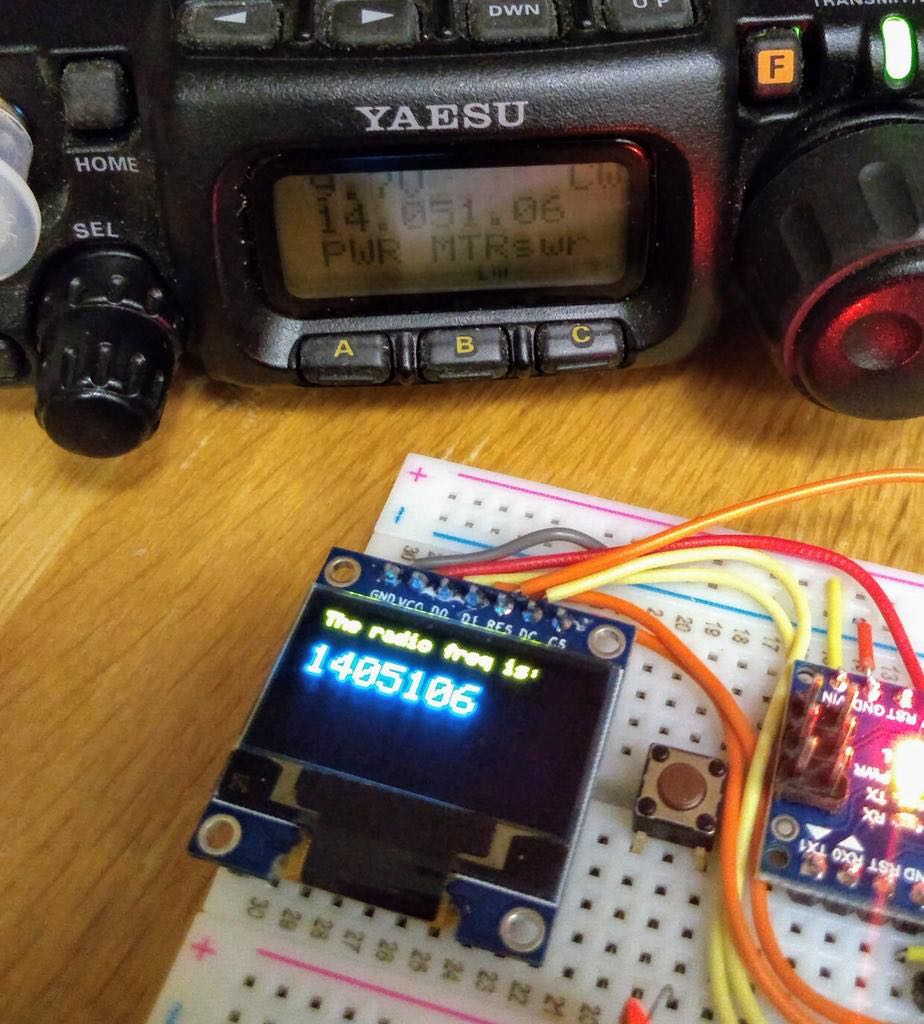
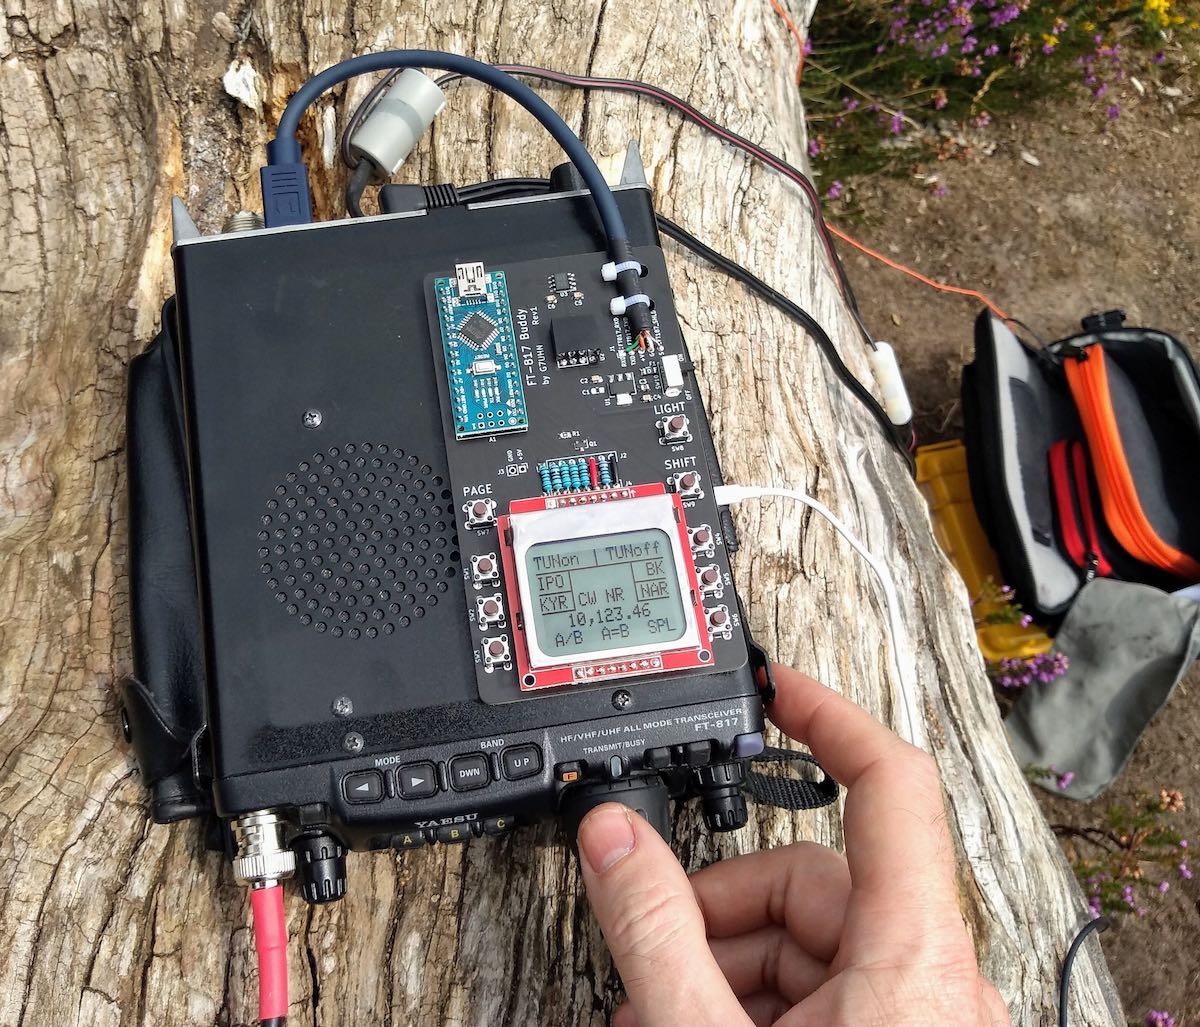
Yaesu FT-817 companion display
by Andy Webster (G7UHN)
Like so many I love getting out portable with my FT-817 but I do seem to spend so much of my operating time fiddling through the soft-keys because my most used functions (CW narrow filter, power and keyer settings to tune an ATU, A/B, A=B, etc.) are spread across different “pages” of the A,B,C assignments. Compared to the sublime experience of using my Elecraft K2 the FT-817 can be a little frustrating!
Last month, inspiration struck and I thought I could cobble together a small microcontroller and a little OLED display with some buttons to provide some extra soft-keys for the radio using the CAT serial port. Nothing particularly original here (I’ve seen articles of people using PICs for this purpose) but it seemed like a nice sized project for me to play with and build some experience doing PCBs (I’ve only done this once before at home). A little bit of discussion with Michael G0POT (FT-817 and SOTA guru), some Google searching and we were looking over KA7OEI’s excellent reference page (http://www.ka7oei.com/ft817_meow.html) and thinking about our favourite FT-817 commands…
As it happened I was lucky to have the right bits (Arduino Nano, small OLED display, buttons, prototype board and an 8-pin mini DIN cable) lying around the house to see “first light” from my FT-817’s serial port that evening. The Arduino Nano is a good place to start because it works at 5V so can work directly with the FT-817 levels on the ACC port. What followed next was some late nights of hacking on Arduino code to send and receive the data for my favourite commands and more experimentation on prototype board.
I tried a couple of cheap OLED displays and they look great indoors but weren’t quite up to the job in full sunlight which is fairly typical in my portable operations.
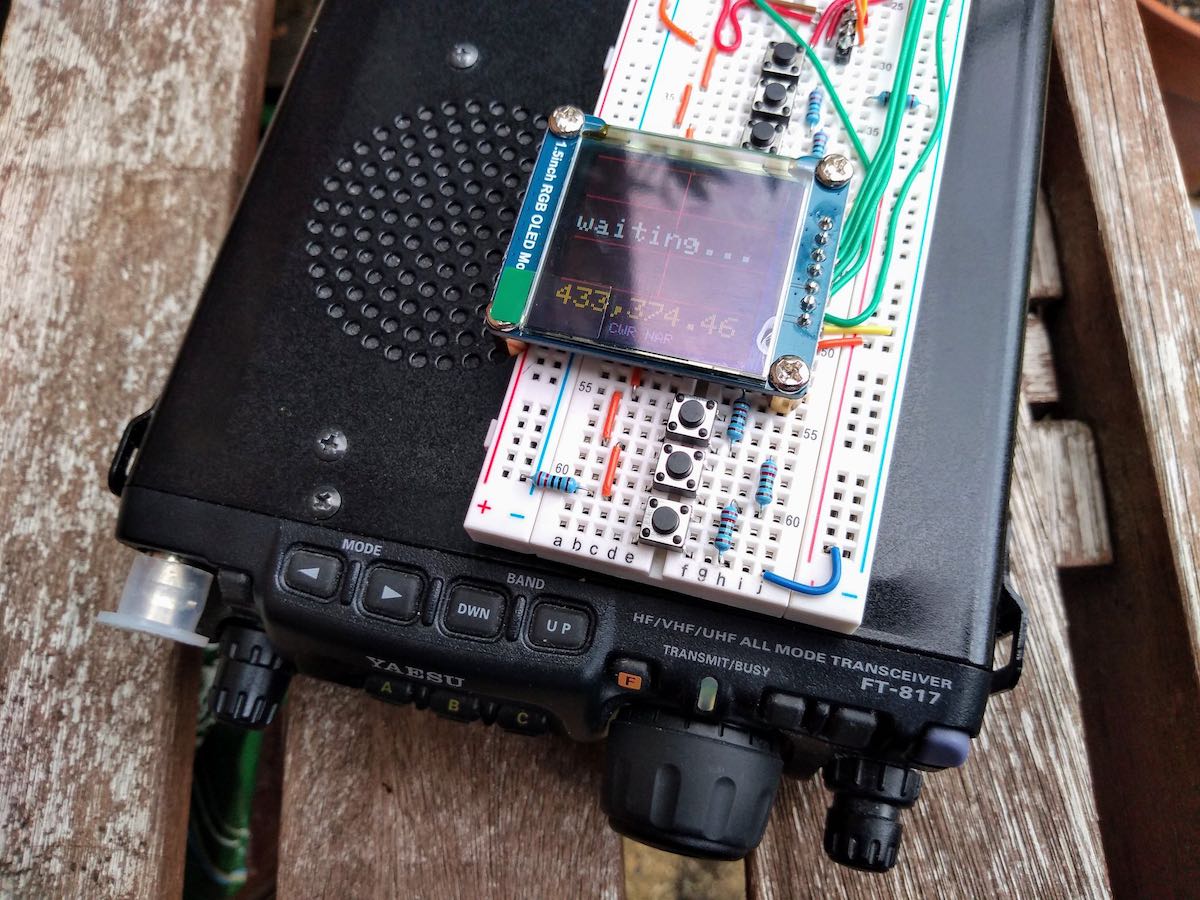
Daytime readability issues with an OLED display
By this point I had also realised the utility of having an auxiliary display on top of the radio as a much easier thing to view than the 817’s own display on the front panel. I’d also experienced some interference from the unshielded prototype board coming through as clicking sounds on the radio’s receiver so it looked as though some isolation between radio and my circuit might be necessary. Guided by many Internet tutorials, I switched to using a Nokia 5110-style LCD for better daylight readability and lower power consumption. Adding an ADUM1201 digital isolator and a B0505S-1W isolated DC-DC converter to the prototype board (modules acquired very quickly from eBay suppliers) gave me some isolation and lowered the interference which I guessed would disappear when I made the design on PCB with good ground planes around the signal lines.
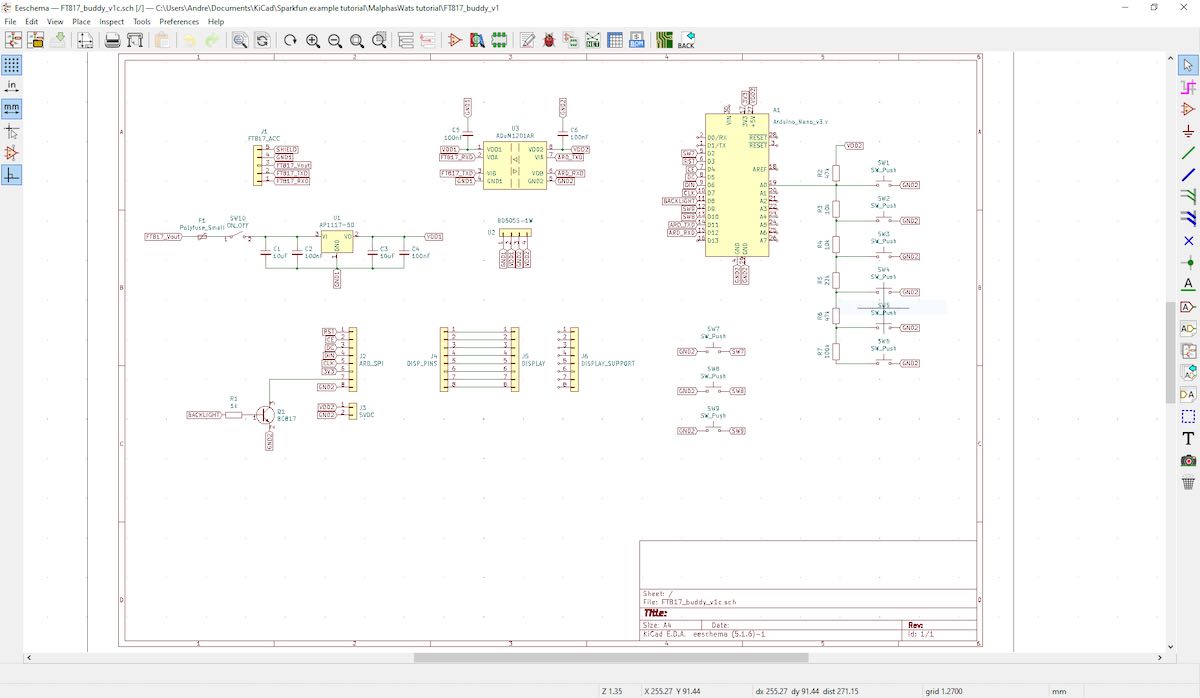
Screen capture showing the schematic (click to enlarge)
With a (mostly) working prototype it was time to hammer the Internet tutorials again, this time to learn how to use KiCad, a free open-source PCB design tool available on Linux, Windows and Mac. I’ve done one PCB for home projects before using Autodesk EAGLE and I found learning Eagle pretty hard going, it seems like it carries 20 years worth of baggage and dogma in the user interface. In fact I started using EAGLE on this project but spent 3 hours on the first evening just trying to change the labels on the ADUM1201 chip that I couldn’t find in an EAGLE library… so I gave up and thought I’d try KiCad which I’d seen some recent good reports on. I’m happy to say after finding an excellent tutorial on KiCad I had drawn the schematic and my PCB layout in about 15 hours working time spread over a few evenings.
I should add that the 15 hours of KiCad time did include several hours of agonising over the choice of slide switch so a PCB can be done much quicker than that once you’ve got your favourite parts sorted!
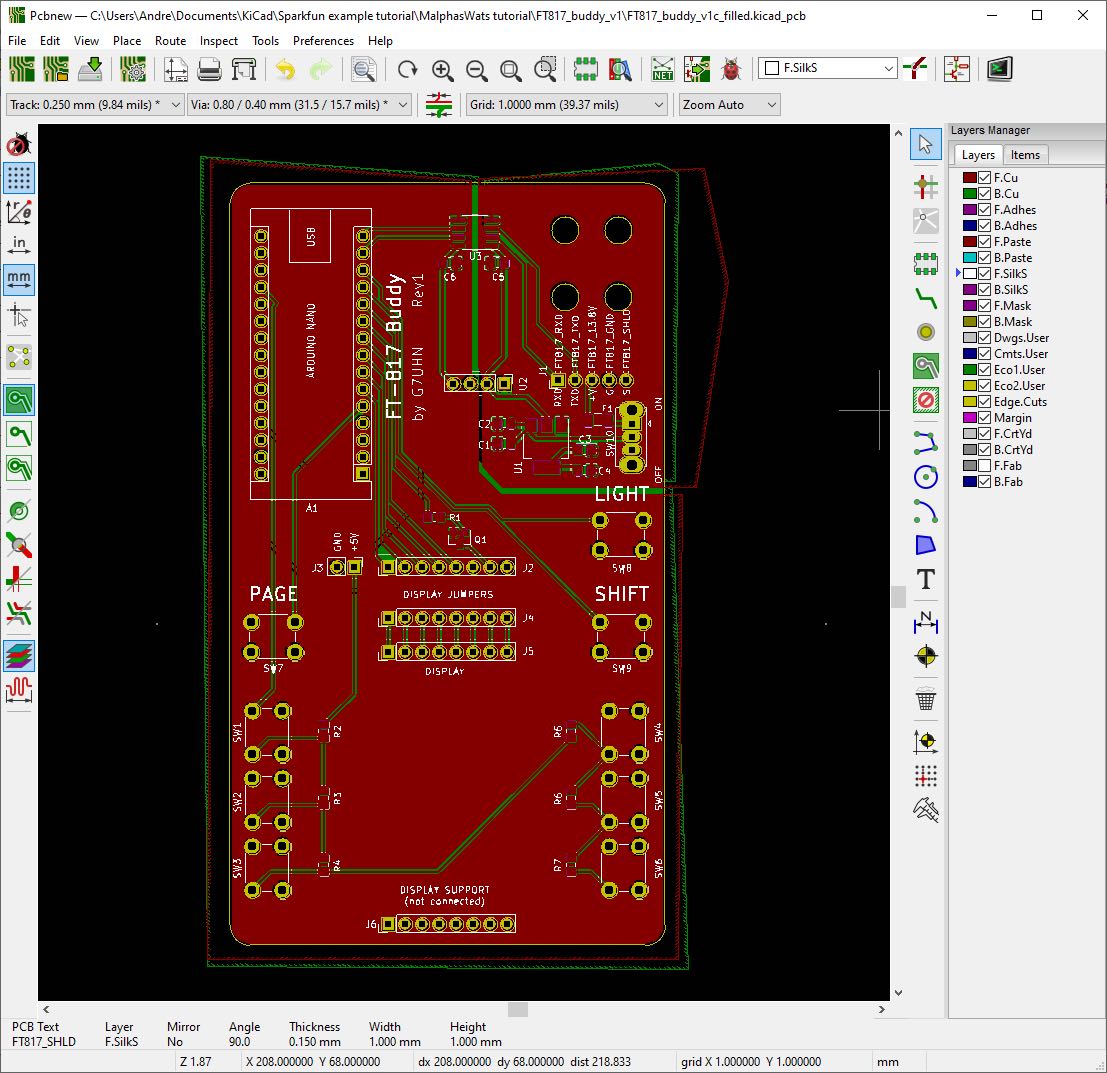
That’s pretty impressive for my first go with KiCad as a near-beginner to PCBs, I heartily recommend it, it was so much easier than EAGLE and quite an enjoyable tool. Right, PCB design done and uploaded to JLCPCB for manufacture. 5 PCBs with DHL shipping cost me less than £20 and arrived from China within 5 calendar days. Other PCB fabs are available… 🙂
Click to enlarge
So that brings us to today, pretty much. The PCB was assembled very quickly (!) and there is no sign of noise from the serial data lines creeping into the 817’s receiver now it’s on PCB. Some lessons have been learned through the construction (e.g. brown 6mm push buttons are less “clicky” than the black ones and that’s a good thing!) and I now have my companion FT-817 display/buttons in field trials. I’ve no plans to sell this, it’s a trivially simple design, but it does make a great home project to polish your skills in microcontrollers, PCBs and construction. I’ll post a write-up on my website in due course.
In use, the device works just as I’d hoped, I can do everything I want to on my FT-817 without having to fiddle through the awkward button presses. The frequency display is also in a much better position for me now (as most FT-817 owners will know as they jealously eye the KX2, KX3, etc…!) and I think I used it for the whole session when I took it to the field on Saturday. If only my CW had been so slick!
Next steps are to work on the Arduino code. My code is pretty rubbish (my coding style involves a lot of Stack Overflow and copy/paste!) and not safe for public consumption. There are also some health warnings to be noted in manipulating the FT-817’s EEPROM (required for some of the functions I wanted), explained on KA7OEI’s page but there have been a few volunteers on Twitter to help with the software which is great. Also I may do a “Rev 2” board with an Arduino Pro Mini to lower the drain on the FT-817 battery before sharing the PCB files. Other than that it’s now time to get back outdoors and enjoy the new improved interface to my smallest radio! 😀
73
Andy G7UHN
Andy, I absolutely love this project! A wonderful addition to the FT-817/818 and I’d hardly call it a “trivial” design–!
I purchased the original FT-817 shortly after it was introduced. At the time, I was living in the UK and travelled extensively throughout Europe. I loved the ability to simply throw this little rig into my carryon and play radio pretty much anywhere my work travels took me. In the end, I did less ham radio work with the FT-817 and more SWLing.
Still, I eventually sold my FT-817 for the very same reason that motivated you to build a companion display: the front panel is too small and my most used functions require too much menu digging.
Your companion board is an elegant homebrew solution. I love the Nokia LCD screen–superb readability in the field.
Thank you again and once you do a write-up on for your website, we’ll be sure to link to it on the SWLing Post!
Many thanks to SWLing Post contributor, Bruce (VE3EAR), who writes:
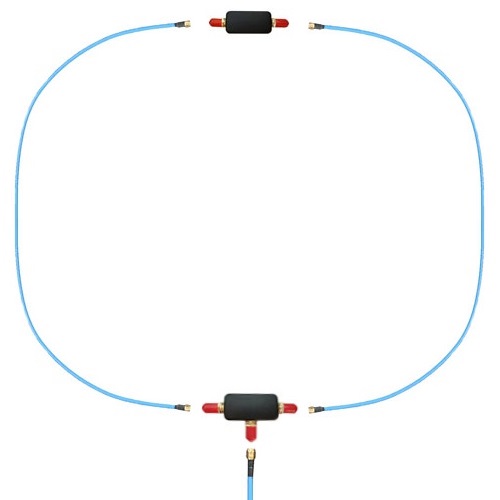
I decided that more testing of the Noise-Cancelling Passive Loop (YouLoop) antenna was needed, but I wanted to start with a clean page.
I built two identical loops using some 3/8 inch heliax scraps I had on hand. Both are one metre in diameter and employ the same feed arrangement, with a balun wound on a half inch square binocular core of type 75 mix. There are four turns on the antenna side and eight on the feed line side, of #24 gauge plastic insulated wire. The feed line shield connects to the antenna shields. The only difference between the two antennas is at the top of the loop, opposite to the feed point. One has a simple one inch gap in the shield, with the centre conductor passing across the gap, while the second one uses the crossover connection of the YouLoop design.
I’ve been running some A-B comparison listening sessions, both mid-day and in the evenings after local sunset. The testing is done outside, with the antennas hanging on a low limb of a maple tree in front of the house. The feed line is about twenty feet of coax which connects to my Realistic DX-440 receiver on the front porch. Testing is done listening to the AM broadcast band and the 160, 80, and 40 metre ham bands, with the loop aligned both E-W and N-S and about one loop diameter off the ground.
Both loops work well, but I do have to give the nod to the YouLoop (by Airspy), which produces a stronger signal of two S-units higher than the conventional loop. It also has deeper and sharper nulls, which can sometimes produce total nulling of the station!
73, Bruce, VE3EAR
Thank you so much, Bruce, for sharing your findings with us! I, too, have found that the Youloop generally outperforms my homebrew NCPL antenna. I believe one of the reasons for this as Youssef at Airspy once told me is because the Youloop has a lower loss transformer than anything that can be wound by humans (0.28 dB)–this improves gain.
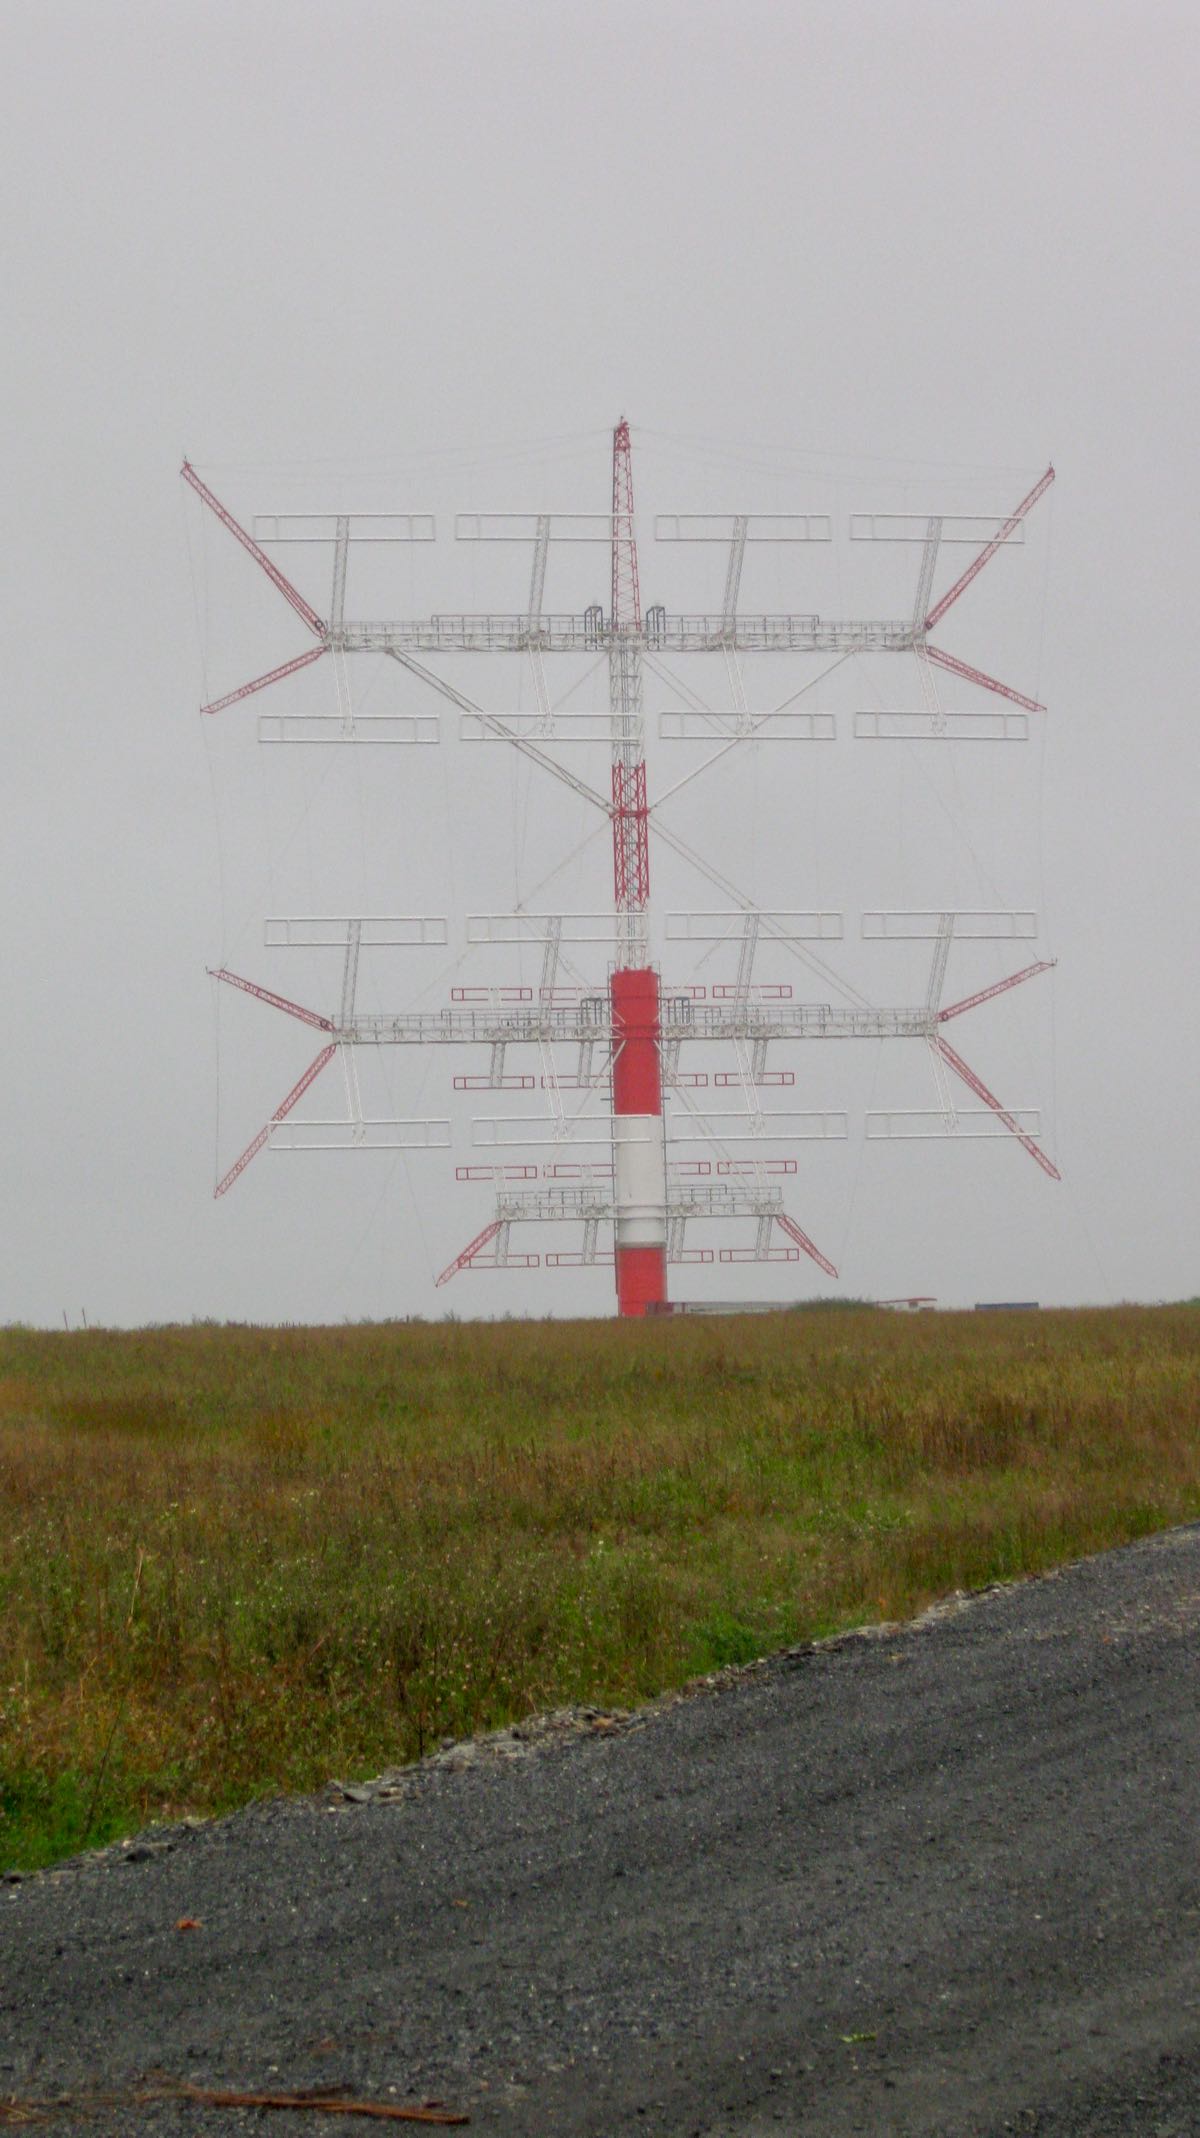
WBCQ’s Ampegon antenna at the Monticello transmitting site.
Many thanks to SWLing Post contributor, Benjamin, who shares the following news tip via Radio Insight:
Family Broadcasting Corporation is selling shortwave Christian “World Harvest Radio” WHRI Furman SC to Allan Weiner for $1.25 million. Weiner also owns shortwave Talk “The Planet” WBCQ Monticello ME as well as Talk/Rock 780 WXME/98.3 W252DW and Classic Country “Kixx 94.7” WBCQ-FM Monticello. The seller owns multiple Christian television stations as well as Christian AC “Pulse-FM” 103.1 WHME South Bend IN, 96.9 WHPZ Bremen IN, and 92.1 WHPD Dowagiac MI.