Category Archives: Mediumwave

HF Signal Enhancer for SDR: A Hands-On Build by Steve Allen (KZ4TN)

Many thanks to SWLing Post contributor Steve Allen (KZ4TN), who shares the following guest post:


SDR Signal Enhancer

by Steve Allen

I came across this HF Signal Enhancer for SDR on the RTL-SDR.com website. It was designed and built by Peter Parker, VK3YE from Melbourne, Australia. Below is the link to the video of the signal enhancer in action using an RTL-SDR V4 Software Designed Radio;

www.youtube.com/watch?v=W6OXc_wZTXU

It was very easy to see and listen to the improvement to the signal reception the signal enhancer made. Having been a life-long shortwave listener and current SDR user, I had to build one.

I did a screen capture of the schematic, re-drew it using MS Word, and built the bill of materials. In Peter’s original design he included a T-R relay so you could use the SDR along with a transmitter, which I opted to leave out. I had the passive components in my “junk box” but had to source the enclosure, controls, and antenna connectors. I have used these clam shell extruded enclosures with previous projects and love the build quality and the fact that they incorporate a slot in the sides which let me insert a sheet of PCB material on which I can do the assembly.

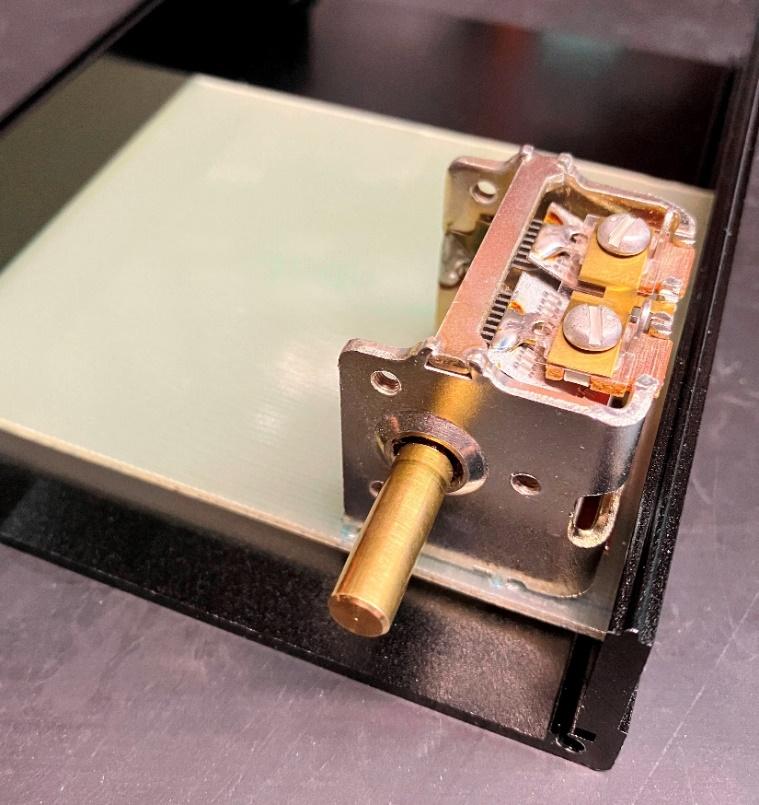
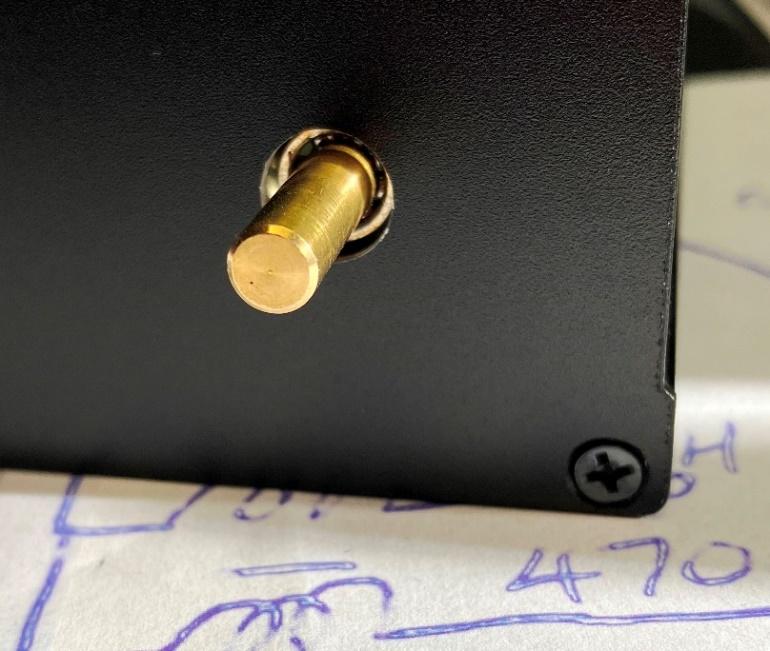
Referring to the schematic drawing in Peter’s video, you can see that the variable capacitor “floats” above ground, which is not the usual application for these devices. To do that I mounted the vari-cap on a piece of non-plated PCB material that I cut to the width of the enclosure and it fit nicely within the slot. The vari-cap had three pins on the side of the frame that allowed me to force fit it into three holes I drilled in the PCB material. I was very careful to drill the holes undersize and then slowly open them up until the vari-cap press fit on to the board. For good measure I ran UV curing adhesive down into each hole, letting it flow all the way through before I set it with a UV light source.

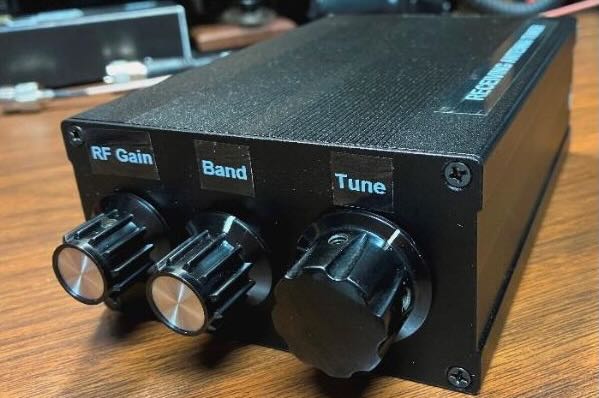
I then drilled an oversized hole in the front panel for the vari-cap shaft to pass through.

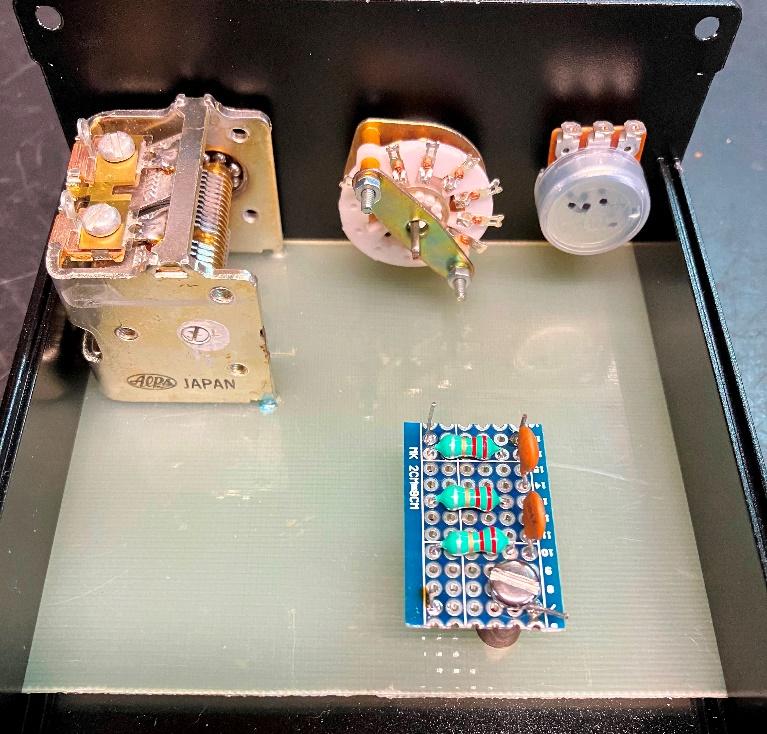
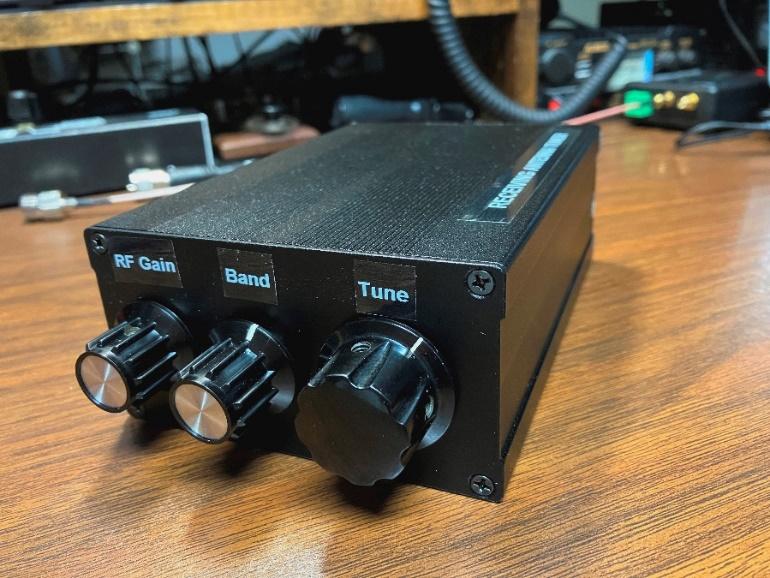
I then mounted the RF gain and band switch. The next step was the assembly of the AM broadcast filter. As SDRs can be overpowered by local AM radio stations Peter choose to include an internal band pass filter that is configured for around 3.5 MHz. The intent of this filter is to attenuate the signals below 3.5 MHz. Strong AM stations will still be heard but there is much less chance of them bleeding through on the higher frequencies.

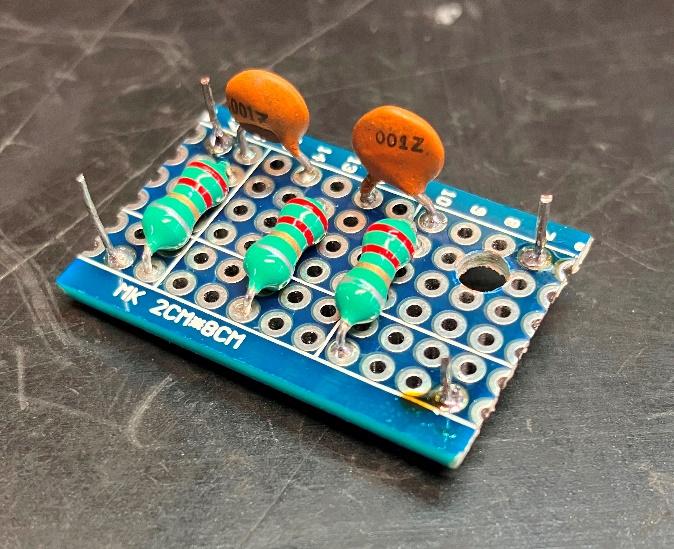
I assembled the filter on a piece of perf board and connected the component leads on the bottom. I passed leads back up through the perf board for the signal path and ground. I mounted it on the main board with a standoff.

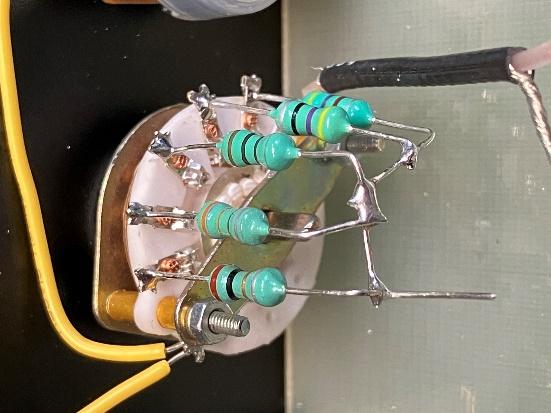
The next step was the wiring of the inductors to the rotary switch. Simple, and I tied them to the vari-cap frame.

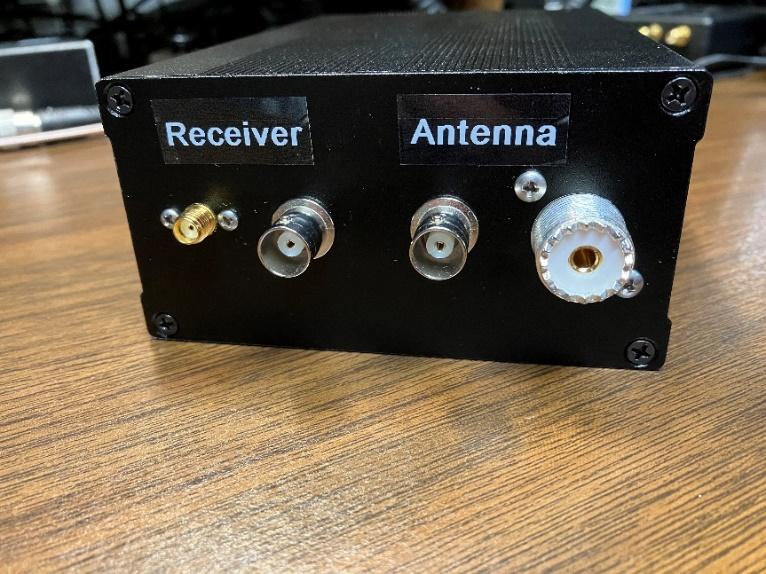
For the back panel I chose an SO-239 and a BNC for the antenna input, and for the radio connection an SMA and another BNC. I sanded off the coating on the enclosure at the antenna mounts as well as the four corners where the back panel screws into the top and bottom of the clam shell enclosure to provide good grounding of the enclosure. I wired the 1N4148 diodes on the antenna connectors, and attached the RG-174 coax. As Peter suggested, I grounded the long (relatively speaking) runs to and from the back panel with coax and grounded it at the back panel.

The last step was to apply a bit of epoxy adhesive to the fiberglass board and the slot it runs in to hold it in place. Once the epoxy set, I did the final wiring of the front and rear panel components. You can see how I sanded the corners of the back panel in the above photo.

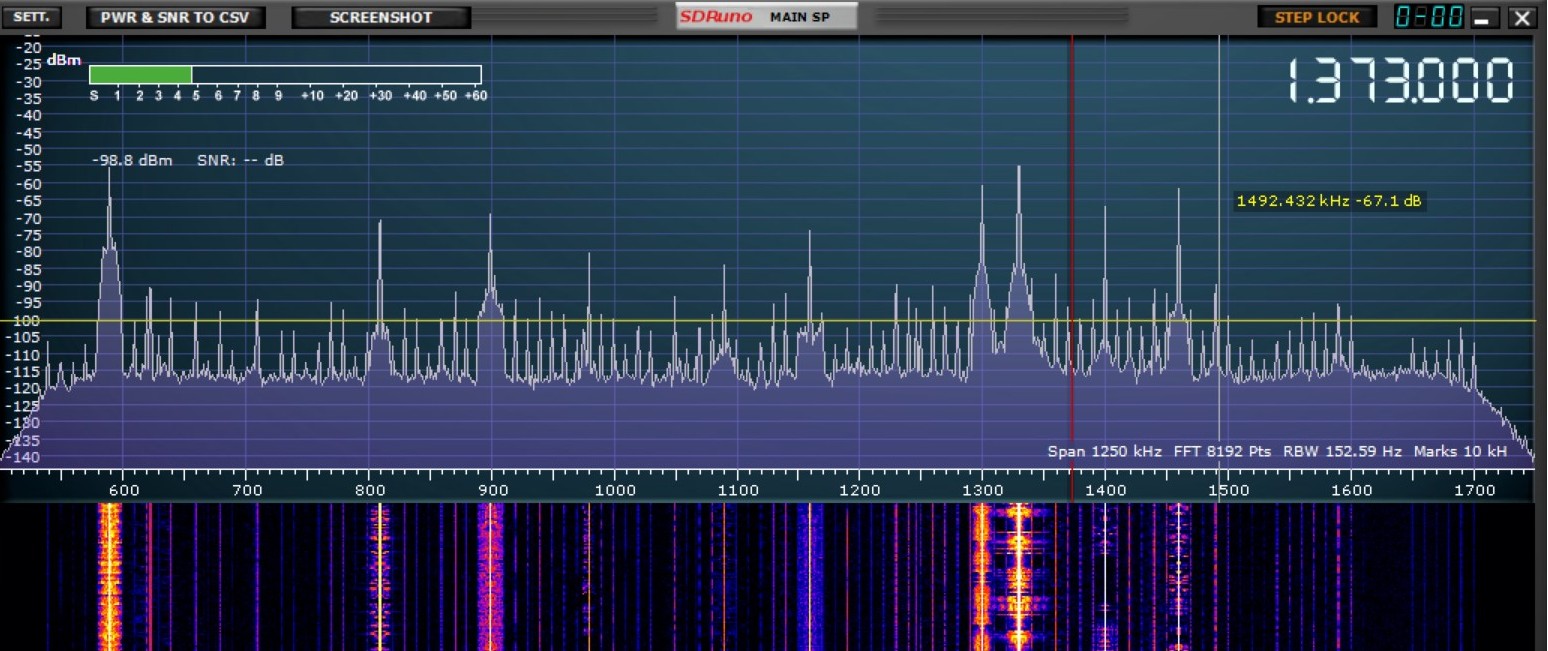
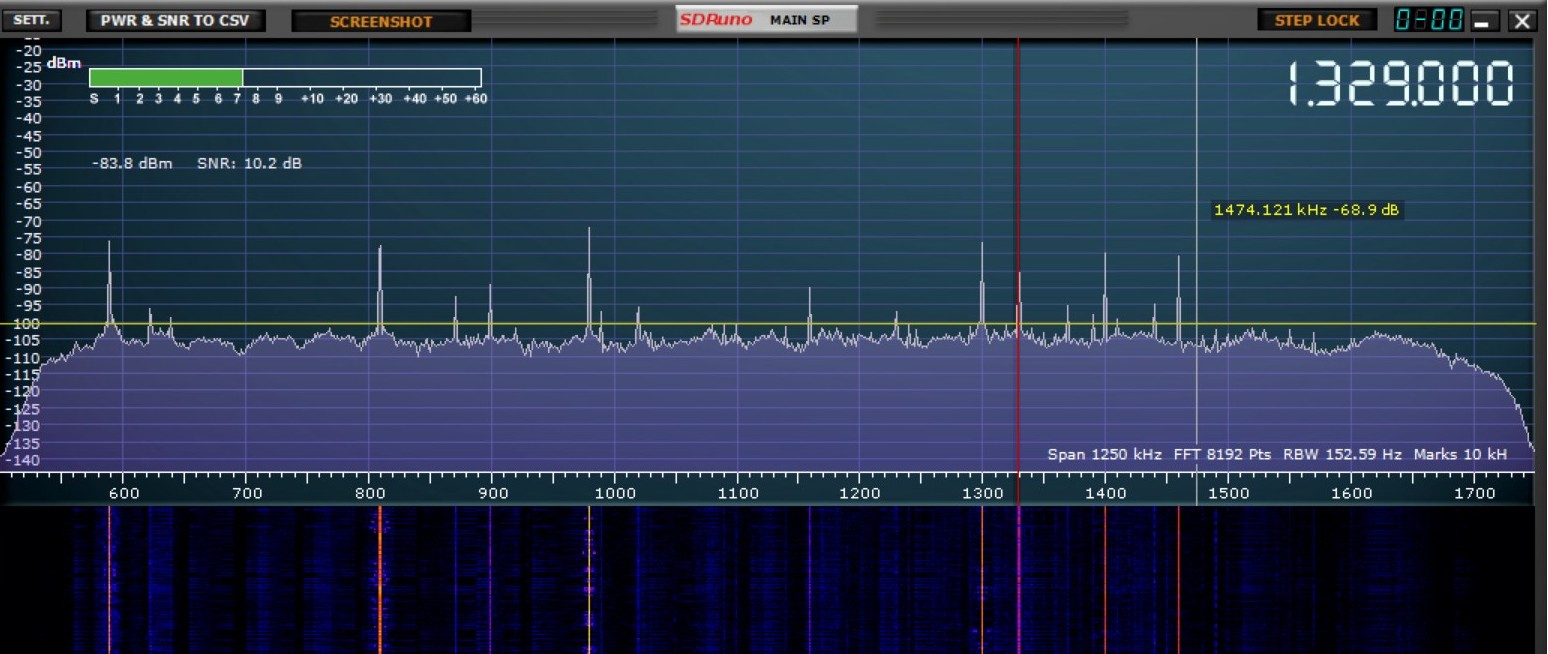
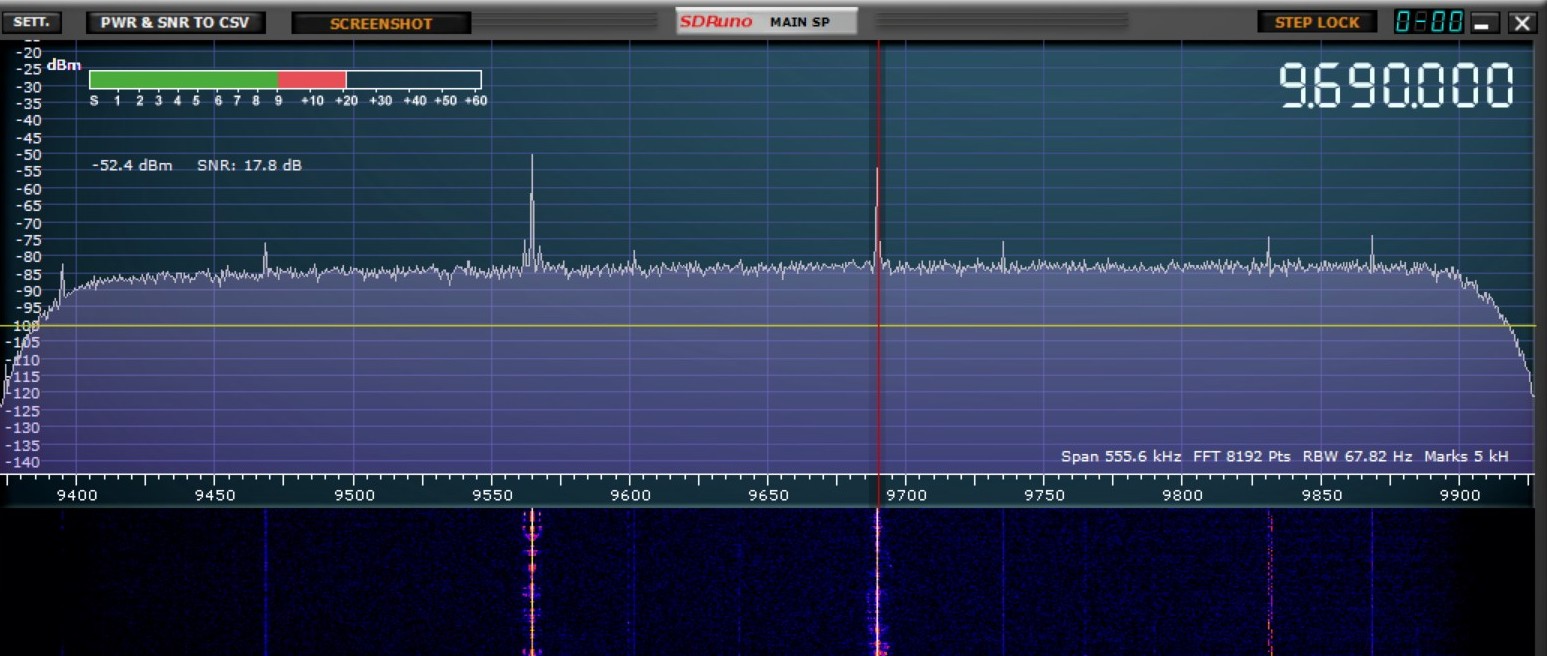
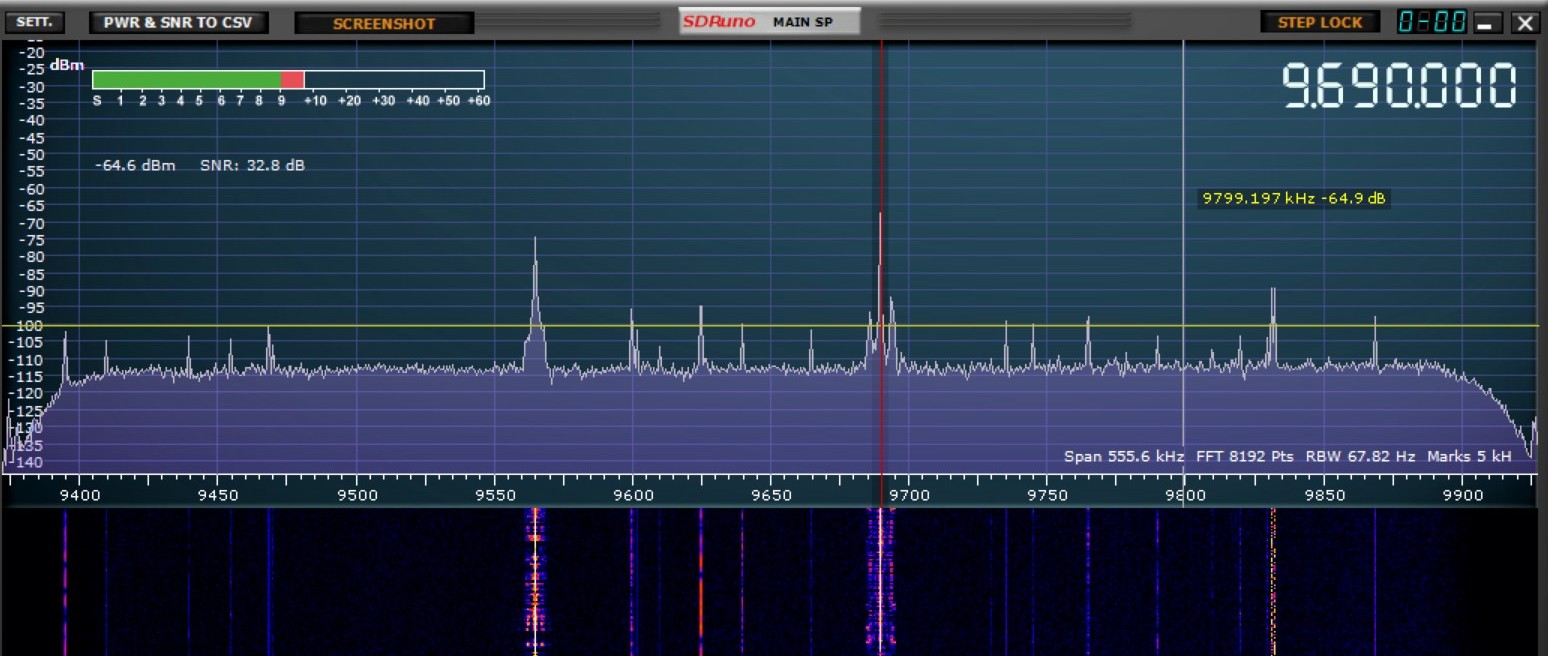
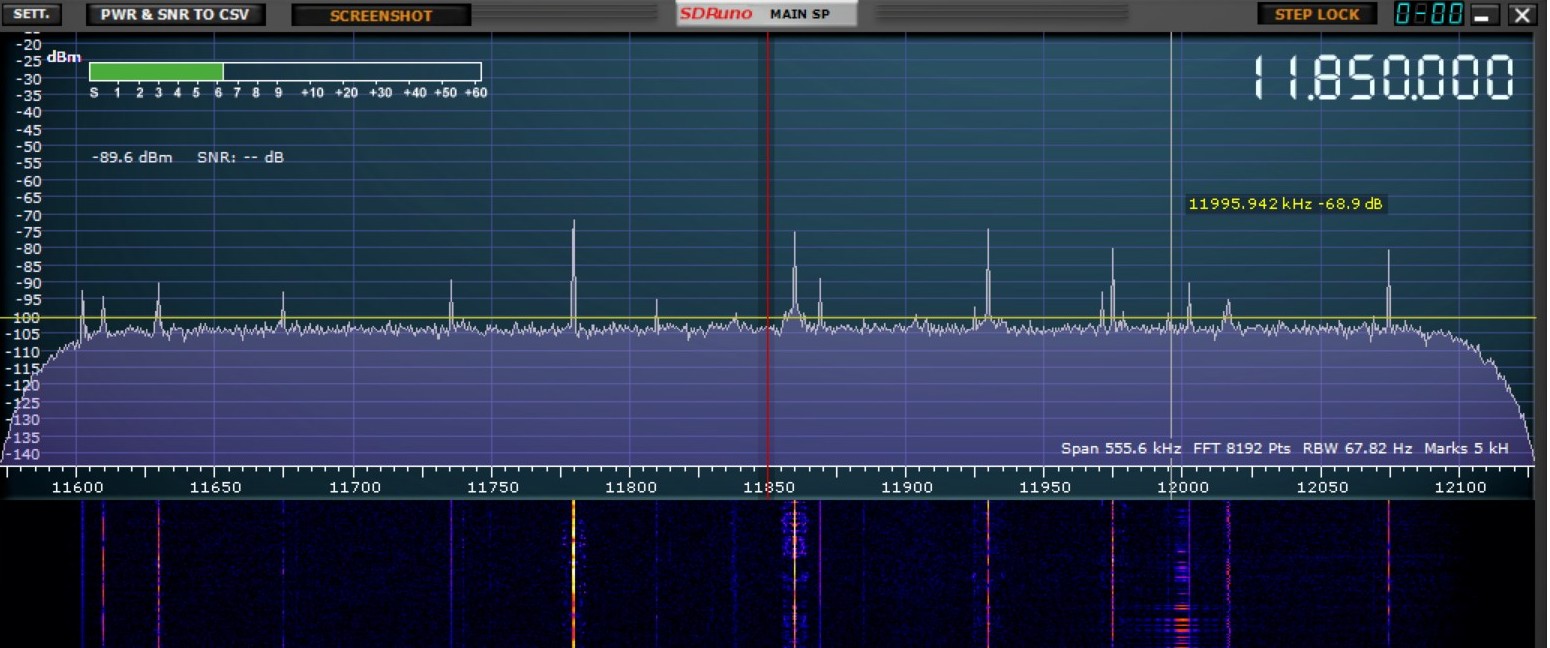
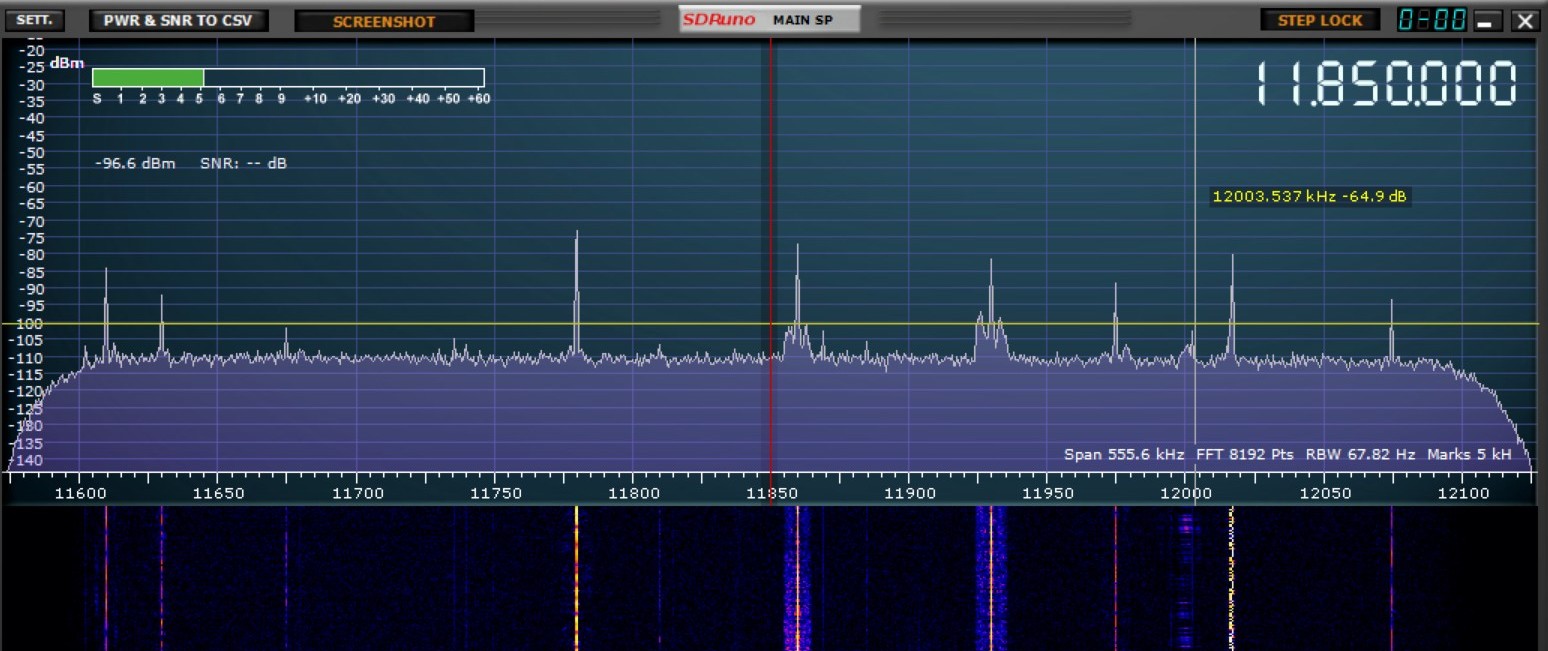
I connected it to my inverted L antenna and an SDR Play RSP2 and gave it a test run. I like the fact that I can visually see the changes to the signal strength on the SDR software as well as audibly. It makes a noticeable improvement to the reception.

Thank you Peter. I enjoyed the build.

Steve Allen, KZ4TN

Giuseppe’s Multi-Band Milk Crate Loop Antenna

Many thanks to SWLing Post contributor Giuseppe Morlè, who shares the following guest post:

Dear Thomas and Friends of SWLing Post,

I am Giuseppe Morlè from Formia, a town in central Italy on the Tyrrhenian Sea.

I have built a new “Multiloop” antenna using a 40 cm diameter milk crate. The crate is very sturdy and shockproof, making it an excellent base for this project.

Construction Details

I wound three different loops on the crate:
1. A single shortwave coil
2. Two shortwave coils
3. Twelve medium-wave coils

The design includes a single coil placed between the two shortwave coils, which picks up the signal by induction and transfers it to the receiver via an RG58 cable.

The heart of this system is a 2,100 pF variable capacitor with sockets connected to the rotors. Inside the crate, I added another 18 cm diameter loop positioned just below the two main coils.

The ends of this small loop are attached with crocodile clips to the external ends of the rotor. This small loop allows me to exploit induction and, by turning the capacitor, access all decametric bands from 160 to 10 meters.

Tuning Ranges

The variable capacitor enables tuning as follows:

      • In the lower ranges, it covers 80 to 20 meters.
      • When reversed, it tunes all higher ranges from 10 to 20 meters.

This works because the small loop and capacitor couple inductively with the primary turns. By increasing capacity with cables on the rotors, the antenna can even tune up to 160 meters.

The medium-wave turns cover frequencies from 300 kHz to 1,900 kHz. Essentially, this Loop Milk Crate antenna can access a wide range from 300 kHz to 30 MHz.

Testing and Comparisons

I tested the antenna using the Tecsun PL-660 and the Tecsun S-8800 receivers. I also compared the Loop Milk Crate with my “Ferritona” antenna and found surprising results!

Some of the videos were filmed in my shack because it was too cold to work on the balcony. Other videos were shot outside, either on my balcony or on the beach in Formia.

Videos

Final Thoughts

I hope you enjoy my “crazy” constructions. Always remember, I’m not a technician—just a passionate listener who loves building with recycled materials.

Wishing everyone a year full of happiness and satisfaction!

Best wishes to all,
Giuseppe Morlè

Carlos’ Illustrated Radio Listening Report and Recording of La Union (December 27, 2024)

Many thanks to SWLing Post contributor and noted political cartoonist Carlos Latuff, who shares an illustrated radio listening report of a recent La Union (Paraguay) broadcast.


Carlos notes:

Part of Radio La Union talk show (in Spanish). News about three men attacked by bees in Encarnacion, Paraguay, leaving one dead. Listened in Porto Alegre, Brazil.

Click here to view on YouTube.

A File Worth Having: Bob’s guide to building an Electrically Small Resonant Loop Antenna for Mediumwave Reception

Screenshot

This post is short and sweet.

If you click here–Electrically Small Resonant Loop Antenna for Mediumwave Reception (PDF)–you can download a copy of Bob Colegrove’s excellent paper on the Electrically Small Resonant Loop Antenna for Mediumwave Reception.

He has actually built this antenna; it works; and he uses it often. Perhaps you might want to build one for yourself. As an added bonus, Bob is an excellent writer (in my not-so-humble opinion). What’s not to like?

— Jock Elliott, KB2GOM

The Great Gonzo Radio Experiment

By Jock Elliott, KB2GOM

It’s funny how you can start out thinking about how to solve a problem, the whole process takes a turn, and you wind up with an unexpected but pleasing result.

It all started innocently enough. Alan posted this — https://swling.com/blog/2024/11/bbc-rd-how-to-test-a-loop-antenna/ — and this statement appeared at the end of a BBC report on how to test loop antennas:

“Polarisation Illustrations of the antenna usually show it mounted upright; that is, with
its axis parallel to the ground. This is fine for the reception of LF and MF transmissions, which are vertically polarised, but most HF transmissions are horizontally polarised.”

When I tested that assertion here — https://swling.com/blog/2024/12/here-we-go-loop-de-loop-in-which-your-humble-correspondent-tests-a-hypothesis/ — there were a couple of interesting responses.

Bob Colegrove said (in part):

“To address your conundrum, from my long-standing, untutored tinkering with loop antennas, I have concluded that, regardless of LW, MW, or SW, optimum performance for peaks and nulls requires that the axis of the loop (i.e., line through the center of the coil) be able to rotate 360 degrees laterally and 90 degrees vertically.” (emphasis mine)

Robert Gulley added:

“I will have to concur with Bob – if I may state it another way, there is no “proper” position for a loop when getting shortwave signals.”

To which I responded:

“I suppose the ultimate setup might be an articulated motorized outdoor mount with a joystick inside that would allow me to fiddle the loop to the optimal position.”

Early in the morning I awoke thinking about how a system capable of manipulating my three-foot-diameter MFJ 1886 loop both vertically and horizontally might be implemented. Everything that came to mind seemed awkward, hard to put together, difficult to operate, expensive, and just plain clunky.

I dozed off and woke up thinking: “What about a really small loop? I could hold it in my hand and easily turn it to different positions to optimize reception, no equipment required.”

A thought came to mind: “You’ve got a small loop antenna, why don’t you see what you can do with it?”

At this point, I need to make my Shameful Admission: I got so intrigued by the idea of using my wrist and hand to turn a small loop to various orientations that I forgot that I was trying to solve the problem of manipulating a shortwave loop.

The loop that came to mind is the Terk AM Advantage. I tested it here.  Designed to boost signals on medium wave, it is a nine-inch tunable loop encased in plastic that requires no power supply. It inductively couples with the ferrite antenna inside a portable radio. But I seemed to recall that it also comes with a direct wire connector that can be used with some radios. Perhaps I could connect it to my CCrane EP-PRO which has clips and a switch for an external medium wave antenna on the back of the case.

I found the Terk AM Advantage easily enough, but the direct wire connector required a major archeological dig. Once I unearthed it, I plugged the connector into the back of the Terk AM Advantage, slipped the wires from the connector into the clips on the back of the EP-PRO.

Now to try it out . . .

Tuning slowly down the dial, I found across a very faint signal that I could barely copy. Reaching around the back of the EP-PRO, I switched from the EP-PRO’s internal antenna to the Terk AM Advantage external loop antenna (which I was holding in my hand), rotated it from side to side, tipped it back and forth, and – tah-dah! – was rewarded by a far more copyable signal. It was WEEU in Reading PA, 200 miles away, transmitting 6,000 watts into the darkness on 830 kHz. Switching back to the EP-PRO’s internal antenna, I tried rotating the EP-PRO to optimize the signal but could not produce a signal that was as good as the external loop.

Repeating the procedure with additional faint stations, I got the same results: better reception with the handheld loop antenna, and it was fun and easy to use. I held it in my left hand (it’s light) so I could rotate the dial that peaks the signal with my thumb and working the tuning knob on the EP-PRO with my right hand. It was a very pleasing, almost addictive, experience.

If you’re looking for a potent setup for medium wave DXing, I can recommend the EP-PRO/Terk AM Advantage combo, even though it wasn’t my original objective. Call it serendipity.

In the meantime, does anyone know what might be the smallest loop that could be handheld for shortwave reception and would provide a performance boost over a whip antenna?

Carlos’ Illustrated Radio Listening Report and Recording of Radio Buenos Aires (December 12, 2024)

Many thanks to SWLing Post contributor and noted political cartoonist, Carlos Latuff, who shares illustrated radio listening report of a recent Radio Buenos Aires broadcast.


Carlos notes:

Part of Radio Buenos Aires (Argentina) news show (in Spanish): “…Burlón*, former Secretary of Tourism of Bariloche, current president of the Argentine Chamber of Student Tourism, was shot in Rio de Janeiro while he was heading to Christ the Redeemer, along with his family… “

“…Burlón was driving with his family in his car, took the wrong route while using a GPS, and mistakenly entered the Morro dos Prazeres favela, an area controlled by the criminal group Comando Vermelho, a Brazilian drug trafficking organization…”

*Gastón Fernando Burlón

Click here to view on YouTube.

Here we go loop de loop . . . in which your humble correspondent tests a hypothesis

By Jock Elliott, KB2GOM

It was this post by Alan — https://swling.com/blog/2024/11/bbc-rd-how-to-test-a-loop-antenna/ — that set me off. After downloading the BBC report on how to test a loop antenna, I noticed the following in it:

“Polarisation Illustrations of the antenna usually show it mounted upright; that is, with
its axis parallel to the ground. This is fine for the reception of LF and MF transmissions, which
are vertically polarised, but most HF transmissions are horizontally polarised.”

Huh, I thought, “I wonder this would have any bearing on how I use my MFJ 1886 loop antenna?

So hooking the 1886 loop to an SDRplay RSPdx, here’s what the spectrum looks like on medium wave in vertical orientation with the 1886’s internal amp turned on:

And here’s what the medium wave spectrum looks like with the loop in horizontal orientation, amp on:

But what about shortwave reception? Here’s 31 meters in vertical orientation:

And here’s 31 meters with the loop in horizontal orientation:

Here’s 25 meters in vertical orientation:

Here’s 25 meters in horizontal orientation:

It looks to me, at the very least, the noise floor is lower . . . or I am in desperate need of a laxative?

For more about my adventures with the 1886 loop, check this — https://swling.com/blog/2022/10/testing-the-mfj-1886-receive-loop-antenna/ — and this — https://swling.com/blog/2023/01/saturday-morning-fun-fat-mw-dxing-with-the-mfj-1886/

My conclusions: I definitely don’t want the 1886 loop in horizontal orientation for medium wave DXing, but I think that the flat orientation might help for shortwave DXing.

What do you think?