Shortwave listening and everything radio including reviews, broadcasting, ham radio, field operation, DXing, maker kits, travel, emergency gear, events, and more
Many thanks to SWLing Post contributor, Mike, who writes:
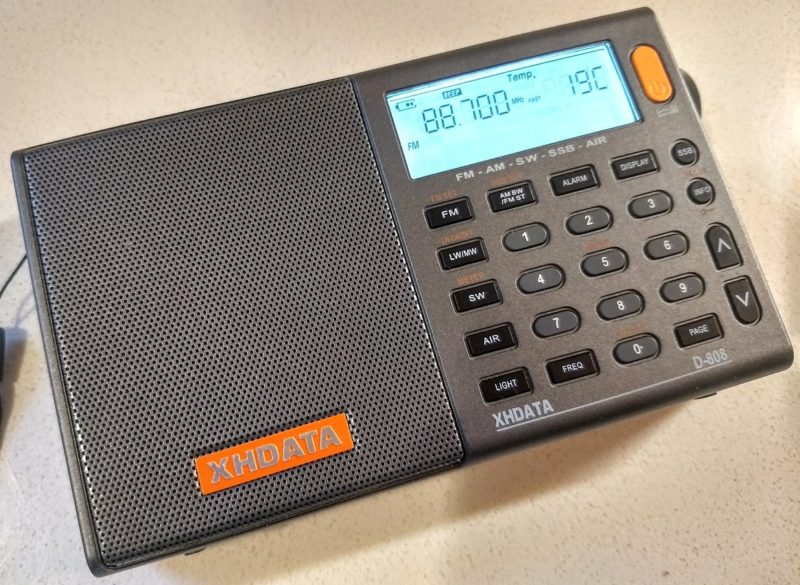
I’ve recently picked up an XHDATA D-808 and I’ve noticed a rather bothersome problem with it. When I have headphones plugged in and I switch bands, such as from SW to FM, a rather loud “pop” is emitted through my headphones during the band switching. This happens with every band change and happens even with the volume all the way down. I was wondering if you had noticed this sort of behaviour on your unit.
PS: Your review of the C Crane Skywave SSB is very well written. Great job!
Glad you liked the Skywave SSB review, Mike!
Yes, I do hear a small audio pop when I change bands on the XHDATA D-808. As you suggest, changing the volume seems to have no effect in the pop intensity. On my set, it’s not particularly loud, but if I use my in-ear earphones, it is annoying. I’m curious if perhaps the pop in your unit, Mike, is louder than mine.
Please comment if you’ve noticed this same audio pop in the D-808.
The following review first appeared in the January 2018 issue of The Spectrum Monitor magazine.
[IMPORTANT UPDATE (October 21, 2018): I’m pleased to report that C. Crane have addressed issues that I found in the first production run of the CC Skywave SSB. Click here to read the update.]
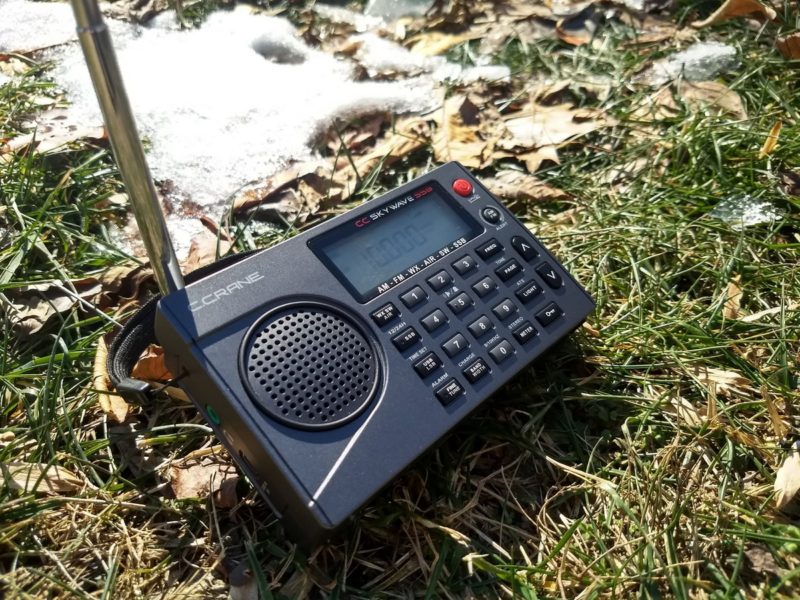
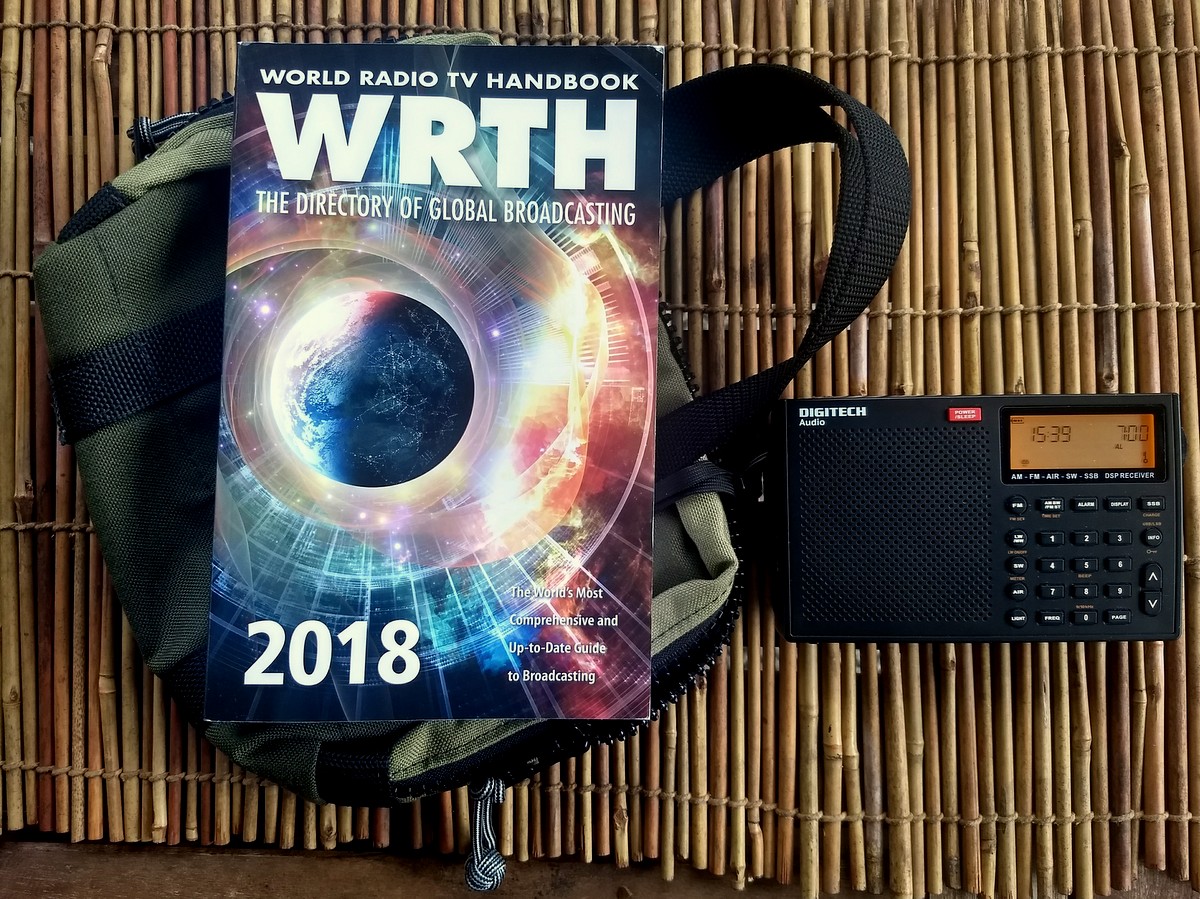
Those who know me know I’m all about travel, and all the things that make the travel experience enjoyable. I like to pack light, taking only the essentials, and if I’m traveling by air, I can easily fit two weeks of fun into one small carry-on. To me, the idea of lugging a huge suitcase, being subject to lost check-in luggage, and fretting over finding room in an overhead bin to squeeze in a huge bag simply has no appeal. Even though I often opt for the budget ticket, which means loading later, I know I can literally be the last one on board without fear because my travel bag is so compact that, if nothing else, it will fit underneath the seat in front of me.
Yet even though I travel light, I never ever travel without a radio. That’s a given in my bag. Since packable real estate in my carry-on is at a premium, I opt for the most bang-for-buck I can manage in a portable radio.
My radio travel partners
To date, I have a few favorite full-featured travel radios and know quite well both their strengths and weaknesses. Here’s a list with some notable pros and cons:
Pros: A 1990s era marvel of compact technology, it sports SSB mode, sync detection, headphone and audio out jacks, external antenna jack, and long life on two AA batteries. It has excellent sensitivity and selectivity. No muting between frequencies spoils listening pleasure.
Cons: Speaker audio is poor, no FM RDS, no weather radio, no AIR band, the battery cover may be easily broken, ribbon cable can break (in early models) and the clamshell design, while a cool feature, isn’t always practical and makes the unit feel prone to damage. Plus, the SW100 series is no longer manufactured and, due to desirability, typically have a price point well above the competition.
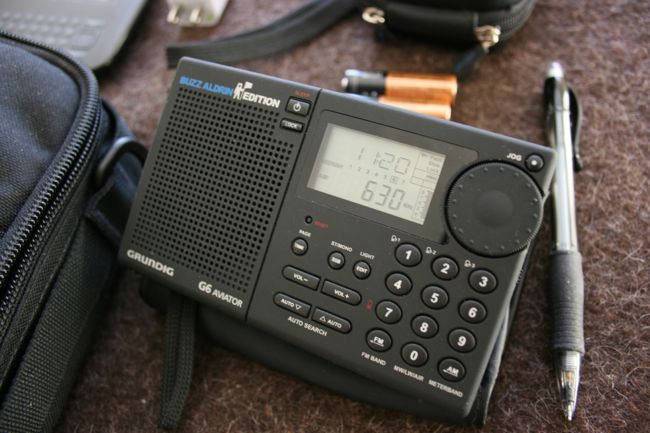
Pros: A compact, ergonomic full-featured radio which sports SSB mode, AIR band, external antenna jack, reasonable audio from internal speaker, very good shortwave and mediumwave performance for the size. No muting between frequencies.
Cons: Rubberized coating becomes sticky as it deteriorates, no weather radio, no audio-out jack, no RDS, and it’s no longer manufactured.
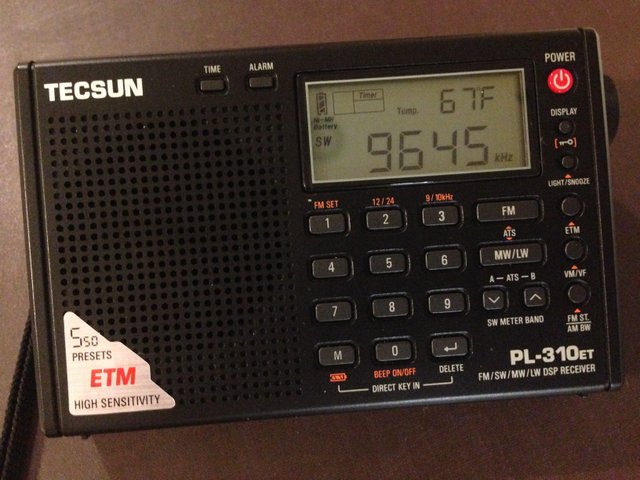
Pros: Very affordable (typically $40-50 shipped), excellent shortwave, mediumwave and FM reception, external antenna jack, average audio fidelity from built-in speaker, internal battery charging, common 5V mini USB plug, reasonably durable.
Cons: No SSB mode, no weather radio, no AIR band, no RDS, no dedicated audio-out jack, limited shortwave coverage compared with other portables 2.3 – 21.95 MHz
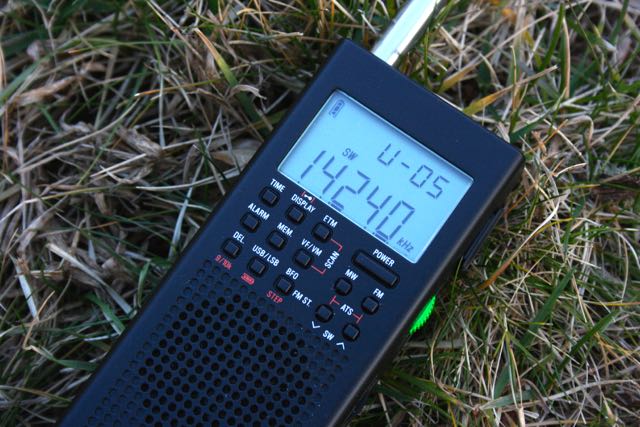
Pros: SSB mode, great shortwave, mediumwave, fm reception, vertical form factor great for handheld listening while walking/hiking, external ferrite bar antenna enables excellent AM/mediumwave reception.
Cons: Vertical form factor means it’s prone to fall over if placed on a bedside table, no direct entry keypad for frequencies, tinny audio from built-in speaker, no RDS, no AIR band, detachable external ferrite bar antenna is an extra piece to keep up with while traveling.
Pros: SSB mode, AIR mode, squelch control, FM RDS, dedicated fine-tuning control, external antenna jack, internal speaker provides better audio than other compact travel radios. Excellent sensitivity.
Cons: Slightly larger form factor than other travel radios. Somewhat awkward ergonomics. 7 VDC power port is non-standard. No dedicated audio out jack.
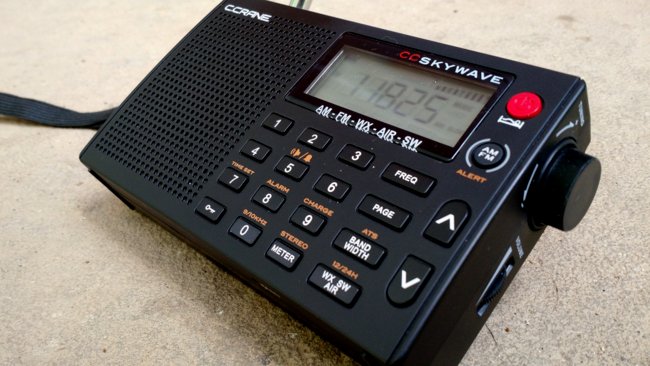
Pros: Overall excellent performance on shortwave, mediumwave, and FM. AIR band, North America weather radio (excellent sensitivity) with alerts, squelch control, common 5 VDC USB mini power port with charging capability, a great value at $89
Cons: No SSB mode, no external antenna jack, no RDS,
What radio I decide to pack really depends on the type of trip I’m taking.
If I really want SSB mode to listen to HF pirates, ham radio, or utility stations, I tend to grab the Sony ICF-SW100, the Grundig G6, or more recently, the Digitech AR-1780 [and now the XHDATA D-808].
If I plan to do extended hiking or walking during my trip, I might grab the CountyComm GP5-SSB.
If I only plan to listen to AM/FM/SW broadcasts, and it’s a short trip––or one during which the radio might receive rough treatment––then I might grab the Tecsun PL-310ET. If I leave the PL-310ET in a hotel or drop it, I’m only out about $40. I’ve even been known to simply give one of these to someone, like a kid for example, who shows a fascination in shortwave radio.
If I plan to do off-air audio recordings during my travels, then the Sony ICF-SW100 because it’s the only radio with a dedicated audio-out port. Plus, it’s a great performer.
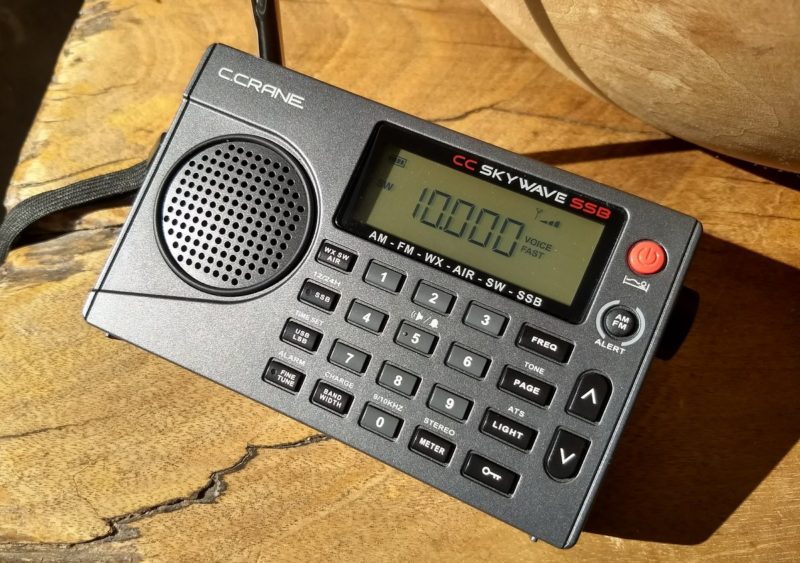
If I’m travelling by air, however, I almost always choose the CC Skywave: its unique combination of AM/FM/SW coverage, NOAA weather, and AIR band are simply hard to beat. It’s compact, durable, and gets the job done. Plus, the Skywave seems to operate for ages on a set of AA batteries. C. Crane really knocked it out of the ballpark with the CC Skywave.
But there was one glaring omission on the original CC Skywave: Single-sideband (SSB) mode.
Enter the CC Skywave SSB
Earlier this year, I learned about a new radio in development at C. Crane: the CC Skywave SSB. I saw a Beta unit very early on and a few weeks later, knowing how much I appreciate the original Skywave, C. Crane asked me to help test the new Skywave SSB. I was happy to do my bit.
I actually do quite a bit of alpha- and beta-testing for manufacturers. While it’s time-consuming volunteer work, and requires meticulous attention to detail––even seemingly minor details––it gives me an opportunity to have meaningful positive impact on an upcoming product. Manufacturers that actively involve enthusiasts in their testing phase tend to produce better quality. I wish all manufacturers did this (yes, Tecsun, I’m looking squarely at you!).
After the Skywave SSB arrived, I started putting it through its paces. Typically, pilot run units have quirks and glitches buried in non-standard operating procedures. Try as I might, I couldn’t find any on the Skywave SSB. I’ve since learned that C. Crane invests heavily in pre-production testing; I saw their full list of iterative notes, and they were incredibly detailed. Result? No obvious problems. I’ve always believed that while C. Crane doesn’t always produce the most affordable products––nor do they stuff every bell-and-whistle into them––what they do produce is well thought out, user friendly, well documented, and performs at or near the top of its class.
Features
The CC Skywave SSB comes with a surprising amount of features for such a compact radio. Many of these features are also found on the original CC Skywave.
I’ve placed upgraded features in bold:
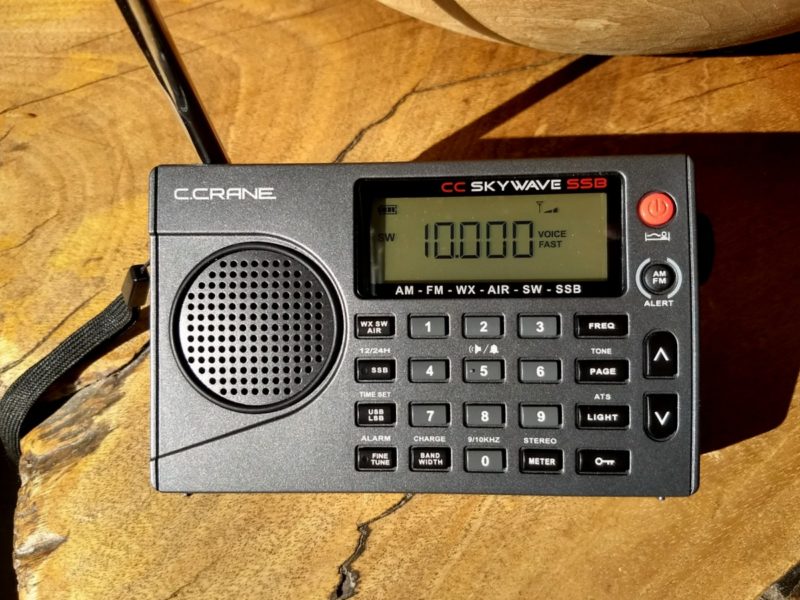
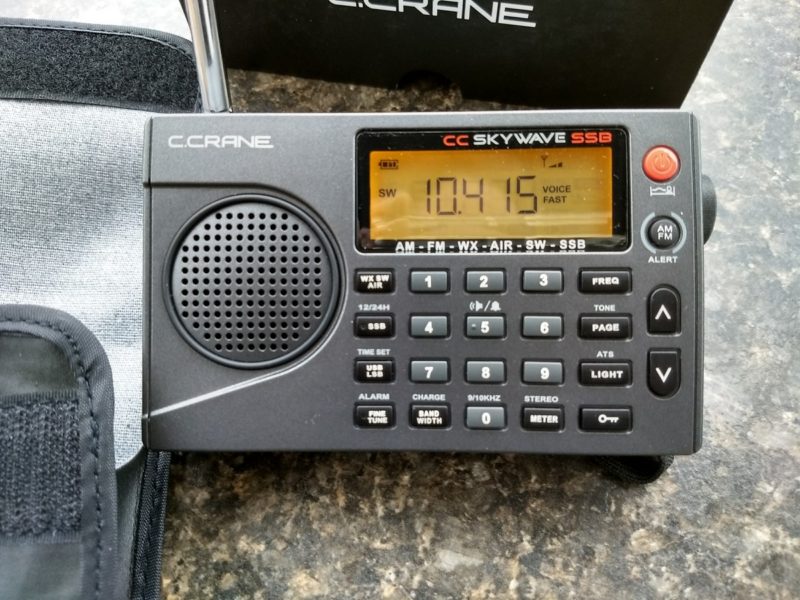
AM, FM, NOAA Weather band plus Alert, Shortwave (1711-29.999MHz) with SSB mode, and Airband
Frequency direct entry, plus auto scan and store
Lighted LCD display
Selectable fast or fine tuning (on all bands except weather)
Dedicated fine tuning control, selectable on front panel
400 memory presets
Runs on 2 AA Alkaline batteries (not included)
(Optional) CC Skywave AC power adapter w/ mini USB plug required for charging NiMH batteries.
Stereo headphone jack and fold-out back stand
Clock with 12/24 hour format and alarm
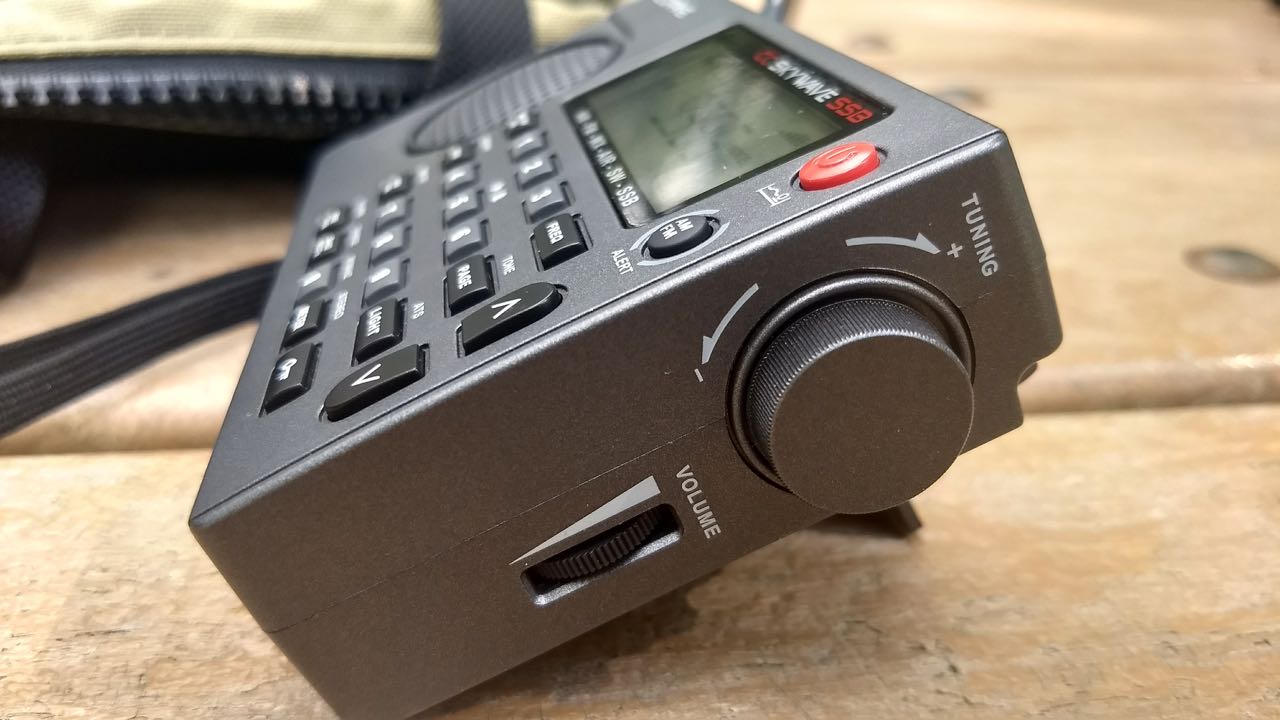
Rotary volume knob
Squelch control
High quality CC Buds Earphones and radio carry case included
Run Time (on batteries––approximate):
± 70 hours (earbuds)
± 60 Hours (built-in speaker)
10 Aviation Memories can be scanned for activity
You’ll notice there are actually very few obvious upgrades from the original Skywave to the Skywave SSB: just SSB mode, expanded HF coverage (from 1,711 to 29,999 kHz), and dedicated fine tune button/control. I’ve also learned that aviation band scanning is much faster on the newer model than on the original Skywave.
Other than those items, in terms of features, it’s very similar to the original CC Skywave.
Appearance
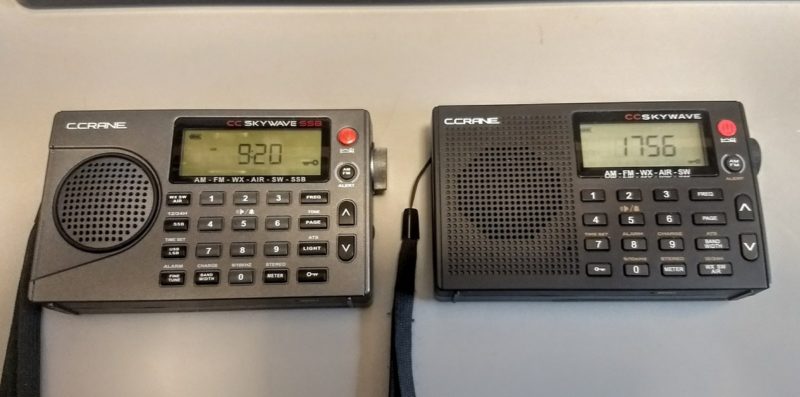
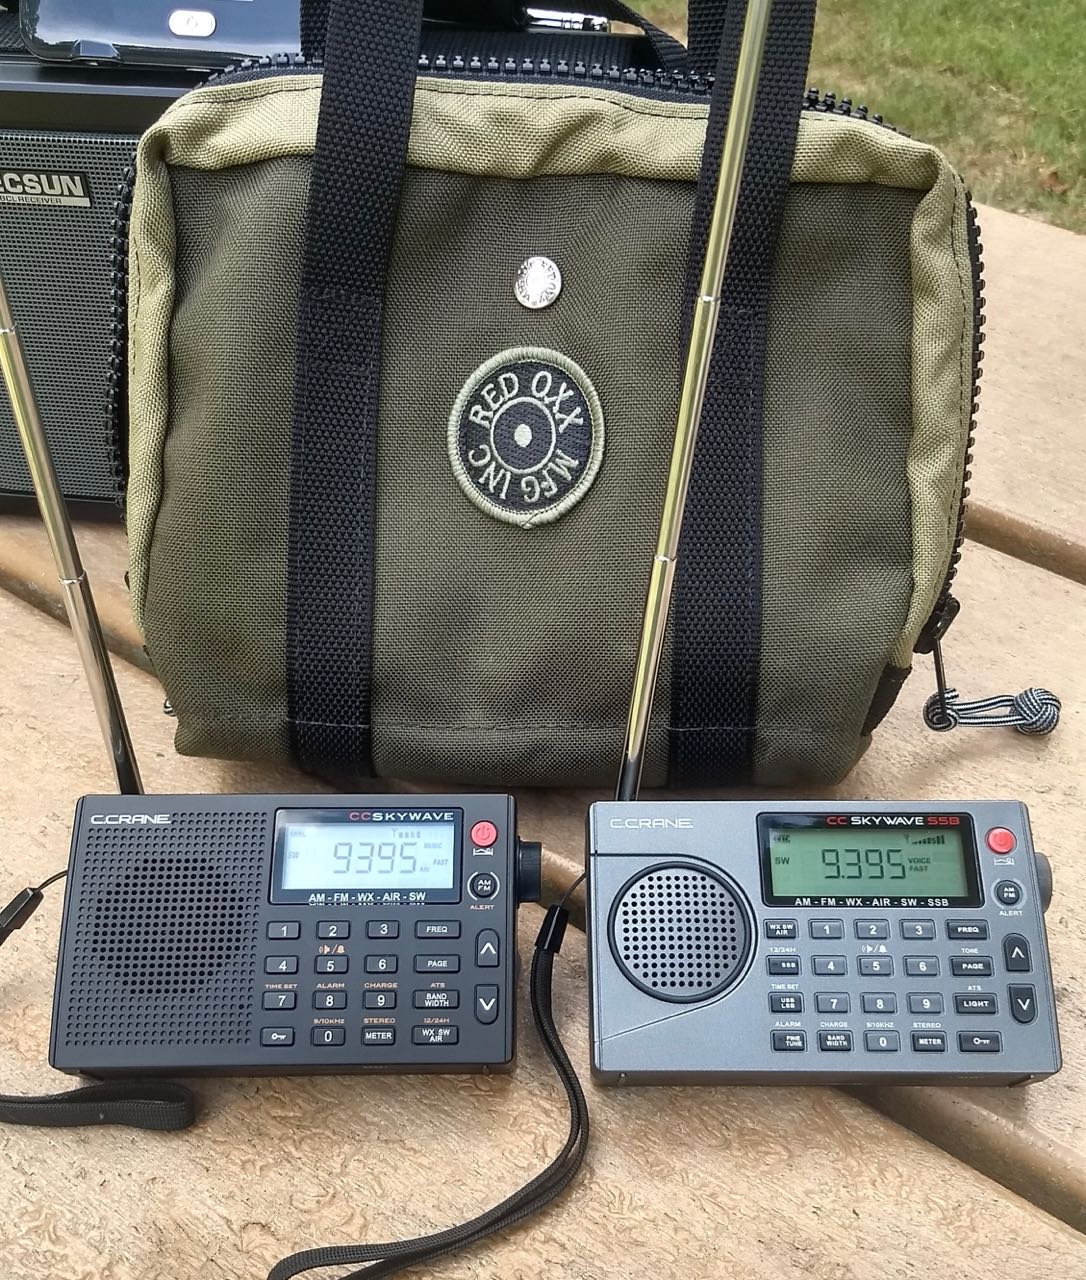
CC Skywave SSB (left) and the original CC Skywave (right)
The original Skywave and Skywave SSB are nearly identical in terms of form factor; overall dimensions are identical (4.8″ W x 3″ H x 1″ D), although the Skywave SSB weighs 1.2 oz more than the original––a difference that’s scarcely detectable.
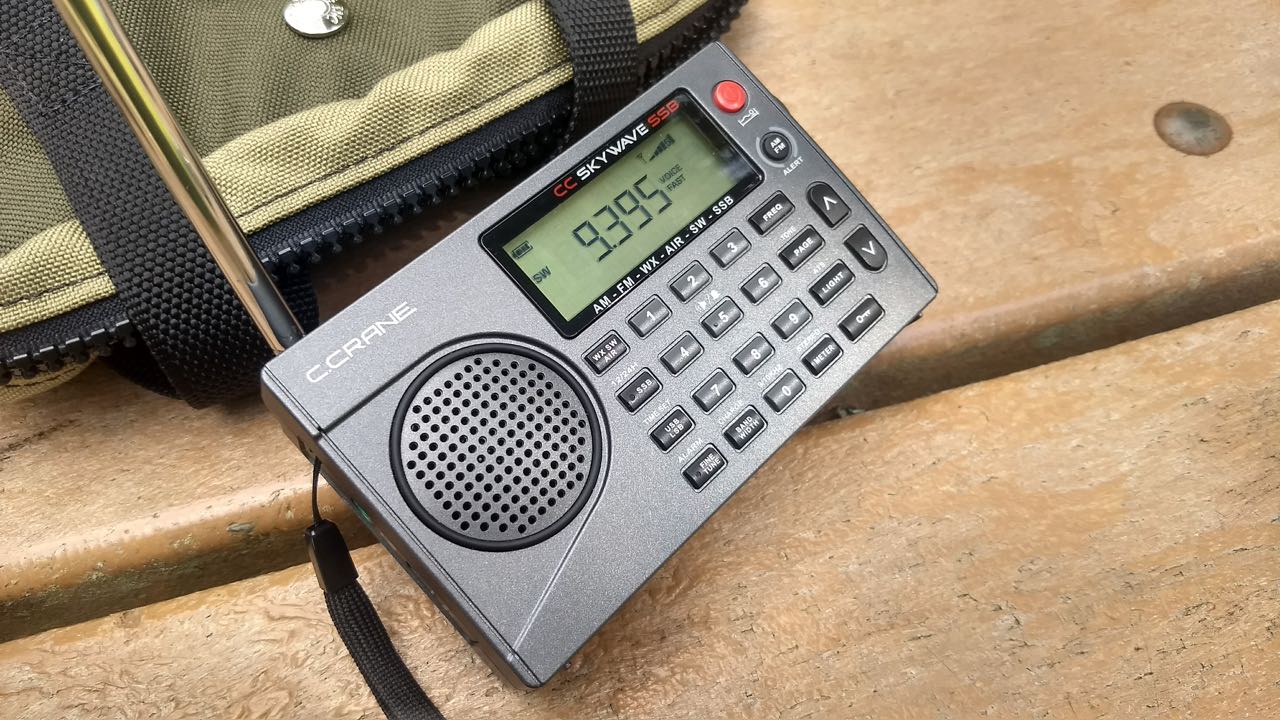
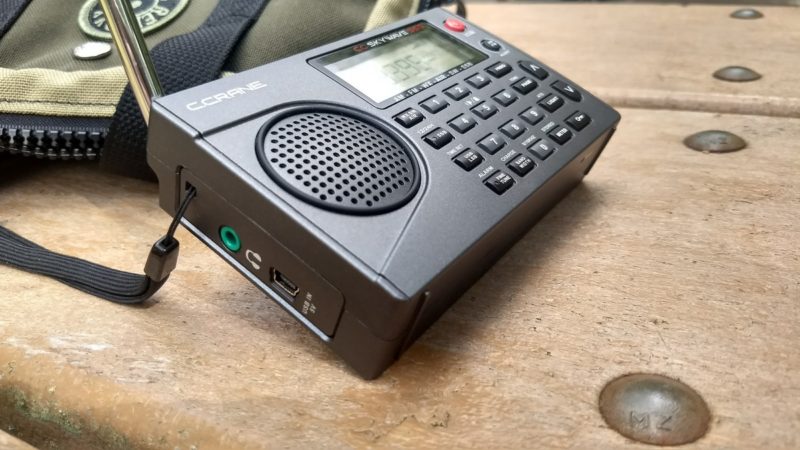
The tuning knob, volume control, power port, and headphones jack are in the same places on the SSB. The chassis color is different, however; the original Skywave is black, whereas the new Skywave SSB is grey––a dark warm or “dim” grey,” to be accurate.
Original CC Skywave (left) and CC Skywave SSB (right)
Where one finds the true difference between the new Skywave SSB and its predecessor is on the front panel. The Skywave SSB has dedicated buttons to enable both SSB mode, select upper or lower sideband, and a fine-tune control. The Skywave also has a dedicated backlight button. This accounts for a total of four additional buttons compared with the original Skywave.
In a rather nice touch, both the SSB and fine tune buttons have tiny red LED indicators to let the user know when they’re engaged.
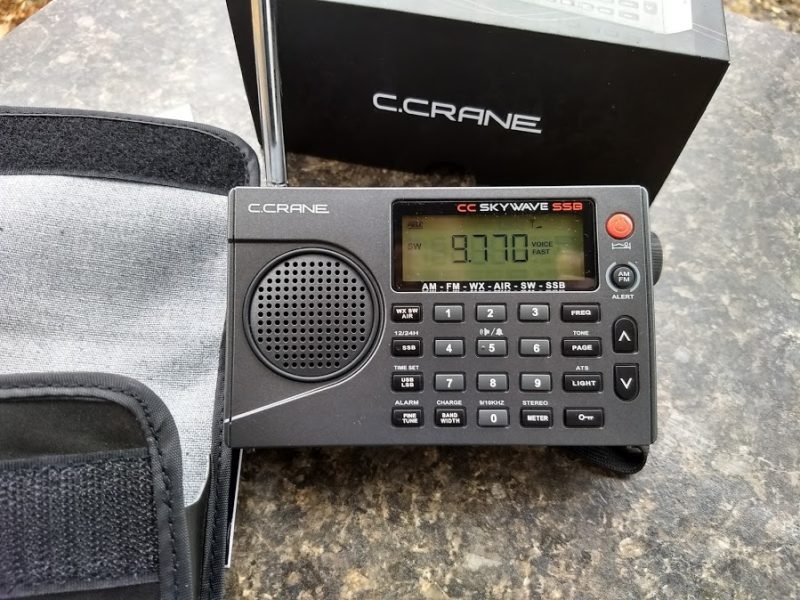
The CC Skywave SSB also has a redesigned speaker grill which more closely resembles the grill on their CC Pocket radio. Much to my surprise, once I shared detailed photos of the CC Skywave SSB, many of my readers expressed their disappointment with the speaker design. Many claimed it looked “cheap” as compared with the original Skywave and thus felt the chassis might be more subject to breakage. Some even got the impression that the speaker grill was raised in a way that it would lend itself to harm.
Actually, this is not accurate. Though it may appear that the speaker grill is elevated in photos, it’s actually in a recessed portion of the chassis and surrounded by an absorbent rubber ring, rising only ? 1 mm above the chassis, if that. And the hard plastic case feels as solid and robust as any portable I’ve tested. I wouldn’t hesitate to toss it in my pack.
Personally, I think the Skywave SSB is a handsome little radio! Perhaps I’m not as sensitive as others about chassis design, but I’m actually happy it’s not a clone of the original Skywave, making it much easier for owners of both models to distinguish them when packing!
From Pilot/Beta to production
While C. Crane allowed me to post a number of photos once the product announcement had been made, I would not publicly comment on performance. Indeed, I never post performance comments about pre-production units since I wouldn’t be evaluating the same product that hits the store shelves.
So once C. Crane posted an ordering page for the Skywave SSB, I placed an order, just like everyone else.
In truth, I was told there were only minor differences between the pilot unit and the production unit: some silk screening and other very minor changes.
Production Quirks
[IMPORTANT UPDATE: Again, please note that the following production quirks have been addressed in the second production run of the CC Skywave SSB. Click here to review the update.]
I was eager to get started on the review of the Skywave SSB, so as soon as I received it, I did what I always do: compared it with other radios!
I make my comparisons, by the way, at least fifty yards from my house to separate the radios from any inadvertent sources of local noise.
Production Radio #1
My first comparison was with the Digitech AR-1780 and the original CC Skywave. I quickly noted that the Skywave SSB was very slightly less sensitive than the other radios. I had tested the pre-production unit enough to know that the Skywave SSB’s performance should at least be on par with, if not a little better than, the original Skywave.
Upon careful listening, I discovered the production unit had a faint, internally-generated whine on some of the shortwave bands; when tuned to marginal signals, this whine manifested in the form of variable background noise. Between signals it was audible as a faint background whine, hardly noticeable. With that said, the whine was most notable while tuning––since the Skywave SSB mutes between frequency changes, the whine was most conspicuous during audio recovery between steps.
The pre-production unit had no trace of an internally-generated whine. Audio was very clean in comparison.
Here’s a sample of the first production radio being tuned down from 10,000 kHz in 5 kHz tuning steps:
I contacted C. Crane promptly, and to their credit, they immediately dispatched another unit from inventory, via UPS Next Day, along with a return label to send my faulty unit back to their engineering team.
Production Radio #2
The second unit arrived while I was on Thanksgiving vacation, but was sent to me directly at my hotel. The day I received the replacement Skywave SSB, I put it on the air. The first listening session with it, alone, revealed that this unit did not have the internally-generated whine, however, this unit had issues with sensitivity. All of my comparison receivers were outperforming this Skywave SSB on the shortwave broadcast bands. When I compared it with the pre-production Skywave SSB unit and the first production unit, the second production unit was about four to five S-units less sensitive…Odd.
I sent both production radios back to C. Crane with detailed notes and sample recordings. Their engineering team confirmed my findings and started looking into the variations in QC and double-checking their inventory to make sure none shipped with these problems.
Production Radio #3
A few days later, I was sent a third production unit. After putting it on the air, I immediately noticed the same faint noise characteristics of my first full production unit, which is to say, the notorious whine.
Once again, I contacted C. Crane. This time, I requested that no less than three radios be sent to me, and that they kindly expedite the request.
Production Radios #4, #5, and #6
I tested all three radios from this final batch of production units. What follows is an assessment of those radios.
First production run noises
I spent two full hours searching for birdies (internally generated noises) and other anomalies on the three CC Skywave SSB production units I received that Monday. Each radio’s noise location varied slightly (within 20-40 kHz).
Birdies
Birdies are a fairly common occurrence among sensitive receivers, and the CC Skywave SSB has about an average number. Fortunately, the birdies I noted are outside the space where I do my broadcast listening:
2,305 kHz
9,220 kHz
11,520 kHz
Background audio whine/tone
All of the production units (save Radio #2) had a very slight audio whine present––either via the internal speaker or headphones––on certain portions of the spectrum.
In the first full production unit I received, I believe this whine may have slightly affected the unit’s overall sensitivity. On the last three production units I received, the whine didn’t seem to have as much of an impact on overall sensitivity.
The whine is still there, however. And occasionally when the unit is tuned to a weak signal within one of these zones, other faint sweeping noises can be detected in the background.
Sometimes it’s even more noticeable when the broadcaster is weak and is located within one of the “whine zones.” Here’s an example of 10 MHz WWV time station comparing the original Skywave with the Skywave SSB. Note that at the time this was recorded we had terrible propagation due to a geo storm, so WWV was very weak, indeed.
Here are the frequency ranges where I noted the background whine:
7,830 – 8335 kHz
8,610 – 8,690 kHz (note: very faint)
9,770 – 10,415 kHz
11,585 – 11810 kHz
Another oddity is a noise I found prevalent on CHU Canada’s 7,850 kHz frequency. I’m guessing it may be due to the presence of a DSP birdie on top of a relatively strong broadcaster.
Here’s a video comparing the original Skywave with one of the production models:
I noted no birdies or noises on the mediumwave band.
I’ve no doubt, C. Crane will tackle these issues and solve them by the time the second production run ships.
In the meantime, I’ve become somewhat of an expert on the CC Skywave SSB, having evaluated a total of seven models and spending more time evaluating them than I have any other portable.
Let’s take a look at what we can expect from the CC Skywave SSB with these first production quirks aside.
Audio
Like its predecessor and many other travel radios (the Digitech AR-1780 and XHDATA D-808 being notable exceptions) the Skywave SSB’s audio from the internal speaker is adequate. It’s just shy of what I would call “tinny” because it does cover the mid-range . For spoken word content in AM and SSB, it does the job quite well. With music, you simply can’t expect any bass notes or room-filling audio. But then again, in a compact radio, my expectations are simply lower. The Digitech AR-1780 and XHDATA D-808 have the best audio of my compact travel radios, but they’re also the largest, so have a slightly bigger speaker.
I did note a minor amount of background hiss present somewhere in the audio amplification chain on the first production run units–most noticeable via headphones.
With the supplied CC Buds, you’ll be a happy camper.
Audio sounds rich via the headphones jack.
Performance
Of course, what we all want to know is how well the CC Skywave SSB performs. In a nutshell (spoiler alert!) it’s very similar to the original Skywave.
I break this down band-by-band below, starting with my favorite band.
Shortwave
Keeping in mind the frustrating experience with quality control, when I received the final three production units, I was very pleased with performance on the shortwave bands. The AGC characteristics are relatively stable, making weak signal listening a pleasant experience. Even though the Skywave SSB lacks a synchronous detector, I found that stability––even with periods of notable selective fading––is impressive.
In the realm of compact travel radios, both my pre-production and (better functioning) production models are strong performers. The Skywave SSB is slightly less sensitive than my larger, full-featured portables like the Tecsun PL-660, PL-680, PL-880, and Grundig Satellit. All of these radios, however, have longer telescoping whip antennas. If I add the gain from the included CC Reel antenna, the Skywave SSB can even hold its own with many of these.
I’ve been very pleased with the original Skywave for broadcast SWLing for a few years now. I’m happy to report that the Skywave SSB offers an incremental improvement over the original Skywave.
FM
Much like other modern DSP portables, FM performance is stellar for such a compact radio. The Skywave SSB was able to receive all of my benchmark FM stations. While audio fidelity from the Skywave SSB’s internal speaker is not a strong point, via headphones you’ll be quite pleased.
AM/Mediumwave
I’ve found the Skywave SSB to be capable mediumwave receiver. Performance characteristics are very similar to the original Skywave and the AGC settings even make MW DXing a pleasant experience. Since the internal ferrite bar isn’t terribly large, better performance can be achieved by coupling the Skywave SSB to an inexpensive loop antenna, like the Grundig AN200 AM Antenna.
Weather radio
Like the original Skywave, the Skywave SSB is an impressively capable weather radio receiver. From my home, I’m able to pick up a marginal NOAA weather radio frequency that most of my other weather radios cannot. The Skywave SSB also includes a handy weather alert feature that will monitor your chosen NOAA/Environment Canada frequency and wake up the receiver if an alert is issued.
Note that the weather alert feature works on a timer and, most importantly, if operating from battery, drains batteries as quickly as if you were monitoring a live station with the squelch open.
AIR band
While I didn’t compare performance with a triple conversion scanner, I’m favorably impressed with AIR band performance. During my tests, I noted no imaging or overloading on the AIR band, a very good thing. Additionally, the Skywave SSB offers improved scanning features for the AIR band, making it easier to monitor ground, tower, and even approach/departure frequencies at larger airports. When employing the squelch feature, you almost get the impression you’re holding a scanner, rather than a shortwave portable, in your hands.
Longwave
Like the original CC Skywave, the SSB does not cover the longwave band. In North America, there is very little to listen to on longwave, so many consumers will never take notice. I’m sure longwave DXers will wish it was a part of the package, however. Admittedly, when I’m traveling in Europe and other parts of the world where there are still stations on longwave, I’ll certainly miss the band.
Comparing to other compact travel radios
Trying to decide if the CC Skywave SSB will have the performance characteristics to displace my other travel portables, I compared it with the radios I mention at the beginning of this article.
In terms of overall sensitivity and selectivity, the CC Skywave SSB essentially runs neck-and-neck with, or in some respects slightly edges out, the Tecsun PL-310ET, Grundig G6, and CountyComm GP5-SSB.
However, both the Sony ICF-SW100 and the Digitech AR-1780 are more sensitive than the Skywave SSB. The Digitech AR-1780 has the best audio characteristics of the competitors, but is also slightly larger and heavier than the others.
Note, too, that the Sony ICF-SW100 and Grundig G6 are the only radios in this comparison that don’t mute between frequency changes. They’re the best band-scanning receivers.
And how does the Skywave SSB compare with the original CC Skywave? I find that the Skywave SSB has a slightly lower noise floor which is perhaps helped even further by better audio/tone characteristics. Sensitivity is about the same, but signals pop out of the background static better on the Skywave SSB.
In terms of features, the Skywave SSB likely offers the most for the traveler.
Summary
Every radio has its pros and cons, of course. When I begin a review of a radio, I take notes from the very beginning so that I don’t forget my initial impressions. Following is the list I’ve formed over the time I’ve been evaluating the CC Skywave SSB:
Pros:
Overall well thought out, considerate design
Excellent form factor for travel
Very good sensitivity and selectivity for a compact radio
Faster AIR scanning compared with the original Skywave
Better HF frequency coverage than the original Skywave (1.711-29.999 MHz, compared to 2.300-26.100 MHz)
Pleasant SSB audio
Multiple bandwidths in both AM and SSB modes
No overloading noted
Well-written operation manual
Excellent weather band reception
Nice red LED indication lamps for SSB and Fine Tune engagement
Supplied with:
a quality external reel antenna
CC Buds earphones
Soft case with Velcro closure
Excellent battery life from two AA cells (AA cells are a plus for travelers as they’re so ubiquitous)
Engaging SSB mode requires 2-3 seconds of delay (common for this DSP chip)
Some ticking noise in audio when pressing buttons (identical to the Digitech AR-1780)
No RDS
No audio-out jack
No longwave reception
ATS Scanning in 1st production run stops at 26,100 kHz
No synchronous detection (though not expected in this class of compact portable)
Shortwave ATS tuning time about half as fast as the original Skywave (original is quite speedy!)
$149 $169 price is at the top of its class
Conclusion
I love the CC Skywave SSB. Sure, I wish it had RDS, an audio-out jack, didn’t mute between frequencies, and was a little less expensive. But overall, it’s a fantastic package. I’m impressed with the amount of performance the Skywave SSB provides with such a short telescoping antenna.
Most reading this review will be scratching their heads wondering if: a) having SSB mode is worth the $60 premium over the original Skywave ($89 vs. $149)? and b) is any compact radio, for that matter, really worth $149––?
Because of how I travel, I would say that I easily use ultra-compact portables like the Skywave SSB about 70% of the time I’m found listening to portables.
When the Skywave SSB was first placed on the C. Crane website, they posted a price of $169––when the units started shipping, they reduced the cost to $149, and reimbursed those who had placed an order with the higher price. [UPDATE: Early 2018, they once again increased the price to $169.]
Though the initial $169 price made me wince a bit, I still ordered one. Why? Because to me being a traveler who loves an ultra compact, having an ergonomic, full-featured, durable, compact travel radio with SSB, AIR and NOAA weather radio is worth it!
Therefore, the CC Skywave SSB will be my travel radio of choice going forward––it’s essentially a Swiss Army Knife of a travel radio.
There’s another factor, too: I trust C. Crane. Despite the frustrating quirks I experienced reviewing my first production run units, I know C. Crane takes care of their customers in the long run, and will replace any faulty units without hesitation. They’ve taken every item of feedback I’ve provided directly to their engineers and quality-control specialists, and the work continues to resolve this radio’s concerns. If you have a Skywave SSB with noise, don’t hesitate to contact C. Crane about it.
Overall, I am optimistic about this radio. I expect the second production run will produce radios performing as they should––like the final production units I tested, but without the internally-generated noises. [Click here to read second production run update.] And if this occurs as I expect, you can expect good performers.
At any rate, I know this: I’ll be one of the first to test units of their second production run…and to let you know just what I find. (Bookmark the tag CC Skywave SSB for updates.)
As in past seasons, WRTH is pleased to announce that an update file for the B17 broadcast schedules is now available for free download from http://www.wrth.com
This update contains changes, additions and frequency cancellations; new stations that have become active since WRTH was published; and the revised full schedules of certain stations.
We hope you find this file useful as an addition to WRTH (it is formatted in the same manner as the printed WRTH), or it can be used on its own, of course.
Please forward this information to your various mailing lists and reflectors and to anyone else who may be interested.
February 13 is a day to celebrate radio, to improve international cooperation between broadcasters and to encourage major networks and community radios to promote access to information, freedom of expression and gender equality over the airwaves. The theme of World Radio Day this year is “Radio and Sports”.
As we look forward to a year of momentous sporting events, events that have the ability to unite the hearts and minds of people everywhere, UNESCO calls on all radio stations around the world to showcase the beauty of sports in all of its diversity.
Radio Romania invites you to bring your contribution to our World Radio Day show by telling us what sports topics you would prefer hearing about in our programmes.
World Radio Day, celebrated on 13 February, marks the anniversary of the first broadcast by UN Radio in 1946, when it transmitted its first call sign: “This is the United Nations calling the peoples of the world.”
World Radio Day seeks to raise awareness about the importance of radio, facilitate access to information through radio, and enhance networking among broadcasters.
To celebrate World Radio Day, we invite you, dear listeners and Internet users, to send us short messages, by email, at [email protected]
In truth, Brother Stair never really left the shortwaves. WBCQ (and others?) replayed archived Overcomer Ministry shows while Brother Stair was incarcerated.
In fact, shortly after Stair was taken into custody last month, WBCQ’s Allan Weiner–a friend of Brother Stair–shared his thoughts on the air. Overcomer Ministry still has this audio available on their website:
Screenshot taken from the Overcomer Ministry website.
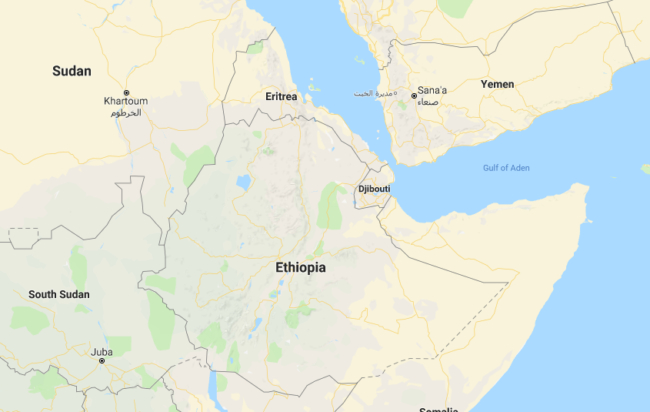
The BBC is launching new daily radio services which will be aired Monday to Friday in Amharic, Afaan Oromo and Tigrinya. The new language services have been available online since September 2017 when they launched websites and Facebook pages in all three languages.
The new radio services will provide impartial news, current affairs, features and analysis for Ethiopia and Eritrea, as well as regional and international news. There will be a strong focus on culture, health and original journalism from the region. These services are part of the largest investment in the BBC World Service since the 1940s and are funded by the UK government.
The programme will be broadcast on shortwave, satellite – and streamed directly onto each service’s Facebook page.
In addition content produced by BBC Learning English, part of the BBC World Service which teaches English to global audiences will feature prominently across the schedules for all three languages, with daily content as follows:
· Essential English – Beginners (airs on Monday, repeated on Wednesday)
A functional five-minute audio course presented by an English speaker and a local presenter, which aims to help beginners to learn English. Learners will be introduced to essential chunks of functional language, which will allow them to start having simple conversations in English immediately.
English Expressions – Intermediate (airs Tuesday, repeated on Thursday)
This five-minute audio course focusses on common expressions used in everyday English. An English speaking presenter and a local language presenter discuss the meaning and use a different expression each week.
English Together Advanced (airs Friday only)
This is a bilingual five-minute audio with three presenters (2 English and one local language) discussing a current (safe i.e. non news) topic and examining the language used in the story allowing the user the practise their listening skills and equip them with the grammar and vocabulary needed to discuss the story.
The programmes are broadcast Monday-Friday at the following times:
17:30 – 17.45: Amharic news
17.45 – 17:50: Amharic Learning English
17:50 – 18:05: Afaan Oromo News
18.05 – 18.10: Afaan Oromo Learning English
18:10 – 18:25: Tigrinya News
18:25 – 18:30: Tigrinya Learning English
Programmes will also be streamed via the respective BBC websites and Facebook pages (see links below).
Notes to Editors The Initial shortwave broadcast to go out at 17:30 GMT/ 20:30 EAT on three transmitters providing coverage across Ethiopia and Eritrea:
7.595MHz
11.720MHz
12.065MHz
Repeat to follow at 18:30 GMT /21:30 EAT
9.855MHz
15.490MHz
Satellite Radio content will go out on the following channels:
Arabsat (BADR4) – 11.966GHz, Horizontal
Nilesat 201 -11.843GHz, Horizontal
Hotbird 13D – 12.597GHz, Vertical
Evening satellite broadcast to go out at 17:30 GMT and will be repeated until 21:30 GMT.
The BBC World Service reaches a global audience of 269 million weekly, on radio, TV, and digital.
BBC World Service received further funding of £291m until 2019/20 from the UK Government to launch twelve new language services: Afaan Oromo, Amharic, Gujarati, Igbo, Korean, Marathi, Pidgin, Punjabi, Serbian, Telugu, Tigrinya, and Yoruba. This additional funding is not part of the licence fee.
Many thanks to SWLing Post contributor, TomL, who shares the following guest post:
Backpack Shack 2.0
by TomL
Like Audiophile speakers, it could be said that “antennas are forever”. They tend to not become obsolete like all of our favorite electronic gear (a good one is worth the trouble). And antennas don’t care if the signals are digital or analog formats. They are “Digital Ready” (LOL)!
Retain the broadband design of the amplified loop on a sturdy form
Shrink the size to fit into a backpack without heavy stand or long pole
Build a modular platform that would allow quick setup
Be something durable that can last me 20+ years of use
Allow the loop to be rotated and tilted by hand
Be easy to hook up to any kind of radio
and later on, Enhance the design as a true Ferrite Sleeve Loop
The Backpack: The existing photo backpack was slightly too bulky. Found on Amazon was an Adidas Excel II XXL backpack on special sale with plenty of tall compartments and minimal padding. It is surprisingly roomy and comfortable to wear with springy shoulder straps and padded mesh backside!
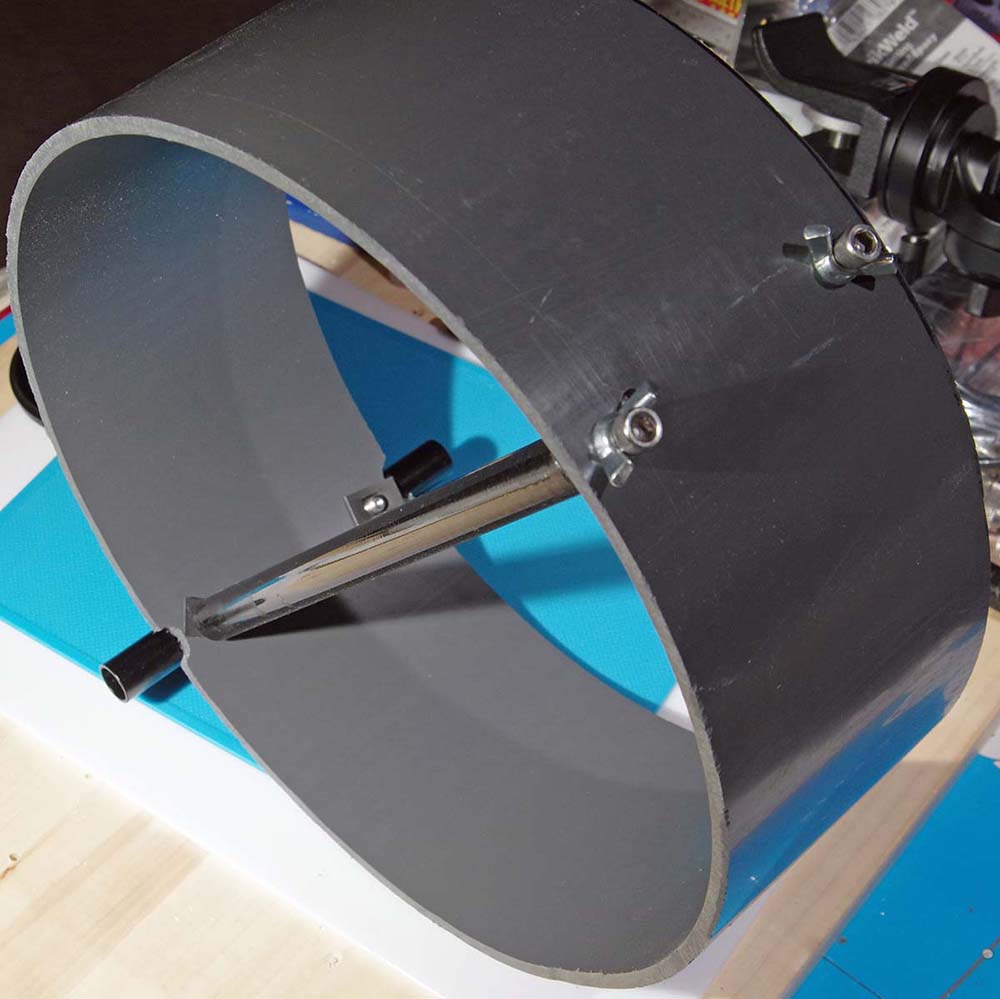
Sturdy Basic Form: The Backpack Shack loop was originally built on 14-inch quilters loops (three of them) in a parallel configuration. I thought to simplify the whole thing and just use one wide loop. But what should I use for a sturdy form? The quilters loops were too flimsy and PVC pipe was too heavy. I stumbled upon a nice company called FlexPVC which allows sales to the public of various kinds of PVC pipe. Their Thinwalled Air Duct PVC looked promising. It is thinner than regular PVC but having standard inside dimensions and comes in custom-cut lengths. I decided 10-inch diameter would fit best inside the Backpack. FlexPVC even sends you a small booklet of the U.S. Constitution and the Bill of Rights with your order! 🙂
Thinwalled PVC form
The “length” as they call it would be my form width for the copper strip. I thought 3-inch would be nice but decided 4-inch was better. Supposedly, the aperture + the width of the “radiant element” is the main design consideration for loop performance. So, I figured that as wide an element as I could get away with was better.
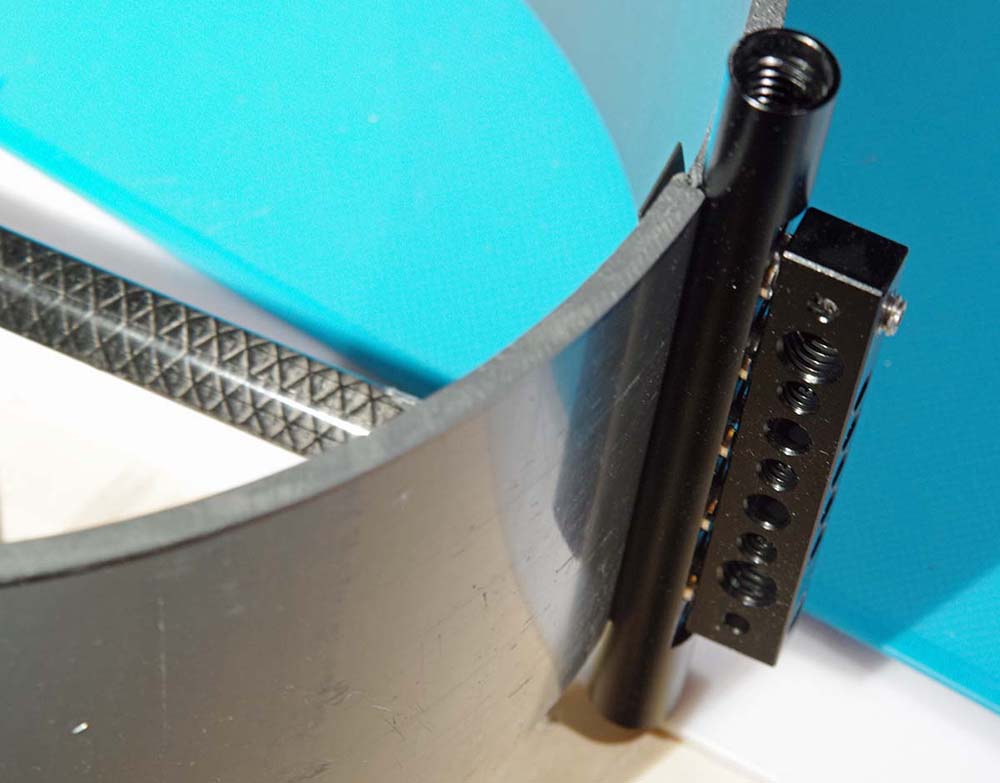
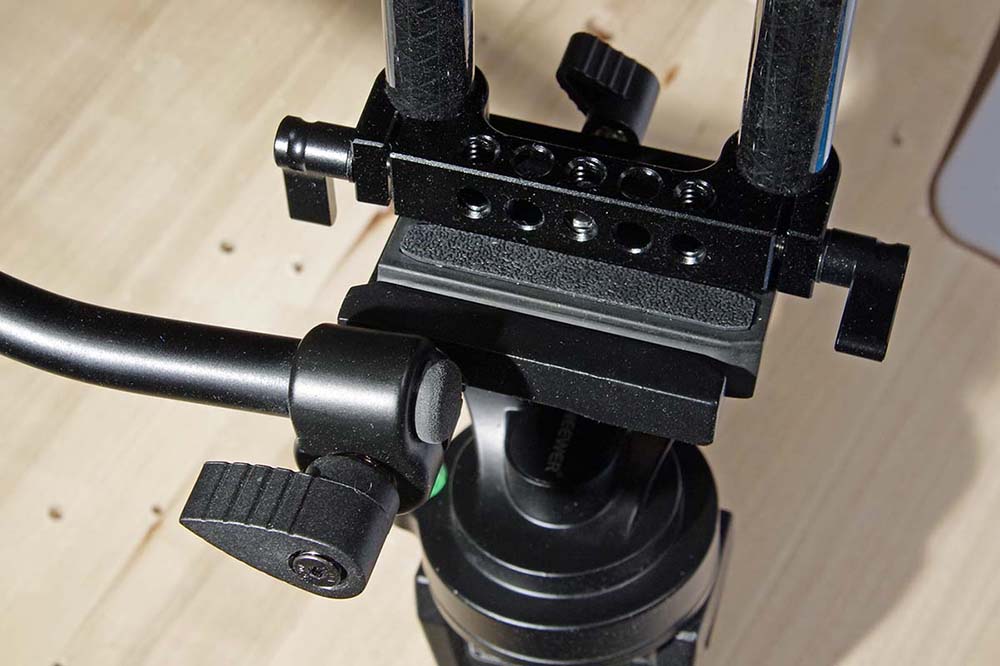
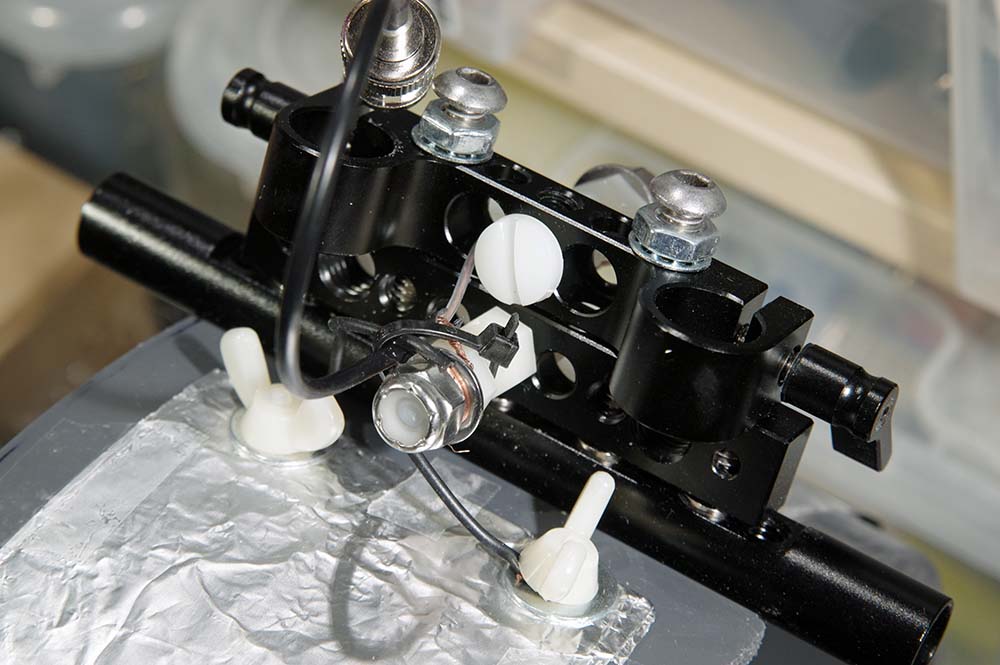
Stable Mounting: Now, how to mount this thing! I eventually went back to my photographic web links and found nice rig equipment for video cameras. The typical construct is made of 15mm tubes of aluminum or carbon fiber (CF) and fit into adapters that allow attachment to other adapters or clamps. Non-metallic CF seemed ideal, so, I ordered a whole bunch of items from eBay to experiment piecing together two 10-inch CF tubes mounted inside the PVC form. Then, I attached two 15-inch CF tubes to the bottom of the PVC with something called a “Cheese Rod” that has multiple holes. Those two tubes are attached to another “Cheese Bar” which is attached to a second Cheese Bar on a cheap two-axis tripod head. This is a simpler photo version with quick release plate that locks pan-tilt separately and only cost $16.
Cheese Rod attached to bottom of PVC
Pan-tilt head assembly with Quick Release plate
For the base, I had an unused Sirui T-2005X 5-Section Aluminum Travel Tripod going to waste, so it was pressed into service. Very good tripod: can hold 26 lbs. (forged aluminum, not cast aluminum), legs can flare out for stability, and folds to 14.5-inches. Now, everything could come apart and fit into the Excel II Backpack!
Critically, the video rig standardization in the DSLR industry allows me to pick and choose parts from any cheap manufacturer but end up with a system that looks and feels coherent, is both sturdy and light, and can come apart if needed. Also, the pan-tilt photo head is really easy to work to get maximum peak or null out of the loop when mounted to a camera tripod.
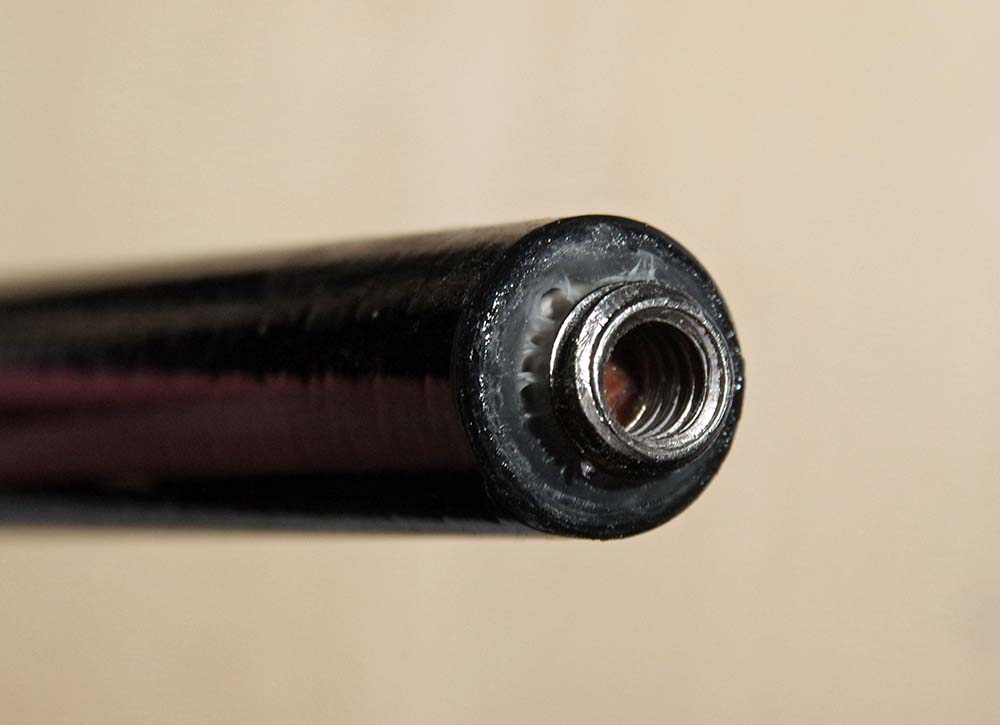
CF Problem: CF tubes have no internal threads like that of aluminum tubes. So, I attached two, small 3/8-1/4 inch tripod adapters to the ends of a 3/8-inch oak dowel inside each CF tube destined for the inside of the PVC (ridiculously, I used up almost a whole bottle of super glue to get these 4 tiny pieces to attach to the oak dowels). This is definitely a weakness of my design but I could not figure out any other way to get the CF to mount inside the PVC form. Then, added to this is something wonderful I found at Ace Hardware called “speed nuts” to help push ipwards against the incoming stainless steel socket head screws of exact length. With jam nuts, internal lock washers, wing nuts, and strategic use of Thread Locker Blue, I finally had enough confidence that this thing would hold together!!
Speed Nuts pushing upward against incoming screws
Super-glued 3/8-1/4 inch adapter on end of oak dowel inside CF tube
Bottom assembly (Cheese Rod, Cheese Bar, and 15mm Clamp screwed together + wires to a BNC connector)
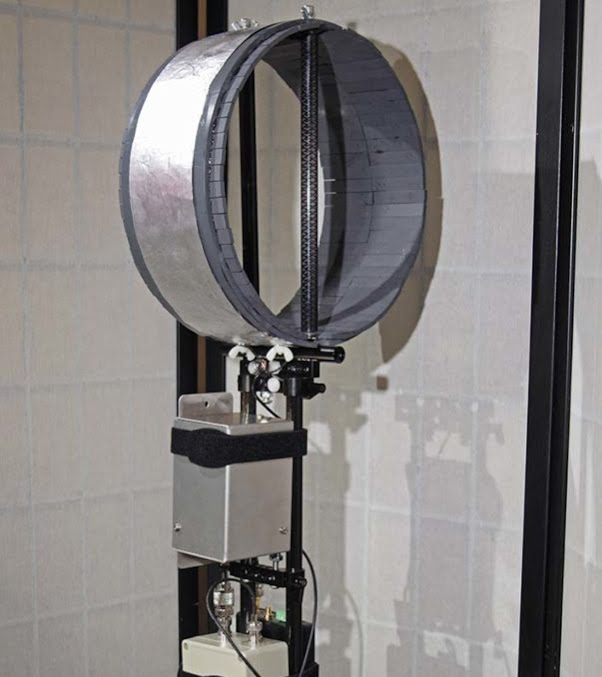
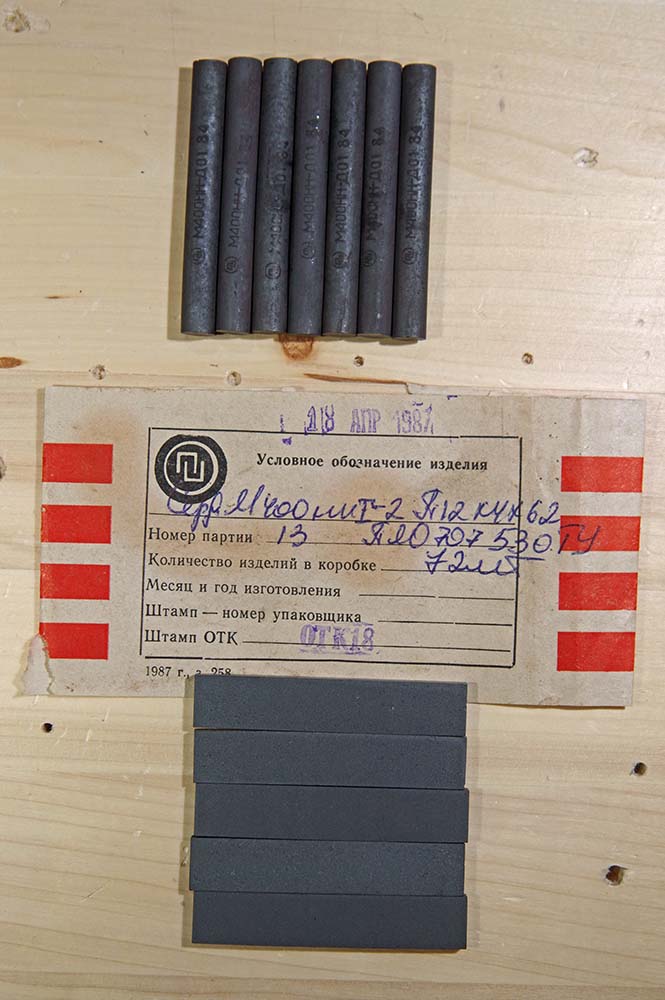
Ferrite Sleeve Loop: Halfway through this project, I became determined to use the ferrite bars and rods I had purchased from eBay mid-summer 2017 to turn this antenna into a real Ferrite Sleeve Loop but with a broadband design (At that time, I ended up purchasing the very last quantities of 62x12x4mm ferrite bars from the Lithuanian eBay seller, just because they were becoming scarce plus some other 8mm ferrite rods). The Thinwalled PVC is 5mm thick, perfect for this type of application. The video equipment could handle the extra weight. I had just enough ferrites to line the inside of this PVC form with two bars side-by-side all the way around the inside (plus some shorter ferrite rods at the top and bottom). Some quick setting JB WELD Kwik Weld epoxy made quick (and permanent) attachment of these ferrites to the inside of the PVC. Now, the bars stick out from the PVC form by about ½-inch on each side, so I do have to be careful it does not get abused and chip off any of the exposed ferrite.
Soviet ferrite bars and rods, 400 ui (initial permeability).
Note: Using Gary DeBock’s Performance estimate (diameter * length), this calculation predicts that this FSL 10.75-inch loop should perform similarly to Gary’s 10-inch models using 140mm long Russian ferrite bars (mine probably performs less than his since I am not using carefully tuned (to Mediumwave) litz wire on higher permeability 1500 ui ferrites like he does).
Preamplifier: I believe one advantage of building a portable, table-top loop antenna like this is that all the connections are short. This allows me to use a Preamp right at the connection point of the loop. Indeed, this was critical since passive testing (no Preamp, nor ferrites) found that this loop is somewhat deaf at the MW frequencies and uninspiring on the SW bands. This was true even when connected to Antenna A of my SDRPlay RSP-2 and the internal Low Noise Amp cranked all the way up. So, I ordered the DX Engineering RPA-2 Preamp. This adds to the weight somewhat since I also needed a 12V battery supply using a 10-cell holder of NiMH AA batteries and 2.1mm plug.
The question arises that I “should” impedence-match the output of the loop before anything else to increase “maximum gain”. Well, for one thing, a tuner or matching balun would just introduce loss as soon as the wire comes out at the base of the antenna. The slight net increase in gain does not seem worth it; the signal/noise ratio rarely changes when introducing a device that is meant specifically for matching a transmitter to a load. Receiver circuits don’t care as long as there is enough signal to process. That is what the Preamp is for. The Preselector is for rejecting out-of-band (i.e., increasing signal/noise ratio + eliminate overloading the electronics).
Preselector: Now that the signal level was satisfactory, I added on the Cross Country Preselector, which I like very much since it is passive, lightweight, and well made. I had looked at other amplified preselectors but found the schematics showing the preselector came first in the path. I needed the preamp first, so that is how I ended up with separate units. In fact, the reverse configuration performs with worse signal/noise ratio because of the loss inherent in the preselector. In this case, it is definitely needed to amp the loop first with a high quality preamp (high IP3 rating)!
Automatic Bypass: The Cross Country unit has a great feature in the “off” position as an automatic bypass. This feature is very important since I do not need a Preselector in the circuit all the time. The bypass feature also allows the RSP-2 to monitor a large swath of spectrum without having the Preselector cut the bandwidth. The DX Engineering RPA-2 Preamp also has a circuit bypass when the power is off – very nice feature! So, I can keep all the antenna wires connected if I don’t want to use either device on a certain band – necessary for my broadband antenna design and use with an SDR.
Modular Portability: Another advantage of a table top loop is portability. Because of the modular design, I can put this into checked baggage (except for the AA batteries and laptop) and have it available for DXing in unexpected places. It could be useful when traveling and I cannot string wire into a tree but want something better than a whip antenna on a small radio. Everything fits into the bag and can be setup on a balcony, inside a car with a sunroof, or on a park picnic table.
A third advantage is that a short antenna could be clamped to one of the tubes and then connected directly to Antenna B of the RSP-2 for listening to higher frequencies (like a Comet W100RX). This expands the usefulness of this project as a platform for multiple antennas!
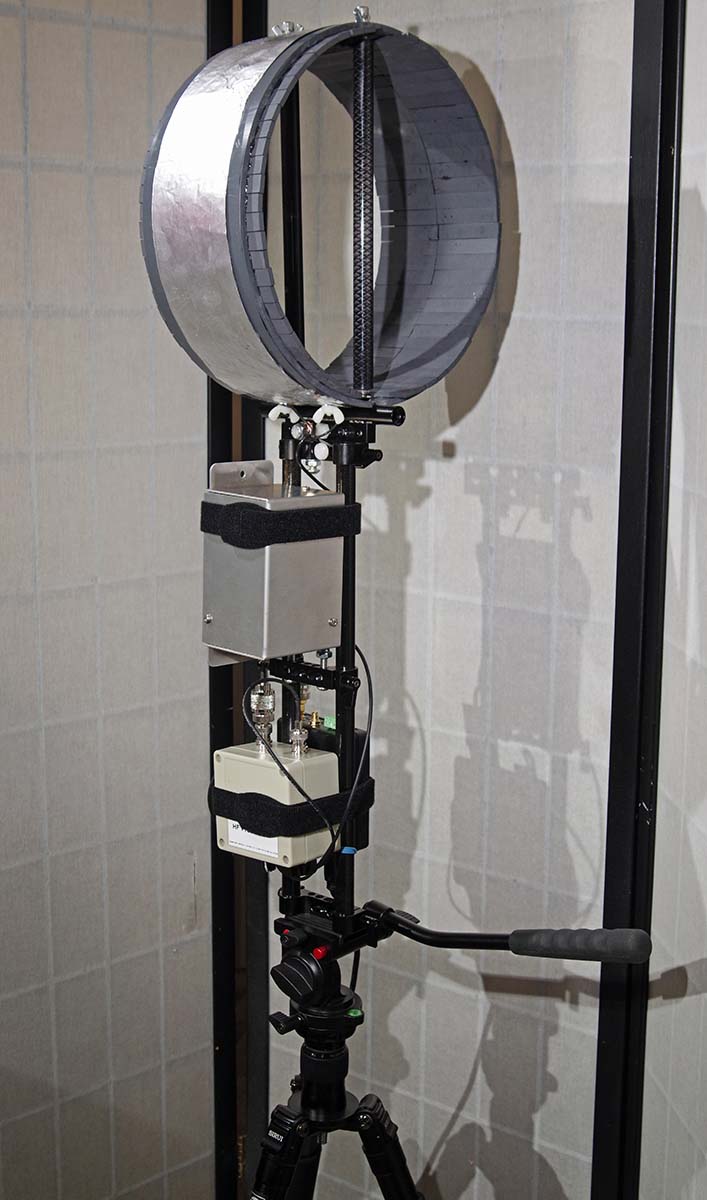
Finished Loop and accessories assembled together
Performance: Good on MW and very good on Shortwave. It is not in the league of Wellbrook antennas but it is useful as long as the RSP-2 LNA is kept down around -7 on MW and -4 on SW, else it overloads. The photo gear makes it easier to use than the original loop. I found that one side has a slightly larger receiving lobe than the other which is OK in practice. The null is very sharp and takes a little finesse to null out an offending station by almost 20 dB on MW and 15 dB on SW (the photo head can lock in place). It is handy to have the pan-tilt arm point directly at a station to maximize the null since the arm is mounted perpendicular to the loop. I will look for a clear plastic bag to cover the antenna and electronics to use in wet environments.
A larger loop would work better but this one is to use wherever I can. Also, my work laptop is noisey and shows birdies and spikes here and there on the bands, so I added a large ferrite bead to the USB computer end which helps. But I don’t have to use an SDR, I just have to change a connector and radio. It was expensive and fun to build – I guess I am just LOOPY!
Happy Listening,
Tom Lebryk
Appendix I, Field Recordings 27-Jan. 2018 between 21.26-22.36 UTC:
Note 1: All Transmitter locations referenced from web site short-wave.info at time of recordings
Note 2: My location in a shelter at Dick Young Forest Preserve (41.84334, -88.38133)
Note 3: Moderate but declining solar wind with no flares, Kp Index = Calm (1)
9.420 MHz – Voice of Greece booming in like it was next door:
10 AA Powerex Precharged NiMH batteries for the Preamp + 10x AA snap battery holder + CCTV 2.1mm snap plug
1 Cross Country Preselector
1 SDRPlay RSP-2 with SDR Console software on Lenovo laptop
1 Belkin USB printer cable with large ferrite bead looped through 3 times on computer end
1 Sirui T2005X travel tripod
1 Adidas Excel II XXL backpack (gaudy Solar Orange color!)
Velcro brand 7/8” x 23” One-Wrap velcro strips
Plus shielded cables, BNC and SMA adapters, Thread Lock Blue, tie wraps, rubber bands, super glue, JB WELD Kwik Weld epoxy, speed nuts, jam nuts, acorn nuts, wing nuts, internal lock washers, nylon nuts and screws, and 1/4”-20 socket head screws of various lengths as needed.
What a brilliant project, Tom! What I love is the fact that you consider your unique requirements prior to starting a project and base your design on your specific needs. Additionally, you see each design as an iteration. Fantastic job! No doubt, you’ll log numerous hours with this antenna in the field! Thank you for sharing your detailed design notes, process, list of materials and even audio clips with us.
Please support this website by adding us to your whitelist in your ad blocker. Ads are what helps us bring you premium content! Thank you!