Tag Archives: Shortwave Radio Reviews

Review of the Elecraft KX3: world-class transceiver, superb shortwave receiver

I originally wrote this review for Monitoring Times Magazine, May 2013 issue (pages 56-57). The review that follows has been expanded and includes updates.

The Elecraft KX3 Transceiver (Click to enlarge)

The Elecraft KX3 Transceiver (Click to enlarge)

You may have noticed that in the past few years, while more and more software defined radios (SDRs) are appearing on the market, fewer and fewer traditional tabletop shortwave receivers are being introduced. Most of the receivers in production, meanwhile, are quite mature, having been in production for years. For those of us who still have an appreciation for the traditional front panel, tuning knob, and portability of an all-in-one tabletop receiver, perhaps we should look to the active ham radio transceiver market.

Introducing the Elecraft KX3

Besides being an avid SWLer (ShortWave Listener, for the newbies out there), I’m also a ham radio operator (callsign: K4SWL). But if you’re not a ham, you may not be familiar with the innovative, US-based radio designer and manufacturer, Elecraft. First of all, note that “US-based” adjective: this is an increasingly rare phenomenon in the world of radio production, and it deserves a word of praise up front. Elecraft started life as a kit manufacturer, focusing on QRP ham-band-only radio transceivers that were effective, affordable, and maintained a very high level of performance. Their K1, KX1 and K2 transceivers are legendary, and I’ve had the good fortune to own them all at some point along the way. Their K3, introduced in 2008, became a benchmark transceiver and still tops the charts in performance; it’s truly a choice DXpeditioner’s radio.

In 2011, Elecraft introduced the KX3–a portable SDR transceiver with a full-featured knob-and-button user interface that doesn’t require connection to a computer to operate. At the Dayton Hamvention, the KX3 instantly drew crowds, as it was unlike any other transceiver on the market. I was there, and like others in the crowds around the Elecraft booth, I was eager to try out this full-featured transceiver, especially upon learning that even the basic, no-options model has a general coverage receiver. A ham transceiver with “general coverage,” incidentally, means that its receiver is not limited to the ham bands only; these receivers typically receive between 100 kHz and 30 MHz (i.e., the full shortwave radio spectrum). That morning at the Hamvention, I quickly made my way to one of Elecraft’s owners, Wayne Burdick, to ask him,“Would the KX3 make for a good shortwave radio receiver?” Wayne’s prompt response: “Yes.”

That was enough for me: more than ever, I simply couldn’t wait to get within reach of a KX3. Why? I love to travel and take radio along, but I’ve always had to haul separate transceivers and receivers for my separate-but-related hobbies: 1) ham radio and 2) SWLing. Perhaps the KX3 would suit both purposes? I was hopeful. If this was true, with a KX3, I could have a full-featured QRP transceiver and a shortwave receiver in one…and a portable one at that. Ideal!

I just had to get my hands on one to find out.

(Click to enlarge)

(Click to enlarge)

A closer look

Though the KX3 was introduced in the summer of 2011, it didn’t start shipping until a few months later, and there was a backlog of orders for it. Fortunately, my good buddy, Dave Anderson (K4SV), was among the first purchasers of the KX3, and he was generous enough (and trusted me enough!) to let me borrow it.

At first glance, the KX3 resembles just the faceplate of a tabletop radio: it has a large tuning knob, wide, clear amber backlit display, and a traditional set of function buttons and multi-function knobs…but not much else. Or so it appears, as there’s no bulky chassis. Connections for microphones, DC power, headphones, IQ out, key and PC interface are located on the left side panel of the radio, while the RF connection (a female BNC) is on the right side panel. The KX3 has built-in folding feet, quite sturdy, that allow the radio to be tilted at a comfortable angle for tabletop operation.

To best evaluate the KX3, I’ll first discuss some of the features that would interest a ham radio operator, then focus on those best suited to the SWLer.

There is a hidden keypad for direct frequency entry (notice the numbers printed next to the multi-function knobs and buttons?)

There is a hidden keypad for direct frequency entry (notice the numbers printed next to the multi-function knobs and buttons?)

Everything for the Ham

If you’re a ham, you’ll love the feature set on the KX3. It must be one of the most comprehensive set on any radio I’ve ever used. At a bare-bones level, meaning without adding any options, the basic KX3 is truly an all-in-one QRP transceiver.

Of course, it will function on any mode: USB, LSB, CW, data, AM and FM. The output power is adjustable from 0 to 10 Watts. You can easily adjust the DSP filters, AF, RF, passband, and notch all from dedicated buttons and knobs. It even has a memory keyers for both CW and voice.

You say you prefer digital modes? Not only will the KX3 natively decode RTTY and PSK31 and display the scrolling text on the display, but you can also send RTTY and PSK31 without a PC. How? Simply set the appropriate data mode and use your key to tap out your message in CW. Though you will hear the CW side tone, the KX3 will transform your code into RTTY or PSK-31, and send. Hypothetically, armed with only a KX3, you could run a RTTY contest from the field with no computer. Remarkable.

The variable DSP filtering is most impressive and the KX3’s ability to block adjacent signals is benchmarked. Indeed, if you look at Sherwood Engineering’s receiver test data rankings (http://www.sherweng.com/table.html), which are sorted by third-order dynamic range (narrow spacing), the KX3 is second only to the Hilberling PT-8000A, an $18,000 transceiver.

With the installation of the $170 optional internal automatic antenna tuner (the KXAT3), you will be able to tune most any wire antenna on the go, with no need to carry an external ATU.

In short, for the ham, the KX3 offers a cornucopia of features, too numerous to list here; but I can at least tell you that I discover something new on this radio almost every day and continue to be amazed by the features on this transceiver, especially considering that it costs only $1000 ($900 in no-solder modular kit form).

The Elecraft KX3 is built for travel and portability--here we compare its size with the Grundig G3

The Elecraft KX3 is built for travel and portability–here we compare its size with the Grundig G3

For the SWLer

We’ve talked about the KX3 as a ham radio transceiver, but how does it stack up if your primary interest is to just sit back and listen to broadcasts? Short answer: Very, very well.

The KX3 is loaded with features that would please even the most discriminating DXer.

First, on the faceplate, the KX3 has a multi-function knob that controls both the AF and RF gains. It’s very simple to use, even though I’m not a fan of switching between the AF/RF gain controls on the same knob. AF gain is what most of us refer to as a volume control and many dedicated shortwave receivers lack an RF gain control even though it’s a vital tool for broadcast listening in noisy conditions. By default, the KX3 RF gain is set to zero; turning the RF pot counter-clockwise will decrease RF gain.

Grundig G3 (left), Elecraft KX3 (right)

Grundig G3 (left), Elecraft KX3 (right)

The KX3 also has three different preamp settings, which are useful for amplifying weak stations, as well as an attenuator for local or strong broadcasters. The KX3 has passband and notch filtering, and an auto-notch function that effectively deals with heterodynes from nearby carriers. The KX3 also has DSP noise-reduction (NR) for noisy band conditions (or to help a signal “pop” out from the noise) and noise blanking (NB) for local RFI.

Many automatic gain control (AGC) parameters are adjustable, too, so they can be tweaked for AM fading and weak-signal DXing. The fact is, the KX3 has more built-in receiver controls than the dedicated tabletop shortwave receivers I’ve owned.

Audio

Left side panel of the Elecraft KX3 (click to enlarge)

Left side panel of the Elecraft KX3 (click to enlarge)

To be clear, however, there is one negative in the architecture of the KX3 when viewed through the eyes of an SWLer. The KX3 is designed around the amateur radio operator and AM bandwidth is narrower than you will find on most dedicated tabletop shortwave receivers–indeed, a commonality on any general coverage ham transceiver. The KX3’s AM bandwidth can only be widened to 4.2 kHz–a figure that almost made me dismiss this radio’s SWLing abilities out of hand. I’m glad I didn’t let that spec stop me, though: I had read many a favorable comment from KX3 owners who used the radio to listen to the broadcast bands. Their comments on the audio were very positive, and for good reason.

What the KX3 lacks in wide bandwidth is made up for by the 32-bit floating point DSP architecture. I’m not sure how, but the KX3’s audio fidelity “sounds” much wider than 4.2 kHz. Indeed, I still have a difficult time believing that the filter is not closer to 7-8 kHz in width. When using headphones or amplified speakers, the bass response rivals some of my tube receivers. There are even adjustable 8-band equalizer settings for audio to improve this even further.

In addition, Elecraft has unique audio effects available in the audio effects menu. One I’ve found very valuable in broadcast listening is called “delay,” a stereo simulation effect that broadens the mono sound in such a way that the audio sounds even richer.

Memories, scanning and tuning

The KX3 has 100 general-purpose VFO A/B memories with optional alpha numeric labels. It also supports channel-hopping or scanning within any number of labeled memory groups. Auto scan is simple and works in both muted and (my favorite) non-muted, or continuous, modes.

The KX3 can also use the “K3 Memory” application from Elecraft’s K3 transceiver, which allows for longer labels and the instant selection of desired memories from a PC. The “K3 memory” application is a free software download on Elecraft’s website.

The tuning knob on the KX3 is substantial and of good quality. It’s only slightly smaller than the tuning knob on my Alinco DX-R8T, so it’s a substantial knob, which is helpful to big (or buttery) fingers. The drag can be easily adjusted with a supplied hex wrench. The tuning rate can be adjusted to .5 kHz increments, allowing you to quickly tune through the band. The small multi-function knob next to the main tuning knob can also be set for a 1 kHz rate.

At first glance, you might not realize that the KX3 has a direct frequency-entry keypad. Check out the photo, however [MAKE REFERENCE TO POSITION ON PAGE]. The buttons and multi-function knobs in the lower left quadrant of the KX3 double as number pad, decimal point, and an “enter” button for a keypad. I thought this a bit odd at first, but now find I use this all the time.

Installing the optional ATU is very simple and requires no special tools or soldering

Installing the optional ATU is very simple and requires no special tools or soldering

Optional ATU: Worth the Cost

As I mentioned earlier, the optional automatic antenna tuner, the KXAT3, makes a lot of sense for the ham who operates portable. If you are a licensed amateur radio operator, the ATU can be a powerful tool for matching random length, or multi-band antennas to your desired broadcast band by tuning to a nearby ham band frequency. The L and C parameters of the tuner can be manually adjusted to optimize without transmitting. The user can select one of 8 L’s or one of 8 C’s parameters in the ATU MD menu entry. When an L is selected, C is set to 0, and vice-versa. However, it is not presently possible to select combinations of L and C to achieve a closer resonance. Still, selecting an L or C value in this way will provide a useful increase in gain.

In addition, if you like medium wave (MW) DXing, the ATU comes with MW (AM broadcast band) filtering that tracks the VFO, somewhat improving image rejection between 300-1,000 kHz. I have tested the KX3 on medium wave both with and without the ATU installed and find that it certainly improves rejection.

To be clear though, sensitivity decreases as you tune below 1,500 kHz. Elecraft informed me that it was necessary because the KX3 uses PIN diodes in its T/R switch, and the signal must be high-pass filtered to avoid IP2 problems with the diodes. When you tune through the 300-1200 kHz range (or so) you will certainly notice the loss of sensitivity. Elecraft also noted that selectivity in the AM broadcast band was not a major design criteria, so in this band the 160 meter low pass filter is used. This is not ideal from a harmonic rejection standpoint, and there will be some 3rd and 5th-harmonic images from strong stations. Adding the ATU helps with this. However, adding the ATU doesn’t generally improve sensitivity in this range.

The ATU is very easy to install–almost “plug and play” (see photo).

Oh, yes–and it’s an SDR, too!

As if the KX3 didn’t do just about everything, it also has a quadrature down-sampling mixer compatible with PC-based SDR (software-defined radio) applications. This means, via a shielded stereo audio patch cable and a supplied USB control cable, you can connect the KX3 to your PC and use a freeware SDR application like HDSDR to turn your KX3 into a proper software-defined receiver.

SDR functionality is limited to receiver functionality, and depending on the bandwidth and sampling rate, will be dependent on the quality of your sound card. The true benefit is the ability to see a wide–48 kHz or more–chunk of spectrum.

Summary

Every radio has its pros and cons. When I begin a review of a radio, I take notes from the very beginning so that I don’t forget some of my initial impressions. Here is the list I formed over the time I’ve spent evaluating the KX3. Note that I created this list with the shortwave listener in mind, not necessarily the ham radio operator.

I even had some success SWLing using an inexpensive whip antenna (attached via BNC).

I even had some success SWLing using an inexpensive whip antenna (attached via BNC).

Pros:

  • World class, benchmarked receiver performance powered by high-performance 32-bit floating-point DSP
  • Rich, full audio fidelity on AM despite limited bandwidth (see con)
  • AF and effective RF gain controls
  • Adjustable filters (no optional roofing filters needed for SWLing)
  • Superb sensitivity and selectivity; outperforming even my WinRadio Excalibur with weak signal DXing
  • Very low noise floor
  • Auto-notch, which helps eliminate annoying heterodynes, even in AM
  • Internal ATU option brings improved MW image rejection (see MW con) and hams have the ability to tune a random length antenna
  • Natively decode (170 Hz) 60-WPM RTTY and display it right on the KX3’s VFO B display, which is alphanumeric
  • Battery operation via 8 AA batteries
  • Lightweight
  • Dedicated headphone jack
  • For non-ham radio operators, the transceiver can be disabled and re-activated once you have a license with a simple hardware adjustment. No need to fear accidental transmission
  • For hams, or those who plan to become one, the KX3 is a QRP transceiver in the top of its class

Cons:

  • AM bandwidth limited to 4.2 kHz (see pro)
  • Hand mic connector is the less standard 3.5 mm audio plug
  • Built-in speaker is small with limited volume and fidelity–only intended as a back-up when headphones or external powered speakers are unavailable
  • AA batteries fit a bit tightly in internal holder and can present a challenge to remove
  • Medium wave reception is mediocre at best, but with the optional ATU, is improved though slightly better image rejection (see ATU pro)
  • Very slight audio whine (similar to a faint heterodyne sound) heard in some zero beat AM stations; may be fixed in future firmware update
  • No AM sync detector (AMS)

Did I buy one? Confession time

I must admit, I was appreciating my buddy Dave’s KX3 very much. Maybe too much…

I have three hobbies: shortwave radio listening, ham radio, and traveling. After using the KX3 for a few hours, I knew it would be my perfect companion. Not only is it a top-notch amateur radio transceiver, its also an excellent shortwave radio receiver. It’s portable, but also makes an excellent tabletop radio. It’s an all-in-one radio, but can also double as an SDR when connected to a PC.

So, is the KX3’s broadcast audio fidelity as good as a purpose-built broadcast receiver like the legendary Drake R8B? Not quite. But I would argue that its ability to receive weak signals would give even a Drake a run for its money. I have to admit, the KX3 receiver outperforms my Alinco DX-R8T in every respect. Even though the AM bandwidth is limited to 4.2 kHz, I think the audio also sounds better than my Alinco and any of my portable radios with wider bandwidth.

The Elecraft KX3 Transceiver (Click to enlarge)

My Elecraft KX3 Transceiver (Click to enlarge)

Needless to say, I bought one. It was only fair to Dave, who needed to discover for himself what his loaned-out rig could do.

The KX3 is a game changer for me. Though I’ve always carried portable transceivers in my travels, I’ve also had to carry a separate tabletop receiver and an SDR or portable radio for my SWLing. No more. Moreover, I like the broadcast audio on the KX3 well enough to record and archive shortwave broadcasts, which I frequently do for my blog, The SWLing Post and The Shortwave Radio Audio Archive. In my shack, I’m even considering purchasing Elecraft’s 100 watt amplifier and doing away with my 100 watt tabletop transceiver.

As for support? No worries there. I’ve been an Elecraft customer for years and I can tell you that they believe in and stand behind their products. I purchased with confidence.

I encourage you to try on the KX3 as well. It may very well be all the radio you’ll ever need.

A review of the Lowe SRX 100

The Lowe SRX 100 shortwave receiver (Click to enlarge)

The Lowe SRX 100 shortwave receiver (Click to enlarge)

I recently had the opportunity to spend some quality time with the Lowe SRX 100 (a.k.a., Target HF3, AKG HF-3, and Garex HF-3), a receiver produced in the UK around 1995-96. It’s not know for being a DXing machine, but virtually any Lowe product has a certain nostalgia factor, not to mention, collectability factor. As you can see in the photo on the right, the SR 100 is a very simple receiver, and as such, it’s just the type for which I have a personal affinity.

The antenna connection and attenuation switch on back panel of radio. (Click to enlarge)

The antenna connection and attenuation switch on back panel of radio. (Click to enlarge)

When I first brought the SRX 100 home and hooked it up, I used the supplied 10 meter antenna wire that Lowe shipped with all of these units when new. The antenna wire has the correct fitting for the antenna connector on the receiver:  an RCA type connector, instead of the more common SO-239 or BNC.  A bit strange. But nonetheless, I hooked it up, plugged in the supplied AC adaptor, and turned on the radio…to find I received nothing but loud static. I live in a fairly RFI-free house and area, but the supplied antenna was so good at receiving noise that I thought the receiver was “deaf” and broken. I decided to give it another chance:  I took the SRX 100 into my radio room and hooked it to my large, external horizontal loop antenna; lo and behold, it came to life!  Needless to say, it was a relief.  (I later learned that many others have experienced this symptom with the supplied antenna.)

(Click to enlarge)

(Click to enlarge)

Basics

The SRX 100 receiver coverage is from 30 kHz to 30 MHz, in one-kHz steps. The receiver is a dual-conversion design with the first intermediate frequency at 45 MHz, and the second at 455 kHz. During the past two months of use, I have noticed no serious overloading.

The bandwidth, however, is fixed in AM and SSB–there are none of the wide and narrow settings we’re used to seeing on modern portables, let alone tabletops. I found, though, that for broadcast listening, the AM filter is near ideal so long as no adjacent signals are present. In crowded conditions, you can tune off-frequency to decrease interference unless your desired signal is sandwiched between two others.

The sound quality is a major plus. My unit reminds me very much of the mellow sound I got out of my Palstar R30C; it has almost a tube-like quality.  And in my book, that’s a huge compliment.

Tuning around

photo_4As simple as the Lowe SRX 100 is, tuning it can take practice. First off, the tuning knob is substantial, with a weighted feel–it spins freely and hints of quality workings within.  The actual tuning encoder, moreover, is quite clever.  I thought it odd that this radio had no band switching–to permit moving from meter band to meter band, or even in 1 MHz increments–instead, it is adaptive, something I hardly recall in a receiver from this era. If you tune the SRX 100 slowly, you will move in 1 kHz increments; speed up, and you can skip in steps of 10, 100 or 1,000 kHz steps. So, if I wanted to move from the tropic lower bands up to 11 meters, one really quick spin will get me there in a second. While this seems intuitive, in practice, any jerky movement of the tuning knob will shoot you right past the desired frequency into the hinterlands.

Also, 1 kHz increments in single side band can seem like a large tuning step on a modern tabletop radio.  The SRX 100 gets around this with its “Clarify” knob, which allows for fine tuning. The LDC display, though, does not reflect any incremental changes with the clarify knob.

Back panel of the Lowe SRX 100 and RCA to BNC adapter (Click to enlarge)

Back panel of the Lowe SRX 100 and RCA to BNC adapter (Click to enlarge)

Sensitivity-wise, the Lowe SRX 100 is quite respectable in the lower bands, but above 15 MHz or so, started to drop off a bit. Selectivity-wise, you will have no contest grade receiver here. For most broadcast listening, it does quite well, even on medium wave.  But on SSB, it’s simply disappointing in crowded conditions. Forget CW listening unless your “internal filter ” (your brain/ears combo) can cope with multiple signals at once.

Every receiver has pros and cons; I started noting them from when I first tuned on the radio:

Pros:

  • Simple design–even grandpa can figure out these controls without cracking open the manual
  • Nice weighted tuning knob
  • Easy to read LCD display (see con)
  • Tuning rate is adaptive to spin rate of tuning knob
  • Pleasant, mellow audio from its built-in speaker, reminiscent of the Palstar R30 series
  • Compact size for a tabletop receiver
  • 12 VDC power supply and current are only at 300 mah
  • Sturdy metal chassis and build quality excellent
  • Attenuator switch (Con: on back of unit)
  • Even at time of production, this was a relatively inexpensive tabletop with reasonable performance for price

Cons:

  • No adjustable bandwidth
    • SSB bandwidth too wide for listening to CW if any adjacent signals are present
    • AM too wide if competing station within 5 kHz of either side of desired carrier
  • No back lighting on display (see pro)
  • Clarifier only marginally effective on SSB signals
  • Only 10 memory positions
  • Adaptive tuning rate takes practice to become fast and accurate (see pro)
  • Non-standard RCA type antenna connector (will require an adapter for most people)
  • Supplied 10 meter length of antenna wire with RCA plug is useless in most environments
  • No bail

photoSRX100FrontPanelSummary

This is a fun little radio!  Even thought it’s a tad quirky, it may just be the best shortwave radio for an armchair shortwave radio listener, someone who wants an uber-simple design and small footprint. If you find used one on eBay, or with a company like Universal Radio, it may make a nice working addition to any shortwave radio collection.

A review of the Degen DE1129 portable shortwave radio

My Degen DE1129 as tested (Click to enlarge)

The Degen DE1129 is the latest compact, full-featured, DSP-based, AM/FM shortwave radio from Chinese manufacturer, Degen.  It’s available from TecsunRadio.com at $100 US, shipped. I received my sample radio last week, and published my initial impressionsof the unit. Since then, I’ve had time to put this tiny radio through its paces and learn the functions of the various buttons labeled in Chinese, which I don’t read. In the following review, we’ll study the positive characteristics–and the drawbacks–of this little radio.

Getting started:  the unit

I’ll begin by discussing some of the positive attributes of this radio. First, it should be noted that the DE1129 I have reviewed is one of the first to be produced, and as such, it currently has 18 buttons screen-printed in Chinese. Last week, Degen announced that they will be producing an English version, and (importantly) adding a number pad for keying in frequencies directly (see photo above). I have confirmed this via the manufacturer’s retailer. It will require squeezing a lot of buttons into a very small area, but I imagine this alteration will be easy enough, and probably remain functional even for those with larger fingers.

Degen has confirmed that they intend to produce a DE1129 with a number pad and English print in the future (Click to enlarge, Photo: Degen)

On the topic of buttons, those on the DE1129 are easy to push and have a very tactile response–very much like those on the Tecsun PL-380 and PL-390. I don’t expect these buttons are likely to be compressed accidentally if the radio is in your pocket, but just in case, there is a number lock button (with a key icon) that will further protect the radio.

The body of the radio is made of a hard, smooth plastic–without a rubberized coating–and seems durable enough. The speaker is not exactly flush-mounted. Instead, it protrudes from the rest of the body by about 1/4  inch. At first, I thought this quite odd, but I’m fairly sure this was in order to accommodate a larger speaker than it otherwise would have had.

For more on the DE1129 unit itself, be sure to read my initial impressions, which go into greater detail.

This little speaker packs a punch!

Audio

The audio from the built-in speaker is impressive–in fact, this is possibly the best feature of this little radio.  Just the other day, I was able to listen to an NPR FM station, with the volume turned up, as I cooked a meal; typically, I wouldn’t be able to hear a radio this small while doing other things–the output would be tinny with too much emphasis on the treble end of the audio, and the sound lost in all but a quiet room. However, the DE1129 speaker offers just enough bass to keep the audio (especially on FM, or from a quality digital audio file) comparatively rich and full. In essence, it sounds like a larger radio. Though the speaker lacks a bit of mid-range, the overall experience of listening to AM is quite pleasant, while FM is exceptional.

Digital Audio Player/Recorder

The “Music” mode will allow you to play pre-recorded MP3 files

With several of their latest DSP radios, Degen has added digital audio recording and playback features.  The DE1129 is no exception, and offers the following capabilities:

  • Records from a built-in microphone
  • Records directly from the radio while playing
  • Plays any MP3 formatted audio files
  • Offers many standard music playback options, like repeat, shuffle, etc.
  • Provides expandable memory via the insertion of a micro SD card into the radio, has 4GB of storage built-in

Perhaps the handiest feature is the fact that you can connect the Degen DE1129 to a PC, via supplied (standard) USB to miniUSB, for file transfer and maintenance. In my case, no additional software was needed for recognition of the DE1129 by my Windows 7 PC, which simply interpreted the radio as a storage device.

The “Voice” mode must be used to playback any recordings you make with the DE1129

NOTE: The DE1129 divides recordings into two different categories: “Music” or “Voice.”  “Music” is basically any MP3 file that is stored in the root directory of the radio (when viewed on your PC). “Voice,” on the other hand, is stored in the “Voice” folder on the radio and is accessible only via the radio’s “Voice” mode. I could not find a way, for example, to record music on the FM radio and save it in the “Music” category–I believe anything that is recorded on the radio itself will be filed under “Voice.” Of course, you can connect the radio to your PC, then manually drag the files from the “Voice” folder into the root directory to have access within the “Music” mode. If you actually used the built-in microphone to make a live recording, it will also be saved under “Voice.”

My DE1129 came with two preloaded MP3s–a Kenny G song and a Chinese pop song. I added a few of my own choices and, again, was favorably impressed with audio fidelity from its tiny speaker.

Recording from the radio, however, was a different story…

First of all, a note of caution: I know that some of the DE1129’s predecessors had  quality issues, when users tried recording from the radio without setting the volume to a very precise level.  I assume that’s the reason why, when you record from the radio, the DE1129 auto-adjusts the volume level to a rather specific setting. Therefore, while the radio is recording, you cannot adjust the volume. This wouldn’t be a problem, save the fact that the volume level it sets is rather loud. The first time I tried recording from the radio, I was using in-ear, noise-cancelling headphones; the radio rapidly shot the volume level up to such a level that I had to jerk the phones out of my ears to protect them. In many situations, I find the volume level via the built-in speaker a little loud, as well. You will not be able to discreetly record your favorite show during church or while eating dinner with the in-laws! During recording, I believe this radio adjusts the volume to 20.

Oddly, while recording, the DE1129 will allow you to engage the mute function–it even shows you the audio muted icon–but it has no effect on the audio level, whatsoever.

The “Record” mode is only used to record via the tiny built-in microphone–quality is quite good for voice

There are two levels of quality when recording: 129K or 96Kbps. Regardless of the setting, I find that there is a loss of quality when recording via the built-in recorder, though perhaps slightly less than with previous Degen models. When I recorded a stong FM station at 129K, I notice at least a 20% degradation in audio quality. The recorded audio sounds slightly muffled and garbled, more like an MP3 recording made at 48 Kbps. There was a noticeable lack of the higher and lower tones which make the DE1129’s internal speaker otherwise sound quite crisp.

There is a less noticable difference in audio quality while recording AM radio (whether shortwave or medium wave/AM). No doubt, this is due to the fact that AM radio lacks the higher and lower audio characteristics and general fidelity of FM radio.  While AM recording quality is acceptable and content is intelligible, for playing back a recorded program, it certainly leaves a lot of room for improvement. As with FM recordings, AM recording sounds muffled.

I would not recommend purchasing the Degen DE1129 if you’re seeking an all-in-one unit to record quality radio on-the-go. If you can settle for a mediocre recording, and you don’t mind the fact that while you’re recording, the radio will be playing at fairly high volume, then this may be a useful feature.

Radio performance

The “FM Radio” mode is actually the mode for all radio bands, including shortwave and medium wave

While I spent the bulk of my time testing the DE1129 on the shortwave and AM/MW bands, I will cover all three bands in order of performance, starting with the best.

FM

The Degen DE1129 is an excellent FM radio. In my tests, it received both strong and weak stations with relative ease and compared very favorably to my Eton S350DL, which I routinely use for receiving weaker FM stations in my area. Again, FM sounds great via the DE1129’s built-in speaker, providing nearly room-filling sound from a very tiny package.

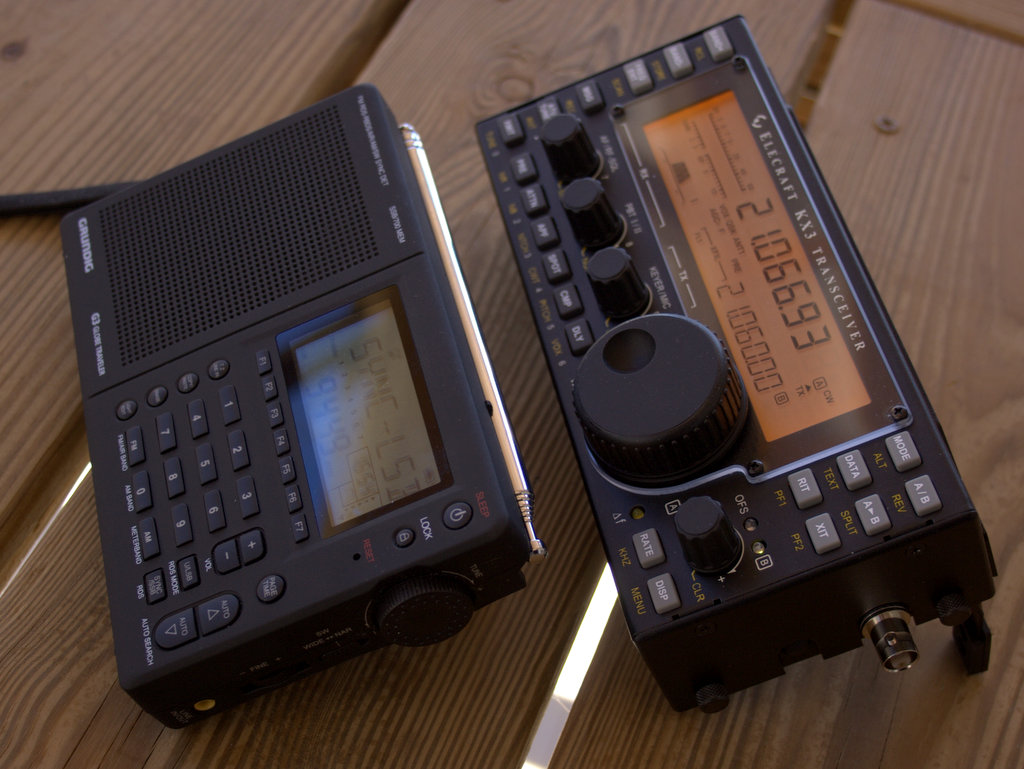
The DE1129 (lower right), with its competitors, the Grundig G3 (top) and Tecsun PL-380 (lower left)

Shortwave

I always spend the bulk of my radio review time on the shortwave bands, of course, and to test the DE1129, I pitted it against my trusty Tecsun PL-380 and Grundig G3. Note, however, that neither the G3 nor the PL-380 have recording capabilities.

Sensitivity

First, the good news. Shortwave sensitivity, in general, is fairly good on the Degen DE1129. With it, I was able to hear most of the weaker stations that were received by the PL-380 and G3. I believe adding a length of wire to the antenna with an alligator clip–as there is no external antenna jack–could slightly improve performance. I may test this further. Again, since the radio lacks a fold-out stand and the telescopic antenna cannot rotate, attaching a wire to the antenna will be less than practical, as this will tip the radio over.

But unfortunately, the DE1129 suffers from several shortcomings that make it the clear loser against its two similarly-priced competitors. Note that I mentioned a few of these problems in my initial impressions post. Here is more detail, by function:

This image, with English translations for the keys on my DE1129, helped me identify each button’s function. Since there aren’t many buttons, I found that only after a few minutes of using the radio, I no longer needed to reference it. Click to enlarge

AGC (Automatic Gain Control)

The pre-defined AGC level is simply inadequate for comfortable shortwave radio listening of weaker signals. As mentioned above, though the radio has the sensitivity to detect the weak signals that its competitors can readily detect, the AGC gets in the way of comfortable listening. It creates a sort of pumping effect on weak stations, and truly seems to be “all or nothing:” at times, the radio’s signal will pop into clarity, then back into obscurity–obviously, it does not handle fading very well. The G3, in contrast, even without the sync detector engaged, did a much better job.

Bandwidth

The bandwidth is fixed–non-adjustable–on the DE1129. It is adequate for general shortwave broadcast listening, but a little too wide when you have two strong stations crowded together. Several times, adjacent broadcasts would bleed into the broadcast I was monitoring. I would expect even some rudimentary bandwidth control on a radio in the $100 US price category; the G3 (at $99) has wide/narrow, and the PL-380 (at $60 US) actually can be adjusted in 1 kHz increments from 6 kHz down to 1 kHz.

Single-Side Band

The DE1129 does NOT have SSB, thus would be useless for monitoring ham radio traffic, or listening to pirate radio stations in SSB, for example. The similarly-priced Grundig G3 does, of course, have SSB.

Shortwave can only be tuned in 5 kHz steps

Frequency steps

Unfortunately, the DE1129 has fixed frequency steps at 5 kHz; you cannot adjust it to be more or less.  In comparison, both the PL-380 and G3 can be adjusted down to 1 kHz steps.

Since the DE1129 mutes between frequency changes, it creates a “chuffing” sound while band scanning or tuning much like the PL-380. The Grundig G3, in contrast, tunes with smooth, continuous sound–much like an analog radio.

Tuning Speed

I normally don’t bother commenting on tuning speed, but I find that band scanning on the DE1129 leaves something to be desired. It’s rather arduous.

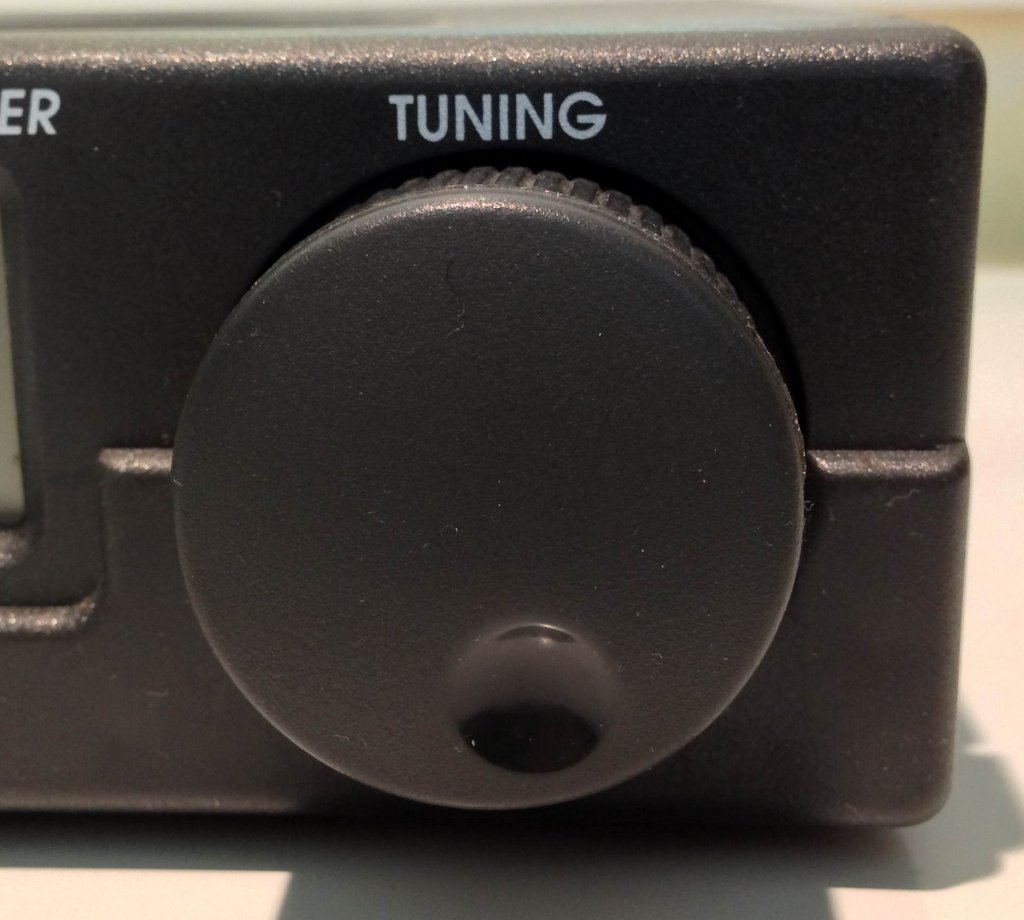
The DE1129’s hard plastic band covering the tuning wheel may protect it if dropped, but it’s also in the way of your thumb for easy tuning on the side

The tuning speed is not adaptive. Meaning, if I turn the tuning dial faster, it doesn’t increase the speed of tuning. This is very frustrating, especially since the model I reviewed does not have direct frequency entry via a number keypad. If I want to move from 5800 kHz to 6100 kHz, it takes a lot of tuning to get me there!

If I were stuck with the DE1129 as my only shortwave radio, I would be forced to fill its memory bank with all of my favorite frequencies, just to make tuning easier.

The DE1129 does have two different ways to navigate the shortwave spectrum:

  • By pressing the “Shortwave” button repeatedly, the DE1129 will move you from one SW meter band to the next highest. This is the only practical way of tuning.
  • The other way, (practical only if you want to listen to something outside of the normal broadcast meter bands) is to manually tune the entire SW spectrum (2.3 – 23 MHz) in 5kHz increments. Since the tuning rate is rather slow, this is a cumbersome process to say the least. To make it go a little faster, you could allocate memory locations, say at 3, 4, 5, 6 MHz etc. to make points (or bookmarks) from which you could tune.

Noise

My observation is that the radio’s internal processor and/or display seem to inject noise into the DE1129. This is especially noticeable on medium wave (see below).

While testing the radio against the G3 and PL-380, I even noticed that I could hear the (tuning) encoder noise of the DE1129, emanating from it, and even from other radios operating within two feet of it. Each tuning increment (via the tuning wheel) would produce a clicking sound in the audio of not only the DE1129, but even more noticably in that of other radios. The DE1129 is obviously generating a little RF noise of its own.

SW Summary

At $100 US, the DE1129 is simply not a good value for those interested in shortwave radio performance. Perhaps if it were in the $40-50 category, my expectations would be lower, and it might meet them at this price point. At the very least, a wide/narrow bandwidth control and the ability to speed up/slow down tuning speed would make this a more pleasant  and functional radio.  The sloppy AGC alone, though, would still keep me from recommending the DE1129 as a good shortwave radio.

AM/Medium Wave

On the positive side, the DE1129 can be used in any ITU region as the user can specify either 9kHz or 10 kHz spacing, although there is no option for choosing frequency steps less than 9 kHz.

How well does the DE1129 perform on medium wave? Not so well, I’m afraid–it’s mediocre at best. Medium wave suffers from many of the same problems as shortwave (described above), including the fact that the DE1129’s AGC (Auto Gain Control) simply cannot handle the up-and-down nature of weak AM stations.

Ticks like a clock?

Perhaps worst of all, though, is a “ticking” sound that plagues this Degen’s audio on the medium wave band. Spaced almost at second intervals, this “ticking” sound is present most anytime I listened to an AM broadcast. It was less noticeable in robust local broadcasts, but was still there, nonetheless. Recording a broadcast only seemed to make it more noticeable.

Unfortunately, if you purchase the DE1129 to listen to medium wave, you are likely to be disappointed.

The DE1129’s thin rechargeable pack fits neatly into the battery compartment on the back of the unit

Battery

As mentioned in my initial impressions, the DE1129 operates on a slim 3.7V 850 mAh Li Ion battery pack. Unlike most other shortwave portables on the market (but similar to the Grundig G2 and Degen DE1128), it does not operate on AA batteries.

No doubt, the slender battery pack allows for the compact form factor of the DE1129. In my testing, I found that the battery life is very good. Indeed, I have not needed to re-charge the battery even though I’ve played the radio for many hours in testing. I cannot speak to the overall longevity of the battery pack, however.

While I’m sure these battery packs are convenient, I still prefer the traditional AA battery.  If this battery pack wears out, I will have to order a replacement, whereas most portable radios only require the ubiquitous AA cell.

Stacking up the pros and cons

The rechargeable battery pack is very slim

Every radio has positive and negative attributes, and the DE1129 is no exception. Alas, in this case–especially since I’m reviewing this with a focus on shortwave and radio performance–the negatives outnumber the positives.

Pros:

  • Audio from built in speaker is superb for size (see con)
  • Sturdy, smooth plastic body (see con)
  • Perfect small size for travel
  • Strong FM radio performance
  • Ability to record either via built-in microphone or directly from radio (see cons)
  • One-button recording from any radio band
  • Crisp, easy to read backlit display
  • MP3 playback and functionality
  • Simple interface via supplied USB cable to both charge the radio and add/maintain recordings and MP3s
  • MW frequency steps can be adjusted between 9/10 kHz
  • Up to 32 GB of additional storage via micro SD card
  • Built-in microphone recordings of voice notes are excellent

Cons:

  • DE1129 plastic body lacks a back-stand and telescopic antenna cannot rotate
  • Shortwave performance is mediocre, AGC can’t handle weak signals and QSB
  • Mediumwave performance is poor, AGC flounders on weak signals, and most of the MW band is plagued with a ticking noise
  • Bandwidth cannot be changed and is too wide for crowded SW broadcast conditions
  • No direct frequency entry (though Degen plans to add this very soon!)
  • No complete (stand-alone) charging adapter; USB cable only, to plug into PC or wall-mounted USB charger
  • Tuning rate is fixed on SW at 5 kHz and not adaptive if you turn the dial faster
  • 4 or 5 second delay when turning radio on
  • Additional delays in response when changing frequency, mode, band and starting/ending a recording
  • Protective tuning knob strap prevents thumb tuning
  • While recording from radio, the volume level will spike loudly and cannot be changed or muted regardless if using built-in speaker or headphones
  • Recorded radio audio suffers from compression and is significantly degraded from the original broadcast–less noticeable on SW and MW/AM
  • No external antenna jack
  • No English manual (at time of this review, though I imagine this will be forthcoming)
  • In the current firmware version, the radio mode is displayed as “FM Radio” in the menu selection, though this mode covers all radio bands
  • There are no backlight options or modes that I could find–if you touch a control or move the frequency, the display will remain backlit for only about 10 seconds (please comment if you know how to change this)

Summary

I really should have started this review with the following disclaimer: it is possible that there is functionality to this radio, and adjustments that can be made to it, that I have yet to discover.  To my knowledge, I have toured and tried every menu option and explored every possibility with the radio’s settings.  However, since this is an early production unit and all of the instructions are in Chinese, I could easily have missed something. Future firmware updates and the forthcoming numeric keypad could also change my opinion of the DE1129.

With that said, I can freely comment on my experience:

If you are looking for a very compact radio with good FM reception, with MP3 recording and playback, with a compact form factor and a wonderful built-in speaker, you may want to consider the Degen DE1129 in your search.

If you are seeking a good shortwave or mediumwave radio, however, I would look elsewhere.

Overall, I feel like the DE1129 has much room for improvement, and I hope Degen is listening and will make firmware upgrades to quickly address some of my criticisms above. It’s as if  the DE1129 was built around the MP3/FM functionality and shortwave/mediumwave was simply an add-on, a bonus feature. I would never use the DE1129 for shortwave DXing, and certainly not for mediumwave DXing. The fact that the radio receives noise from its CPU–especially the ticking sound on MW–makes me believe that it was not thoroughly tested before production.

The Degen DE1129 & box (Click to enlarge)

For the price point (currently $100 US, shipped from the manufacturer), I simply expect better performance. In my tests, the Grundig G3 and Tecsun PL-380 outperformed the DE1129 in every respect on shortwave and mediumwave.

TecsunRadio.com provided a sample unit for this review and I paid for DHL shipping.  I can say that I’ve been very pleased with customer service at TecsunRadio.com. Since they are in a different time zone, and English is their second language, communication was slow, but they answered my many questions.

To my knowledge, the Degen DE1129 is only available from TecsunRadio.com and can be purchased for $80 US plus $20 shipping internationally.

The Degen DE1129 unboxed: initial impressions

Degen DE1129 and box (Click to enlarge)

Yesterday, I received a sample Degen DE1129 from TecsunRadio.com, which is, to my knowledge, the only current distributor of this newest Degen. I paid extra for DHL shipping to get it quickly to my door, as I’ve been very curious how this new radio stacks up against similarly-priced portables on the market–especially in light of the number of emails I’ve gotten from readers asking about this particular radio.

The DE1129 promises a lot: AM/FM/Shortwave coverage and a fully functioning MP3 player/recorder.

I have only played with the DE1129 for a few hours, thus have only developed some initial impressions of the unit.  (A full-fledged comparison review will be coming in the very near future–simply follow the tag DE1129).

My very first impression–?  The DE1129 is just a wee little radio–much smaller than I had imagined. Indeed, though its box (pictured above) isn’t very large, it’s a cavernous container for such a minute radio. Size-wise, it’s certainly within the realm of the ultra-portable. Note its size in comparison with my Grundig G3 and Tecsun PL-380 in the photo below:

For those of you not familiar with the size of these two radios, we’re talking quite small–the Degen is just a little bigger than a pack of cards, easy to hold in one hand.

There is no mistaking the fact that this radio is DSP-based. When you turn this Degen on, it seems to boot up, like a computer–a process which takes about four seconds. It starts where you left off, i.e., at your last frequency, or in the MP3 player, if you were listening to an audio file, just before turning it off.

The Degen DE1129’s display is small, but contains a lot of information (Click to enlarge)

The display on the Degen is back-lit, although the buttons are not. The display, moreover, has an incredible amount of information for such a tiny screen. Fortunately, it is crisp enough to read easily.

You’ll note that all of the buttons are labeled in Chinese Mandarin–since I don’t know or read Mandarin, I found that this English translation of the front panel came in very handy.

I can’t comment on the performance thus far, as I can tell that the learning curve is going to be slightly steeper than usual.  I have yet to determine how to change the steps, bandwidth, AGC control (if there is one), and recording volume level.

Changing between receiver modes is simple enough; volume and tuning, of course, are intuitive.

I have very little to base a review on yet, but I can say this:  I love this Degen’s compact size, crisp display, and am impressed that its tiny built-in speaker actually has some bass response. This is the first shortwave radio I’ve reviewed that (like the Grundig G2 and Degen DE1128) has a slim rechargeable battery pack instead of accepting the typical AA batteries most portables use. No doubt, this is how they keep the size of the unit so small and its profile so slim. Is this a pro or con? Battery longevity will tell.

The back of the DE1129 (Click to enlarge)

Any negatives? Just superficial ones at this point.  Most notably, I’m disappointed in the unfortunate combination of no back stand (see photo) and a fixed, non-rotatable, telescopic whip antenna. This means that when listening to shortwave with the whip fully extended, you pretty much have to hold the DE1129 in your hand. Even if you have a universal portable radio stand (like this one), you won’t be able to make the antenna vertical in relation to the ground–rather, it will be fixed with only the ability to move from left to right.   This is, alas, poor product design, as a radio so slim has very little stability when standing with the antenna fully extended; even a slight breeze can potentially tip it over.

Also, the Degen DE1129, like the Tecsun PL-380 (and many other DSP-based radios), “chuffs” while tuning–meaning, it mutes between frequency changes. This is a pet peeve of mine, as I prefer a more uninterrupted analog-like fluidity while band scanning.  I’ll experiment to learn whether there is a way to minimize this.

Again, look for a more complete review in the near future as I test this little radio against the (similarly priced) Grundig G3 and the (more affordable) Tecsun PL-380. Simply follow the tag DE1129 or subscribe to our email updates by clicking on the link in the right panel of our site.

Using and setting up the Alinco DX-R8T/E receiver as an SDR (software defined radio)

The Alinco DX-R8T (DX-R8E in Europe) can be used as a traditional tabletop or as a software defined receiver

Some time ago, I posted a review of the Alinco DX-R8T–a surprisingly capable, flexible and affordable dedicated tabletop receiver.  In that review, I explored its capabilities as a tabletop unit, and was favorably impressed.

But I knew then that one of the virtues of the DX-R8T is that it’s more than a typical tabletop:  the control head (or, front panel) can literally be detached, and with an extension cable, can be moved as far away as 16 feet from the rest of the receiver. Also, with the optional ERW-7 cable and a shielded audio patch cord, you can connect the Alinco to your PC, converting it to a software-defined radio (SDR).  Just to be fair, I wanted to further check out this alternative operation mode, and review it independently.

I’ve recently had an opportunity to explore the Alinco DX-R8T/E as an SDR, and here’s what I’ve discovered.

As it took some time to figure out how to get KGSDR, the Alinco control software, communicating with my DX-R8T, it’s fair to state that the Alinco’s SDR functionality is not exactly “plug-and-play.”  Nor does Windows seem to find the USB driver automatically.  You must download a USB driver for your computer, as well as download KGSDR from external sites.  It’s also important to note that the Alinco website is not easy to navigate–at least, the relevant links are somewhat buried in large portions of site content.

When I first attempted to set up my receiver as an SDR, I had to use a combination of the printed owner’s manual, the Alinco website, external sites, and simple determination.

Before reviewing the actual performance of the Alinco DX-R8T/E as an SDR, I’ll simplify setting it up as an SDR with a step-by-step process, below. (I wish this was clearly outlined in the owner’s manual, however.)

How to convert your Alinco DX-R8T/E into a Software Defined Receiver

The ERW-7 is the cable that connects your Alinco DX-R8(T) to your computer.

1.) Connect the ERW-7 cable and download the  driver

The ERW-7 is the USB cable that connects your Alinco DX-R8T with your computer. Specifically, it allows your computer to tune and control the DX-R8T; it does not carry audio. If you wish to have full control of your receiver via your PC, you will need to purchase the ERW-7.

You simply plug one end of the cable (the one that looks like an 1/8″ audio connector) in the “clone” port on the back of your Alinco, the other end into an available USB port on your computer.

The download page–at FTDI Chip, the manufacturer of the Alinco cable–has versions of the USB driver for most OS platforms. If you have Windows, you can save a little time by downloading the USB setup tool that will attempt to automatically load the USB driver. Otherwise, you can download and manually install the drivers for the Windows 32 bit version or Windows 64 bit version.

You will need a shielded audio patch cord with 1/8″ stereo plugs on both ends

2.) Connect an audio patch cord

The Alinco DX-R8T/E sends the received IQ signal to your PC via a shielded audio patch cord. This is a standard audio cable that you can purchase at most electronics retailers. It needs to have 1/8″ stereo connectors on both ends, and it must be shielded.

One end of the patch cord is plugged into the IQ port on the back of the receiver, the other is plugged into the microphone input on your computer.

3.) Tell your DX-R8T/E to send the IQ audio to your computer

Your computer will need to “hear” the IQ (spectrum) audio produced by the Alinco DX-R8T/E. The receiver will only send the IQ audio to your computer if you tell it to do so. Fortunately, this is easily done:  simply press the MODE button on the front panel of your receiver until FM appears. Then, simply press the FUNCTION button, then the MODE button.  Your Alinco should now display “IQ” on the main display. You can feel confident the audio is now being sent to your PC.

4.) Install KGSDR

The KGSDR controls are very similar to those of the Ten-Tec RX-320D

KGSDR is a software-defined radio application built specifically for the Alinco DX-R8T/E receivers. A third-party software developer maintains the download page for the KGSDR. Click here to download the setup software for Windows. (If this link doesn’t work, you can also download a zipped copy by clicking here.) To my knowledge, there are no updates to the software–as of time of this post, the current version is 1.0.0.

Installation is simple and only requires that you extract the contents of the zipped folder, then run the KGSDR executable file.

If all has been installed correctly, and the IQ signal is being sent to KGSDR, then you should be able to hear the received audio via your computer.

I have actually installed KGSDR on three different computers. On my laptop, I had to troubleshoot and tweak the settings to get KGSDR to work. On the other two computers, it worked the first time.  All of them were running a 64 bit version of Windows 7.

Troubleshooting tips

If you change the tuned frequency on KGSDR from, say 5,000 kHz to 10,000 kHz, but your Alinco receiver does not change frequencies (it still displays the centered frequency on the front panel), then the USB driver has not been installed or configured properly.

If the receiver tunes, but the audio is garbled or non-existent, you will need to check the audio cord connections. First of all, make sure it’s plugged into the microphone input on your computer (not the speaker/headphone port!) and the IQ port on the back of the Alinco. You cannot plug the patch cord into any other port port on the DX-R8T/E. The plug will fit in the headphone jack, for example, but the IQ port is the only one that sends interpretable analog information to your PC.

Review:  the Alinco DX-R8T/E as an SDR

KGSDR comes with a spectrum and waterfall display (Click to enlarge)

I have read reports of people achieving remarkable results with their Alinco functioning as an SDR…I wish I could report the same.

While the Alinco DX-R8T/E is a very capable tabletop receiver, I find that the SDR functionality adds very little, performance-wise. In fact, in many respects this function seems to compromise the performance of the DX-R8T/E. Still, there are some positives:

Pros

  • Affordable – the EWR-7 USB cable is about $45 US, and you can easily buy a shielded audio patch cable for under $10. For about $55 US, you can unlock the SDR functionality of your receiver.
  • With KGSDR, you can see a bit of the surrounding spectrum on a waterfall display
  • KGSDR is a very lightweight program, not likely to tax even older PCs.
  • KGSDR allows for variable filter control–a true compensating factor since the DX-R8T/E only has a wide/narrow filter on AM (see review)
  • You get the basic benefits of typical SDR receivers:
    • Spectrum/Waterfall display
    • Recording at the push of a button (.wav only)
    • Practically unlimited memory slots
    • With practice, you can import frequency databases
    • A basic DSP filter
  • Simple “lightweight” application that should work on any Windows-based PC (see con)
  • With a DRM decoder, you will be able to receive and decode DRM transmissions (see con)

Cons

  • Performance is underwhelming–not as good as the DX-R8T as a stand-alone tabletop receiver
    • Images of strong stations several kilohertz above the source
    • DX-R8T/E sensitivity is somewhat compromised in SDR mode
    • Selectivity is mediocre
  • Audio patch cord transfers computer/shack RF noise more easily than SDRs which use a digital IQ output via USB
  • Audio fidelity, in general, is not as good as the stand-alone receiver will provide
  • KGSDR has only the most basic of SDR features
  • KGSDR does not allow the spectrum display to be expanded vertically
  • Requires tweaking and repeated efforts in order to function properly
  • Owner’s manual and website are confusing and lack vital information about the installation and trouble-shooting process (hopefully our guide above can help the average user)
  • DRM mode is not native; you will have to use a program like DREAM (see pro)

 Summary

So, is it worth it?  Well, yes––and no.

Yes

If you have $55-60 US dollars to spare, it’s a real bargain. I believe the extra SDR features  and functionality are worth the price. I have not yet tested this in a DXpedition setting, where there are a limited number of RF noise-producing devices around. If you have an RF-“quiet” location in which to use the Alinco as an SDR, you may find you have better results than I describe above.  I imagine you will still suffer from some imaging of stronger signals, however.

Plus, KGSDR is so lightweight, I believe you could use it on a netbook. Moreover, I have heard of owners who’ve actually used other open source SDR applications to drive the Alinco DX-R8T/E.  Additionally, though I have not yet tested it, N4PY makes a software controller that would be far superior to the KGSDR–I base this on the fact that N4PY’s RX-320D software was such an improvement over the standard OEM package.

No

If you wish to enhance the performance (not features) of your Alinco DX-R8T/E, I do not think it’s worth it to put your Alinco into service as an SDR.  Again, I find that it somewhat compromises the performance of what is otherwise an excellent tabletop radio.

If, like me, you have other SDRs in the shack, you’ll find that you’ll seldom use the Alinco as an SDR. Your other digital IQ-based receivers or IF receivers will most likely run circles around it.

Thanks, Alinco

I think it’s pretty cool that for under $500, you can purchase an excellent tabletop receiver like the Alinco DX-R8T/E. Its price tag is significantly lower than its top two competitors (the Icom R75 and Palstar R30A). Still, even with this price edge, Alinco added bonuses like a detachable face plate and SDR functionality, making this a “Swiss Army Knife” of a receiver. So, again,I’ll say…thanks, Alinco!

What do you think?

If you are using the Alinco DX-R8T or E as an SDR and feel you are achieving better performance than I’ve described, or would like to share any other thoughts/suggestions, please comment below. Note that my Alinco is a very early-release–perhaps from the first production run. It is possible that some of the issues I mention above have been resolved  in later production, or that I simply have not finished properly tweaking settings.  I await your responses!


Frank’s assessment of the Elad FDM-S1

The ELAD FDM-S1 Software Defined Receiver

SWLing reader Frank Holden (VK3JFH/VP8DNM) contacted me by email to share his experience with the ELAD FDM-S1–of particular interest because we have yet to see many reviews of this particular software defined receiver. Although the FDM-S1 was announced with some modest fanfare, its actual release and availability skipped over many of us. Not over Frank, however:  he purchased an FDM-S1 and had it shipped to his home in Australia, where he apparently put it through its paces.

Frank’s overview of the ELAD FDM-S1 is quite good, and he has kindly given us permission to post his observations here:

I have had an ELAD FDM-S1 now for over a month, having purchased it directly from the manufacturers, and while I don’t feel qualified to write a review you may be interested in my opinion of it.

In my shack at present I have an Icom R-1500, Icom 718, Tecsun 390, Tecsun 660, Grundig G6, Sangean ATS 909, Drake SW 8, Kenwood R5000, a Funcube Dongle and an Alinco DJ-X11. In the way of antennas I have a couple of dipoles, a G5RV , and a 10 metre vertical for TX together with an AOR DC to Daylight, a Diamond discone , a GWhip longwire and a simple 7 metre long untuned vertical on a squid pole for RX.

I was going to buy my ELAD pre-release from WoodBoxRadio but language difficulties and confusion over getting it VAT-free put paid to that. I take full responsibility for the confusion……

In the end I bought one direct from ELAD sdr for 362.81 Euros VAT-free, which price included 10 Euros postage to Australia. It arrived within a week… would that everything that I bought from overseas was as cost effective and fast.

Out of the box it was simple enough to set up with just a USB connection to the computer. I have it connected to a Dell Netbook and this had to be upgraded to XP Service Pack 3 together with some .Net software, the purpose of which remains something of a mystery. I imagine with a newer computer it would operate straight out of the box. It came with a DVD which had both the .net software on it plus an early version of the operating software. I immediately upgraded this software to v3.07 which is what I am currently using.

I believe that originally the frequency range stopped at 30 MHz… however, it can now receive up to 452 MHz if this is selected in the advanced menu. As I write this I am monitoring aviation traffic on 132.200.  Likewise the original viewable spectrum was quite restricted,  but in the latest version 1.2 MHz can be viewed in the waterfall.

Tuning is straightforward… either by direct keyboard entry or by clicking on the waterfall…. there are also three ‘sliders’ at the bottom of the screen which permit ‘mouse tuning’ by either metre band, MHz, or kHz. Mode selection and quite a bit of other stuff (did I mention that this is not a technical review?) are on a drop down menu at the right hand side of the screen. DRM is included amongst the modes and I listen to RNZI DRM most evenings.

I haven’t used any of the recording options on this radio yet.  What I have been doing is either simple SWLing where the ability to monitor an entire Metre band is excellent, especially when combined with the info on the WRTV frequency guide DVD. I also use it at other times of the day  in what I suppose you could call ‘Ham’ mode where it can be left watching the 20 metre, 40 metre or other ham band and I can see when a band has opened… far simpler than scanning around…

So all in all, I am very satisfied and would recommend this SDR to anyone.

My #2 radio these days is my Tecsun 390 with its ETM… another bit of brilliant kit.

Frank also sent some helpful photos of his screen, and added:

I am currently running v.3.07 beta… the last shot is the latest  ‘polished’ version   3.01.

As you can see in that shot, you can now get three screens, including an AF and an IF screen. That version also comes with a separate program that lets you work with recorded files more easily.

He even included some photos of recording:

Thanks for your most interesting observations, Frank.  If there are any others out there who have experience with the Elad FDM-S1, feel free to comment below or simply contact me.

For those of us here in the US, to my knowledge there still is no FCC approval of this device. I have contacted Elad with this question; they’re on annual holiday leave just now.

Follow our other Elad FDM-S1 posts with the tag: Elad FDM-S1

A traveler’s review of the Grundig G6 shortwave radio

The Grundig G6 makes for an excellent travel companion

Last week, I traveled to New York City by air and used trains, taxis and buses en route to Philadelphia. All the while, I carted along my luggage–and it’s a good thing I like to travel light.

Indeed, I almost never check in luggage, no doubt a remnant of my days as an expatriate, when I was required to travel throughout Europe at a moment’s notice. But I love traveling with only one bag. It’s incredibly liberating. I revel in the challenge of fitting everything I need into one Eagle Creek convertible backpack/suitcase.

This latest trip was no exception, and I planned to do a little shortwave and medium wave DX along the way. So which radio did I reach for? Oddly enough, none of those I listed from my travel radio suggestions, my usual stand-bys. This time, I chose my Grundig G6.

Keypad for direct entry and as with most Grundig radios, the G6has a logical, simple key combination for entering frequencies.

I have had a mini Grundig G6 review out for a couple years now in which I praise it highly. I am surprised to find that many other reviewers only give it a lukewarm rating. I believe a lot of this stems from the fact that the radio’s aircraft band (117-137 MHz) is not terribly sensitive or selective. Since purchasing the G6, I’ve only used the aircraft band once–during review. I leave aircraft and VHF/UHF listening to a proper scanner, preferably one with triple-conversion circuitry.

Yet I find that the Grundig G6 performs quite well on the shortwave and medium wave bands. Last week, while in NYC and Philadelphia, I was surrounded by big signals and didn’t hear many instances of overloading or imaging. Sure, larger portables (like the Grundig G3, Tecsun PL-660, Sony ICF-SW7600GR, Sangean ATS-909X) will outperform the G6 on SW and MW, but none of those radios can comfortably fit in my pocket. In fact, the G6 is so small that it can get lost in my suitcase–oh, there it is, tucked among my socks. The portables mentioned above, though reasonably sized, will need some dedicated space.

The placement and orientation of the tuning knob on the G6 is genius. My favorite ultra-portable radio for band-scanning

There’s another plus about the G6. It feels good in your hand. I have big, clumsy fingers, yet I still manage to punch in the frequency correctly every time. Having the (smooth) tuning knob in the upper left corner of the radio where it’s accessible both on the side, and (more importantly) on the face, was a stroke of ergonomic genius by this little radio’s designer. I wish more manufacturers would do this. It’s so easy and comfortable to band scan using your thumb on the face of the tuning wheel, which is great when you’re sitting around a campfire or listening to FM on a bumpy bus ride.

Don’t get me wrong: if I were going on a DX vacation where I needed top-notch filtering, sync-detection and SSB, I would not pick the G6. For the odd business trip, though, it’s the perfect little radio.

The G6 even has an external antenna connection.

Pros:

  • Small, affordable and full-featured
  • Shortwave and medium wave reception are comparable to others in price class
  • Two bandwidth choices
  • Direct keypad entry of frequencies
  • Fluid and well-placed tuning knob
  • No chuffing/muting during band scans
  • Includes SSB (see con)
  • Great audio for a tiny speaker
  • Excellent ergonomics (especially for such a small package)
  • Aircraft Band (see con)

Cons:

  • SSB reception is mediocre–fine tuning is difficult
  • Volume button increments a little too steep (between 8-12) with headphones
  • Keypad not backlit
  • Some image problems on aircraft band

The Grundig G6 has been on the market a long time, in a consumer electronics life span. I would not wait to purchase one. Occasionally, RadioShack (in the US and Canada) will close out their stock of shortwave radios and the G6 can be found at bargain prices. Universal Radio currently has a promotion where if you buy a Grundig Satellit 750 for $299.95, you will receive a free Grundig G6. You get both a large portable/tabletop radio and a pocket-sized one in the same deal. That’s great value!

Want specifications and other reviews of the Grundig G6? Check out our G6 entry in the Shortwave Radio Index.