Shortwave listening and everything radio including reviews, broadcasting, ham radio, field operation, DXing, maker kits, travel, emergency gear, events, and more
Many thanks to SWLing Post contributor, Martin Tobisch, who shares the following guest post and videos from his home in Malta:
New AM Signal Coupler
Many AM medium wave listeners are looking for solutions to improve the reception performance of their radios.
After many attempts, which I don’t want to entertain anyone with, a coupler was created that feeds the external antenna directly into the ferrite antenna. I use my 66 foot long wire antenna on 50 ohm RG-58 cable, but other antennas will have similar success.
The clips available on YouTube speak for themselves:
Experiments with smaller ferrites and antenna rods met with no success. It is important that the coupler still works even at a distance from the ferrite antenna and without precise alignment.
With tube radios it easily bridges the distance from the housing to the ferrite rod Antenna
The finished coupler consists of 6 NiZn ferrite cores, which are connected with glue to form a rod. 8 turns of wire are wound over this and soldered to an RG-58 cable. Some electrical isolation tape and ready. So far I’ve just put it in a box. Of course there are finer solutions and it should be protected against shock. Ferrite cores are notoriously brittle.
Advantages: Advantages to what? Nothing comparable exists.
So there are advantages to feeding via an antenna socket. The signal coupler is also good for radios without an antenna socket. But in case of using an antenna socket, common mode wave interference picked up in the house goes unlimited into the radio. Due to the magnetic coupling to the ferrite antenna, common mode waves are completely suppressed. They do not create a magnetic field in the coupler.
No changes are necessary in the radio
The biggest advantage is, that you can listen to distant stations loud and clear, which previously only produced a quiet scratching noise.
Many thanks to SWLing Post contributor, Bill Hemphill, who shares the following guest post:
Remote Antenna Switching Remote Low Noise Amplifier Switching and Switching an Antenna and Audio Between Two Radios
by Bill Hemphill, WD9EQD
Remote Antenna Switching
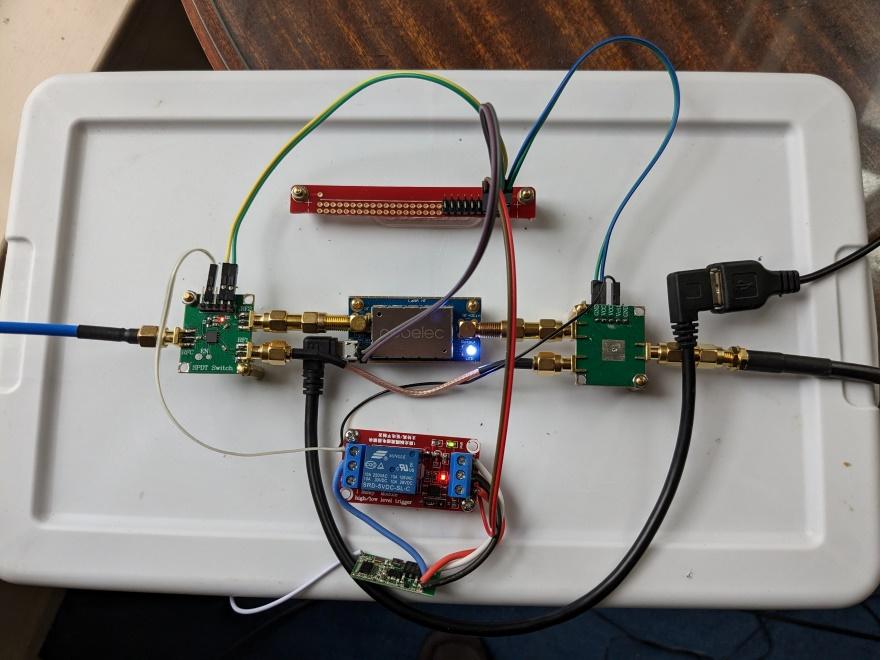
I have two YouLoop Antennas. I had been placing them at right angles to each other. I would then put one of them on the AirSpy software defined radio. But manually switching from one antenna to the other was a real pain. If only there were a way to electrically switch between the two antennas.
It would be nice to place the antennas remotely from the radio (and computers) and then have some sort of remote switch that would select an antenna and then a single feed line to the radio. It was research time.
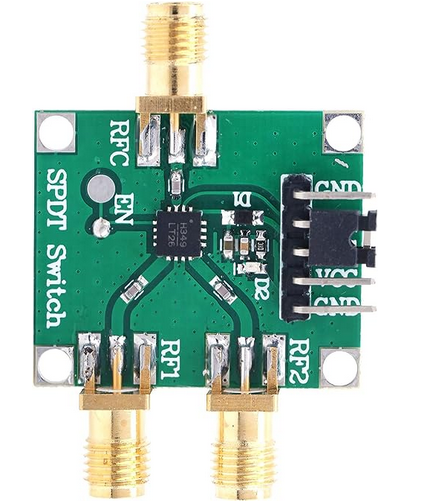
The YouLoop and the Airspy both use SMA connectors. An SMA switch would be required. A little research and I came across the following small board that can switch between two SMA antennas:
This board is perfect for RECEIVE only projects. Apply 5V to the board and then 5V to the VCC (control pin) to switch from RF1 to RF2.
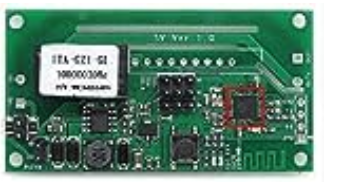
Now that I had the SMA switch module, a way to actually do the switch remotely was required. Maybe WI-Fi or Bluetooth module would do the trick. I found a nice Wi-Fi module on Amazon that looked like it would do the trick:
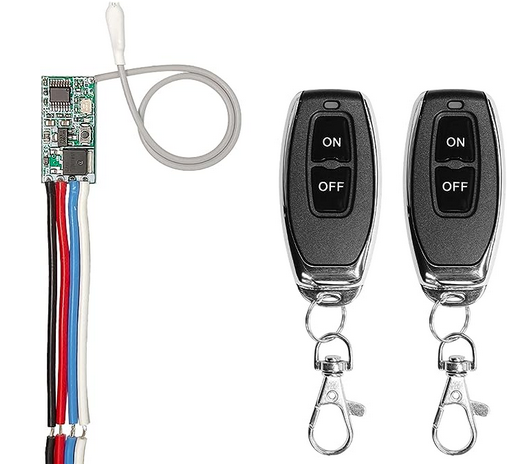
BIngo!! I could just press a button and switch antennas. But a problem quickly arose. I hadn’t fully read the description of the RODOT switch:
The blue output wire is ALWAYS Vcc (input voltage)! The device only switches the ground.
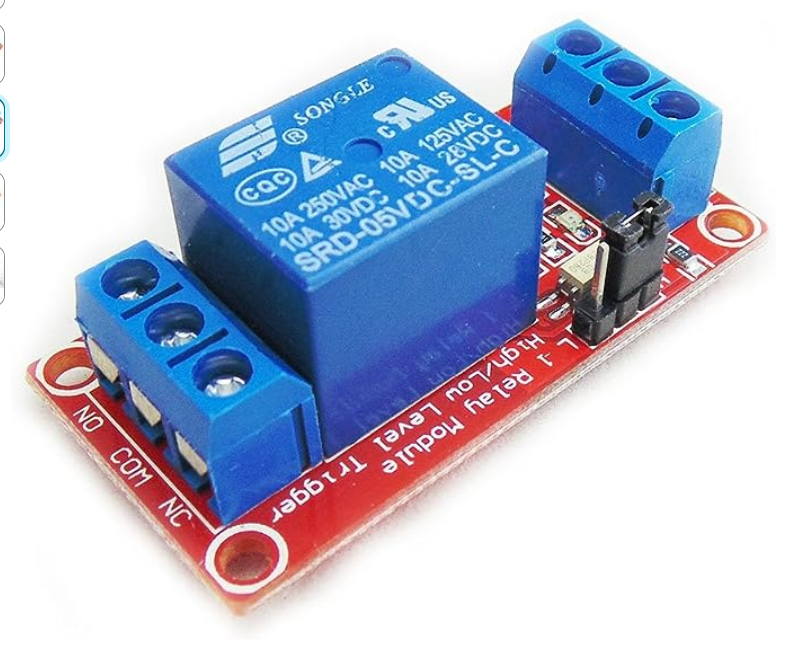
So the RODOT switches the ground but the HMC349 uses positive voltage to switch. OOPS. Next step was to place a latching relay to take the on/off ground and convert it to on/off positive. Again, another nice board was found:
The nice thing about the Relay Module is that it can be latched either High or Low, so the RODOT switching ground can be used to latch the relay and then provide a positive voltage to the HMC349 antenna switch.
All modules are powered by 5V. There are other modules available that use higher voltages. But I wanted to be able to use a 5V power source for everything.
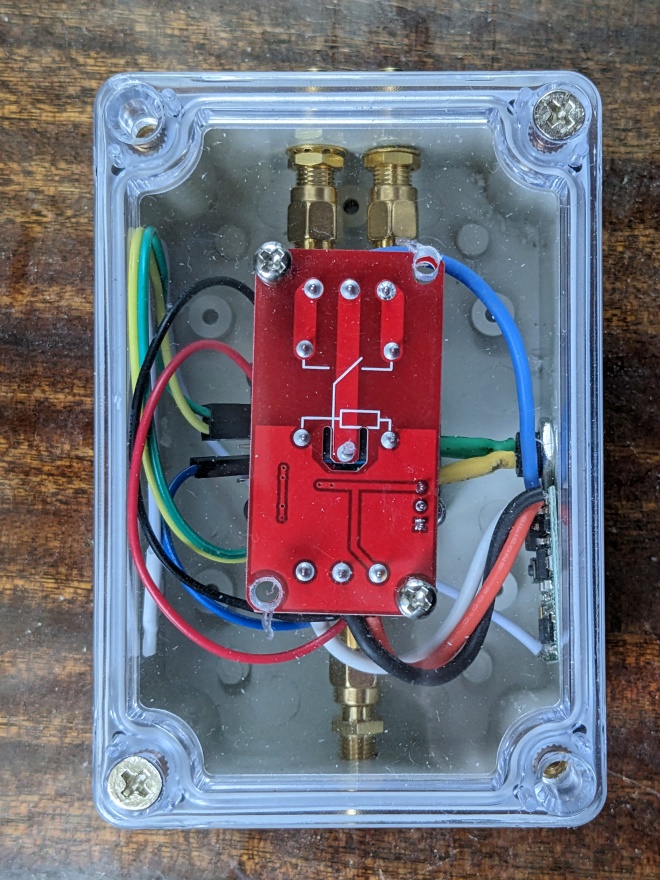
I learned a quick lesson on the first layout I did. I had directly connected the antenna cables to the HMC349 module. A quick accidental side yank on one of the antenna cables and the SMA connector tore off the board. A replacement board and some quick wiring and I had a workable antenna switch that with the press of the car fob button, either antenna could be selected.
I found a nice small plastic box that allowed for the HMC349 module to be suspended between SMA bulkhead connectors. By using bulkhead connectors, there is no strain placed on the HMC349 connectors. The relay module was attached to the box lid. The modules are mounted using brass standoffs. The finished box is about 3”x4”x 2” high. Either battery or a 5V wall module can be used to power it.
Overall, I’m quite pleased with the results. I find that sometimes switching antennas (and their orientation) can make a big improvement in the signals. Other times, there’s very little difference.
Remote Low Noise Amplifier along with Antenna Switching
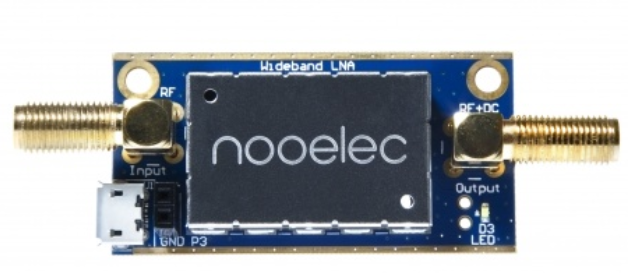
Now that the antennas can be switched, it would be nice if a Low Noise Amplifier could be switched in and out of the circuit. Something like the Lana HF Barebones LNA made by NooElec:
For testing purposes, I first did a quick layout of just using one antenna with the ability to switch the LNA in and out. Note: I took a gamble on hooking the antenna cables directly to the HMC349 modules. Luckily, the SMA connects didn’t tear off the boards.
Two HMC349 modules are used. The first module selects the bypass or the LNA. Likewise, the second module also selects either the bypass or LNA. Note that the second module is turned upside down so that the switches match up when activated. Two modules were used so that the LNA is totally switched out of the circuit. Continue reading →
The rolling, green-turning-golden hills just outside Steve Shannon’s studio window at the offices of Inland Northwest Broadcasting north of downtown Moscow aren’t just pretty to look at.
They’re also the reason the AM radio dial remains important in this expansive, rural stretch of the country.
FM broadcasting is based on line-of-sight, but the pesky thing about AM waves is that they pass through anything, Shannon explained. And they reach a monthly audience that’s still more than 82 million strong across the country, most of them in areas just like the Palouse, according to a fall 2022 survey by broadcast tracking company Nielsen.
“People are tuning in to AM because they are listening to content they can’t get anywhere else,” said Shannon, operations manager for the group that is behind six stations on both the AM and FM dial broadcasting in Moscow and Colfax.
The future of the format seemed in jeopardy just a few short weeks ago, when broadcasters convened in Washington D.C. and pushed federal lawmakers to pressure carmakers who were pondering an end to AM receivers in new cars. Electric vehicles, growing in popularity and headed for a likely continued boom, especially with Washington outlawing the sale of new gas-powered cars beginning in 2035, create interference with a signal that can make AM transmissions difficult to hear, according to automakers.
That pressure, which included the introduction of legislation that would have required manufacturers to install AM receivers in new cars, appears to have made the point. In late May, Ford’s chief executive officer announced on social media it had reversed course and would provide the service in all 2024 Ford and Lincoln models after planning to remove it from some models because of higher costs and lack of listeners. [Continue reading…]
AM radio, a pioneering force in the world of broadcast communications, has for several decades been an essential medium for disseminating information and entertainment. However, its appeal has been progressively diminishing due to social, regulatory and technical challenges. Nevertheless, this scenario presents an opportunity for a significant revival.
The decline of AM radio can be traced back to significant changes in content, notably the reduction in locally focused programming. Many AM station owners made strategic decisions to move away from content that directly catered to local communities, often replacing local news, events and issue discussions with syndicated programming. These changes left a void of locally relevant content, reducing listeners’ connection with stations.
The Federal Communications Commission’s abolition of the Fairness Doctrine in 1987 exacerbated the situation. This doctrine, which required broadcasters to present contrasting views on controversial issues of public importance, ensured a balanced discourse on the airwaves. Its repeal led to increased broadcasts favoring extreme political views, either heavily liberal or conservative. While this trend may have appealed to specific audience segments, it risked alienating listeners seeking balanced discourse.
Compounding these programming shifts, religious content on the AM band has considerably increased. While serving an essential audience, the sheer volume of these broadcasts reduced the variety and balance of programming, possibly leading potential listeners to turn away. [Continue reading…]
In 1939 photographer Ralston B. Collins made a photo album of metro New York radio station WOR. This album is from the J. R. Poppele Collection at the Antique Wireless Museum.
This article describes the effects of EMP and CME and how to build a simple inexpensive Faraday cage.
Most readers of the SurvivalBlog are aware of the potential damage from either a Coronal Mass Ejection (CME) or an Electromagnetic Pulse (EMP) and the impact on everyday electronics. With an EMP, an electromagnetic pulse is generated at high altitudes from a nuclear explosion damaging sensitive electronics. A CME damages electronics in a similar way with the release of a large solar flare from the sun reaches carrying magnetic fluxes and plasma toward earth. These magnetic fluxes interfere with Earth’s magnetic fields and create current surges in power systems and electronics. As of this writing, there is several C and M class flare activity causing some Amateur Radio blackouts on the lower bands. To follow active solar weather visit Spaceweather.com. [Continue reading…]
Many thanks to SWLing Post contributor, Patrizio (IN3032SWL), who writes:
If you are a fan of foreign radio broadcasts (BCL), you may have experienced the difficulty of transcribing the details of the programs, especially if they are in an unknown language. In addition, many radio stations have their own web pages where listeners can input their listening data, but these pages often do not allow the upload of any kind of file, even partial recordings of the broadcasts.
For these kinds of problems, Speechtexter can be a great help. It is a speech-to-text program that can automatically transcribe audio in real time, allowing BCL fans to have an accurate and detailed transcription of what they are listening to.
Speechtexter can recognize a wide range of languages, including Italian, English, French, Spanish, and many others. The program is completely free and does not require any registration. Moreover, it is very precise and offers high-quality transcriptions. It is also available online, which means that you can access it from any internet-connected device.
Using Speechtexter to transcribe foreign radio broadcasts is very easy: simply go to the official website and click on the “Start talking” button. The program will start transcribing everything that is said during the broadcast, and the text will appear automatically on the screen.
Video demonstration
In conclusion, if you are a fan of foreign radio broadcasts and want to transcribe the programs you listen to accurately and quickly, Speechtexter could be the solution for you. Try it now and see how it can simplify your life as a BCL listener! Here’s the link to the website: https://www.speechtexter.com.
73 Patrizio
IN3032SWL
Very clever, Patrizio–what a great trick! Thank you for sharing.
Many thanks to SWLing Post contributor, Bob Colegrove, who shares the following:
A Rack of Radios
by Bob Colegrove
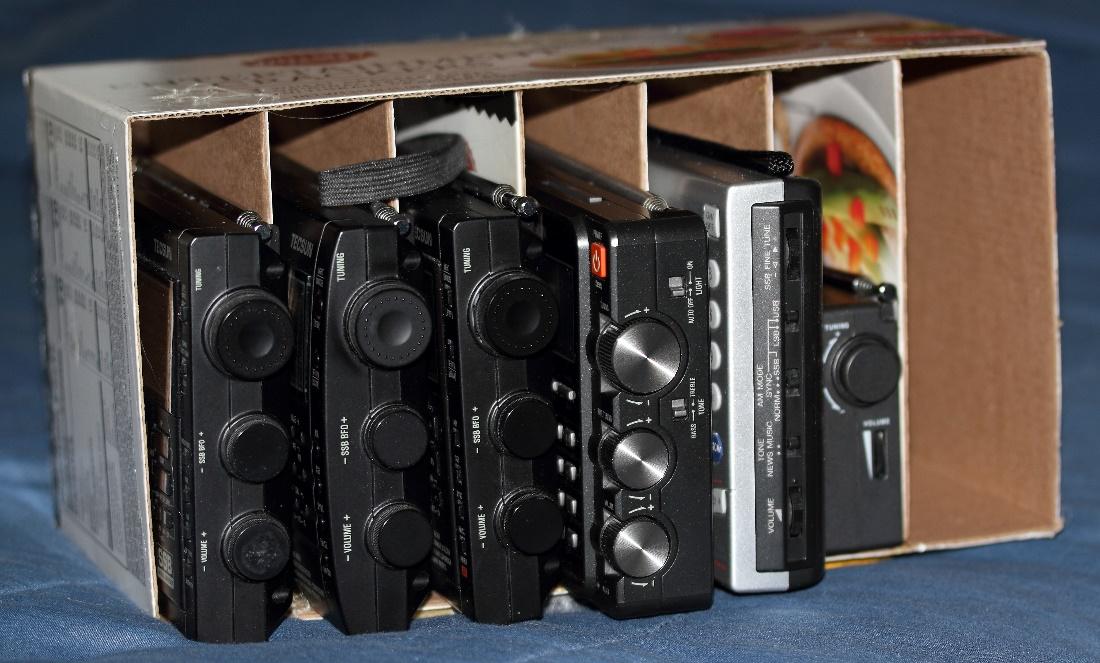
You simply cannot have enough radios – a principle I learned a long time ago. The difficulty occurs when it comes to storing them and yet having them at the ready when necessity calls. Turns out several of my portables fall within a dimensional range that they can be conveniently stored in a rack on the table.
I would like to say I made a project out of this choosing a fine hard wood for construction, carefully routing each divider into a finely milled slot, tastefully finishing the whole thing off with appropriate stain and varnish, and perhaps lining each slot with felt of finest virgin wool. However, never having been one to let form triumph over function, instead, I found a couple empty cracker boxes of the right dimensions, made a few cuts with a hobby knife, and applied some hot glue. Whalla!
Wait a minute. Is that an unused slot at the end? Hmm!
I love it, Bob!
I mean, you know those cracker boxes just wanted to become a custom radio rack–! I say save the fine wood working to build the shelf upon which you’ll place your bespoke cracker box radio rack.
Frequently when people write about attaching a long wire to a portable shortwave receiver, readers will comment that you need to worry about desensitizing or overloading the receiver or ever harming the front end of the receiver. Clearly that can be a concern.
But recently I noticed something on the CCrane website in the FAQ section that shows clearly that CCrane has thought about and dealt with this consideration:
Q: When using the 2-wire adapter and wire attached, why am I not noticing any improvement on shortwave?
A: To see any difference using the 2-wire adapter you will need to have a wire that is more than 30 feet long (we recommend 60-100’) with a good ground wire. Insulated wire will last longer and should be stranded so it is more flexible. If you do not have a good ground, you are actually inputting noise. If you look at the 2-wire adapter (included) you will see an antenna icon and a ground (G) marking. You need to connect them properly when using an external antenna. When a plug is inserted into the antenna jack of the radio the internal rod antenna is disconnected. (See page 30 of the Instruction manual.)
If you check out my review of the CCrane Skywave SSB 2 you will read that I heard a noticeable improvement when connecting the SSB 2 to a 45-foot end fed wire.
Note, though, that if you plan to attach a wire to the SSB 2’s whip antenna, use the 23-foot reel antenna that comes with the radio.
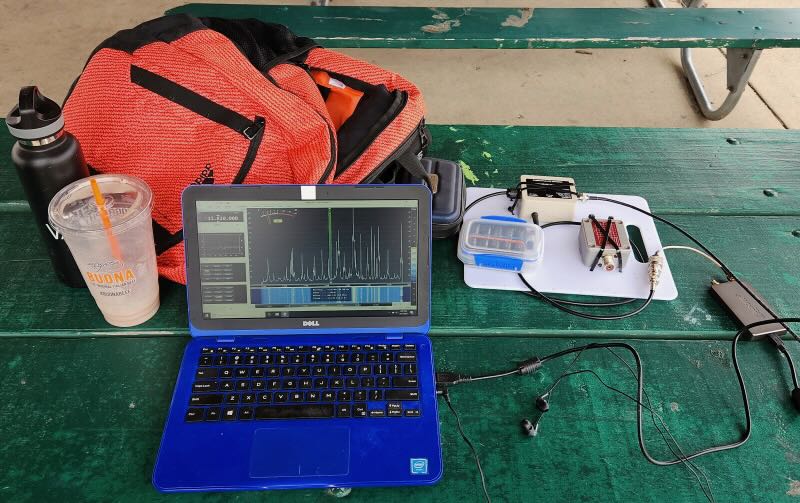
It dawned on me recently, perhaps due to sloppy thinking or unintended distractions, that I never wrote about my modified Loop on Ground (LoG) receive antenna that I use at parks and such. For over a year now, I have been using 3-conductor rotor wire bought cheap at the local hardware store and have wired the conductors in series. Grayhat (Andrew) was the inspiration when he decided to create a folded dipole along the side of his house.
The usual construction of a LoG antenna for shortwave is a single wire of about 60 feet in circumference in order to not go above one wavelength for 20 meter band usage. If you recall, going above one wavelength will start creating weird lobes in the reception pattern. See – Loop-On-Ground Antenna Part 2.
However, I did not like this 19 foot diameter wire on the ground in public parks just waiting to be tripped over. Like, the time when a horse got loose from its owners and almost tripped over my 60 foot wire. I don’t think I would have liked the resulting lawsuit!
So out of fearful necessity I took some leftover RCA 3-conductor rotor wire, about 29 feet of it, and wired a loop with the conductors in series. This gives about 81 feet of total conductive length. But since it is folded onto itself, there is an undetermined loss of resonant length. Callum (M0MCX) of DXCommander fame has experimented and found folded dipoles need three times more length in the folded section to reach resonance, so my loop is probably around 69 feet (electrically). See – Fold the end of a Dipole Back – What’s Happening?.
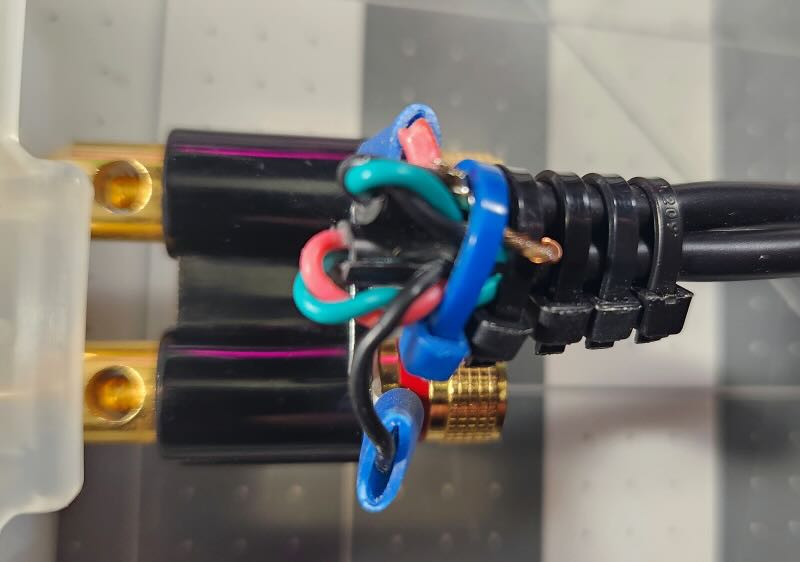
In the picture below, the black wire with Ring Terminal at the bottom goes all the way around to the other side, soldered to the green wire, which goes around and is soldered to the red wire, which goes around to the Ring Terminal at the top, plus tie-wraps to hold the wires together.
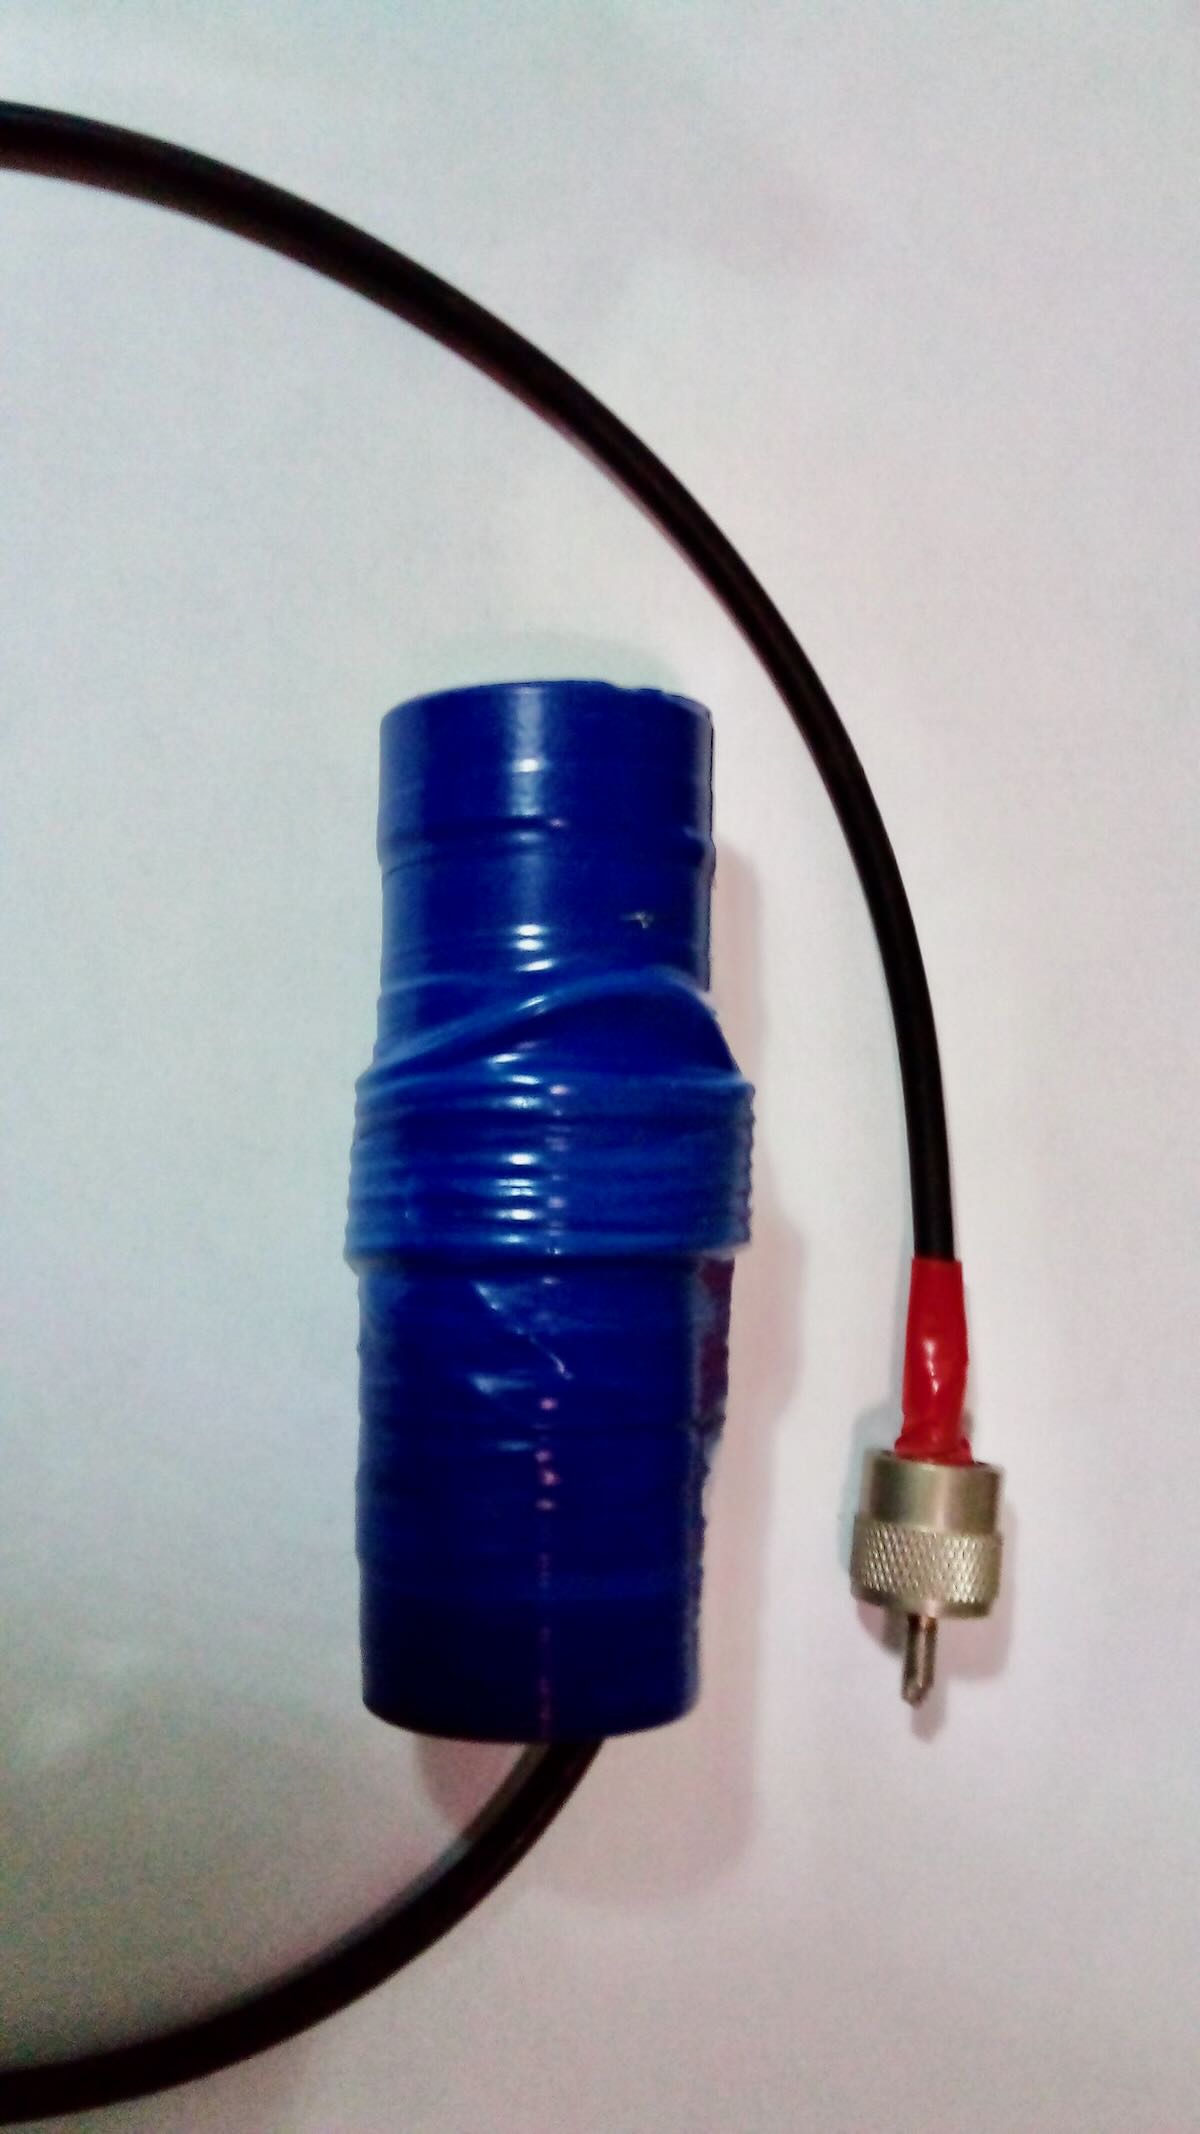
The next picture is how the Wellbrook Medium Aperture preamplifier is connected to the loop with BNC cable that goes to the 12V power injector. I have had this Wellbrook unit for maybe 6+years with no signs of problems. WARNING – do NOT use the Wellbrook preamplifier in the presence of high powered RF energy like your Amateur Radio antenna pumped with 1000 watts from a linear amplifier; the Wellbrook premap might just overload and get damaged! I did use this loop and preamplifier at last year’s 2022 ARRL Field Day and was able to get away with it because we were only using 100 watts per station. Listening to the 9pm 3916-net trivia group was fun but I still needed to keep it away from the transmitting antennas. Continue reading →

 Many AM medium wave listeners are looking for solutions to improve the reception performance of their radios.