Shortwave listening and everything radio including reviews, broadcasting, ham radio, field operation, DXing, maker kits, travel, emergency gear, events, and more
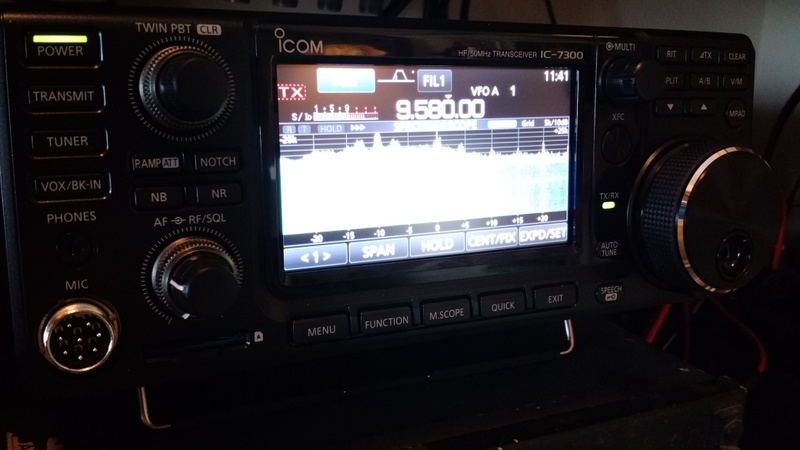
Before completing my review, I thought I might fit in one more quick comparison–this time, comparing the Icom IC-7300 to my Elecraft KX3 and focusing on SSB and CW reception.
Recording notes and disclaimers
The Icom IC-7300 offers native digital audio recording, which means that it records both transmitted and received audio to an inserted SD card.
The Elecraft KX3 does not have a built-in recorder (indeed, most transceivers do not) thus I made in-line recordings using my Zoom H2N digital recorder.
I did no post-processing of the audio other than converting .wav files to .mp3.
Both receivers shared my large outdoor omni-directional horizontal delta loop antenna for each test.
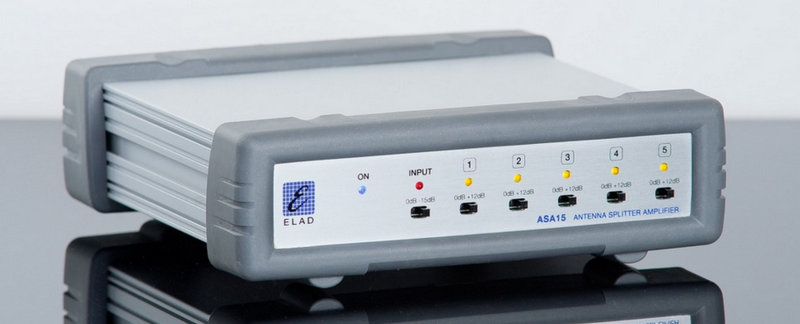
The Elad ASA15 Antenna Splitter Amplifier
To keep the comparison on as equal footing as possible, the receivers shared the same antenna through my Elad ASA15 antenna splitter amplifier. Though the ASA15 has both 12dB amplification and –15dB attenuation, I employed neither.
The ASA15 allowed me to make the following recordings simultaneously.
In each case, I tried to set up both radios using the same filter widths, AGC settings, and (as much as possible), audio level. I didn’t engage a noise-reduction feature on either rig.
I also didn’t employ any type of audio equalization on either rig–still, you’ll note that one radio produces a more “flat” response than the other.
Please vote!
At the end of this post, I have an embedded a survey in which you can vote for the sample recordings you like best. Each recording is clearly labeled to denote that it’s either from “Radio A” or “Radio B” (chosen at random).
In the past, receiver shoot-outs in which I’ve provided sample audio for “blind” comparison––meaning, the listener does not know which audio sample is associated with which radio––have produced particularly positive feedback from Post readers.
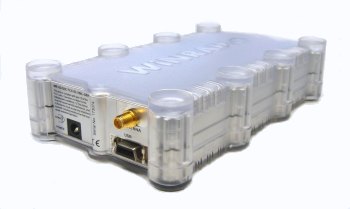
I have a number of SDRs (software defined radios) in the shack at the moment, but I picked the Excalibur because it’s the closest in price ($900 US) to the IC-7300 ($1500) as compared to my Elad FDM-S2 ($520) or the TitanSDR Pro ($2500).
Recording notes and disclaimers
Both the WinRadio Excalibur and the Icom IC-7300 offer native digital audio recording (nice touch, Icom!). The Excalibur simply records the AF to a file on my PC’s hard drive, while the IC-7300 records the audio to an SD card which I can later transfer to my PC.
I’ve been using the Excalibur since 2012, so I’m very familiar with its recording feature. I was not, however, familiar with the IC-7300’s digital recorder, so prior to making recordings, I checked to make sure its recorded audio was a fair representation of its live audio. To my ear, the IC-7300 recorded audio was nearly identical to that of the live audio, so I used the 7300’s internal recorder rather than one of my external recorders.
Both receivers shared my large outdoor omni-directional horizontal delta loop antenna for each test.
The Elad ASA15 Antenna Splitter Amplifier
To keep the comparison on as equal footing as possible, the receivers shared the same antenna through my Elad ASA15 antenna splitter amplifier. Though the ASA15 has both 12dB amplification and –15dB attenuation, I employed neither.
The ASA15 allowed me to make the following recordings simultaneously.
In each case, I tried to set up both radios using the same filter widths, gain, AGC settings, and (as much as possible), audio level. I didn’t engage a noise-reduction feature on either rig.
Note: the only exception to the radios’ equal treatment was in the AM mode recordings, in which I used the WinRadio’s AM Sync (AMS) mode. Why? Frankly speaking, 99% of the time during which I use the Excalibur, I do employ its AMS mode as its AM mode often sounds “hot” and over-driven when band conditions are as noisy, as they were last night.
The IC-7300 does not have AM synchronous detection (AMS mode), but I felt it compared very favorably to the Excalibur in AMS mode. The IC-7300 would have easily beat the Excalibur in this test had I only used the Excalibur’s AM mode. In the end, as a shortwave listener, the goal is to compare the total capabilities of broadcast performance between the two receivers (thus using sync mode if available, to maximize broadcast listening performance).
Please vote!
At the end of this post, I have an embedded a survey in which you can vote for the sample recordings you like best. Each recording is clearly labeled to denote that it’s either from “Radio A” or “Radio B” (I had my wife draw names from a hat to determine which radio would be labeled as A or B).
Since there are quite a few recordings, I’d suggest jotting down your notes separately before completing the survey.
The following recordings were made on the 40 meter ham radio band yesterday evening. Both radios have the same filter width: 250 Hz in CW, 3 kHz in SSB.
Note that the following mediumwave recordings were made during the morning hours (grayline). The strong station is the closest AM broadcaster to my home; it’s not a blow-torch “Class A” type station, merely the closest local broadcaster.
In the “weak” sample, I tuned to 630 kHz, where multiple broadcasters could be heard on frequency––but one was dominant.
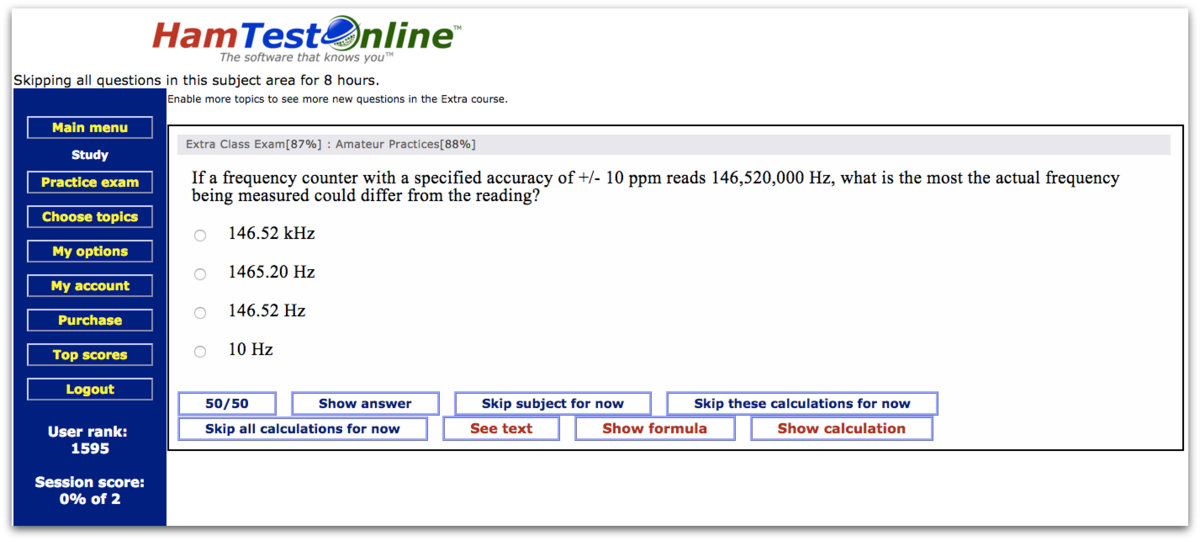
The Extra class is the highest class amateur radio license you can hold in the United States. I’ve put off studying for this test for more than 17 years.
Why? Well, for one thing, I’m not an electronics engineer–indeed, I’ve never taken a formal course on electronics other than the practice study I did for my first three amateur radio licenses. The Extra exam is chock-full of formulas and electronics theory and it intimidated me for ages. Studying for it was…well…arduous.
I did, however, enjoy studying for my Technician, Novice and General exams. [Note that today there are only three license classes: Technician, General and Extra and no Morse Code requirement.] Indeed, I learned a lot about circuits and radio wave propagation from those first exams. As soon as my daughters are old enough, I’ll teach them the Technician course work.
What prompted me to study for my Extra license exam this month? I gave a presentation at the Blue Ridge Amateur Radio Club on April 4th–the president announced that the Extra class question pool was going through a major overhaul and I had already invested a few hours studying the current material.
The current Extra class question pool is only valid until the end of June 2016.
I made a decision that evening: it was time to buckle down and cram for this exam! Especially since my radio club (the NCDXCC) was giving exams the following week.
Studying
In the past, I used a combination of exam study guides published by the ARRL and W5YI, and free online practice exams provided by AA9PW. The combination worked very well.
With the Extra exam, however, I needed a method that was more persistent and one that focused on my weakest subjects.
Enter Ham Test Online
About this same time last year (April 2015), I decided to invest in an online course called Ham Test Online (HTO) with the idea that I could take the Extra exam at the 2015 Dayton Hamvention. That exam never happened because, in the build-up to the Dayton Hamvention, I had very little free time to study. Indeed, the same was true this month, but I fit study and practice time in every spare moment I had to get the exam in the books by the club meeting.
Typical Ham Test Online study screen.
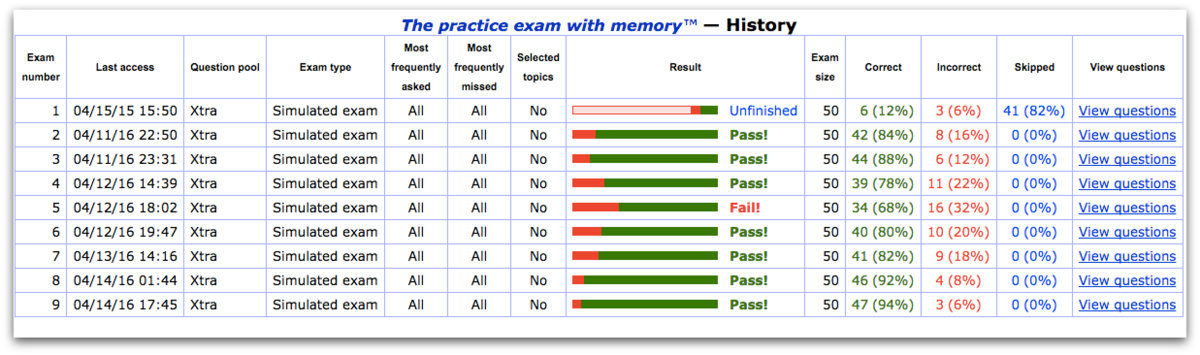
According to HTO, I spent a total of roughly 30 hours studying for the Extra exam in total–at least 28 of those hours were within a one week period of time. I wouldn’t recommend this level of cramming for anyone else.
HTO advises that setting aside only one hour of study per day will have you in good shape to take the Extra exam in about one month. That is a much more reasonable timeline.
Ham Test online shows you, at a glance, your weakest/strongest subjects and topics you have yet to cover. (Click to enlarge)
In short: I am very impressed with Ham Test Online. It was worth every penny to have a dedicated tutorial system that was persistent in noting and repeating my weakest subjects.
It’s actually a very simple website and, fortunately, was usable via my Moto X smart phone’s Chrome web browser. This meant that when I was waiting for my kids in the doctor’s office or parking lot, I could study or even take a practice test without needing a PC.
HTO keeps track of your practice exam results and notes any missed questions for review later. Keep in mind that you only need a 75% score or higher to pass the test. I felt comfortable taking the test with scores in the 85% range. (Click to enlarge)
Indeed, at any given time, I had HTO running in a web browser session on my shack PC, my MacBook, my iPad and my smart phone–they all worked in symphony, picking up the last session/topic from the device I was last using.
Summary
Here are a few notes I took while using Ham Test Online:
Pros:
Adaptive study
Ability to skip topics temporarily
Informative, concise study material
Responsive website that is even usable via smart phone
Both the study and exam metrics show amount of material learned or committed to memory
User has control over:
level of persistence/repetition when a question is missed
difficulty of practice exams
ability to skip topics for an 8 hour period of time
reminder emails when system hasn’t been used for study
and more…
Useful metrics in both study and exam modes
Cons:
To be honest, it’s hard to list many cons for HTO. I’ve never used a similar online tutorial system for comparison.
I should note that I started studying for the Extra exam last year and perhaps learned 8-10% of the total exam. After a one year hiatus, HTO never assumed I could have forgotten the material I learned last year–bad assumption! (ha ha!) Only a day before the exam, I realized I had forgotten some of the initial study material, so I forced HTO to test me on it by selecting only the first element for study. I’m glad I caught that in time. Perhaps HTO should re-check course material after an extended hiatus?
Obviously, the HTO training method works–I was able to pass my Extra Exam with only about 30 hours of total study time. I’m pretty sure I couldn’t have achieved that with books–especially on such short order–and I know of no other web-based platforms like it on the market [readers: please correct me if I’m wrong].
HTO is efficient and cost-effective–especially for those of us with an active family life. It would work well for someone who wants to learn the course material or, frankly, even for someone who is only interested in memorizing the answers.
$24.95 Technician Class study course (2-year subscription)
$29.95 General Class study course (2-year subscription)
$34.95 Extra Class study course (2-year subscription)
(includes both the current question pool and the 2016 pool when it becomes available)
$24.95 Renew all previously-purchased courses (for 2 more years)
If you are considering upgrading to the Extra class license, you might do so before July 2016 when the new question pool will be used. At least, for me, the deadline was a good excuse to get my act together and knock the test out!
Readers: Please comment if you’ve found other study methods or systems that have worked well for you.
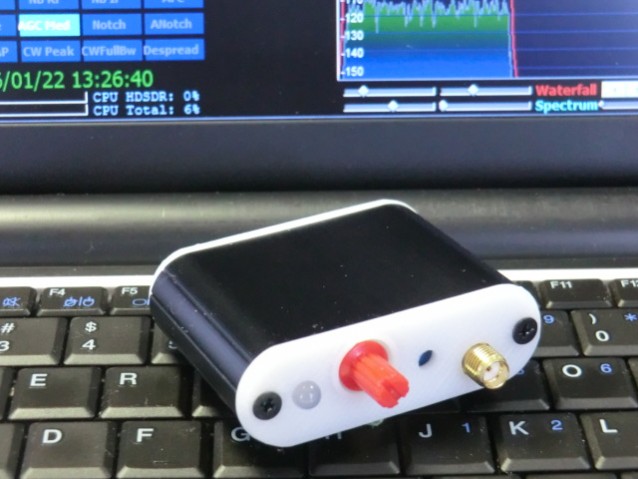
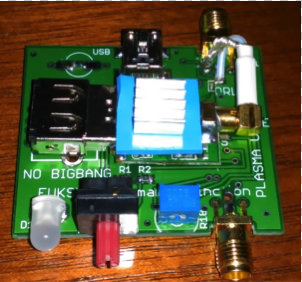
Many thanks to SWLing Post contributor, Mike Ladd, for the following guest post and overview of setting up and using the Soft66RTL3 SDR:
Soft66RTL3 SDR: A low cost…Good performer direct from Japan
by Mike Ladd
Much has changed in the last 8 years in the world of SDR radios. Fast forward to 2016 and just about everyone in the hobby has heard the buzz word “SDR radio”. When SDRs first came out to the market they were all aimed at HF listening and you had two types to pick from. The first being soundcard based and the second being direct sampling. The price gap between the two were several hundred dollars. The more expensive being direct sampling. As the hobby progressed, so did the technology and the prices started to shift dramatically.
You can now purchase a TV dongle for $10.00 and turn it into a SDR. The Soft66RTL3 is basically a TV dongle but with a lot more features.
The Soft66RTL3 comes from an engineer who is no stranger to the world of SDRS. Kazunori Miura (JA7TDO) has been designing and selling many models of SDRS over the internet and shipping them direct from Japan for about 7 years. The Soft66RTL3 is his latest of model hot off his bench. This SDR is a dual input RTL-SDR with a built in 50 MHz upconverter along with 4 user selectable band pass filters that greatly increase your signal to noise ratio in the HF bands.
The frequency range of the RTL3 is from DC to Daylight (0.4 kHz to 1.7 GHz). Miura also addressed a heat issue with the previous version (RTL2) by adding a thermal pad and heatsink. RTL dongles are notoriously unstable due to overheating. In theory, the thermal pad should add frequency stability and keep drift to a minimal.
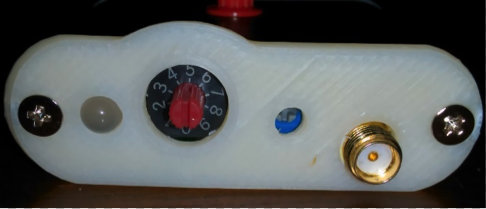
The last feature of the RTL3 is the input gain trimmer pot (see image above). The trimmer pot is for the HF side of the SDR and is already set before it’s shipped from Japan. If you would like to reduce or increase it the trimmer pot is easily accessible. I would suggest leaving it as is.
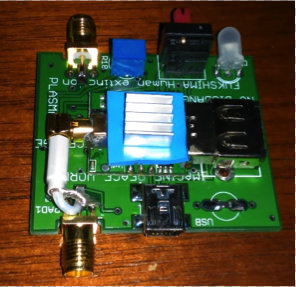
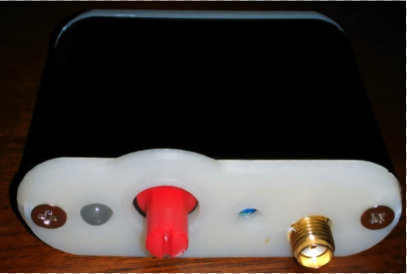
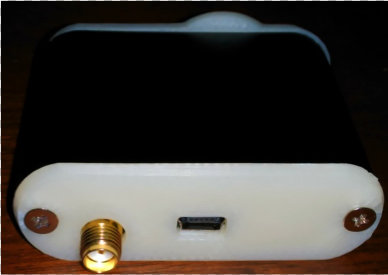
The RTL3 is broken down into two sections: the HF input side and the VHF/UHF input side.
The HF side of the SDR (above) has a red rotary encoder and trimmer pot port. The VHF/UHF side (below) has the USB Mini-B connection.
Both sides of the RTL3 terminate to a SMA-Male connection and Power comes from a single USB Mini-B cable.
Band pass filter selection
If you look at the rotary encoder (red cap cover) you will see a small notch window. The 12 o’clock position is #5 on the encoder dial. One click clockwise will take you to switch position #6 and one click counterclockwise will take you to #4. You should pull the red cap cover off to have a look and get your bearings.
The band pass filter selection is as follows:
#4 enables BPF 0.4 to 1.2MHz
#5 enables BPF 1.2MHz to 5MHz
#6 enables BPF 5MHz to 15MHz
#7 enables BPF 15MHz to 30MHz
#8 or #9 enables the VHF UHF side of the SDR
All other positions will bypass the filtering section on the HF side of the SDR.
Installation
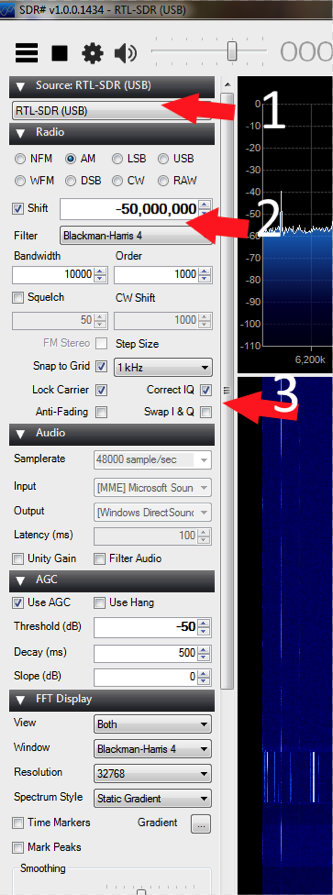
If you already have a RTL-SDR on your system then all you need to do is swap it out with the RTL3 and change the offset of -50,000,000 in HDSDR or SDR# to listen to the HF side of the RTL3–but if this is your first SDR we will need to install 2 items: the front end app and the driver.
I will assume your system is Win-7 or better and we will be using SDR# as our program of choice to drive the RTL3. The RTL3 runs just fine in HDSDR and SDR-Console, but by choosing SDR# it will reduce our setup time considerably.
Plug in the RTL3
Make a folder on your desktop and name it SDR#
Download the latest version SDR# from www.airspy.com and copy the contents of the zip file to your newly created SDR# folder
Inside of your SDR# folder, double click on install-rtlsdr
After the batch completes, double click on the “zadig.exe” inside your SDR# folder
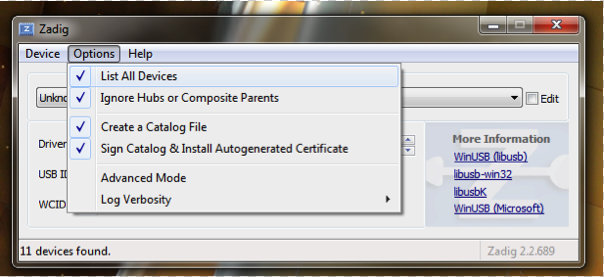
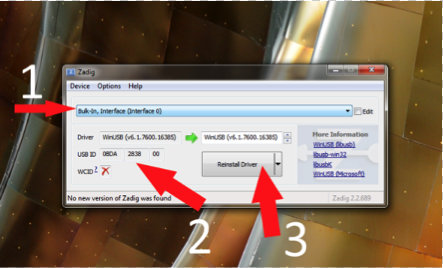
When you run the “zadig.exe” make sure you select “list all devices” as shown above.
The next 3 steps are:
Select “Bulk-In Interface” (Interface 0)
Make sure the proper USB device is selected (2838)
Click “install driver”
The RTL3 is now ready to be used and no further setup is required.
I will assume you did not have any issues setting up the ZADIG driver and now move on to using the RTL3 inside of SDR#. I will show you real world conditions that are not from any scientific standpoint.
Antenna wise, for the HF side I will be using a G5RV mini and for the VHF/UHF side I will be using a Scanntenna ST-2.
You can now launch SDR# and check the following settings (see image below).
For the VHF/UHF side of the RTL3 you will want the rotary encoder on position #9. You want the cutout in the encoder cap showing the 5 o’clock position.
Summary
I have been using this SDR for a little over 3 months. Out of all the low cost SDR’S on the market, this one gives you the most bang-for-your-buck and it is a great entry level SDR with some “Pro” features.
Pros:
Low Price
HF VHF/UHF in one package
Works with any app that supports the RTL-SDR front end
Mike, thank you so much for this excellent overview of the Soft66RTL3! I’m especially appreciative of the time you’ve taken to explain the installation process–for many, this is one of the more difficult RTL-SDR learning curves.
I’m very tempted to check this out for myself–I love the fact that this little SDR has bandpass filters.
Post Readers: I suspect Mike will monitor the comments in this post, so feel free to ask questions. Make sure to check out Mike’s website, where you’ll find more articles about software defined radios.
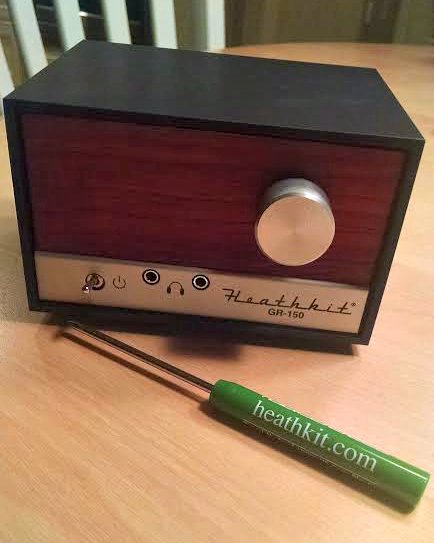
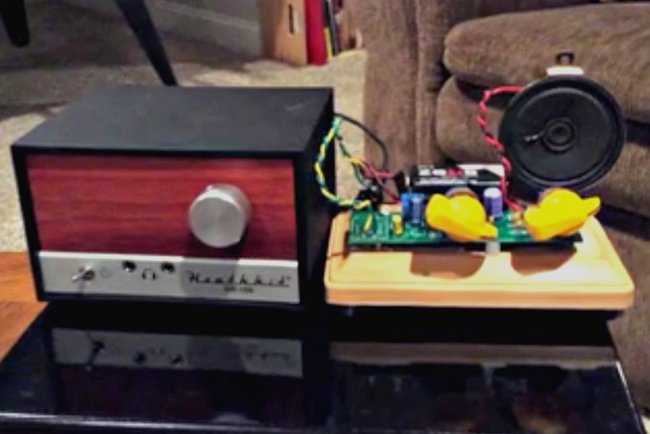
With regard to the Heathkit TRF AM receiver kit, I did indeed build my LM386 amplifier.
I was planning on home-brewing it from scratch as the chip is pretty much all you need and there are various proven schematics for the circuit, but in the end I went with a small kit from Nightfire Electronics for $10 plus $5 shipping that I found on Amazon.com.
It was a bit cheaper to buy it in kit form, of course, and then there was the convenience of having all the parts in one place.
I modified the kit to add a 3.5mm input jack, replacing the RCA jack that came with the kit, to make it easier to plug into the Heathkit radio.
I deliberated whether to install the audio amp into the Heathkit cabinet drilling out a couple of holes for the pot shafts. It all would have fit and I could have easily mounted the 3″ 8 ohm speaker to the back panel of the Heathkit radio. In the end, I decided to keep the radio original and mounted the amplifier board on a small piece of wood I found at a hobby store and decided to leave it all exposed. It works well, all things considered.
It worked well and per my original review on SWLing Post, I feel Heathkit should have included such a little amp in the kit – it makes a big difference.
Many thanks for the update, James! That little LM386 amp kit seems like an affordable addition for any receiver lacking an amplifier or adequate audio amplification.
Many thanks to SWLing Post reader, Larry Thompson, who shares his review of the CountyComm GP5/SSB:
Been having a ton of fun with my new toy, the tiny survivalist radio, the CountyComm GP5/SSB receiver. $74.95 with free heavy duty cordura case with metal belt clip (normally $17.95). Also purchased 2 spare whip antennas @ $6.00 ea. The unit arrived promptly
in just 5 days from CA.
The radio is manufactured by Tecsun and is similar to the Tecsun PL-365, but re-engineer end to military standards for use in embassies and military installations around the world. The case is a heavy plastic that feels like anodized aluminum.
It’s about the size of a small TV remote control, taller than a cell phone, and about 1/2 the width of an iPhone.
Very, east intuitive menus. Incredibly sensitive to dx, relatively good selectivity. A great radio to throw in your travel bag or briefcase. So small that no one, especially customs, TSA, etc would even suspect it is a shortwave receiver with SSB capabilities.
I live in a very highly QRM and RFI interference zone.
I’m in the central city, in an old 1920’s hi-rise, with high power tension lines right next to the building.
Lots of QRM from the elevator motors, etc. Having a good antenna option is a challenge.
I’ve resorted to a stealth longwire antenna, strung out my 5th floor window. It’s 50′ of #16 black insulated copper stranded wire, weighted by a medium size galvanized carriage nut. It seems to work well.
I also use a Magic Wand shortwave antenna, a type of broomstick antenna with 23′ of lead-in, available from Lowbander on eBay.
My main receivers have been a Sony ICF-SW7600GR dual conversion receiver and the SRDPlay. In the past, I have listened to dx with some really outstanding receivers, including a Nordmende Globetrotter, a National NC-183D, a Japan Radio JRC-525′ and a Yaesu FT900AT transceiver. The later two were computer-controlled using TRX-Manager software.
In just 4 days, I can’t get over the sensitivity of the CountyComm GP-5/SSB and it’s ability to pull in stations. So far, it’s far superior to the Sony or SDRPlay.
Digging into the specs, it is a direct conversion receiver, using a DSP si47XX microchip from Silicon Labs to digitize the analog AM/FM broadcasting signal base on modern software technology and radio principles. The direct conversion circuitry can highly improve a radio’s sensitivity, selectivity, S/N ratio and anti-interference capabilities. Direct conversion using software is far superior to a double or triple conversion traditional IF circuitry. This must explain why the unit is so amazingly sensitive!
I can hear things on this unit that I can’t even begin to hear on the Sony or the SDRPlay. The FM reception and sound with earphones is amazing and LW and AM reception is equally sensitive. I can easily get WLW Cincinnati 700 kHz in the daytime here in St. Louis!
There are 550 preset memories: 100 for AM, 100 for FM, 100 for SSB, and 250 for SW. You can scan the memories or scan the bands in various ways. You can also use the Auto Tune Storage function to store memories.
Something I really enjoy is the Easy Tuning Mode function. The ETM function allows you to tune into stations easily and temporarily store them into the ETM storage. 100 stations for FM/MW and 250 for SW. Scanned stations will not be stored in the regular 550 memories, but will remain in the ETM temporary storage until the next time you do an ETM scan.
This is a great feature for travel. When you are in a different city, you can perform the ETS function and this will not delete any of the stations already in the memory.
Thanks for sharing your review, Larry. I use the GP5/SSB all of the time–it stays in one of my vehicles and I often use it for walks, picnics, camping and even a little parking lot DXing.
I suspect if your SDRplay RSP was hooked up to an antenna that could better mitigate your local QRM, you’d find it outperforms the GP5/SSB. The great thing about portables, though, is that you can simply take them to areas with low noise levels. It’s just a matter of finding the right location!
The CountyComm GP5/SSB is a very handy portable. Thanks again!
The CountyComm GP5/SSB can be purchased from:
CountyComm (current promo includes heavy duty carry case)
The Tecsun version, the PL-365, can be purchased on eBay (though be aware that some sellers have BuyItNow prices almost two times the price of CountyComm).
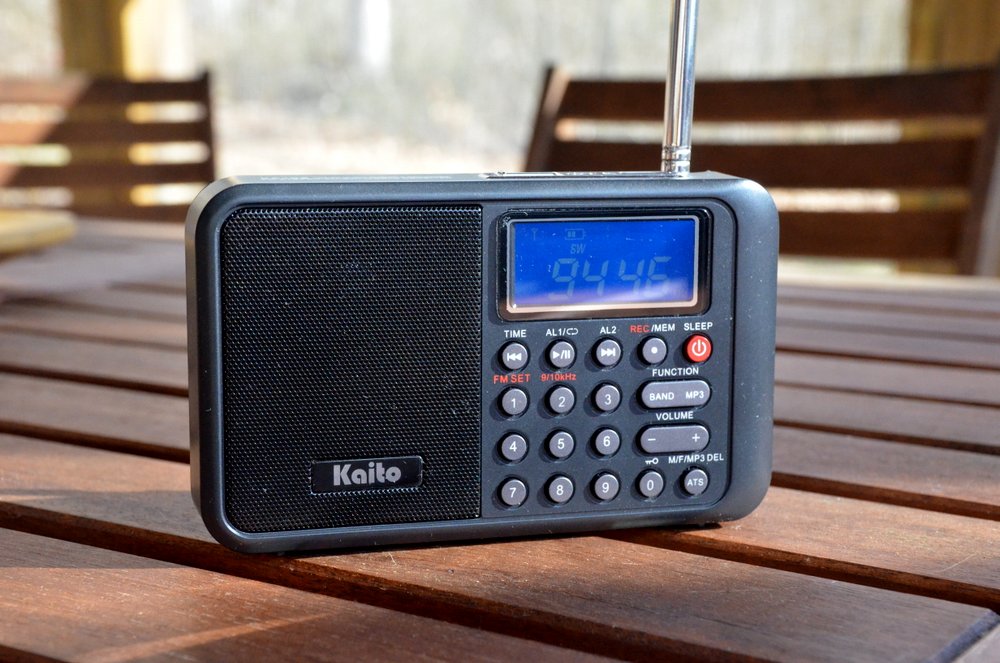
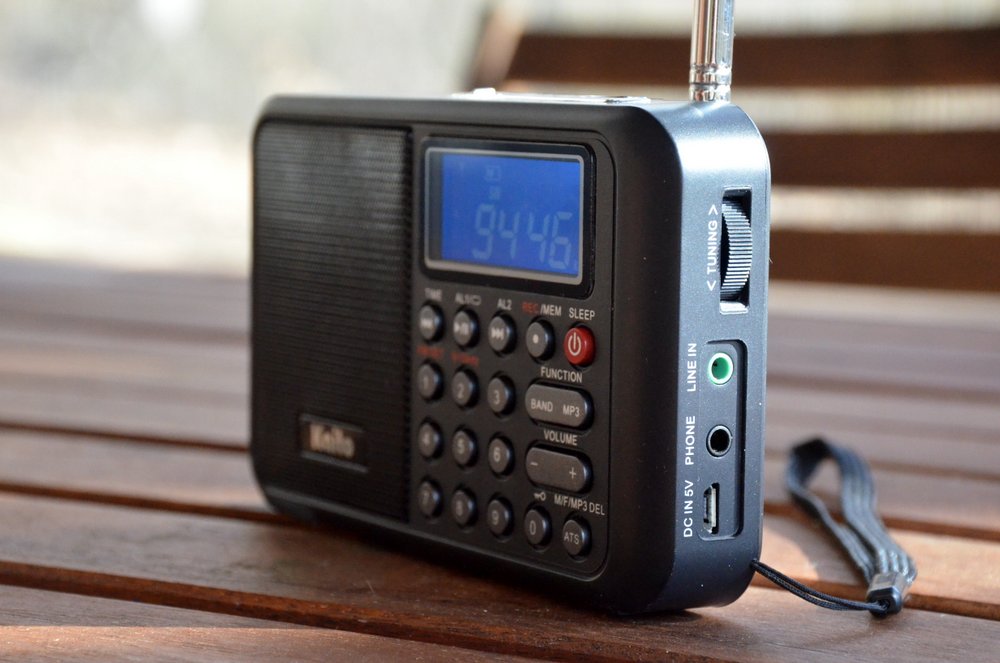
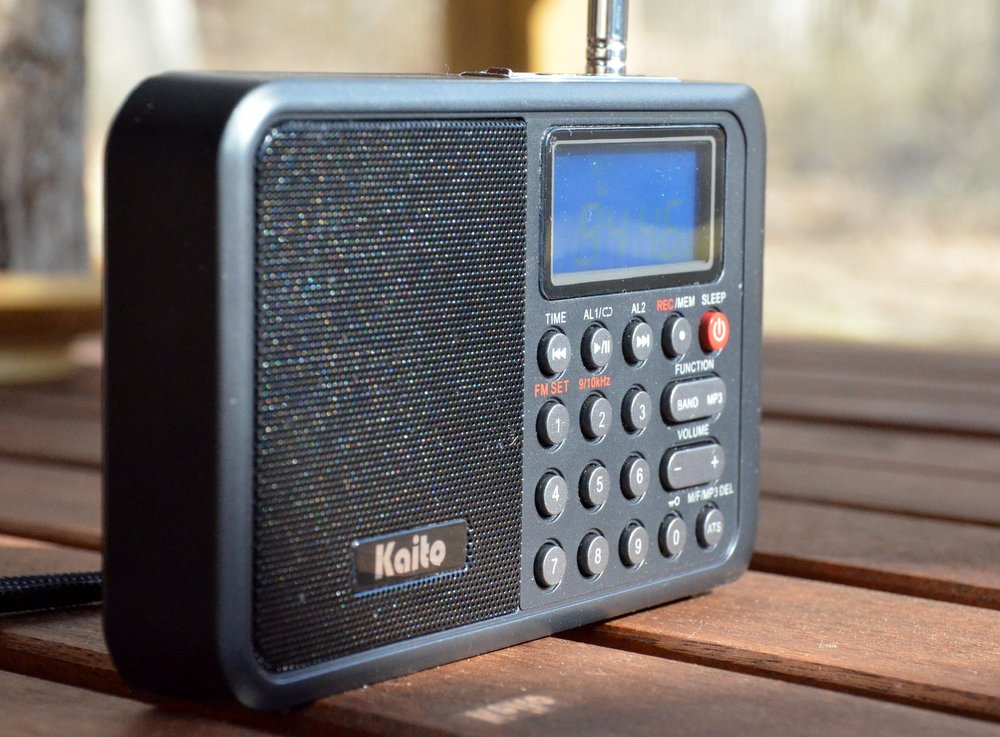
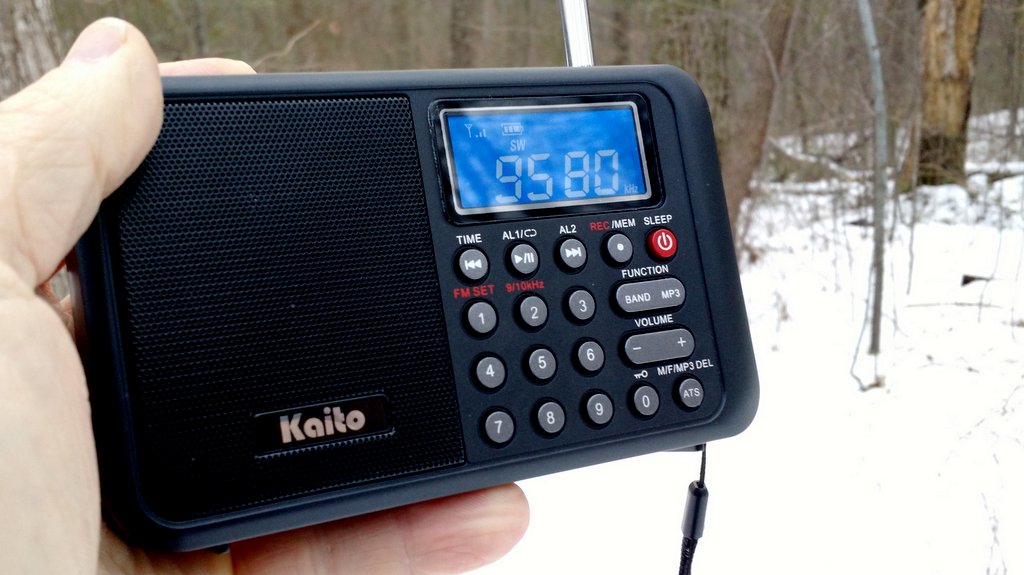
Recently, I learned about a new portable by Kaito Electronics: the Kaito KA108. While there are a number of compact portables on the market, the KA108 really caught my attention because it features a built-in digital recorder. Which is to say, you can listen to a station on shortwave, press a button, and the KA108 will record it to a MicroSD card. Pretty cool, right? It’s also the first shortwave portable I’ve ever known that offers a scheduling feature for recordings.
In the past there have been a few shortwave portables with digital recording capabilities, but most of these have been plagued with poor performance. So this time, I had my fingers crossed that Kaito might have produced a winner.
Having used the KA108 for several days now, my initial review follows, with a focus on shortwave as well as mediumwave performance.
User’s Manual
The KA108 actually ships with two manuals: a quick start reference guide and a proper highly-detailed user’s manual.
The manual is written in English and is quite descriptive, despite a number of spelling and grammar errors that should have been caught before going to print. It’s obvious that Kaito didn’t hire a native English speaker/professional editor to check their copy. (I don’t understand why a company would go to the expense to produce a manual without having it professionally edited…Kaito, please take note!) Fortunately, these spelling and grammar errors, while annoying, can be overlooked and/or deciphered by most English-speaking readers.
Tuning
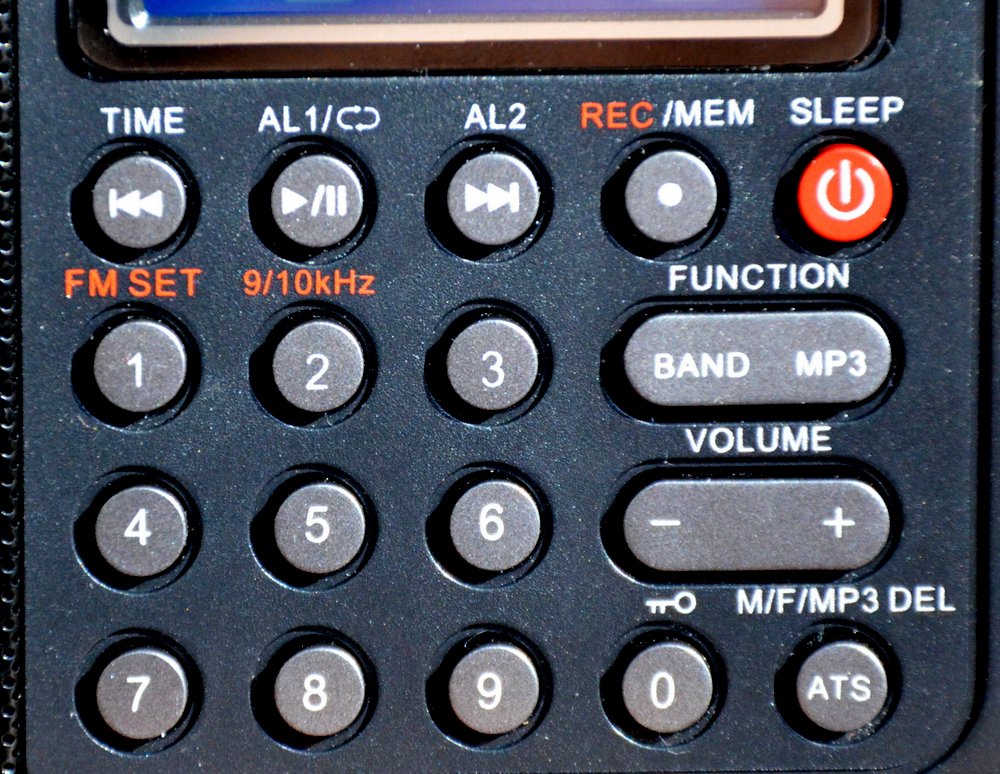
On the plus side, the KA108 sports a full number keypad for direct frequency entry. This makes tuning to a known frequency a very simple process––with one exception (see below). There’s also a tuning wheel on the right side of the radio.
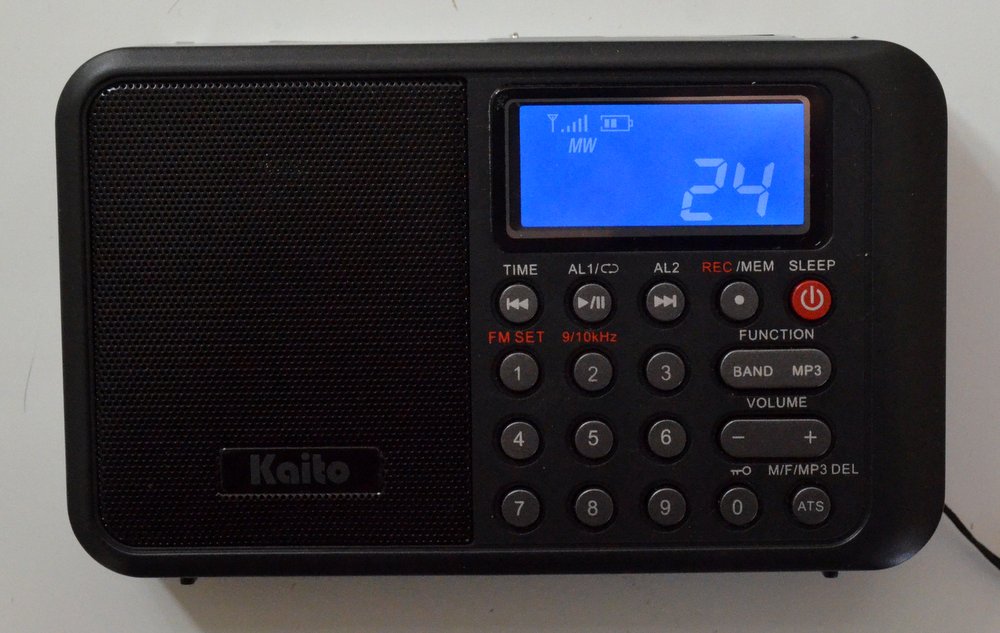
Note where the “0” is placed on the keypad: why the change?
Using the keypad requires some getting used to, however. Most of us––myself included––are familiar with traditional numeric keypads, but the KA108 inexplicably changes the game plan: as you can see above, the “0” button is located on the lower right side of the main keypad. So it took me a few hours of use before I could reliably key in a frequency without looking at the radio.
In my humble opinion, Kaito should have moved the number pad up one row, positioned the “ATS” button to the lowest row on the left, the “0” button to its immediate right, and completed the bottom row with the “Rewind/Play/Fast-Forward” buttons.
Another annoyance––and this is a big one for me–-is that the KA108 has extended muting between frequency changes. It makes band-scanning a frustrating experience. I made a short video demonstrating this:
Audio
The KA108 is designed around a very innovative small speaker with an acoustic chamber that significantly boosts bass response. This is the same speaker used in the Melson S8 that I reviewed some time ago.
The audio fidelity is excellent on FM, and when playing back a full-fidelity digital recording. Unfortunately, when tuned to the AM broadcast (mediumwave) band or to the shortwave bands, the KA108 falls short; the bass response actually becomes an impediment to listening.
In a nutshell: the KA108 audio has issues. A further explanation of the KA108’s audio is described in the performance notes that follow.
FM Performance
On a positive note, the Kaito KA108 has respectable FM reception. I was able to receive all my benchmark FM stations with little trouble, and the KA108 maintained a strong lock on all signals.
And as mentioned above, KA108 audio via the built-in speaker is much better on FM than on any other band. Indeed, on FM, the KA108 produces rich, full-fidelity audio that can easily fill a room. Audio is similar to that of the Melson M7 and the Melson S8.
If you’re seeking a nice FM portable with robust audio, you’ll enjoy the KA108.
Shortwave Performance
I’m quite disappointed with the KA108’s shortwave performance.
Almost immediately after unboxing the KA108, I inserted a battery, walked outdoors, and tuned through the 31 meter band.
Other than a couple of blow-torch North American private broadcasters, I heard…nothing. It was during this first band scan that I realized how annoying the tuning mute could be. And the audio, meanwhile, sounded muffled and garbled: I assumed that there was some local interference, and simply turned the radio off, hoping the following day would produce a change for the better.
The following day, I spent a great deal of time with the KA108 on the air, and compared it with the Eton Traveller III and the Tecsun PL-310ET––both capable, similarly-priced compact DSP radios.
Sure enough, when compared with other portables, the KA108’s reception is, sadly, rather poor.
At first I thought it might be an issue with receiver sensitivity, but the KA108 could receive almost every station the Traveller III and the PL-310ET could receive. But the audio was so muffled on the KA108, even with the use of headphones, that spoken word was hard to interpret. Additionally, the over-active AGC (Automatic Gain Control) meant that audio levels were all over the place. That combination makes for fatiguing listening.
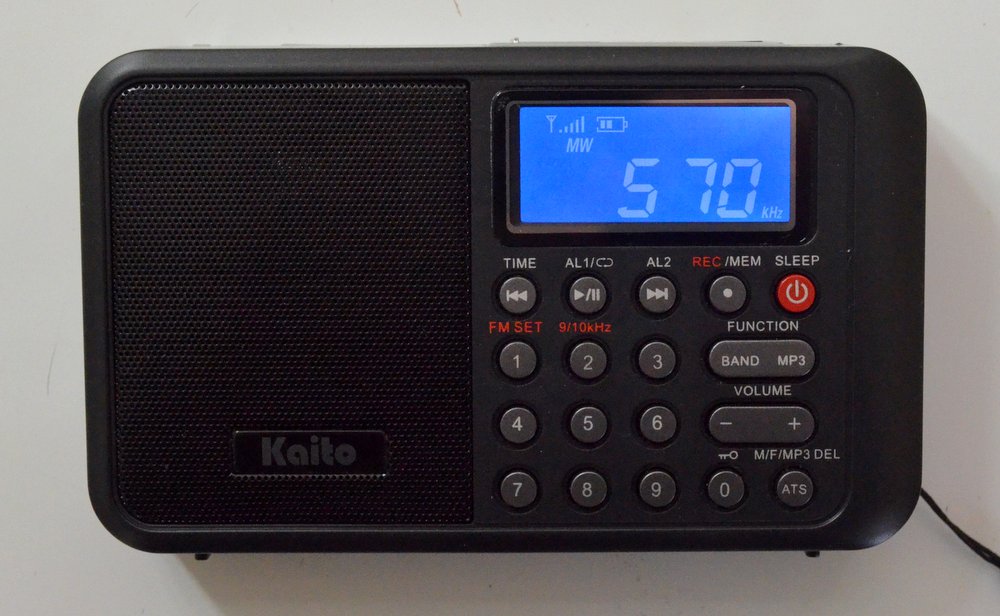
Volume level indicator.
Over the next few days with the KA108 on shortwave, I drew a few conclusions.
After recognizing that the audio fidelity did not improve significantly when using headphones, I realized that at least three factors are having a negative impact on shortwave audio, as follows:
The default AM bandwidth is too narrow for broadcasts, and cannot be adjusted
The AGC setting is over-active and causes audio pumping; it, too, cannot be adjusted
Portions of the shortwave bands are polluted by internally-generated noise/interference
This combination makes for sloppy shortwave performance.
To save time in making the KA108’s comparison information readily available, as well as to indicate actual speaker performance, I decided to take a few quick comparison videos not with the KA108 or an external mic but simply with my smartphone. While my phone’s microphone is somewhat limited, I believe you’ll be able to observe the inherent problems with the KA108.
I compared the KA108 with the Traveller III in each video.
In the first comparison, I tuned to Radio Exterior De España on 9690 kHz, as you’ll see. The signal was marginal or relatively weak at the time:
Mediumwave (a.k.a., AM broadcast band) performance is very similar to shortwave performance.
In this video, I’ve tuned to an AM station located twenty-five miles away on 1600 kHz. The KA108 can receive the station, but audio is not pleasant and the AGC is, yet again, overactive. I’ve noticed that the mediumwave band is plagued by more internally-generated noise than are the shortwave bands.
Note that YouTube’s copyright checking system flagged my video because it recognized the song being played in the background on WTZQ. I believe this easily qualifies as fair use since the clips are short and it’s an off-air recording with dialog on top. I’ve disputed this, but YouTube may choose to delete this video. In anticipation, I’ve saved the audio from this video–you can listen to it by clicking here.
In a nutshell, AM performance on the Kaito KA108 is frankly poor. Even when I tuned to strong local stations, the audio sounded muffled and distorted, much as in the Radio Havana Cuba example above.
So you can forget about using the KA108 for mediumwave DXing.
MP3/WAV Playback and recording
There are some redeeming virtues with the KA108, however. Here’s a positive: digital playback with the KA108 is fantastic. I’ve played a wide variety of audio files on the KA108, and am very impressed with its on-board MP3/WAV player. While audio characteristics unfortunately cannot be adjusted––i.e., there’s no equalization––I find the default audio settings well-balanced for both music and voice.
The KA108 has a dedicated MicroSD slot and a covered USB slot on top of the unit.
Recording directly from shortwave and mediumwave is also quite good. I believe its on-board recorder is perhaps the best I’ve tried in recent portables; it’s a marked improvement over that of the Kaito KA29, for example. It seems to capture the receiver’s produced audio well, with only a slight, high-pitched “hiss” injected in the audio, though this is not a major distraction.
Sadly the main distraction is that the recorder is recording audio, as I’ve outlined above, from a sub-par receiver.
Still, as an MP3/WAV player, it’s brilliant, and boasts excellent audio.
Summary
Invariably, all radios have strengths and weaknesses; here’s a list of my notes from the moment I put the KA108 on the air:
Pros:
Great portable size
Clear back-lit display
Numerous recording and playback features
Audio via MP3 or headphones is strong, considering the small speaker with acoustic chamber provides more bass response and volume than comparable portables (see con)
Excellent FM reception
Excellent MP3/WAV playback with well-balanced audio fidelity
Recorder schedule function
Alarms and sleep timers easy to use
Dedicated MicroSD and USB slots on top of chassis
Cons:
Mediocre sensitivity on SW and MW
Internally-generated noise on MW and SW
Audio (via built-in speaker) is:
too bass-heavy, lacks treble on MW/SW
garbled and mushy on MW/SW
“hot” and often splatters/distorts when signals are strong
Tuning
extended mute between frequency changes
no “scan to next station” function (only ATS)
Odd numeric keypad layout
Any local RFI garbles reception even further on SW/MW
No SSB (in fairness, few radios in this price class have SSB)
Antenna swivel to the front somewhat blocked by the radio’s chassis
No backstand
Conclusion
I really wanted the Kaito KA108 to be a strong––or even average––performer. Why? Because, like many of you, I would love to have a capable shortwave/mediumwave radio with built-in digital recording and playback.
Sadly, the KA108 falls short on multiple levels.
Concerned that I might have simply received a defective unit––as I did when I reviewed the Sangean ATS-405––I contacted Kaito Electronics USA. I mentioned my disappointment with the radio’s performance, and detailed the negatives mentioned in this review.
I asked Kaito’s technician if I might have received a defective unit? He responded that my experience seems to be the norm with this particular production run. He, too, had noted muffled/garbled audio on shortwave and mediumwave. Per his request, I sent a detailed list of the KA108’s shortcomings with suggested fixes. He is planning to send this to Kaito’s current manufacturer in China.
The KA108’s poor performance issues would likely be mitigated to a great extent, if the manufacturer would simply make the following adjustments:
Widen the AM bandwidth
Tweak the AGC for greater stability
Adjust the audio settings for the AM mode
Minimize/shorten muting between frequency changes
Improve internal shielding and grounding
And while they’re at it, have the radio manual edited by a native English speaker
Since this is a DSP-based radio, I imagine the first four adjustments can be made via firmware upgrades.
Time will tell if the second production run of the Kaito KA108 improves on the first. Fingers crossed…! Kaito, we’d like you to succeed on this score.

 The Elecraft KX3 does not have a built-in recorder (indeed, most transceivers do not) thus I made in-line recordings using my Zoom H2N digital recorder.