Category Archives: Field Radio

MLite-880 Review: Advanced SDR Performance in a Traditional Portable Design

Many thanks to SWLing Post contributor Dan Robinson, who shares the following review:


MLite-880 Spectrum Display Portable:  Advanced SDR Performance in Traditional Portable Clothes

by Dan Robinson

For years, radio listening hobbyists (as many of us who are still around in 2026) have had numerous choices when it comes to portable receivers.  Those of us who got our start as DX’ers/SWLs in the 1960’s (some earlier) or 1970’s have seen a lot of hardware come around the corner.

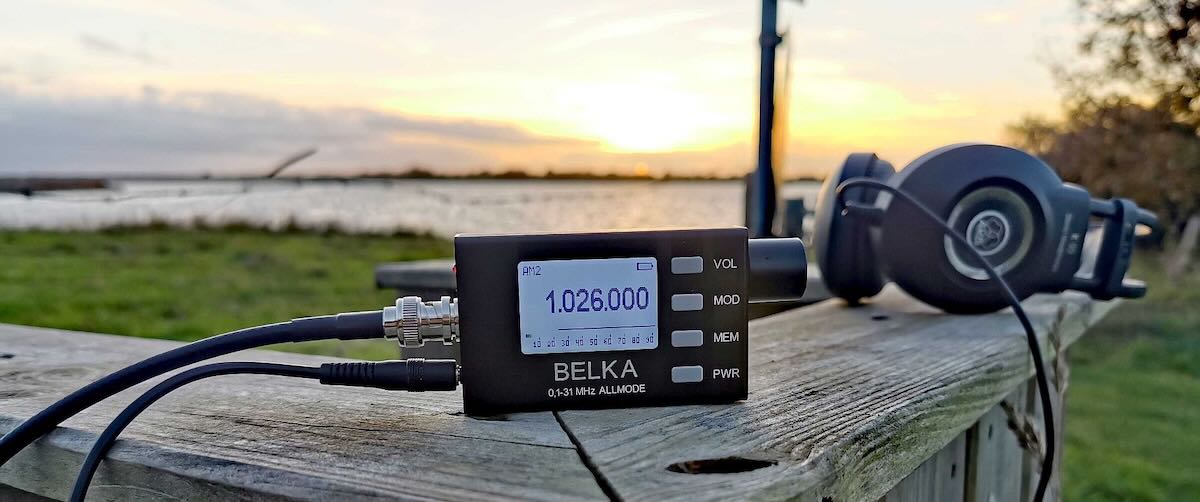
Some years ago, the Malahit/DSP receivers, firmware, and hardware designed and made in Russia appeared.  There was the Belka, amazingly small but a superb receiver that many of us still use.  Although shortwave broadcasting has generally been on the decline, we were lucky that companies such as Tecsun, Sangean (reported to have now stopped all production of SW portables), and other China/Taiwan-based companies continued to make impressive portables.

ICOM, Yaesu and Kenwood began putting spectrum scopes in displays a long time ago.  ICOM’s IC-R9000 (produced 1989 to 1998) was the first to bring that feature. The more recent Icom 7300, 8600, and 9500 demonstrated far more advanced spectrum displays, as did Kenwood.  Ten Tec in its original form put rudimentary spectrum display capability in its RX-350/Jupiter receiver/transceiver.

Today, we’re seeing a number of HT units with some kind of spectrum display.  The Radtel 950Pro is one example of this.  ICOM’s IC-R30, discontinued but a superb wide band unit, also has a spectrum option though quite limited.  Various China-based companies started putting spectrum displays into the ATS series of receivers, and scope displays became standard on transceivers by Xiegu and others.

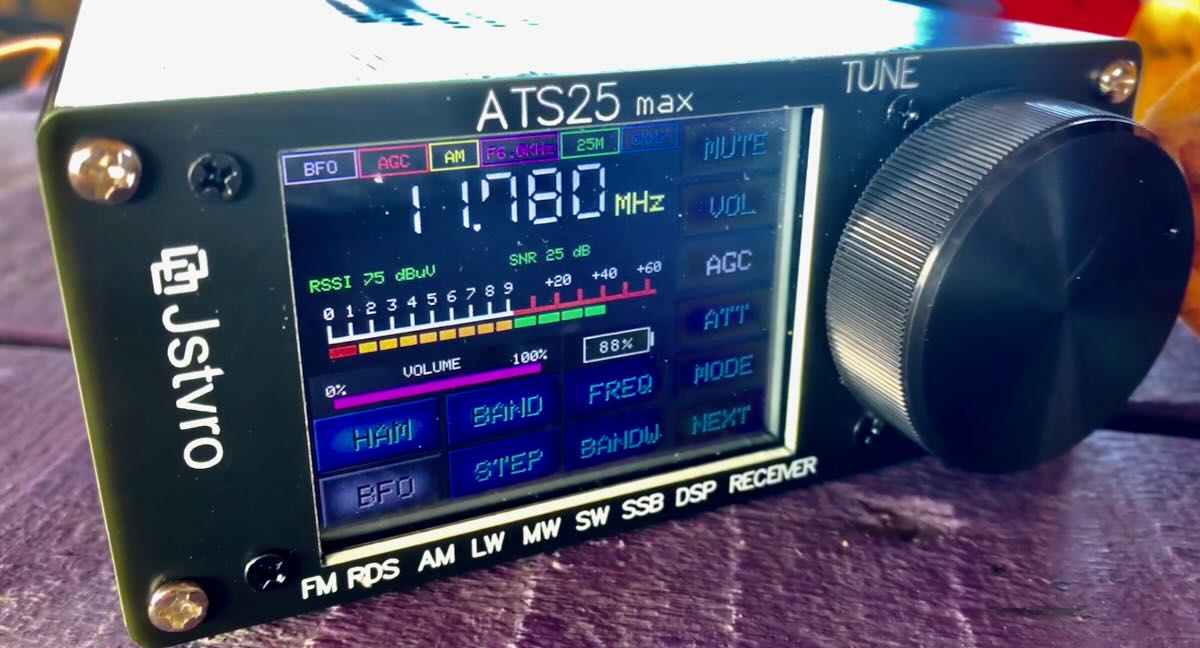
Malahiteam in Russia licensed firmware out to a range of China-based manufacturers.  The China-made “ATS” portables available from AliExpress and Banggood have been through numerous versions, including the ATS25 Pro + AIR desktop, the ATS25 Ultra, ATS25 XF (see https://www.youtube.com/watch?v=LJC-pAu4nUk), and these are increasingly emphasizing the spectrum option on the display. There have been some very interesting front panel designs such as the DP-666 based on the TF6686 chip, and the AMNVOLT ESP138, the first with dual 4732/6686 architecture (see:  https://www.youtube.com/watch?v=m1njJskDSUI&pp=ygUMZXNwMTM4IHJHzGlv)

What we had not seen until recently was anyone putting a spectrum display into a “traditional” portable cabinet (some years ago, I had suggested to County Comm/Maratac which has carried a re-badged Tecsun PL-368 that they consider doing so. At one point I received from them a photo of a prototype which looked like a PL-368 with a spectrum display at the top.  But to my knowledge nothing was done to advance that to market).

WHAT IS THE MLite-880?

There have been a number of reviews/demonstrations on YouTube of the MLite-880, including by Tech Minds (see:  https://www.youtube.com/watch?v=cmO8TIr_VFo).  One of the most extensive is a nearly hour-long review by a Russian YouTuber RADIOCHIEF.RU (see:  https://www.youtube.com/watch?v=ut6cY2jZv7Q&t=1065s) and another excellent overview by Radio Bunker here:  https://www.youtube.com/watch?v=wgcRoha-mfM).

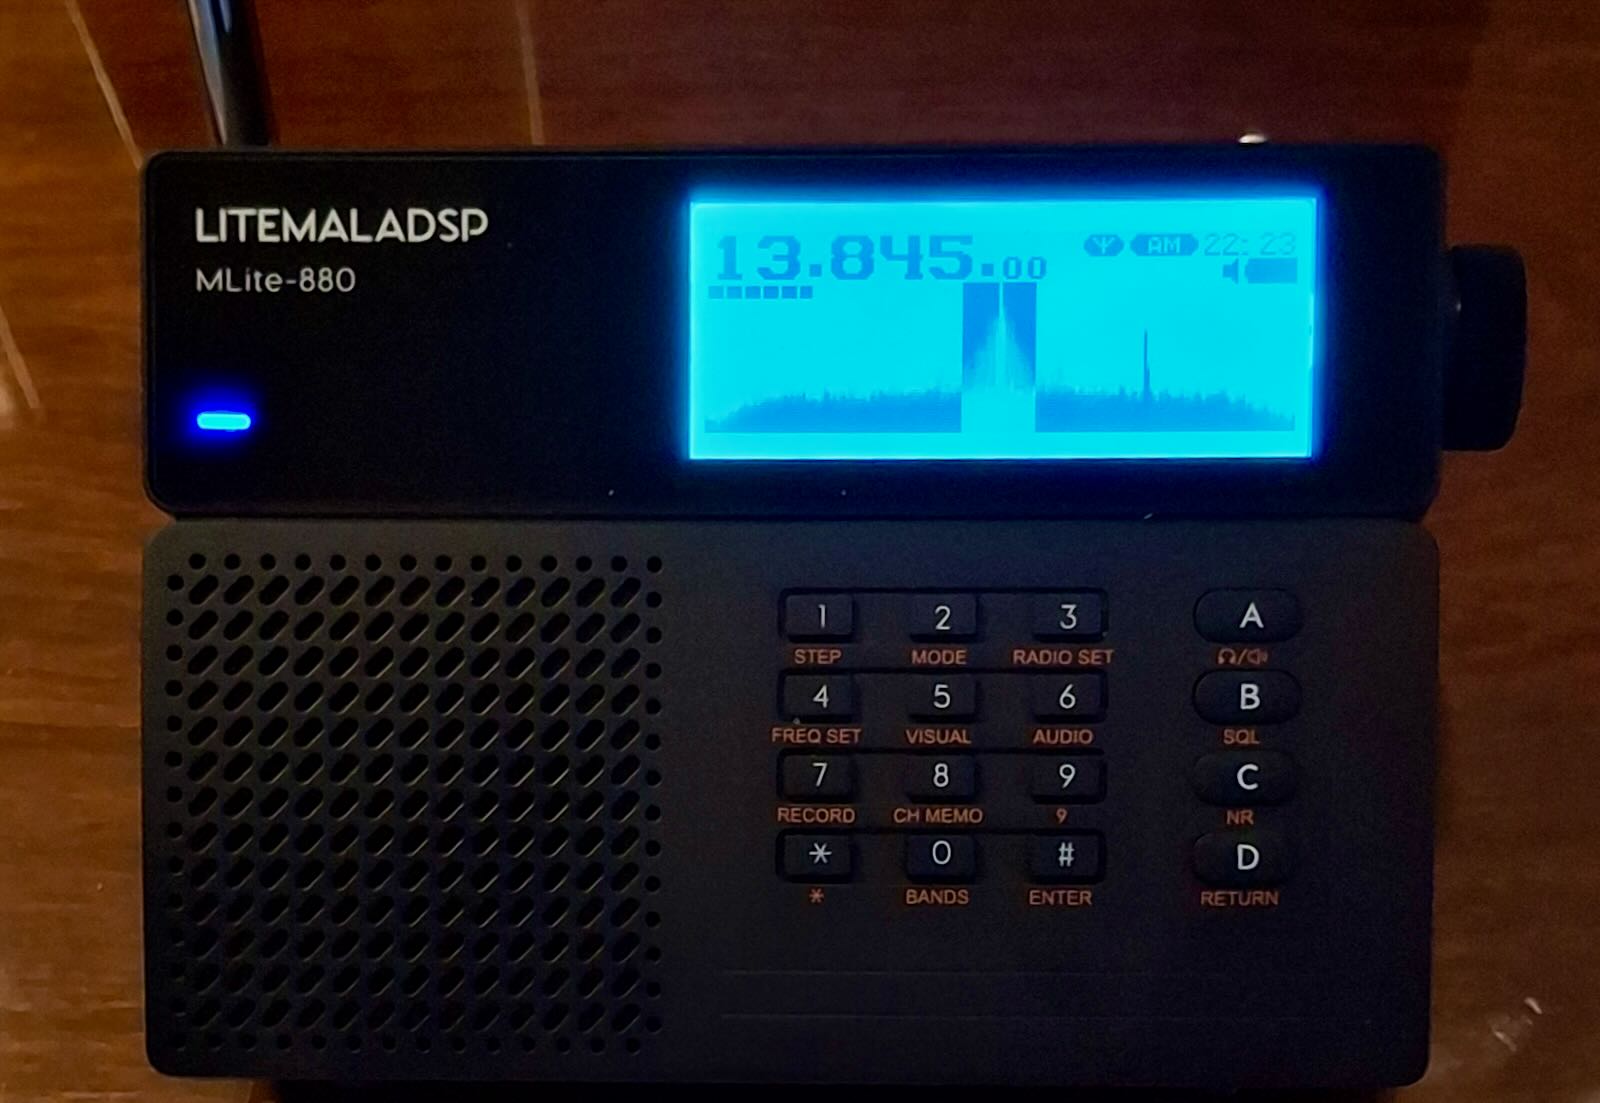
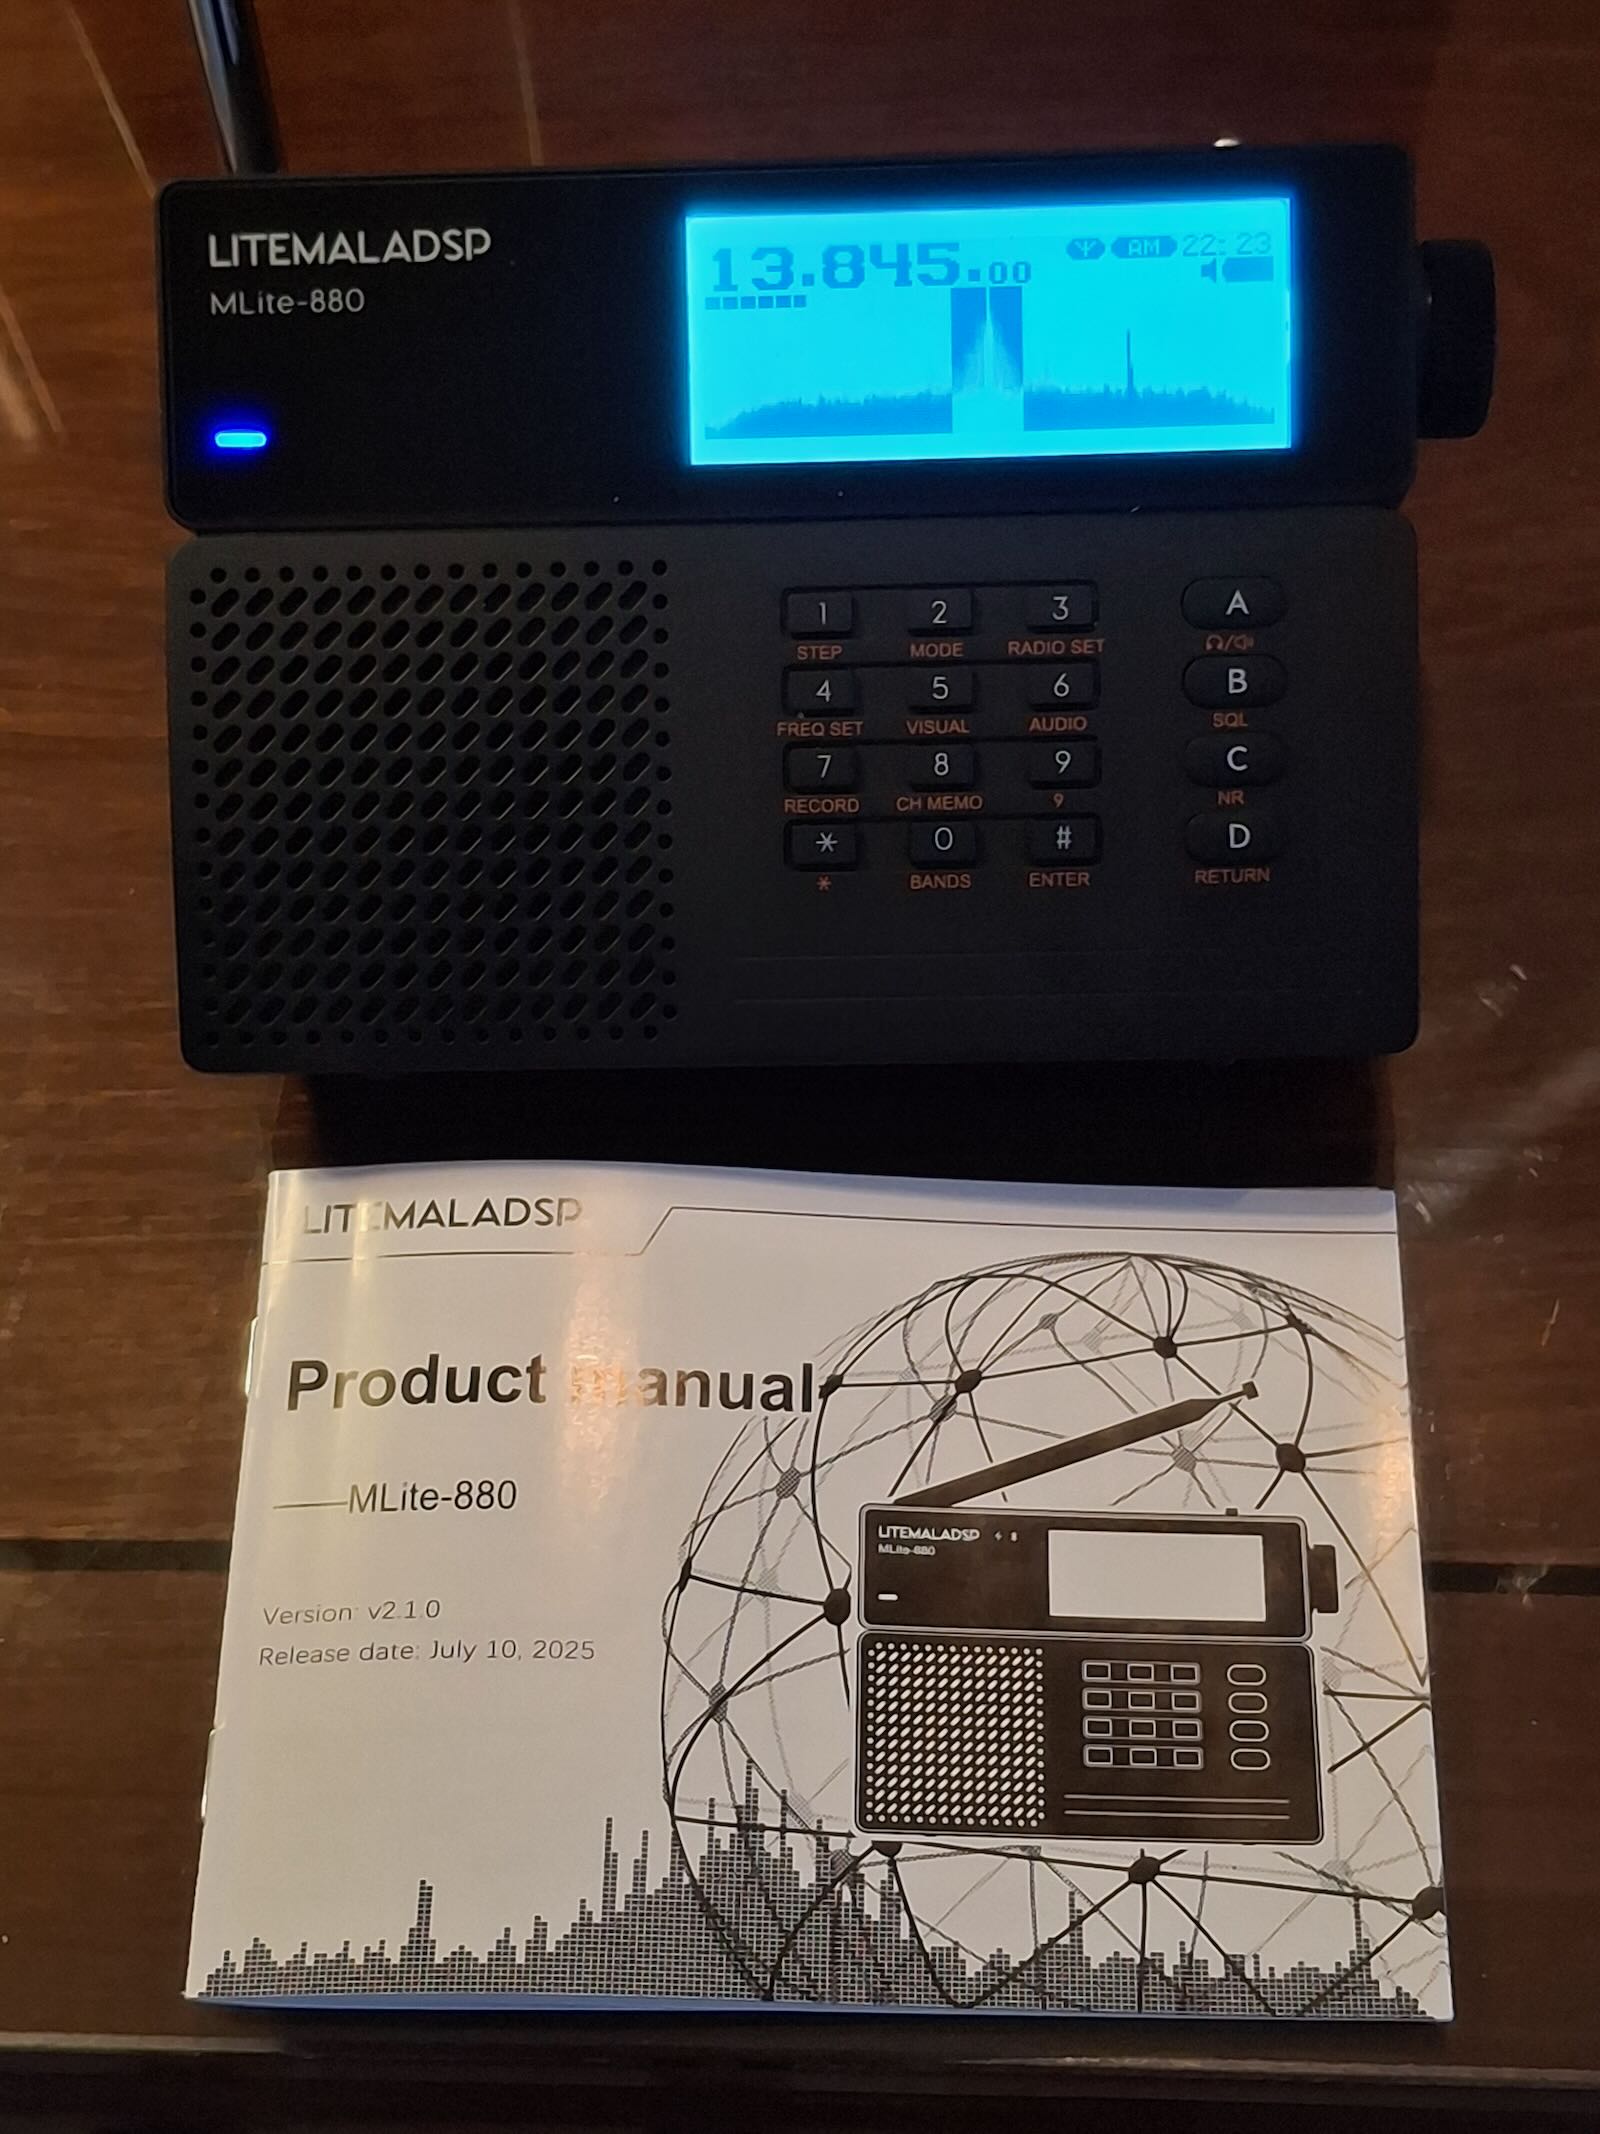
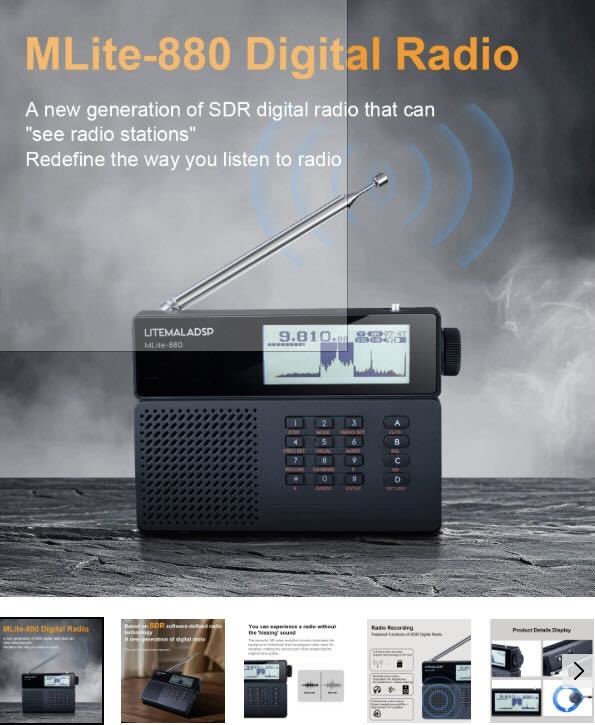
The major feature can be seen at power on.  Instead of just a digital/numerical display of frequency we see the frequency AND below, a 40 kHz slice of spectrum.  As the advertising description on the Elecevolve.com website states:

“A new generation of SDR digital radio that can “see” radio stations” . . . and “the radio in people’s impressions stays in the last century.” 

The message that Malahiteam wants to convey is clear:  this is a major step forward from portable design of the past.

The radio is very light, with a back-stand and a fairly robust whip antenna which stands at an angle when the receiver is being used with the back-stand (unfortunately, the antenna base does not allow it to go vertical).

Around the cabinet, there are a minimum of controls:  on top, we have a simple power-on/off switch and a microSD slot (more about that later).  USB-C and headphone jack are on the right, and an external antenna jack on the left.  The frequency display module of the radio looks like just that — it’s on top above the multi-function keypad and ABCD keys.  As for mode displays, there are battery and Bluetooth lights below and next to the LITEMALADSP letters.  On the back, we find the 21700 battery compartment, and on the back-stand, we find information about the receiver, but no “Made in…” information whatsoever.

From the videos, and certainly from the name of the radio (LITEMALADSP) we have the impression that the MLite-880 is a cost-reduction version of the Russian DSP/2/3 receivers.  Neither 4732 nor TEF 6686 chips are used.  While one video review states that an MSI-SDR-M1 chip is inside, Georgiy at Malahiteam states that this is not so.

There was obviously a deliberate choice of the 21700 battery rather than 18650 used in Tecsun, Choyong, and other portables.  First adopters say that so far, this battery keeps the receiver going for hours, something I can confirm.  Anyone unfamiliar with professional type batteries like this should invest in a good standalone charger; if you already own a Tecsun PLxxx or D808 portable you will be familiar with 18650 and similar cells.  [UPDATE]:  Larger size 21700 battery does not fit — the battery provided with the radio is a EVE INR21700/50E

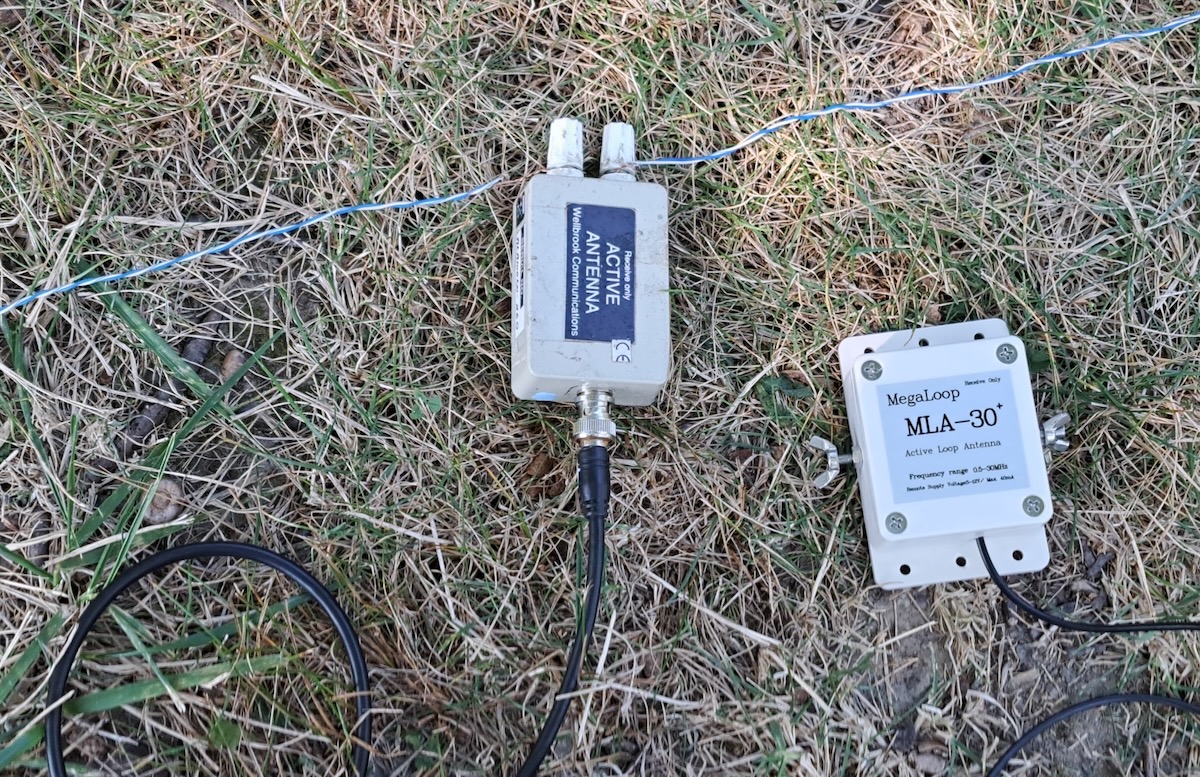
The inclusion of a backstand is very welcome, since Russian DSPs and China-made SDR portables often lack one.  The whip antenna is not thin and flimsy like those found on some China-made small portables.  There’s a mini to SMA adapter included in the box.

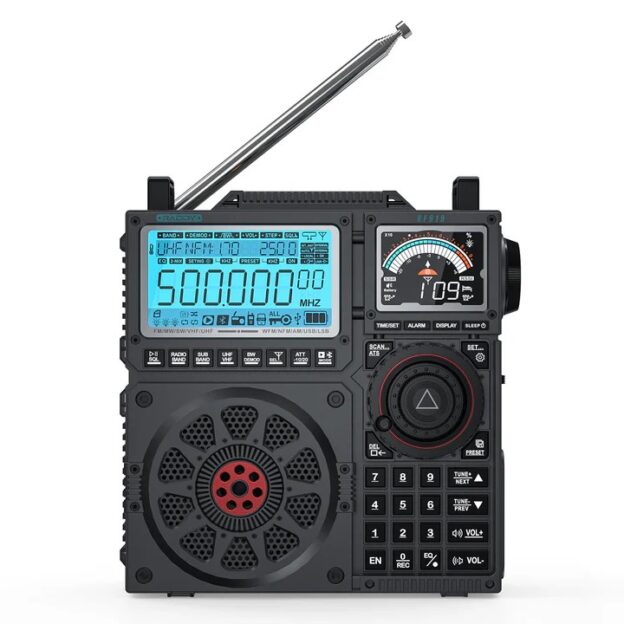
One reviewer notes that high-speed microSD cards are needed because files are recorded in WAV format.  Georgiy at Malahiteam states that 16 and 32 GB cards have worked, BUT one user reports a 256GB card worked.  Recording capability is a feature seen on other portables like the Raddy RF919.  A good sized speaker is on the left.  The tuning knob has a dual push-pull function for volume and frequency change.

And the radio has Bluetooth capability, which worked fine when I first tried it with a Bluetooth speaker.

In menus under “About” we see “Designed in Russia/Made in China.” I recommend that readers view the various videos available online.  While I was in the process of writing, I was surprised when the MLite-880 I had ordered from Banggood showed up on my doorstep.  So, I’m able to provide initial impressions, and when a second unit arrives here, I’ll do some unit-to-unit comparisons.  [NOTE:  Testing done using only the onboard whip antenna]

VIDEO: UNBOXING AND DEMO

Click here to view on YouTube.

“LITE” BUT NOT LIGHT ON FEATURES

If this is supposed to be a “Lite” version of the Malahit DSP receivers, whether the original Russian-made units or those from China, that would not be apparent to someone using this receiver for the first time.  Numerous options are brought over from the Malahiteam DSP.  We have synchronous reception (but see below) and the ability to correct calibration variations.  Recalibration and BFO fine adjust is something we see on Tecsun portables, and China-made SDRs, and the AFEDRI SDR.

I won’t list everything, but we also see Hi-Z/50 Ohm, BiasT, Attenuation, and options for adjusting display brightness, spectrum average, spectrum fill, and RDS view.  That is quite a lot of flexibility and reminds me of what we find on receivers costing thousands of dollars.  Under Audio settings, we see Filter Type, Filter Low Freq, Filter High Freq, and variable Noise Reduction.  One reviewer asserted that NR “works significantly better than on the Russian-made DSP-3, which costs near $500,” and based on my first tests, I agree.  NR runs from 0 to 15 and, once set, can be quickly activated by pressing the C button on the right labeled NR.  Overall filtering ranges:  0 to 8 Hz, 0 to 12 Hz, 0 to 15 Hz for the three designated filter positions.

AGC settings include AGC limit, AGC gain, and manual control, all settable in dB.  On a third page of options, we find NB Mode, NB Threshold, Equalizer Type, Key Beep Level, and SQUELCH Threshold.  Recording is accomplished with a direct access button (NOTE:  I had some problems getting record working with a 1GB microSD but switched to a FAT32 8 GB and it worked).  A quite nice printed manual shows the modes: USB, LSB, CW, DSB, AM, SAM, NFM, WFM.  Steps are listed as:  100 Hz, 500 Hz, 1 kHz, 2.5 kHz, 5 kHz, 6.2 kHz, 8.3 kHz, 9 kHz, and 10 kHz.

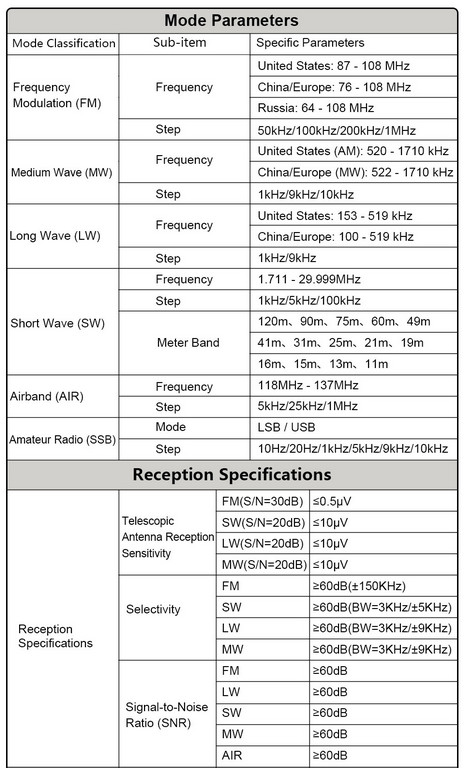
The MLite-880 contains band ranges selected by pressing the appropriate key and then A/B to scroll through those ranges.  Coverage is from 100 kHz to 519 kHz, from 520 kHz to 1710 kHz, and up to 29,999khz.  But one can directly enter any frequency in this entire range, regardless of the ranges.  Under AMATEUR BANDS, we find 135.70 kHz to 137.80 kHz (2200m), 472 kHz to 479 kHz (630m), 1800 kHz to 2000 kHz, 3500 kHz to 3800 kHz, 5351.5 kHz to 5366.5 kHz, 7000 kHz to 7200 kHz, and on up to 29.700 kHz, with 70 mHz to 70.5, and 144 mHz to 148 mHz.  Finally, FM/VHF bands include 65.9 mHz to 74 mHz (OIRT), 76 mHz to 108 mHz, and AIR band 118 to 137 mHz.

The spectrum display on the MLite-880 is 40 kHz.  For most people, especially those coming from a portable with just a digital numerical readout, I don’t think this is going to be a problem.  The 880 obviously has a smaller spectrum display than the full Russian DSP or Chinese-originated portables.  Under VISUAL settings, we have choices of:  BRIGHTNESS LEVEL, BRIGHTNESS OFF TIME, SPECTRUM AVERAGE, SPECTRUM FILL.

I have not opened my MLite-880, but RADIOCHIEF.RU on YouTube shows the cabinet back removed (around the 29-minute mark).  We see extensive shielding with metal covers over key sections. Very impressive, and it finds me wishing that other manufacturers would have done this.  How much better the short-lived “Elite Satellit” by Eton might have been with better internal shielding.

What remains to be seen is the extent to which the MLite-880 monochrome display throws off interference, a well-known issue with the original Russia-made Malahit units and China-made portables.  See my interview with Georgiy of Malahiteam, who notes that not all noise is gone.  “We weren’t able to completely eliminate the noise,” he says, adding that “it still occurs in places, mostly on the long and medium wavelengths. However, significant attention was paid to the screening, and turning off the display completely solves the issue.”  The screen shutoff he mentions is accomplished as of now by pressing the “9” key.

We learn from the few available YouTube reviews that the main microcontroller in the MLite-880 is the STM32H743, which one reviewer says is “about the same as the older version in the Malahit DSP-3”.  And he adds:  “It’s a full-fledged SDR like the DSP-3 that is, unlike all sorts of superhet Tecsuns and DEGENs on chips with all sorts of soft mutes, the Malachite works just as well but significantly better. . .”

Unfortunately, so far we see that firmware updating is accomplished using the STMCube program used by the Russia and China units and the excellent AFEDRI.  I find STMCube to be clunky and often frustrating, though it seems straightforward when explained in the ML-880 manual.

RADIOCHIEF.RU on YouTube provides a demonstration of the MLite-880, comparing it with an ICOM IC-R20 and a DSP-3.  He notes that while there are flaws in the 880 they appear to be fixable via  firmware upgrades.  In the downloads section of the elecevolve website we see version 1.2 dated 6 February 2026.  The unit delivered here has 1.1  The printed manual shows “v2.1.0 Release date July 10, 2025”.  I’m not aware of videos or other online presence of the ML 880 before January 2026.

WHAT’S THE BIG DEAL?

SWLing Post readers, whether SWLs or amateur operators, may be asking what the big deal is with the MLite-880.  That’s understandable, but let me explain the significance.  Much as the Choyong LC-90 became the first receiver to provide HF and Internet radio in a traditional radio cabinet (though without any spectrum display), the 880 shows that placing such a display in a traditional portable cabinet has been quite possible for some time — it just took someone to go ahead and do it. Continue reading

Don Pushes Portable Antennas Further: Loop Size, Performance, and Real-World Limits (Part 2)

Many thanks to SWLing Post contributor Don Moore–noted author, traveler, and DXer–who shares the following post:


Two Portable Antennas for Remote DXing (Part Two)

By Don Moore

Don’s traveling DX stories can be found in his book Tales of a Vagabond DXer [SWLing Post affiliate link]. If you’ve already read his book and enjoyed it, do Don a favor and leave a review on Amazon.

In my initial comparison of the PA0RDT mini-whip and the MLA-30+ MegaLoop, the mini-whip performed best on medium wave and the lower shortwave bands, while the loop worked better on the higher bands. But, I wondered, why should the MLA-30+ be restricted to that small steel loop? The wire loops I use with my Wellbrook ALA-100LN typically range from twenty to fifty meters in circumference.

I threw a twenty-five-meter wire over a tree branch and formed it into a delta with the MLA-30+ in the bottom center. Remember, I was testing in the northern Chicago suburbs. My SDRs were completely overloaded. Medium wave was useless and I had strong MW stations all over the shortwave bands. The MLA-30+ doesn’t have the same strong-signal handling capabilities as the Wellbrook. And there are a lot of strong medium wave signals in the Chicago suburbs.

So I took that wire down and replaced it with a loop of twelve meters circumference.

That did the trick. I had lots of signals on medium wave without the overloading. Here’s what the upper end of the MW band now looked like with the MLA-30+.

For comparison, here’s the same wire loop using the Wellbrook ALA-100LN. The Wellbrook has a slightly lower noise floor but otherwise the signals are about the same.

Out of curiosity, I replaced the Wellbrook power unit with the Bias-T from the MLA-30+ but left the Wellbrook antenna head unit in place. With this hybrid setup there’s no visible difference with the full Wellbrook.

I was satisfied with my findings but I still wondered how much wire the MLA-30+ could handle. A few weeks later I ran some more tests in Kansas, where I knew the dial wouldn’t be as crowded. The MLA-30+ easily handled a 25-meter delta loop without overloading.

Two weeks after doing the Kansas tests I was at a DXpedition in rural western Pennsylvania. The MLA-30+ worked fine with a 40-meter circumference loop, other than being a tad noisier than the Wellbrook with the same wire. So how much wire you can use with the MLA-30+ components depends on how strong your local medium wave stations are.

Findings

From the SDR images above it would be easy to conclude that with the right length of wire an MLA-30+ is just as good as a Wellbrook ALA-100LN even though it is significantly cheaper. But that’s not the full picture. Back in the 1990s my Drake R-8 cost about three times what my Sony ICF-2010 did.  All other things being equal, I would say that 95% of the DX heard on the Drake could have been heard equally well on the Sony. I wanted the Drake for the other five percent.

I have no doubt that if I did a very careful head-to-head comparison of the two units under serious DX conditions on the same wire that the Wellbrook would get things the MLA-30+ couldn’t. But I suspect the difference would be around that five percent mark. I’m willing to accept that tradeoff for an effective cheap light-weight travel antenna. And the MLA-30+ is like having two antennas in one. I can use it with the steel loop in limited space situations or with a larger wire loop when I have access to some garden space with a tree. Together, the MLA-30+ and the PA0RDT make the perfect DX travel antennas.

The only thing I didn’t like about the MLA-30+ was that pre-attached coax cable. It’s not the best quality and I’d rather carry my own cable. I’m not very handy with a soldering iron in tight spaces but at our recent DXpedition my friend Bill Nollman replaced the coax with a BNC jack for me.

The MLA-30+ now looks like this when connected to a wire loop.

Finally, I should address powering the MLA-30+ via USB. While it can be connected to a spare USB port on your laptop, I found doing that sometimes introduced a tad more noise. Instead I’ve been using one of those battery packs used for recharging cellphones. Mine is rated at 6700 mAh and it can power the MLA-30+ for over 48 hours before needing a recharge. But be sure to test yours before doing any serious DXing. I’ve read that some power packs have a minimum required power draw and will automatically shut off if the draw is too low.

Another Option?

While I was finishing this article I heard about another option from my friend Guy Atkins.  This antenna is a combination of the YouLoop with a low-priced Chinese made clone of the LZ1AQ amplifier. Some users say it’s better than the MLA-30+. Guy says it works well on shortwave up to 16 meters but he hasn’t tried it on medium wave. Guy says it’s a “low price, good value” antenna. I’m traveling in Southeast Asia for the winter but will definitely have to try this antenna when I get back to the USA. So maybe there will be a follow-up article next summer.

Links

[Note: Amazon links are affiliate and support the SWLing Post at no cost to you.]

Info on ordering a quality PA0RDT from Roelof Bakker. (Other cheaper versions have had issues with quality control.)

https://dl1dbc.net/SAQ/miniwhip.html

There are various versions of the MLA-30+ and the original MLA-30. This is the version that Mark Taylor recommended and that I bought.

https://amzn.to/3MEKjPY

There are numerous YouTube videos on using and modifying both versions of the MLA-30+. This one shows how to replace the coax with a BNC jack.

https://www.youtube.com/watch?v=OAqh2Lawwdc

Here’s the Amazon link for the YouLoop/LZ1AQ antenna that Guy has.

https://amzn.to/4s1RB09

And the same antenna on Ali Express.

https://www.aliexpress.us/item/3256808527623276.html

Retekess V112: An Ideal Ballpark Companion

The Retekess V112 takes in the scenery at a Lehigh Valley IronPigs game in Allentown, PA

by Aaron Kuhn

In my previous post for SWLing Post, I suggested the characteristics of an ideal ballpark radio and considerations for radio selection. While researching that post, I came across the Retekess V112 which ticked a lot of the boxes I recommended – compact, cheap, unobtrusive.

The Retekess V112 has indeed turned out to be a compact, affordable, and unobtrusive companion for enhancing the game-day experience at the ballpark. Priced at a consistent $15.49 on Amazon [SWLing Post affiliate link] for over a year now, this little red (or Gold) radio has exceeded my expectations.

Unboxing and Accessories (and what to replace):

While the physical packaging is a distant memory to me, the V112 comes with earbuds, a neck lanyard, and a Micro-USB charging cord.

  • Earbuds: While included, the provided earbuds are notably uncomfortable and were quickly relegated to the recycling bin. My ears are not your ears of course, and they might be salvageable with interchangeable eartips if you have some lying around, but it’s highly recommended to bring your own comfortable earbuds or headphones. This is especially important as the headphone wires double as the antenna, and reception can vary significantly between different pairs of headphones based on the cable. My older Apple EarPods offered good comfort and reception, while Sony MDRE9LP’s performed poorly. Experimentation of pairing the radio with low-cost IEMs would be an interesting project.
  • Neck Lanyard: Surprisingly, the neck lanyard is the hidden gem of this package. It allows the radio to hang around your neck, keeping your hands free for hot dogs and foul balls.
  • Micro-USB Charging Cord: While USB-C would be a welcome modern update, the included Micro-USB cable is understandable given the radio’s price point and older engineering. It’s hard to complain about the cable-port standard chosen when they give you the cable you need, and you probably have multiple other Micro-USB cables kicking around in storage boxes and drawers already.

Portability and Power:

  • Size and Weight: The Retekess V112 truly shines in its portability. Weighing 45 grams (0.1 lbs) and measuring 3.3 x 1.8 x 0.5 inches, it’s so small and lightweight that it’s easy to forget you’re carrying it, and easy to lose it in your pocket (like I have done multiple times!) This weight is even more impressive given the battery is built-in. I like to leave my earbuds plugged into it and wrap them around the radio body for transport, producing a tidy, tiny package of everything I need.
  • Battery: Battery life is another strong suit – I have yet to accidentally run it down, even forgetting to charge between games. I typically throw the radio on a battery bank on the way to the game, or shortly before the game, and have never run down the 500mah battery. I can’t find a stated battery life, and due to my experience really can’t estimate a runtime besides “long enough for extra innings.”

Features and Functionality:

  • Antenna: While relying on the headphone cable for an antenna does impact reception, it eliminates the bulk and vulnerability of a traditional antenna whip. This helps to make the radio instantly pocketable and prevents accidental seat-neighbor-pokes or damage. There’s nothing fancy such as selectable bandwidths to really help you out here, so you’re either going to have usable reception or you won’t.
  • Power/Mute Button: The power button cleverly doubles as a soft-mute, perfect for cutting out commercials between innings. A quick button tap when the last batter is out mid-inning mutes until you see the next batter up, and returns the previously set volume quickly.
  • Keypad Lock: The keypad lock function is invaluable for setting the desired volume and then tossing the radio in your pocket or letting it hang from the lanyard without accidental button pressings changing stations or volume.
  • Presets / Direct Frequency Entry: The lack of a number keypad for direct frequency entry is a minor inconvenience and my only real complaint, but in reality it’s lack of preparation. The radio does offer presets, making it easy to save your preferred stations before heading to the game – as long you remember to do so.

Future Wishlist:

If any radio manufacturers are out there listening (get in touch, Retekess or Tecsun!) I still think there’s a few features that would make an even better ballpark radio as discussed in my article from last year:

  • Bluetooth Headphone Support: There are a number of small radios on Amazon that advertise themselves as having “Bluetooth”, but when you dig deeper the feature just turns the radio body into an external speaker to your phone/tablet/laptop. The exception to the rule is the Prunus J-618 which claims actual bluetooth headphone support. Bonus points to manufacturers – allow two sets of paired headphones to be driven simultaneously. Finding comfortable Bluetooth earbuds is way easier these days at retail than finding a pair of wired earbuds, and you probably already own a pair to your liking.
  • Replaceable Parts: Implementing Bluetooth headphone support is going to require the move to an external antenna, and with that I’d love to see an antenna that can be easily replaced if it snaps off / is broken. I’m pro-repairability on electronics, so it would be great to see parts kits available at a small cost up-front with the radio to increase the likelihood the device lasts for years. Think antennas, plastic trim/doors, clips, lanyards, etc.
  • Selectable Bandwidth: I’d pay a little more for a radio that has a selectable bandwidth feature on both FM and AM. Legible commentary for a ballgame doesn’t require a very wide bandwidth, and this would go a long way towards turning an unstable/fringe signal into something more enjoyable. I’ve made use of bandwidth selection on Tecsun radios at the ballpark in the past and this is a sorely missed feature.
  • USB-C Charging: It’s 2025 – the world has moved to USB-C. Any device worth its salt these days should include a USB-C charging port, with actual proper USB-C PD support – none of that hacked up USB-A to USB-C junk.
  • Multiple Mounting Options: The lanyard on the Retekess V112 is great, what would be even more fun is some kind of clip that could attach to a stadium cupholder, or be attached to a seat in some fashion. Being able to strap a radio somewhere with bluetooth headphone support would be the ultimate convenience.

Conclusion:

For under $17 delivered to your door, the Retekess V112 is a great investment for live baseball enthusiasts. This radio has consistently enhanced my enjoyment of baseball games with its portable size, performance, and ease-of-use.

At $25, the Prunus J-618 looks like it might be a contender to the Retekess V112 throne and is one I’ll likely be checking out in the future. The Tecsun PL-368 is an attractive proposition for a ballpark radio, but in my mind provides more radio than you need, at a price-point ($75-$100) where I’d be afraid of breaking it or misplacing it in a ballpark environment.

For what it is, I’m not sure there’s much else that can compete at this price with the Retekess V112 for a low-cost, turn-key solution to live baseball play-by-play.

Initial Impressions of the Tecsun S-2200X

By Jock Elliott, KB2GOM

Bob Colegrove inspired this, with his excellent post “Pressing Buttons. Twirling Knobs and Throwing Switches.” If you haven’t read it, go do so now.

And it was our Maximum Leader, Thomas, who some time ago was asked “What’s the best shortwave radio?” His response (if I recall correctly): “The one you enjoy using.” That’s worth taking to heart. It doesn’t matter if you have the highest, techiest, super zoot receiver or SDR with the best lab numbers, if you don’t enjoy using it, how much will you really use it?

Given my age and my radio experience, my belief is that a real radio has a knob or button or switch for just about every function and a real tuning knob that doesn’t snap, crackle or pop as it changes between tuning increments.

The photos show the Tecsun S-2200X is studded with knobs and buttons, enough to satisfy an old retrocrank, but how would it perform? Dan Robinson had already reviewed it here. I respect his reviews, but I had to see for myself. With some trepidation I ordered the Tecsun S-2200X.

It arrived a couple of days ago. First impression: it’s a large radio – measuring approx. 15 inches wide, 7 inches tall, and 5 inches deep. It can run off 4 D batteries or 2 18650 rechargeable batteries, so technically it is a portable, but you’ll probably want something like a gym bag or backpack to transport it.

The fit and finish are pleasing, what you would expect from a radio in this price range. The front panel is studded with (if I am counting correctly) 33 buttons for activating various functions, 7 knurled metal knobs, a lighted analog signal strength meter, and a 3.5 inch by 1.5 inch (approx..) lighted liquid crystal display that serves as information central for the S-2200X.

On the right side are two BNC antenna connectors (one for FM and airband, the other for shortwave), a pair of clips for attaching a shortwave wire antenna, and a switch for selecting between internal and external antennas.

On the back are two hatches for installing batteries and inside one of the hatches, a switch for choosing between powering the receiver with D cells or the 18650 batteries. Also on the back, stereo line-out sockets.

On top, there are a retractable carry handle, a rotatable LW/MW antenna with a connector on the backside for an external LW/MW antenna, and a pull-up telescoping whip antenna for SW, FM, and air band.

On the left side is a port for plugging in the charging cable for the 18650 batteries.

Ease of Use

The S-2200X is straightforward to operate for basic operations (Memory operations will require consulting the well-written manual). On either side of the tuning knob are buttons for selecting FM, MW/LW, SW and Air bands, as well as selecting memory pages. Prolonged pressing of certain band buttons will activate Auto Tuning Storage of frequencies in that band, and these buttons are clearly labeled.

For shortwave, there are two buttons: SW+ and SW-, and, if you are in AM mode, these are used for incrementing between shortwave bands. However, if you are in either upper or lower sideband mode, these buttons will increment between amateur radio HF bands.

Below, and to the right of the tuning knob is a small button for switching between memory mode and frequency mode. A long press of this button will activate scanning of whatever band or memory page is active. To the lower left of the tuning knob is a button for changing tuning steps.

Below the signal strength meter is a 12-button keypad, and to the left of this are buttons for selecting synchronous detection, USB, LSB, and bandwidths. Volume and tone controls are knobs below the speaker grill.

As they used to say in the old sports car magazines: “The controls fall readily to hand.” If your goal is to pop in some batteries and start using the S-2200X right away, I found it easy to do. I particularly enjoyed the smooth tuning – both mechanical and audio – provided by the large, dimpled, tuning knob. On the unit I purchased, the tuning knob, though solidly mounted, wobbles a tiny bit.

Performance

The S-2200X acquits itself well. FM is top notch and the stereo audio is pleasing through headphones, which I routinely use to listen.

The MW performance was also satisfying, and I enjoyed using the rotatable LW/MW antenna to peak signals . . . it works! I tried plugging a Terk AM Advantage loop antenna into the jack on the backside of the rotatable antenna and found no discernable improvement in signal. To be fair, if you want the ultimate in MW DX performance, there are “hotter” MW receivers available, but I was not disappointed. I did not test LW performance.

Airband performance was average. An ATS scan of airband found five active frequencies in my area, and there is the ability to scan stored memories, stopping at each one for about five seconds.

On SW, the S-2200X delivers satisfying performance through its telescoping whip antenna. Using time stations as standards for testing, and switching between the whip and a 45-foot indoor wire loop antenna, the signal strength meter showed signals received on the whip often equaled or were only slightly less strong than those from the loop. Note well: if you conduct this experiment for yourself, there is a noticeable – perhaps one second – delay in the signal strength meter reacting to the change in antennas. If you are a SW  program listener, there are a variety of bandwidths and tone controls to fine tune the signal to your liking. I tried using the synchronous detection, and it sharpened the audio but introduced a pulsing quality to the signal that I did not like.

Most of my HF listening concentrates on single-sideband voice signals: the HF ham bands, Coast Guard weather forecasts, aeronautical voice communications, and the like. Here the S-2200X also delivers satisfying performance with impressive sensitivity on the whip antenna, a variety of bandwidths to choose from, and a fine tuning knob for dialing in the signal.

Noise Control

Now here is where the S-2200X got really interesting.

Not long ago, I became aware of a technique used by some of the experienced old hands. They would tune up on an SSB signal, then reduce the RF gain to remove as much noise as possible while preserving an intelligible signal. It made listening much more enjoyable and less fatiguing.

I tried this on my Icom IC-706 MkIIG and found that it was indeed an effective technique, but I wanted a radio I could park bedside so I could listen SSB signals on headphones while the Better Half drifts off to sleep. The Icom requires a separate power supply and an external antenna, and that seemed impractical for a bedside radio. Further, none of my portables have RF gain control.

The S-2200X does have a gain control. Here’s what the manual has to say about it: “When listening to longwave, medium wave, or shortwave, use the RF Gain control knob to adjust the gain for signals of different strengths and obtain the best reception.” I tried it on a SSB signal and it reduced the noise a little, but not nearly as much as the Icom IC-706.

Then I idly tried the squelch knob below the RF gain knob, and – tah dah! – substantial noise reduction, rendering the signal much more pleasant in my ears. The manual says: “Using the squelch control knob may reduce or suppress background noise when listening to LW, MW, SW, and airband.” As they say in the informercials: it really, really works!

Yes, but is the S-2200X really better than the other Tecsun radios that have similar basic circuitry but don’t have RF gain or squelch controls? The short answer is a definitive YES. Doing A/B comparison with my Tecsun PL-880, I found the two radios sounded about the same on a noisy band. But when I activated the RF gain and squelch controls on the S-2200X, it demonstrated a substantial advantage in “listenability” over the PL-880 with no RF gain or squelch controls.

Bottom line: based on my usage so far, I can heartily recommend the Tecsun S-2200X, particularly if you are interested in using it as a communications receiver for monitoring ham and utilities SSB signals.

Check out the Tecsun S-2200x at Anon-Co.

Raddy RF919

RF919 Bonus Antenna

I received a message yesterday from Raddy Marketing that they are offering a bonus antenna for the RF919 radio which will be shipped with future orders.

Here is the note they sent:

“All previous RF919 orders from our website or Amazon are eligible to request the new antenna. Customers can contact our customer service at [email protected] and provide their order number to receive it.”

I do not have any details about the new antenna, but wanted to post the info so folks who have purchased the radio as indicated above can receive the offer from Raddy.

Robert K4PKM

High Noon: Belka MW shootout part 2, with a review of the AFA200C active MW ferrite antenna

High Noon: Belka MW shootout part 2, with a review of the AFA200C active MW ferrite antenna

by 13dka

When I reviewed the updated Belka (gen3, 2022) for its MW/LW performance in October last year, I just wanted to know if it’s any good with just the whip antenna and used the XHDATA D-808 as a reference radio because it’s a Jay Allen 2.5-star average performer on MW and my expectations were not high for MW reception on a short whip.  To my surprise that average bar turned out way too low for the Belka!

That was sure asking for a comparison with the most sensitive MW radio I have and gave me hope to use the Belka for ultra-portable MW DXing on the move.  The omnidirectional whip doesn’t allow me to null out unwanted co-channel interference though, therefore I wanted to find a reasonably sized loopstick antenna to pair with the Belka.  Continue reading

Short Video: Paul tunes in Rádio Nacional da Amazônia with his ATS25 in McGrath, Alaska

Many thanks to SWLing Post contributor, Paul Walker, who shares the following video of his open-air DX shack in McGrath, Alaska. Paul notes:

I got my iRig working and recorded audio of Rádio Nacional da Amazônia on 11780 kHz directly from the radio into my phone and it sounds really good with such a strong signal here in ALASKA. Take a listen….

Click here to view on YouTube.

Thanks for sharing this, Paul! That does sound amazing–like a local station!

You, sir, are a true DXer! Anyone who regularly braves frigid temps to chase far-flung DX is made of some incredibly tough stuff!

Thanks for sharing, Paul!