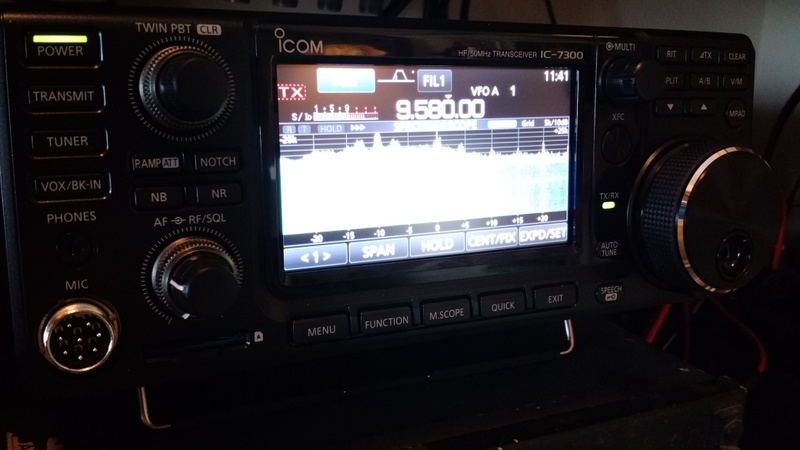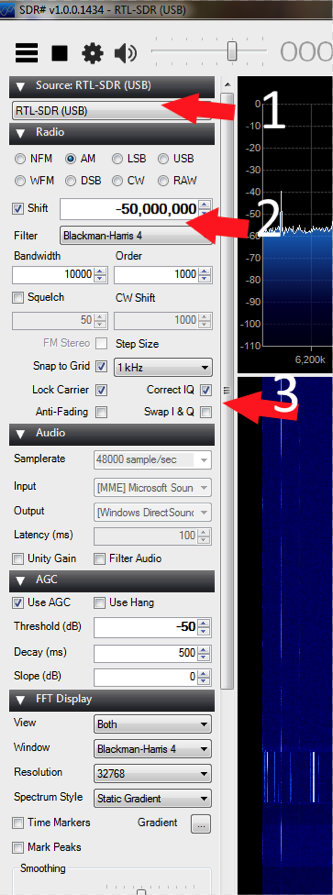
In August 2015 at the Tokyo Hamfair, Icom debuted a new type of transceiver in their product line––one featuring a direct RF sampling receiver. Essentially, it was an SDR tabletop transceiver.
At about the same time that the IC-7300 started shipping around the world, Icom pulled their venerable IC-7200 off the market. Yet the IC-7200 was established as a well-loved product, due to its highly sensitive receiver, its relatively robust front end, and its quality audio. Moreover, it was simple to operate, which made superb as a Field Day or radio club rig.
Therefore, even though the IC-7300 promised much more versatility than the IC-7200, for its price point it had a tough act to follow.
So, of course––even more so than with any other radio Icom has introduced in the past few years––I was eager to get my hands on a IC-7300. I’m very fortunate that my good friend, Dave Anderson (K4SV) was one of the first purchasers of the IC-7300, and that he didn’t mind (after only having the rig perhaps one week!) allowing me to borrow it for a several weeks for evaluation.
Note: I should state here that since this rig was loaned to me, I evaluated it based on the firmware version it shipped with, and made no modifications to it.
 This review primarily focuses on the receiver’s performance, functionality and usability.
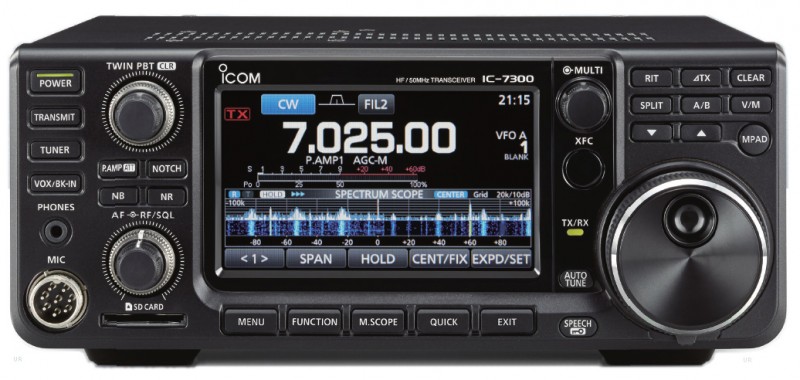
Introducing the Icom IC-7300
In recent years, the “big three” ham radio manufacturers have been using color displays, and––Icom most especially––touch screens. While I’m no fan of backlit touch screens in mobile applications, I think touch screen displays make a lot of sense in a base radio. If carefully designed, a touch screen can save an operator from heavily-buried menus and decrease the number of multi-function buttons on the front panel.
The challenge, of course, is making a display with intuitive controls, and one that is large enough, and with sufficient resolution, to be useful to the operator. In the past, I’ve been disappointed by many displays; the most successful have been incorporated in DX/Contest-class (i.e., pricier) transceivers, meanwhile, entry-level and mid-priced transceiver displays often seem half-baked. While the graphics may be crisp, spectrum displays at this price point are often too compressed to be useful, and if not a touch display, force the user to pause operation in order to find the correct knob or button to change settings. In such cases, I find myself wondering why the manufacturer went to the expense of a color display at all––?
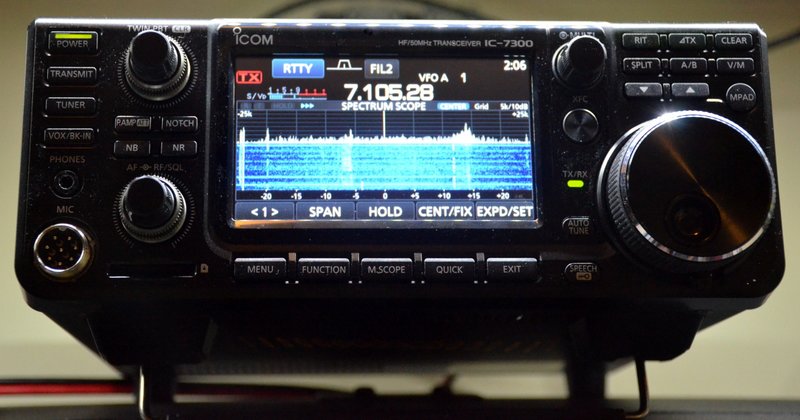
But what about the C-7300 display? I’m thoroughly pleased to report that Icom did a fantastic job of balancing utility and function in design of the IC-7300’s color touch display and front panel. There are number of ways you can chose to display and arrange elements on the screen–since I’m an SDR fan, I typically chose a display setting which gave the waterfall the most real estate. Of course, one can chose to give the frequency display priority or a number of other arrangements.
User interface
I can tell that Icom built upon their experience with the IC-7100––their first entry-level touch screen display transceiver.
I was able to get the IC-7300 on the air in very little time. Within five minutes of turning on the IC-7300, I was able to:
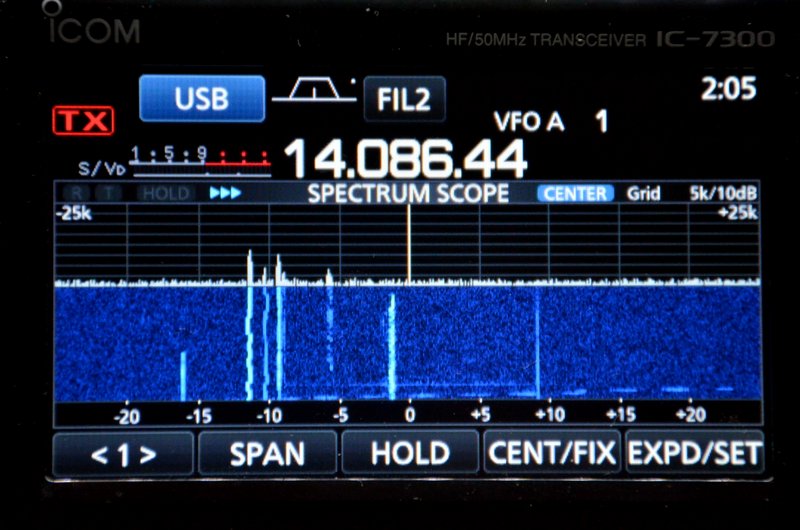
- change the display to feature a spectrum waterfall;
- change the span of the waterfall display;
- adjust the TX power output;
- change the filters selection and the transmit mode;
- change bands and make direct-frequency entries;
- adjust notch, passband, and filter width;
- adjust AF and RF gain;
- set A/B VFOs and operate split;
- change AGC settings;
- turn on Noise Reduction/Noise Blanker, and
- adjust compression.
Basically, I found that all the essential functions are clearly laid out, accessible, and highly functional. Impressive.
The IC-7300 ships with a manual–– aptly titled, the “Basic” manual––and a CD with the full and unabridged operations manual. The Basic Manual covers a great deal more than the manual which accompanied the Icom ID-51a, for example. If you read through the manual, you’ll readily familiarize yourself with most of the IC-7300’s higher function operations, and especially, you’ll be able to adjust the settings to your operation style. The Manual is written in simple language, and includes a lot of diagrams and graphics.
If you’re like me, you will find you’ll also need to reference that unabridged manual, so hang on to the CD, too.
Still, I imagine there’s a large percentage of future IC-7300 owners that will never need to reference the manual––especially if they don’t care about tweaking band edges or similar settings. Yes, believe it or not, it’s that easy to use.
Operation

While I spent a great deal of time listening to CW and SSB in various band conditions and at various times of day, I spent less time on the air transmitting.
With that said, all of my transmitting time was in CW since the IC-7300 mic was accidentally left out when my friend loaned me the rig.
I’m please to report that CW operation is quite pleasant. All of the adjustments––RF Power, Key Speed, and CW Pitch––can be quickly modified using the multi-function knob. While in CW mode, you can also toggle full break-in mode, which is quite smooth, via the function button and touch screen.
SSB functions are similar. While in SSB mode, the multi-function knob allows you to change the tx power, mic gain, and monitor level. The function button opens an on-screen menu with VOX, compression, TBW, and the monitor toggle.
Here’s a short video I made with my phone while I made a few adjustments to the IC-7300:
Of course, my smartphones’s microphone can’t accurately reproduce the audio from the IC-7300, but you probably get the idea.
The only annoyance I noted––and perhaps I’m more sensitive to this, being primarily a QRPer––is that the 7300’s cooling fan starts up each time you key up. It even comes on when transmit power is at its lowest setting. I find this a little distracting in CW. Fortunately, however, the 7300’s fan is fairly quiet and operates smoothly.
Receiver performance and reader survey results
Since our radio comparison shoot-outs have been particularly popular (and useful; check out our shoot-out between top portables, and ultra-compact radios, and others), I decided it would make sense to invite our informed readership to evaluate the Icom IC-7300’s performance in a series of blind, informal tests. (For information about these surveys, please read the first survey.)
Below, I’ve matched the labels (Radio A/Radio B) with the radio models. I’ve also included pie charts which show the results from the survey.
Icom IC-7300 vs. WinRadio Excalibur
Weak Signal CW (40 meter band)

Based on listener comments, those of you who preferred the ‘7300 did so because the CW was more interpretable and stable.
Some of you noted that I didn’t quite have CW at the same pitch on both rigs. I believe this is because the IC-7300’s calibration was ever so slightly off. This has since been addressed.
Weak/Strong SSB QSO (40 meter band)

This result was almost tied. The Excalibur’s audio––without any adjustments––has a fuller and “bassier” sound. The ‘7300 can be adjusted to have similar characteristics, but the default EQ settings produce very flat audio. Many of you commented that the IC-7300 more faithfully produced audio optimized for SSB.
Shortwave Broadcast recordings
The following recordings were made on the 31 meter broadcast band in the evening. Both radios had the same filter width: 9 kHz and 8.2 kHz.
Weak Shortwave AM (Radio Bandeirantes 31 meter band)

There was a noticeable preference for the WinRadio Excalibur in this particular audio set. Even though the Excalibur’s audio splattered a bit, the content was more interpretable. The IC-7300’s audio sounded flat in comparison––again, something that can be adjusted quite easily in the ‘7300’s audio settings.
Strong Shortwave AM (Radio Romania International, French 31 Meter Band)

Once again, the Excalibur won favor, but I imagine results would have been closer had I adjusted the ‘7300’s audio EQ.
Mediumwave Broadcast recordings
Note that the following mediumwave recordings were made during the morning hours (grayline). The strong station is the closest AM broadcaster to my home; it’s not a blow-torch “Class A” type station, merely the closest local broadcaster.
In the “weak” sample, I tuned to 630 kHz where multiple broadcasters could be heard on frequency, but one was dominant.
Both radios are set to a filter width of 9.0 kHz.
Strong Mediumwave AM (1010 kHz)

Two out of three listeners preferred the Excalibur in this example.
Weak Mediumwave AM (630 kHz)

In this particular example, the IC-7300 could not pull the strongest broadcaster out of the pile as well as the WinRadio Excalibur. In fairness, the Excalibur was using AM sync detection, something the IC-7300 lacks.
Icom IC-7300 vs. Elecraft KX3
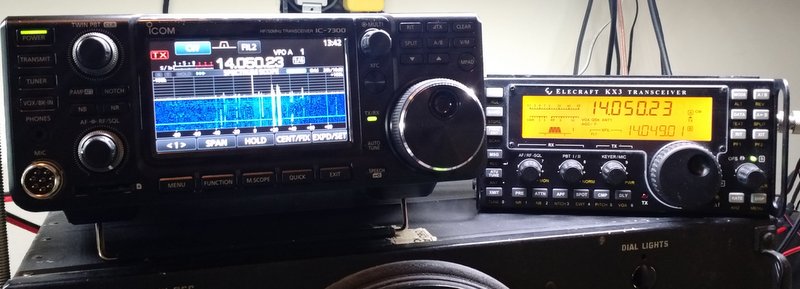
I also decided to pit the IC-7300 against my well-loved Elecraft KX3.
Audio Clip 1: CW (20 meter band)

Based on comments, readers who preferred the IC-7300 felt the CW sounded more pleasant and stable.
Audio Clip 2: Weak Signal CW (20 meter band)

Your comments indicated that the CW seemed to “pop out” of the noise slightly better with the IC-7300.
Audio Clip 3: Weak/Strong SSB
(Sable Island working Asia/Pacific on 20 meter band)

These results were spilt in the middle. Again, I believe this comes down to personal preference in the audio. And again––in both radios––the audio EQ can be adjusted to suit the operator.
Receiver performance summary
I enjoy producing audio clips for readers to compare and comment upon. Each time I’ve done so in the past, I’ve had listeners argue the virtues of a particular audio clip while others have the complete opposite reaction to that same clip. Not all of us prefer our audio served up in the same way. No doubt, there’s a great deal of subjectivity in this sort of test.
I’ve had the IC-7300 on the air every day since I took possession of it. I’ve listened to SSB, CW, and lots of AM/SW broadcasters.
And here’s my summary: the IC-7300 is an excellent receiver. It has a low noise floor, superb sensitivity and excellent selectivity. I even slightly prefer its audio to that of my Elecraft KX3, and I’m a huge fan of the little KX3.
I’ve written before about how difficult it is to compare SDRs; the problem is that there are so many ways to tweak your audio, filters, AGC, noise reduction, etc. that it’s hard to compare apples with apples.
In the audio samples above, the IC-7300 and WinRadio Excalibur were both set to their default audio settings. In SSB and CW, the IC-7300 excels, in my opinion. CW seems to pop out of the noise better and SSB is more pleasant and interpretable. The Excalibur has a better audio profile for AM broadcasters, though. Its default audio simply sounds fuller–more robust.
The audio from the IC-7300 on AM sounded absolutely flat. However, if I tweak the audio of the ‘7300, adding more bass, it instantly sounds more like a dedicated tabletop receiver.
Here’s a recent example of Radio Romania International:
I should also mention that while the IC-7300’s built-in digital recording is a fantastic and effective feature, it doesn’t produce audio true to what’s heard through headphones live. This is especially the case when you add more bass and treble response as in the RRI example above. When the audio EQ is set to a default flat, it’s quite accurate.
To be clear: for broadcast listening, I’ll still reach for my SDRs (the Excalibur, FDM-S2, TitanSDR and CR-1a).
If, however, I have limited space and/or budget for multiple receivers, I’d be quite happy using the IC-7300 as a broadcast receiver on the HF bands.
Speaking from the Shortwave Radio Listener (SWL) perspective, meanwhile, am I pleased with how the ‘7300 handles the broadcast bands? Most definitely.
And as a ham radio operator, am I pleased with the IC-7300’s receiver––? Absolutely.
In short: the IC-7300 seems to have some of the best all-around receiver qualities of any transceiver I know under $2,000.
Summary
Every radio has its pros and cons. When I begin a review of a radio, I take notes of my initial impressions. Here’s my list for the IC-7300:
Pros
- Excellent sensitivity and selectivity
- Excellent, highly-customizable RX and TX audio
- Color touch screen interface
- Spectrum display is large enough to be useful
- Intuitive functions
- Twin PBT is both intuitive to operate and effective
- Effective RF gain to compensate for noisy band conditions
- Built-in RX and TX recording, file transfers via common SD card
- Front panel knobs and buttons are spaced appropriately and easy to use
- Quiet cooling fan (see con)
- Decodes RTTY on screen
- Built-in ATU
- Antenna analyzer function (not tested)
Cons
- Lacks secondary receive antenna jack on rear panel
- Cooling fan immediately starts up on CW/SSB transmit at any power setting (see pro regarding fan noise)
- Occasionally you may get lost in deeper customized functions
- Supplied printed basic owner’s manual, while well-written, doesn’t fully cover the IC-7300s functions and options; you must explore the digital owner’s manual in supplied CD.
Conclusion
In a nutshell: Icom has hit a home run with the IC-7300. If I didn’t already have an Elecraft KX3 and K2, I would buy the IC-7300 without hesitation.
Though the price point is a little high for an “entry level transceiver,” it’s worth every penny, in my opinion. For $1500 US, you get a fantastic general-coverage transceiver with an intuitive interface, nearly every function you can imagine, and performance that would please even a seasoned DXer.
Though I haven’t done and A/B comparison with the IC-7200, I imagine the IC-7300 would prevail in a test. The IC-7300 would certainly wipe the floor with it’s more economical brother, the IC-718.
Radio clubs, take note:
In my view, the IC-7300 has the makings of an excellent radio club rig in which performance, functionality, as well as ease of use are important. I expect that the IC-7300 will not only cope very well with crowded and crazy Field Day conditions, but it will also give any newcomers to the hobby a little experience with a proper modern transceiver. The fact that you can view signals so easily on the spectrum display means that it will be easier to chase contacts and monitor bands as they open and close. Indeed, what better way to mentor a newly-minted ham in modes, contacts, carriers, QRN, QRM, and so forth, than to simply point these out on the IC-7300’s bright, clear display––?
If your club is considering a transceiver upgrade or purchase, do seriously consider the IC-7300. I think you’ll find this rig is up to the task.
And for home? The Icom IC-7300 may be all of the rig you’ll ever need.