Shortwave listening and everything radio including reviews, broadcasting, ham radio, field operation, DXing, maker kits, travel, emergency gear, events, and more
Many thanks to SWLing Post contributor, Matt Blaze, for the following guest post:
The “Signal Sweeper”, a portable Wellbrook antenna setup
by Matt Blaze
Here’s a very simple construction project that’s really improved my travel shortwave and mediumwave listening experience.
When I go somewhere interesting (whether a day trip on my bike or a longer excursion to an exotic locale), the two things I’m sure to want with me are my camera gear and at least one good receiver. Fortunately, there are plenty of good quality shortwave receivers to choose from these days; the hard part is packing a suitably portable antenna that can do justice to the signals wherever it is I’m going.
I’ve long had a Wellbrook antenna on my roof at home. These wide-band amplified loops famously enjoy a reputation for excellent intermod and noise rejection, as well as an almost magical ability to pull in signals comparable to much larger traditional HF and MF receive antennas. A portable Wellbrook – something I could pack in my luggage that performs as well as the one on my roof, would be just ideal.
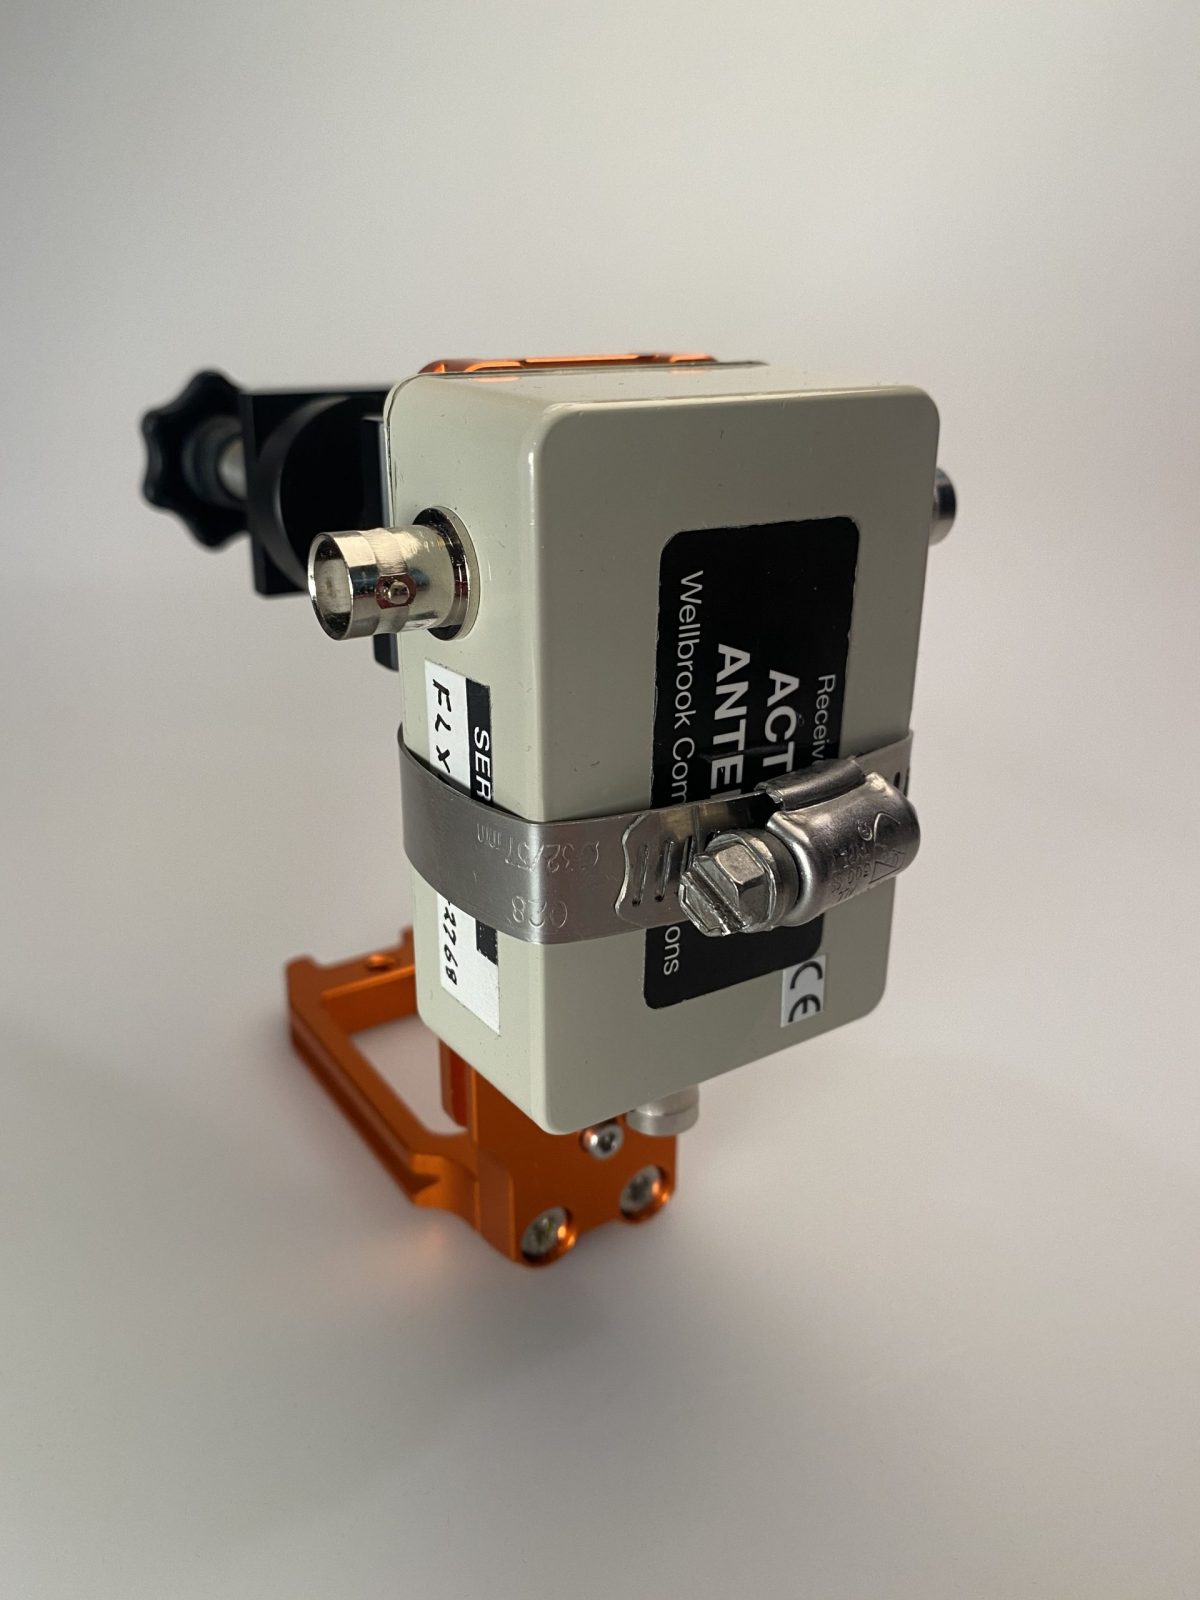
Fortunately, Wellbrook sells a “flex” version of their antenna intended for just this application, the model FLX1530LN. It’s essentially just the amplifier of their fixed-mount antennas, equipped with a pair of BNC connectors for you to attach a user-supplied ring of coaxial cable that serves as the antenna loop. This way, you don’t need to travel with the awkwardly large 1 meter diameter ring of aluminum tubing that makes up the normal Wellbrook. You can just bring a compact spool of coaxial cable and configure a loop out of it when you arrive at your destination.
The tricky part is how to actually form a stable loop out of coaxial cable without needing lot of unwieldy supporting hardware. In particularly, I wanted something that could be set up on a camera tripod to be freestanding and easily rotated wherever I happened to find myself wanting to play radio. The key would be finding or making some kind of mostly non-metalic support for the coaxial loop that could be folded down or collapsed to fit in my baggage or backpack for travel.
And then I found it: a humble 3-section telescoping broom handle sold on Amazon for about $15 that’s exactly the right size: the “O-Cedar Easywring Spin Mop Telescopic Replacement Handle“. It collapses to 22 inches (just short enough to fit in my suitcase), and extends to 48 inches (comfortably long enough for a one meter diameter loop).
Normally, a wire loop would need both vertical and horizontal supports in a cross configuration, but by using a reasonably stiff coaxial cable, I figured I could get away with just using the broom handle vertically. I found that LMR400 (the basic kind, not the “Ultraflex” version) holds its shape quite well in a one meter loop supported this way.
At this point, it was just a matter of the details of attaching and mounting everything together into a portable package.
A one meter diameter loop, which is the ideal size for the Wellbrook amp, can be made from 3.14 meters of cable (ask your middle-school math teacher). That’s about 10 feet for Americans like me. High precision is not required here, so I just cut 10 feet of LMR400.
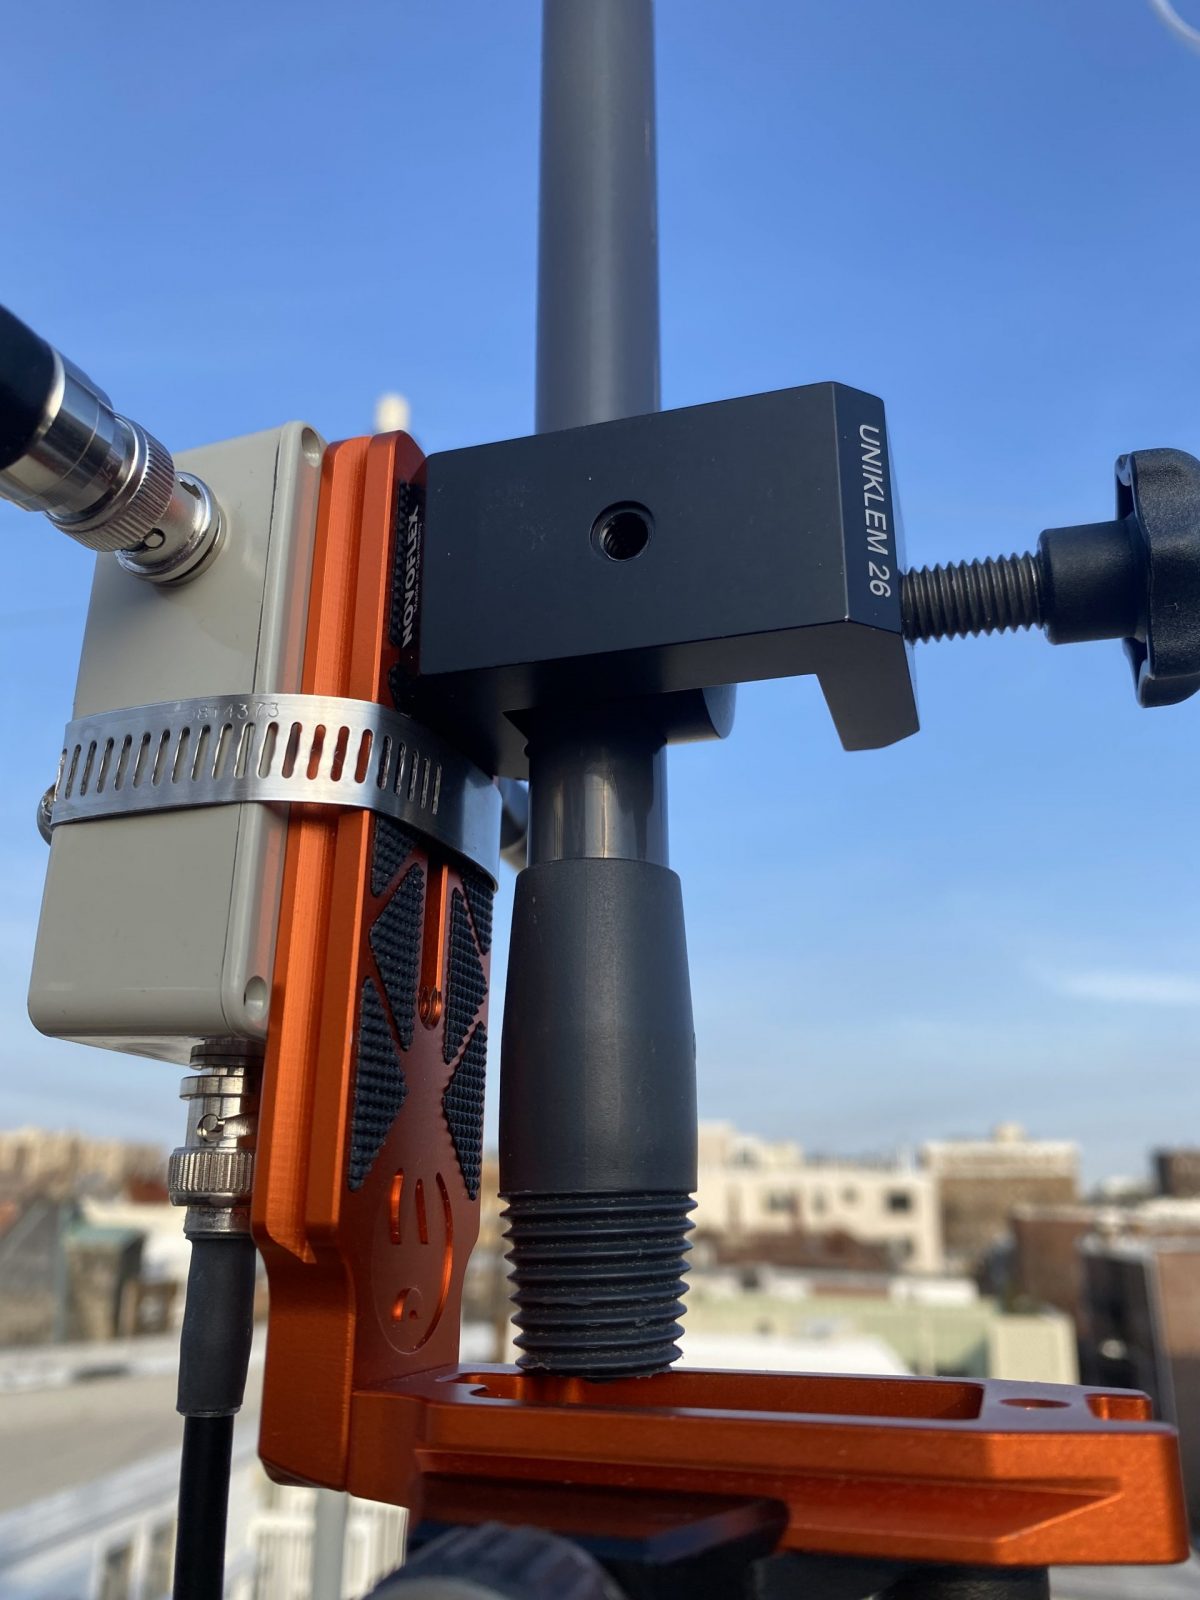
The next step is to attach the middle of the cable to the top of the broom handle. The O-Cedar handle has a loop at the end for hanging it on a hook in your broom closet. It happens to be just the right diameter for LMR400, but not with BNC connectors attached. So you’ll have to thread the cable through before you crimp or solder on the with connectors. (See photo above). I used the Times Microwave crimp-on BNC connectors, which I had some extras of lying around. I also put some shrink wrap on the cable at either side of the broom loop, just to keep it from slipping out and becoming unbalanced, but that was probably unnecessary.
Now I needed a way to to attach the Wellbrook amplifier to the other end of the handle, as well as some way of mounting the whole thing to a camera tripod. My first thought involved a lot of duct tape. But I wanted something more permanent and reusable.
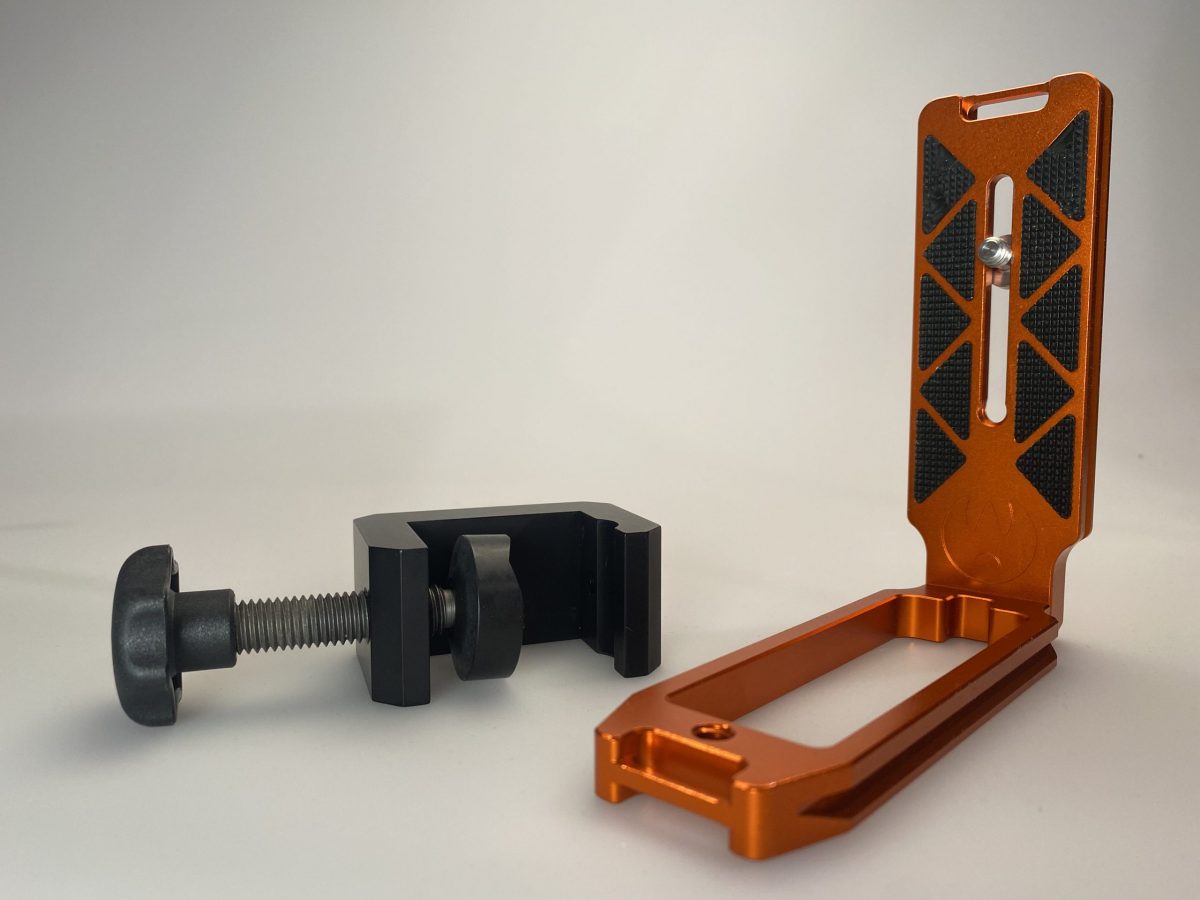
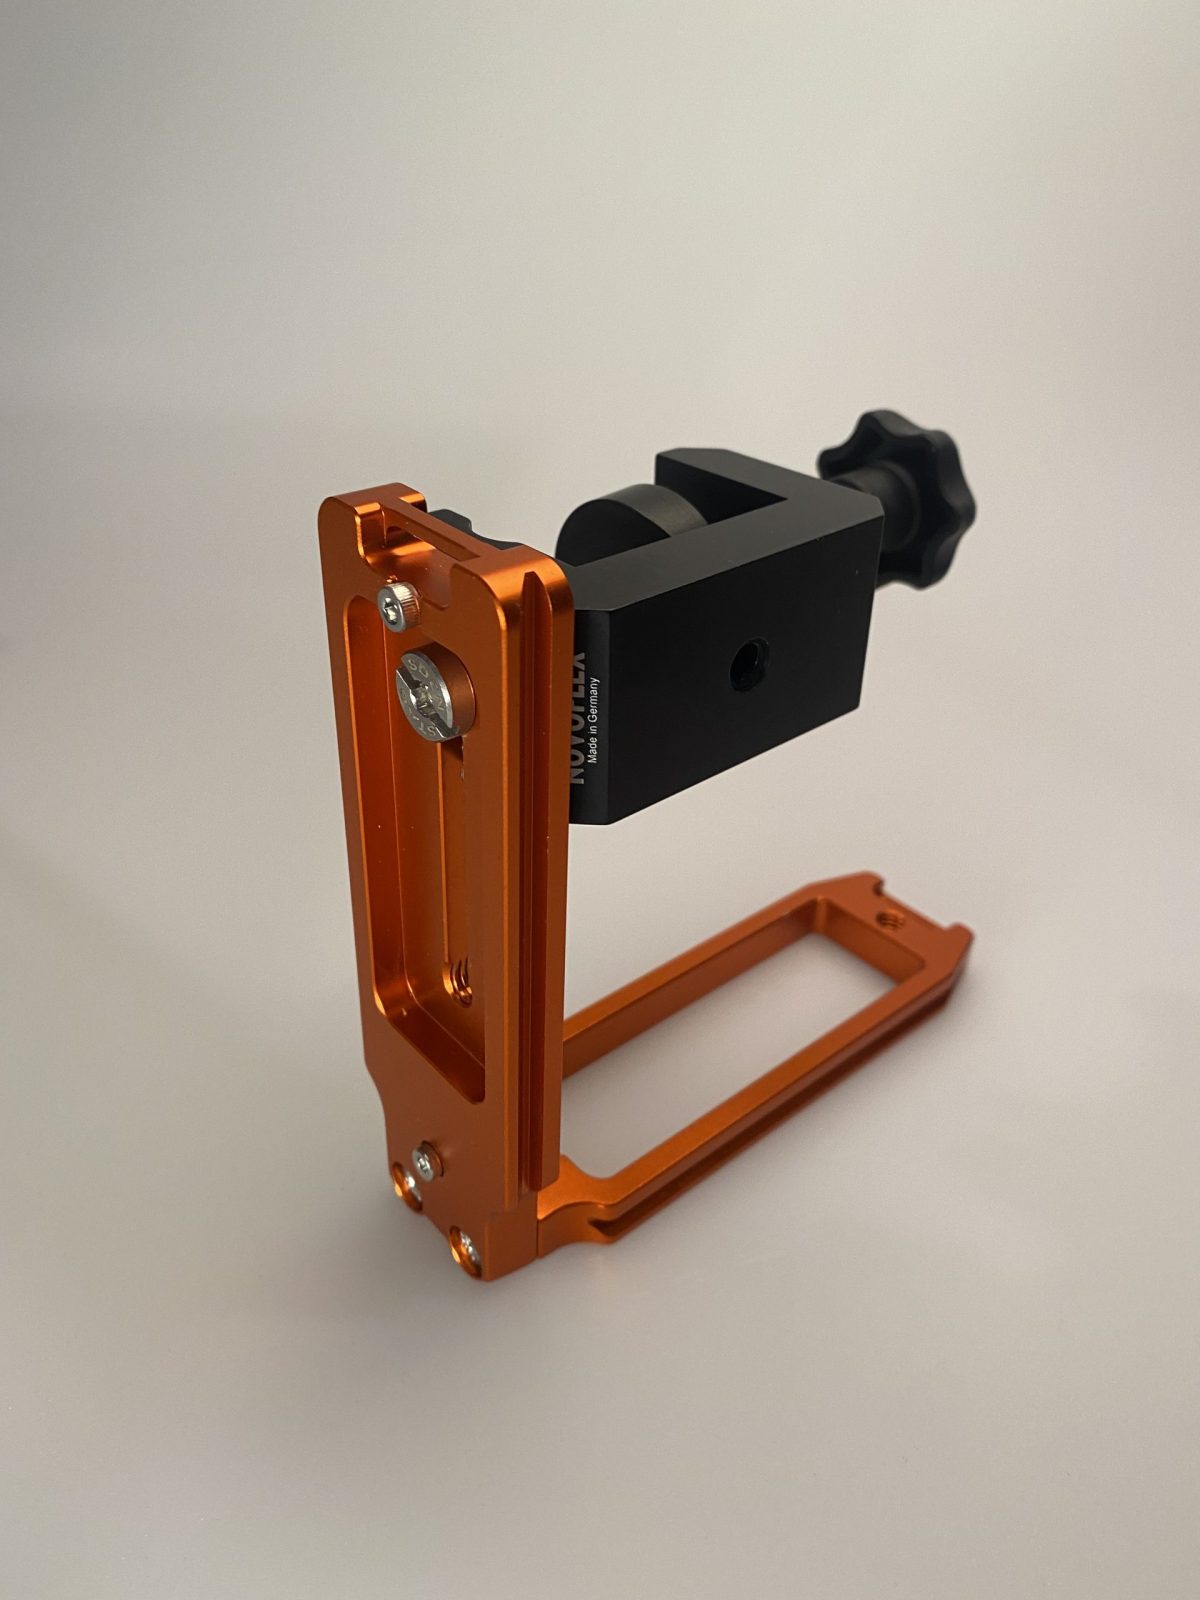
The key is something called an “L-Plate”, which is a piece of hardware intended to allow you to mount a camera to a tripod in either “landscape” or “portrait” mode. It’s basically two tripod dovetail mounts attached at a 90 degree angle. I used one that was in my junk box, but you can buy them new or used on eBay. I also needed a clamp to attach the L-plate to the broom handle. I used the Novoflex MiniClamp 26, which I got from B&H Photo. The clamp attaches to the inside of the L-plate with a captive screw. (See photos)
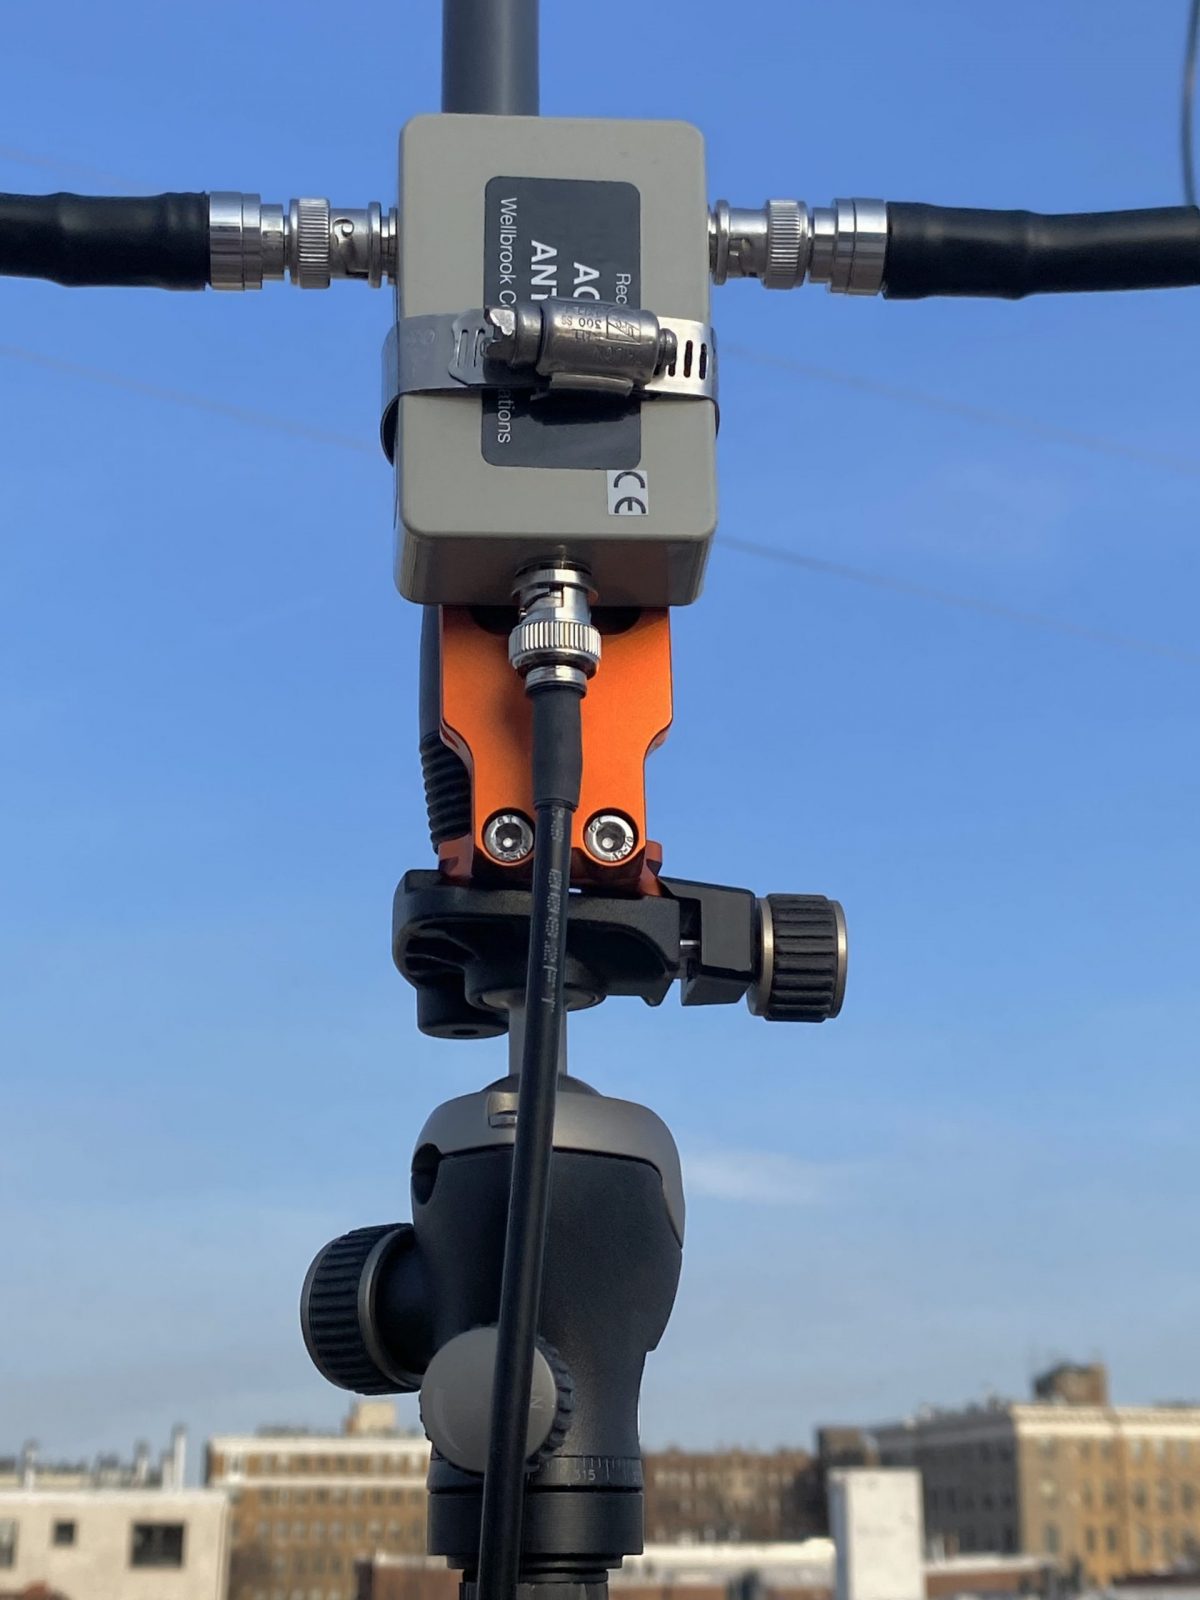
Next, I attached the amplifier to the other side of the L-plate using an ordinary screw-on hose clamp. Easy enough, and surprisingly sturdy.
And that’s it. To assemble the antenna, just extend the broom handle to about one meter, allowing for a roughly one meter diameter loop that’s as round as you can make it with the amplifier at the bottom. Then clamp the L-plate to the bottom of the handle so that the handle is just above the base of the plate, and attach to the tripod. (See the photos).
The Wellbrook is powered over the feedline with a 12VDC bias-T injector. So you need a clean source of 12 volts. I use a cheap Talent Cell battery pack (available on Amazon in various capacities). These actually deliver 11.1 VDC (3x 3.7V), rather than the 12V the Wellbrook calls for, but it works fine in practice. I can also use the same pack to power the radio and digital audio recorder.
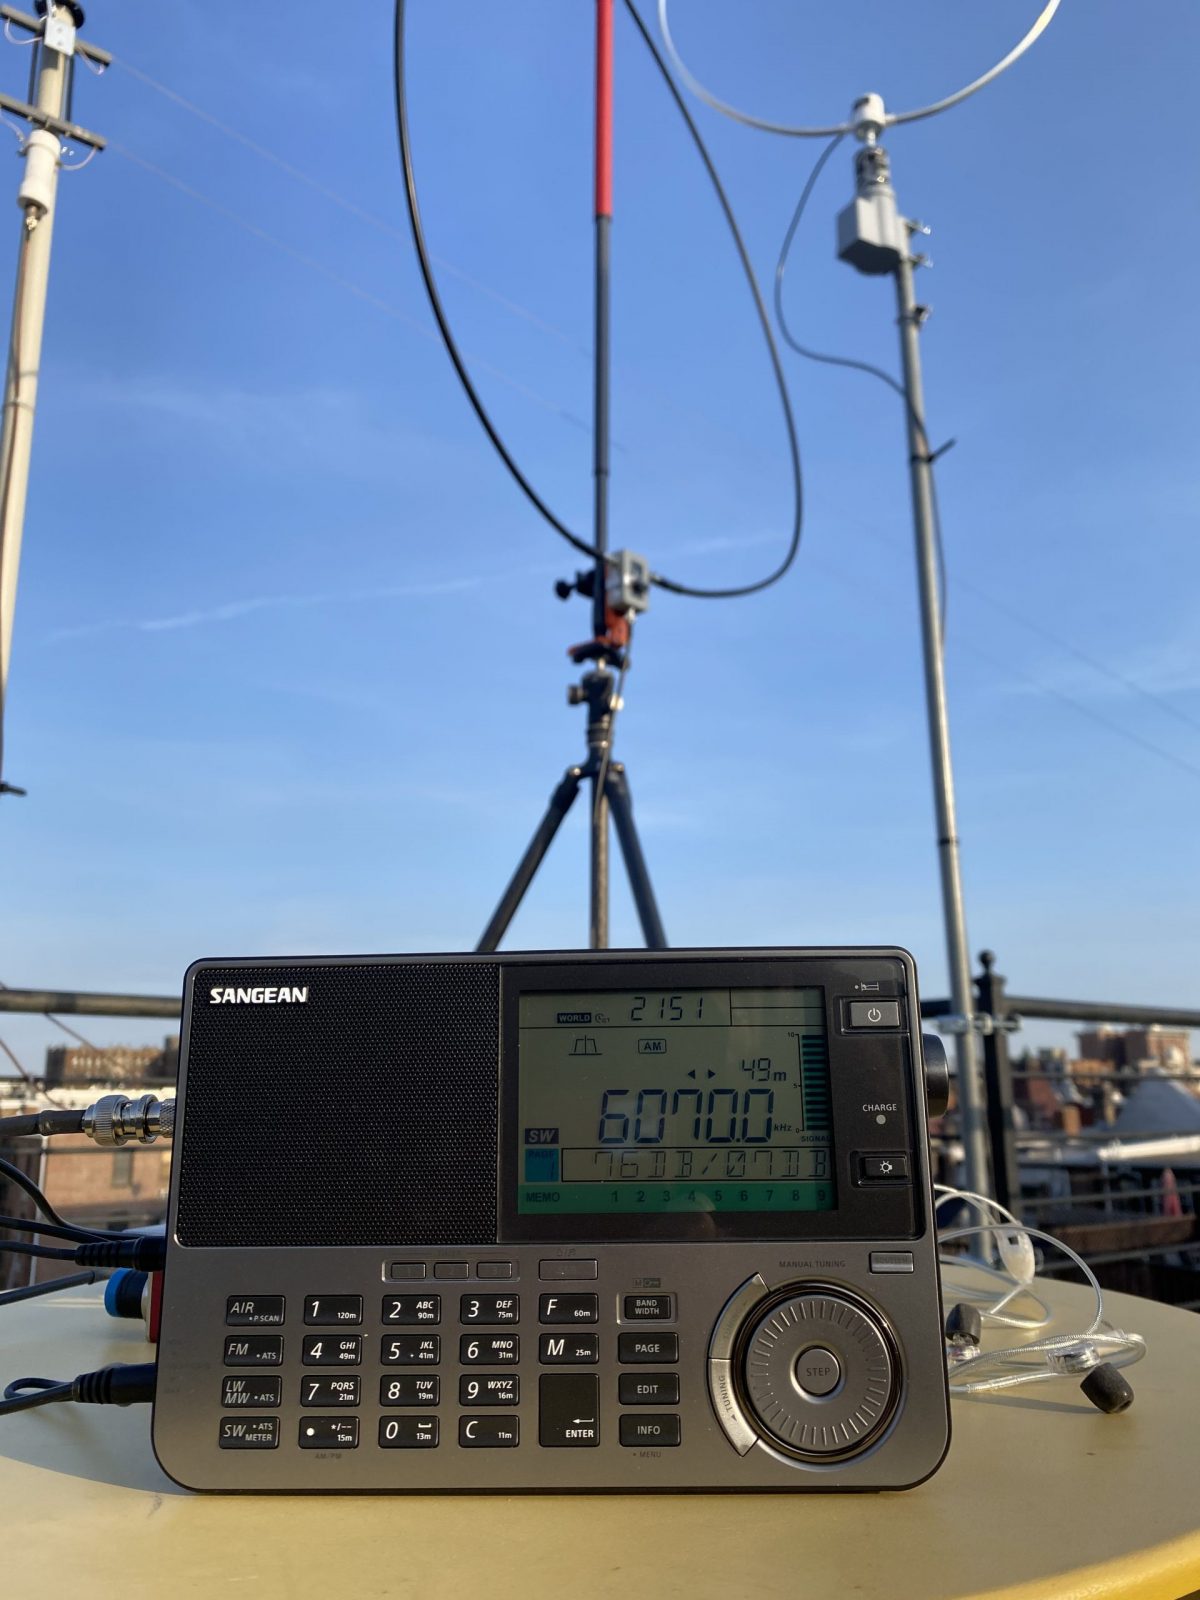
In the photos, you can see the finished antenna setup on my roof, with my permanent base Wellbrook on the rotor in the background. The performance of the two antennas is quite comparable.
(Note that there’s an eBay seller that makes a somewhat similar travel loop. The performance is quite good under normal conditions, but it is a bit more subject to MW overload when near a transmitter site. So I prefer the Wellbrook, which is much less susceptible to overload, I’ve found.)
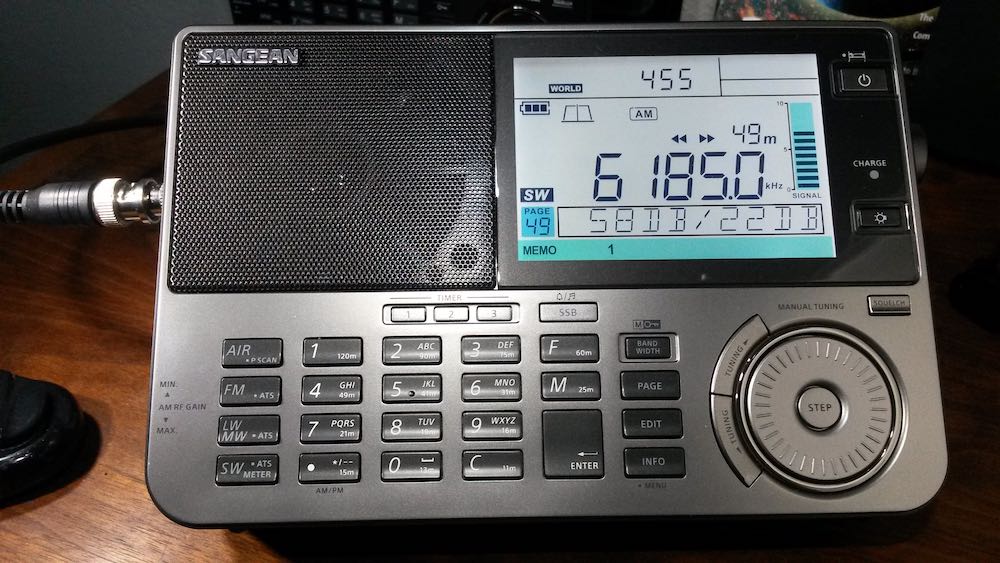
My usual complete travel setup is either a Reuter RDR Pocket C2 radio or a Sangean ATX-909X (recently upgraded to the X2 model). Both these radios work well with the Wellbrook. I use a Sound Devices Mixpre 3 to record airchecks in the field. In the photos, I’m on a rooftop DXpedition listening to Toronto traffic and weather from CFRX on 6070 kHz on a warm later winter afternoon.
The whole setup breaks down for travel pretty easily, and fits easily in my suitcase, backpack, or bike bag (see photos). I usually bring a larger tripod than this if I’m also taking my camera.
The Wellbrook setup has really made bringing a receiver into the field a lot easier and less uncertain. There’s no worry about finding trees or other supports for wires, and packing and unpacking is quick and easy. Have fun!
Many thanks to SWLing Post contributor, Mark Hirst, who shares the following guest post:
Using the Yaesu FT-891 for SWLing
by Mark Hirst
Woodland Operation in North Hampshire
Introduction
While I have a small collection of portable shortwave radios for outdoor listening, I’ve been looking to fill a gap in my amateur radio lineup for a while. Outdoor operation has become important in recent years as solar cycle conditions deteriorated along with rising levels of QRM in urban neighbourhoods. The ICOM IC–7200 with Wellbrook loop stays at home fighting a losing battle with PLA noise, while the very portable FT–817ND does occasional data modes contacts and outdoor listening. Somewhere in the middle, the FT–891 promised to provide a modern and more powerful data modes station, a radio to take on holidays, needing external batteries, but portable enough for walks into the country side. Earlier this year, I bought one new from my local ham radio store, and what follows are my findings and observations so far on shortwave listening.
Audio Characteristics
I’ve accumulated hundreds of recordings of VOA Radiogram and Shortwave Radiogram since 2013, so a recent woodland expedition with the FT–891 was an opportunity to compare a recording made with it against those of other radios I’ve used.
The most striking difference is the lack of frequencies in the lower part of the audio spectrum along with a distinct cut off at around 5kHz.
This is easily visualised in the following comparison between the FT–891 and the Tecsun PL–680. Note the conspicuous pillar associated with MFSK32 from these Shortwave Radiogram broadcasts, and interfering RTTY on the FT–891 recording:
Audio Frequency Analysis
While this audio profile may not be to everyone’s taste, the extra sparkle yields voice audio that is clear and distinct. I find those low frequencies make the audio muddy and tiring to listen over long periods, so I’m quite happy with this.
When listening to speech based broadcasts through the top mounted speaker, the audio is also precise and intelligible, and provides more than enough volume.
You also have the option of connecting an external speaker or headphones to a socket on the side of the radio. Be aware that the audio level is different for headphones, and is controlled by a small switch hidden behind the front panel. I expect people may go for one option such as headphones and then stick with it, rather than continually detaching the front of the radio and moving the delicate switch back and forth.
If you turn the volume right down you will hear a hiss, although its really only noticeable if you face the speaker directly and get close. Listening outdoors with the sounds of nature around you? It’ll be fine. There’s no way to avoid it with headphones of course, with forums suggesting inline resistors or high impedance headphones as solutions.
Audio recordings can of course be taken from the headphone socket, but you will get better results from the data port on the back. I use a UD04YA cable which provides 3.5mm audio in and audio out jacks, plus a USB cable to provide PTT functionality. It’s meant for data modes operation with the FT–817, but I have used it successfully with the FT–891 for PSK contacts using fldigi, eliminating the need for CAT control through a second cable to the radio’s USB port.
Customising for SWL
The advanced manual for the FT–891 helpfully provides a section called ‘Tools for Comfortable and Effective Reception’, so I began configuring the radio using the guidance there.
First up was re-configuring the front panel RF/Squelch knob to only control RF gain (Menu 05–05). I use the same configuration on my FT–817ND to dial back RF gain, allowing the AGC to pick up the slack.
Next was enabling the awkwardly named Insertion Point Optimisation (IPO) which switches out the pre-amplifier. It’s interesting to note that this setting can be associated with a stored memory channel, which became relevant later when I used CAT control to program some favourite frequencies.
The radio has an attenuator, although I’ve not found a need for it so far.
The AGC can be configured as Auto, Fast, Mid, and Slow. Since it is not a ‘set and forget’ setting like the RF control or IPO options, it might be a good candidate for assigning to one of the three user definable buttons below the LCD screen.
Audio can be fine tuned using four menu options (06–01 to 06–04) to control high and low frequency cutoff, but after some experimentation I have turned these options off.
As an aside, I found the LCD backlight, button illumination and TX/Busy lights too bright for indoor use, so dialed them back to their minimum values.
Listening Tools
The radio provides some additional tools as part of its IF DSP. The features of particular interest are Digital Noise Reduction (DNR), Noise Blanker, IF Notch Filter, Digital Notch Filter, and Narrow IF filter. Contour, IF Bandwidth, and IF Shift are not available in AM mode, and you must resort to SSB to get them. More about SSB in a moment.
Out of this wide array of options, I’ve only explored Digital Noise Reduction and the Narrow IF filter so far, as they offer fairly immediate gains without too much configuration.
Narrow filter simply reduces the total IF bandwidth from 9kHz to 6kHz, which gives some immediate relief to higher frequency noise. In tougher conditions at home tackling QRM, the harsher sound it causes has sometimes been counter productive.
At the outset, it’s obvious that the DNR capability of the FT–891 is a powerful feature. Rather than providing a level of processing that varies from a little to a lot, the radio provides 15 different ‘algorithms’ which can be selected for best results. This means you will tweak the DNR setting to address signals on a case by case basis.
Comparing it with the IF noise reduction of my ICOM IC–7200, the ICOM has a scale of diminishing returns as the DSP level is turned up, whereas the FT–891 seems to start strong and it’s more about picking the algorithm that sounds best.
After testing the DNR on AM broadcast stations away from the noise at home, voice audio sounds distant and words can be clipped, which is fine for SSB amateur radio contacts, but makes me think it’s not a feature of first resort when trying to improve broadcast reception. In those circumstances, the narrow filter might be a better option.
The Trials of Single Side Band
On the matter of SSB and using it to combat adjacent or co-channel signals, the radio offers a single SSB option in the mode menu, picking USB or LSB for you automatically based on the current band. When tackling broadcast band interference however, you want the option to go in either direction. The radio also changes the current frequency by 700Hz when SSB is selected, which then has to be corrected with the main dial.
You would begin by switching to SSB mode by pressing and holding the band button. If you’re lucky, the default setting is the one you want.
If it isn’t, activate the settings menu with a long press of the F key, go to the menu option SSB BFO (11–07), select it and use the multi-function knob to change the mode away from Auto to LSB or USB.
As you are doing this, the VFO will change to LSB or USB too. Leave the setting on the option that suits your needs.
If you exit the menu option without saving (pressing F), the mode will remain changed, but the override is not saved. This can be a useful quirk because next time you turn the radio on, it will be back in auto mode.
If you commit the override by pushing the multi-function knob instead, the radio will stay in manual mode until you remember to return to the menu and restore automatic behaviour again.
It’s a needlessly complicated system, as I discovered recently while recording another Shortwave Radiogram broadcast. Even after testing the procedure previously for this article, the radio was determined to stay in LSB no matter what.
Memory Programming
Since the radio has no keyboard for direct frequency input, an early priority for shortwave listening was to program some of the 99 memories available. My plan was to have some favourite broadcast stations, along with WX, Volmet, GMDSS, and some data mode frequencies. To handle ad-hoc stations however, I wanted a way of moving quickly across the main shortwave bands without excessive use of the main tuning dial or multi-function knob.
Taking the official definitions of the broadcast bands between 60m and 16m, and combining those with frequency schedules, I came up with a series of frequencies 150kHz apart across each of those bands, guaranteeing that no broadcast was more than 150kHz away.
The combined list of favourites and the 150kHz stepping stone frequencies resulted in 70 memory channels in total. As I wanted to apply alphanumeric tags to those channels, and didn’t relish the prospect of entering them manually, my next port of call was the CAT control manual to see how those memories could be set programmatically.
While there is commercial software available for the FT–891, I only needed to set up the memory channels, so decided to adapt some PowerShell I’d written for another radio, sending the necessary serial port commands to configure my list.
Now that is done, I can fast travel using the stepping stone memories to the closest point in a band, then use the fast mode of the main tuning dial to move quickly to my final destination.
The following table lists my current stepping stone channels in kHz:
60m
49m
41m
31m
25m
22m
19m
16m
4750
5900
7200
9400
11600
13570
15100
17480
4900
6050
7350
9550
11750
13720
15250
17630
5050
6200
7500
9700
11900
13870
15400
17780
7650
9850
12050
15550
17930
7800
15700
Memory Access
An obvious way to access the memories is to toggle memory channel mode with the V/M button, then cycle through the memories using the multi-function knob. Depending on your memory choices, you will hear relays clicking as the radio jumps back and forth between widely spaced frequencies and bands. You will also need a good memory of your memories, so you know which way to turn the multi-function knob.
An alternative and perhaps faster method is to press the M>V button. This brings up a multi-line listing of memories that can be scrolled through using the multi-function knob. Pressing the M>V button again copies the selected memory to the VFO and leaves you in VFO mode. This avoids the radio flipping across bands and the associated relay activity.
Although it is not documented, if you push the multi-function knob on a selected memory channel in the multi-line listing rather than using the M>V button, the selected memory is activated and the radio is left in memory channel mode displaying the memory tag.
Disabling Transmit
At the time of writing, I haven’t discovered a way of formally disabling transmit, and the minimum transmit power goes no lower than 5W. Since my main interests are around shortwave listening, utility stations and an occasional data mode QSO, I have not fitted the microphone to the radio. In that configuration at least, there is no danger of me manually transmitting into a receive antenna by accident.
Outdoor Power
Reports vary on the power consumption of the FT–891. It certainly isn’t as high as the 2.0A documented in the user guide.
While some sources claim values in the region of 1.0A, my power supply shows around 0.4A at 13.8V when receiving a typical HF broadcast. You will notice where some of that power goes quite quickly, as part of the radio gets warmer.
To save weight, my preferred power supply in the field is usually a lithium battery designed to jump start smaller engined cars. This versatile 12V battery also supplies 5V USB power to phones and tablets, and can even charge laptops.
In Conclusion
Control ergonomics and screen size are factors that can detract from shortwave listening on these kinds of radios, with smaller speakers and menu options for features normally at your fingertips.
Despite this, I’m happy with the audio, and I like the emphasis on mid-range frequencies in its audio spectrum. The digital noise reduction is impressive and can tackle significant QRM environments, but for outdoor listening may not be your first port of call.
Memory presets can make tuning less laborious, while assigning key listening tools to the customisable front panel buttons should reduce the need to access menus. I may consider defining some stations with known co-channel issues to memory with preset LSB and USB variations, to allow rapid responses to interference in future.
In good conditions, I suspect there is little difference between the FT–891 and FT–817ND for general listening. The FT–817ND has produced some of my best recordings of Shortwave Radiogram. The newer radio however brings many advanced tools to bear on more difficult signals, while its band scope and full sized VFO tuning dial enable desktop style shortwave exploration.
The ICOM IC–7200 is constrained by interference at home, biding its time for when the solar cycle swings back. When it’s been out on field days, it has always been a strong performer for broadcast listening. All the important controls are upfront, but is not a trivial thing to transport on foot. While the FT–891 has impressive DNR chops, I think I prefer the ability of the IC–7200 to apply noise reduction in incremental steps. Perhaps the algorithm approach will grow on me in time.
Any amateur radio operator using the FT–891 should have no trouble using it for shortwave listening. It attracts a lot of positive reviews for its ham radio capabilities, and it looks like those features carry across for listening to the world too.
An excellent review, Mark! Thank you for sharing.
The Yaesu FT-891 must be the most popular HF transceivers Yaesu sells today. So many of its users rave about its performance and audio characteristics. Mark, thank you for sharing your experience with the FT-891 as an SWL!
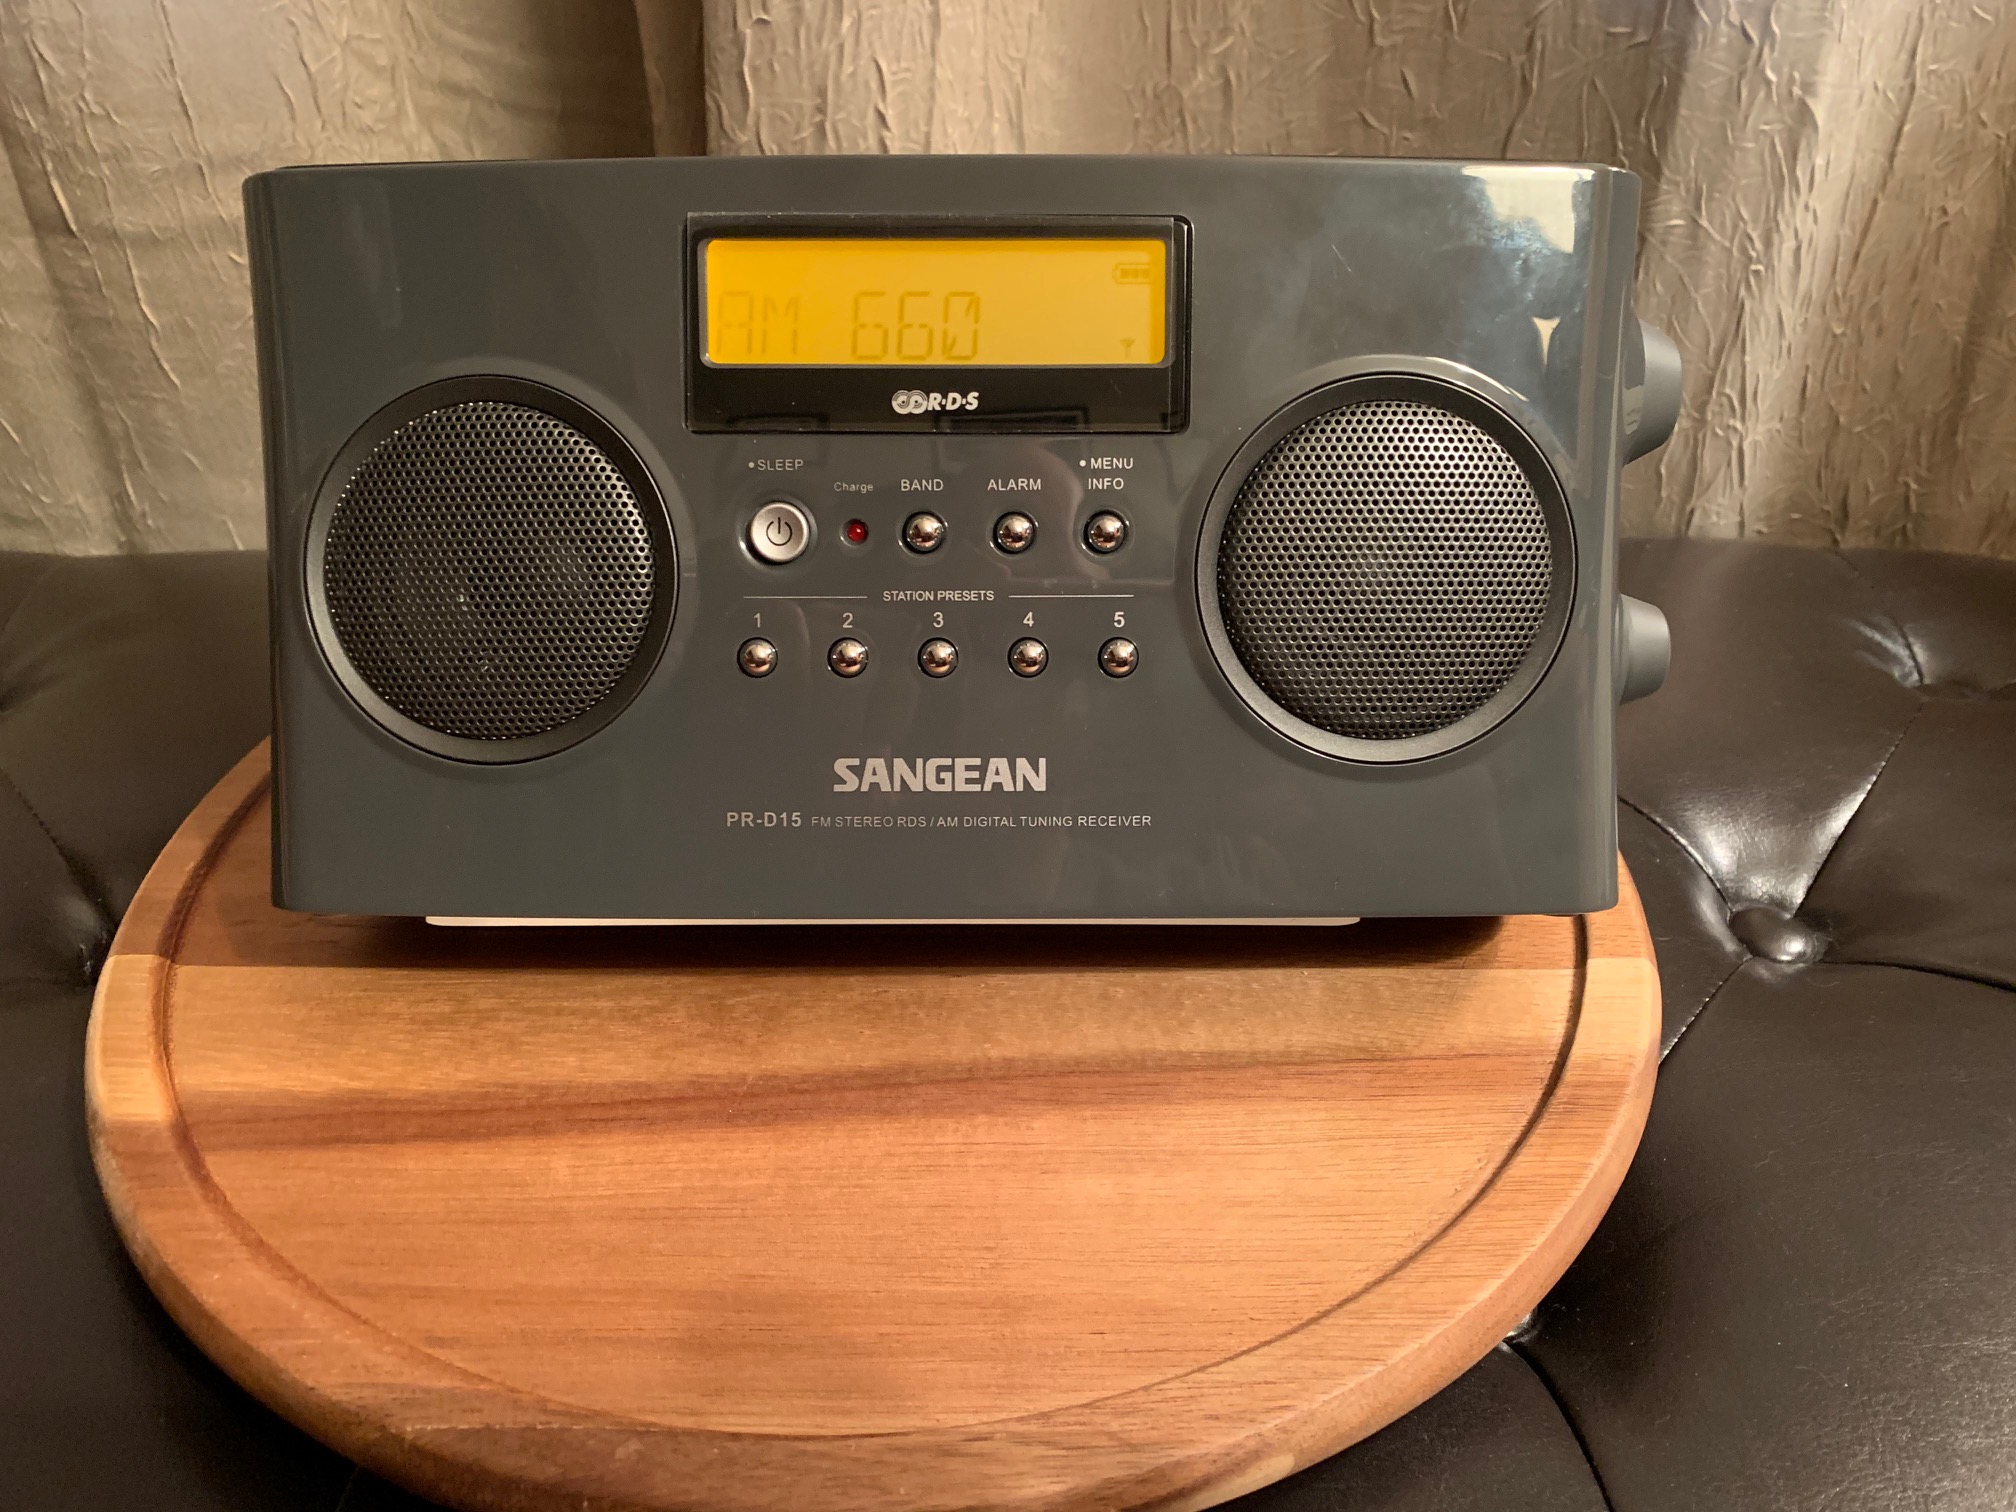
Since the demise of my Sony ICF-SW100, I’ve decided to do some AM Dx’ing. A few years ago I purchased a Sangean PR-D15 as my dedicated “AM Dx Radio”. Despite owning it for a few years, I hadn’t yet really put it through its paces.
Note: My 1994 Gründig Yacht Boy 400, with its 150mm (5.9″) ferrite rod antenna, performs splendidly on AM and until this purchase, the YB400 was the radio I grabbed for AM Dx.
At the time of my purchase – if my memory is correct – the other models I had considered were the CC Radio 2 (now discontinued), the CC Radio 2E (it was a relatively new release at the time), and the Original CC Radio EP (now discontinued & replaced by the CC Radio EP Pro).
Admittedly, part of my decision was based on cost. At the time, the CC Radio 2 & 2E were priced over 2x the cost of the PR-D15 and the CC Radio EP was $15-$20 more when shipping was added. Besides the cost, I chose the PR-D15 based on a few things I had read online. But the aspect that really appealed to me is the 200mm (7.9”) Ferrite Rod Antenna and that compared favorably with the C. Crane offerings (yes – ferrite size isn’t everything, but it is an important consideration). So after having read online comments (reviews, discussion boards, etc.) about the PR-D15, I felt very comfortable with my decision and it wasn’t based on cost alone.
Frankly, I don’t really care how well my AM radio performs during the day (I hope this isn’t sacrilege). Why? During the day whether I’m in the car, working in the garage – whatever – I’ll typically stream my favorite station (NYC) via radio.com on my iPhone so I can pause, rewind, or pick-up where I left off. Until my Sangean PR-D15 can do that, I prefer to daytime stream. My “hobby” of AM Dxing is in the evening – to relax and have fun (and isn’t that what a hobby is supposed to be?). Keep that in mind as I reveal my results.
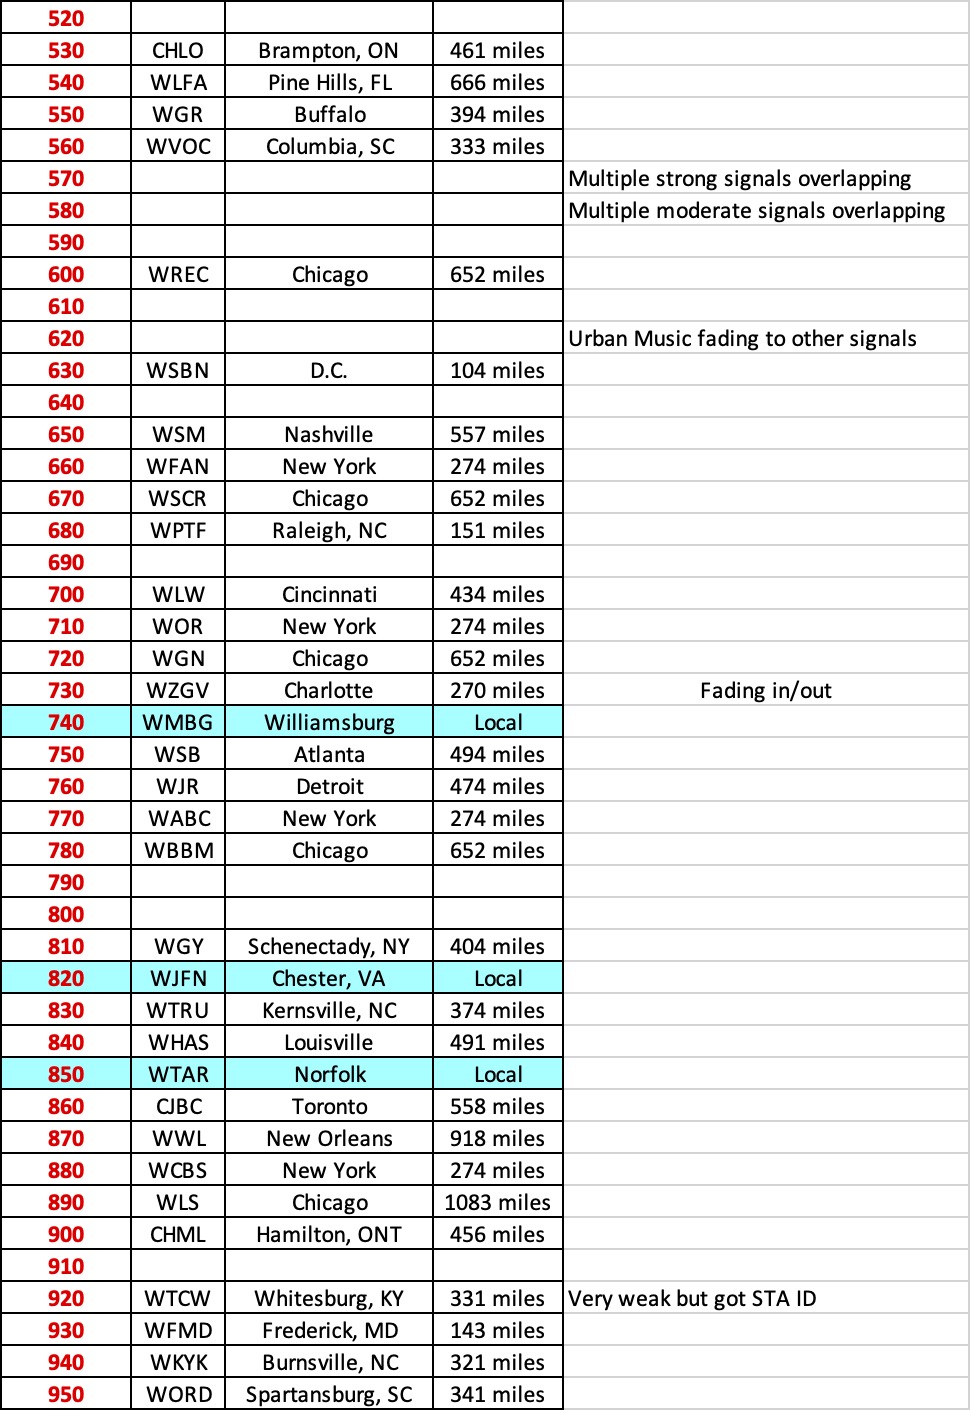
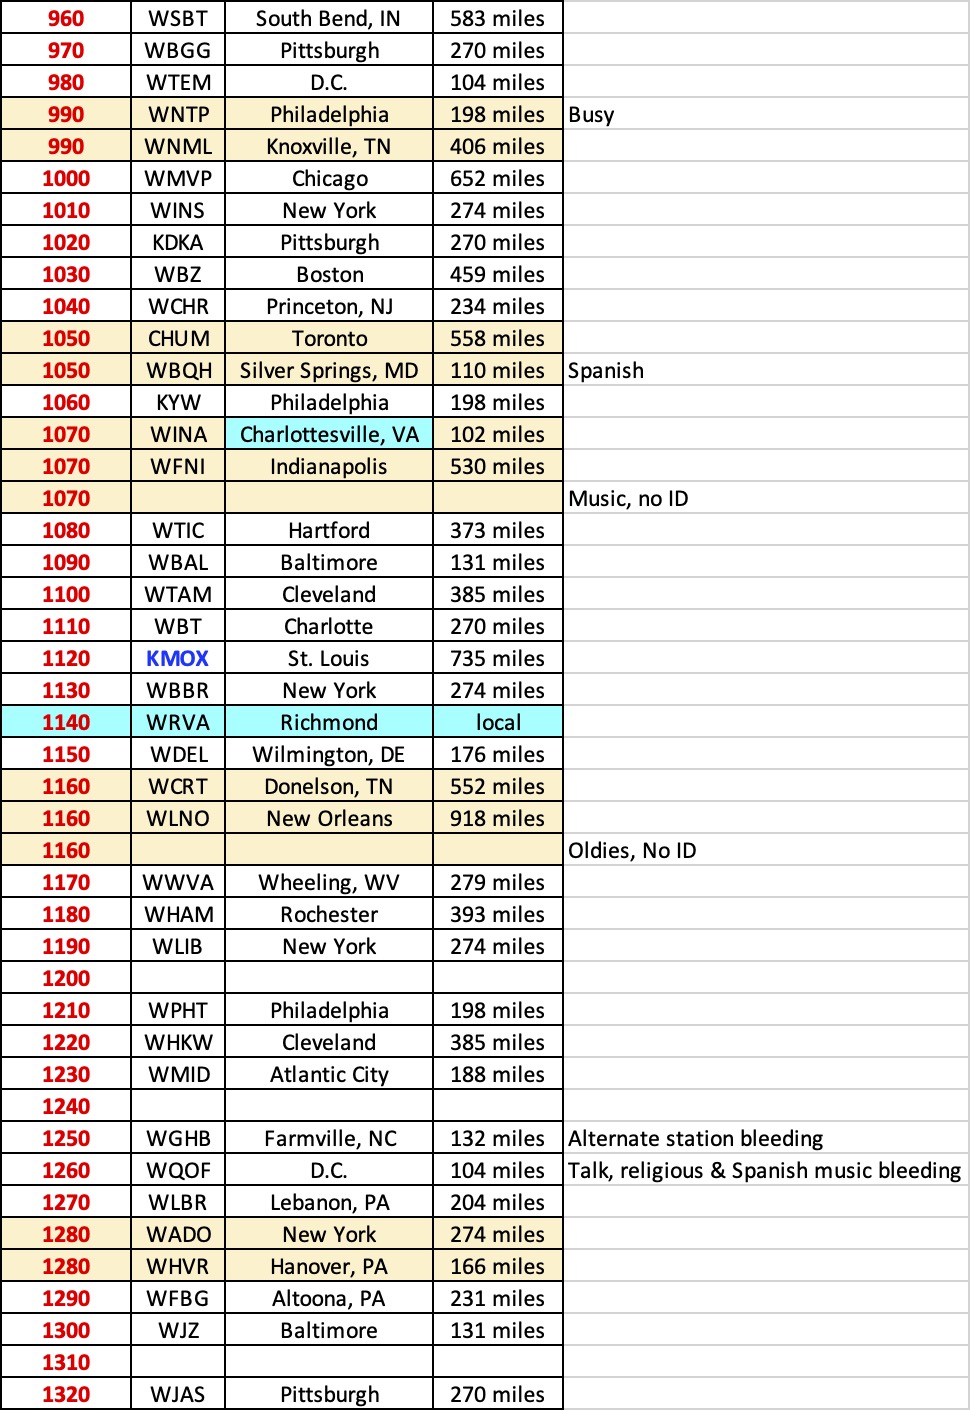
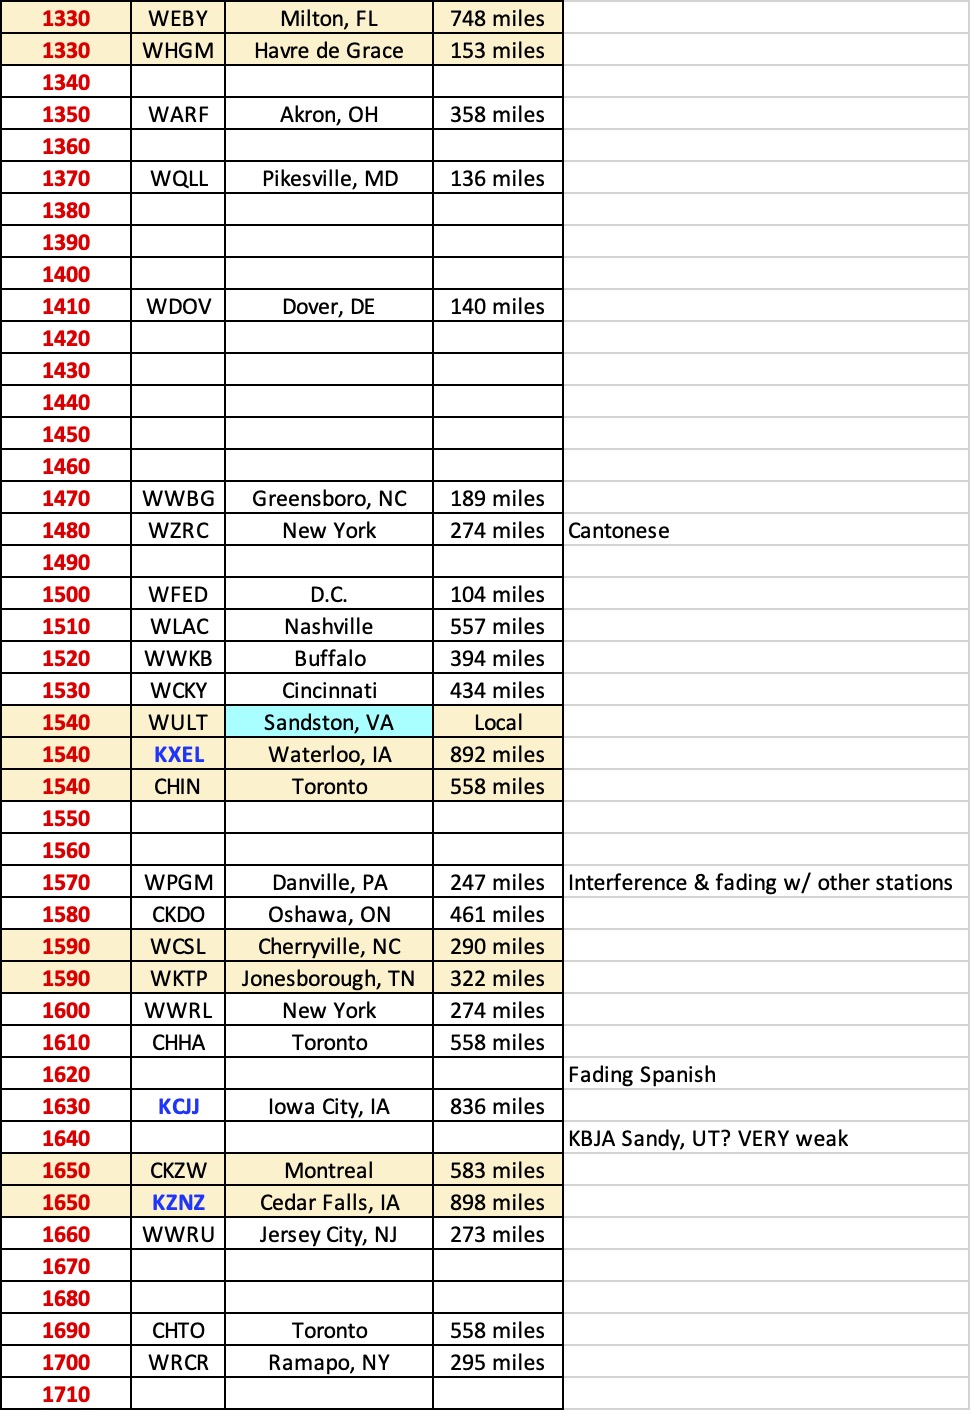
I intended to do my AM Dx Nighttime Test in one night, but I was getting so may stations that I had to extend it over two nights. I started each session around 8PM and they lasted until 11:30PM – 12AM (over 7.5-hours of testing on consecutive nights late this week). I had my PR-D15 on a lazy susan turntable and I had two nearby laptops – one to aid as an AM Station locator and the other I used to stream. Stream? Yes – to count as a recorded station I had to get a positive station ID. However, many radio programs are syndicated. Syndicated radio (and ESPN radio) can go on seemingly forever between station IDs. If I didn’t get a station ID within 15-minutes, I used the second laptop to go to the web site of the station I believed it to be to “listen live” to see if the radio and the stream matched-up (luckily live web streams are slightly behind live terrestrial radio so the IDs were easy). Often by the time I had given-up and gone to my 2nd laptop, I’d finally get an on-air station ID. I just didn’t want to waste too much time on one station and miss other stations.
Since my test extended for 2 nights, on night two I quickly dialed-through nearly all of the stations I confirmed on night one to make a quick re-confirmation they were still audible on the 2nd night.
Since I captured so many stations, I was overwhelmed trying to finish and thus I feel this test is still incomplete. My wife typically ends all of my radio playtime (my man cave is a “sitting room” off the side of the master bedroom & there is no wall – no door – so it’s completely open). But my wife and my step-daughter have a weekend out of town in mid to late March. And that means I can stay up all night and do one non-stop test session. Is it bad to say that I cannot wait to be alone?
My QTH is ~ 35-miles east of RIC (Richmond, VA) Airport. The tables below (broken into three files) are my results. Some frequencies have multiple station IDs – since when turning the radio and nulling signals, sometimes one station disappeared and another jumped onto the dial. If/when I post an update of my all-nighter, I’ll add another column to the spreadsheet to include the transmitter strength for better context. It should also be noted that I recorded straight-line distances & not driving distances (via an online straight-line/GPS calculator).
I was impressed that I successfully captured three Iowa stations. And though I find it almost unfathomable, I truly believe I was on the verge of successfully logging a station in Sandy, UT which is over 2000-miles away (there are only six stations assigned to the 1640 frequency, and given the content I [barely] heard, all indications are that it was KBJA)!
I also believe I captured at least one Super-Clear Channel station from Mexico, but unfortunately I just couldn’t successfully verify the station ID. I hope to have a future opportunity to add it to my list.
My ultimate goal is to: (1) compile & maintain a spreadsheet of every AM station that I am able to successfully ID; and (2) maintain a record of the most AM stations I was able to ID in a single one-night, non-stop session.
Despite being somewhat incomplete, I’m impressed by my results. I’m interested to see what you think so please post your comments below!
I should note that my results are strictly off the internal ferrite antenna – no external antenna, no passive loop antenna was used to enhance any signal.
To save column space, please click on each table below. A larger & easier to read image will open in a separate window or tab (depending upon your browser setting).
Many thanks to SWLing Post contributor, DanH, who shares the following guest post:
Sangean ATS-909X2 First Impressions
by DanH
A few hours spent tuning a new radio are enough to make me feel confident that I know most of the new features and how to use them. Then several days, weeks or months later I discover overlooked features and I figure out new ways to operate the radio. Sometimes I actually read the operating instructions again. Understand that I received my new Sangean ATS-909X2 only three days ago so this early report is hardly a comprehensive review nor was it intended as such. At this point I’m looking mostly at shortwave and medium wave performance.
My first experience with the new Sangean ATS-909X2 was online at the Amazon shopping site. On December 16, 2020 I pre-ordered the radio for US $459.99 (list price). The radio didn’t ship and the prices dropped a couple of times. Each time I cancelled the order before it shipped and ordered it again at the lower price. In the end I ordered my 909X2 for $297.95 and paid for it with credit card bonus points and a little more that I had on my Amazon gift card.
The 909X2 arrived on Friday afternoon, February 19. I devoted the first 24 hours to tuning around on SW and a little MW only. I deliberately made no videos at this time and devoted my radio time to exploring the bands. The latest addition to the ATS-909 series is a well thought out evolution of the radio and much more than a 909X with a cosmetic facelift. The 909X2 retains the excellent speaker sound of its predecessor, the tuning knob is unchanged from late production 909X, the solid build quality remains the same as does the general layout, performance, size and weight. SSB audio for the 909X2 remains at a lower level than for AM, like 909X. I don’t like having to turn the radio volume up for ECSS or SSB. Like 909X, the new radio excels with external antennas and is not easily overloaded by a lot of wire antenna.
Like 909X, 909X2 occupies an interesting niche in the portable multiband world. It is a little too large and heavy for a travel radio but over the years I have packed it many times in my carry-on bag. Sometimes I am willing to sacrifice extra clothes if it means bringing the best radio. These radios excel on a desk or radio room work station. The radio is big and powerful enough to provide top notch sound for all modes. Late at night I run mine with Sennheiser HD 280 Pro headphones. With 909X2 you get top performance in a small package. It is an over-used metaphor but think of a 1950 – 60’s communications receiver in a small package, plus VHF air band and FM. The speaker audio sounds better for broadcasts than many Amateur rigs.
There are many new features with the 909X2. Instead of charging NiMH batteries like Eneloop in series the 909X2 monitors each cell individually and identifies failing cells for you. SSB resolution is now selectable 10 – 20 Hz, auto-bandwidth control may be used on all bands except SSB on HF. There are many more memory slots available in three separate banks. The LCD has dimmer settings, soft muting is switchable for FM and the keyboard beeper may be shut off! Instead of hidden features the 909X2 has an INFO/MENU button for customizing your operating options.
The new bandwidth choices make a real improvement in LW, MW, SW, FM and VHF airband signal quality especially when adjusted in tandem with the audio tone control. Automatic bandwidth control selects the bandwidth that offers the best signal-to-noise ratio. Now I understand why the 9090X2 shortwave bandwidths are relatively closely-spaced: auto control shifts quickly between multiple bandwidths. Too much space between bandwidths would sound jarring. The auto bandwidth control is most useful during heavy fading and has improved my ability to copy words on poor AM broadcast signals. This feature does add an odd effect to fading signals: the audio tone quality will shift as different bandwidths are selected. This feature is not something that I would leave ON as a default for shortwave listening but it is definitely a welcome tool when needed.
MW performance is as good as the 909X but with improvements made possible with more bandwidth and memory slot availability. I found that 909X2 LW is generally better than 909X with fewer MW images. I am hearing substantially more LW beacons on 909X2. LW activity is very limited here on the US West Coast.
10 Hz SSB resolution means that ECSS is excellent on the 909X. I can tune a shortwave music broadcast on the 909X2 without warble. This was impossible with the 909X 40 Hz resolution.
The 909X sold near US $220 for most of the last five years with a few rare Amazon holiday sales at the $190 level. Then the prices jumped another $30 post-Covid 19, as did prices for other radios in this range.
Is 909X2 worth the additional money right now? I say yes! Mine is a keeper.
I do not believe that there will be significant improvements coming along any time soon. Sangean is a private Taiwanese company with its own factory located in PRC. 20 pre-production units delivered to Europe in January are not the same batch as the retail production units released by Sangean USA this month. Sangean USA has two of the pre-production units. They did not offer these for sale. The first retail production units arrived at Sangean USA in mid-February before the Lunar New Year. If there are significant changes for 909X2 we won’t see those radios for at least another 6 – 8 weeks. I can’t see much need for significant changes anyway.
Believe it or not I have been very busy with the Sangean ATS-909X2 and haven’t tried FM or VHF air band on it yet!
This video is a companion to my first impressions written here. Hearing and seeing video is hard to beat. SW and MW features are shown in real-life reception conditions. I test for the dreaded LCD/hand capacitance internal noise and have a look, listen and comparison for telescopic whip performance. And you will hear DX too, not just Brother Stair. You need to see and watch auto bandwidth control to believe it.
Wow! Thank you so much for sharing this, Dan. Very encouraging. We look forward to publishing your updates as you get to know the 909X2 even better!
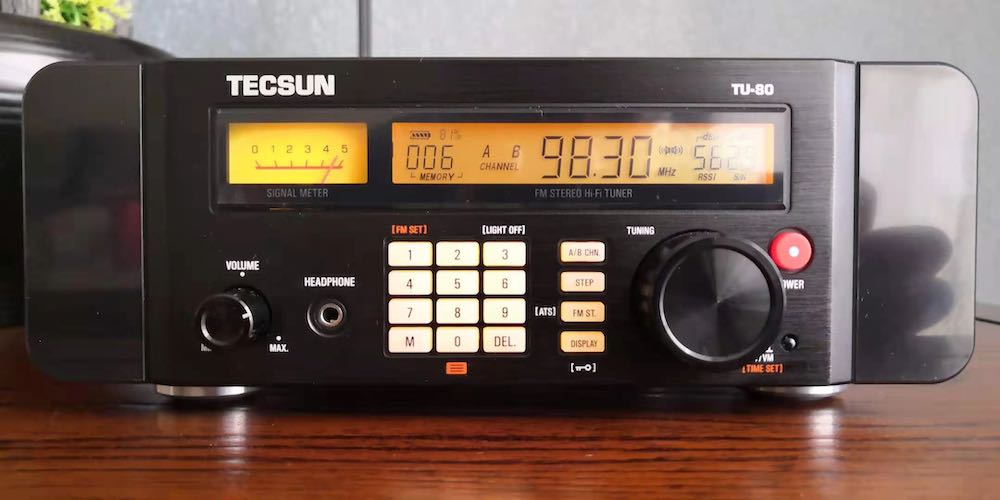
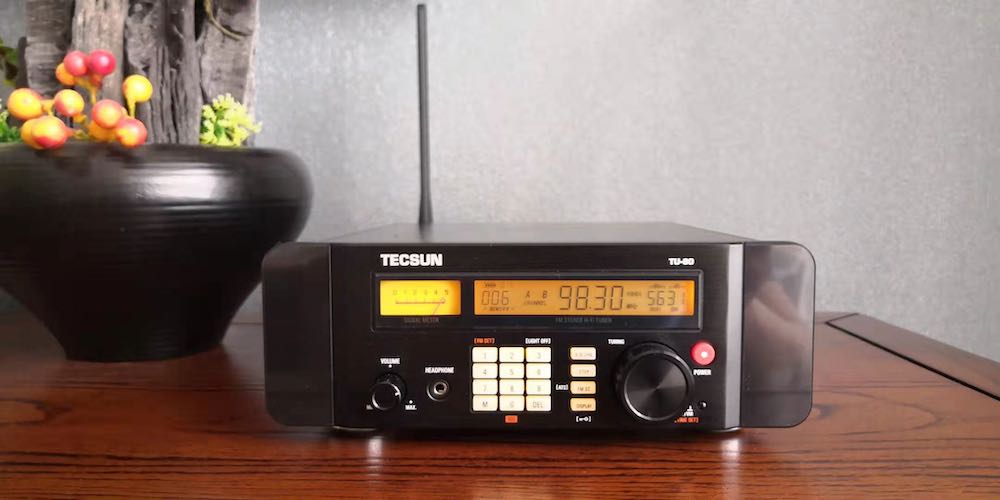
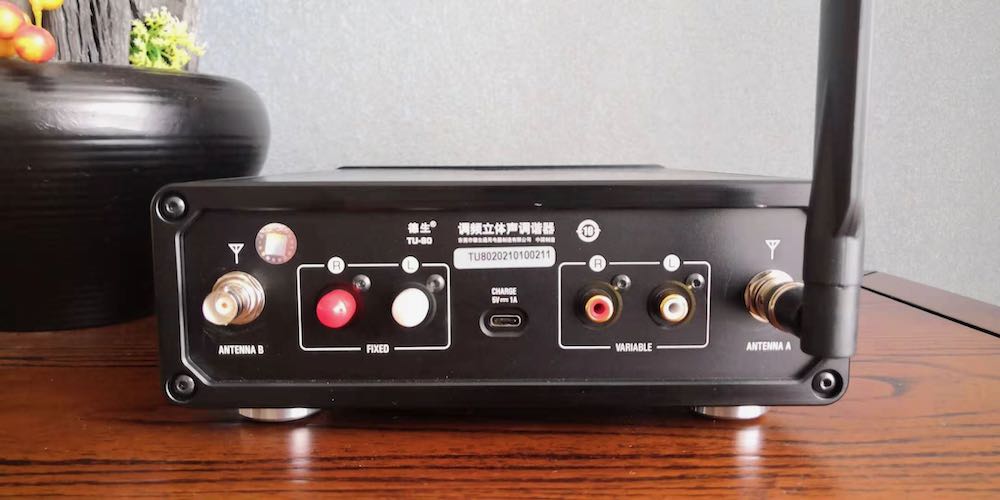
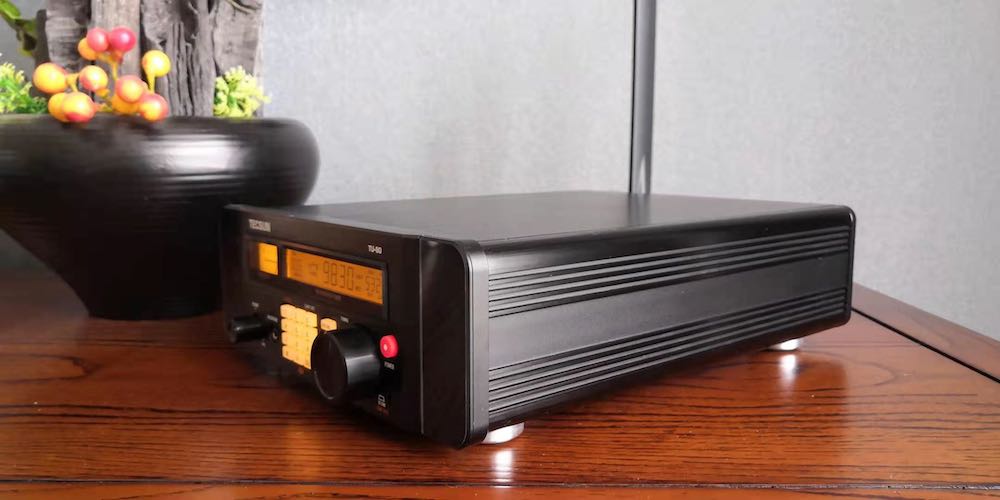
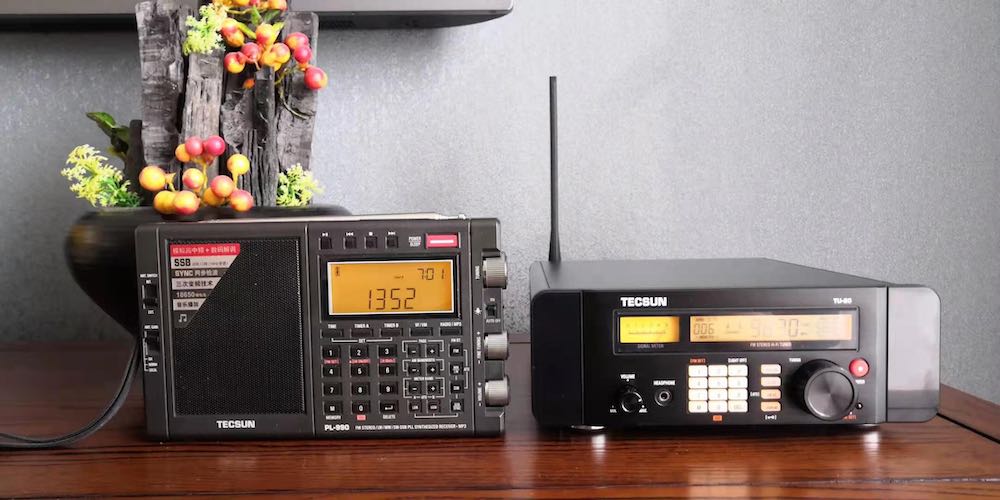
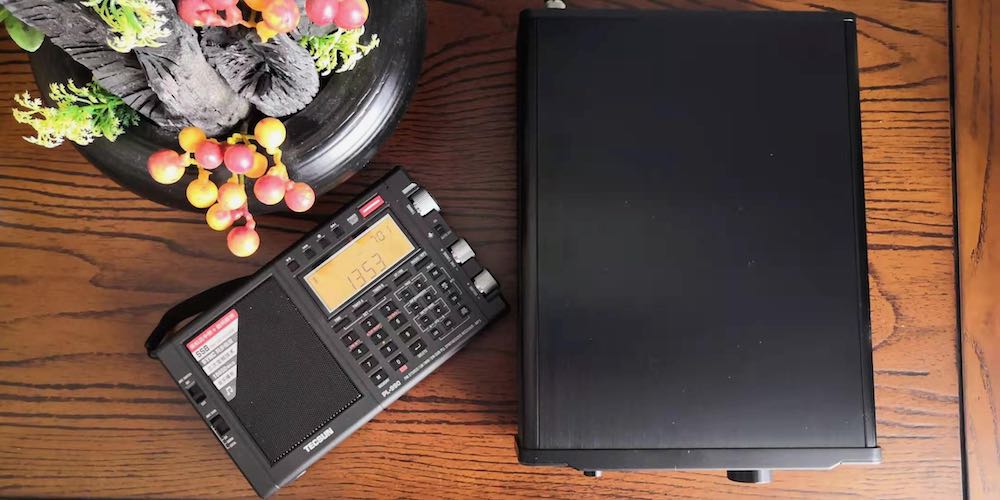
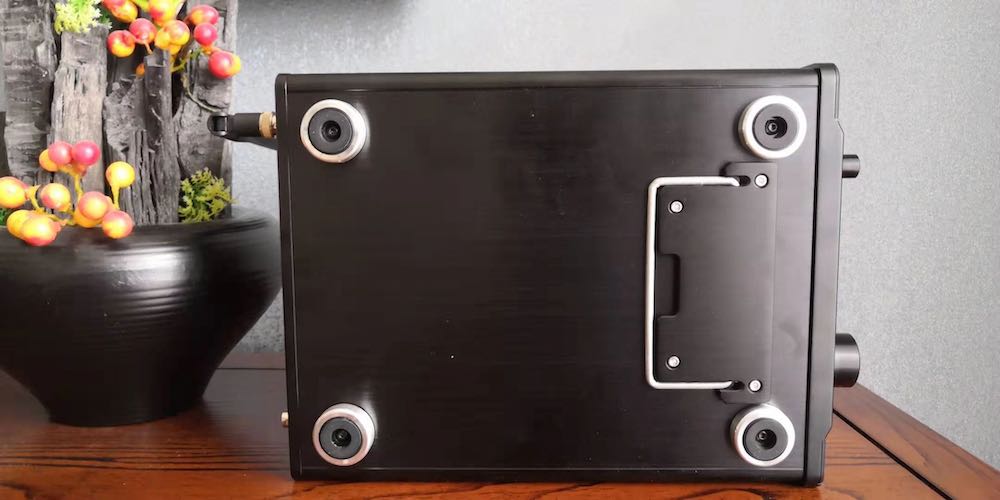
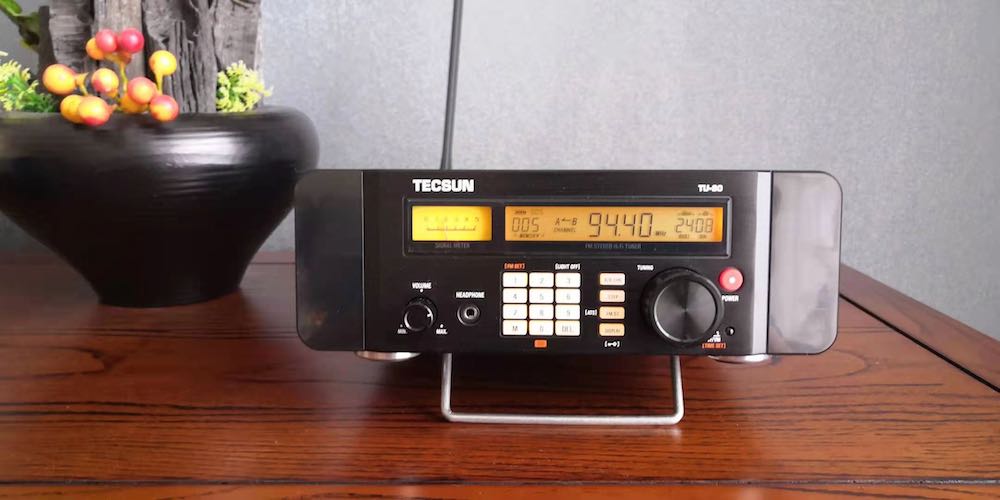
Tecsun’s Chairman, Mr Liang Wei has told us that TU-80 was not designed for the pure Bclers not for the pure audiophiles either, but for the person who is both Bcler and audiophile. We have to use it with high quality external speakers. That’s it.
Let me show you some pictures I took yesterday:
Additionally, one reader misunderstood me as a seller, absolutely no, I am just a radio enthusiast and a college teacher, I major in western philosophy, especially American Pragamatism.
Yours sincerely.
Mei Tao
Thank you, Mei Tao. We truly appreciate your early access to these various models of portable radios. The TU-80 appears to be a truly unique model and I’m sure FM DXers are following it carefully. Thanks again!
Many thanks to SWLing Post contributor, Dan Robinson, for the following guest post:
Premium Receiver Scammer(s) Back
by Dan Robinson
From time to time here on SWLing Post, we have alerted readers to scammers using multiple eBay addresses to attempt to rip off unsuspecting potential buyers and using old photographs of usually premium receivers to do so.
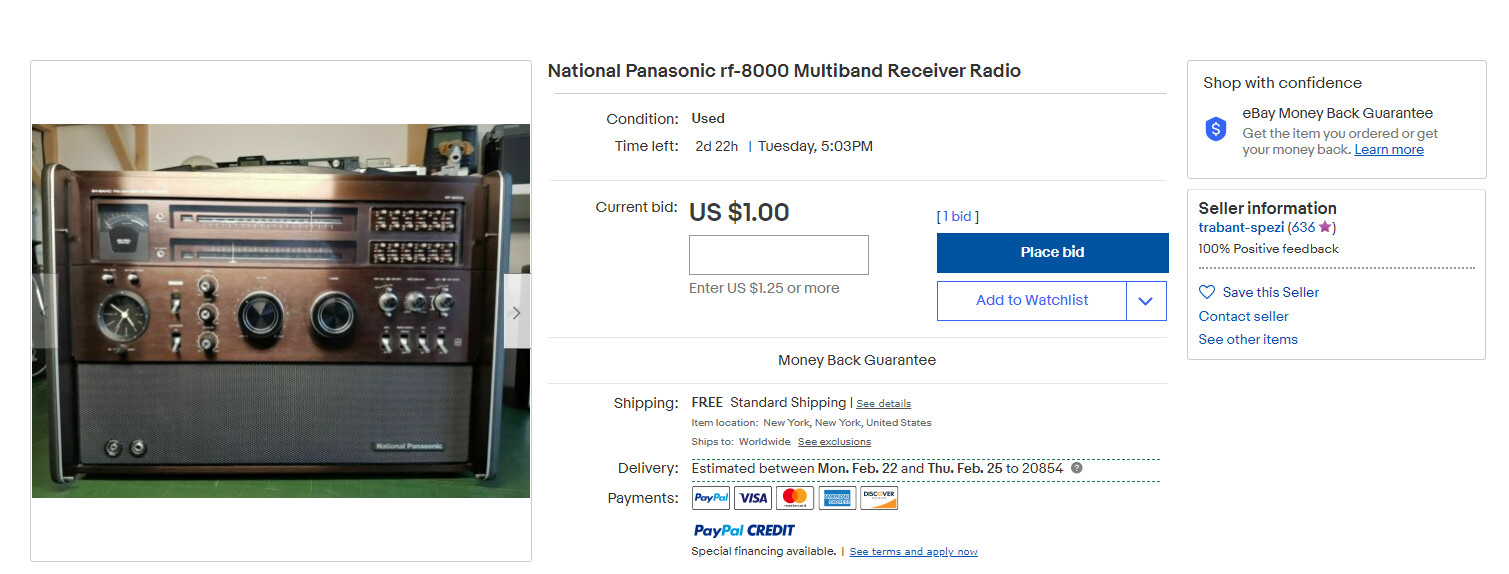
Well, whether this is one scammer or many, he is back. See the photos attached here, which show what is surely a fictitious eBay ID and what appear to be legitimate photos of a Panasonic RF-8000, one of the most sought after of the large portables from decades ago.
It’s not until the 4th photograph that this person provides that you see what’s involved in the scam, which is the scammer noting that he is “selling this on behalf of my company” and that the radio can be purchased “at the buy it now price only” The scammer then provides an email address to get around the standard eBay auction process, adding that he does not respond via Ebay messaging.
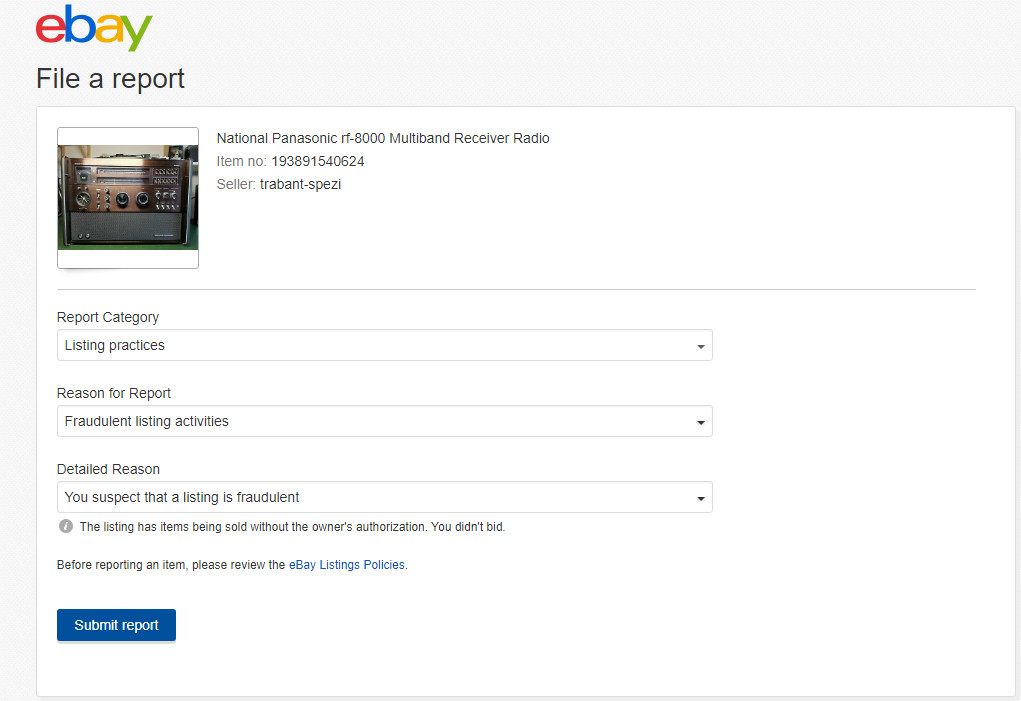
I have continued to alert eBay to these scams, and to their credit eBay has taken down many of these items in recent weeks and months, though occasionally eBay does miss these. eBay also does not make it immediately clear as to how to report items like this (HINT: you have to scroll down the page until you see a tiny REPORT link on the right side which takes you to multiple categories. These scam items fall under “LISTING PRACTICES” “FRAUDULENT LISTING ACTIVITIES” and “YOU SUSPECT THAT A LISTING IS FRAUDULENT”
If eBay has successfully already taken a scam item down, you will then see a confirmation page saying the item could not be found after refreshing the page. Very often, even after reporting an item, the identical item will show up within seconds or minutes under a completely different eBay ID (see the 2nd photo here on the Panasonic RF-8000 which shows a changed eBay ID)
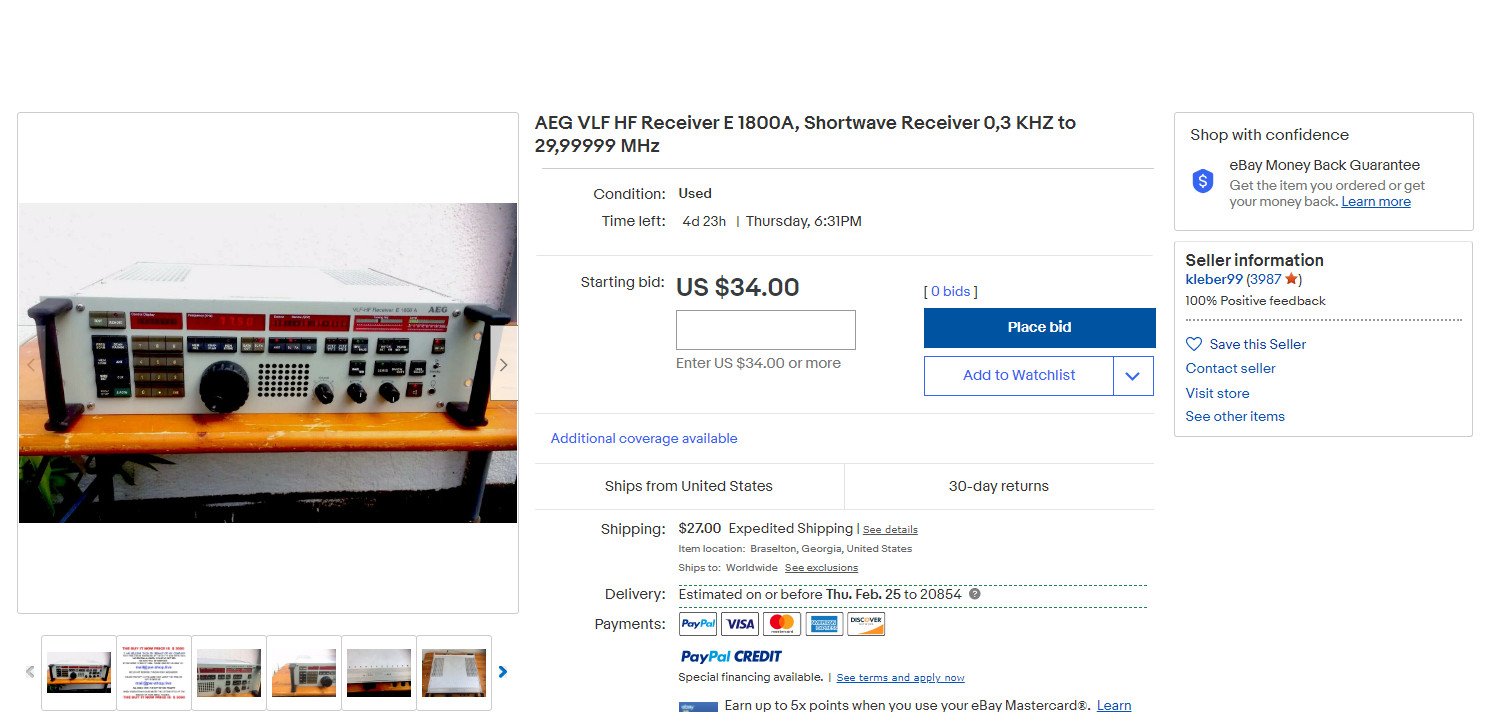
Receivers most often seen on these scams include: AEG 1800A, Panasonic RF-8000, and usually other premium sets, and the tip off to the scam is that the seller/scammer usually always starts the price at $1.00 or $34.00 or similar level. In the case of the AEG 1800A, the scammer consistently uses the exact same photo of this rare receiver, from a sale that completed years ago.
I would encourage eBay users to join me in reporting scams like this — eBay certainly appreciates it and if you have eBay “Concierge” level service, which I do, it’s sometimes a help to them to get online and chat with eBay about the item and your report, especially if the eBay algorithms have failed to spot and take down a particular scam.
Thank you for sharing this, Dan. We appreciate insight from radio enthusiasts like you and Paolo. As Dan suggested, I encourage you to report listings that are obviously fraudulent to eBay. They will investigate the case and take action if it is a scam.
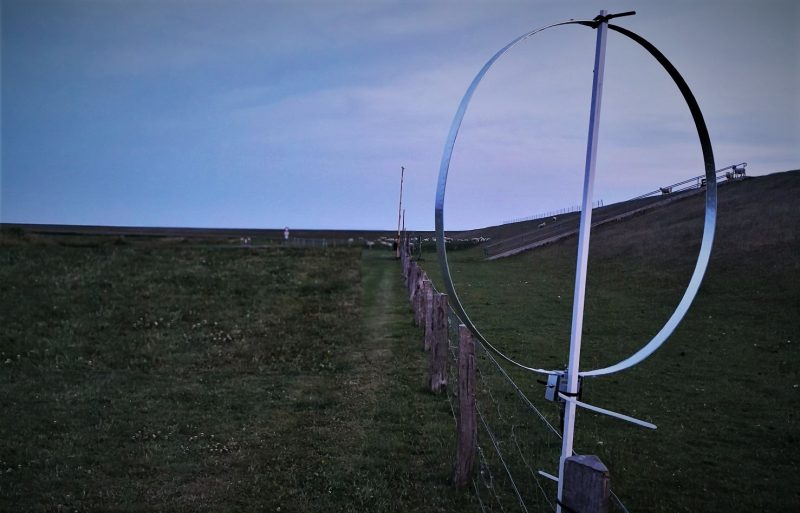
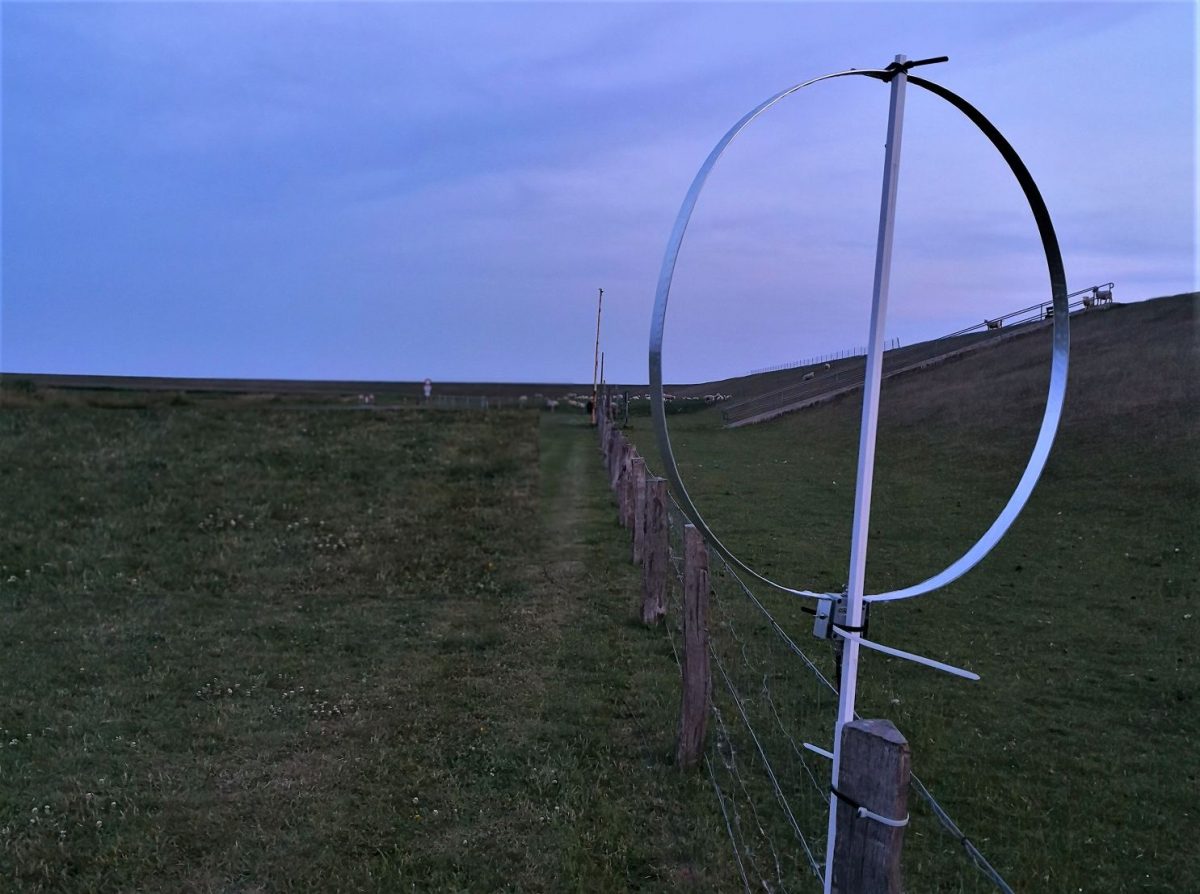
Many thanks to SWLing Post contributor, 13dka, who shares the following guest post:
Dipping my toes into transatlantic MW DX
by 13dka
Most of my SWLing life I wanted to dig into MW DX but never managed to make that really happen for some reason. Then last November, I fetched my first transatlantic station while I wasn’t even trying, in a rather surprising setting:
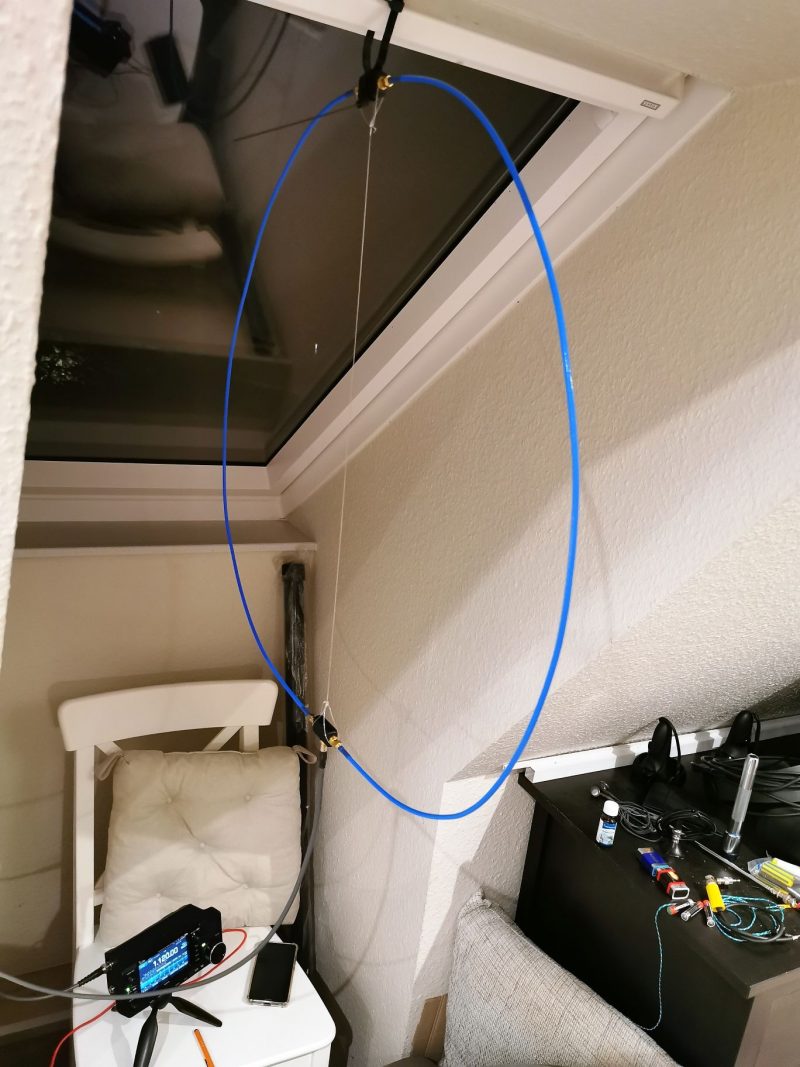
I have to explain that my home and neighborhood got so infested with a multitude of QRM sources that I did not put my outdoor antennas back up after a storm blew them out of the trees in winter 2018/19. I just used an ML-200 loop indoors, which also has to put up with my own additional QRM sources in my den, consisting of 3 computers running 24/7 and a couple of switching power supplies, a TV, LED lighting… allowing for very basic reception as long as my neighbors don’t watch TV or use the internet. On top of that, medium wave is badly beaten by a mowing robot’s boundary wire here, making reception on several portions of the band completely impossible.
I never expected receiving any US stations on MW in that noise, but I couldn’t sleep that night and scanned the bands a bit with the IC-705 hooked up to my new YouLoop hanging over my bed for testing. I had seen the characteristic transatlantic carriers on MW many times before on my SDRs, but for some reason I never picked up anything intelligible on them in any winter season, now a lot of these carriers were there again but on 1130 there was actually modulation and it wasn’t the only station!
Small bedside loop: SWL’s dreamcatcher!
Bloomberg Radio 1130 came in with almost enjoyable quality at times, but Bloomberg is also kind of a surefire station for MW DX over here. I also picked up a station on 1120 and another one on 880 which was briefly so strong that it surmounted the strong interference from BBC Radio Wales on 882 kHz. 1120 was confirmed the next night to be KMOX in St. Louis, 880 kHz was *not* KCBS in NY – I checked that immediately, I have a KiwiSDR set to that frequency booknarked on my cellphone in case I have a craving for the 1-877-Kars-4-Kids commercial. Powerwise likely candidates for that would be CHQT (50kW) in Edmonton, CKLQ (10kW) in Manitoba or KRVN in Nebraska (50kW class B station) but this may be hard to verify due to the dominance of the BBC on that frequency. Anyway, KMOX wasn’t a bad catch for a small, passive indoor loop, that’s 7,150km or 4,440 miles from here!
Bloomberg Radio on the YouLoop:
Here’s KMOX:
This was A) quite encouraging for nighttime DXpeditions to the dike (brrr…cold!), B) a testimony for the YouLoop’s good performance on MW and C) a testimony for the IC-705 having pretty much all one could wish for in a capable MW DX radio – notch filter, passband tuning on AM, stable ECSS, waterfall display to detect stations and last but not least loads of sensitivity to make the most out of low-output antennas down on MW.
Going to the dike
Of course I just had to put on some long johns and drive to the dike around 3:00am local a few nights later, to try my luck with my ML-200 (lacking a better idea) with an 80cm diameter rigid loop. I was mildly surprised that reception wasn’t that much better than with the YouLoop at home. The overall yield wasn’t exactly outstanding compared to other people’s logs but a lot of stations were hidden in the frequency ranges that are submerged in QRM at home. My log has US/Canadian stations on 20+ different frequencies, unfortunately most of them UNID. Here are some recordings I made that night, hunting for unambiguous station IDs from North American broadcasters:
ML-200, Nov. 16th, 2020
1130 Bloomberg Radio on the ML-200:
Presumedly WABC 770 in NYC: In MW DX, never think you ID’d something properly just because you heard a city name and the frequency has a clear-channel station located there!
This is more unambiguously 1010 WINS in NYC (with a twist described later)
1030 WBZ Boston, MA – the first part of the clip is showing how it sounds when the signal is good, the second part demonstrates how reliably propagation is taking a rest while a station identifies itself.
The grandpa of AM broadcasting, 1020 KDKA:
Moving away from the east coast, this is WHAS 840 in Louisville, KY:
760 WJR Detroit, MI
Here’s a tough one, the religious content I heard with a great signal before doesn’t warrant a proper ID alone, and as per usual the station ID’d while fading out. I could ID this only with a set of big, closed headphones, which is a mandatory accessory for all extreme DX (CHRB 1140 in High River, Alberta):
Of course I was occasionally checking other bands too and got some serviceable signals from Brazil:
Clube do Para on 4885 kHz:
VOA Pinheiro from Belem, Brazil on 4960:
Going to another dike, this time it’s personal!
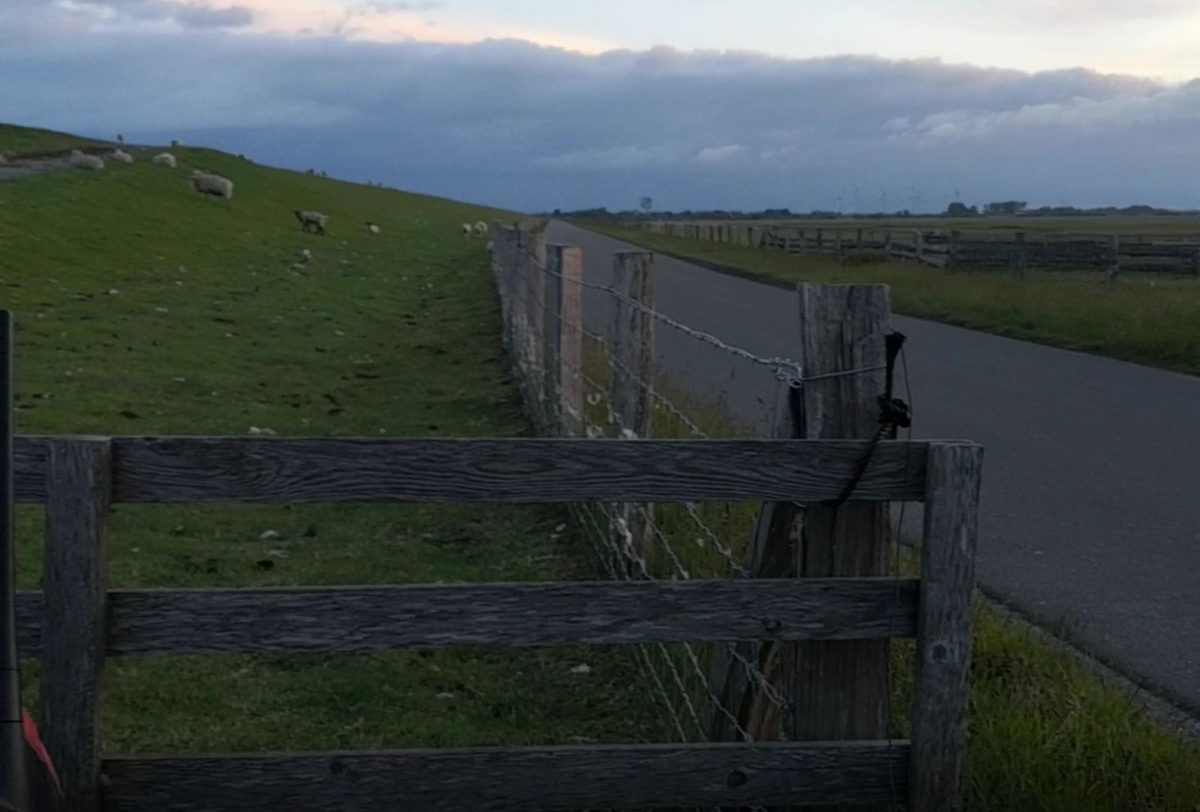
Time to try something completely different: A ~1,000m/3,000′ straight (and preliminary considered continuous) stretch of mesh fence along the dike heading ~345° (NNW), pointing roughly to mid-/western mainland North America. I had briefly tried its aptitude for being a “natural” Beverage antenna before – with mixed but encouraging results: Due to the fence not being terminated at the far end it may be kind of bidirectional, and according to my latest insights a Beverage style antenna doesn’t work well over very good (conductive) ground, probably even less so close (maybe 200′) to the ocean. Also, I forgot to pack the 9:1 balun I prepared for that purpose, so I just had some wire with alligator clip to connect the fence to the radio. Boo.
Accordingly, what I saw on the waterfall display didn’t look so much different than what I got from the ML-200 before – there were clearly more stations visible (as a carrier line on the waterfall) but nothing was really booming in. However, I managed to log a few more stations, such as WRKO in Boston and (the highlight of the night) 1650 KCNZ “The Fan” in Cedar Falls, IA which has only 1kW to boot at night to make the 6,940 km/4,312 mi to my dike. This may or may not be an indication that the “Beverage sheep fence” isn’t so bad after all!
“Fence”- reception, Nov. 18th, 2020:
VOCM 590, St. Johns, New Foundland, Canada’s easternmost blowtorch is like Bloomberg an indicator station for European MW DXers:
680 WRKO, Boston, MA:
1040 kHz, presumed to be WHO, Des Moines, IA: No ID, only a matching frequency and a commercial for “Jethro BBQ”, which has locations only in and around Des Moines:
Here’s 1650 KCNZ, Cedar Falls, IA with 1KW:
To put that into some relation, this is what 1KW sounds like on a very quiet 40m band in SSB (K1KW from Massachusetts on 7156 kHz producing a 9+20 signal that morning on the “Fence antenna”):
BTW, interesting bycatch – not the first time I caught WWV and WWVH on the same frequency but that morning was the first time I could hear both on 5 MHz:
So where have you been all my life, American AM stations?
A question remains – how could I miss the existence of these stations forever, then in modern SDR times see the carriers on the spectrum scope and still miss the modulation on these carriers? Or the other way around – why did I hear them now?
To begin with, when I started out with the radio hobby many decades ago, the reason for the occasional whine and whistle on some stations (particularly past midnight) wasn’t obvious to me: The last thing I suspected was that this could be interference from across the pond, with the pitch of the whine (or “het”) having a direct relation to the 9kHz vs 10kHz difference in channel spacing. Of course these stations were there all my life! Then, with just some regular radio you’d have to pick one of very few frequencies where a strong station from across the pond coincides with a nice silent gap in the local channel allocation. But until this millennium, European medium waves had no such gaps and a lot more local blowtorches.
Since that time many MW stations were turned off and demolished and whole countries abandoned MW here in Europe, so we’re in a much better spot now for transatlantic DX. Unfortunately the opposite is true for listeners on the left side of the pond, you guys still have a very crowded AM band but less potential DX targets in Europe. On the bright side, the remaining European stations are often not restricted to 50kW and you have another ocean with very distant and rewarding DX stations that are very, very hard to catch in Europe!
Wrong time, wrong place
Another bunch of factors are – of course – propagation, season and location/latitude. The MW DX season is roughly fall to spring nights (when TX and RX are in the dark) with a period of increased absorption in the middle (the “mid-winter anomaly”), signals are potentially stronger at lower latitudes and weaker at higher ones but the distance to the noisy equator and a lack of stations interfering from the N can be a huge advantage for using over-the-pole paths on higher latitudes. The big showstopper is solar activity: Good condx on shortwave can be rather bad for skywave propagation on medium wave, so a solar minimum is the long-term hotspot for (transatlantic) medium wave DX.
I’m glad that I learned how intense that relationship is right away: When I discovered that Bloomberg is pretty good on my indoor YouLoop at home, condx were pretty down with SFI in the low 70s and very little excitement of the auroral zones. 2 weeks later the SFI was only slightly higher in the 80s-100, many of the carriers were missing on the waterfall and Bloomberg could be heard only in much bigger intervals.
Speaking of which – even with favorable condx, a proper radio and a half-proper antenna, patience is key! In my very fresh experience the fading cycles on those over-the-pond signals are long! So far I have seen everything fading in and out over the course of a few minutes to half hours or more, with less favorable conditions or a worse antenna it may take much longer until it sticks out of the noise for a while. So you may have to park on a frequency for a long time to not miss the station coming up so much that it becomes readable at the right time to ID it. Multiple DX stations on the same channel can make identification difficult unless one station really dominates the other and that all may take hours or days until it happens. Here’s a lucky example on 1010 kHz:
Lucky because in this case one station is already known – it’s WINS but it often has another station underneath and I was curious what that station might be. On this occasion, the station ID’d itself as “Newstalk 1010” (which is CFRB in Toronto, 0:05 in the clip) just in a short talking break on WINS. Again, this can’t be heard on my laptop speakers but on headphones:
Waiting for a moment like this to happen isn’t exactly fun, that’s why spectrum recordings are incredibly valuable particularly on MW – you won’t miss a possible station ID on frequency A because you were listening to frequency B, but a part of me thinks this is taking a bit of the challenge away, like blast fishing. 🙂
Fancy equipment
The IC-705 fits snuggly-wuggly into my steering wheel for extra-comfy tuning!
Fun fact: While Bloomberg NY on 1130 was (kind of) booming in at home so I knew for sure it was there, I could hear it even on the XHDAtA D-808 with its tiny loopstick and only average sensitivity on the AM band! So for “easy”, loud and undisturbed stations some persistence and a simple portable radio may suffice to catch some transatlantic DX. But most of the stations will be hit by interference from closer stations, then the radio needs at least to be capable of stable sideband reception, with a corresponding narrow filter and proper suppression of the unwanted sideband – luckily this isn’t an unusual feature on inexpensive portables anymore. So if you already have an SSB capable radio that’s all you need to address the most common issue with transatlantic DX, US and EU stations being too close in frequency. Of course passband tuning and notch filters are most helpful assets in a radio for this, rescuing reception in even more severe interference situations and the spectrum/waterfall display on an SDR helps a lot with finding the carriers and SDRs also have all the nice tools but with some more patience you may find stations with many conventional receivers.
Of course antennas are the crucial component again: If conditions are excellent, even a loopstick may bring the first stations into the log, some small magnetic (wideband) loop could dig up some more stations, from there it’s quickly going a bit esoteric – AFAIK there are no commercial offers for multi-turn (tuned) loop antennas nor are FSL antennas easy to come by, you can’t buy EWE et al antennas either and Beverage antennas for MW are quite a project – not that hard to get a kilometer of wire and there are even kits to buy but it could be much harder to find a place to roll it out in the direction you’re interested in, in an area that doesn’t have electric fences or high voltage power lines within a radius of at least several miles. I guess once you become addicted, you’ll stop asking yourself whether or not it’s worth the effort.
So it’s pretty clear what happened: For catching TA DX stations, the ionospheric conditions must be good, to receive that with a loopstick they must be ideal and that’s what they are currently – it’s winter in what’s still a deep solar minimum and on top of that, some of my radios are very apt for MX DX and I was lucky to listen on the right time on the right frequency. When I started writing this article, my enthusiastic bottom line was supposed to be something like “MW DX isn’t rocket science”, which is certainly true but I think my history with it shows that it’s not exactly trivial either. Maybe that’s why it’s so rewarding, it sure is some hardcore DX challenge that complements the shortwave activity quite nicely and may give you something to look forward to when solar activity is down.

 Many thanks to SWLing Post contributor, Matt Blaze, for the following guest post:
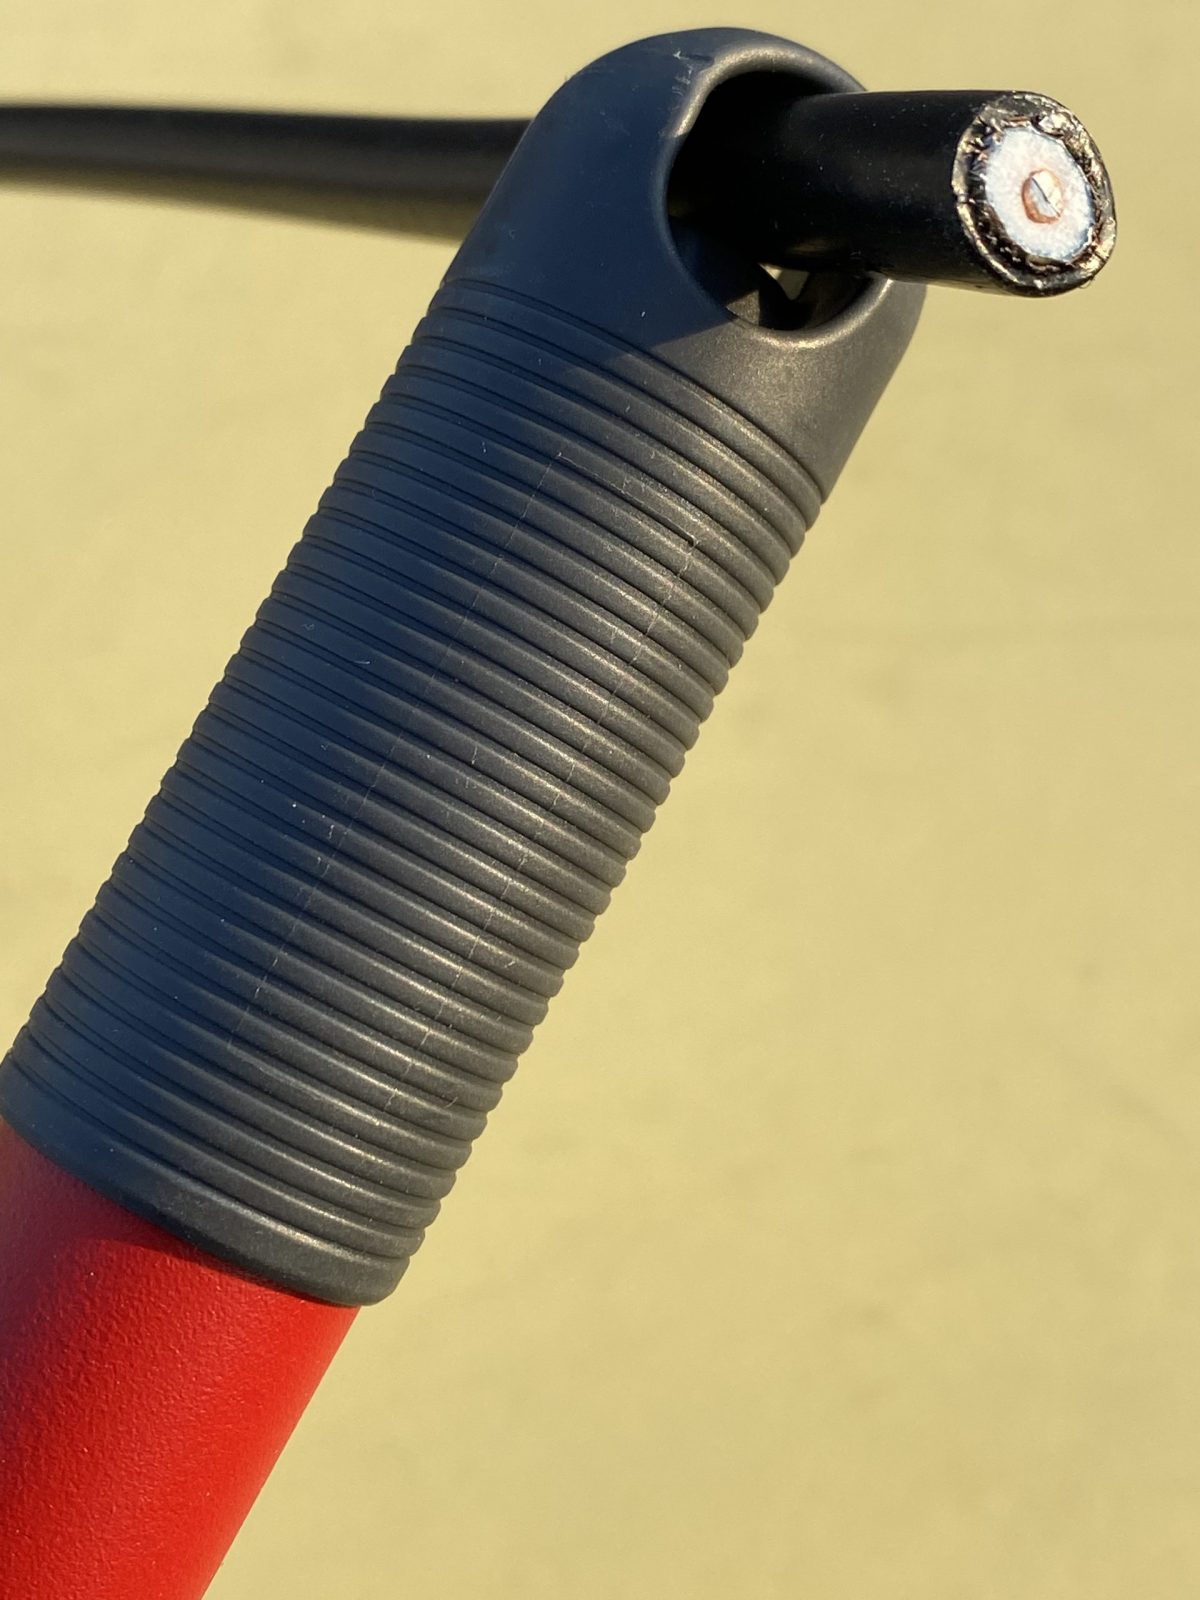
 The Wellbrook is powered over the feedline with a 12VDC bias-T injector. So you need a clean source of 12 volts. I use a cheap Talent Cell battery pack (available on Amazon in various capacities). These actually deliver 11.1 VDC (3x 3.7V), rather than the 12V the Wellbrook calls for, but it works fine in practice. I can also use the same pack to power the radio and digital audio recorder.