Shortwave listening and everything radio including reviews, broadcasting, ham radio, field operation, DXing, maker kits, travel, emergency gear, events, and more
Based on readers correspondence, the most anticipated non-shortwave radio to hit the market this year might be the Sangean HDR-14 AM/FM HD radio.
Sangean sent me a sample evaluation unit and I’ve had it on the air since taking delivery last week. I’m starting to put the elements of my HDR-14 review together while also writing Part 2 of my SDR primer for The Spectrum Monitor magazine (Part 1 was published last week). Indeed, I’ve a total of five reviews and evaluations on my desk right now–!
So far, I’m impressed with the little HDR-14. If you recall my review of the Sangean HDR-16, I mentioned that one of my benchmark distant HD FM stations is WFAE 2–its transmitter is a full 101 miles from my home and I’m well outside even the the fringe reception area.
The HDR-14 has a unique back stand: a small foot that swivels out of the base of the chassis.
I’m pleased to note that on more than one occasion, I’ve gotten a reliable HD lock of WFAE from my porch. A most positive sign!
Over the next three weeks, the HDR-14 will be travelling with me and I hope to even snag an AM HD station if all goes well.
I can tell you already that I’m as pleased as punch Sangean gave the HDR-14 a total of 20 AM and 20 FM memory presets. The larger HDR-16, in contrast, only has 5 AM and 5 FM presets.
Look for my review of the HDR-14 on the SWLing Post in the coming weeks. If interested, follow the tag: HDR-14
I’ve noted that both Universal Radio and Amazon.com (affiliate link) have the HDR-14 in stock and shipping. Universal’s price is $79.99 plus shipping and Amazon’s price is $88.67 including shipping.
Moments ago, I posted a press release from the UK-based software-defined radio manufacturer, SDRplay, announcing their latest product: the RSPduo: a 14-bit Dual Tuner SDR.
I should start with the disclaimer that, not only was I sent an RSPduo to review and evaluate, but SDRplay has been a supporter of the SWLing Post for a few years now. You’ve no doubt seen their ads in the upper right corner of our site. After I reviewed their first SDR (the RSP1) I discovered that SDRplay––all of their staff and supporters––welcome constructive criticism and even invite frank discussions. They’re a company with integrity. No doubt, this is why I agreed to alpha- and beta-test their SDRs. Fortunately, I’ve not been disappointed.
As a company, moreover, SDRplay breaks the mold––and in very good ways:
SDRplay is a small company that employs actual radio enthusiasts. Their designs and software cater to DXers, SWLs, hams, scanner enthusiasts, amateur astronomers, experimenters, and makers, among others.
SDRplay designs and builds their products in the United Kingdom. No doubt they could increase their profit margin by using manufacturing centers in China, but they choose not to do so, to the benefit of their products.
The quality of the company’s products is, at least to date, excellent.
SDRplay’s product pricing is nonetheless quite affordable
That last item, in particular, is a head-scratcher. Considering these facts, how does SDRplay still manage to keep their pricing so competitive? I only wish I knew. When the company released the RSP1A last year, I had already spent a few months with alpha and beta units, mulling over their respective merits (and there were many). So I was simply gobsmacked when they announced that the price would be just $99 US. I rather figured the company was leaving money on the table, although I was pleased to announce this price to my readers here.
Fast-forward to two weeks ago: I received the new RSPduo to review. And the price this time? $279 US. While this is currently the priciest product in the SDRplay line, let’s go over what makes this SDR special…and why I still think SDRplay may be leaving money on the table.
Introducing the SDRplay RSPduo
The RSPduo is unlike any other SDR in the SDRplay product line, and, indeed, unlike most of the budget SDRs currently on the market.
As “duo” implies, this RSP features dual independent tuners, both piped through a single high-speed USB 2.0 interface. With the RSPduo, you can explore two completely separate 2 MHz bands of spectrum anywhere between 1kHz and 2GHz.
SDRplay lays out several use-scenarios in their press release:
The ability to simultaneously receive on two totally independent 2 MHz spectrum windows anywhere between 1 kHz and 2 GHz
Simultaneous processing from 2 antennas enables direction-finding, diversity, and noise-reduction applications
Ideal for cross band full-duplex reception, e.g. HF + VHF, or VHF + UHF
Simultaneous Dump1090 and VHF ATC reception
Simultaneous monitoring and recording of 2 ISM bands
Use SDRuno to seamlessly control and manage the dual tuner in a single environment.
Externally, the RSPduo bears a strong resemblance to the RSP2pro. Internally, however, it’s quite different.
Besides featuring a second independently controlled tuner, the RSPduo also sports 14 bit ADCs and a completely re-designed RF front end, which enhances receiver selectivity and improves dynamic range.
In short, the RSPduo is like having two SDRs in one.
Performance
I received the RSPduo during a very busy time of the year: the build up to the Hamvention in Xenia, OH.
One of the first things I noticed about the RSPduo is its weight. When I picked up the package from SDRplay, I could tell it weighed at least twice that of the RSP1A. One reason for the extra heft is that the RSPduo, like the RSP2 Pro, has a metal enclosure. I’m willing to bet the RSPduo also has more shielding––adding even a little extra weight.
I’ve had the RSPduo on the air for more than a week now, and have checked out all of its major functions and begun to learn the nuances of navigating the dual receivers in the latest version of SDRuno.
SDRplay will, I feel sure, post a primer video on using the various dual tuner functions in the coming weeks.
Installation of the software, even in pre-production, was totally a “plug-and-play” experience. Simply install the SDRuno software package with the RSPduo disconnected from the USB port. Plug in the RSPduo, and wait for the USB driver to load, then open SDRuno. That’s it. You’re on the air!
As I’ve indicated, the RSPduo is really like having two RSP1As in a single RSP2 Pro package. One of these dual receivers––the master––can utilize either a standard 50 ohm SMA antenna port, or a Hi-Z port. The second receiver uses one 50 ohm SMA antenna port just like the RSP1A.
I much prefer using the Hi-Z port for everything longwave and mediumwave. I did hook up both antenna ports on the master receiver, however, and switched back and forth between the two. At least in my antenna setup, I feel like the Hi-Z option lends itself to improved sensitivity on these bands. It’s not a dramatic difference––indeed, looking at the spectrum display one barely notices the difference––but my ears told me the noise floor was lower and signal strength slightly better with the Hi-Z port. Above 2 MHz, the Hi-Z port is not prefered since it lacks the same level of RF pre-selection as the 50 ohm ports provide.
Unlike the Hi-Z port with the RSP2, the RSPduo treats the Hi-Z port more like an auxiliary antenna port. When I employed the Hi-Z port in the HF bands, I did notice small spurious noises, but this might have been due to my antenna port configuration here in the shack (my Hi-Z connector is simply attached to the shield and center conductor of my coax).
Again, however, for anything above 2 MHz, SDRplay suggests using the 50 ohm ports.
How to set up dual receivers on one screen/monitor
Listening to the FM broadcast band on the main receiver and Voice of Greece shortwave on the second receiver.
One of the first things I was eager to do was to run the dual receiver functionality on one monitor. Although SDRplay makes this a pretty simple process in the latest version of SDRuno, I still stumbled a bit as I learned to navigate the controls.
Here’s a quick primer to get both receivers on the air on one monitor/screen:
First, open SDRuno in “single receiver mode” (the typical SDRuno default).
Next, click on the “RSPduo mode” button and select one of the modes. In this case, I’m not running the ADS-B application, so I’ll choose “DUAL (NORMAL)”.
Now, to format the “Master” receiver windows so they only use the top half of the monitor, click on the OPT button.
Select “Auto Layouts” and “RSPduo Master.”
If you’ve followed these steps with me, your screen should look something like this:
Now you’ll want to start the second receiver. Do this by opening the SDRuno application again (as if you were opening SDRuno for the first time). Make sure you’ve selected your RSPduo if you have more than one RSP connected.
The new instance of SDRuno will fill the entire screen by default, so you’ll need to format it to occupy the lower half of the screen.
Simply click on the OPT button again, select “Auto Layouts,” and “RSPduo Slave.”
Your full screen should now look something like this:
Now you can start using both receivers, but you’ll have to always start the “Master” receiver first. In fact, the “Master” receiver must always be active in order to operate the “Slave” receiver. You can always close the “Slave” receiver without affecting the “Master” receiver; however, if you close the “Master” receiver, you will effectively close both receivers.
Again, I fully expect SDRplay will soon produce a demonstration video showing how you can navigate SDRuno’s new dual-receiver functionality.
Comparisons
As I’ve mentioned in most previous SDR reviews, I do like to take a considerable amount of time to set up SDR comparisons.
Herein lies the difficulty of reviewing an SDR’s performance. Because the user has so much power to control variables and thus shape the receiver’s function, it’s actually quite hard to make an “apples-to-apples” comparison––insuring that all important filters, gain controls, DSP, etc., are as close to identical as possible.
One tool that helps me do this is SDR Console, since it can control a number of SDRs and receiver parameters can be set up identically. Unfortunately, the RSPduo is so new, SDR Console doesn’t yet support it.
I did use SDRuno to compare the RSPduo with the RSP1A. Fortunately, I could actually run two separate instances of SDRuno simultaneously (and on different monitors, in my case). Both were hooked up to the same antenna via my ELAD ASA15 antenna splitter amplifier.
The RSPduo’s improved dynamic range gives it an advantage in terms of noise floor, sensitivity, and selectivity.
The improved performance is not dramatic––but I understand it might be especially detectable to those who want a receiver with a more robust front end.
In fact, the RSPduo’s 50 ohm coaxial ports have quite an array of automatically configured front end filters:
Low Pass
2 MHz Band Pass
2-12 MHz
12-30 MHz
30-60 MHz
60-120 MHz
120-250 MHz
250-300 MHz
300-380 MHz
380-420 MHz
420-1000 MHz
High Pass
1000 MHz
And an array of notch filters
FM Notch Filter:
>30dB 77 – 115MHz
>50dB 85 – 107MHz
>3dB 144 – 148MHz
MW Notch Filter:
>15dB 400 – 1650kHz
>30dB 500 – 1530kHz
>40dB 540 – 1490kHz
DAB Notch Filter:
>20dB 155 – 235MHz
>30dB 160 – 230MHz
The thing is, I live in an RF quiet area, so I can’t fully take advantage of the SDRuno’s more robust front end.
In head-to-head comparisons with the RSP1A, the RSPduo’s performance edge is discernible. Again, I suspect it would be a bit more obvious if I lived in an urban setting with blowtorch stations in the neighborhood. Using the Hi-Z antenna port in the mediumwave portions of the band, the RSPduo has a performance edge over the RSP1A, as well.
Should you grab the RSPduo?
The new SDRplay RSPduo
Anytime a new product hits the market, I ask myself if this is the sort of product that would tempt me to reach for my hard-earned cash.
The short answer? Absolutely! Take my money, please! There is no other sub-$300 SDR on the market currently that has the dual tuner functionality of the RSPduo. Thing is, I’ve only had the RSPdup a couple of weeks–there’s so much yet I want to explore here–especially diversity reception!
But what if you already have an SDRplay SDR? Afterall, the RSP1A was only released a few months ago, and the RSP2 series only a year before that.
Here’s my opinion: If you’re an RSP1A or RSP2 owner who is pleased with this SDR’s performance, I wouldn’t necessarily urge you to purchase the RSPduo simply for the modestly enhanced performance characteristics. SDRplay hasn’t retired the RSP2 and RSP1A designs because each model still holds its own, has a purpose, and obviously enjoys a healthy market.
The RSP1A is the affordable yet high performance entry model in the SDRplay product line. It’s really the best value in the radio world, in my humble opinion, at just $99 US. Som enjoy.
The RSP2 and RSP2pro provide excellent performance, three software-selectable antenna inputs, and clocking features, all of which lend it to amateur radio, industrial, scientific, and educational applications; it is a sweet SDR for $169 or $199 (Pro version). I know of no other SDRs with this set of features at this price point. If I liked the characteristics of the RSPduo, but didn’t really need a dual receiver for my application, I’d probably reach for the RSP2 Pro.
But if you have the original RSP, and like SDRuno and the SDRplay community, then I would certainly consider this an opportunity to upgrade. For $279, you’re getting a dual receiver SDR with excellent performance characteristics that will easily surpass the original RSP––considering that you’re essentially getting two very good SDRs in one.
And if you’re all over the spectrum (aren’t we all a bit––quite literally?) in terms of usage, the RSPduo is a fascinating machine for running, say, an ADS-B receiver while independently using the same SDR box to monitor other parts of the spectrum. Or one can listen for FM DX on one receiver while trying to snag elusive LW DX on the other.
Better yet, the RSPduo only uses one USB port––an important factor if you’re using a laptop or tablet. Of course, having two receivers on two different antennas, while sharing one data port, means syncing them for diversity reception is especially effective. This alone will sway many SDR experimenters in favor of this rig.
I have yet to compare the RSPduo with the brilliant little AirSpy HF+. The AirSpy HF+ is not a wideband receiver like the SDRplay RSP series; it only covers 9 kHz to 31 MHz and 60 to 260 MHz. But if your primary concern is HF performance, the HF+ and its excellent dynamic range will impress you, if you’re anything like me. It’s also a bargain at $199––very hard to beat!
The RSPduo is a good value, in my opinion––and an inexpensive upgrade to a proper dual receiver SDR––so if that’s the sort of thing you’d like to add to your shack, go ahead and bite the bullet!
In fact, I suspect SDRplay will quickly sell out of all of the units they bring to the 2018 Hamvention (SDRplay: pack some extras!). I’m happy to see the company continue to push the price and performance envelope to such exceptional ends. I’m also looking forward to the many applications SDRplay customers (and our readers) find for the RSPduo.
Stay tuned! I plan to post more comparisons in the future.
And if you acquire an RSPduo and find some new and fun applications for it, please share!
Folks have been known to say that good things come in small packages. And, do you know what? They’re sometimes right. [Spoiler alert: This review features a good thing which comes in a small package.]
I’ve been in the process of evaluating some pretty complicated pieces of communications equipment lately. So when Sangean approached me a few weeks ago and asked if I would check out their latest FM radio and Bluetooth speaker––a comparatively simple piece of kit––I thought, Well, why not? Because while I prefer “enthusiast grade” radios, sometimes it’s nice to check out something super-simple and purpose-built from a company I’ve grown to trust. Plus, it didn’t hurt that Sangean actually bothered to include FM radio on what would otherwise simply be just another Bluetooth speaker. Ah, yes; a worthy addition.
Sangean dispatched the sample radio and I received it within a few days. I was expecting something roughly on the scale of a Tivoli Model One. Instead, when I opened the box, what I found was a radio only slightly larger than my diminutive Muzen OTR, a little radio that fits the palm of your hand. To be fair, it could only be called…cute.
By my measurements, the tiny Sangean WR-7 is about 2 1/2″ tall, 4 5/8″ wide, and 3″ deep (if you include the tuning knob in that last dimension). It’s mini by almost any standard.
For this photo I placed it next to my handy XHDATA D-808 compact radio. And here’s how they compare:
Though wee, the WR-7 feels weighty (14.4 oz), solid, and substantial in the hand.
Turns out the chassis is solid––solid wood. Sangean has two options: walnut and dark cherry. Of course, my sample is a black version which may appear later in the year.
And the WR-7 is as simple to operate as it is to…well, hold in your hand. There’s one knob to turn the radio on and select the source (FM, Bluetooth, or the analog AUX input), and another knob for volume. Just as these photos show.
The tuning knob is the largest knob and moves fluidly across the dial. The analog dial is white with black frequency markings, and is backlit. From my tests, the FM dial is fairly accurate, although the frequency marking steps are a bit odd: 2 or 3 MHz increments starting at 87.5 and ending at 108 MHz.
There is a green LED lamp hidden behind the speaker grill that acts as the FM signal strength indicator. This LED turns blue when in Bluetooth mode.
Performance
There’s not a lot to report on here and, perhaps, that’s why I halted my other evaluations to fit this one in. This radio needs no owner’s manual (though it does ship with one). All you need is a USB charging cable––yep, the same type that likely charges your mobile phone. And, of course, it ships with one. It also ships with a lightweight cloth-like carrying bag.
You might have noticed that the WR-7 doesn’t have a telescoping whip antenna. That’s okay, because it also ships with an external wire antenna (which I actually prefer on this type of mini tabletop radio).
The WR-7 has an internal 2600 mAh Lithium-Ion Battery that provides this tiny rig with up to 36 hours of operation between charges. While I haven’t tested this claim yet, I can tell you that its battery life is incredibly good––especially acknowledging that the audio amplifier must be using quite a bit of the battery.
FM
The WR-7 receives the FM broadcast band from 87.5 to 108 MHz. While the dial is analog, I know there’s a DSP chip inside because I can hear frequency steps while I tune across the band. There is no muting between frequency steps, so the experience of tuning feels somewhat analog. As I mentioned earlier, the dial layout is a little quirky, but overall the frequency markings are pretty close to accurate. I found my benchmark stations with little difficulty.
In terms of sensitivity, the FM receiver is quite good in the WR-7. I could receive almost all of my local stations with the external FM antenna connected. Of course, you’ll want to connect the FM wire antenna.
With the external antenna connected, I could receive all of my benchmark distant and weak stations as well on the WR-7. While reception is very good, it isn’t quite as good as on my XHDATA D-808, C. Crane CC Skywave SSB, or Tecsun PL-660––the lock isn’t quite as stable––but I probably could have tweaked this by moving the external wire antenna.
Audio fidelity
Thing is, with even a decent FM signal, you’ll be mighty impressed with the audio fidelity of the WR-7. It easily manages to sound like a radio three to four times its size. Truly, the bass that emanates from this tiny speaker is incomprehensibly deep–only limited by the size of the acoustic chamber.
The sound is rich and room-filling when the volume is turned up.
And speaking of turning up the volume, this is one little radio you’ll probably peg at its highest volume setting from time to time. In fact, I rather wish this radio would allow the volume level to reach even a notch higher…but I expect this was a design choice at Sangean. With the volume turned up all the way, the sound is room-filling, but not distorted. While testing the WR-7, I tuned it to a variety of stations and played a wide range of music through it via Bluetooth: I never noticed bass-heavy songs distorting the audio. I suspect if the volume could be increased even further, the audio would indeed distort a bit.
In short: though you might occasionally turn up the volume on the WR-7 all the way, you’ll be pleased with the results––even across the room!
Bluetooth
I’m not sure what to say about Bluetooth; to me this is a technology that seems to work quite well for wireless connections between mobile devices. The WR-7 has built-in Bluetooth Technology Version 4.1, and it worked flawlessly with all of my mobile devices as well as my shack’s PC.
For a full week, I used the WR-7 as the speaker for my shack computer, and it was most impressive. In fact, it makes for a nice compact external speaker to pair with my SDR applications. AM audio, piped through Bluetooth into the WR-7, is a treat.
For a few nights, I even streamed OTR productions of “Buck Rogers in the 25th Century” with my shack computer, connected to the WR-7 via Bluetooth. The WR-7 was actually in the adjoining room, yet the Bluetooth connection was strong and never dropped the audio. The resulting sound was nothing short of amazing: if you closed your eyes, it almost sounded like a valve set from 1939.
And that’s another thing about the WR-7 worth noting: It’s so small and so simple in design, it fits in anywhere, and isn’t in the least obtrusive, all while filling the room with its warm, rich sound.
Summary
Every radio has its pros and cons. When I begin a review of a radio, I take notes from the very beginning so that I don’t forget some of my initial impressions. Here is the list I formed over the time I’ve spent evaluating the WR-7.
Pros:
Superb, room-filling, rich audio especially considering its very compact package
Very good FM sensitivity
Internal battery powers it for dozens of hours between charges
Easy to recharge via any 5VDC USB source
Easy Bluetooth connection and brilliant audio
Simple operation
Cons:
Volume and selection knobs could be slightly small for some users’ hands
Volume range more limited than most, upper volume capped
Although it does come with a nice lightweight carrying pouch for traveling, you might wish for a little extra protection in a suitcase or carry-on bag
Radios like the Sangean WR-7 give me hope that consumer electronics might be heading back in what is, in my humble opinion, the right direction: that is, toward quality.
The WR-7 is really a quality piece of kit: it has a solid feel (imparted by solid wood), has an acoustic chamber that produces excellent audio, and you can tell that the FM receiver wasn’t simply an “add-on” feature, as it works quite well.
While you won’t see many radios like this reviewed on the SWLing Post, I’m glad I agreed to take on this one. It was an fun exercise, and reminded me why I love doing radio reviews: sometimes these digital marvels really surprise me. That, and I’m enough of a radio and consumer electronics geek to bask in the indulgence of pure listening!
Many thanks to SWLing Post contributor, Mario Filippi (N2HUN), for sharing the following guest post:
TYT Frequency Counter/Tone Meter Review
by Mario Filippi (N2HUN) All photos courtesy of author
Most hobbyists own some type of transceiver whether it is a handheld, mobile, or base station. Some examples are amateur radio HF/VHF/UHF transceivers, Citizen’s Band radios, FRS (Family Radio Service) and GMRS (General Mobile Radio Service) handhelds.
A useful tool for the shack or the field is a frequency counter/tone meter since it can measure frequencies and analog/digital tones from transmitters/transceivers. At times ascertaining that a UUT (Unit Under Test) such as a 2 meter handheld is transmitting accurately may be indicated due to problems communicating with other stations. In addition, if the UUT transmits a sub-audible tone (either analog or digital) to access a repeater, a frequency counter/tone meter can detect the presence and verify accuracy of the CTCSS/digital tone.
Author’s TYT SF-401Plus, includes instructions, antenna, rechargeable battery and charger/cable. Covers 27 MHz – 3 GHz
Frequency/tone meters can be purchased for less than twenty US dollars but normally do not include a rechargeable battery and BNC connector for attaching an external antenna. Having had experience with these types, the time finally came for an upgrade.
After shopping around a decision was made to purchase the Tytera TYT SF-401 Plus. This model includes an instruction sheet, antenna, internal rechargeable battery, USB charger and cable. It represents a significant improvement over my previous, inexpensive meter, as the TYT has a BNC connector to attach a larger antenna and has four control buttons on the front panel. It also has, via a system menu, options to adjust the frequency/tone offset, dimmer levels, three or four decimal display and auto power off. All these valuable features warrant a higher cost, which was about $50, but well worth it. This price fits the budget of most hobbyists. However, higher end frequency/tone meters are available and cost several hundred dollars for those requiring that level of quality.
Out of the box the TYT SF-401 Plus, when checked against an IFR FM/AM-500A communications service monitor, was right on the money as far as accuracy. Note that the IFR-500A was calibrated against a high precision internal 10 MHz crystal in an “oven” and this is my gold standard reference for frequency accuracy in my shack.
TYT accuracy checked against an IFR FM/AM-500A communications service monitor transmitting a 146.52 MHz/131.8 Hz tone. Note frequency readout to four decimal places.
Now, it was time to check typical radios around the shack using the TYT. The first radio tested for frequency accuracy was a BTECH GMRS-V1 HT which I use to communicate with the home QTH while running errands around town. See photo for results. The BTECH and TYT agreed perfectly. Note that the TYT’s display includes a battery status indicator on top left and a timer use indicator, which resets every time the TYT is turned on. If you are going to measure digital signals (not included in this review) there is an option in the Setup Menu for that. With the BTECH handheld running 2 watts the TYT could detect its’ frequency at roughly four feet away.
Confirming BTECH transmit frequency against the TYT. Output is 2 watts. TYT multicolor display is super.
For VHF/UHF operating, especially when afield with other hams or groups such as CERT (Community Emergency Response Teams), problems can ensue if one does not have the correct frequency or tone programmed, so having the TYT in your shirt pocket to confirm these parameters when trouble occurs can be a quick way to get to the problem. See photo of an Icom IC-2300H 2 meter transceiver checked against the TYT for proper offset and tone. The Icom was putting out 65 watts and a repeater with an offset of -1.3 MHz and 88.5 Hz tone was checked.
TYT confirming unusual offset (-1.3 MHz) and tone for a repeater. Icom IC-2300H was at high (65W) setting and connected to an outdoor discone antenna.
According to the instructions included with the TYT SF-401 Plus, the operating range is from 27 MHz – 3000 MHz with a note stating “27 MHz – 100 MHz it can not be guaranteed and the corresponding normal emission appliance” which I interpret as accuracy is not guaranteed in this frequency range. Well, I checked the TYT against the IFR FM/AM-500A service monitor transmitting an AM signal on CB Channel 19, 27.185 MHz, and the TYT measured it exactly. One other important note is that according to the instructions, the tone decoder operates in the 136 MHz – 174 MHz and 400 MHz – 520 MHz frequency range. So that may limit its use in certain areas of the spectrum. One other item if interest is that the TYT has a 10 dB attenuator when dealing with high power signals.
All in all, I’m very happy with this purchase, and find the TYT SF-401 Plus useful for “first pass” troubleshooting and helpful when aligning older rigs which due to age are off frequency /tone. It definitely has a use in this shack.
Wow–what a bargain tool for the radio shack! Thank you for sharing your review, Mario. Once again, however, you have tempted me with a purchase! I remember when frequency counters would set you back a couple hundred bucks–it’s insane to think that you can grab one for $40-50 US shipped.
SF-401 Plus Retailers:
Note that the TYT SF 401 Plus is also marketed as the Surecom SF401 Plus:
UPDATE (05 November 2018): Please note that we have posted a second production run update to this initial review. In short, C. Crane addressed all of the major issues I noted in the review below. Click here to read the CCRadio-EP Pro update.
Without a doubt, C. Crane Company has become an established name in our radio community as a retailer and manufacturer that focuses on the world of broadcast listening. The company’s ads, website, and blog all promote broadcast listening as a viable and important part of our evolving media landscape. Their radio products are all designed with broadcast listening in mind.
The C. Crane CCRadio 2E
Currently the company manufactures one of the most capable AM broadcast receivers on the market: the CCRadio-2E.
The CCRadio-2E, however, is a pricey portable at $170 US, perhaps overkill for the casual broadcast listener.
So, for those seeking a simpler broadcast receiver, C. Crane later developed the original CCRadio-EP, a bare-bones, fully analog AM/FM radio with a large backlit slide rule dial, designed for the listener who wants to “go old school” in their receiving.
The original CCRadio-EP also attracted mediumwave/AM broadcast radio listeners because it had fairly impressive performance characteristics supported by C. Crane’s patented Twin Coil Ferrite AM antenna. In many ways, the original CCRadio-EP was somewhat reminiscent of the GE Superadio.
Yet while the original CCRadio-EP has––according to C. Crane––been a popular product, because certain vital EP components are now becoming obsolete, the company has been forced to redesign it; hence the new CCRadio-EP Pro.
The CCRadio-EP Pro: A different animal
Let’s be clear, though: unlike its predecessor, the CCRadio-EP Pro is no longer a true analog set.
Despite external similarities, internally this radio and its predecessor are very different receivers. Inside, the EP Pro is based on the Silicon Labs SI4734 DSP chip. Perhaps it goes without saying, but I consider the move to a chip a significant design change.
Crane kindly sent me a review sample of the new CCRadio-EP Pro. It’s important to note that the review unit came from a strictly limited first production run; the actual consumer rig’s first major production run is still a few weeks away. Thus this radio is not yet shipping.
I’ve had the CCRadio-EP Pro for a few weeks now, during which time I’ve given it a thorough evaluation. So, let’s take a close look at the CCRadio-EP Pro––first, in terms of performance.
AM Performance
Let’s face it: if you’re a radio enthusiast and reading this review, you’re likely mainly concerned with the EP Pro’s performance on the AM broadcast band. Personally speaking, that’s true for me, too.
The CCRadio-EP Pro (left) and Tecsun PL-660 (right).
Over the years of reviewing portable receivers of all stripes, I’ve learned that nothing beats a radio specifically designed for AM broadcast band performance. Without a doubt, C. Crane intends that the CCRadio-EP Pro be one of these radios. Indeed, in many ways, it’s an ideal set for broadcast listening, because it sports:
C. Crane’s Twin Coil Ferrite AM antenna
A large speaker
Wide/Narrow bandwidth switch
Dedicated external antenna connections
Although beefy internal AM antennas, large speakers, and external antenna connections were relatively common in the 1970s and 80s, these are rare features among modern AM/FM portable radios. The fact is, radios with superb AM broadcast performance are becoming a rather rare breed.
External antenna connections
In other words, the CCRadio-EP Pro has many design features that position it to be a formidable AM broadcast band receiver.
So, then, how does it perform? Well…that’s complicated to explain. The CCRadio-EP Pro has some positives, but also a notable amount of negatives.
Let’s start with the good news.
Positive: AM Sensitivity
Comparing the CCRadio-EP Pro (left) with the Sony ICF-5500W (right) and the Tecsun PL-660 (middle) at the Pisgah Astronomical Research Institute.
The CCRadio-EP Pro is quite sensitive on the AM broadcast band. When I’ve compared it with a number of shortwave portables I own, it almost always outperforms them on frequency. When my Tecsun PL-660––one of the most sensitive mediumwave receivers among my shortwave portables––is tuned to a marginal signal, it sounds about half as sensitive as the CCRadio-EP Pro.
The noise floor is fairly low while the audio is robust and room-filling via the EP Pro’s front-facing speaker.
Positive: No drifting
As I’ve said above, unlike the original (analog) CCRadio-EP, the EP Pro is a mechanically-tuned DSP radio. In all of my testing, I never noted a time that the radio drifted off frequency.
Positive: Nulling
Crane’s internal Twin Coil Ferrite AM antenna affords the listener excellent gain and nulling capabilities. In fact, I find the nulling quite sharp, a major positive for this listener.
Positive: Fine tuning control
On the right side of the CCRadio-EP Pro you’ll find a large tuning knob (top), the antenna trimmer (middle), and large volume knob (bottom)
Like the original EP, the EP Pro has a Twin Coil Antenna Fine Tuning adjustment.
This feature can help make small adjustments to received station to peak reception. This fine tune control is actually trimming the twin coil ferrite bar.
Positive: Wide/Narrow filter
The EP Pro does have a Wide/Narrow filter selection which essentially helps widen or narrow received audio. Note that this has no meaningful impact on the imaging mentioned below.
Altogether, this about sums up the CCR-EP’s positive performance capabilities on the AM broadcast band.
Now let’s look at the CCR-EP’s negatives, some of which are, unfortunately, significant.
The original CCRadio-EP revives the joy of a purely analog radio set. When you tune up/down the bands, there’s a fluidity to the whole process. While the interface is simple, analog tuning allows your ears to pick up on the nuances––the rise and fall of stations both strong and weak as you travel across the dial.
As we mentioned earlier, mechanically-tuned DSP radios, like the new CCRadio-EP Pro, may look like analog sets, but inside, they’re entirely digital. And one drawback to all of the mechanically-tuned DSP radios I’ve tested so far is a tendency to mute between frequencies. With each 10 kHz frequency step, you’ll hear a short audio mute. If you tune across the dial quickly, audio mutes until you land on a frequency. Here’s a video demonstrating the effect:
Needless to say, muting makes band scanning a more fatiguing process. It’s really a shame this affects the AM band. I hope that C. Crane engineers can minimize this issue in future production runs, but I understand much of this is a characteristic/limitation of this particular DSP chip.
Crane actually includes a note about weak images which you might find below and/or above your target signal. Weak images are an unfortunate reality of the CCRadio-EP Pro; they’re prevalent on both AM and FM.
Here’s how you’ll experience the images by way of example: let’s say you’re tuning to a strong local AM station on 630 kHz, noting that the EP Pro has 10 kHz tuning increments. As you tune to 630 kHz, you’ll hear the station on 620 kHz, though it won’t be as strong as it is on 630 kHz. Then if you tune to 640 kHz, you’ll likely hear a weaker image of the station there, as well. In my experience, images are present on both sides of the target station if the station is strong. If it’s a weak station, you might only hear it, say, 10 kHz lower but not above (or vise versa).
The CCRadio-EP Pro is powered by four D Cells.
As you might imagine, this poses a problem for the weak signal AM broadcast band DXer. Let’s say you’re trying to snag an elusive DX station on 640 kHz; although the EP Pro might have the sensitivity required to grab that station, it’s simply not selective enough (if selective is indeed the right word) to reject the local station on 630 kHz, thus your weak DX will have local competition.
This, more than any other negative, takes the EP Pro out of the realm of the mediumwave DXer.
I’ve also discovered that, on my unit, the top half of the AM dial is inaccurate. I estimate that the slide rule dial is off by about 40-50 kHz at the top end of the band. It’s much more accurate below 1,200 kHz, however.
Here is a few photo of the CCRadio-EP Pro tuned to 1600 kHz:
I hope C. Crane can address this in future iterations of the EP Pro. While I don’t expect slide rule dials to be extremely accurate, there nonetheless needs to be some reliability.
Note: C. Crane engineering is aware of this problem and even attempting to implement a fix on the first production run units. I will follow up when I learn more.
Negative Audio “pop” with power on
As you might have heard in the band scanning video above, any time you turn on the CCRadio-EP Pro, you’ll hear an audio “pop.” This is happening when power is applied to the audio amplifier. The pop is not soft, but fairly audible, and is present even if you turn the volume down all the way. The audio pop is prevalent via both the internal speaker and when using headphones. Fortunately, it’s much less pronounced via headphones. While not a major negative, I find it a bit annoying, and don’t doubt that other listeners will, too.
Note: C. Crane engineering tell me that they’ve minimized the audio pop since making the limited first production run, thus the first full production run should be improved.
Negative: AM frequency steps currently limited to 10 kHz
My initial production run EP Pro is limited to 10 kHz frequency steps. This radio is primarily marketed to North America where 10 kHz increments are standard. Of course, if you’re trying to use the EP Pro to snag Transatlantic or Transpacific DX, you’ll miss the ability to tune between those broad 10 kHz steps. But, again, due to the imaging mention above, I think the CCRadio-EP Pro is simply not suited for DXing.
Note: C. Crane engineering has informed me that future production runs of the CCRadio-EP Pro may have a 10/9 kHz switch, thus eliminating this negative. If you’re reading this review a few months after time of posting––crossed fingers––this may already be resolved.
FM Performance
If you’re looking for a simple AM/FM radio, and plan to spend most of your time on the FM band, you’ll like the CCRadio-EP Pro.
Positive: Audio
FM audio is very good on the CCRadio-EP Pro. I think it would be safe to say that it’s superior to most other receivers currently on the market in its $85 price range. Audio is room-filling and has good characteristics with dedicated adjustments for Bass and Treble. FM audio is reminiscent of 1970s-era solid-state receivers like the GE Superadio (a big positive, in my book). The bass is not very deep and resonant, nor the treble super-crisp, but the sound overall is very pleasant to the ear.
Positive: Sensitivity
The EP Pro is a sensitive FM receiver. It received all of my benchmark local and distant FM stations.
Positive: No drifting
As with AM, the EP Pro does not drift off frequency (again, this is actually a DSP radio).
The FM band is less affected by some of the negatives that impact AM broadcast band listening:
Negative: Inaccurate dial
As with the AM dial, FM frequency markings are slightly off. I measured the entire FM band and found that the upper half of the dial (above 102 MHz) seemed to deviate the most. See images below comparing the Tecsun PL-660 and CCRadio-EP Pro tuned to the same FM frequencies:
Here are a few examples of the CCRadio-EP Pro and Tecsun PL-660 tuned to the same frequencies:
Note: As mentioned above, C. Crane is trying to implement a fix for this in future production runs.
Negative: Imaging
As with the AM band, you will find imaging on the FM band. This bothers me less on the FM band, but I live in an area where the FM dial isn’t incredibly crowded. If you live in an urban market with stations packed into the dial, then the imaging concern will probably make the experience of listening to a weak station adjacent to a strong station quite unpleasant.
What about muting between frequencies? While you can hear frequency steps on the FM band, there is little to no muting between frequencies. It almost feels more like an analog radio.
Funny, but the weak signal images around a strong FM frequency actually help contribute to an analog-like experience during band scanning, as stations seem to rise and fall as you tune.
There is another factor that I don’t really consider a positive, but is worth noting. The EP Pro is one of the best mechanically-tuned DSP receivers to use on the FM band because the slide rule dial is wide––there’s a larger space for the needle to travel. FM band scanning would be a pretty pleasant experience if only the dial markings were more accurate.
Summary
Every radio has its pros and cons. When I begin a review of a radio, I take notes from the very beginning so that I don’t forget some of my initial impressions. Here is the list I formed over the time I’ve spent evaluating the C. Crane CCRadio-EP Pro.
Pros:
Excellent AM sensitivity
Good audio via internal speaker
Internal Twin Coil Ferrite AM antenna provides excellent gain and nulling
My conclusion is that the first production run of the CCradio-EP Pro is simply not an enthusiasts’ radio.
If you read the list of negatives in the AM performance section of this review, you’ll know why I simply can’t recommend it…at least not yet. If C. Crane could minimize AM muting, improve imaging and fix the frequency accuracy, this radio may prove more promising. But at this point, the limited production run CCRadio-EP Pro lacks the level of refinement that I’ve come to expect from a C. Crane radio.
For what it’s worth, I have been in close contact with C. Crane regarding these issues; the company is taking them to heart and even looking to implement some fixes/adjustments prior to their full production run. As these issues are resolved, I’ll amend this review. Click here to read the second production run review.
The lack of refinements is somewhat disheartening. Otherwise, the CCR-EP Pro would be a great mediumwave DXing machine. When on frequency, it’s quite sensitive and stable! Perhaps some mediumwave DXers could overlook the negatives above to take advantage of this. I would not, however. I’d soon find the problems frustrating and turn to other receivers in my arsenal. Sensitivity is important, but personally I would sacrifice sensitivity to have an overall better tuning and listening experience.
On the other hand––as C.Crane makes a point of stating––the CC-Radio EP Pro was designed around the needs of Bob Crane’s mother: so is essentially an effective radio for casual listening that’s utterly simple to use. In this respect, at least, the EP Pro is a success.
The EP Pro has no multi-function buttons, no menus, and no memories. The knobs and buttons are tactile and obvious. The backlit dial is also a nice touch; I love it. The EP Pro is old school design around a modern DSP chip and, in terms of audio, a hat tip to classic solid state analog radios from the 1970s and 80s.
The casual listener––especially those who use radio to primarily listen to their one favorite station––will enjoy the EP Pro. For example, I have an older friend who’s in the process of replacing his bedside radio of 30+ years. He wants a set he can tune to his staple AM broadcast station (which is not a super-easy catch) and leave it on frequency––essentially, he wants a “set it and forget it” radio. I think the EP Pro will work well for this application.
But for radio enthusiasts––like most of you wonderful people who read the SWLing Post––I would pass on the EP Pro and consider a more capable mediumwave radio instead like the original CCRadio-EP, the CC-Radio 2E, or a vintage solid state set like the GE Superadio, Sony-5500W, or the venerable Panasonic RF-2200.
You can purchase the CCRadio-EP Pro from the following retailers:
Many thanks to SWLing Post contributor, The Professor, who shares the following review of the RFA200 external ferrite antenna:
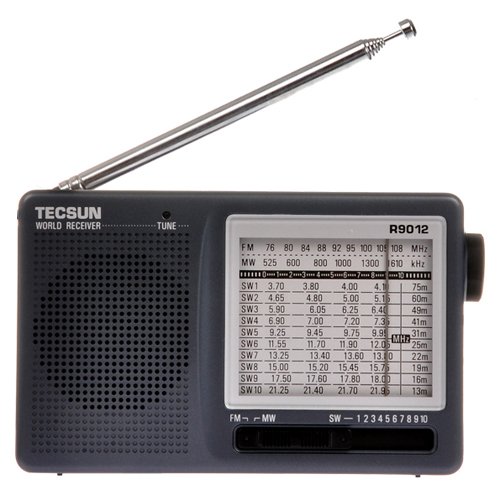
The Tecsun R-9012 and RFA200 MW antenna (Photo credit: The Professor)
A Quick Review of the RFA200
The Professor
I’ve considered saying something here about RFA200, as I bought one of these not long after its existence was announced on this blog a few months ago, but I’ve been hesitating because I didn’t have much good to say about it. A couple of times I’ve placed it up snug up against the the top of the two Tecsun sets I have handy (the PL-310ET and the PL-880) and found that despite a lot of knob turning it had little or no effect on improving signal on medium wave stations. I was not impressed.
But I guess I’ve kind of changed my mind on that. And oh yeah, I bought another radio. It’s funny how you can talk yourself into things when you’re talking someone else into something. But after I had mentioned to a reader here the other day that the very inexpensive Tecsun R-9012 was a worthy analog DX portable, I decided to drop twenty and pick one up for myself. After all, it was about the same price as a fancy Brooklyn hamburger. It arrived a couple days ago.
So, I have been playing with it a bit over the last few days. It’s as good as the other ones I’ve had which are the same basic radio (I’d mentioned that the bandswitch slider broke in a couple of mine). It’s single conversion. The bandwidth is a little wide, but it’s a very sensitive and simple analog set.
Yesterday I was going through the AM band and remembered that ferrite from Greece, and I pulled it out recalling that in my experience some radios are more susceptible to reception improvements using passive loops than others. Maybe this ferrite bar might be similar. And sure enough, the antenna made a notable difference this time. By placing it up against the R-9012 and tuning the thing I could certainly increase signal a bit. And I could even see it in the slight brightening or steadiness of the tuning light.
So, not a total waste money after all. I would emphasize that the difference in reception doesn’t seem to be as dramatic or sustaining as you might hear with a tunable loop antenna next to your radio. But it’s not junk either. Then again, for fifty dollars shipped it is a little pricey. Twice as much as a Tecsun tunable loop antenna, and two and half times more expensive than the R-9012 itself.
I found the best way to use this antenna is to tune the radio separately first and when you find a weaker signal you want to improve physically go ahead and rotate the radio until the signal is strongest and THEN put the antenna along the top of the radio and adjust the tuning knob on the antenna. Focus in on strengthening the signal you actually hear, going back and forth until it gets strongest. If you seem to be pulling up other stations it’s because the antenna adjustment will bring in adjacent stronger stations if you move it too far either way.
I’m surely not able to pin down the science involved in exactly how these things work, but perhaps somebody can chime in on this. I’m wondering if analog radio tuning in particular is better suited to the use of these tunable passive antennas, as opposed to PLL and DSP radios?
If you buy one of these be prepared to wait. At least mine took weeks to get here from Greece. And don’t expect miracles. But it seems rather well constructed, and will probably work with some radios. The seller has a 100% rating on eBay and has all sorts of interesting antennas for sale. I’m glad to see people succeeding in that business.
Many thanks, Prof, for sharing your fine review of the RFA200! Thanks for also mentioning the Tecsun R9012–I purchased one a couple years ago with the intention of reviewing it, then gave it to teenager who expressed interest in shortwave. I don’t think I actually put it on the air myself. I do enjoy simple old school analog radio–especially when making band scans.
I’m a few years after Steve’s comments but I will have a go at it, at least anecdotally speaking. I’ve owned a half dozen Sangean ATS-909’s, which includes two of the 909X’s, and one super-909 from radiolabs. The 909X is the finest looking portable I have ever seen or lain hands upon, and that includes several Sony’s that I still think of as neat looking, I had the white cabinet 909X first and then the much more striking (to my eyes) black cabinet 909X after returning the first one due to rock hard buttons.
They are both extremely attractive, and exceptionally well made, especially by today’s cheap Chinese standards. I must confess that I also still find the original 909’s almost equally neat looking, though not quite sporting the same robustness of build.
The 909x’s sound wonderful on MW & FM, and its a decent performer reaching out to fairly distant FM stations. Unfortunately that is largely the best of the radio, its performance on MW & SW is best described as pathetic, and not just due to being deaf, it has a lot of noise, even when attached to the superb RF systems tuned EMF antenna. The older 909 is also to my experience substantially better then the 909X when matched up to a serious outboard antenna, such as the above EMF, I found this difference especially surprising, its not even close.
The PL-880 from Tecsun blows it away on SW and MW sensitivity, while also offering the superb advantage of genuinely ECSS tuning anything on MW & SW, you cannot decently receive any MW or SW signal via ECSS with the 909X as its SSB can only be fine tuned to 40 Hz, which is terribly disappointing, you can zero beat the little Tecsun easily. serious ECSS capability is to my mind a much more attractive option then a sync circuit, and unfortunately with the beautiful little Sangean 909X you get neither.
I do hope anyone who happens upon this pays attention, because for the money the PL-880 is far and away the better performer, in fact my little 1103 from Degen/Kaito out performs the 909X, as does my Grundig Yacht Boy-400, and my Sangean ATS-803A. Its my great hope that Sangean seriously upgrades these deficiencies in the otherwise gorgeous 909X, its circuitry is noisier than the old 909 and its not nearly not as sterling a performer hooked up to household current and a decent outboard antenna as the old 909, its 40 hz tuning SSB once a great reason to buy a 909, is no longer competitive, especially against the superb PL-880 which again is capable of excellent ECSS even by Icom R75 standards, Sangean would do well to drastically improve the SSB performance of the 909X.
I hope this helps, I liked the original review up top, but again its several years old, and the ATS-909X is now known to be clearly outclassed by the more affordable Tecsun, actually by the PL-660 to boot, I really hope Sangean addresses the issues, its such a beautiful receiver, you just want it to be as good as it looks, unfortunately it’s not!
Thank you for sharing your evaluation and comments!
The Sangean ATS-909X is an interesting radio indeed. Almost everyone loves the design, audio and overall quality of the 909X. Yet performance reviews are somewhat polarizing: some 909X owners claim the 909X has strong performance characteristics on shortwave, while others believe it’s almost deaf. Your findings coincide with mine from the Mega Review where I pitted the ATS-909X against the Tecsun PL-880, PL-660 and Sony ICF-SW7600GR. In that review, where I relied on a whip antenna, the 909X was noticeably less sensitive than the other three competitors. Based on the premium one pays for the 909X, I was surprised.
I have learned over the years, however, that the 909X can handle larger outdoor antennas and doesn’t easily overload. Additionally, the 909X requires a fresh set of batteries for optimal performance/sensitivity. Some users have even modified the radio with a 4:1 impedance transformer–click here to read a post/comments about this mod.
I would love to see Sangean produce an updated/upgraded version of the 909X, but at this point I’m not exactly holding my breath. I’ve heard that they’re slowly pulling out of the market. Hope I’m proven wrong because I’d love to see a new shortwave set from Sangean.
Spread the radio love
Please support this website by adding us to your whitelist in your ad blocker. Ads are what helps us bring you premium content! Thank you!