Shortwave listening and everything radio including reviews, broadcasting, ham radio, field operation, DXing, maker kits, travel, emergency gear, events, and more
Many thanks to SWLing Post contributor, Dan Robinson, for the following guest post:
Additional Thoughts on the Malahit DSP-2
Potential for Noise Reduction Using Non-Whip Antennas
Latest Firmware Changes
by Dan Robinson
After my last update on the Russia-made Malahit DSP-2, I thought it important to add something about the receiver, as it could well influence those who may be on the fence about purchasing one.
In a series of communications, Georgiy at Malahit team has stressed steps taken to attempt to deal with internal interference seen across the bands. And he has asserted
that noise spikes lessen if the receiver is connected to a non-whip antenna.
Most of my tests have used whip antennas of various lengths, in various locations indoors and outdoors, because it’s my view that portability is a major attraction of these small SDR receivers.
Many thanks to SWLing Post contributor, Dan Robinson, for the following guest post:
UPDATE NO 3: Malahit DSP-2 (August 18, 2021)
A few weeks ago, I wrote about my experiences with the Russia-made Malahit DSP-2 receiver, and made a recommendation that potential purchasers of the receiver hold off until the design team in Russia made some changes.
Weak points included the SMA antenna connector – specifically the short cable going from the antenna to the PCB board, and sharp noise spikes seen at numerous locations throughout the spectrum from mediumwave up to 30 MHz.
My particular DSP-2 unit went dead after an update to an early version of the 2.10TEST firmware. At the time, I had spoken via Skype with Georgiy on the Malahit team and kept up a string of communications on the Malahit Telegram channel.
It was not clear to me whether the problem with the first DSP-2 was primarily due to SMA antenna issues or also due to a problem with the firmware update I had applied at the time (it was an early version of 2.10TEST).
My appreciation goes to Georgiy who decided to send a new DSP-2 to me. This took about 3 weeks from the end of July until just recently when the receiver arrived (though the U.S. Postal Service made the end of that journey quite interesting).
Here are some observations that I hope will help current and prospective owners of the DSP-2: Continue reading →
Many thanks to SWLing Post contributor, Dan Robinson, for the following guest post:
UPDATE: Malahit DSP-2 (July 24, 2021)
RECOMMENDATION: Hold Off Until Issues Are Resolved
I thought it important enough to write this update to my earlier extensive review of the Malahit DSP-2, the second version of the Russia-made receiver. Earlier incremental updates can be seen on the main article.
In concluding my main review, I spoke about being on the Malahit “train” and “roller coaster” – and my experiences since have shown that to be true.
As noted in one the updates, further testing confirmed the observations of Malahit users that when voltage of a 18650B battery drops below 3.7 v the receiver did indeed shut down. And the battery icon was still showing 50%.
Georgiy at the Malahit team confirmed this as a software bug, and in a test firmware update, the voltage issue was, according to him, corrected. The result, in a test firmware upgrade (2.10) could be seen with remaining voltage displayed in the battery icon itself. But I was unable to confirm that this actually resolved the issue of inaccurate voltage displayed before yet another problem emerged.
After performing the update from 2.0 to 2.10 Test firmware (more on that a bit later)
I thought things were fine until I noticed that all signals had vanished from the Malahit. This applied to the strongest signals from U.S. religious broadcasters, and down through FM.
In a combination of Telegram and Skype chats, Georgiy was extremely helpful – we went over seemingly every possible cause for this problem and focused on the SMA cable which from observing conversations online appears to be an issue in some units.
We went to the point of disconnecting the SMA from the PCB to test if anything brought back any level of signal, which it did not. With my basic knowledge of electronics, I believe that some problem may have developed on the PCB – whether that is directly related to the firmware upgrade process remains unknown.
On the firmware, the Malahit-recommended PC app is SMT32CubeProgrammer, which is easily downloadable, and instructions for the firmware update are on the Malahit You Tube channel. The process and app look difficult at first.
But things get interesting, as they always do, in using these Bootloader apps as I have found on several occasions in trying to upgrade my AFEDRI LAN-IQ.
Instructions on the Malahit You Tube channel direct you to power off the radio, then plug in a micro-USB cable to the receiver and to your PC. The rough Russian translation says push in and hold both main and smaller encoder knobs, and then press power either once or 3 times, and then watch for the LED to go off. The LED actually doesn’t really go off– in the process of the firmware update, flashes on and off.
I managed to get through the process of upgrading – it was quite smooth. The test 2.10 firmware according to Georgiy is supposed to correct the issue with voltage readings, though again I was unable to test this fully because my DSP-2 quite literally went quiet over its entire range.
As of now, and despite the best efforts of Georgiy which I appreciate, I have a dead DSP-2. Whether signal loss was due to some issue with the SMA connector, or whether the firmware process (I reverted back to 2.0 after noticing the signal loss) itself caused something on the PCB to fail, remains unknown.
Given all of this new information, and though I had made no BUY recommendation on my original review, I would have to advise anyone considering a DSP-2 to hold off for a while until the Malahit team is able to thoroughly iron out all the hiccups with the receiver, whether in firmware or hardware. This includes the question of the SMA connector, and the issue of voltage monitoring.
Based on the conversations that were taking place on Telegram, I would also be urging Malahit team to quickly come up with a clear English translation of the Malahit manual, and to review instructions contained in You Tube videos showing the firmware upgrade process.
Many thanks to SWLing Post contributor, Dan Robinson, for the following guest post:
Test Driving The Russia-Made Malahit DSP-2
Poised on Edge of Greatness? (Some Challenges To Overcome)
by Dan Robinson
By now, the Malahit SDR is well known in listening hobby circles. We have the made-in-Russia original, and those manufactured in China with various firmware and some physical differences such as location of the tuning encoders.
At the same time, we saw the development and appearance of the Belarusian Belka SDR. I consider the latest Belka DX to be the ideal portable – a sensitive diminutive miracle that has become a must-have device for many of us.
As for the Afedri LAN-IQ, I held off on purchasing one until the “Standalone” version was available. It is made in Israel by a Russian developer who supports the receiver with fairly frequent firmware revisions (though upgrading remains a bit of a challenge involving some obscure boot-loading software).
I waited and observed reviews of the original versions of the Malahit. When its designer, Georgiy (RX9CIM), announced availability of the new DSP-2 version of the receiver, with expanded coverage to 2 GHz and a claim of improved performance, I finally purchased one.
As was observed in one of the early SWLing Post articles “It seem[ed] the project is open source, the schematic, PCB and software are available to download. . . we hope [these] receivers become popular and available world wide [and that] this new project “shakes” a bit the industry of shortwave receivers.”
Malahit project authors RX9CIM George, R6DAN Vladimir, and R6DCY Vadim, had the apparent objective of “designing a low-cost portable SDR radio, using only easily obtainable components and to become the natural successor of the popular Degen and Tecsun radios.”
At the time, the price for a finished Malahit, with an ARM chip at its center was about $195 US. Coverage was to 1 GHz – this has since been extended to 2 GHz. Synchronous AM mode was added, and the DSP-2 also comes with an internal battery tray for a single 18650 Li-on battery.
This is a change from the original flat Li-on cell, and in my opinion a welcome one since 18650s are easily obtainable. Being able to easily change out a battery is important, rather than messing around with soldering (the famous Reuter Pocket receiver made in Germany should take a hint).
In this age of the SDR, we’re all familiar with the SDRplay series and various AirSpy receivers, along with other SDRs such as the RX666/888. Before that, we had the famous Perseus, which still has a strong following, and numerous WinRadio receivers.
See the articles here on the SWLing Post assessing the performance of these, as well as reviews at eHam.net, and numerous SDR dongles all over eBay, coming from China. There is also an SDR group on Groups.io.
Of course, receivers and transceivers with panoramic displays began to appear some years ago – the ICOM IC-R8600 and IC-7300 are examples of how this technology was integrated into the listening and amateur radio markets.
What we had not seen was integration of this kind of technology into portables. Even in its latest iteration, the Belka DX has a small screen without any PAN display. So, the advent of the Malahit has made this kind of advanced display widely available.
The price, by the way, for my DSP-2 as of July 2021 was 19,500 Russian rubles, with an extra 2,000 rubles for express delivery via Russian Post (though due to COVID Georgiy stressed that no guarantees could be made as to timing). That’s $263 – not a small investment and rivaling the cost of a Tecsun ATS-909x and H-501x.
According to the description I received when ordering, the Malahit DSP-2 was improved over the previous version with the following differences:
Frequency range – from 50 kHz to 380 MHz, and 400 MHz to 2 GHz
Improved RF shielding and hardware improvements to reduce interference
Changes in software functions
Dimensions changed to 140x 88x 39mm
18650 battery
The DSP-2 is in a thin black metal cabinet with dimensions 5 x ½ by 3 x ½ by 1 x ½.
A power button and headphone jack are on the right along with a power LED. On the top, we find the SMA antenna input, and a small telescopic whip is included.
The speaker, capable of some decent audio, is located on the inside rear of the receiver – audio level exceeds that of the Belka DX with its very small speaker, but the Belka has a clarity that often exceeds the Malahit.
My first testing of the DSP-2 was indoors, in a far corner on the top floor of my home, using just the included whip antenna. For comparisons, I used a Tecsun PL-368 with its whip antenna and a Belka DX in the same location. I find that indoor testing tends to identify some issues that would not be apparent outdoors.
In this, the Tecsun PL-368 and other Tecsun portables consistently performed best, followed by the Belka DX and the Malahit. This may be surprising, but shows that radios specifically designed for shortwave reception, often provide better reception because they are matched better with their internal telescopic antennas.
Now, when I say “best” I mean best basic audio quality, using auto-memory and ETM functions on the PL-368 and 990x. But what those radios can do with the signal after that point is pretty limited – there is no NR (noise reduction), you’re limited to a handful of set bandwidth selections, and SYNC mode leaves much to be desired.
Which is where the Malahit comes in with its numerous levels of flexibility, accessed through MENU icons on the lower part of the screen: HARD, AUDIO, VISUAL, NR, MODE, and BAND. I refer the reader to the Malahitteam site links showing the user manual (this is still a bit in the rough, with translation from Russian) and another link with a Quick Start guide written by John Pitz (KD8CIV).
KEY HIGH POINTS ON MALAHIT
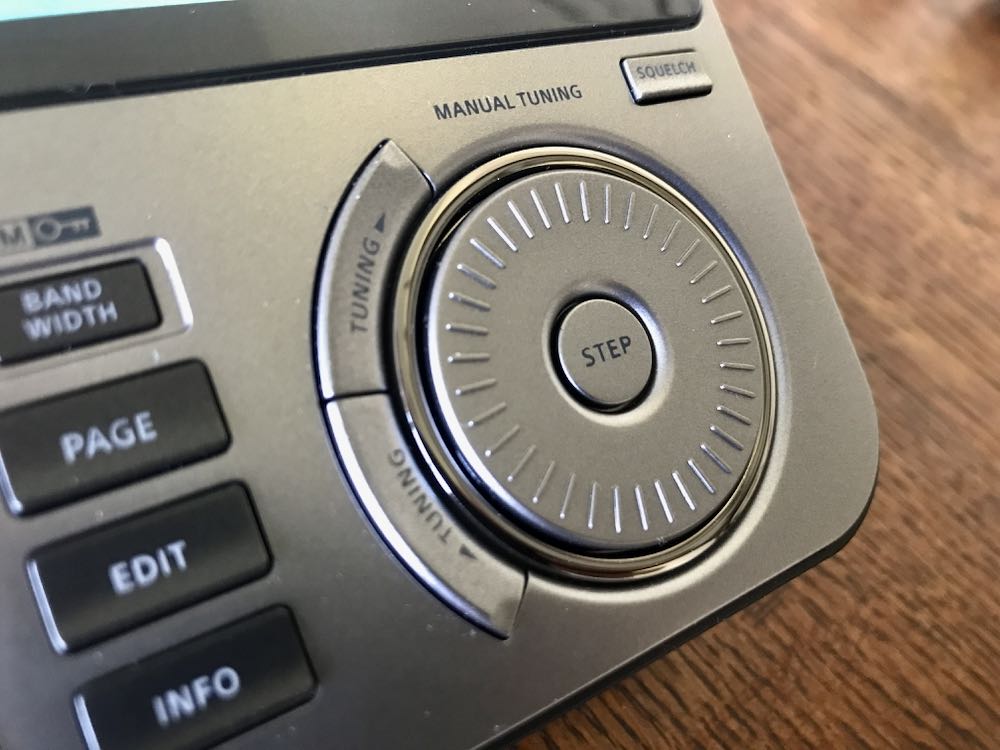
SUPERIOR COLOR DISPLAY
The color display, also seen on numerous China-made clones, is the best on any handheld SDR. Where the Belka LCD is a basic utilitarian tool that performs well for that receiver, the Malahit display is an invitation to the wonderland of what this receiver offers.
At the top are small icons for: SQ, NB, NR, AGC, ANT, PRE, MODE. Right of center, and controlled with pushes of the small volume encoder knob, are ATT, VOL, FILTER, and the battery icon. Below those are headphone and speaker icons and an excellent, if small, frequency window. Pushing the small encoder knob selects/controls volume, attenuation, and main filters. The large tuning knob, with a press, selects step increments.
EXCELLENT NOISE REDUCTION
Noise reduction on the Malahit is superb, as many users have observed. It’s activated directly with a front panel icon and Threshold is adjustable with an icon under AUDIO, with 0 to 30 increments. NR is so good that I compare it with the latest firmware version on the ICOM IC-R8600 – it’s actually probably better than the ICOM even near and at the highest 30 level.
EXCELLENT FILTERING
Whereas the Belka DX offers fixed audio filtering values accessible via its front panel, the Malahit DSP-2 offers continually variable LOW FREQUENCY adjustment from 0 Hz to 2350 Hz, and HIGH FREQUENCY adjustment from 100 Hz all the way up to 150,000 Hz. This is in addition to standard NARROW, NORMAL, and WIDE filter options selectable with the volume encoder knob. This is nothing short of extraordinary for a handheld portable receiver.
The latest (and possibly last) Tecsun receivers offer set value multiple bandwidths, which is excellent but is a throwback to radio design from years ago. So, the DSP-2 capabilities can be compared to the kind of filtering that a Watkins Johnson or Cubic receiver have, but in the palm of your hand.
As I often observe, what we would have given in gold to have this kind of capability in consumer receivers during the glory days of international broadcasting!
AGC / MGC FLEXIBILITY
The Malahit allows the listener to use AGC, with choices of SLOW, MEDIUM, and FAST. But it also allows, again through the AUDIO settings menu, control of AGC GAIN 0 to 60, and AGC LIMITER 40 to 90 db. Wow – priceless! So even if you prefer, as I do, to listen to shortwave using AGC, you still have amazing flexibility. You can still switch to MGC with 0 to 60 range.
NOISE BLANKER FLEXIBILITY
Just as the Malahit delivers on AGC, so does it deliver with its regular noise blanker function. With NB activated, there are 3 configurations with a separate THRESHOLD icon adjustable for each of these. Amazing.
RF GAIN FLEXIBILITY
RF GAIN is adjustable from 0 to 59, and there is a separate icon for adjusting gain for the PRE-AMPLIFIER. Where the PREAMP comes in very handy is when one has the Malahit indoors – it provides a more sensitivity in situations where one is using the telescopic whip antenna, though care must still be taken not to overload the receiver and distort signals.
FCORRECT FUNCTION MAKES FOR EASY RE-CALIBRATION
The Fcorrect function located under the HARD settings menu enables one to re-calibrate the receiver to correct for error. This is similar to the capability that Tecsun added to its 330, 909x and 501x receivers (there are indications Tecsun has or will enable this ability also in the PL-368) but seems, based on my testing of the Malahit to be more effective. After I corrected my DSP-2 to about +57, calibration was pretty much on the money up and down the HF bands.
SQUELCH FLEXIBLITY
The Malahit not only has SQUELCH, but SQUELCH THRESHOLD control, another example of the tremendous flexibility in this receiver’s firmware. Since I do not do much listening outside of the HF bands, or have the antenna for it, I have not extensively tested the Squelch above 30 MHz and up to the maximum range at 2 GHz.
There is yet another feature described as adaptive noise canceling that allows the user to significantly improve the intelligibility of the received station under conditions noise and interference.
[From the manual]: The squelch uses different algorithms [depending] on filter bandwidth. With a bandwidth of more than 1 kHz, a squelch of more than suitable for speech type signal. With bandwidth less than or equal to 1 kHz, the squelch is suitable for tone type signals. Choice of algorithm is carried out automatically, depending on bandwidth. Meanwhile, squelch for speech signals can be used with NR (see further details on this in the manual).
FM RECEPTION WITH RDS
What the Belka DX lacks, namely reception of the FM range, the Malahit delivers in droves. FM sounds excellent to me, on the same level perhaps of the Afedri LAN-IQ Standalone receiver.
RDS is enabled by touching the waterfall area of the display which brings up the RDS information. The speed with which station information appears varies depends on position of your antenna and signal level.
As one user (Harold Hermanns) on the Facebook Malahit group observed: “ I don’t think it works very well. I just checked mine, and went to about 25 stations. The RDS or station name came up on only 5 stations. Letters I get are PS, PT, and PTY. When you tune a strong station, give it a minute or so, that’s what I did, and the RDS feature does work, but again, it’s not 100%. Maybe will be improved with firmware?”
The RDS information could be better organized – currently the name of the station, and name of the program scrolls on different lines. Another touch of the screen brings up an old style FM scale – this is nice, but I prefer the PAN display. Yet another touch returns the screen to the PAN display and waterfall. Mode options include NFM and WFM, and another option provides FM-STEREO. Also in FM, there is an auto-search function and station labeling
MISCELLANEOUS FEATURES
There are some other features in the mind-boggling list of options in various menus:
In FM (WFM) there is an eight position EQUALIZER function with SOFT, LIVE, CLUB, ROCK, BASS, JAZZ, POP, and VOICE positions.
A voltage monitoring function allows the user to turn off the receiver when voltage drops lower than 3.3 volts. As explained in the manual this is intended to preserve battery life and avoid full discharge.
Antenna selection can be 50 ohms or Hi-Z (preferred for telescopic antenna use).
As the Malahit manual details, internal gain of the receiving chip can be adjusted. Accessed from the HARD menu, this is too much for me to go into here, but it’s another example of the detail that went into designing the Malahit.
Brightness of the display backlight is adjustable as well as time after which backlight level is reduced to minimum and turned off completely. Rate of change of the display spectrum is adjustable as is spectrum display range, color, ratio of waterfall and speed and brightness of waterfall. Spectrum scale and view are adjustable.
There is a 5 page memory system, with M1 to M10 in each, so a total of 50 storable memories.
LOW POINTS OF THE MALAHIT
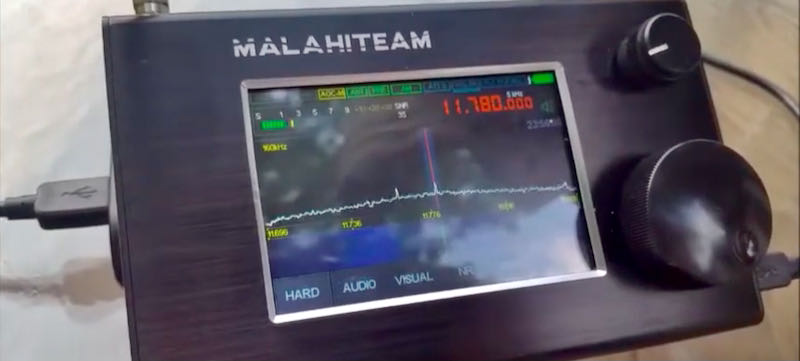
NOISE FROM THE DISPLAY
Example of noise on 1,000 kHz
As I was testing my Malahit DSP-2 it quickly became clear that there is one major low point, and thus a challenge for Georgiy and other members of the design team.
There’s no other way to say this: internally-generated noise remains the major issue keeping the Malahit from achieving greatness.
The developers of the Russian version receiver have not attempted to hide this, and users noticed it from the beginning, with one writer identifying “internally generated noise, which peaks at various frequencies” as one of the key drawbacks of the Malahit.
I had hopes that the DSP-2 version of the Russian-originated Malahit might have less of this problem. There are numerous internally-generated noise/buzzing spikes, some stronger than others, by my estimation at intervals between 125 and 200 kHz throughout the HF bands.
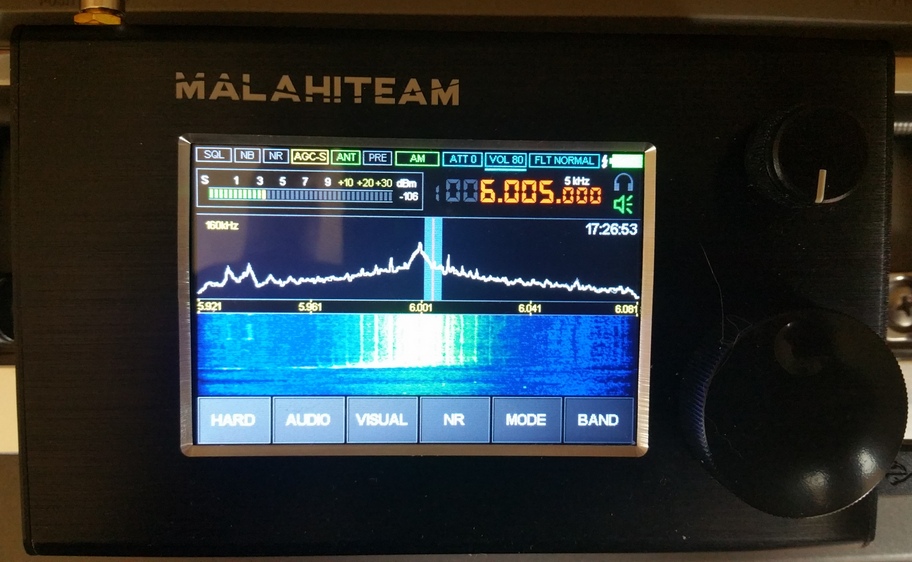
Example of noise on 6,000 kHz (RHC)
In the case of one huge noise spike appearing at or around 6,000 kHz – right over Radio Havana – it ruins any chance of hearing clear signals at, below and above that point. As you can see in my video, the Belka DX does not have this problem (note: apologies for mis-spelling Malahit as Malachit).
Via Telegram, Georgiy asserted to me that when using an external antenna, noise is not as serious, and notes differences between the Malahit and Belka. The Belka, he says, is a simpler device that concentrates only on shortwave, while Malahit is a wide band receiver with more complex DSP and user functions.
“When Belka cannot receive something, Malahit can. And where Belka does not have noise, Malahit has it. These devices are in different classes.”
The result is that a major workaround is often necessary – to disable the VIEW PAN&WTF option, a key feature that is a major highlight of the radio.
Georgiy says that this problem is mainly linked to telescopic antenna antenna operation because of the antenna’s proximity to the display. But as you can see in my video, when testing the Malahit and Belka on 6,000 kHz it’s a night and day situation.
A quick push of the power button blanks out the display completely – and seems to completely resolve the noise issue. But you don’t buy a radio to see a dark display, and it’s depressing to think that turning off a major feature, namely panoramic display, has to be part of standard operating procedure.
When testing the Malahit from its bottom frequency of 50 kHz, even with the PAN & WTF off, huge buzzing noise spikes are heard. In mediumwave/AM, they are seen at 615 kHz, 790 kHz, 965 kHz, 1140 kHz and so on.
If a radio had emerged from a known large manufacturer with this issue, such as Tecsun or Sangean, it would have been roundly condemned by users and reviewers and sent back to the drawing board.
Georgiy does say that in the new firmware interference from the display was decreased, with a “step of about 2.5 MHz, from 1MHz (i.e. 1MHz, 3.5MHz, 6MHz). After correction it will be with a step [of] 4 MHz”. I’m not quite sure what he’s saying with this, due to language issues, but the overall indication is that he is aware of this issue and will continue trying to tackle it in future revisions.
CW DECODING
In the MODE section of the Malahit there is no confirmation that the receiver is actually in CW. Decoding is enabled with an icon, but again no confirming icon at the top of the display. This is a bit odd.
Going to the Telegram app discussion group for the Malahit, and re-reading the translated Russian manual, I discovered that confirmation of CW appears as a white bar under the SPEAKER/HEADPHONE icon on the right. There is also a MINIMUM SNR option in decoding, with a 0 to 70 range.
A You Tube video (the Gerry DX channel) shows the decoding process and notes that it’s important to keep the filter setting at NARROW when attempting to use the decoding feature on the Malahit and also important to set the SNR at the right level.
One would think that this could be easily rectified, but adding a CW indicator to the top row of small icons on the front display might not be as easy as one thinks, unless the display can be modified to also display “CW” in the icon spaces for AM, LSB, or USB.
It turns out that CW decoding on the Malahit works quite well, at least in my attempts. I was able to decode fairly strong CW signals in 40 meters.
LCD/TOUCH SENSITIVITY
When I first got the Malahit, I was puzzled by what seemed to be a serious lack of sensitivity on the display when trying to use the touch icons to change configurations and modes.
This was so bothersome that I raised it with Georgiy who responded that this is by design. The present capacitive touch method, he says, is preferable and more comfortable for users. “If [we were to] change the touch [enable faster response] then [some] people will demand to decrease it.”
With benefit of some time, I have concluded that a slightly firmer and longer press of about half a second to a second almost always brings up the menu selected. But this is definitely a characteristic of the DSP-2, so potential owners should be aware of it.
ISSUE WITH CLOCK
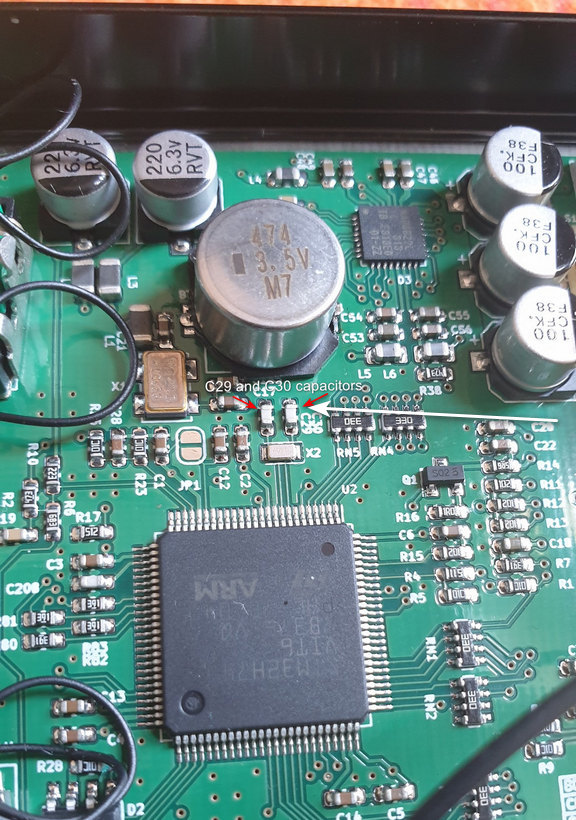
Another issue that prospective purchasers should be aware of involves instances where the internal clock of the receiver does not retain the time, and the solution for this directly from Georgiy is not necessarily satisfactory.
“Yes, they need to be removed from the PCB” he says, a reference to two capacitors on the main PCB, C29 and C30 which are next to each other below a larger M7 device on the PCB.
These are SMDs so anyone without good soldering skills will be hard pressed to want to mess around with that PCB. This is not a confidence-builder, nor a solution – clearly these receivers should come from the supplier without such an issue.
This was upsetting enough for some users that the Malahit team faced some sharp criticisms. One user said the clock on his DSP-2 was working perfectly. Another said: “Unless I power off the unit the date stays good but the time is always 2 hrs and 10 minutes behind. As soon as I power off the unit the date defaults back to 15:08:2062.”
One user said: “Problem is voltage is very inaccurate causing the clock settings to be lost. I have tried several 18650 batteries (good Panasonics) and fully charged they are 4.2v, but the DSP-2 indicates 4.6v. When the battery runs down to 4.0v the clock settings are lost. Also, the battery indicator continues to show FULL. I think there is an internal problem with the DSP2. Perhaps the new design, or new internal parts are causing this. This is very disconcerting.”
In exchanges on Telegram, Georgiy said he personally checks each outgoing Malahit for sensitivity on each band, and clock operation, among other things. In a later comment just before this article went to press, Georgiy said that C29/C30 should be replaced only if there is a problem with the clock.
There is no mention by the Malahit team of any official return policy – which of course would be quite challenging and costly involving an additional round trip for a receiver back to Russia and then back again to the user.
On my DSP-2, which I have used with an Anker 26800 USB battery, so far my clock/date settings have maintained accuracy with no reset, even after the USB cable is unplugged from the receiver. I have not yet tested longer times to see if the clock/date is reset when voltage drops below a certain point.
[UPDATE: 22 July 2021]
In a message sent after publication, Georgiy says that the C29 and C30 capacitors will be deleted from the next series of the Malahit, and for now they are being removed from receivers that have not been sold yet.
[UPDATE 23 July 2021]
Further testing revealed that the observations of Malahit users are accurate. When voltage of a 18650B battery in my Malahit dropped below 3.7 v the receiver did indeed shut down — this is with the battery icon still showing 50%. So this is definitely an issue that needs to be addressed in future updates. That said, I got hours of operating time before the full 18650 dropped to the cutoff level — but obviously an inaccurate battery icon is something that the Malahit team will have to correct.
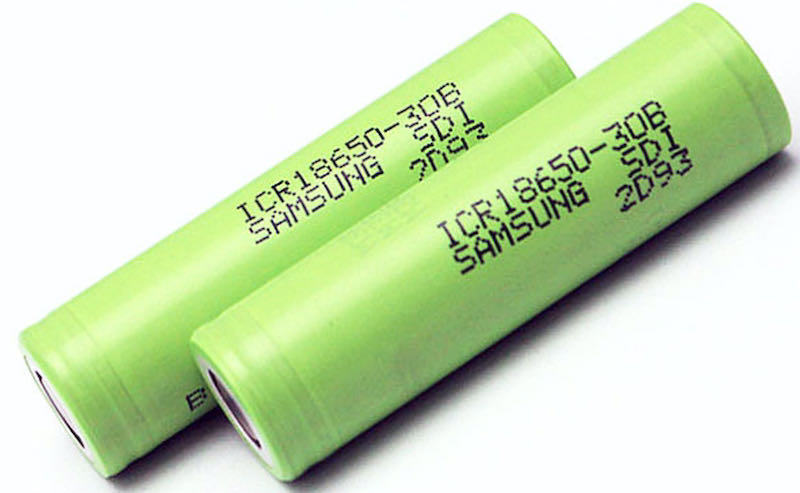
THE BATTERY GAME
Example of 18650 rechargeable batteries
The Malahit DSP-2 uses a 18650 Li-on battery. Unfamiliar to many people, these are actually well known among professional-grade flashlight collectors/users (flashlight collecting is another of my vices).
One of the first things I realized when my Malahit arrived was that my existing button top 18650 cells were too long to comfortably fit in the battery tray. A bit of research on the Facebook Malahit group page revealed that some users have modified the receiver to take two 18650 cells, with a double tray replacing the single tray.
The original Malahit tray requires shorter “unprotected” flat top 18650 cells. At the time I write this, there is a shortage of these cells at the major battery / flashlight suppliers (Battery Junction is one). DO NOT try to force a slightly larger 18650 in the stock Malahit battery tray!
So, one recommendation I would make to the Malahit Team in Russia would be to make it possible for the receiver to use regular protected button top 18650s, of the type one would easily use in a Tecsun receiver such as the 909x and H-501x.
However, in a message to me just before this article went to press, Georgiy said that the Malahit team has used “typical holders” available to them and that they had been unable to obtain a sufficient number of alternative trays for protected 18650 button top batteries. So, for now at least the Malahit will require unprotected flat tops.
My 18650B flat top batteries arrived just as I was completing this review – easily charged up in my Littokala charger, each then fit easily in the single battery tray and power the Malahit perfectly.
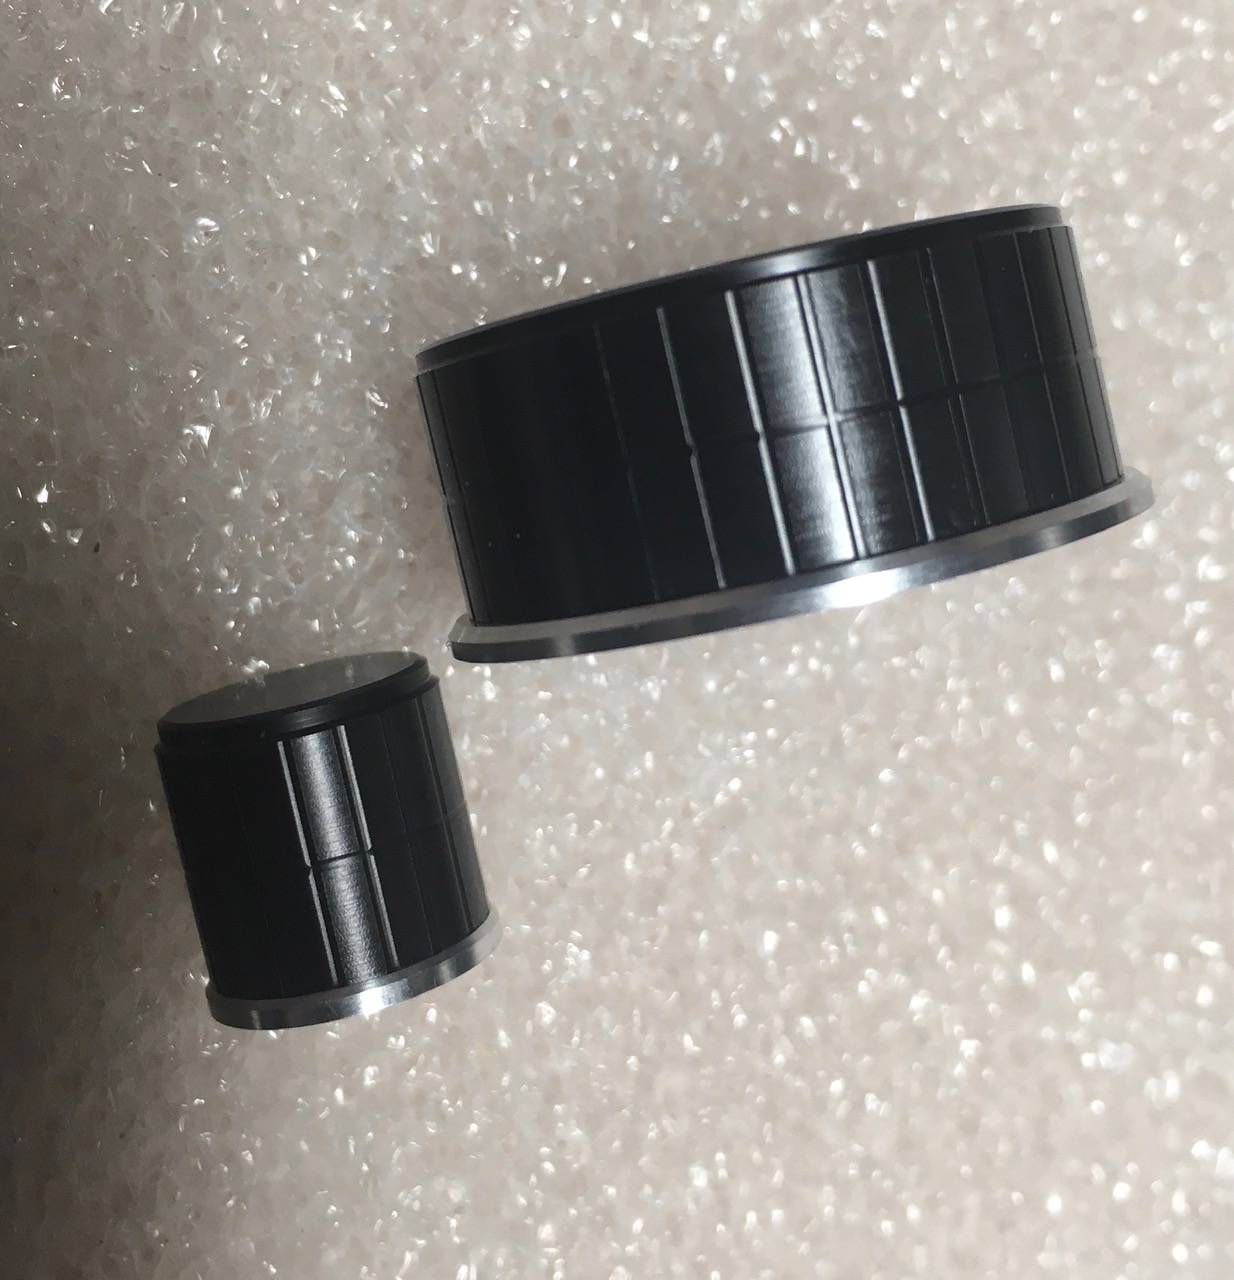
ENCODER KNOBS
Higher quality replacement knobs
The original encoder knobs on the Malahit can be replaced by higher quality, metal construction ones for the small and larger knobs. I got mine from Nikolay, a member in Russia of the Malahit Facebook group (he says he sources them from Switzerland, but I have not confirmed this).
I am, however, not sure that the new knobs can simply be installed on the Malahit – there are no set screws on the original plastic Malahit knobs and I chose not to mess around to see whether the metal knobs can easily be installed, at least for now. Price for the higher quality metal knobs: $17
[UPDATE 23 July 2021]
Nikolay Vedeneev in Russia produces high quality encoder knobs for the Malahit, Afedri, and Belka SDR receivers. He can be reached at: [email protected] and received a very positive review from Fernando Duarte who is known for his reviews of numerous receivers. Both of his knobs fit perfectly on the shafts of my Malahit DSP-2 and have a much better feel than the originals (NOTE: I used a 1.5 mm hex key to tighten the set screws) https://fenuradio.blogspot.com/2020/07/custom-tuning-knopfe-fur-jedes-gerat.html
The subtitle of this article asks whether the Malahit is poised on the edge of greatness. I believe it is, but anyone’s choice to join the Malahit user/fan club comes with some headaches.
We can only hope that the Malahit team can work on the problem of noise spikes that permeate the lower frequency ranges from mediumwave on up. There’s no way to minimize this: at $263 (the price of a DSP-2 as of July 2021) buyers should not have to be shutting off the display to eliminate noise.
As for the question of the clock on the DSP-2 not maintaining time/date, etc it’s clear that Georgiy and the Malahit team are aware of this issue and one hopes this could be checked off the list of concerns that users have raised.
Whether one needs all the bells and whistles that a Malahit offers is the major question, especially when the Belka DX offers excellent stepped (not continuously adjustable) audio filtering and a form of synchronous AM detection in what has to be the smallest high performance receiver ever available to the listener.
More than a few Malahit owners have observed that between 1.5 MHz and 30 MHz the Belka DX seems to be the better shortwave receiver, with no display noise issues, superb battery life and an amazing small size that makes it the ultimate ultra-portable.
In short, if you choose to step aboard the Malahit train you enter a world where there will be constant improvements in software and hardware, and bugs along the way, of which noise spikes issue is a perfect example. But if you’re someone who gets enjoyment from being on the leading edge of technology in radio development, the Malahit may be for you.
It’s impressive that the Malahit originated in Russia, not generally been known for innovations at this level. In recent years, Asia was the main source of advances from the likes of ICOM, Yaesu, AOR etc in the amateur radio area, and from Tecsun, Sangean, and Eton in the area of portable receivers for HF listeners.
Finally, one has to wonder about the potential that the Malahit design holds for integration into the kind of portables seen over the past two years. Some observers have asked why the LCD display and other features on the Malahit could not be part of a future receiver that looks like a Tecsun 990x or Sangean 909×2 with additional advances such as off-air microSD recording, and DRM.
FINAL ASSESSMENT: I boarded the Malahit bus fairly late, but I am definitely a fan. Owning one of these receivers is indeed a roller coaster – anyone climbing on should become a member of the Facebook and other discussion groups where users exchange views, suggestions, and their own experiences.
For ultimate portability in 2021, the Belka DX wins the race. But the Malahit wins on the sheer number of advanced signal processing and other features it contains, though it is hobbled to an extent by the problem of display interference.
If Georgiy and the Malahit team can continue to make steady progress in confronting the noise issue and fine tune the already amazing array of features, the Russia-made Malahit has a bright future ahead.
[UPDATE 24 July 2021]
In the latest firmware update to the Malahit DSP-2, Georgiy provides this
changelog. Note that this is still described as “TEST” firmware, so it’s still unclear
whether he intends to put out a non-TEST version of this particular upgrade:
Firmware 2.10 TEST:
fixed battery voltage indication
fixed behavior of encoder buttons at low supply voltage
protection against false switching has been made – for switching on by three, set switch 2 to the On position.
added test function – increased display frequency. This reduces noise and increases the number of frames per second; To enable this function, set switch 3 to On. The function may not work correctly, if so, please let me know
the level of interference from the display is slightly reduced
changed the distribution of frequencies to which the input high-pass filters are turned on
when HiZ is turned on, the power supply of the external active antenna is automatically turned off;
added indication of external antenna power on – now the ANT indicator is highlighted in red if this function is enabled
the algorithm for displaying the picture on the display, slightly reduces the level of interference
changed the panorama display mode from “Pan & WTF Disabled / Enabled” to “Pan & WTF Single / Always”, while the panorama image is now always present, but it is updated once (when the settings are changed) or always.
fixed attenuators bugs
[UPDATE 2, 24 July 2021 ]
Please read this updated post explaining why I believe you should hold off on making the DSP-2 purchase until software and hardware issues have been resolved.
Many thanks to SWLing Post contributor, Dan Robinson, for the following guest post and review:
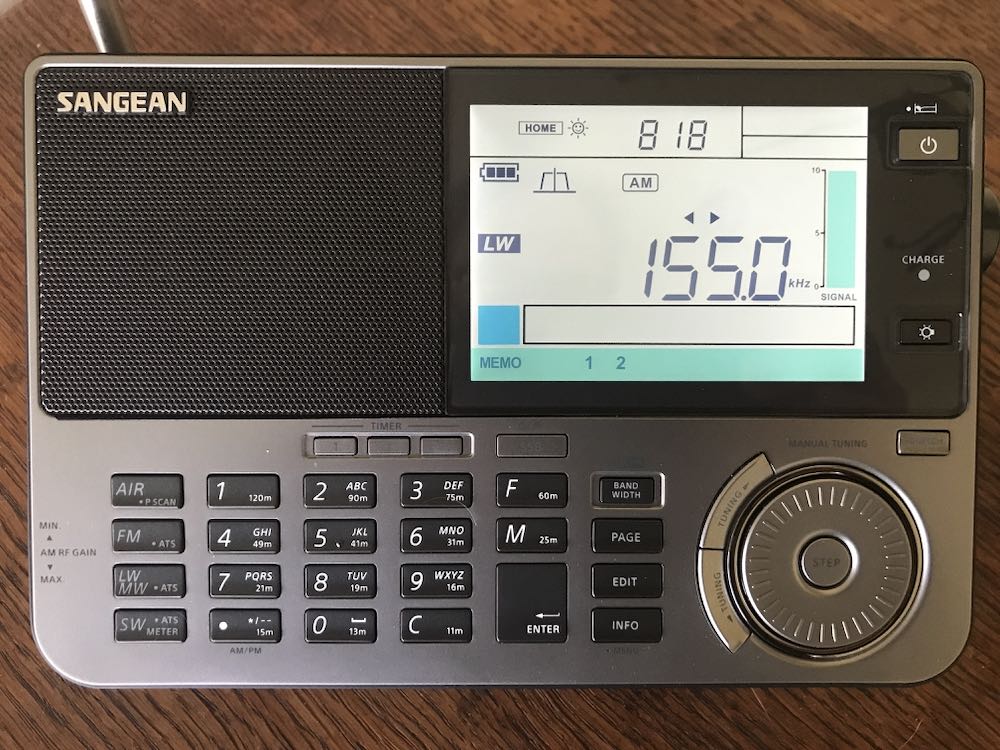
Sangean v Tecsun in the Battle of Late Shortwave Era Portables: The ATS909x2
by Dan Robinson
Some years ago – actually more than a decade – I decided to give Sangean a shot at winning me over in the shortwave portable category.
I had and still do use numerous portables with a bias toward the classic SONY, Panasonic, and Grundig sets. The ones that made an impression stayed, often in multiples, as anyone can see if they visit the radio shack here in Maryland.
These include, for those interested: the Panasonic RF-B65, SONY ICF-SW77, ICF-2010, ICF-PRO80, ICF-7600D, ICF-7700, ICF-SW1000T, ICF-SW55, ICF-SW100s, ICF-SW07, Grundig Satellit 500, to which were added in more recent times the Toshiba RP-F11, XHDATA D-808, and Tecsun portables ranging from the PL-365 and new PL-368 to the PL-880, PL-990x, H-501x, and S-8800.
Sangean has generally not been on that list. There’s a good reason – I just never considered Sangean to be competitive when it comes to portables, though they did have some excellent larger sets such as the ATS-803A that made the first forays into multiple bandwidth options.
My last experience with Sangean was with the ATS-909. I liked the looks and capabilities of that receiver, and even went to the point of having mine modified by Radio Labs. But those mods were underwhelming, in my view, and the original 909 always seemed to me to be deaf when using the whip antenna.
That issue continued unfortunately with the 909x. Some of you may have seen a video I did a few years ago in which I set a 909x against a SONY SW-07 and Panasonic RF-B65. This was done barefoot with only the whip antennas, but near a window. In short, the other two radios wiped the floor with the 909x.
It took a surprisingly long time for Sangean to update the 909x with the 909×2, during which companies asked valid questions about the need for further development of world band portables.
Eton turned the market on its head when it introduced the still superb E1/XM which competed with the very end of SONY portable production, and co-designed with R.L. Drake added such superb features as Passband Tuning and three selectivity positions.
Meanwhile, Tecsun plugged away, introducing an impressive array of portables including the PL-600 series, then the 880 and now the 990x and H-501 portables.
So, now the 909×2 is here and with its 073 firmware upgrade has become a bit of a holy grail for portable receiver users. There have been a number of excellent reviews, including Dave Zantow’s deep dive, and some others here on SWLing Post.
I’m going to give you my impressions, using the really detailed Zantow review as a base. I received my 909×2 from Amazon just today – it is a 073 firmware which confirms that new supplies have the upgrade.
SENSITIVITY ON WHIP
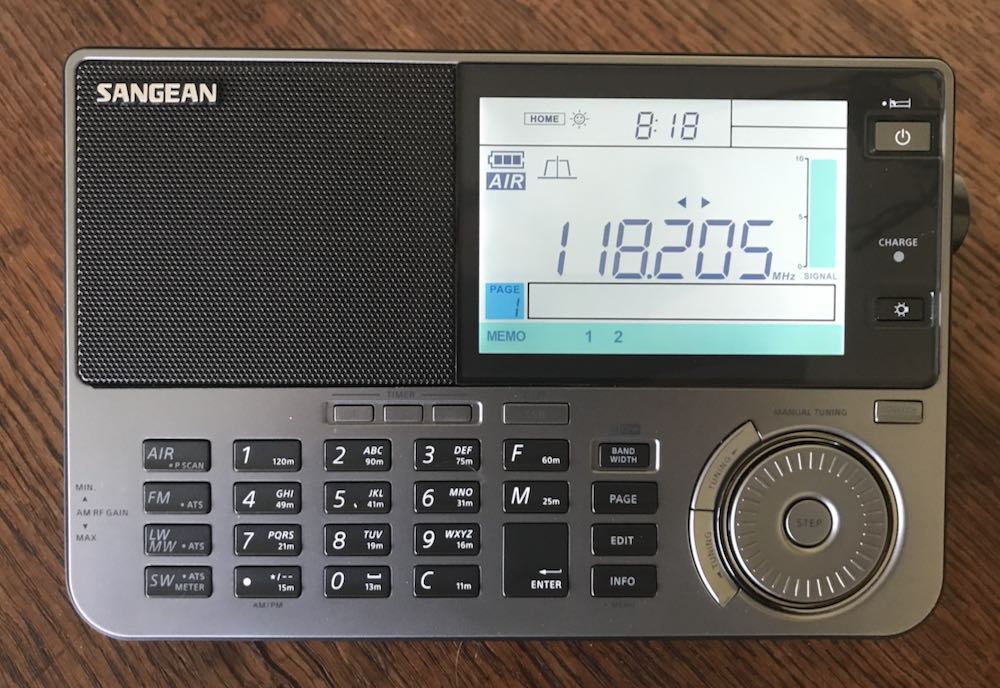
First, let’s get the elephant in the room out of the way. Although I have not undertaken detailed technical testing of the 909×2 – nor do I have the equipment to carry this out – it does seem that Sangean may have finally tackled this crippling flaw that rendered the old 909x nearly useless when using it only on the whip. I’ll undertake further testing and comparisons with some of my other portables to confirm this. The whip antenna itself is robust – solid and long, something that Tecsun could take note of.
AIR BAND
Inclusion of air band on this radio is a major selling point for those interested in this type of monitoring. My initial tests showed the 909×2 to be quite sensitive and useful – I managed to pick up no fewer than five airport comms frequencies in my area here in Maryland.
SELECTIVITY / AUTO-BANDWIDTH
The 909×2 really shines with FIVE available selectivity options that are easily selectable in shortwave mode. It would have been nice to be able to actually see the values of each filter as one scrolls through, but that’s a minor point. Think about it – in shortwave AM mode, this is the number of selectivity positions that one finds on such power house communication receivers as a Drake R8. Amazing that we now have that in a portable. On the negative side, I find the auto-bandwidth feature on the 909×2 to be nearly useless, as useless as the similar feature found on Tecsun receivers. The automatic switching is distracting and annoying. My advice to users: forget this, and stick with manual bandwidth control. My advice to Sangean – I wish they had left this feature out but given us multiple bandwidths in SSB.
LCD AND BRIGHTNESS
Sangean hits it out of the park with this multi-stage lighting for the display. Simply superb and the kind of quality we could only hope for from other manufacturers.
MAIN TUNING / DETENT CONTROL
I found the detents on the old 909x to be annoying – indeed, modifications have been available that could remove this feature. But Sangean being Sangean, the detent wheel remains in the 909×2 and it is not a deal killer.
AUDIO QUALITY
The radio retains the excellent audio of the 909x – I am not sure the 909×2 exceeds what one hears from a Tecsun 990x or H-501x but it’s right up there and competitive.
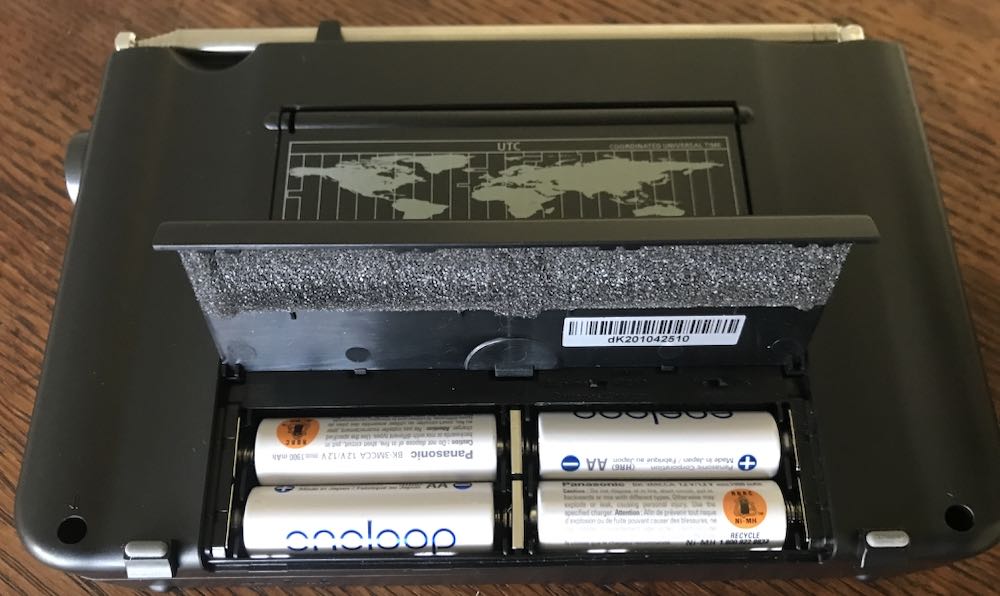
POWER SUPPLY
As others have noted, thanks to Sangean for sticking with AA cells. Together with internal charging when using Ni-Mh cells this is a major selling point. On the other hand – competitor Tecsun went a step farther with its H-501x which though it uses 18650 lithium batteries, has dual batteries, one of which can be held in standby, and switchable charging. That’s a design feature that you really have to respect.
VARIABLE RF GAIN
Again, as noted by others Sangean retained the extremely useful thumb wheel RF gain control. This is an excellent feature.
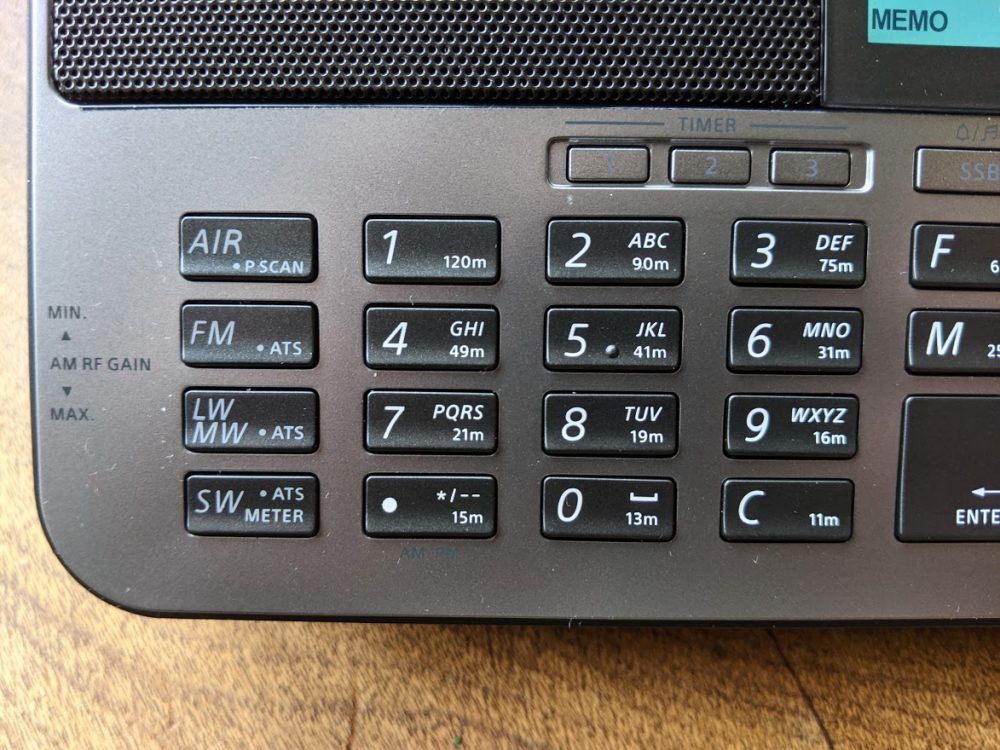
KEYPAD
Another home run for Sangean when it comes to the keypads on the 909×2, which can be compared in this respect to the Tecsun H-501x which itself improves upon the 990x when it comes to front panel control. Time will tell, however, and we shall see if the keys on these radios hold up in heavy use.
UP/DOWN SLEWING
These controls which sit outside the circular main tuning knob are excellent, and reminds one of the slewing buttons on the SONY 7600GR, SW1000T and SW100.
S-METER / DISPLAY
RSSI and SN Digital Signal Strength Information are provided on the beautiful 909×2 display. This is an improvement over the Tecsun signal strength/SNR meters that I wish would be redesigned, if in fact Tecsun has any intention of future modifications to their portables.
NO SOFT MUTING
Thank goodness we don’t have to deal with the annoying soft muting issue that is still seen in some other portables (the XHDATA D808 comes to mind along with the Eton Executive). Soft muting quite simply ruins a listening session and it’s baffling that any manufacturer still puts it in.
NEGATIVES (I AM IN TEARS)
OK, close all airtight doors and prepare to dive! Here are the negatives I see with the 909×2. I held off obtaining one of these radios because I knew there would be issues. And I was disappointed enough in the past with the 909x and 909 before it that I had almost decided not to go for it.
SIGNS OF LONGWAVE RECEPTION PLAGUED BY CROSS-MOD FROM MEDIUMWAVE
On my particular unit – it remains to be seen whether this is true for others – long wave seems to be near useless. The band is filled with mediumwave stations bleeding through. Turning down the RF obviously helps but I still hear AM stations here in the DC area, when I am in LW mode.
SSB PERFORMANCE
ALERT FOR SANGEAN AND ALMOST A DEAL BREAKER – as mentioned in the Zantow review, and in other comments I have seen on the 909×2, the drop in level from AM to LSB is a killer negative.
This is less noticeable in MW. But if you are in shortwave and have turned your volume up on any particular station, say a strong one such as Greece on 9,420 kHz or Spain, or an AM station, and you then switch to LSB it is like you have almost lost the signal. This simply needs to be fixed. Level on USB seems fine and acceptable, but LSB on shortwave requires immediate upwards adjustment of volume, only to have to reverse the process when returning to AM mode. I find this problem to be sufficiently serious that I would recommend against obtaining a 909×2 until Sangean finds a way to fix it. This issue is on the same level of BAD as the still unsatisfactory SYNC mode in all three of Tecsun’s shortwave portables. In fact, I may return the 909×2 I obtained and wait until a fix for this emerges.
Example Video
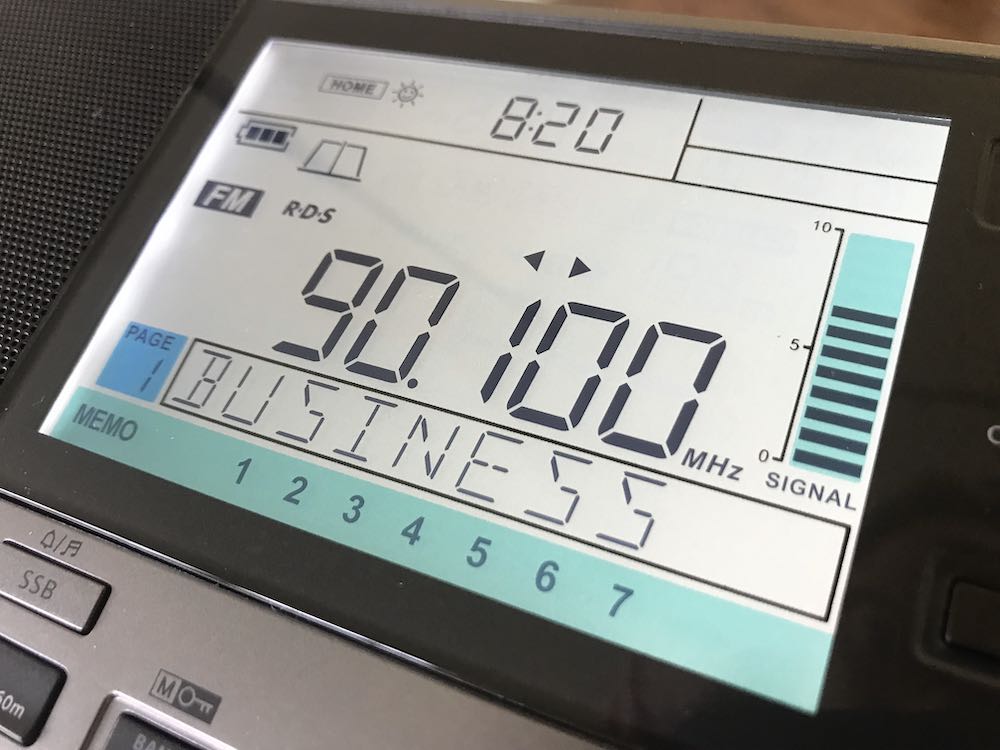
In this video, I demonstrate the extent of the problem as seen on this particular unit of the 909×2, which carries a serial number dk201043181.
Dave Zantow says his unit does not have this issue, so there is a possibility this is due to unit to unit variation. As you can see, with a strong signal such as 12,160 kHz — switching from AM to LSB instantly reduces listenable level, and signal as measured on the 909×2 drops to zero bars or near zero. In USB, the reduction is less severe. Regardless, having to perform adjustments with main volume just to struggle to hear any signal in SSB is a bit ridiculous. This kind of thing is not seen on the Tecsun H-501x or 990x though as Dave correctly points out, Tecsun receivers are not exactly great performers in SSB. On Tecsun receivers, there is a slight processor pause while the receiver makes the switch into LSB or USB, without the sharp reduction in listenable level.
CALIBRATION ISSUES WITH NO WAY TO ADJUST
Imagine my joy when I first began using the x2. Initially, it seemed to be smack on frequency – I tried this on WMAL, the powerhouse local AM station here in the DC area, and then again with stronger stations on shortwave, such as 12,160 kHz. Ah, I said to myself, Sangean has some decent QC and paid attention. About 30 minutes later, however, what I found matches the Zantow review. Stations are consistently low of the tuned/displayed frequency by as much as 300 Hz. The reason this is so disappointing is that I feel Sangean could have taken a clue from Tecsun and provided a re-calibration function (unless it exists and we aren’t being told about it). On Tecsun radios, the re-calibration capability is the major counter-punch to poor synchronous mode – in my view, one can live with flawed SYNC on a 990x or H-501 or PL-330 as long as you can adjust and at least have zero beat or close to it across frequencies. At the same time, as Zantow points out, no one should be expecting TCXO level performance from portables such as these. However, it is a bit disappointing that after all these years and redesign of the 909x to add some really nice features, they’re still landing up to 300 Hz from a tuned frequency. On the other hand, is this really any worse than one would see from an off-tuned SONY ICF-2010? No, and adjusting those older receivers required surgery.
CONCLUSIONS
I really like the 909×2. There simply is something about this design that Sangean knew was a winner when it first arrived on the market years ago, so it’s not surprising that Sangean stuck with it. It’s clear that some hard thinking went into the step up from the old 909x, notably the larger LCD, addition of finer step tuning to make SSB easier, the robust antenna and the still pretty darn good audio through the wonderful speaker. The 909×2 is a radio that you can imagine guests would comment on if it were sitting on your coffee table – it just looks THAT GOOD.
But then here in 2021, so does a Tecsun H-501x LOOK THAT GOOD. As I noted above, where the Tecsuns fall down – with their still challenged synchronous mode – they make up for with the ability to re-calibrate.
That is a huge feature and one that Sangean struck out on, though surely Sangean designers had to know the 909×2 would appeal both to listeners and to hobbyists with obsessions about frequency accuracy.
To repeat, I really (really) like the 909×2. But another area where the receiver strikes out is the problem with sharp reduction in LSB mode. Seriously – you have to crank the volume control up to at least 50 percent to hear ANYTHING when you’re in LSB, whereas USB requires going only up to about 30 percent. Then when you’re completing your carousel back to AM, you have to be sure not to still have the audio up at 50 percent or more to avoid blowing your speaker.
Again, as I said above, the calibration/drift issue on the 909×2 can be lived with. The problem with LSB, in my opinion, cannot or should not be tolerated. So, the question is, do you want to purchase a 909×2 now that still has that LSB audio issue, or wait a while until Sangean gets its act together?
These and other earthshaking questions are before us here in 2021. We have some of the best portables ever made by anyone in a time of sharply declining shortwave use, but they each have their flaws.
I don’t usually do a star rating or RECOMMEND / NOT RECOMMEND for radios. This time, I am going to make an exception and it links directly to the issue of the LSB problem on the 909×2. These radios simply should not have been allowed to enter the market with this being as serious a problem as I think it is. For that reason, I honestly cannot recommend a Sangean 909×2 until this is corrected.
Many thanks to SWLing Post contributor, Dan Robinson, who shares the following guest post:
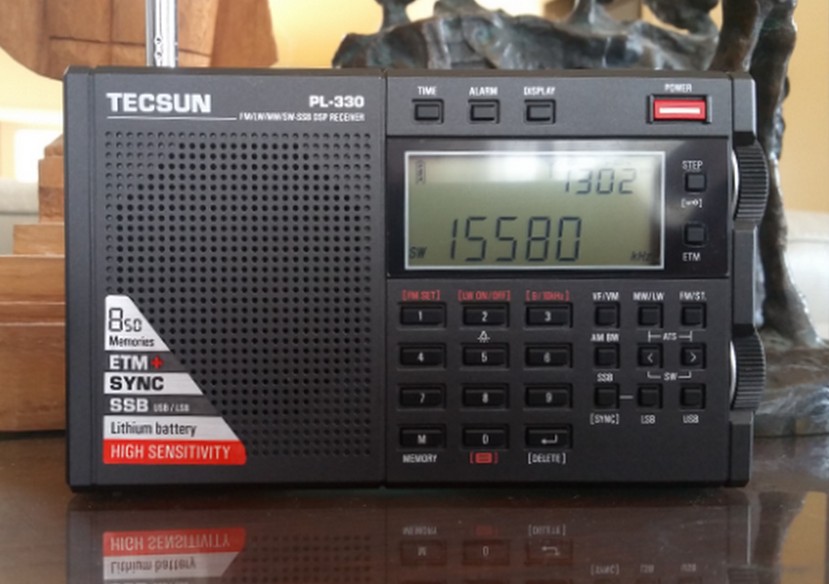
Tecsun PL-330: The Powerful Mini With One Serious Design Issue
by Dan Robinson
As SWLing Post readers know, I have a huge radio collection – including premium receivers and portables, now nearly 100 in all.
So, these days I am hesitant to add too many, but I continue to take interest in what companies such as Tecsun and Sangean are doing in the way of stuffing the latest chip technology and capabilities into portables radios.
The last receivers I reviewed included the Tecsun PL-990x, which has developed quite an enthusiastic following since its consumer version was released in 2020, and the Tecsun S-8800.
Out for some time now is the Tecsun PL-330. By now there are many reviews of it on You Tube and elsewhere.
It’s become a familiar observation for many of us – if this were still the 1960’s and 1970’s – even into the 1980’s, which could be considered the golden days of shortwave and we had receiver technology like this, well what a joy that would have been.
When I traveled around the world both before and after college, and professionally for Voice of America in the 1980s and 1990s, wow what a good time I could have had with today’s portables!
Some world band portables radios back then were superb performers. The Grundig Satellit series 500/700/600/650 come to mind – but these were not exactly what I would call small portables.
Paging through Passport to Worldband Radio from 1990 (wow, that’s 30 years ago!) you see others such as the SONY SW-1, Panasonic RF-B65, and of course, the SONY ICF-2001D/2010 which introduced killer synchronous tuning technology in the 1980s and remains popular today decades after it first appeared.
Also available were the SONY ICF-SW55 and later in competition with the 2010, the SONY ICF-SW77. Today, I have four SW-55s and two SW-77s and still use them regularly.
Tabletop receivers back in the good ol’ days offered multiple selectivity positions. One of those was the Lowe HF-225 (and later Europa version) along with the HF-250, Kenwood R-5000 and R-2000, ICOM IC-R71A, and Yaesu FRG-8800 among many others.
But as far as smaller portables go, features such as synchronous detection and multiple selectivity were still pretty limited, and a number of receivers didn’t offer selectable synchronous as was eventually offered on the Drake R8B and later production of the SW-8.
The RF-B65 by Panasonic – which today remains sought after for its amazing sensitivity – was hobbled by having a single selectivity position. Same with SONY’s SW-1 and SW-100, and 7600GR, though SONY’s PRO-80 had two bandwidths.
Indeed, it wasn’t until Eton brought out the E-1, with its three bandwidths combined with Passband Tuning (though no notch filter) that a portable finally reflected capabilities of some of the better tabletop radios (though lacking a notch filter).
The Grundig Satellit 800 was close in competition with the E-1 (though the earlier Sat 600/650 series also had multiple bandwidths) but was bulky.
Fast forward to 2021 – credit due to Tecsun and more recently to Sangean with its 909X2, for some years now we have enjoyed Asia-originated portables with multiple selectivity and synchronous mode, though sync implementation on some has left much to be desired.
Which is where the PL-330 comes in. When I look at the 330, I am reminded of one of the now ancient SONY portables, the ICF-4920 which was a super small slide-rule receiver that nevertheless was quite sensitive.
Like the 4920, which you could easily slip in a pocket, the PL-330 is a perfect travel portable. Only the Belka-DX SDR and still wonderful SONY SW-100 compete in terms of performance and size.
The 330 is basically a PL-990x in miniature: smaller speaker obviously, shorter antenna, no bluetooth capability or card slot. But as many people who frequent the Facebook groups have observed, pretty much anything the 990x can do, so can the 330.
This radio has ETM/ATS tuning, synchronous detection, multiple bandwidths in AM, SSB and MW, FM mono-stereo speaker control, alarm/timer functions, external antenna jack, display light, and other features.
Tecsun decided to go with a BL-5C battery here – the same with the new PL-368. I think this is unfortunate, since it requires one to obtain a number of those flat batteries if you want to travel and not have to re-charge. On the other hand, this is not a crippling design decision.
What is an unfortunate design problem, in my view, involves the simple question of tuning the receiver.
The main and fine tuning knobs on the right side of the PL-330 are embedded into the cabinet just far enough as to make easy rapid finger tuning of the radio nearly impossible.
In fact, in my testing it’s impossible to thumb tune the radio more than 10 kHz at a time. The same applies to using the lower knob which controls volume. When in FM mode, this issue make tuning just as frustrating almost forcing one to use rapid scan mode.
Another puzzler: Tecsun limited bandwidths in AM SW to three, while in SSB you have 5 bandwidth options. In AM mode, you have a 9 kHz bandwidth, another puzzling choice. Longwave too is limited to 3 bandwidths.
But overall, none of these problems really knock the PL-330 down very far. This is one mini powerhouse of a radio, one that makes you think “wow, if I had just had this back in 1967 or 1973 or 1982.
Some additional thoughts. My particular PL-330 was supplied by Anon-co but is a pre-production version and so does not have the latest firmware. Thankfully, I have not experienced the issue of SSB tuning running in reverse as others have.
NOTE: As most users know by now, but some newer users may not, you cannot charge one of these radios – whether Tecsun or Sangean – using the mini-USB port and use them at the same time. . . there is just too much noise introduced from the charging process.
This little mentioned feature: just as the Tecsun 909x has a re-calibration function, so does the PL-330. Tecsun itself initially declined to acknowledge this, but finally confirmed through Anon-co.
The procedure: Switch to LSB/USB. If the station is not zero beat, hit STEP button once and then quickly again to move the flashing display down arrow so it’s above the far right digit. Then fine tune the station for zero beat. Hold LSB or USB in for a couple of seconds. The LCD blinks. You then have zero beat – but be sure to repeat the process for LSB and USB.
I should mention that just like on the 990x, the re-calibration process doesn’t mean the receiver is then zeroed up and down the shortwave bands. You will likely have to repeat the process from, say 25 meters, to 19 meters, to 49 meters, etc.
I have come to enjoy using the PL-330 here in my house, though like other portables in my collection I need to position it in one particular corner of my home away from incoming cable TV lines.
The PL-330 and the Belka DX are currently king of the pile when it comes to my smaller travel portables.
I fully expect there will be no further receiver development by Tecsun after the PL-330/990x/H-510 radios – but that company will certainly have left us with some great receivers as the days of shortwave approach an end.
It sometimes seems that one of the biggest enemies of a radio enthusiast these days is RFI (radio frequency interference), which is to say, human-originated noise that infiltrates––and plagues––vast chunks of our radio spectrum.
Yet I believe RFI has, in a sense, also managed to energize––and even mobilize––many radio enthusiasts. How? By drawing them out of their houses and shacks into the field––to a local park, lake, river, mountain, woodland, or beach––away from switching power supplies, light dimmers, street lights, and other RFI-spewing devices.
Shortwave and mediumwave broadcast listeners have it easy, comparatively speaking. They can simply grab a favorite portable receiver, perhaps an external antenna, then hit the field to enjoy the benefits of a low-noise environment. In that a portable receiver is something of a self-contained listening post, it’s incredibly easy to transport it anywhere you like.
Ham radio operators, on the other hand, need to pack more for field operations. At a minimum, they need a transceiver, an antenna, a power source, not to mention, a mic, key, and/or computing device for digital modes. Thankfully, technology has begun miniaturizing ham radio transceivers, making them more efficient in the use of battery power, and integrating a number of accessories within one unit.
Photo from the 2019 Tokyo Ham Fair
Case in point: in 2019 at Tokyo’s Ham Fair, Icom announced their first QRP (low-power) radio in the better part of two decades: the Icom IC-705.
Introducing the Icom IC-705
It was love at first sight among fans of Icom when the 2019 announcement was made. Why? The instant thrill came courtesy of the IC-705’s resemblance––in miniature––to the IC-7300, one of Icom’s most popular transceivers of all time. Not only that, but the IC-705 sported even more features and a broader frequency range than the IC-7300. What wasn’t to love?
But of course, unlike the IC-7300, which can output 100 watts, the IC-705’s maximum output is just 10 watts with an external 12V power source, or 5 watts with the supplied Icom BP-272 Li-ion battery pack. Nevertheless, enthusiasts who love field radio––this article’s writer being among them––were very pleased to see Icom design a flagship QRP radio that could take some portable operators to the next level. Power was traded for portability, and for field operators, this was a reasonable trade.
And since, again, the IC-705 has even more features, modes, and frequency range than the venerable IC-7300, I felt it important to note them up front. Here are a few of its most notable features, many of which are not available on its bulkier predecessor:
VHF and UHF multimode operation
D-Star mode
Built-in GPS
Built-in Wifi connectivity
Built-in Bluetooth connectivity
Portable size
Battery power
The receiver design is similar to the IC-7300 below 25 MHz in that it provides a direct conversion. Above 25 MHz, however, it operates as a superheterodyne receiver. While the user would never know this in operation, it’s a clever way for Icom to keep costs down on such a wideband radio.
At time of publishing, there are no other portable transceivers that sport all of the features of the Icom IC-705. It has, in a sense, carved out its very own market niche…At least for now.
I’ve owned the IC-705 since late September 2020, and I still haven’t fully explored this radio’s remarkable capabilities. It’s really a marvel of ham radio technology, and I’m having fun exploring what it can do.
One conspicuous omission
Let’s go ahead and address this promptly. The IC-705 does have one glaring shortcoming. It lacks one feature that is standard on the larger 100-watt IC-7300: an internal antenna tuner (ATU).
To be frank, I was a little surprised that the IC-705 didn’t include an internal ATU, since it otherwise sports so many, many features. Not having an internal ATU, like a number of other general coverage QRP transceivers in its class, definitely feels like a missed opportunity. With an ATU, the ‘705 would truly be in a class of its own.
I’m sure Icom either left the internal ATU out of the plan due to space limitations––perhaps wanting to keep the unit as compact as possible?––or possibly to keep the price down? I’m not sure. At release, the price was $1300 US, which is undoubtedly on the higher side of this market segment; at that price point, it might as well have included an ATU.
With that said, not having an internal ATU is still not a disqualifier for me. Why? Because I have a number of resonant antennas I can add on when in the field, a remote ATU at home, and a couple of portable external ATUs, as well. Yes, it would be helpful to have it built in––as on my Elecraft KX1, KX2, and KX3, or on the ($425) Xiegu G90––but for me it’s not a deal-breaker.
One other minor omission? A simple tilt stand or foot. I do wish Icom had included some sort of foot on the bottom of the IC-705 so that it could be propped up for a better angle of operation. Without a tilt stand or foot, the IC-705 rests flat on a surface, making its screen a bit awkward to view. Of course, a number of third-party tilt stands are available on the market. And if you have a 3D printer or access to one, you can find a wide variety of options to simply print at home. I printed this super simple tilt foot, which works brilliantly.
But why not include one, Icom?
My 3D printed tilt foot
But while the IC-705 lacks a tilt foot, it actually sports a number of connection points on the bottom, including a standard tripod mount. Thank you, Icom, for at least including that (other radio manufactures please take note)!
Initial impressions
Funny: the IC-705 is the first new transceiver I’ve purchased with a color box.
If you’ve ever owned or operated the Icom IC-7300, you already know how to operate many of the functions on the IC-705. The user interfaces on the touch screens are identical. Features that are unique to the IC-705 are easy to find and follow the same standard Icom user-interface workflow.
Having less front faceplate real estate, the IC-705 has less buttons than the IC-7300––about 11 less than its big brother, to be exact. However, the twin passband, gain, multi-function knob and encoder are in the same positions and layout as on the IC-7300.
And if you’ve never used an IC-7300 before, no worries: this is one of the more user-friendly interfaces you’ll find on a ham radio transceiver.
The build of the IC-705 is excellent. It’s not exactly hardened for the elements––there is no waterproof rating or dust rating, for example––but it gives the impression of a solid little radio, likely to withstand a bit of less-than-delicate handling. Yet even though it’s designed to be a portable field radio, I’ll admit that the front panel and especially the color touchscreen feel a little vulnerable. I do worry about damaging that touchscreen while the radio travels in my backpack.
The Icom LC-192
On the topic of backpacks, Icom released a custom backpack (the LC-192) specifically for the IC-705, Icom AH-705 ATU, antennas, and accessories. I did not consider purchasing this backpack, although I’m sure some operators would appreciate it, as it has dedicated compartments for supplies and the radio can be attached to the floor of the backpack’s top compartment. Again, I passed because I’m a bit of a pack fanatic and tend to grab gear that’s more tactical and weatherproof.
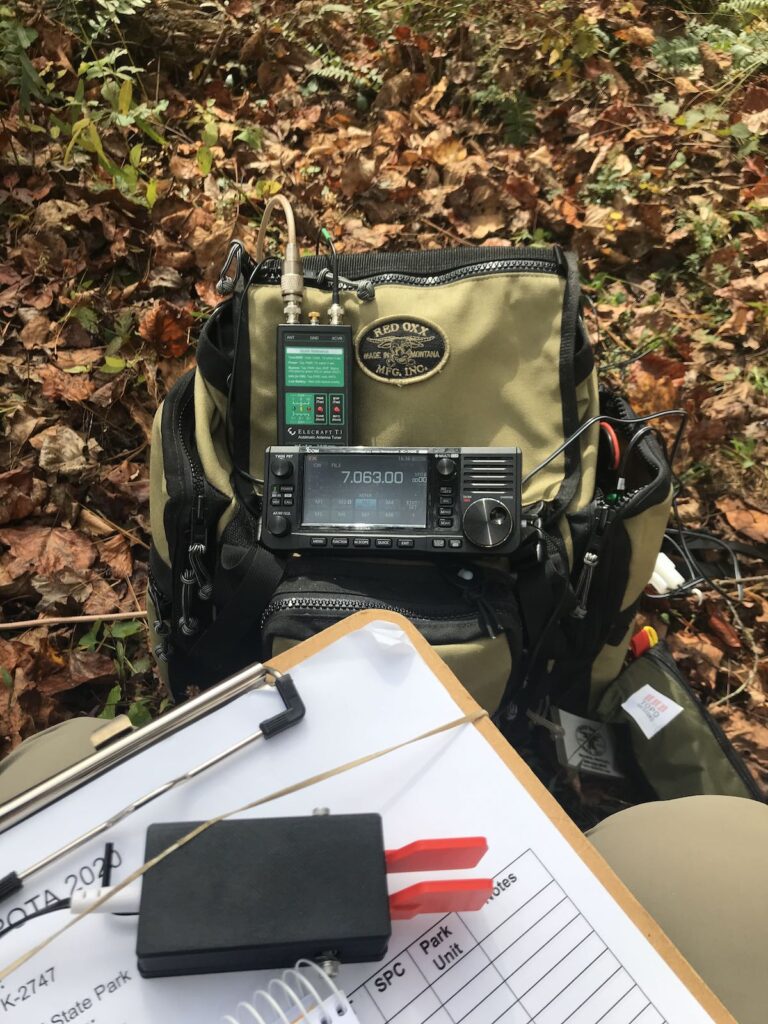
IC-705 and Elecraft T1 ATU at Toxaway Game Land
While its in my Red Oxx or GoRuck backpack, I house the IC-705 in a $14 Ape Case Camera insert. Eventually I want to find a better solution, but this does help pad the IC-705 while in my backpack and certainly fits it like a glove––hopefully protecting that touchscreen.
A number of third-party manufacturers have designed protective “cages” and side panels for the IC-705, but I’ve been a bit reluctant to purchase one because I feel they may add too much weight and bulk to the radio.
To the field!
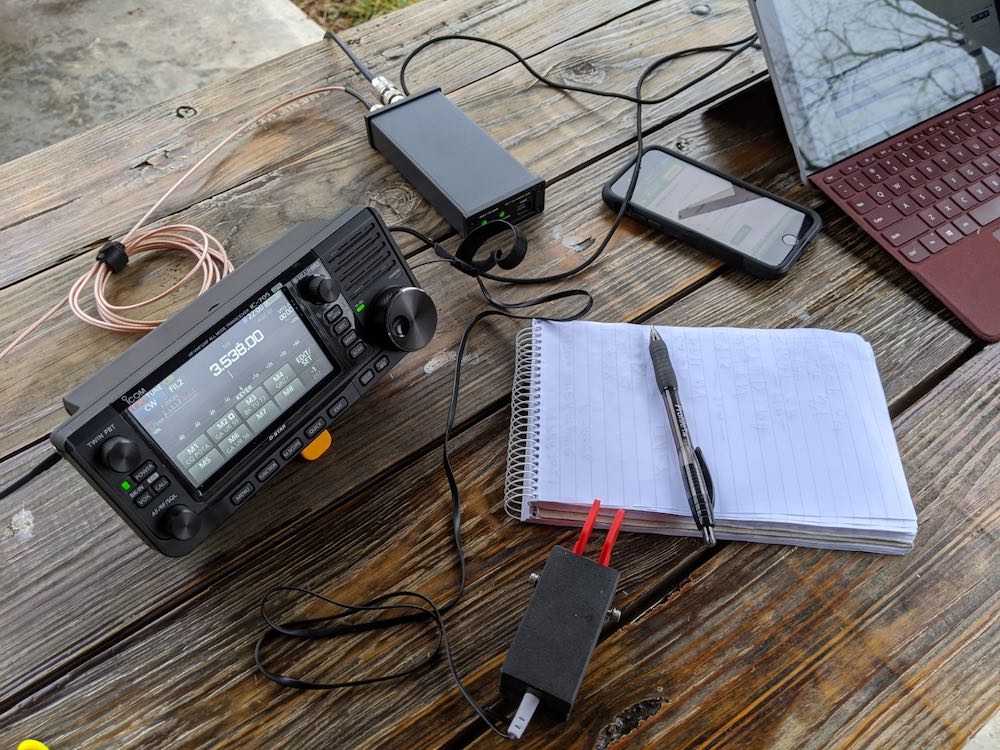
Sandy Mush State Game Land
The day after I received my Icom IC-705, I took it to the field to activate Sandy Mush State Game Land for the Parks On The Air (POTA) program. Typically, when I review a new radio, I spend a few hours with it in the shack before taking it to the field. In this case, however, I felt comfortable enough with the IC-705 user interface, so I decided to skip that step entirely––I was eager to see if this little radio would live up to expectations.
The previous evening, I’d connected the IC-705 to my 13.8V power supply, so the BP-272 battery pack was fully-charged and attached to the IC-705. There was no need for an external battery to be connected.
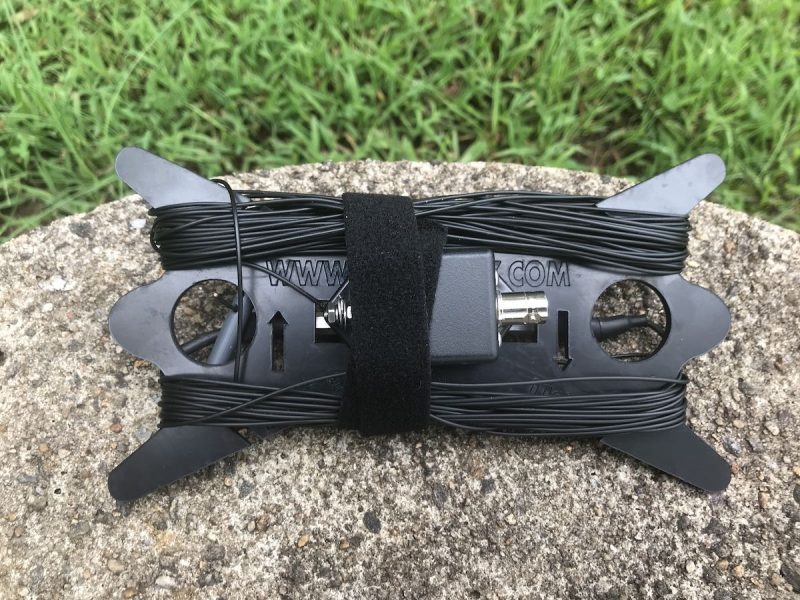
Getting on the air that day was very straightforward; indeed, the set-up couldn’t have been more simple: radio plus antenna. I connected the IC-705 to a Vibroplex EFT-MTR end-fed 40, 30, and 20-meter resonant antenna, thus an external antenna tuner was not required.
The Vibroplex/End-Fedz EFT-MTR antenna
Next, I plugged in the included speaker/mic, spotted myself to the POTA network, and started working stations. I asked for audio reports and all were very positive using only the default audio settings. Obviously, the small hand mic works quite well. I did quickly decide to unplug one of the two connectors of the speaker mic (the speaker audio side) so that the received audio wouldn’t be pumped through the hand mic, using the much better IC-705 front-facing speaker.
In the field that day, I had a few objectives in mind:
See how well the supplied hand mic works for SSB contacts, thus intended to ask for audio reports
Check out full break-in QSK operation in CW mode
Measure exactly how long a fully-charged Icom BP-272 Li-ion battery pack would power the IC-705 under intense operation
SSB
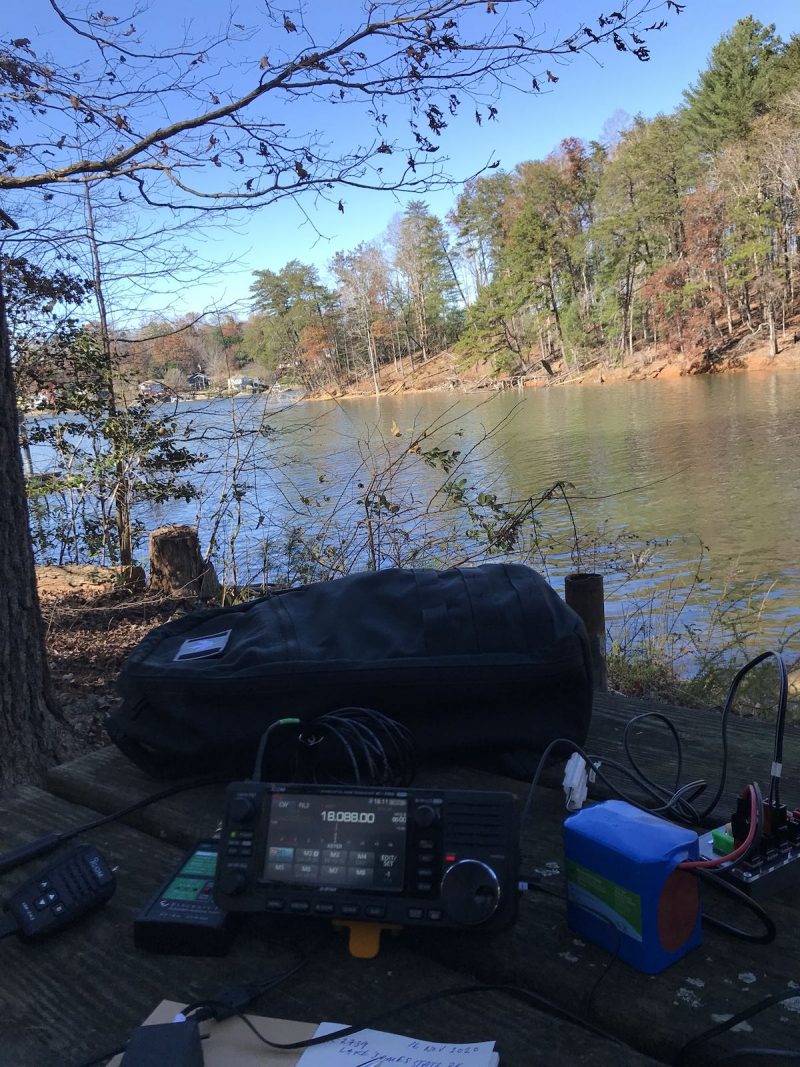
SSB at Lake Norman State Park
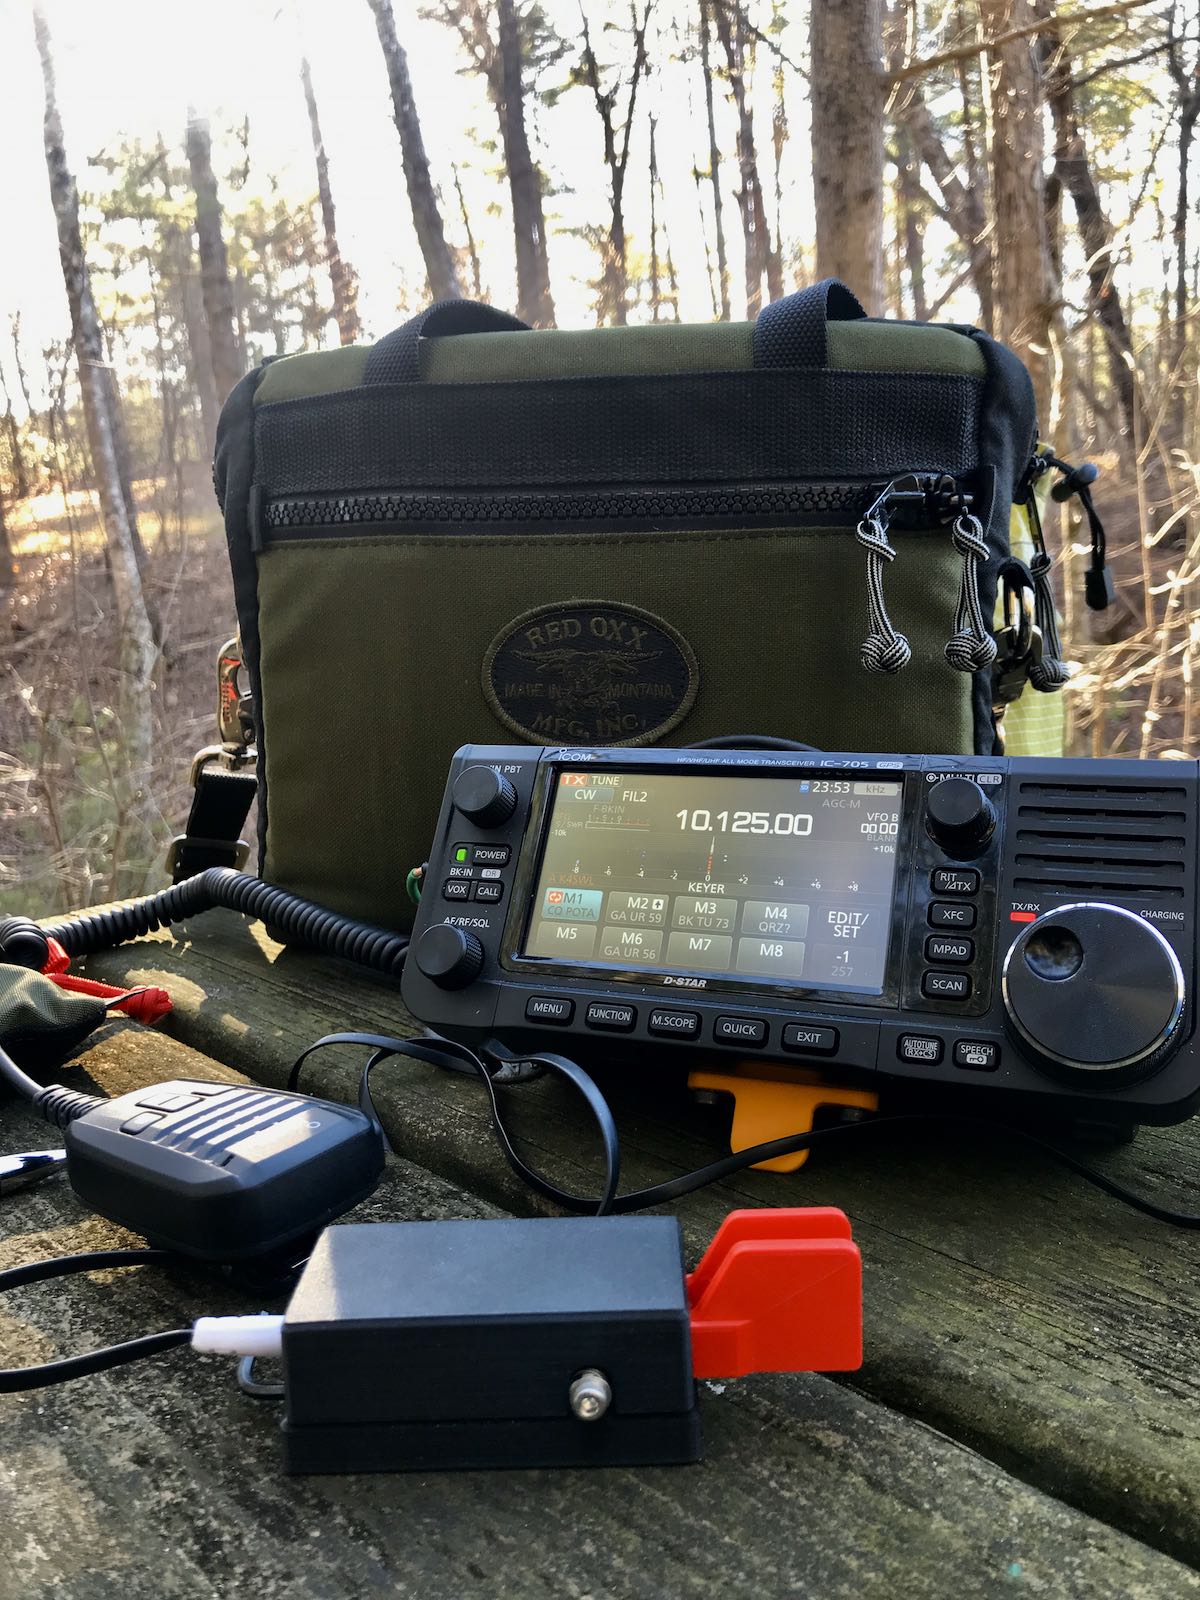
I was very quickly able to sort out how to record and use the voice memory keying features of the IC-705. There are a total of eight memory positions that can be recorded to the internal microSD card. It’s very simple to use one of the memories in “beacon” mode––simply press and hold one of the memory buttons and the recording is transmitted repeatedly until the user presses the PTT to disengage it. This is incredibly helpful when calling CQ; I typically set mine to play “CQ POTA, CQ POTA, this is K4SWL calling CQ for Parks On The Air.” I’ve also set a five-second gap between playback, allowing for return calls. As I’ve mentioned before, voice-memory keying is incredibly useful and saves one’s voice when calling CQ in the field.
The voice and CW-memory keying features of the IC-705 are robust enough that they could be used in a contest setting to automate workflow. One important note: voice-memory keying saves recordings to the internal MicroSD card. If that card is removed, formatted/erased, or if the file structure is altered, the voice-memory keyer will not recall recordings.
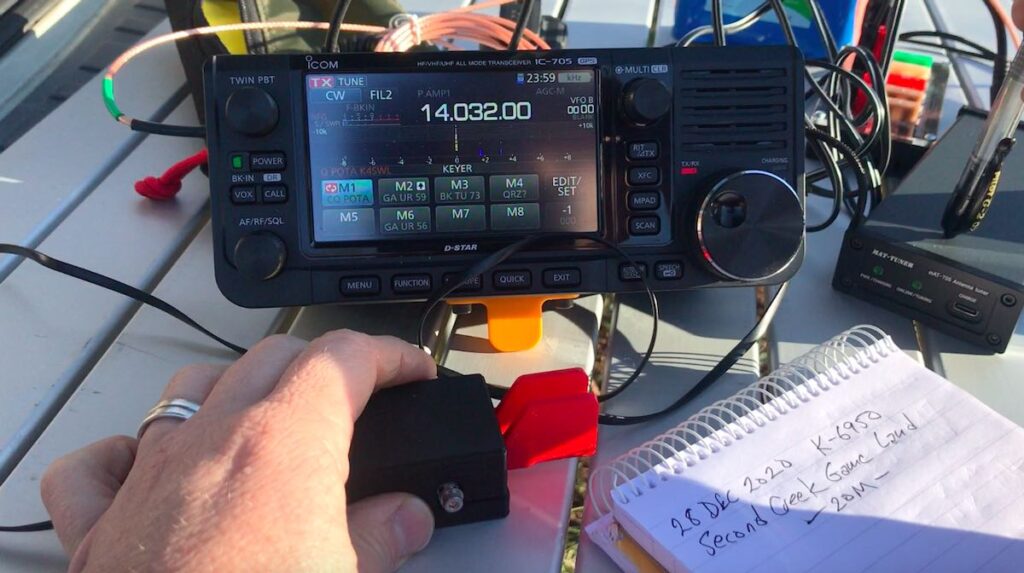
CW
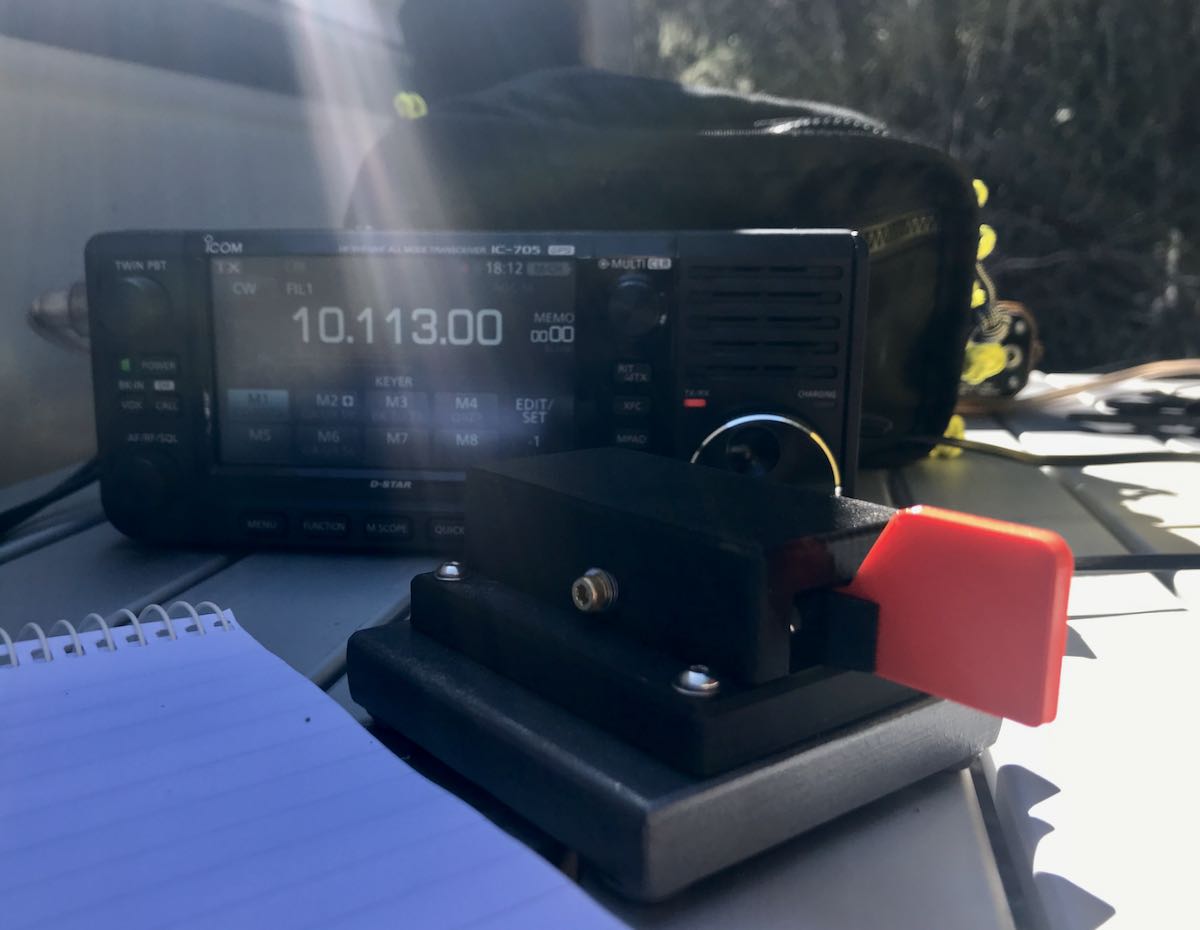
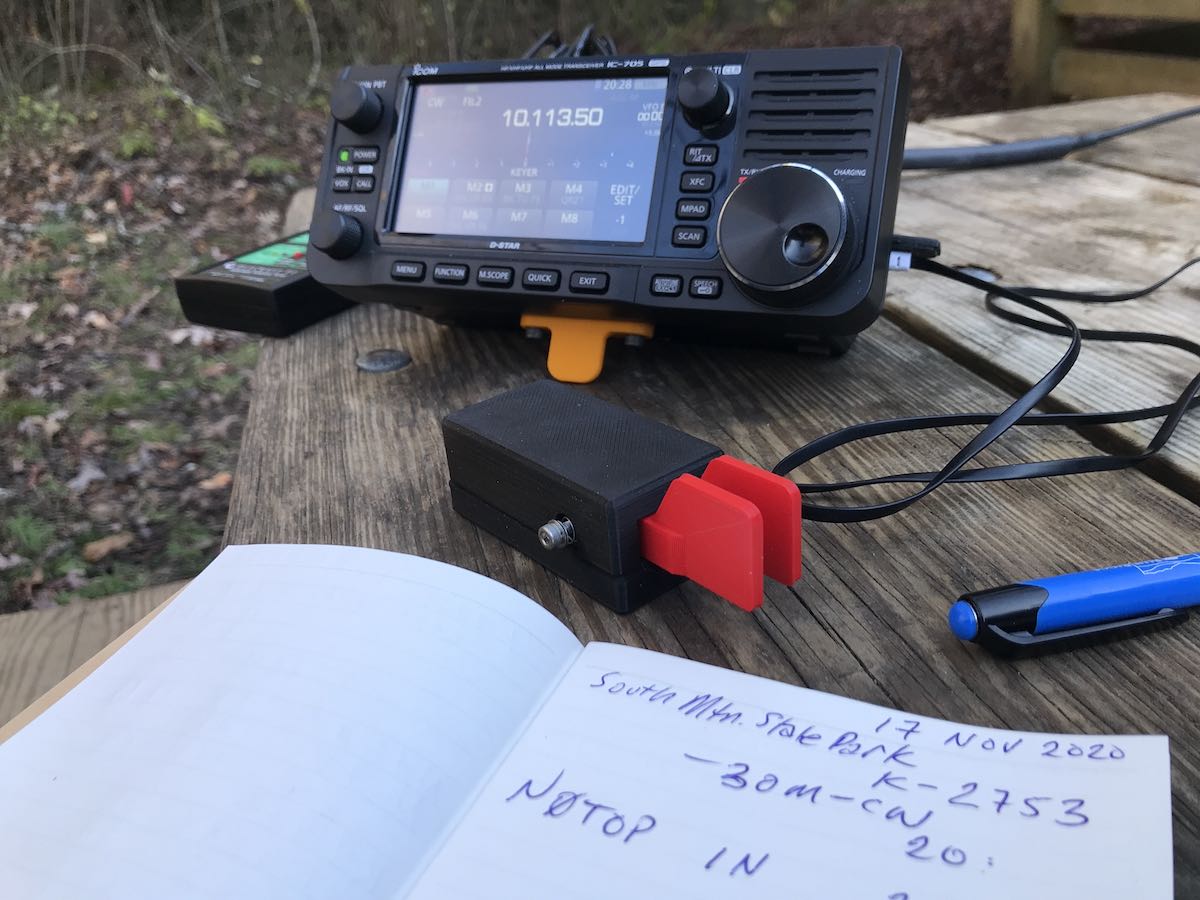
CW at South Mountains State Park
Next, I plugged in my paddles and started calling “CQ POTA” in CW.
As with the voice-memory keyer, CW-memory keying was incredibly easy to set up. Once again, the user once has eight memory positions. As the keyer plays a pre-recording sequence, the IC-705 will display the text being sent.
One of the questions I’m asked most by CW operators about the IC-705 is whether the radio has audible relay clicks during transmit/receive switching. Radios with loud relay clicks can be distracting. My preference these days is to operate in full break-in QSK mode, meaning, there is a transmit/receive change each time I form a character––it allows me space to hear someone break in, but results in much more clicking.
The IC-705 does have relay clicks, but these are very light––equal in volume to those of other Icom transceivers, neither louder nor softer. These clicks, fortunately, are not too distracting to me, and to be fair, I find I don’t even notice them as I operate. With that said, transceivers like my Elecraft KX2 and Mission RGO One use PIN diode switching, which is completely quiet.
Battery Life
Tapping the battery icon will open a larger battery capacity monitor.
My third objective at the first field outing was to test how long the Icom BP-272 Li-ion battery pack would power the IC-705 while calling CQ and working stations in both SSB and CW for an entire activation.
After nearly two hours of constant operation, the BP-272 still had nearly 40% of its capacity.
I didn’t expect this. I assumed it might power the IC-705 for perhaps 90 minutes, max. Fortunately, it seems at 5 watts, one BP-272 could carry you through more than one POTA or SOTA (Summits On The Air) activation. I was pleasantly surprised.
Four months later…
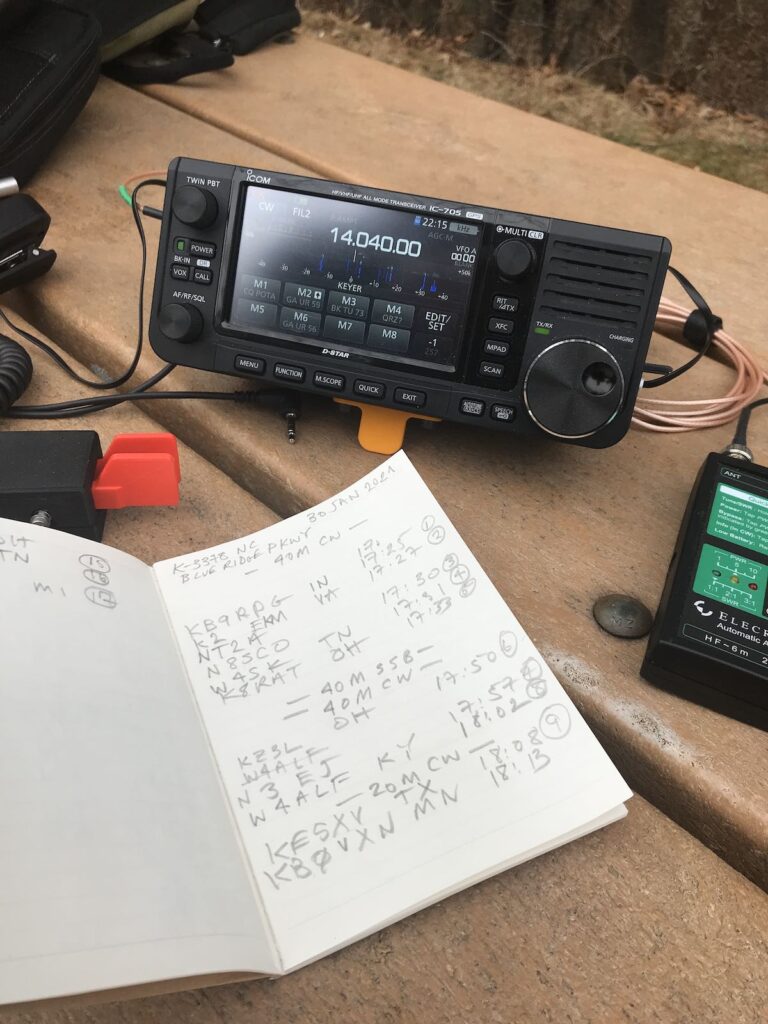
POTA activation at Tuttle Educational State Forest
Since that initial field test, I’ve taken the IC-705 on easily thirty or more individual POTA activations. I’ve also used it at home to chase POTA stations and rag chew with friends.
In short, I’ve found that the IC-705 is a brilliant, robust portable transceiver for SSB and/or CW and a pleasure to operate.
Herein lies the advantage of purchasing a radio from a legacy amateur radio manufacturer: it’s well-vetted right out the door, has no firmware quirks, and is built on iterations of popular radios before it.
I’ve found that IC-705 performance is solid: the receiver has a low noise floor, the audio is well-balanced, the AGC is stable at any setting, and it’s an incredibly sensitive and selective radio.
Digital modes
POTA activation at Lake Jame State Park
One huge advantage of the IC-705 is that it, like the IC-7300, has a built-in sound card for digital modes. This eliminates the need for an external sound card interface. After you’ve read the installation guide, and installed Icom’s USB drivers, simply plug the IC-705 into your computing device via USB cable and you can directly control the ‘705 with popular applications like WSJT-X.
I have not used the IC-705 for digital modes while in the field, but I have done so in the home shack. It was one of the easiest radios I’ve ever set up for FT8 and FT4.
I’m not the biggest digital mode operator, but if you are into it, I expect you’ll be very pleased with the IC-705. It must be one of the most portable, uncomplicated transceivers for digital mode operation currently on the market. I know a number of POTA activators have been using the IC-705 for FT8 and FT4.
D-Star
Being perfectly honest here, I have a chequered history with the D-Star digital voice mode. I purchased an Icom ID-51a and D-Star hotspot several years ago because a local ham pretty much convinced me it was the coolest thing since sliced bread.
And in truth? It is rather amazing.
But at the end of the day I had to admit to myself that I’m an HF guy, and found the user interface and operating procedures just a bit too other-worldly. I kept the ID-51a for perhaps a year, then sold it, along with the hotspot.
Although I knew the IC-705 had D-Star built in, I really hadn’t given it a second thought. But since I’m a reviewer, I simply had to check it out. I still had my D-Star credentials from some years ago, so I set up the IC-705 and connected the transceiver to the Diamond dual band antenna on top of my house.
Fortunately, I was able to hit our only local D-Star repeater and connect on the first go. Note that, like the ID-51a, the IC-705 can use your GPS coordinates, then automatically find the closest D-Star repeater and load the frequency and settings from the default database on the IC-705 MicroSD card.
After reviewing a YouTube video demonstration, I was on the air with D-Star and found the user interface much easier to use than that of the ID-51a. It really helps having a large touch screen.
I’ll admit it: I’m warming back up to D-Star, and I have the IC-705 to thank for that.
Some day, I plan to use D-Star on HF, as well. I acknowledge that it might take some pre-arranging, but perhaps I could even make a D-Star POTA––or better yet, SOTA––contact, if the stars align. It’s certainly worth the experiment.
Let’s talk about broadcast listening
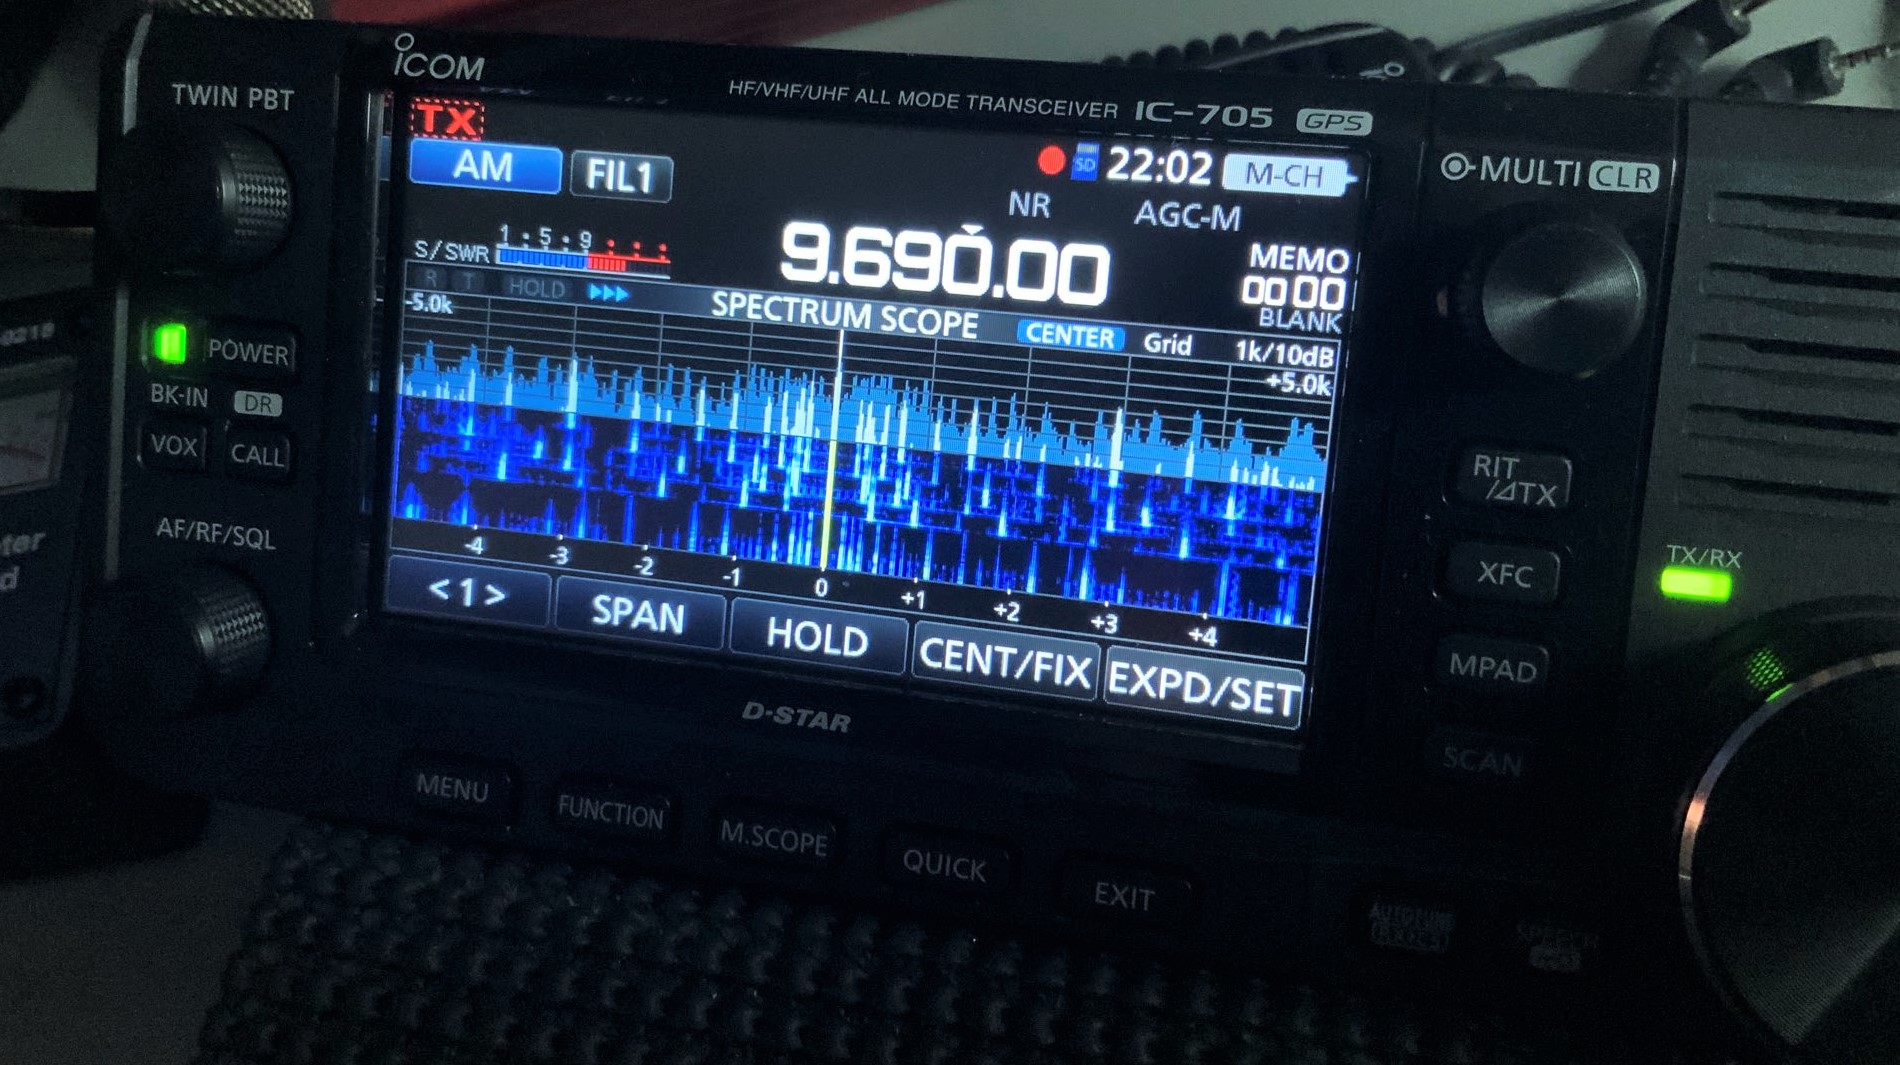
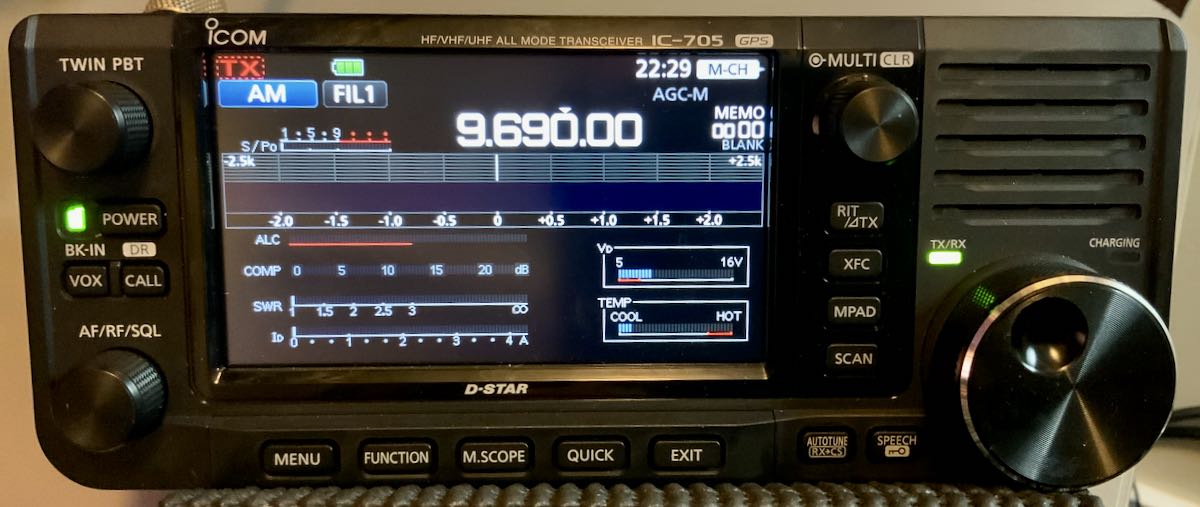
Radio Exterior de España’s interval signal on the IC-705’s waterfall display
Although I’m a pretty active ham radio operator, I’m an SWL and broadcast listener at heart. One of the appealing things about the IC-705 is its excellent receiver range (0.030-470.000 MHz) and multiple operating modes, as well as its adjustable bandwidth. Broadcast listeners will be happy to know that the AM bandwidth on the IC-705 can be widened to an impressive 10 kHz, which is certainly a stand-out among general coverage transceivers.
After turning on the IC-705 for the very first time, I tuned to the 31-meter band and cruised the dial. I felt like I was using a tabletop receiver: for such a small transceiver, the encoder is on the large side, and the controls are ergonomically designed. The spectrum display and waterfall are amazingly useful.
The front-facing speaker on the IC-705 is well-designed for audio clarity on the ham radio bands. It’s not a high-fidelity speaker, but it’s adequate and has enough “punch” to perform well in the field. Speakers on portable QRP radios are typically an afterthought and are terribly compromised due to space constraints within the chassis. The IC-705’s speaker design feels more deliberate, akin to what you might find on a mobile VHF/UHF rig. Broadcast listeners, in other words, will certainly want to hook the IC-705 up to an external speaker––or, better yet, use headphones––for weak-signal work.
While the received audio isn’t on par with a receiver like the Drake R8B, it’s pretty darn good for a portable general coverage transceiver. The audio is what I would call “flat,” but you are able to adjust the received audio in EQ settings to adjust them to your taste. Audio is well-tailored for the human voice, so I’ve found weak signal IDs are actually easy to grab on the air.
Audio samples
One of the brilliant things about the IC-705 is the fact that it has a built-in digital recorder. Both transmitted and received audio can be recorded in real time and saved to a removable MicroSD card. I made audio recordings of two broadcast stations on the 31-meter band as samples: the Voice of Greece (9420 kHz) and RadioExterior de España (9690 kHz). The Voice of Greece was moderately strong when I made the recording and Radio Exterior was quite strong. Click on the links to download the .mp3 files for each recording:
Voice of Greece
Radio Exterior de España
I’ve also used the built-in digital recorder to record long sessions of my favorite shortwave, AM, and FM stations. Even with the recorder on, I can typically achieve hours of listening on one battery charge and need no other power supply.
In short? The IC-705 makes for an excellent portable shortwave, mediumwave, and FM broadcast band-recording receiver.
Charging ahead…
The supplied BP-272 battery pack snaps snugly on the back of the IC-705
Power supply is always a concern when taking a transceiver on travels. Most transceivers need a 12-13.8 volt external supply, or an external battery, one that will eventually need to be charged.
This is not the case with the IC-705, because while it can be charged or powered via a 12-13.8V source, it can also be charged via a common 5V USB power supply. Simply insert any USB phone-charging cable into the MicroUSB port on the side of the IC-705, and it will charge the fully-depleted attached BP-272 battery pack in just over four hours.
Indeed, I traveled to visit family one week, and had plotted two park activations both en route and on the way back home. After my first activation, I quickly realized I forgot the supplied IC-705 power cord that I’d normally use to hook the IC-705 up to one of my LiFePo batteries. I was quite disappointed, expecting that I’d missed this opportunity. Then I remembered USB charging: I simply plugged the IC-705 up to my father’s phone charger, and in four hours, the battery was completely recharged.
To my knowledge, there are no other transceivers that have this capability without modification. A major plus for those of us who love to travel lightly!
Summary
POTA activation at the Zebulon Vance Historic Birthplace
Every radio has its pros and cons. When I begin a review of a radio, I take notes from the very beginning so that I don’t forget my initial impressions. Here’s the list I formed over the time I’ve spent evaluating the Icom IC-705.
Pros:
Frequency range
TX: 160 – 6 meters, 2M, 70cm
RX: 0.030-470.000 MHz
Modes include SSB, CW, AM, FM, DV, RTTY
4.3 inch color touchscreen that’s (surprisingly) readable in full sunlight
Multiple means to power/charge:
Icom BP-272 battery pack (supplied) for 5 watts output
Can be charged via 12V power supply or
5V USB phone charger with standard MicroUSB plug (admittedly, I wish they would have adopted now standard USB-C rather than MicroUSB)
Angled speaker/mic connectors can be challenging to insert as they are too close to the recessed area behind front face, especially for those with larger fingers and/or if in chilly conditions in the field
MicroSD card also difficult to access––I use needle-nose pliers to remove and insert
Conclusion
POTA activation of Second Creek Game Land
I purchased the Icom IC-705 with the idea that I would review it and then sell it shortly thereafter. Much to the dismay of my (rather limited) radio funds, I find that I now want to keep the IC-705…indefinitely.
I didn’t think the IC-705 would fit into my QRP field radio “arsenal” very well because I tend to gravitate toward more compact radios that I can easily operate on a clipboard on my lap when necessary. My Elecraft KX2 (TSM November 2016), Elecraft KX1, LnR Precision LD-11 (TSM October 2016), and Mountain Topper MTR-3B probably best represent my field radio interests.
But I’m loving the versatility and overall performance of the IC-705. It’s providing an opportunity to do much more than most of my QRP radios allow.
Here are just a few of the things I’ve done with the IC-705 thus far:
Activated numerous parks in SSB and CW
Connected to a local D-Star repeater and talked with a fellow ‘705 owner in the UK
Listened to ATC traffic (and recorded it)
Listened to NOAA weather radio
Listened to and recorded local FM stations
Enjoyed proper FM DXing
Recorded GPS coordinates during a POTA/WWFF activation
Made numerous digital mode contacts by connecting the IC-705 directly to my Windows tablet
Made a 2-meter SSB contact
POTA activation of the Blue Ridge Parkway
Indeed, there are more features on this transceiver than I can fully cover in one review; truly, I consider that a very good thing.
So if you’re looking for a portable transceiver that can truly take you on a deep dive into the world of QRP HF, VHF, UHF, and even satisfy the SWL in you, look no further than the Icom IC-705.
Well played, Icom.
More Icom IC-705 articles, information, and resources:

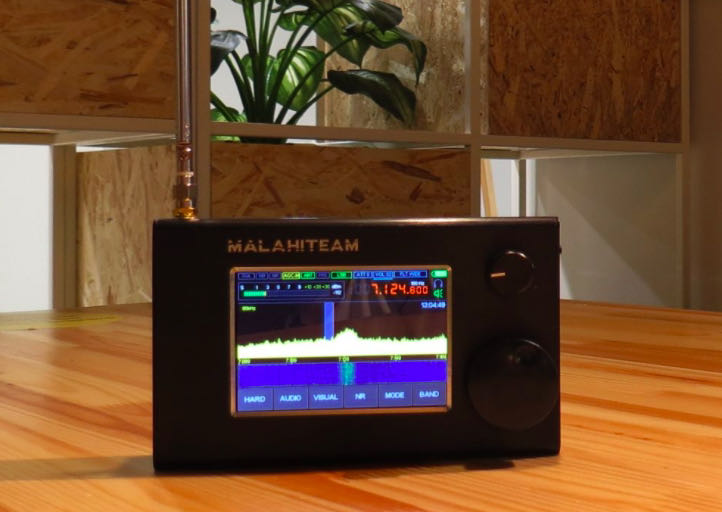 Many thanks to SWLing Post contributor, Dan Robinson, for the following guest post: